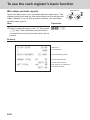
1
User's Manual
SE-G1
PCR-T273
SM-T274
Electronic Cash Register
Introduction
Thank you very much for purchasing this CASIO electronic cash register.
START-UP is QUICK and EASY!
For the basic settings of your cash register, please see “Quick Start Guide”.
IMPORTANT
For programming assistance please visit
http://casio4business.com/sa_index.html
CASIO Authorized Service Centers
If your CASIO product needs repair, or you wish to purchase replacement parts,
please visit http://casio4business.com.
Original Carton/Package
If for any reason, this product is to be returned to the store where purchased, it must
be packed in the original carton/package.
Location
Locate the Cash register on a flat, stable surface, away from heaters or areas exposed
to direct sunlight, humidity or dust.
Power Supply
Your cash register is designed to operate on standard household current (120 V, 50/60
Hz). Do not overload the outlet by plugging in too many appliances.
Cleaning
Clean the cash register exterior with a soft cloth which has been moistened with a
solution of a mild neutral detergent and water, and wrung out. Be sure that the cloth is
thoroughly wrung out to avoid damage to the printer. Never use paint thinner, benzene,
or other volatile solvents.
The mains plug on this equipment must be used to disconnect mains power. Please
ensure that the socket outlet is installed near the equipment and shall be easily accessible.
E-2
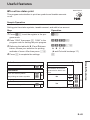
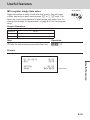
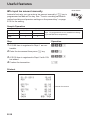
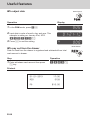
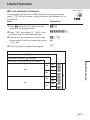
What would you like to do with your cash
register?
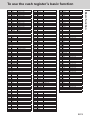
To use the cash register safely.....................E-4
Precautions for Use........................................ E-7
To use the cash register’s basic function.... E-9
To Program basic settings...................................................E-10
To use the cash register’s basic functions........................E-15
To print sales reports.......................................................... E-25
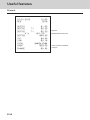
Useful features.............................................. E-29
Various programming.......................................................... E-31
Various operations.............................................................. E-54
Other operations.................................................................. E-63
Calculator mode................................................................... E-69
When you consider it as a problem....................................E-72
Specifications.......................................................................E-74
E-3
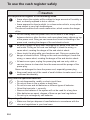
To use the cash register safely
• Congratulations upon your selection of this CASIO product. Be sure to read the
following safety precautions before using it for the first time. After reading this
guide, keep it close at hand for easy reference.
• Please pay due attention to the following symbols to help you use the product
safely and properly and to avoid any personal injury or damage to the product.
*Danger
If this symbol is ignored and the product consequently misused, it can result in serious personal injury and/or death.
*Warning
If this symbol is ignored and the product consequently misused, it may result in serious personal injury and/or death.
*Caution
If this symbol is ignored and the product consequently misused, it may result in personal injury and/or property damage.
• The figures in this manual have the following meanings.
’
This symbol means be careful = a warning.
The example at left is a warning about an electrical shock.
!
This symbol indicates something you must not do = prohibited action. The
example at left means never disassemble the product.
$
This symbol indicates something you must do = an instruction.
The example at left indicates you should unplug the product from the
outlet. Please note that instructions that are difficult to express by a figure
are indicated by +.
*Danger
If liquid that leaked from a battery gets in your eye, on your skin or
clothes, deal with it immediately as follows.
-
1.Immediately rinse it off with lots of water.
2.Immediately get medical treatment.
Failing to act may result in a rash or loss of sight.
*Warning
Handling the register
$
E-4
• Should the register malfunction, start to emit smoke or a strange odor,
or otherwise behave abnormally, immediately shut down the power and
unplug the AC plug from the power outlet. Continued use creates the
danger of fire and electric shock. Contact CASIO service representative.
To use the cash register safely
*Warning
-
-
!
• Do not place containers of liquids near the register and do not allow
any foreign matter to get into it. Should water or other foreign matter get
into the register, immediately shut down the power and unplug the AC
plug from the power outlet. Continued use creates the danger of short
circuit, fire and electric shock. Contact CASIO service representative.
• Should you drop the register and damage it, immediately shut down the
power and unplug the AC plug from the power outlet. Continued use
creates the danger of short circuit, fire and electric shock.
Attempting to repair the register yourself is extremely dangerous.
Contact CASIO service representative.
• Never try to take the register apart or modify it in any way. High-voltage
components inside the register create the danger of fire and electric
shock. Contact CASIO service representative for all repair and maintenance.
Power plug and AC outlet
+
+
+
-
• Use only a proper AC electric outlet. Use of an outlet with a different
voltage from the rating creates the danger of malfunction, fire, and
electric shock. Overloading an electric outlet creates the danger of
overheating and fire.
• Make sure the power plug is inserted as far as it will go. Loose plugs
create the danger of electric shock, overheating, and fire.
Do not use the register if the plug is damaged. Never connect to a
power outlet that is loose.
• Use a dry cloth to periodically wipe off any dust built up on the prongs
of the plug. Humidity can cause poor insulation and create the danger
of electric shock and fire if dust stays on the prongs.
• Do not allow the power cord or plug to become damaged, and never try
to modify them in any way. Continued use of a damaged power cord
can cause deterioration of the insulation, exposure of internal wiring,
and short circuit, which creates the danger of electric shock and fire.
Contact CASIO service representative whenever the power cord or
plug requires repair or maintenance.
*Caution
-
• Do not place the register on an unstable or uneven surface. Doing so
can cause the register - especially when the drawer is open - to fall,
creating the danger of malfunction, fire, and electric shock.
E-5
To use the cash register safely
*Caution
Do not place the register in the following areas.
+
• Areas where the register will be subject to large amounts of humidity or
dust, or directly exposed to hot or cold air.
• Areas exposed to direct sunlight, in a close motor vehicle, or any other
area subject to very high temperatures.
The above conditions can cause malfunction, which creates the danger
of fire.
+
• Do not overlay bend the power cord, do not allow it to be caught
between desks or other furniture, and never place heavy objects on top
of the power cord. Doing so can cause short circuit or breaking of the
power cord, creating the danger of fire and electric shock.
+
• Be sure to grasp the plug when unplugging the power cord from the
wall outlet. Pulling on the cord can damage it, break the wiring, or
cause short, creating the danger of fire and electric shock.
-
• Never touch the plug while your hands are wet. Doing so creates the
danger of electric shock. Pulling on the cord can damage it, break the
wiring, or cause short, creating the danger of fire and electric shock.
-
• At least once a year, unplug the power plug and use a dry cloth or
vacuum cleaner to clear dust from the area around the prongs of the
power plug.
Never use detergent to clean the power cord, especially power plug.
+
• Keep small parts out of the reach of small children to make sure it is not
swallowed accidentally.
Only use the specified batteries.
-
• Do not disassemble, modify or short-circuit them.
• Do not put them in fire or water or heat them.
• Do not mix new and old batteries or different types of batteries.
• Orient the terminals +- correctly.
• Remove the batteries if the system will not be used for a long time.
• After batteries are spent, dispose of them as per local regulations.
• Do not try to recharge dry cell batteries.
Disposing of batteries:
E-6
• Make sure that you dispose of used batteries in accordance with the
rules and regulations in your local area.
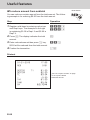
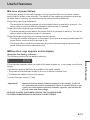
Precautions for Use
When the cash drawer does not open!
Drawer release lever
In case of power failure or the machine is
in malfunction, the cash drawer does not
open automatically. Even in these cases,
you can open the cash drawer by pulling
drawer release lever (see below).
Important!
The drawer will not open, if it is locked
with a drawer lock key.
About drawer hook
Drawer hook prevents the cash register from
falling caused by weight of coins.
Insert the drawer hook in the ditch of the drawer.
Peel the release paper from the drawer hook
and stick the drawer on the place where the
register is installed.
As it may cause a malfunction of the drawer,
please do not put coins and bills in the drawer
excessively.
LIMITED WARRANTY : ELECTRONIC CASH REGISTERS
This product, except the battery, is warranted by CASIO to the original purchaser to be free from defects in material
and workmanship under normal use for a period, from the date of purchase, of one year for parts and 90 days for
labor. For one year, upon proof of purchase, the product will be repaired or replaced (with the same or a similar model)
at CASIO’s option, at a CASIO Authorized Service Center without charge for parts. Labor will be provided without
charge for 90 days. The terminal resident software and programmable software, if any, included with this product or
any programmable software which may be licensed by CASIO or one of its authorized dealers, is warranted by CASIO
to the original licensee for a period of ninety (90) days from the date of license to conform substantially to published
specifications and documentation provided it is used with the CASIO hardware and software for which it is designed.
For a period of ninety (90) days, upon proof of license, CASIO will, at its option, replace defective terminal resident
software or programmable software, correct significant program errors, or refund the license fee for such software.
Significant program errors will be significant deviations from written documentation or specifications. These are your
sole remedies for any breach of warranty. In no event will CASIO’s liability exceed the license fee, if any, for such
software. This warranty will not apply if the product has been misused, abused, or altered.
Without limiting the foregoing, battery leakage, bending of the unit, a broken display tube, and any cracks or breaks
in the display will be presumed to have resulted from misuse or abuse. To obtain warranty service you must take or
ship the product, freight prepaid, with a copy of the sales receipt or other proof of purchase and the date of purchase,
to a CASIO Authorized Service Center. Due to the possibility of damage or loss, it is recommended when shipping
the product to a CASIO Authorized Service Center that you package the product securely and ship it insured. CASIO
HEREBY EXPRESSLY DISCLAIMS ALL OTHER WARRANTIES, EXPRESS OR IMPLIED, INCLUDING ANY IMPLIED WARRANTY OF MERCHANTABILITY OR OF FITNESS FOR A PARTICULAR PURPOSE. NO RESPONSIBILITY IS ASSUMED FOR ANY INCIDENTAL OR CONSEQUENTIAL DAMAGES, INCLUDING WITHOUT LIMITATION
DAMAGES RESULTING FROM MATHEMATICAL INACCURACY OF THE PRODUCT OR LOSS OF STORED DATA.
SOME STATES DO NOT ALLOW THE EXCLUSION OR LIMITATION OF INCIDENTAL OR CONSEQUENTIAL DAMAGES, SO THE ABOVE LIMITATIONS OR EXCLUSIONS MAY NOT APPLY TO YOU.
This warranty gives you specific rights, and you may also have other rights which vary from state to state.
E-7
Precautions for Use
Manufacturer:CASIO COMPUTER CO., LTD.
6-2, Hon-machi 1-chome, Shibuya-ku, Tokyo 151-8543, Japan
Responsible within the European Union:CASIO EUROPE GmbH
CASIO-Platz 1, 22848 Norderstedt, Germany
Please keep all information for future reference.
The declaration of conformity may be consulted at http://world.casio.com/
Laite on liitettävä suojamaadoituskostkettimilla vaurstettuun pistorasiaan
Apparatet må tilkoples jordet stikkontakt
Apparaten skall anslutas till jordat nätuttag.
This mark applies in EU
countries only.
This product is also designed for IT power distribution
system with phase-to-phase voltage 230 V.
The main plug on this equipment must be used to disconnect mains power.
Please ensure that the socket outlet is installed near the equipment and shall be easily accessible.
WARNING
This is a Class A product. In a domestic environment this product may
cause radio interference in which case the user may be required to take
adequate measures.
GUIDELINES LAID DOWN BY FCC RULES FOR USE OF THE UNIT IN THE U.S.A.
(Not applicable to other areas)
WARNING: This equipment has been tested and found to comply with the limits for
a Class A digital device, pursuant to Part 15 of the FCC Rules. These limits are designed
to provide reasonable protection against harmful interference when the equipment is
operated in a commercial environment. This equipment generates, uses, and can radiate
radio frequency energy and, if not installed and used in accordance with the instruction
manual, may cause harmful interference to radio communications. Operation of this
equipment in a residential area is likely to cause harmful interference in which case
the user will be required to correct the interference at his own expense.
FCC WARNING: Changes or modifications not expressly approved by
the party responsible for compliance could void the user’s authority to operate
the equipment.
E-8
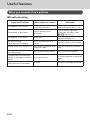
To use the cash register’s basic function
To issue receipts........................................................................... E-10
To set tax table............................................................................... E-11
Tax tables of each state................................................................ E-12
To change taxable statuses of departments.............................. E-14
To use the cash register’s basic functions...................E-15
To open the cash drawer without any transaction..................... E-15
Basic registration.......................................................................... E-15
To register multiple quantity of the same item ......................... E-17
To sell packaged item individually ............................................. E-18
To sell items on charge................................................................. E-19
To sell items in cash and charge (split sales)............................. E-20
To sell items by cash and check (split sales)............................. E-22
To correct erroneous inputs......................................................... E-23
To print sales reports..................................................... E-25
To print daily management report............................................... E-25
To obtain periodic reports............................................................ E-28
E-9
Basic function
To Program basic settings..............................................E-10
To use the cash register’s basic function
To Program basic settings
This section describes the fundamental programming for basic operations.
To
issue receipts
Mode Switch
Instead of recording on journal paper, you can issue receipts.
1 Remove the printer cover by lifting up.
2 Lift the take up reel and cut the paper.
3 Replace the printer cover.
4 Turn the Mode switch to PGM position.
“P” appears on the display.
5 Press Zk to set the cash register in program mode.
6Press Zu to set the register in “Receipt” mode.
Now your cash register issues receipts.
If you wish to restore the register to “Journal” mode, press ?u in step 6.
E-10
To use the cash register’s basic function
Mode Switch
Basic function
To
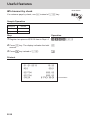
set tax table
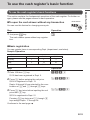
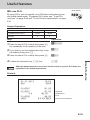
To program the tax table, follow these operations.
If you wish to set flat tax rate, please see “To set tax tables and
rounding system” on page E-41.
Step
Operation
1Enter C then press k to set the cash
Ck
2Enter ??XB and press k key.
??XBk
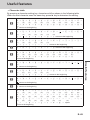
3 Refering “Tax tables of each state” on page
?Z?Zp
register in program mode.
“0025” is the function code for tax table setting.
E-12, choose tax table of your area and enter
the table number then press p key. The
example shown on the right is choosing tax
table number “0101”.
4 If necessary, repeat the step 3 for tax table 2.
5Press k to complete the setting.
k
E-11
To use the cash register’s basic function
Tax
tables of each state
ALABAMA
0101 4%
0102 4.5%
0103 5%
0104 5.5%
0105 6%
0106 6.5%
0107 7%
0108 7.5%
0109 8%
0110 8.5%
0111 9%
ALASKA
0201 2%
0202 3%
0203 3%
0204 4%
0205 4%
0206 5%
0207 5%
0208 5.5%
0209 6%
ARIZONA
0301 5.6%
0302 6.8%
0303 7.1%
0304 7.8%
0305 8.1%
0306 8.3%
0307 8.6%
0308 8.8%
ARKANSAS
0401 4.5%
0402 5%
0403 5.5%
0404 6%
0405 6.5%
0406 7.5%
0407 8.5%
0408 9%
0409 9.5%
0410 10.5%
0411 11.5%
CALIFORNIA
0501 7%
0502 7.125%
0503 7.25%
0504 7.375%
0505 7.5%
0506 7.625%
0507 7.75%
0508 7.875%
0509 7.925%
0510 7.975%
0511 8%
0512 8.175%
0513 8.25%
0514 8.275%
0515 8.375%
0516 8.475%
0517 8.5%
0518 8.725%
0519 8.75%
0520 8.875%
0521 8.975%
0522 9%
0523 9.25%
0524 9.475%
0525 9.5%
0526 9.725%
E-12
State & Local
State & Local
State & Local
State & Local
State & Local
State & Local
State & Local
State & Local
State & Local
State & Local
State & Local
KENAI
HOMER
HAINES
JUNEAU
KENAI
SEWARD
HOMER
0527 9.75%
0528 10.25%
COLORADO
0601 3.75%
0602 5.75%
0603 6.15%
0604 6.75%
0605 7.5%
0606 8.5%
0607 2.9%
CONNETICUT
0701 6%
DELAWARE : No State Sales Tax
COLUMBIA
0901 2%
0902 5%
0903 6%
0904 9%
0905 11%
0906 12%
FLORIDA
1001 6%
1002 6.5%
1003 7%
1004 3%
1005 3.5%
1006 4%
GEORGIA
1101 4%
1102 5%
1103 6%
1104 1%
1105 2%
1106 3%
1107 6%
1108 7%
HAWAII
1204 4%
IDAHO
1301 5%
1302 6%
ILLINOIS
1401 6.25%
1402 6.5%
1403 6.75%
1404 7%
1405 7.125%
1406 7.25%
1407 7.5%
1408 7.75%
1409 8%
1410 8.25%
1411 8.5%
1412 8.75%
1413 9%
1414 9.25%
1415 9.5%
1416 9.75%
1417 1%
INDIANA
1501 5%
1502 5%
1503 6%
1504 7%
IOWA
1601 5%
1602 6%
1603 7%
KANSAS
1701 2.5%
SALES TAX
State & Local
State & Local
State & Local
1702 3%
1703 3.1%
1704 3.25%
1705 3.5%
1706 3.75%
1707 4%
1708 4.1%
1709 4.5%
1710 4.9%
1711 5.4%
1712 5.5%
1713 5.65%
1714 5.9%
1715 6.15%
1716 6.4%
1717 6.5%
1718 6.9%
1719 5.3%
KENTUCKY
1801 6%
LOUISIANA
1901 4%
1902 4.5%
1903 5%
1904 5.25%
1905 5.5%
1906 5.75%
1907 5.8%
1908 6%
1909 6.25%
1910 6.5%
1911 6.7%
1912 6.8%
1913 7%
1914 7.5%
1915 7.8%
1916 8%
1917 8.5%
1918 9%
1919 10%
MAINE
2001 5%
2002 5.5%
2003 7%
2004 10%
MARYLAND
2101 5%
2102 6%
MASSACHUSETTS
2201 5%
MICHIGAN
2301 6%
2302 4%
MINNESOTA
2401 6.5%
2402 7%
2403 7.5%
2404 9%
2405 9.5%
2406 10%
MISSISSIPPI
2501 7%
MISSOURI
2601 4.225%
State
2602 4.6%
State & Local
2603 4.725%
State & Local
2604 4.85%
State & Local
2605 4.975%
State & Local
2606 5.1%
State & Local
2607 5.225%
State & Local
To use the cash register’s basic function
3704 4.875%
3705 4.917%
3706 5%
3707 5.25%
3708 5.5%
3709 5.75%
3710 6%
3711 6.125%
3712 6.25%
3713 6.35%
3714 6.5%
3715 6.625%
3716 6.75%
3717 6.875%
3718 6.917%
3719 7%
3720 7.125%
3721 7.25%
3722 7.375%
3723 7.5%
3724 7.6%
3725 7.7%
3726 7.75%
3727 7.85%
3728 7.875%
3729 7.917%
3730 8%
3731 8.125%
3732 8.2%
3733 8.25%
3734 8.35%
3735 8.375%
3736 8.417%
3737 8.5%
3738 8.725%
3739 8.75%
3740 8.85%
3741 8.875%
3742 9%
3743 9.125%
3744 9.25%
3745 9.35%
3746 9.375%
3747 9.5%
3748 9.6%
3749 9.625%
3750 9.75%
3751 9.85%
3752 10%
3753 10.25%
3754 10.35%
3755 10.5%
3756 10.75%
OREGON : No State Sales Tax
PENNSYLVANIA
3901 6%
RHODE ISLAND
4001 7%
SOUTH CAROLINA
4101 5%
4102 6%
4103 3%
SOUTH DAKOTA
4201 3%
4202 4%
4203 5%
4204 5.5%
4205 6%
4206 6.5%
4207 7%
4208 7.5%
4209 8%
TENNESSEE
4301 7%
4302 7.5%
4303 7.75%
4304 8%
4305 8.25%
4306 8.5%
4307 8.75%
4308 6%
TEXAS
4401 6.25%
4402 6.75%
4403 7%
4404 7.25%
4405 7.75%
4406 8%
4407 8.25%
UTAH
4501 5.75%
4202 6%
4503 6.25%
4504 7.25%
4505 8.25%
4506 4.75%
4507 2.75%
VERMONT
4601 5%
4602 6%
VIRGINIA
4701 3.5%
4702 4%
4703 5%
4704 2.5%
WASHINGTON
4801 7%
4802 7.3%
4803 7.5%
4804 7.6%
4805 7.7%
4806 7.8%
4807 7.9%
4808 8%
4809 8.1%
4810 8.2%
4811 8.3%
4812 8.4%
4813 8.6%
4814 8.7%
4815 9.1%
4816 6.5%
WEST VIRGINIA
4901 6%
4902 5%
WISCONSIN
5001 5%
5002 5.5%
WYOMING
5101 3%
5102 4%
5103 5%
PUERTO RICO
5201 7%
Basic function
2608 5.475%
State & Local
2609 5.6%
State & Local
2610 5.725%
State & Local
2611 5.85%
State & Local
2612 5.975%
State & Local
2613 6.1%
State & Local
2614 6.225%
State & Local
2615 6.35%
State & Local
2616 6.475%
State & Local
2617 6.6%
State & Local
2618 6.725%
State & Local
2619 6.85%
State & Local
2620 6.975%
State & Local
2621 7.225%
State & Local
2622 7.725%
State & Local
2623 1.225%
Food
MONTANA : No State Sales Tax
NEBRASKA
2801 4.5%
2802 5%
2803 5.5%
2804 6%
2805 6.5%
NEVADA
2901 6.5%
NEW HAMPSHIRE
3001 7%
3002 7%
Rooms & Meals
3003 8%
Rooms & Meals
NEW JERSEY
3101 6%
3102 7%
NEW MEXICO
3201 5%
NEW YORK
3301 4%
State
3302 5%
State & Local
3303 6%
State & Local
3301 7%
State & Local
NORTH CAROLINA
3401 3%
3402 4%
3403 6%
3404 6.5%
NORTH DAKOTA
3501 3%
3502 3.5%
3503 4%
3504 5%
3505 5.5%
3506 6%
3507 6.5%
3508 7%
3509 7.5%
3510 8%
3511 9%
OHIO
3601 5%
3602 5.25%
3603 5.5%
3604 5.75%
3605 6%
3606 6.25%
3607 6.5%
3608 6.75%
3609 7%
3610 7.25%
3611 7.5%
3612 7.75%
3613 8%
OKLAHOMA
3701 4.5%
3702 4.7%
3703 4.85%
State & Local
State & Local
State & Local
State & Local
State & Local
State & Local
State & Local
State & Local
State & Local
State & Local
State & Local
State & Local
State & Local
State & Local
State & Local
State & Local
State & Local
State & Local
State & Local
State & Local
State
State & Local
State & Local
E-13
To use the cash register’s basic function
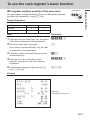
Mode Switch
To
change taxable statuses of departments
By default, taxable statuses of departments are as follows.
Dept. 2: Taxable status 1
Depts. 1, and 3 through 24: Non-taxable.
You can change the statuses by the following operations.
Sample Operation
Setting Depts. 1 through 4 as non-taxable and Depts. 9 through 11 as taxable 1.
Step
Operation
1Press Zk then ~ to set the register in
Zk~
tax program mode.
2 Press corresponding tax status setting key
(see the table below) first then press Dept.
keys you wish to set. The example on the
right is for setting Depts. 1 through 4 as nontaxable.
asdf
A (Depts. 1 through 4)
3 Depts. 9 through 24 are assigned by combi-
cjajsjd
4Press k to complete the settings.
k
nations of j and Depts. keys. The example
on the right is for setting Depts. 9 through 11
as taxable status 1.
A ( Depts. 9 through 11 )
Taxable status selections
Taxable status 1
c
Taxable status 2
v
Taxable status 1 and 2
cv
Taxable status 3
x
Taxable status 4
u
Non-taxable
Further operations:
•“To set tax tables and rounding system” on page E-41.
E-14
A
To use the cash register’s basic function
This section explains the fundamental operations of the cash register. For further usages, please see the pages referred in each operation.
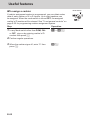
To
open the cash drawer without any transaction
Mode Switch
You can use this feature for changing money etc.
Step
Operation
1 Just press
key.
The cash drawer opens without any registration.
Basic
registration
You can register items in corresponding Dept. (department, see below)
Sample Operation
Unit Price
$1.00
$2.00
$0.30
Quantity
1
1
1
Dept.
2
13
21
Tendered cash amount
$5.00
Step
Operation
1 Enter 100 then s key.
Z??s
$1.00 has been registered in Dept. 2.
2Press j before entering the unit price.
jX??5
$2.00 is registered in Dept. 13.
Depts. 9 through 24 are selected by the combination of j and a through 8 keys.
3Press j key twice before inputting the unit
jjC?5
price then 5 key.
$0.30 is registered in Dept. 21
Pressing j key twice and a through 8
keys assign Depts. 17 through 24.
Continues to the next page. 6
E-15
Basic function
To use the cash register’s basic functions
To use the cash register’s basic function
Step
Operation
4Press k key.
k
The subtotal amount will be displayed.
5 Input tendered cash amount then press
B??p
p key.
If received amount is more than the subtotal
amount, the amount of change will be displayed and printed.
Printout
01−21−2013
REG
DEPT02
DEPT13
DEPT21
TA1
TAX1
TOTAL
CASH
CHANGE
09:00
0002
T1
$1.00
$2.00
$0.30
$1.00
$0.04
$3.34
$5.00
$1.66
— Department No./Unit Price
— Taxable Subtotal
— Tax
— Subtotal
— Cash Amount Tendered
— Change
Further operations:
•“To give discount or premium” on page E-67.
•“To set a unit price in a department key” on page E-31.
•“To set PLU unit price” on page E-40.
•“To link PLUs to departments” on page E-41.
E-16
To use the cash register’s basic function
Mode Switch
You can register multiple quantity of items in a department by pressing Dept. key repeatedly or using x key.
Sample Operation
Unit Price
$1.00
$1.35
Quantity
2
3
Dept.
2
3
Step
Operation
1 Input the unit price then Dept. key. One piece Z??s
of an item is registered in the department.
2 Press the same Dept. key again.
s
Every time you press the Dept. key, the item
is registered in the department.
3 Input the number of quantity then press the
Cx
4 Input the unit price of the item. In this
ZCBd
5 Complete the transaction by pressing k
kp
multiplication key.
example, three pieces of $1.35 items are
registered.
and p keys.
Printout
01−21−2013
REG
DEPT02
DEPT02
09:10
0003
T1
T1
3 X
DEPT03
TA1
TAX1
CASH
T1
$1.00
$1.00
@1.35
$4.05
$6.05
$0.24
$6.29
— Repeated
— Sales Quantity/Unit Price
E-17
Basic function
To
register multiple quantity of the same item
To use the cash register’s basic function
Mode Switch
To
sell packaged item individually
You can sell packaged item individually. The example shown below
is for selling three pieces of an item that is sold $10.00 for 12 pieces.
Sample Operation
Unit Price
$10.00/12
Quantity
3
Dept.
1
Step
Operation
1 Input the quantity then press x key.
Cx
2 Input the package quantity, in this case 12 then ZXx
press x key.
3 Enter package price, in this example 1000
Z?'a
4Press k key.
k
5Press p
p
then press a key. The register calculates
the price and shows the amount on the
display.
key to complete the transaction. If the customer paid an amount more
then the total, enter the tendered amount
before p key.
Printout
01−21−2013
REG
3 X
12 /
DEPT01
CASH
E-18
09:15
0004
— Sales Quantity
@10.00
$2.50
$2.50
— Packaged Quantity/Packaged Amount
To use the cash register’s basic function
Instead of cash, you can register charge sales.
Sample Operation
Unit Price
$1.00
$2.00
Quantity
1
1
Dept.
1
2
Step
Operation
1 Register the sold items in corresponding
Z??a
2 The example on the right is to registering
X??s
3 Press subtotal key to display the total
k
4Press u key instead of p key.
u
Dept. The example on the right is for registering $1.00 in Dept. 1.
$2.00 in Dept. 2.
amount.
Printout
01−21−2013
REG
DEPT01
DEPT02
TA1
TAX1
CHARGE
09:30
0005
T1
$1.00
$2.00
$2.00
$0.08
$3.08
— Charge sales
E-19
Basic function
Mode Switch
To
sell items on charge
To use the cash register’s basic function
To
sell items in cash and charge (split sales)
You can sell items partially on cash and the rest on charge.
The total amount of the following example is $9.00 and the payment
is made $5.00 in cash and $4.00 on charge.
Sample Operation
Unit Price
$2.00
$3.00
$4.00
Quantity
1
1
1
Dept.
1
2
1
Tendered cash amount
$5.00
Step
Operation
1 Register the items in corresponding depart-
X??a
2 Inputting $3.00 in Dept. 2.
C??s
3 Inputting $4.00 in Dept. 1.
V??a
4Press k key to display the total sales
k
5 Enter the amount paid in cash then p
B??p
6Press u key to pay the rest of the amount
u
ment by inputting unit prices and Dept. keys.
amount.
key. The display shows the balance amount.
on charge.
Continues to the next page. 6
E-20
Mode Switch
To use the cash register’s basic function
01−21−2013
REG
DEPT01
DEPT02
DEPT01
TA1
TAX1
TOTAL
CASH
CHARGE
Basic function
Printout
09:50
0007
T1
$2.00
$3.00
$4.00
$3.00
$0.12
$9.12
$5.00
$4.12
— Tendered Cash amount
— Charged amount
E-21
To use the cash register’s basic function
To
sell items by cash and check (split sales)
Mode Switch
The following example is for paying $20.00 in cash and the rest by
check.
Sample Operation
Unit Price
$30.00
$25.00
Quantity
1
1
Dept.
2
3
Tendered cash amount
$20.00
Paid by check
$36.20
Step
Operation
1 Register sold items by entering unit prices
2Press k. The display indicates the total
C???s
XB??d
k
3 Enter tendered cash amount then press
X???p
and Dept. keys.
amount.
p. The display shows the balance due.
4Pressing
registers as the rest of the
amount paid by a check.
Printout
01−21−2013
REG
DEPT02
DEPT03
TA1
TAX1
TOTAL
CASH
CHECK
E-22
14:10
0026
T1
$30.00
$25.00
$30.00
$1.20
$56.20
$20.00
$36.20
To use the cash register’s basic function
There are two ways to correct wrong inputs one is for correcting numeral entries (before pressing Dept. key) and the other is correcting
stored data (after Dept. key has been pressed).
Correction before pressing Dept. key
Sample Operation
By mistake, entered unit price $4.00 instead of $1.00.
Step
Operation
1Press y key after the wrong entry.
V??y
2 Enter the correct unit price then press Dept.
Z??a
3 Finalize the transaction.
p
key.
Correction after pressing Dept. key
Mode Switch
Pressing Dept. key registers an item in the memory. The g key cancels wrong registrations in a department. The followings are examples
to cancel incorrect registrations.
Sample Operation 1
Entered incorrect unit price $5.50 instead of $5.05 and pressed Dept. key.
Step
Operation
1 Wrong unit price $5.50 is registered in Dept.
BB?a
2Press g key to cancel the registration.
g
3 Input the correct unit price $5.05 and press
B?Ba
4 Finalize the transaction.
p
1.
Dept. 1 key.
Continues to the next page. 6
E-23
Basic function
Mode Switch
To
correct erroneous inputs
To use the cash register’s basic function
Printout
DEPT01
ERR CORR
DEPT01
$5.50
−5.50
$5.05
Sample Operation 2
Entered incorrect unit price $2.20 instead of $2.30 and pressed Dept. key in multiplication registration.
Step
Operation
1 Inputting quantity and multiplication key. The
Cx
example on the right is selling three pieces of
an item.
2 Incorrect unit price $2.20 has been registered XX?s
in Dept. 2.
g
3Press g to cancel the registration.
4 Again input the quantity and the multiplication Cx
key.
5 Input the correct unit price $2.30 and press
XC?s
6 Finalize the transaction.
p
Dept. key.
Printout
3 X
DEPT02
ERR CORR
3 X
DEPT02
E-24
T1
T1
@2.20
$6.60
−6.60
@2.30
$6.90
To use the cash register’s basic function
This section describes to print sales data of transactions stored in the register.
To
print daily management report
Mode Switch
Flash report
Flash report prints summarized sales data of the present time.
Step
Operation
1 Turn the Mode switch to X and press x.
The printer prints flash report.
x
Printout
01−21−2013
X
16:50
0131
FLASH
GROSS TOTAL QT
NET TOTAL
CASH−INDW
CHARGE−INDW
CHECK−INDW
X
67
$270.48
No
36
$271.24
$197.57
$18.19
$45.18
— Read Symbol
— Gross Total Quantity
— Gross Sales Amount
— NET Total No. of Customers
— NET Sales Amount
— Cash Total in Drawer
— Charge Total in Drawer
— Check Total in Drawer
E-25
Basic function
To print sales reports
To use the cash register’s basic function
Daily read/reset report
Mode Switch
At the end of the business day, you can print categorized and summarized results of the day. Reset report (Z) clears all the sales data
whereas the data remains in memory by Read report (X).
Please do not perform the Reset report (Z) printing while your store is open. It
clears all the sales data.
Step
Operation
1 Turn the Mode switch to X or Z and press
p
p. The printer prints Read (X) or Reset
(Z) report.
Printout
01−21−2013
Z
CLERK01
19:25
0073
0000 DAILY
DEPT01
E-26
QT
Z 0012
48
$50.10
DEPT02
QT
28
$76.40
DEPT03
QT
17
$85.80
DEPT20
QT
4
$3.00
•••••••••••••••••••••••
GROSS TOTAL
QT
108
$316.80
NET TOTAL
No
46
$325.13
CASH−INDW
$199.91
CHARGE−INDW
$16.22
CHECK−INDW
$105.00
TA1
$105.10
TAX1
$4.20
ROUNDING AMT
$1.23
RF−MODE TTL
No
2
$0.50
CALCULATOR
No
3
•••••••••••••••••••••••
CASH
No
44
•203.91
CHARGE
No
3
— Date/Time
— Consecutive No.
— Z Report Symbol/Non resettable
consecutive No.
— Dept. Name/ No. of Items
— Amount
— Gross Sales No. of Items
— Gross Sales Amount
— Net Sales No. of Customers
— Net Sales Amount
— Cash in Drawer
— Charge in Drawer
— Check in Drawer
— Taxable Amount for Tax Rate 1
— Tax Amount for Tax Rate 1
— Rounded Amount
— RF Mode Count
— RF Mode Amount
To use the cash register’s basic function
CALCULATOR
No
3
•••••••••••••••••••••••
CASH
No
44
$203.91
CHARGE
No
3
$16.22
CHECK
No
2
$105.00
RA
$6.00
PO
$10.00
−
$0.50
%−
$0.66
ERR CORR
No
21
NS
No
12
•••••••••••••••••••••••
CLERK01
$325.13
•••••••••••••••••••••••
GT
$0,000,832,721.20
Basic function
Printout
— No. of p key operation in CAL mode
— Cash Sales Count
— Cash Sales Amount
— Charge Sales Count
— Charge Sales Amount
— Check Sales Count
— Check Sales Amount
— Received On Account Amount
— Paid Out Amount
— Reduction Amount
— Premium/Discount Amount
— Error Correction Count
— No sale Count
— Clerk 1 Sales Amount (Refer to E-62
Cashier Assignment)
— Non-resettable Grand Sales total (Printed
only on RESET report)
E-27
To use the cash register’s basic function
Mode Switch
To
obtain periodic reports
Apart from daily report, you can obtain periodic sales report. The
register prints gross and net total sales data from the last periodic
report. Namely, if you do this operation monthly, you can obtain
monthly sales reports.
Step
Operation
1 Enter the periodic report code “10” then press Z?p
p key. Total quantities and amounts accumulated from the last periodic report will be
printed.
Printout
01−31−2013
Z
20:35
0365
0010 PERIODIC
GROSS TOTAL
NET TOTAL
E-28
ZZ 0001
QT
67
$270.73
No
38
$271.24
— Date/Time
— Consecutive No.
— Periodic Reset Symbol
— Gross Total Quantity
— Gross Sales Amount
— Net Total No. of Customers
— Net Sales Amount
Useful features
Various programming.................................................... E-31
Various operations......................................................... E-53
To register items with preset unit price set in a department....E-53
To register single item sales........................................................E-55
To transact by check.....................................................................E-56
To change the tax status in REG mode.......................................E-57
To input tax amount manually......................................................E-58
To use PLU.....................................................................................E-59
To sell single item using PLU.......................................................E-60
To refund........................................................................................E-61
To assign a cashier.......................................................................E-62
Other operations............................................................ E-63
To display date and time...............................................................E-63
To adjust time................................................................................E-63
To adjust date................................................................................E-64
To pay out from the drawer..........................................................E-64
To receive cash on account..........................................................E-65
E-29
Useful features
To set a unit price in a department key....................................... E-31
To set a rate on the percent key...................................................E-32
To set a rounding calculation method and discount/premium
settings on the percent key..........................................................E-32
To change the settings on departments.....................................E-33
To set general controls.................................................................E-35
To set print controls......................................................................E-37
To set X and Z reports print controls..........................................E-39
To set PLU unit price ....................................................................E-40
To link PLUs to departments .......................................................E-41
To set tax tables and rounding system....................................... E-41
To change taxable status of the percent key..............................E-43
To change taxable status number of the minus key..................E-44
To set tax status print...................................................................E-45
Character keyboard.......................................................................E-46
To program receipt messages.....................................................E-47
To read preset data other than PLU data....................................E-50
To read preset PLU data...............................................................E-52
Useful features
To register a reference number....................................................E-65
To reduce amount from subtotal..................................................E-66
To give discount or premium.......................................................E-67
Calculator mode............................................................. E-69
To use the register as a calculator..............................................E-69
To calculate during registrations.................................................E-69
To set calculator functions........................................................... E-71
When you consider it as a problem.............................. E-72
Troubleshooting............................................................................ E-72
In case of power failure................................................................. E-73
When the L sign appears on the display ................................... E-73
Specifications..................................................................E-74
E-30
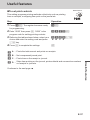
Useful features
Various programming
Mode Switch
To
set a unit price in a department key
You can preset unit prices in department keys so that you don’t have
to input a unit price before registering it in a department.
The following example is for presetting $2.00 in Dept. 1, $5.50 in
Dept. 2, and $15.00 in Dept. 3.
Sample Operation
Unit Price
Dept.
$2.00
$5.50
$15.00
1
2
3
Step
Operation
1Press Zk keys. The register is ready to
Zk
set unit prices in departments.
2 Input the unit price then press corresponding X??a
Dept. key. $2.00 has been preset in Dept. 1.
3 You don’t have to input the decimal point key. BB?s
$5.50 has been preset in Dept. 2
ZB??d
5Press k to complete the settings.
k
Useful features
4 $15.00 has been preset in Dept. 3 by the
operation on the right.
Further operations:
•“To register items with preset unit price set in a department” on page E-53.
E-31
Useful features
Mode Switch
To
set a rate on the percent key
You can preset a percent rate on : key so that you don’t have to
input percent rate for discount sales. The following example is for
setting 2.5% on the : key.
Sample Operation
Discount rate
2.5%
Step
Operation
1Press Zk to set the register in the pro-
Zk
2 Input a percent rate you wish to set then
X"B:
3Press k to complete the setting.
k
gram mode.
press : key.
Further operations:
•“To give discount or premium” on page E-67.
To
set a rounding calculation method and discount/
premium settings on the percent key
You can program rounding method on the percent key. Also you
can assign the percent key to be used as discount or premium
calculations. The following example sets the percent key to perform
premium calculation with cutting off.
Step
Operation
1Press Ck to set the register in the pro-
Ck
2 Refering the following table, choose the
ZZ:
A B
3Press k to complete the setting.
k
gram mode.
rounding method (A) and function (B) of the
percent key then press : .
E-32
Mode Switch
Useful features
Selections
Roundings of percent calculations.
Round off (1.544=1.54; 1.545=1.55)
?
Cut off (1.544=1.54; 1.545=1.54)
Z
Round up (1.544=1.55; 1.545=1.55)
X
Discount calculation (%–).
?
Premium calculation (%+).
Z
Assigning the percent key as manual tax key
X
A
B
The default settings: ??
Mode Switch
To
change the settings on departments
You can program several settings such as restricting entry digits,
prohibiting multiple item registration, etc. on each department.
Sample Operation
Selections
?
Normal Dept. (A)
V
Dept.2
Z
Minus Dept. (A)
B
Maximum entry digits
5 (B)
Z
Single item sales Dept.
(C)
?
Normal sales Dept. (C)
• Minus Dept. is a department that entered unit prices are registered as minus
price and is used for bottle return etc.
• Single item sales Dept. registers one item quickly just by pressing a Dept.
key once and you don’t need to press p key.
Step
Operation
1Press Ck to set the register in the setting Ck
mode.
2 Enter your selection A, B, and C refering the
following tables then press a Dept. key.
The example on the right is setting Dept. 1
as Normal Dept. (A) limiting 4 digits (B), and
Single item sales Dept. (C).
?VZa
A
B
C
Continues to the next page. 6
E-33
Useful features
Dept.1
Maximum entry digits
4 (B)
Useful features
Step
Operation
3 The example on the right is setting Dept. 2
ZB?s
4Press k to complete the settings.
k
as Minus Dept. (A) limiting 5 digits (B), and
Normal sales Dept. (C).
A
B
C
Selections
Normal Dept.
?
Minus Dept.
Z
No limitation for manual price entry
?
Maximum digit of manual price entry (up to 7 digits)
Z~M
Prohibit manual price entry
< or >
Normal sales Dept
?
Single item Dept
Z
The default settings: ???
E-34
A
B
C
Useful features
Mode Switch
To
set general controls
This program sets the general controls of the cash register such as
allowing partial cash payment, resetting consecutive number after
the Reset report (Z report) etc.
Step
Operation
1Press Ck to set the register in the setting Ck
mode.
2 “0622” is the program code for general con-
?NXXk
3 Each digit of A to D corresponds to the set-
??XXp
4Press k to complete the settings.
k
trols and is necessary to input before setting
actual programming.
tings of tables A to D described below. See
the following description for the setting of
“0022”.
A
B
C
D
? A … Always “0”.
Not allowing minus subtotal value after using g key and reset the consecutive number after Z report.
Allowing split check tendering but not allowing split cash tendering, and not
X C … showing seconds on the display.
X D…
Cashier has to enter her or his ID number before registrations, and ' key
is not used as 000 key.
Continues to the next page. 6
E-35
Useful features
? B…
Useful features
Selections
? A
Always “0”
Selections
Reset the consecutive number to
zero after Z report.
Yes
Yes
?
No
X
Yes
V
No
N
Yes
B
Selections
Time displays with second.
Allow split cash amount
tendered.
Allow split check
amount tendered.
Yes
Yes
No
Yes
No
No
E-36
Cashier assignment systems (sign on) is used.
No
Allow minus subtotal after
using g key.
No
Selections
Use the ' key as a 000 key.
No
?
Yes
Z
No
X
Yes
C
No
V
Yes
B
No
N
Yes
M
C
No
?
Yes
Z
No
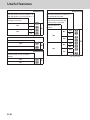
X
Yes
C
D
The default setting of ABCD is; ????
Useful features
Mode Switch
To
set print controls
This setting programs printing methods collectively such as printing
time on receipts, or skipping item print on the journal etc.
Step
Operation
1Press Ck. The register becomes ready
Ck
2 Enter “0522” then press k. “0522” is the
?BXXk
for programming.
program code for setting printing controls.
3 Referring the tables shown below, select your B??Np
choice and enter the setting code and press
p key.
4Press k to complete the settings.
A
B
C
D
k
B A … Prints the total amount and prints on receipts.
? B … Not compressed journal print.
? C … Prints time on the receipt or journal.
Continues to the next page. 6
E-37
Useful features
Skips item printing on the journal, prints subtotal and consecutive numbers
N D … on receipts or journals.
Useful features
Selections
Selections
Use the printer to print receipts = R
Use the printer to print a journal = J
Print the consecutive number on
the receipt and journal.
Print “TOTAL” line on
receipts or journals
Print the subtotal on the receipt and journal when the
Subtotal Key is pressed.
No
Yes
J
?
R
Z
J
V
R
B
A
Skip item print on
journal.
No
No
Selections
Yes
Compressed journal print
No
?
Yes
Z
B
Yes
Selections
Print the time on the receipt or
journal.
E-38
No
Yes
Yes
?
No
Z
Yes
X
No
C
Yes
V
No
B
Yes
N
No
M
D
The default setting of ABCD is; ????
Yes
?
No
V
C
Useful features
Mode Switch
To
set X and Z reports print controls
This program sets the printing methods of X and Z reports.
Step
Operation
1Press Ck. The register becomes ready
Ck
2 Enter “0822” then press k. “0822” is the
?<XXk
3 Referring the following tables, select your
?Xp
4Press k to complete the setting.
k
for programming.
program code for setting printing controls for
X and Z reports.
choice and enter the setting code and press
p key.
A
B
Prints number of refunded transactions and refunded amount on X and Z
? A … reports, and prints Flash report in X mode.
Does not print the grand sales total on Z report and does not print the data
X B … that the transaction is not made .
Selections
Print zero-total line on the X and Z
reports
Print Flash report in X
mode or display only.
Print the grand sales total
on the Z reports.
Yes
No
Yes
?
No
Z
Yes
V
No
B
Yes
A
No
No
?
Yes
Z
No
X
Yes
C
B
The default setting of AB is; ??
E-39
Useful features
Selections
Print number of refund operation
and refunded amount
Useful features
Mode Switch
To
set PLU unit price
Other than departments, you can preset unit prices by using PLU
(Price Look Up) feature. You can call the preset unit price by inputting a PLU number. Your cash register is able to store up to 999
PLUs.
Sample Operation
PLU Number
Unit Price
1
2
$1.00
$3.00
Step
Operation
1Press Zk to set the register in the pro-
Zk
2 Enter a number you wish to use as a PLU
Zi
3 Enter the unit price you wish to preset then
Z??p
4 Enter the next PLU number then press PLU
Xi
5 Input the unit price and press p key.
C??p
6Press k key to complete the settings.
k
gram mode.
number then press the PLU key.
press p.
key.
Repeat the steps 4 and 5 for other PLUs.
Further operations:
•“To link PLUs to departments” on page E-41.
•“To use PLU” on page E-59.
E-40
Useful features
Mode Switch
To
link PLUs to departments
PLUs are also categorized in departments. For example, categorizing PLU number 111 (apples) in department 01 (Fruits). Registered
PLU items are categorized in assigned departments and printed on
X or Z reports.
Sample Operation
PLU Number
1
100
Dept.
1
7
Step
Operation
1Press Ck. The register becomes ready
Ck
2 Enter PLU number, i, Dept. number, then
ZiZp
for programming.
p.
3 The operation on the right links the PLU 100
Z??iMp
4Press k to complete the settings.
k
to Dept. 7.
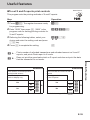
To
set tax tables and rounding system
Mode Switch
The cash register is able to set four kinds of tax tables and you can
set tax rates, rounding, and add-in or add-on tax systems on each
table. These tables can be applied to departments, percent key and
minus key. Therefore, you have to set the conditions of the tables
first.
• If you wish to set flat tax rate, please use this program.
Sample Operation
For settings 7.0000 % in tax table 1, rounding up, and add-on tax.
E-41
Useful features
• You can link up to 999 PLUs to 24 departments.
• If you assign Dept. 0 or Depts. over 25, the PLU number is linked to Dept. 24.
• If unit price is not preset in the PLU, an error occurs.
Useful features
Step
Operation
1Press Ck. The register becomes ready
Ck
2 Enter tax table number. See the following
?ZXBk
3 Enter the tax rate in the range of 0.0001 to
M"?p
4 Enter the rounding system codes (B), (C)
>??Xp
5Press k to complete the program.
k
for programming.
table for the four tables. The example on the
right is for the tax table 1.
(
A
)
99.9999 %. Then press p key. The
example on the right is for setting 7.0%.
(always “0”), and add-in or add-on tax code
(D).
Taxable status number
Tax table 1
?ZXB
Tax table 2
?XXB
Tax table 3
?CXB
Tax table 4
?VXB
(
B
)
C
D
Taxable status number
Always “0”
A
Rounding system
Cut off to 2 decimal places.
??
Round off to 2 decimal places.
B? B
Round up to 2 decimal places.
>?
? C
Add-in/Add-on
No specifications
?
Add-on rate tax.
X D
Add-in rate tax (VAT).
C
Please see “To change taxable statuses of departments” on page E-14, “To
change taxable status of the percent key” on page E-43, and “To change taxable status number of the minus key” on page E-44 for changing tax statuses
on Dept. percent, and minus keys.
E-42
Useful features
Mode Switch
To
change taxable status of the percent key
Initially, the percent key is set as taxable status 1. You can change
the status by the following operations.
Sample Operation
Setting the percent key as taxable status 1.
Step
Operation
1Press Zk then press ~ key to set the
Zk~
2 Referring the following table, press cor-
c:
3Press k to complete the settings.
k
register in tax program mode.
A
responding c key and then : key. The
example on the right is for setting the percent
key as taxable status 1.
Taxable status selections
c
Taxable status 2
v
Taxable status 1 and 2
cv
Taxable status 3
x
Taxable status 4
u
All taxable
cvxu
Useful features
Taxable status 1
A
Non-taxable
E-43
Useful features
Mode Switch
To
change taxable status number of the minus key
Initially, the minus key is set as non-taxable. You can change the
status by the following operations.
Sample Operation
Setting the percent key as taxable status 1.
Step
Operation
1Press Zk then press ~ key to set the
Zk~
2 Referring the following table, press cor-
cg
3Press k to complete the settings.
k
register in tax program mode.
A
responding c key and then press g key.
The example on the right is for setting the
minus key as taxable status 1
Taxable status selections
Taxable status 1
c
Taxable status 2
v
Taxable status 1 and 2
cv
Taxable status 3
x
Taxable status 4
u
All taxable
cvxu
Non-taxable
E-44
A
Useful features
Mode Switch
To
set tax status print
This program sets whether to print tax symbols and taxable amounts
or not.
Sample Operation
Setting print tax status symbols, taxable amount, and add-in tax amount.
Step
Operation
1Press Ck to set the register in the pro-
Ck
2 Enter “0326” then press k. “0326” is the
?CXNk
3 Referring the tables A, B, C and D shown
???Xp
4Press k to complete the settings.
k
gram mode.
program code for setting tax print program.
below, choose your selection for printing
methods of taxes. After then press p.
A B C D
(A and C should be always “0”)
Always “0”
Selections
? A
Print taxable amount and
tax amount for Add-in tax
items.
Selections
Print Tax status symbols.
?
Not printing tax status symbols
X
B
Selections
Always “0”
Print taxable amount.
? C
No
Yes
Yes
?
No
Z
Yes
X
No
C
D
The default setting of ABCD is; ????
E-45
Useful features
Selections
Useful features
Character
keyboard
Using the keyboard, you can program a message on the receipt.
1
DBL
ABC
DEF
GHI
JKL
MNO
PQRS
TUV
WXYZ
6
3
5
7
4
1 Double size key
Use this key to specify the next character to be a double sized character.
Press this key before a character you
wish to be double sized.
2 Alphabet keys
Use these keys to input characters.
Refer to the next page to set characters.
3 Right arrow key
Use this key to set a character that the
next character uses the same key. This
key is also used for inputting a space.
4 Delete key
Use this key to delete preceding character.
E-46
CH
CASH/AMT
TEND
DEL
2
SUB
TOTAL
5 Receipt message number key (u
6
7
key).
Use this key to program receipt messages.
Program end key (k key)
Use this key to terminate character
programming.
Character program key (p key)
Use this key to set characters.
Useful features
Mode Switch
To
program receipt messages
By default, your cash register is programmed following receipt message.
Line No.
Message
1
2
YOUR
3
RECEIPT
THANK
4
CALL
YOU
AGAIN
5
Sample Operation
To add “CASIO SHOP” in the fifth line.
Step
Operation
1Press Xk to set the register in the char-
Xk
2 Enter the line number first then press u. In
Bu
acter setting mode.
Useful features
this example, we are adding a message in
the fifth line.
3 Enter characters as described on the next page then press p.
If you continue to set characters in another line, repeat the steps 2 and 3.
DBL
<<<
(
C
NNN
(
O
)
DBL
)
<
DBL
ZZZZ
( A )
(
S
DBL
)
VVV
(
I
DBL
)
ZZZZVVNNNZp
(Space)
(
S
4Press k to complete the settings.
)
(
H
)
(
O
) (P)
k
E-47
Useful features
Printout
YOUR RECEIPT
THANK YOU
CALL AGAIN
CASIO SHOP
• When the next character uses the same key, press
key.
• For a space, press
key twice.
• You can set a message up to five lines.
• For a double width character, use DBL key.
• In the above example, “CASIO SHOP” will be printed as left justified.
To print it in the center, insert spaces first.
E-48
Useful features
Character table
By pressing a character setting key, characters shift as shown in the following table.
When the next character uses the same key, press ► key to determine the setting.
(1)
A
<
(12)
Â
→
→
(2)
B
(13)
À
→
→
(3)
C
(14)
Ã
→
→
(4)
a
(15)
Ç
→
→
(5)
b
(16)
â
→
→
(6)
c
(17)
ä
→
→
(7)
8
(18)
à
→
→
(8)
Ä
(19)
å
→
→
(9)
Å
(20)
æ
→
→
(10)
Æ
(21)
á
→
→
(11)
Á
(22)
ã
→
→
(23)
ç returns to the beginning
(1)
>
D
(12)
È
(1)
V
G
(12)
Ì
B
(1)
J
(1)
M
N
(2)
→
(12)
Ô
E
(3)
→
(13)
→
→
→
→
→
→
H
(13)
Ï
(2)
K
(2)
N
(13)
Ò
(4)
→
(14)
→
(2)
F
→
→
→
→
→
é
(3)
I
(14)
Î
(3)
L
(3)
O
(14)
Õ
d
(5)
→
(15)
→
→
→
→
→
→
ê
(4)
g
(15)
Ì
(4)
j
(4)
m
(15)
ñ
e
(6)
→
(16)
→
→
→
→
→
→
ë
(5)
h
(16)
í
(5)
k
(5)
n
(16)
ô
f
(7)
→
(17)
→
→
→
→
→
→
è
(6)
i
9
(8)
→
(9)
→
É
(10)
→
Ê
(11)
→
Ë
→
(18)
→
→
ƒ returns to the beginning
(7)
4
→
(8)
Í
→
(9)
Î
→
(10)
Ï
→
(11)
I
→
(17)
í returns to the beginning
(6)
l
(6)
o
(17)
ö
→
→
→
(7)
5 returns to the beginning
(7)
6
(18)
ò
→
→
(8)
Ñ
(19)
ø
→
→
(9)
Ö
(20)
ó
→
→
(10)
Ø
→
(11)
Ó
→
(21)
õ
returns to the beginning
(1)
(2)
→
Q
(3)
→
R
(4)
→
S
(5)
→
p
(6)
→
q
(7)
→
r
(8)
(9)
→
s
→
→
(8)
TEL
→
1
(10)
→
(11)
→
→
(12)
ß returns to the beginning
(1)
X
T
(12)
Ù
→
→
(1)
C
W
(2)
U
(13)
ü
→
→
(2)
→
X
(3)
V
(14)
û
→
→
(3)
→
Y
(4)
t
(15)
ù
→
→
(4)
→
Z
(5)
u
(16)
ú
→
→
(5)
→
w
(6)
v
→
2
(9)
Ü
→
(10)
Ú
→
(11)
Û
→
(17)
µ returns to the beginning
(6)
→
(7)
x
(7)
→
y
(8)
→
z
(9)
→
3
(10)
→
(11)
→
ÿ
→
(12)
returns to the beginning
?
(1)
0 returns to the beginning
(1)
7
(12)
#
M
(23)
&
(34)
_
→
→
→
→
(2)
@
(13)
+
(24)
[
(35)
`
→
→
→
→
(3)
-
(14)
,
(25)
→
→
(4)
/
(15)
^
→
→
(5)
:
(16)
;
(26)
]
→ ‘‘ →
(27)
(36)
(37)
(38)
£
→
√
→
{
¿
→
→
→
→
(6)
!
(17)
<
(28)
|
(39)
¡
→
→
→
→
(7)
?
(18)
=
(29)
}
(40)
∕
→
→
→
→
(8)
~
(19)
>
(30)
•
(41)
§
→
→
→
(9)
(
(20)
$
(31)
“
→
→
→
(10)
)
(21)
¥
(32)
.
→
→
→
(11)
*
(22)
%
(33)
\
→
→
→
(42)
→ space
returns to the beginning
E-49
Useful features
Z
P
Useful features
To
read preset data other than PLU data
Mode Switch
You can check the preset data other than PLU.
Step
Operation
1Press p . The printer prints preset data
p
except PLU settings.
Printout
DEPT01
T1
DEPT02
DEPT20
@1.00
0000
@10.00
0000
@5.00
0000
CLERK01
CLERK02
CLERK07
CLERK08
0125
E-50
0225
— Tax Status/Normal Dept./Digit
Limit/Single Item
— Minus/Tax Status
−
%−(12.34%)*
0122
0522
0622
0822
1022
0326
— Dept. No./Tax Status/Unit Price
— Percent Rate/%+ or %–
0000
— Tax Status/Percent Key Controls
0022
1020
0000
0000
0000
0002
— Date order/Add Mode Control (fixed)
01
02
03
08
0 %
0001
0001
10
30
54
73
110
5.25 %
5002
— Print Controls
— General Controls
— Report Control
— Calculation Controls
— Tax Control
0822
1022
0326
Useful features
Printout
CLERK01
CLERK02
CLERK07
CLERK08
0125
0225
0000
0000
0002
01
02
03
08
0 %
0001
0001
10
30
54
73
110
5.25 %
5002
0000
— Tax Table 1
— Tax Table 2
— Rounding Specifications/Tax
System Specifications
01
— Receipt message
Useful features
02
RECEIPT
03
THANK YOU
04
CALL AGAIN
05
YOUR
E-51
Useful features
Mode Switch
To
read preset PLU data
You can read all the preset PLU data. To stop the printing, press k
key twice.
Step
Operation
1Press Zp.
Zp
The printer prints preset PLU settings.
Printout
PLU0001
#0001
PLU0002
#0002
PLU0003
#0003
PLU0004
#0004
PLU0199
#0199
PLU0999
#0999
E-52
@1.00
0000
@2.00
0002
@3.00
0000
@4.00
0000
@1,999.00
0000
@1,200.00
0000
— PLU Name/Unit Price
— PLU No./Linked Dept.
Useful features
Various operations
To
register items with preset unit price set in a
department
Mode Switch
When unit prices are preset in departments, you can register items
quickly. Please see “To set a unit price in a department key” on page
E-31 to preset unit prices on departments.
Sample Operation
$1.00
$2.20
$11.00
Quantity
Preset Unit Price
1
2
4
Dept.
1
2
3
Tendered Amount
$50.00
Step
Operation
1 Press the Dept. key once if purchased quan-
a
2 Press the Dept. key repeatedly for the num-
ss
3 When you use the multiplication key, enter
Vxd
4Pressing k key shows the total purchase
k
5 Enter the tendered amount. The change
B???p
tity is one.
ber of purchased quantity.
Useful features
the quantity first.
amount on the display.
amount will be displayed. Then press p
key to complete the transaction.
Continues to the next page. 6
E-53
Useful features
Printout
01−21−2013
REG
DEPT01
DEPT02
DEPT02
T1
T1
4 X
DEPT03
TA1
TAX1
TOTAL
CASH
CHANGE
E-54
12:50
0018
$1.00
$2.20
$2.20
@11.00
$44.00
$4.40
$0.18
$49.58
$50.00
$0.42
— Repeat
— Multiplication/Unit Price
— Cash Amount Tendered
— Change
Useful features
Mode Switch
To
register single item sales
Single item sales is useful to sell one item quickly. You just press
a Dept. key and you don’t have to press k or p keys. The
Dept. key must be programmed to allow single item sales. See “To
change the settings on departments” on page E-33 for the programming.
Sample Operation
Unit price
$0.50
Quantity
Dept.
1
3 ( Programmed as allowing single item sales)
Step
Operation
1 Enter the unit price then press the Dept. key.
B?d
Printout
DEPT03
CASH
13:00
0019
$0.50
$0.50
Useful features
01−21−2013
REG
— Cash Sales
E-55
Useful features
Mode Switch
To
transact by check
If a customer pays by check, use m instead of p key.
Sample Operation
Unit price
$35.00
Quantity
2
Dept.
4
Step
Operation
1 Register two pieces of $35.00 item in Dept. 4 CB??ff
2 Press k key. The display indicates the total k
amount.
3 Press
key instead of p.
Printout
01−21−2013
REG
DEPT04
DEPT04
CHECK
E-56
13:20
0021
$35.00
$35.00
$70.00
— Check Sales
Useful features
Mode Switch
To
change the tax status in REG mode
You can change taxable status of a Dept. key during a transaction.
The example shown below is changing non-taxable status to taxable
status 1 on Dept. 1.
Sample Operation
Unit Price
$1.00
$2.00
Quantity
1
1
Dept.
1
2
Programmed taxable status
Non-taxable
Taxable status 1
Changing taxable status to
Taxable status 1
No change
Step
Operation
1 Assign taxable status 1 by c key and enter cZ??a
the unit price then press the Dept. key. In this
example Dept. 1 is assigned as taxable 1.
2 Register the other item and press p key. X??sp
01−21−2013
REG
DEPT01
DEPT02
TA1
TAX1
CA
Useful features
Printout
13:30
0022
T1
T1
$1.00
$2.00
$3.00
$0.12
$3.12
E-57
Useful features
Mode Switch
To
input tax amount manually
Instead of set rate, you can enter a tax amount manually if : key is
programmed as Manual Tax key. See “To set a rounding calculation
method and discount/premium settings on the percent key” on page
E-32 for the setting.
Sample Operation
Unit Price
$1.00
$2.00
Quantity
1
1
Dept.
1
2
Dept. 1 is programmed as non-taxable but changing to add $0.10 tax temporarily.
Step
Operation
1 A $1.00 item is registered in Dept. 1 as non-
Z??a
2 Enter the tax amount then press : key.
Z?:
taxable.
3 A $2.00 item is registered in Dept. 2 with 10% X??s
tax added.
4 Finalize the transaction.
p
Printout
01−21−2013
REG
DEPT01
TAX
DEPT02
TA1
TAX1
CASH
E-58
13:40
0023
T1
$1.00
$0.10
$2.00
$2.00
$0.08
$3.18
— Manual Tax amount
Useful features
Mode Switch
To
use PLU
By using PLUs, you can register up to 999 items with preset prices
and linked departments. To program PLU items, see “To set PLU
unit price” on page E-40 and “To link PLUs to departments” on page
E-41.
Sample Operation
PLU No.
Programmed unit price
Quantity
1
2
$1.00
$2.00
2
4
Step
Operation
1 Enter the item’s PLU number then press i
Zii
key repeatedly for the quantity of the item.
2 If you wish to use the multiplication key, enter Vx
the quantity then press x.
3 Enter the item’s PLU number then press i. Xi
p
Although departments are not printed on the receipt or journal, PLU items are
registered in the linked departments.
Printout
01−21−2013
REG
PLU0001
PLU0001
4 X
PLU0002
CASH
13:50
0024
$1.00
$1.00
@2.00
$8.00
$10.00
— Repeated
— Multiplication
— Price
— Cash Amount Tendered
E-59
Useful features
4 Finalize the transaction by p key.
Useful features
Mode Switch
To
sell single item using PLU
If a PLU item is linked to a department which is programmed as
single item department, you can register the item just inputting the
PLU number. Please note that this operation is effective only when
you sell one PLU item. To program a department as single-item
sales, see “To change the settings on departments” on page E-33.
Sample Operation
PLU No.
Unit Price
Quantity
3
$1.00
1
In this example, PLU No. 3 is linked to a department programmed as
single-sales dept.
Step
Operation
1 Enter the PLU number then press i.
Ci
Printout
01−21−2013
REG
PLU0003
TA1
TAX1
CASH
E-60
14:00
0025
T1
$1.00
$1.00
$0.04
$1.04
— Taxable Amount
— Tax
Useful features
Mode Switch
To
refund
If a customer requests to return goods, use the refund function.
The register subtracts the refunded amount automatically. After the
refund transaction, please do not forget to turn the mode switch to
REG mode.
Sample Operation
Unit price of refunded item.
$1.00
$2.00
Refunded quantity
1
1
Depts. of refunded item
2
3
Step
Operation
1 Turn the Mode switch to RF position.
2 Enter unit prices and Dept. keys of the refunded Z??s
items.
3Press k key. The display indicates re-
X??d
k
funded amount.
4Press p key and pay the customer back p
Useful features
the refunded amount.
Printout
Refund Mode Symbol —
01−21−2013
RF
DEPT02
DEPT03
TA1
TAX1
CASH
14:30
0028
T1
$1.00
$2.00
$1.00
$0.04
$3.04
E-61
Useful features
Mode Switch
To
assign a cashier
If cashier assignment system is programmed, you can obtain sales
data of each cashier on X or Z reports. Up to eight cashiers can
be assigned. When the mode switch is turned OFF, the assigned
cashier’s ID number will be cleared. See “To set general controls” on
page E-35 for programming cashier assignment system.
Step
Operation
1 In any Mode switch other than PGM, CAL
Z ~ <:
or OFF, sign on by entering cashier’s ID
number then press :.
2 Perform regular operations.
3 When the cashier signs off, enter “0” then
press :.
E-62
?:
Useful features
Other operations
Mode Switch
To
display date and time
Operation
Display
1 By pressing x key, the display shows the present
13-5#
time.
2Pressing x key again shows date.
01-21-13
3Press y to return to normal register mode.
~00
To
adjust time
Mode Switch
Display
1 In the PGM mode, press Zk.
p
2 Input present time in 24-hour system. This example
~00
13-58 02
is setting 1:58 PM.
ZCB<x
3Press y to end the setting.
p
~00
E-63
Useful features
Operation
Useful features
To
adjust date
Mode Switch
Operation
Display
1 In the PGM mode, press Zk.
p
2 Input date in order of month, day, and year. This
~00
01-21-13
example is setting on January 21st, 2013.
?ZXZZCx
3Press y to end the setting.
p
Mode Switch
To
pay out from the drawer
Paid out cash from the drawer is registered and subtracted from total
cash amount in drawer.
Step
Operation
1 Enter withdrawn cash amount then press
Z???v
v key.
Printout
01−21−2013
REG
PO
E-64
~00
17:30
0128
$10.00
Useful features
Mode Switch
To
receive cash on account
When you receive cash without any sales transaction, use this
feature. The received amount is added to the memory of total cash
amount in the drawer.
Step
Operation
1 Enter received amount then press c key.
N??c
Printout
01−21−2013
REG
17:35
0129
RA
$6.00
— Received on account amount
Mode Switch
To
register a reference number
As a note, you can add up to eight digits reference number on a
transaction.
Operation
1 Register item(s) in a corresponding depart-
B?a
2 Prior to the finalization, enter a reference
ZXCVBNM<j
3 Complete the transaction.
p
ment.
number then press j key.
Printout
01−21−2013
REG
DEPT01
#
CASH
17:45
0130
$0.50
12345678
$0.50
— Reference Number
E-65
Useful features
Step
Useful features
Mode Switch
To
reduce amount from subtotal
You can reduce a certain amount from the total amount. The following example is for reducing $0.50 from the total amount.
Step
Operation
1 Register sold items by entering unit prices
Z??s
X??f
2Press k. The display indicates the total
k
3 Enter reduced amount then press g key.
B?g
4 Finalize the transaction.
p
and Dept. keys. The example on the right
is registering $1.00 in Dept. 2 and $2.00 in
Dept. 4.
amount.
$0.50 will be reduced from the total amount.
Printout
01−21−2013
REG
DEPT02
DEPT04
TL
−
TA1
TAX1
CA
E-66
17:55
0131
T1
$1.00
$2.00
$3.04
−0.50
$1.00
$0.04
$2.54
— See “To set print controls” on page
E-37 to print subtotal
— Reduced amount
Useful features
Mode Switch
To
give discount or premium
You can give discount or premium to items or to subtotal. The following example is giving 2.5% discount to $1.00 item and 7% discount
to subtotal amount. In this example, minus 2.5% is programmed on
: key. On the contrary, if : key is programmed as percent plus,
premium will be added. To program percent plus or minus, please
see “To set a rounding calculation method and discount/premium
settings on the percent key” on page E-32.
Sample Operation
Unit price
$1.00 (2.5% discount)
Quantity
1
Dept.
Discount amount
$2.00
$3.00
1
1
2
$0.03
Subtotal
$5.97
7% discount to subtotal
$5.55
Step
Operation
1 Enter the unit price $1.00 then press Dept.
Z??s
2Press : key. In this example, minus
:
3 Register other items.
X??s
C??s
k
key.
Useful features
2.5% is programmed to : and 2.5% is
discounted from the $1.00 item.
4Press k key. The display indicates the
discounted subtotal.
5 Enter discount rate manually then press : M:
key. In this example, 7% discount is reduced
from the subtotal amount.
6 Finalize the transaction.
p
Continues to the next page. 6
E-67
Useful features
Printout
Discount
DEPT02
T1
$1.00
%− (2.5%)
DEPT02
DEPT02
ST
T1
T1
−0.03
$2.00
$3.00
$5.97
%− (7%)
TA1
TAX1
CASH
T1
−0.42
$5.55
$0.22
$5.77
— Discount rate and amount
— Discounted subtotal
— Discount to subtotal
— Total amount excluding tax
If : key is programmed as percent plus, the printout will be:
Premium
DEPT02
%+ (2.5%)
DEPT02
DEPT02
ST
%+ (7%)
TA1
TAX1
CASH
E-68
T1
T1
T1
T1
T1
$1.00
$0.03
$2.00
$3.00
$6.03
$0.42
$6.45
$0.26
$6.71
— Premium amount
— Premiumed subtotal
— Added on subtotal
— Total amount including tax
Useful features
Calculator mode
To
use the register as a calculator
Mode Switch
In the CAL mode, you can use the register as a calculator.
Sample Operation
No.
Calculation
Answer
1
5+3-2 =
6
2
(23-56) x 7 =
-231
3
12% of 1500
180
Operation
Display
1 BHCJXp
&
2 XCJBNKMp
−23!
3 ZB??KZX:p
To
calculate during registrations
While registering in REG mode, you can switch it to CAL
mode to perform calculations. After the calculation, you can
resume the registration by switching the mode switch to REG
position. To recall a memory, i key is used. The following
example is for splitting $48.00 by three customers.
Mode Switch
Sample Operation
Unit price
$14.00
$18.00
$16.00
Quantity
1
1
1
Dept.
3
5
4
Total
$48.00
Payment of each customer
$16.00
Splitting the total amount $48.00
by three customers.
E-69
Useful features
18~
Useful features
Step
Operation
1 In REG mode, register the purchased items ZV'dZ<'5
then press k key.
ZN'fk
2 Turn the Mode switch to CAL position.
3 Recall the total amount by i key then
ifCp
perform the calculation. In this example,
divide by three.
4 Turn the Mode switch to REG position.
5Pressing i key recalls the payment for
ip
6 Repeat the Step 5 two more times.
ipip
each customer then press p. The
display shows the remaining payment.
Printout
DEPT03
DEPT05
DEPT04
TOTAL
CASH
CASH
CASH
CHANGE
E-70
$14.00
$18.00
$16.00
$48.00
$16.00
$16.00
$16.00
$0.00
Useful features
Mode Switch
To
set calculator functions
This program sets functions in CAL mode such as opening drawer
when p key is pressed, or print number of calculations on X or
Z report etc.
Step
Operation
1Enter C then press k key to set the
Ck
2 Enter “1022” then press k. “1022” is the
Z?XXk
3 Choose a function number from the table
Zp
4Press k key to complete the program.
k
register in the program mode.
program code for calculator settings.
shown below. Enter the number then press
p key.
(A)
Selections
Open drawer whenever p is pressed.
Open drawer whenever
is pressed.
No
Yes
Yes
No
No
Yes
No
?
Yes
Z
No
X
Yes
C
No
V
Yes
B
No
N
Yes
M
Useful features
Print number of calculations on X or Z reports
A
E-71
Useful features
When you consider it as a problem
Troubleshooting
Symptom/Problem
Most common causes
Solutions
E01 appears on the display.
Changing modes without
completing transaction.
Return mode switch to where it
stops buzzing and press p.
E08 appears on the display.
Sign on operation is not
performed.
Prior to starting registration
of any other operation, press
Z~< and then :.
E10 appears on the display.
Printer error
Turn the register off then remove
the paper and turn it on.
No date on receipt.
Paper does not feed enough.
Printer is programmed as a
journal.
Program printer to print receipts.
Drawer opens after ringing once.
Department is programmed as
a single item dept.
Program the dept. as a normal
dept.
Not clearing totals at end of day
after taking report.
Using X mode to print reports.
Use Z mode to print reports.
Programming is lost whenever
register is unplugged or at power
failure.
Poor or no batteries.
Put in new batteries and program
again.
Register does not work at all.
Can’t get money out of drawer.
No power.
Pull lever underneath the drawer.
E-72
Useful features
In
case of power failure
If the power supply to the cash register is cut by a power failure or any other reason,
simply wait for power to be restored. The details of any ongoing transaction as well as
all sales data in memory are protected by the memory backup batteries.
Power failure during a registration
•The subtotal for items registered up to the power failure is retained in memory. You
will be able to continue with the registration when power is restored.
Power failure during printing a read/reset report
•The data already printed before the power failure is retained in memory. You will be
able to issue a report when power is recovered.
Power failure during printing of a receipt and the journal.
•Printing will resume after power is recovered. A line that was being printed when the
power failure occurred will be printed in full.
•The power failure symbol is printed and any item that was being printed when the
power failure occurred is reprinted in full.
When
the L sign appears on the display
About the low battery indicator...
The following shows the low battery indicator.
~00
If this indicator appears when you switch the cash register on, it can mean one of three
things:
•No memory backup batteries are loaded in the cash register.
•The power of the batteries loaded in the unit is below a certain level.
•The batteries loaded in the unit are dead.
To clear this sign, press y key.
Important!
Whenever the low battery indicator appears on the display, load a set
of 2 new batteries as soon as possible. If there is a power failure or you
unplug the cash register when this indicator appears, you will lose all
of your sales data and settings.
BE SURE TO KEEP THE POWER CORD OF THE CASH REGISTER
PLUGGED IN WHENEVER YOU REPLACE THE BATTERIES.
E-73
Useful features
l
Useful features
Specifications
INPUT METHOD
Entry
10-key system; Buffer memory 8 keys (2-key roll over)
Display (LCD)
Amount 8 digits (zero suppression); Department/PLU No.; No. of
repeats; Total/ Change
PRINTER
Receipt
24 characters
(or Journal)
Automatic paper roll winding (journal)
Paper roll
58 mm × 80 mm ∅ (Max.)
CALCULATIONS
Entry 8 digits; Registration 7 digits; Total 8 digits
CALCULATOR FUNCTION
8 digits; Arithmetic calculations; Percent calculations
Memory protection batteries
The effective service life of the memory protection batteries 2
(UM-3, or R6P (SUM-3) type batteries) is approximately one
year from installation into the machine.
Power source/Power consumption
See the rating plate.
Operating temperature
32°F to 104°F (0°C to 40°C)
Humidity
10 to 90%
Dimensions
7 3/32 ”(H)×12 27/32 ”(W)×13 9/16 ”(D)
(167 mm(H)×326 mm(W)×345 mm(D)
Weight
7.7 lbs/3.5kg
Specifications and design are subject to change without notice.
E-74