1
Ethernet
Fast
Ethernet
AT-8116
Fast Ethernet
Intelligent Switch
USER’S GUIDE
PN 613-10699-00 Rev. A
Copyright ® 1998 Allied Telesyn International Corp.
All rights reserved. No part of this publication may be reproduced without prior written permission from Allied Telesyn
International Corp.
CentreCOM is a registered trademark of Allied Telesyn International Corp.
Ethernet is a registered trademark of Xerox Corporation. HP-UX and OpenView are registered trademarks of Hewlett-Packard
Company. Solaris and SunNet Manager are registered trademarks of Sun Microsystems, Inc. AIX and NetView are registered
trademarks of IBM Corporation. SPECTRUM is a registered trademark and SpectroGRAPH and SpectroSERVER are trademarks
of Cabletron Systems, Inc. All other product names, company names, logos or other designations mentioned herein are trademarks
or registered trademarks of their respectives owners.
Allied Telesyn International Corp. reserves the right to make changes in specifications and other information contained in this
document without prior written notice. The information provided herein is subject to change without notice. In no event shall
Allied Telesyn International Corp. be liable for any incidental, special, indirect, or consequential damages whatsoever, including
but not limited to lost profits, arising out of or related to this manual or the information contained herein, even if Allied Telesyn
International Corp. has been advised of, known, or should have known, the possibility of such damages.
Table of Contents
Chapter 1
Administrative Interface ............................................................................................................................................. 1-1
Features .................................................................................................................................................................................... 1-1
Network Management Systems .............................................................................................................................................. 1-3
Accessing the SNMP Agent ....................................................................................................................................................... 1-3
System Requirements ................................................................................................................................................................. 1-3
Hardware Requirements .................................................................................................................................................... 1-3
Software Requirements ...................................................................................................................................................... 1-4
VT100 Terminal Settings ............................................................................................................................................................ 1-4
Testing the Installation ............................................................................................................................................................... 1-5
Accessing the Command Line Interface Remotely .......................................................................................................... 1-5
Chapter 2
Command Line Interface ............................................................................................................................................ 2-1
Features of the Command Line Interface ............................................................................................................................ 2-1
Entering Commands ................................................................................................................................................................... 2-2
System Commands ...................................................................................................................................................................... 2-4
Command Line Interface Structure ....................................................................................................................................... 2-5
Chapter 3
Console Commands ..................................................................................................................................................... 3-1
Chapter 4
System Commands ....................................................................................................................................................... 4-1
Chapter 5
IP Commands ................................................................................................................................................................ 5-1
Chapter 6
Address Resolution Commands ................................................................................................................................ 6-1
Chapter 7
Ping Commands ........................................................................................................................................................... 7-1
i
Table of Contents
Chapter 8
SNMP Commands ........................................................................................................................................................ 8-1
SNMP Community String Commands .................................................................................................................................. 8-1
SNMP Trap Message Commands ............................................................................................................................................ 8-2
Chapter 9
Switching Database Commands ............................................................................................................................... 9-1
Learning Table ............................................................................................................................................................................... 9-2
Chapter 10
Virtual LAN Commands ........................................................................................................................................... 10-1
Virtual Broadcast Domains (VBC) ..........................................................................................................................................10-2
Chapter 11
Port Monitoring Commands ................................................................................................................................... 11-1
Chapter 12
Port Configuration Commands .............................................................................................................................. 12-1
Chapter 13
Switching Statistics Commands .............................................................................................................................. 13-1
Chapter 14
Spanning Tree Commands ....................................................................................................................................... 14-1
Chapter 15
Using an SNMP Manager .......................................................................................................................................... 15-1
Configuring the AT-8116 SNMP Agent ...............................................................................................................................15-1
Global Setup .........................................................................................................................................................................15-1
IP Setup ..................................................................................................................................................................................15-2
SNMP Setup ..........................................................................................................................................................................15-3
Chapter 16
Software Troubleshooting ........................................................................................................................................ 16-1
Appendix A
Software Downloading ................................................................................................................................................ A-1
Requirements .................................................................................................................................................................................A-1
8116 TFTP Client Download Procedure ...............................................................................................................................A-1
8118 TFTP Server Download Procedure ...............................................................................................................................A-2
Appendix B
System Defaults ............................................................................................................................................................ B-1
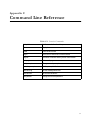
Appendix C
Command Line Reference .......................................................................................................................................... C-1
ii
Chapter 1
Administrative Interface
The Allied Telesyn International AT-8116 Fast Ethernet switch
provides a cost-effective solution for Ethernet and Fast Ethernet
connectivity. With 16 dual-speed 10/100 ports, the AT-8116 switch
delivers the port density and performance required for a wide range
of bandwidth-intensive applications. The autosensing 10/100 ports
allow for compatibility with today’s network while providing a
growth path for the future.
The AT-8116 is a simple-to-use switch that provides versatile
configuration options for the network. It can be used to link hubs to
maximize performance in existing shared media LANs, aggregate
traffic from workgroup switches, and provide dedicated bandwidth
for demanding applications such as client/server and multimedia
applications.
Features
The AT-8116 has the following major features:
❑
16 dual-speed 10/100 TX ports autosensing
❑
Half/Full Duplex selectable on each port
❑
1.6Gbps High Performance Switch
❑
Full Wire Speed on All Ports
❑
Support for up to 8K MAC addresses
❑
Port-based VLANs with support for up to 16 VLANs
❑
IEEE 802.1d spanning tree
❑
Port Mirroring
❑
SNMP Management
❑
RMON
1-1
Administrative Interface
The AT-8116 contains a built-in SNMP agent running on the SNMP
Processor Board. This allows each unit to be managed from a
centralized management station via any SNMP-compliant NMS.
The SNMP agent software complies with the following standards:
❑
RFC 1155 - The Structure of Management Information (SMI) for
TCP/IP Based Internets, May 1990
❑
RFC 1212 - The Management Information Base I (MIB I)
❑
RFC 1213 - The Management Information Base II (MIB II),
March 1991
❑
RFC 1284 - The Ethernet MIB
❑
RFC 1286 - The Bridge MIB
❑
RFC 1757 - The RMON MIB
❑
The UDP/IP stack implementation conforms to:
— RFC 1122-Requirements for Internet hostcommunication layers.
— RFC 1123-Requirements for Internet host-applications
and support.
The AT-8116 also supports two private MIBs: switch.mib and
gswitch.mib.
The SNMP agent utilizes TFTP (RFC 1350), UDP/IP (RFC 768, RFC950,
RFC1071 and RFC791) as OSI layers 3 and 4 protocols, ICMP (RFC792)
and ARP (RFC826) to complete the UDP/IP protocol suite.
The UDP/IP stack implementation conforms to: RFC 1122Requirements for Internet hosts - communication layers. RFC
1123-Requirements for Internet hosts - application and support.
1-2
AT-8116 User’s Guide
Network Management Systems
Network management functions greatly assist in monitoring and
controlling your network. The AT-8116 can be monitored and
controlled through a generic SNMP-based NMS. The connection to
the AT-8116 may be achieved through Ethernet.
The AT-8116 can also be configured and managed through the
Command Line Interface. The process is described in detail in the
following pages.
Accessing the SNMP Agent
This section describes how to use the console services to configure
and manage the AT-8116.
To access the console, connect a terminal to the AT-8116 RS-232 DB-9
connector.
System Requirements
Hardware
Requirements
❑
AT-8116 unit
❑
Either a VT100 terminal or a VT100 terminal emulator running
on a workstation or PC
❑
RS232 crossover cable with a 9-pin female D-subminiature
connector on one end and an appropriate connector on the
other end to attach to the VT terminal or VT100 terminal
emulator
1-3
Administrative Interface
Software
Requirements
If you are using a workstation, use the VT100 terminal emulation
software appropriate for your workstation.
If you are using a PC to emulate a VT100 terminal, you can use the
following software:
❑
In a DOS environment:
— MS-DOS 3.30 or later
— PROCOMM PLUS for DOS
❑
In a Windows 3.1 environment:
— Microsoft Windows 3.1 or later
— Windows Terminal or PROCOMM PLUS for Windows
❑
In Windows 95 or NT
— Hyperterminal
Note
Because of their compatibility and reliability, the software
combination listed above are recommended. Other applications may
also provide satisfactory results.
VT100 Terminal Settings
Use the following settings when connecting the VT100 terminal or
terminal emulator to the AT-8116.
❑
Communications Setup
— 9600 (baud)
— No Parity
— 8 Data Bits, 1 Stop Bit
— No Local Echo
— VT100 Mode
❑
Terminate the setup session by pressing Ctrl-C.
For details concerning using the SNMP agent, see Chapter 15, Using
an SNMP Manager.
1-4
AT-8116 User’s Guide
Testing the Installation
After you have completed the installation, use the CLI ping
command to test for connectivity. See Chapter 15, “Using an SNMP
Manager”.
The ping command sends an echo request to the host specified in
the command line. For example, to test connectivity from the switch
to a workstation with an IP address of 192.1.1.126, use the following
command:
SYS_console>ping 192.1.1.126 2
Use CTRL-C or ping-stop to stop the ping
process
SYS_console>192.1.1.126 Alive. echo reply: id
4643, seq 1, echo-data-len 0
191.1.1.126 Alive. echo reply: id 4643, seq 2,
echo-data-len 0
PING process stopped - statistics:
ICMP echo requests: 2
ICMP echo responses: 2
PING process - press <CR> for prompt
SYS_console>
Accessing the Command Line Interface Remotely
All commands work exactly as if the serial interface were being used.
Five telnet sessions may be active at any given time. This means that
after the fifth telnet session is established, all other telnet
connections will be refused until one of the current sessions is
closed.
1-5
Chapter 2
Command Line Interface
This chapter provides instructions for using the AT-8116 CLI.
Features of the Command Line Interface
The CLI provides the following:
❑
Configuration of system parameters, including the console’s
parameters
❑
Configuration of the switch’s SNMP Agent parameters
❑
Configuration of the ports’ parameters
❑
Network performance monitoring
❑
Virtual LANs operations
❑
Statistics operations
❑
Spanning Tree operations
2-1
Command Line Interface
Entering Commands
Enter commands by typing the command name followed by zero or
more parameters and pressing <enter>. For example, typing
<banner> <enter> at the command prompt displays the
Administrative Interface logo.
Items typed in courier are to be typed literally, or read directly from
the screen.
Angled bracketed items are variables and represent values. For
example, <IPaddress> represents an IP address in dotted decimal
notation as 123.1.2.3.
Items in the Times New Roman font (this font) appearing on a line are
hints to the user (not actually displayed on the screen).
Items in { } and separated by | represent alternatives for the
argument.
get-comm
{read | write | *}
means you can type one of:
get-comm read
get-comm write
get-comm *
If you enter a command incorrectly, a message is displayed indicating
the type of error that occurred. For example, typing a nonexistent
command gives the following message:
SYS_console> pin
command <pin> not found
If the command exists but the number of parameters is incorrect, the
following message is displayed:
SYS_console> ping
too few arguments
2-2
AT-8116 User’s Guide
To get an explanation of the command’s parameters add a question
mark (?) after the command name:
SYS_console> ping ?
?
ping IP traffic generator
[arg #0]
destination IP address
[arg #1] number of packets to send or 0 for
endless ping
SYS_console> ping
Note
The command is reprinted after the prompt, and the user has only to
add the necessary parameters. If a question mark is added after the
first parameter, then the same explanation is provided, and the
previous command, including the provided parameters, is
redisplayed.
SYS_console> ping 129.1.1.7 ?
ping IP traffic generator
[arg #0]
destination IP address
[arg #1] number of packets to send or 0 for
endless ping
SYS_console> ping 129.1.1.7
The CLI provides a history of the last commands. In order to obtain
the last command in the the command history, press <!> or Ctrl-P at
the prompt .
To correct a command line you may use the following special keys
(see the help-kbd command):
❑
<!> or CTRL-P- for the previous command
❑
CTRL-W- o delete the previous word
❑
CTRL-U- to erase the entire line
2-3
Command Line Interface
When, as a result of a command, more than one screen-full of text is
to be printed, the user may continue to scroll or stop the process.
SYS_console>system
System Commands
Table 2-1 System Commands
2-4
sys-stat
show system status
get-stst-level
show the selftest level
set-stst-level
change the selftest level
warm-reset
warm reset of the device
cold-reset
cold reset of the device
get-last-err
displays information about the last fatal error
init-nvram
initialize NVRAM to default values
get-sw-file
retrieves the SNMP Agent Software file name
set-sw-file
sets the SNMP Agent Software file name - for download
get-tftp-srvr
retrieves the TFTP download server IP address
set-tftp-srvr
sets the TFTP download server IP address
set-tftp-mode
sets the TFTP download mode
get-tftp-mode
retrieves the TFTP download mode
sw-dnld
software download BY TFTP
set-fg-param
sets the Ethernet frame generator parameters
start-fg
starts the Ethernet frame generator
stop-fg
stop the Ethernet frame generator
AT-8116 User’s Guide
Finally, the user may press <?> to see the list of commands which
start with the text he has already typed, eg: User pressed <?>
SYS_console>get-c?
?
command 'get-c' not found
SYS_console>get-co?
Table 2-2 Commands Matching <get-c>
get-comm
show current read or/and write community
get-con-matrix
retrieves the VLAN connectivity matrix
get-colls-cnt
gets the collision distribution counters per port
Command Line Interface Structure
The CLI has several categories of commands:
❑
Console related commands: help, banner, console parameters
setup, etc.
❑
System related commands: reset commands, download
commands, initialize the NVRAM with defaults, etc.
❑
IP commands: parameter setup, parameter and information
display, etc.
❑
SNMP agent related commands: parameter setup,
management and traps options
❑
Switching Database related commands: aging time
management and Switching Database entry management
❑
Virtual LAN commands
❑
Port Configuration related commands
❑
Switching statistics commands
❑
Spanning Tree related commands
See the quick reference at the end of this chapter for a command list
separated by subject.
2-5
Command Line Interface
Typing ? at the CLI prompt displays a list of all the available
command topics and a short explanation about each. Typing in one
of the names on this list will yield a list of the commands under that
topic.
SYS_console>?
Table 2-3 Commands Groups
2-6
console
Console related commands
system
System related commands
ip
IP related commands
snmp
SNMP related commands
switch-db
Switching Database related commands
vlan
Virtual LANs related commands
port-cfg
Port Configuration related commands
statistics
Switching Statistics related commands
sp-tree
Spanning Tree related commands
Chapter 3
Console Commands
The console commands contain a set of commands which allow the
user to configure the CLI parameters and user interface. To view the
console commands, type <console>.
help-kbd
This command lists the console function keys.
SYS_console>help-kbd
SYS_console>
Table 3-1 Console Function Keys
^U (or Escape)
clear the line
^W
clear the previous word
! or ^p
for previous command
TAB
for command completion
?
help, depending on position:
in parameters - list of the parameters
in 1st column - list of the categories
#
with line number - repeat command from history, for
example: #26 without line number - show history list
3-1
Console Commands
banner
The banner command will display the CentreCOM 8116 Allied
Telesyn International logo.
clear
The clear command will clear the screen and display the prompt.
login
The login command will exit the Administrative Interface, but will not
disconnect a Telnet session. This allows the user to test a password
(or other activity) without reconnecting.
logout
The logout command will end the actual Administrative Interface
Session. Any further access will request the user to login again.
set-page
This command sets the console page: page size in lines 5...127 or 0
for no paging.
set-prompt
set-prompt <new_prompt>
The set-prompt command allows the user to set a new command
line prompt for the Administrative Interface. With the prompt
command, you can set a more meaningful prompt, such as a location
of the switch, or the name of a workgroup. The default prompt is
SYS_console> .
SYS_console> set-prompt R&D_grp>
R&D_grp> _
3-2
AT-8116 User’s Guide
set-attr-prompt
This command sets the prompt attributes.
SYS_console>set-attr-prompt <number of
option>
[arg #0] options: 0-normal,1-bold,2underline,4-blink,8-reverse
SYS_console>
set-attr-msg
This command sets the display message attributes.
SYS_console>set-attr-msg <number of option>
[arg #0] options: 0-normal,1-bold,2underline,4-blink,8-reverse
SYS_console>
set-attr-text
This command sets the text display attributes.
SYS_console>set-attr-text <number of option>
[arg #0] options: 0-normal,1-bold,2underline,4-blink,8-reverse
SYS_console>
set-passwd
A password is not required to access the system software. However, a
username is required to log in to the system. A user simply enters his/
her username when the username prompt appears and if you do not
wish to set a password at this time, you only need to press the
<enter> or <return> key twice to access the system’s software.
The set-passwd command allows a user to set a password or to
change the original one, if previously installed. The system first
prompts the user for the original (old) password. Then the system
prompts you for a new password. Then, type the same password
again for verification. At no time are any of the passwords echoed
back to the user.
3-3
Console Commands
If the user enters the old password incorrectly or fails to verify the
new password correctly, the password will not be changed.
SYS_console>set-passwd
SYS_console>
Enter old password:
Enter new password:
Enter new password again:
Error : different new passwords
If the password change succeeds, the system will respond
accordingly.
SYS_console>set-passwd
SYS_console>
Enter old password:
Enter new password:
Enter new password again:
CLI running password changed
CLI password change in the NVRAM OK
3-4
Chapter 4
System Commands
The System Commands allow the user to display and set the systemrelated parameters. Type <system> to display system related
commands.
sys-stat
The sys-stat command displays general status information about the
Ethernet Switch and its SNMP Agent Hardware and Software:
SYS_console>sys-stat
CentreCOM 8116
SNMP Agent Software - Version 2.01 Mon Aug 18
12:34:35 1997
SNMP Object ID is: < 1.3.6.1.4.1.207.1.4.14
System MAC Address: 00-00-F4-7A-43-40
Switching Data Base Size: 8192 entries
Total uptime(hundredths of seconds): 12145
Total uptime(days, hh:mm:ss format): 0 days,
0:02:01.45
4-1
System Commands
i/f
1 -- description [Port
1 - 10/100BaseTxETHERNET Port] -- status [UP]
i/f
2 -- description [Port
2 - 10/100BaseTxETHERNET Port] -- status [UP]
i/f
3 -- description [Port
3 - 10/100BaseTxETHERNET Port] -- status [UP]
i/f
4 -- description [Port
4 - 10/100BaseTxETHERNET Port] -- status [UP]
i/f
5 -- description [Port
5 - 10/100BaseTxETHERNET Port] -- status [UP]
i/f
6 -- description [Port
6 - 10/100BaseTxETHERNET Port] -- status [UP]
i/f
7 -- description [Port
7 - 10/100BaseTxETHERNET Port] -- status [UP]
i/f
8 -- description [Port
8 - 10/100BaseTxETHERNET Port] -- status [UP]
i/f
9 -- description [Port
9 - 10/100BaseTxETHERNET Port] -- status [UP]
i/f 10 -- description [Port 10 - 10/100BaseTxETHERNET Port] -- status [UP]
i/f 11 -- description [Port 11 - 10/100BaseTxETHERNET Port] -- status [UP]
i/f 12 -- description [Port 12 - 10/100BaseTxETHERNET Port] -- status [UP]
i/f 14 -- description [Port 14 - 10/100BaseTxETHERNET Port] -- status [UP]
i/f 15 -- description [Port 15 - 10/100BaseTxETHERNET Port] -- status [UP]
i/f 16 -- description [Port 16 - 10/100BaseTxETHERNET Port] -- status [UP]
SYS_console>
The screen displays the following information:
4-2
❑
The device name and type
❑
The SNMP Agent Software version and release date
❑
The device SNMP Object ID
❑
The device MAC Address
❑
The Switching Database size
❑
The system uptime in 1/100 sec as well as in days, hours,
minutes, seconds
❑
The interfaces description and status
AT-8116 User’s Guide
get-stst-level
This command shows the self-test level (Disable or Enable) of the
device.
Default Value: Enable
set-stst-level <level>
This command sets the self-test level of the device. There are two
levels of self-test: Disable and Enable. The self-test level is stored in
Non-volatile Random Access Memory (NVRAM).
warm-reset
The warm-reset command resets the SNMP Agent software. The
Switch configuration is changed according to the values stored in
the NVRAM. This command will permit the user to refresh the Switch
configuration after a change of the NVRAM parameters. The statistics
counters are also reset by the warm-reset command.
cold-reset
This command causes the switch to cold-reset. Cold reset is
equivalent to power on the switch.
get-last-err
This command retrieves the most recent system failure for diagnostic
purposes.
SYS_console>get-last-err
System information since the last hardware
reset
-------------------------------------------Software resets number: 0
The system never encountered a fatal error
SYS_console>
Note
Software resets number implies executed “warm resets” commands
after last “cold reset”.
4-3
System Commands
init-nvram
This command resets the non-volatile RAM (NVRAM) on the SNMP
Agent to default values. Change will take effect after boot (warm or
cold reset).
get-sw-file
This command retrieves the SNMP Agent Software file name.
set-sw-file
set-sw-file <filename>
Sets the name of the file downloaded by TFTP. This name must match
the name of the agent software file on the TFTP server.
get-tftp-srvr
This command retrieves the IP address of the TFTP server which the
Agent will use to download software (see sw-dnld).
set-tftp-srvr
set-tftp-srvr < IP address>
Sets the IP address of the TFTP server used for downloading.
set-tftp-mode
This command sets the TFTP download mode.
SYS_console> set-tftp-mode {client|server}
Switch Tftp client/server is enabled for next
download.
Refer to Appendix A, Software Downloading for more details.
get-tftp-mode
This command retrieves the TFTP download mode and requires no
argument.
4-4
AT-8116 User’s Guide
sw-dnld
This command begins the software download process from the
remote TFTP server specified by the set-tftp-srvr command,
retrieving the file specified by the set-sw-file command.
set-fg-param
set-fg-param
sets the Ethernet frame generator parameters
[arg #0] destination address in hex format xx-xx-xx-xx-xx-xx
[arg #1] source
address in hex format xx-xx-xx-xx-xx-xx
[arg #2] frame fill pattern - hex byte
[arg #3] frame length - including DA, SA and type/length
This command sets the frame generator parameters. dest and source
are dash-separated hardware addresses in hex. fill_byte is a single
byte used to fill the entire packet except for the first 12 bytes. length
is the total length of the packet excluding CRC.
SYS_console>set-fg-param 00-0E-DE-02-80-01
00-0D-01-32-11-22 aa 100
SYS_telnet>
SYS_telnet>start-fg?
?
start-fg
start-fg
starts the Ethernet frame generator
[arg #0] destination ports - ports list in decimal format: d-d-d-..-d
[arg #1] number of frames to be generated - 0=forever
[arg #2] frame per second
SYS_telnet>
4-5
System Commands
This command starts frame generation. dport is a dash-separated list
of ports on which to generate traffic. For example, a dport of 2-3-4-56 will send frames to ports 2,3,4,5,6. count specifies the number of
frames to send on each interface. A count of 0 specifies an infinite
number of packets. rate specifies the number of packets per second
to generate.
stop-fg
This command stops the Ethernet frame generator.
4-6
Chapter 5
IP Commands
This section lists the IP Configuration commands available to the
command line interface. It is separated into different sections to
allow simpler lookup: IP Configuration lists general configuration
commands, Ping lists commands pertaining to the ping ability of the
Agent, Address Resolution Protocol lists ARP-related information.
get-ip
This command shows the device’s current IP address, if any.
If the IP Config has already been defined
SYS_console>get-ip
--IP Config already defined
The device IP address is: 194.090.136.187.
If the device has no IP Address defined.
SYS_console> _
SYS_console>get-ip
-- No IP Config defined
SYS_console>
set-ip
set-ip<IPaddress>
5-1
IP Commands
Sets the IP address of the SNMP Agent. If no IP address was
previously set (as is the default factory configuration), the new value
will be used immediately and saved into NVRAM. Otherwise the new
value will only be stored in the NVRAM, and the user must execute a
“warm-reset” to effect the change.
get-ip-cfg
This shows the complete current IP configuration - address, network
mask and broadcast address.
-- If an address has been previously defined:
SYS_console> get-ip-cfg
The device IP address, netmask and broadcast are:
IP address : 149.035.200.032
IP netmask : 255.255.255.000
IP broadcast : 149.035.200.255
-- If no address is defined:
SYS_console> get-ip-cfg
The device has no IP Address defined.
SYS_console>
set-ip-cfg
set-ip-cfg <IPaddress> <netmask> <broadcast>
Sets IP address, network IP address and broadcast IP address. If no IP
configuration was previously set (as is the default factory
configuration), the new values will be used immediately and saved
into NVRAM. If a previous IP configuration was being used, the new
configuration will be saved in NVRAM for the next session. In order to
use the newly defined values immediately, reset the system using the
“warm-reset” command.
Note
If the IP configuration is not specified, the agent will not respond to
any in-band requests, including ping messages.
-- If no IP Config. is defined:
5-2
AT-8116 User’s Guide
SYS_console>set-ip-cfg 194.90.136.187 255
255.255.0 255.255.255.255
Device IP Address set for this session
Device IP Address change in the NVRAM OK
The device NVRAM IP configuration will be:
IP address
: 194.090.136.187
IP netmask
: 255.255.255.000
IP broadcast : 255.255.255.255
SYS_console>
-- IP Config. is already defined.
SYS_console>set-ip-cfg 194.90.136.187 255.255.255.0
255.255.255.255
Device IP address unchanged for this session
Device IP Address change in the NVRAM OK
The device NVRAM IP configuration will be:
IP address : 194.090.136.187
IP netmask : 255.255.255.000
IP broadcast : 255.255.255.255
SYS_console>
Perform a warm-reset to immediately use the newly defined
parameters.
clear-ip-cfg
This command clears the IP configuration in the NVRAM.
SYS_console>clear-ip-cfg
Device IP Configuration change in the NVRAM cleared OK.
5-3
IP Commands
get-gatew
Shows default gateway. This command shows which default route
will be used to access a different IP network.
SYS_console>get-gatew
The default gateway address is:
194.090.136.254
SYS_console>
set-gatew
Sets the default gateway IP Address. This command lets you specify
the address of the router used to access a different IP for network
management packets or Ping. However, if not set, then all packets
remain in the local network. The default value for the default
gateway IP address is 0.0.0.0.
set-gatew <IPaddress>
SYS_console>set-gatew 194.90.136.254
Device Default Gateway change in the NVRAM OK
Device Default Gateway changed to:
194.90.136.254
SYS_console>
5-4
Chapter 6
Address Resolution Commands
get-arp-tbl
Shows ARP table. The Address Resolution Protocol (ARP) table
contains information that shows the maping of IP addresses to MAC
addresses and interface numbers.
SYS_console>get-arp-tbl
IfIndex
IpAddress
MAC Address
=============================================
8
194.090.136.126
00-20-AF-C9-EB-23
SYS_console>
del-arp-entry
SYS_console>del-arp-entry {<IPaddress>|*}
Deletes entries from the ARP table. If an IP address is specified, the
matching arp entry will be deleted. If * is specified, the entire ARP
table will be flushed. This command should be used if the network
topology has physically changed, e.g. if a management station has
been moved from one segment to another, thus changing its
interface number.
6-1
Address Resolution Commands
add-arp-entry
Add entry to ARP table.
add-arp-entry <IPaddress> <mac_address>
<Interface> (Port MAC address resides on.)
SYS_console>add-arp-entry 194.90.136.133 0011-22-33-44-55 1
ARP Table Entry succesfully added
SYS_console>get-arp-tbl
IfIndex
IpAddress
MAC Address
=============================================
1
194.090.136.133
00-11-22-33-44-55
8
194.090.136.126
00-20-AF-C9-EB-23
SYS_console>
6-2
Chapter 7
Ping Commands
Ping
Performing a ping allows you to send packets
to another managed network device to see if the
device responds.
Ping <IP address><destination address><#
packets to send or 0 for endless pings>
ping-stop
Stops the active ping process.
SYS_console>ping 194.90.136.23 4
Use CTRL-C or ping-stop to stop the ping
process
SYS_console> PING process stopped-statistics:
ICMP echo requests
: 4
ICMP echo responses
: 0
PING process - press <CR> for prompt
7-1
Ping Commands
If the host does not respond, only statistics are printed. Failure to get
an echo response from a host may be due to:
❑
A bad physical connection
❑
A non-existent or inactive host
❑
Network Unreachable: no corresponding entry in the routing
table
❑
Destination Unreachable: the default gateway failed to route
the datagram
❑
Outdated ARP table information - flush the ARP table with the
del-arp-entry command
If there is an active ping process due to a previous “long” ping
command and you try to start a new ping, the command fails and an
error message is displayed.
For example, start an endless ping to an unreachable host. No
response will be received. Now try to ping an existing host. The
second ping will fail because the first one is still active. The solution is
to use the ping-stop command to stop the first active ping process.
-- host 194.90.136.23 0 unreachable
SYS_console>ping 194.90.136.23 0
Use CTRL-C or ping-stop to stop the ping
process
SYS_console>ping 194.90.136.20 1
A ping process is active - can't start another
one
SYS_console>ping-stop
PING process stopped - statistics :
ICMP echo requests
:
35
ICMP echo responses
:
0
PING process - press <CR> for prompt
SYS_console>
SYS_console>ping 194.90.136.20 1
7-2
AT-8116 User’s Guide
Use CTRL-C or ping-stop to stop the ping
process
SYS_console>194.90.136.20 Alive. echo reply:
id 4643, seq 1, echo-data-len 0
PING process stopped - statistics :
ICMP echo requests
:
1
ICMP echo responses
:
1
PING process - press <CR> for prompt
ping-stop
Stop the active ping process.
7-3
Chapter 8
SNMP Commands
This chapter contains a description of the commands available under
the CLI to set and display the SNMP Agent IP and SNMP parameters
and databases. Type <SNMP> to view SNMP related commands.
SNMP Community String Commands
SNMP Community strings authenticate access to the MIB
(Management Information Base). Community strings function as
“passwords” embedded in every SNMP packet. The community string
must match one of the two community strings configured in the
switch for the message to be processed. There are two community
strings, one for each of the following types of accesses:
❑
read - mode gives read access to all the objects in the MIB, but
does not allow write access
❑
write - mode gives read and write access to all objects in the
MIB
get-comm
get-comm {read|write|*}
This command displays the SNMP community string for a given
access mode ( read or write ). If the access mode is specified as *,
both the read and the write community strings are displayed.
SYS_console>get-comm *
Current read
community is: < public >
Current write community is: < private >
8-1
SNMP Commands
set-comm
set-comm {read|write} <community-string>
This command lets you specify the SNMP community string for each
of the two access modes: read and write.
SYS_console>set-comm write password
New write community is: < password >
SYS_console>
SNMP Trap Message Commands
When the Switch detects an extraordinary event, it generates a trap.
A trap is a notification message that may be sent to predefined
Network Manager Stations. A trap event may be a reset (cold or
warm), detection of an interface link status change, an SNMP
authentication failure due to an incorrect community string, etc.
The SNMP trap commands let you manage:
❑
Whether or not the device issues an authentication trap
❑
The list of selected SNMP Manager Stations to which the
switch-generated traps will be sent by the SNMP agent. The
list has a maximum capacity of five entries.
get-auth
Displays the Authentication Trap mode: enabled or disabled.
set-auth
set-auth {enable|disable}
This command allows the user to modify the Authentication Trap
mode. The default value is enable, meaning that the switch will
generate authentication traps. Changing the mode to disable will
prevent the switch from sending authentication traps.
8-2
AT-8116 User’s Guide
get-traps
Displays the list of traps-receiving stations: their IP address and trap
SNMP community string.
SYS_console>get-traps
SNMP TRAP TABLE
===============
IPADDR
COMMUNITY
-------------------------------------------194.090.136.126 ----------- public
-------------------------------------------SYS_console>
add-trap
The add-trap command enters the IP Address of the SNMP Manager
station and the trap community string that will appear in the trap
message.
add-trap <IPaddress> <trap-community>
SYS_console>add-trap 194.90.136.20 rnd
Entry 194.90.136.20 - rnd added
SNMP TRAP TABLE
===============
IPADDR
COMMUNITY
-------------------------------------------194.090.136.126 ----------- public
194.090.136.020 ----------- rnd
-------------------------------------------SYS_console>
8-3
SNMP Commands
del-trap
The del-trap command can be used to remove an SNMP station from
the trap table. The station IP address must be provided.
del-trap <IPaddress>
SYS_console>del-trap 194.90.136.20
Entry 194.90.136.20 - rnd deleted
SYS_console>
get-rmon-state
This command displays RMON’s limits and bounds.
SYS_console>get-rmon-state
RMON current configuration
==============================
MaxTimeForRowCreation = 600
MaxHistCtlRows
= 20
MaxBucketsPerControl
= 500
MaxBucketsTotal
= 2000
AlarmMinInterval
= 1
AlarmMaxInterval
= 3600
MaxAlarmRows
= 50
MaxLogEntriesPerEvent = 15
MaxEventRows
= 10
==============================
SYS_console>
8-4
Chapter 9
Switching Database Commands
This section contains instructions for managing the Switching
Database with the Administrative Interface. Type <switch-db> to
view related commands.
The Switching Database consists of 8192 entries. Each active entry
contains the information relevant to a workstation, characterized by
its Ethernet MAC Address. Each entry contains the following
information:
❑
Entry
Signifies the index in the Switching Database Table.
❑
LOCK
If on (denoted as a +), the entry will not be deleted by the
switch aging process (static entry). If off (denoted as a -), this is
a dynamic entry that may be automatically deleted by the
switch aging process if a packet with this source MAC address
is not received during an aging time period.
❑
MGMT (not user configurable)
If on (denoted as a +), the entry is a system address. Such
addresses are the switch’s individual and group addresses, as
well as other addresses added by the management system. If
off (denoted as a -), the entry contains the MAC address of a
station on the connected network.
❑
DPORT
The destination port to which frames with the stated address
will be forwarded.
9-1
Switching Database Commands
❑
MAC Address contained in an entry or given as a parameter is
printed as a 6 byte, hexadecimal sequence, separated by the
“-” sign, e.g.
00-20-1A-00-01-29
The following section lists commands relevant to the Learning Table
and Aging mechanism of the switch. The <index> contained in the
following commands is an integer number between 1 and the
maximum size of the Switching Database Table (8192).
Learning Table
get-lt-entry
SYS_telnet>get-lt-entry 26
Entry ---- MAC Address ---- LOCK DPORT
MGMT
===============================================
26
00-00-F4-7A-43-49
-
16
-
SYS_telnet>
The entry described is:
9-2
❑
Entry number 26
❑
MAC Address 00-00-F4-A2-4D
❑
Is not a static entry, i.e. it will be aged out (lock is off)
❑
The address was learned on port 16
❑
Is not a system address (mgmt is off)
AT-8116 User’s Guide
get-lt-16
Displays 16 learn table entries starting at <index>, or “ * ” to continue
from the last displayed index. The format of the display is similar to
the previous command format. If the end of the learn table is
reached, the * parameter will start the list over from the beginning.
SYS_telnet>get-lt-16 15
Entry ---- MAC Address ---- LOCK DPORT
MGMT
===============================================
15
00-00-F4-7A-43-4E
+
-NONE-
+
16
00-00-F4-7A-43-4F
+
-NONE-
+
17
00-A0-C9-03-00-4F
-
16
-
18
00-60-E8-FF-FF-FF
-
16
-
19
00-00-A2-62-15-BB
-
16
-
20
00-60-E8-08-03-11
-
16
-
21
00-60-E8-11-22-65
-
16
-
22
00-A0-D2-C1-55-B1
-
16
-
23
08-00-20-81-A4-70
-
16
-
24
00-00-F4-A4-14-E6
-
16
-
26
00-00-F4-A2-4B-48
-
16
-
******* End of Learn Table ************
SYS_telnet>
The first 16 displayed entries belong to the system. These entries
contain important information related to the SNMP Agent and
should never be modified or removed by the user. These entries are
denoted by a (+) in the LOCK and MGMT columns.
The displayed entries in the get-lt-16 table denoted by a (-) in the
Lock and MGMT columns are self-learned MAC addresses, as
indicated by a (-) in the LOCK and MGMT columns. These entries were
each learned from the port stated in the DPORT field.
9-3
Switching Database Commands
find-lt-addr
SYS_telnet>find-lt-addr 0060e8112265
Entry ---- MAC Address ---- LOCK DPORT
MGMT
===============================================
21
00-60-E8-11-22-65 16
SYS_telnet>
The switch as factory-configured, has default a VBC and a SVLAN
VLAN that contain all 16 ports. Ports in the default VLAN's are
deleted when they are assigned to a designated VLAN. By the use of
the "get-vbc-tbl" or "get-svlan-tbl" command, you can discover the
ports that are in the default VLAN's.
Example 1:
SYS_telnet>get-svlan-tbl run
RUNTIME SECURITY VIRTUAL LANs TABLE
===========================================
0000000001111111
SVLAN -
1234567890123456
1:
----------++++++++
SYS_telnet>
This example shows that the current DEFAULT SVLAN ports, which
are represented by hypens, are ports 1,2,3,4,5,6,7, and 8 as denoted
by the (-) in the SVLAN table.
Example 2:
SYS_telnet>get-svlan-tbl run
RUNTIME Security Virtual LANs Table is empty
SYS_telnet>
This example shows that all the ports are in the DEFAULT SVLAN,
since NONE are assigned to a designated VLAN
9-4
AT-8116 User’s Guide
Example 3:
SYS_telnet>get-vbc-tbl run
RUNTIME VIRTUAL BROADCAST DOMAIN TABLE
===========================================
0000000001111111
VBC -
1234567890123456
1:
--------++++++++
SYS_telnet>
This example shows that the current DEFAULT VBC ports are 1, 2, 3, 4,
5,6,7, and 8, As denoted by the (-) in the VBC table.
Example 4:
SYS_telnet>get-vbc-tbl run
RUNTIME Virtual Broadcast Domain Table is empty
SYS_telnet>
This example shows that all the ports are in the DEFAULT VBC, since
NONE are assigned to a designated VBC. The get-vbc-tbl run
command searches for the address in the learning table.
SYS_console>find-lt-addr 01-02-03-04-05-06
MAC Address - 01-02-03-04-05-06 - not in LT
del-lt-entry
del-lt-entry <index>
Deletes the learn table entry at <index>. If the entry delete was
successful or if the entry is not ACTIVE, then the command will be
successful.
Deleting entries with the MGMT field set (+) is prohibited since they
are system addresses.
The del-lt-entry command is very powerful, allowing the user to
change the entire Switching Database with the exception of the
System MAC Addresses. Therefore, it should be used with caution.
9-5
Switching Database Commands
SYS_console>del-lt-entry 25
Deleting entry at index - 25 -
OK
SYS_console>del-lt-entry 1
Cannot delete a System Address
del-lt-addr
Deletes the learn table entry that matches the MAC address.
The command fails if mac_address is not found in the learn table.
Again, as in the previous command, caution should be employed
when deleting system entries : (+) in MGMT column.
del-lt-addr <mac_address>
SYS_console>del-lt-addr 00-11-22-33-44-55
MAC Address - 00-11-22-33-44-55 - not in LT
SYS_console>
add-lt-entry
Add a learn entry to the Switching Database. The commands
parameters are described at the beginning of this chapter.
add-lt-entry <mac_address> <dport>
Note
DPORT is a decimal number representing the ID of the port.
get-lt-age
The running aging time is: 300 seconds.
Displays the Switching Database Aging Time in seconds. The Aging
Time is the time-out period for aging out dynamically learned
forwarding information entries. An entry whose MAC address does
not appear in the source field of an incoming packet for a period
equal to the Aging Time is discarded.
get-lt-age
9-6
AT-8116 User’s Guide
set-lt-age
set-lt-age {run|nvram|all} <aging_time>
Aging _time is between 10 and 11000 seconds or 0 for aging off.
Example:
SYS_console>set-lt-age all 300
Aging Period update in NVRAM OK
Aging Period update in the running database OK
SYS_console>
Lets the user modify the Switching Database Aging Time. The change
may be made:
❑
In the running database so that the new value is used
immediately
❑
In the NVRAM, meaning that the change will occur only in the
next session after the switch is reset
❑
In both the running and the NVRAM databases
9-7
Chapter 10
Virtual LAN Commands
Virtual LANs can be used to limit the broadcast domain and to
establish secure virtual workgroups. The following parameters are
used within the VLAN commands.
❑
run indicates that only the currently running configuration is
changed. Changes are not restored after a reset.
❑
NVRAM indicates that only the configuration stored in nonvolatile memory is changed. Changes will not take effect until
a warm or cold reset.
❑
all indicates that both the currently running configuration and
the non-volatile configuration is changed. Changes will take
effect immediately and will be restored after a reset.
Type <vlan> to view the related commands.
SYS_console>vlan
get-con
matrix retrieves the VLAN connectivity matrix
set-vbc
domain defines a Virtual Broadcast Domain
del-vbc
domain deletes a Virtual Broadcast Domain
get-vbc-tbl
displays the Virtual Broadcast Domain Table
get-vbc
matrix retrieves the VBC connectivity matrix
set-sec-vlan
defines a Security Virtual LAN
del-sec-vlan
deletes a Security Virtual LAN
get-svlan-tbl
displays the Security Virtual LAN Table
get-svlan-matrix
matrix retrieves the Security VLANs connectivity matrix
10-1
Virtual LAN Commands
set-mon-port
sets the monitoring port
stop-mon
stops port monitoring
monitor
starts port monitoring
get-nv-mon
retrieves the NVRAM based monitoring configuration
save-mon
saves the running monitoring configuration to NVRAM
clear-nv-mon
clears the NVRAM based monitoring configuration
Virtual Broadcast Domains (VBC)
Virtual Broadcast Domains are port-oriented VLANs that allow
broadcast Ethernet addresses to be broadcasted (transmitted) to the
assigned ports in that VBC. The VBCs do not require a SVLAN to be
configured to allow packet switching between assigned ports in a
VBC. Broadcast packets (destination address of FF FF FF FF FF FF)
remain within the VBC where they are received and are transmitted
to only the ports in a SVLAN that are members of the receiving VBC
port.
A VBC VLAN can be built from any combination of ports. However,
ports in a VLAN cannot overlap. If you assign the same port to
multiple VLANs, they become one VLAN which contains all of the
original VLAN ports. You can view VLAN settings by using the CLI
“get-con-matrix” command which shows the connectivity
matrix of all the ports (identifies the ports sending frames to other
ports).
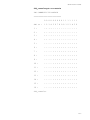
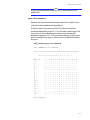
get-con-matrix
Retrieves the current connectivity matrix for the switch. The first
column is the source port. The other columns are destinations to
which frames from a given source port (determined by which row)
may be forwarded. Unlearned addresses will be forwarded to all
destinations marked with a + in the source port’s row. Learned
addresses will be forwarded to their destinations only if the
destination is marked with a “+” in the source port’s row. Note that
the switch has a default VBC that contains all the ports in the switch
that are not assigned to a VBC VLAN. The following example shows
that Ports 1-4 are in VLAN #1; the remaining ports are in the default
VLAN. Also see the example for get-vbc-tbl run.
10-2
AT-8116 User’s Guide
SYS_console>get-con-matrix
VBC CONNECTIVITY MATRIX
==========================
0 0 0 0 0 0 0 0 0 1 1 1 1 1 1 1
SRC to :
1 2 3 4 5 6 7 8 9 0 1 2 3 4 5 6
1 :
- + + + - - - - - - - - - - - -
2 :
+ - + + - - - - - - - - - - - -
3 :
+ + - + - - - - - - - - - - - -
4 :
+ + + - - - - - - - - - - - - -
5 :
- - - - - + + + + + + + + + + +
6 :
- - - - + - + + + + + + + + + +
7 :
- - - - + + - + + + + + + + + +
8 :
- - - - + + + - + + + + + + + +
9 :
- - - - + + + + - + + + + + + +
10 :
- - - - + + + + + - + + + + + +
11 :
- - - - + + + + + + - + + + + +
12 :
- - - - + + + + + + + - + + + +
13 :
- - - - + + + + + + + + - + + +
14 :
- - - - + + + + + + + + + - + +
15 :
- - - - + + + + + + + + + + - +
16 :
- - - - + + + + + + + + + + + -
SYS_console>
10-3
Virtual LAN Commands
set-vbc-domain
set-vbc-domain {run|nvram|all} <port_list>
This command establishes a Virtual broadcast domain. port_list is a
dash-separated list of ports to group into a broadcast domain. For
example:
set-vbc-domain all 2-5-6-7
Creates a virtual broadcast domain of ports 2, 5, 6, and 7.
del-vbc-domain
del-vbc-domain {run|nvram} <domain_id>
This command deletes a virtual broadcast domain. domain_id is the
vbc id number as identified by get-vbc-tbl.
Note
When you use the set-vbc-domain command with the all parameter,
both the runtime and nvram databases are changed. In case you need
to delete the mentioned vbc entries, you should run the del-vbcdomain command twice with run and nvram parameters.
get-vbc-tbl
get-vbc-tbl {run|nvram}
This command retrieves the list of defined virtual broadcast domains.
SYS_console>get-vbc-tbl run
RUNTIME
VIRTUAL BROADCAST DOMAIN TABLE
===========================================
0 0 0 0 0 0 0 0 0 1 1 1 1 1 1 1
VBC -
1 2 3 4 5 6 7 8 9 0 1 2 3 4 5 6
1 :
+ + + + - - - - - - - - - - - -
2 :
- - - - - - - - + + + - - - - -
SYS_console>
10-4
AT-8116 User’s Guide
Note
All ports not defined as a member of a VBC are members of the
default VBC.
get-vbc-matrix
Retrieve the current broadcast domain matrix for the switch. Here
only the broadcast address will be affected.
The first column is the source port list. The other columns are
broadcast destination ports. If a “+” is in the matrix matching up the
source port to the destination port, frames can be forwarded
between these ports. If a “-” is in the matrix matching up the source
port to the destination port, no frames can be forwarded between
the ports.
SYS_console>get-vbc-matrix
VBC CONNECTIVITY MATRIX
===========================================
0 0 0 0 0 0 0 0 0 1 1 1 1 1 1 1
SRC to :
1 :
2 :
3 :
4 :
5 :
6 :
7 :
8 :
9 :
10 :
11 :
12 :
13 :
14 :
15 :
16 :
1
+
+
+
-
2
+
+
+
-
3
+
+
-
4
+
+
+
-
5
+
+
+
+
+
+
+
+
+
+
+
6
+
+
+
+
+
+
+
+
+
+
+
7
+
+
+
+
+
+
+
+
+
+
+
8
+
+
+
+
+
+
+
+
+
+
+
9
+
+
+
+
+
+
+
+
+
+
+
0
+
+
+
+
+
+
+
+
+
+
+
1
+
+
+
+
+
+
+
+
+
+
+
2
+
+
+
+
+
+
+
+
+
+
+
3
+
+
+
+
+
+
+
+
+
+
+
4
+
+
+
+
+
+
+
+
+
+
+
5
+
+
+
+
+
+
+
+
+
+
+
6
+
+
+
+
+
+
+
+
+
+
+
-
SYS_console>
10-5
Virtual LAN Commands
Security VLANs
Each Security Virtual LAN (SVLAN) can contain one or more groups of
ports. The group in a SVLAN are only allowed to send and receive
packets to groups in the same SVLAN. If a group is not assigned to a
specific SVLAN, it remains in the default SVLAN. Unicast packets with
unknown destination addresses are sent to all port members in a
SVLAN. Broadcast packets (broadcast address ffffffffff ) remain within
the VBC where they are received and are transmitted to only the
ports in an SVLAN that are members of the receiving port VBC.
set-sec-vlan
This command establishes a Security Virtual LAN.
The SVLANs are group-oriented. There are eight groups of ports on
the 8116 switch.
Table 10-1 SVLAN Groups
10-6
Group a
ports 1-2
Group b
ports 3-4
Group c
ports 5-6
Group d
ports 7-8
Group e
ports 9-10
Group f
ports 11-12
Group g
ports 13-14
Group h
ports 15-16
AT-8116 User’s Guide
set-sec-vlan {run|nvram|all} <group_list>
SYS_console>set-sec-vlan run a-b
Set Runtime Security Virtual entry - OK
SYS_console>set-sec-vlan run c
Set Runtime Security Virtual entry - OK
SYS_console>get-svlan-tbl run
RUNTIME
SECURITY VIRTUAL LANs TABLE
0 0 0 0 0 0 0 0 0 1 1 1 1 1 1 1
SVLAN -
1 2 3 4 5 6 7 8 9 0 1 2 3 4 5 6
1 :
+ + + + - - - - - - - - - - - -
2 :
- - - - + + - - - - - - - - - -
SYS_console>
del-sec-vlan
This command deletes the Virtual LAN specified by lan_id.
del-sec-vlan {run|nvram} <lan_id>
lan_id is the svlan index in the SVLANs table displayed at the getsvlan-tbl command.
Note
Setting a security VLAN group with the “all” parameter will update
both Runtime and NVRAM databases.
10-7
Virtual LAN Commands
get-svlan-tbl
This command shows the table of defined Virtual LANs.
get-svlan-tbl {run|nvram}
SYS_console>get-svlan-tbl run
RUNTIME
SECURITY VIRTUAL LANs TABLE
===========================================
0 0 0 0 0 0 0 0 0 1 1 1 1 1 1 1
SVLAN -
1 2 3 4 5 6 7 8 9 0 1 2 3 4 5 6
1 :
+ + + + + + + + - - - - - - - -
2 :
- - - - - - - - + + - - - - - SYS_console>
The default SVLAN is ports 11, 12, 13, 14, 15, and 16 (groups F, g, and
H. It is not displayed by the “get-svlan-tbl” command. SVLAN
1 is ports 1, 2, 3, 4, 5, 6, 7, and 8 (groups A, B, C, and D). SVLAN 2 is
ports 9, 10, (group E).
Note
If you assign ports to multiple SVLANs, they become one SVLAN and
includes all the original VLAN ports.
You can view the SVLANs settings by entering the CLI “get-svlanmatrix” command, which shows the connectivity matrix of all the
ports (identifies ports transmitting and ports receiving).
10-8
AT-8116 User’s Guide
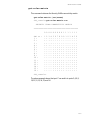
get-svlan-matrix
This command retrieves the Security VLANs connectivity matrix.
get-svlan-matrix {run|nvram}
SYS_console>get-svlan-matrix run
SECURITY VLANs CONNECTIVITY MATRIX
==========================================
0 0 0 0 0 0 0 0 0 1 1 1 1 1 1 1
SRC to :
1 :
2 :
3 :
4 :
5 :
6 :
7 :
8 :
9 :
10 :
11 :
12 :
13 :
14 :
15 :
16 :
1
+
+
+
-
2
+
+
+
-
3
+
+
+
-
4
+
+
+
-
5
+
+
+
+
+
+
+
+
+
+
+
6
+
+
+
+
+
+
+
+
+
+
+
7
+
+
+
+
+
+
+
+
+
+
+
8
+
+
+
+
+
+
+
+
+
+
+
9
+
+
+
+
+
+
+
+
+
+
+
0
+
+
+
+
+
+
+
+
+
+
+
1
+
+
+
+
+
+
+
+
+
+
+
2
+
+
+
+
+
+
+
+
+
+
+
3
+
+
+
+
+
+
+
+
+
+
+
4
+
+
+
+
+
+
+
+
+
+
+
5
+
+
+
+
+
+
+
+
+
+
+
6
+
+
+
+
+
+
+
+
+
+
+
-
SYS_console>
The above example shows that port 7 can switch to ports 5, 6, 8, 9,
10,11, 12, 13, 14, 15, and 16.
10-9
Chapter 11
Port Monitoring Commands
set-mon-port
This command sets the monitoring port (port containing the
monitoring device, sniffer port). All traffic from the port specified by
the monitor command will be duplicated on assigned ports. Port is a
decimal number.
set-mon-port <port>
monitor
This command sets the port to be monitored and starts the
monitoring process. All traffic from this port will be duplicated on the
monitoring port specified by the set-mon-port command. The
monitoring device or sniffer must be connected to the monitoring
port before monitoring is activated.
monitor <port>
stop-mon
This command ends port monitoring.
get-nv-mon
This command retrieves the port monitoring information stored by
the save-mon command in the NVRAM.
11-1
Port Monitoring Commands
save-mon
This command saves the current port monitoring information
(including set-mon-port and monitor commands) into the NVRAM,
so that the monitoring will be restarted upon device reset.
clear-nv-mon
This command clears the port monitoring information previously
stored in the NVRAM with the save-mon command.
11-2
Chapter 12
Port Configuration Commands
This chapter contains instructions for configuring and displaying the
ports’ parameters with the Administrative Interface. Type <port-cfg>
to view the related commands.
get-port-cfg
The get-port-cfg command displays the current port configuration.
SYS_console>get-port-cfg
PORT_ID
LAN_TYPE
LINK
IF_TYPE
SPEED_SEL
LAN_SPEED
FDPLX ENABLE
======================================================================
1
2
3
4
5
6
7
8
9
10
11
12
13
14
15
16
ETH10/100
ETH10/100
ETH10/100
ETH10/100
ETH10/100
ETH10/100
ETH10/100
ETH10/100
ETH10/100
ETH10/100
ETH10/100
ETH10/100
ETH10/100
ETH10/100
ETH10/100
ETH10/100
OFF
OFF
OFF
OFF
OFF
OFF
OFF
ON
OFF
OFF
OFF
OFF
OFF
OFF
OFF
OFF
TP
TP
TP
TP
TP
TP
TP
TP
TP
TP
TP
TP
TP
TP
TP
TP
FORC100
FORC100
FORC100
FORC100
FORC100
FORC100
FORC100
FORC100
FORC100
FORC100
FORC100
FORC100
FORC100
FORC100
FORC100
FORC100
100Mbps
100Mbps
100Mbps
100Mbps
100Mbps
100Mbps
100Mbps
100Mbps
100Mbps
100Mbps
100Mbps
100Mbps
100Mbps
100Mbps
100Mbps
100Mbps
OFF
OFF
OFF
OFF
OFF
OFF
OFF
OFF
OFF
OFF
OFF
OFF
OFF
OFF
OFF
OFF
ON
ON
ON
ON
ON
ON
ON
ON
ON
ON
ON
ON
ON
ON
ON
ON
SYS_console>
12-1
Port Configuration Commands
The information displayed contains:
❑
An interface number (port-id)
❑
LAN type: ETH-10 indicates 10 Mbps Ethernet ETH-10/100
indicates 10/100 Mbps Ethernet ETH-100 indicates 100 Mbps
Ethernet
❑
Link status: ON/OFF
❑
Physical Interface Type: TP
❑
Speed selected: FORC10 (10Mbps), FORC100 (100Mbps),
ASENSE (Autosense)
❑
LAN Speed: 10Mbps or 100Mbps
❑
Full Duplex mode: OFF = Standard Ethernet (default Half
Duplex), ON = Full Duplex
❑
Enable: ON = port enabled (default), OFF = port disabled
set-port-dplex
set-port-dplex <port_number> {half|full}
The set-port-dplex command specifies if the given port will be active
in full-duplex or in half-duplex (Standard Ethernet) mode. The default
is half-duplex.
SYS_console>set-port-dplex 2 full
Port configured in <full duplex> mode
Parameter change in NVRAM OK
SYS_console>_
12-2
AT-8116 User’s Guide
set-speed-sel
set-port-sel <port-number> {asense|100|10}
This command specifies if port-number will negotiate a 10Mbps or
100Mbps connection, or it will autosense. If the switch is having
difficulty auto-sensing the wire speed, use this command to set the
correct value.
Note
If the port’s link partner is in Full Duplex mode and not in ASENSE (or
auto-negotiation) mode, ASENSE cannot be selected as the line speed
of the port.
set-port-state
This command can be used to enable or disable a port when the
Spanning Tree algorithm is not running. When Spanning Tree is
running, set-prt-enb should be used instead.
set-port-state < port-number>
{enable|disable}
set-aggr-mode
This command sets the device mode: aggressive or relax backoff
algorithm.
SYS_console>set-aggr-mode
[arg #0]
enter either {enable | disable}
SYS_console>
The AT-8116 implements the truncated exponential backoff
algorithm defined by the 802.3 standard. The set-aggr-mode
command controls the number of consecutive retransmit trials
(necessitated by collisions) before restarting the backoff algorithm.
In aggressive mode the AT-8116 restarts the backoff algorithm after 4
consecutive transmit trials instead of 16. This results in the switch
being more aggressive in accessing the media following a collision.
12-3
Chapter 13
Switching Statistics Commands
This chapter contains instructions for displaying the switching
statistics. Type <statistics> to view all the related commands. The
commands below provide full physical layer information as well as
inter-port switching statistics.
clr-cnt
This command clears the Ethernet and bridging counters.
get-eth-cnt
This command displays the Ethernet Statistics Counters for port portnumber.
13-1
Switching Statistics Commands
get-eth-cnt <port-number>
SYS_console>get-eth-cnt 8
Ethernet Statistics for Port 8
=============================================
Good Bytes Received: 249432
Good Multicast Bytes Received: 1011480
Good Broadcast Bytes Received: 85944
Good Bytes Sent: 107222
Good Frames Receive: 16011
Good Multicast Frames Receive: 991
Good BroadCast Frames Receive: 13773
Frames Sent: 1059
Receive and Transmit Collisions: 0
Receive and Transmit Late Collisions:0
Receive CRC or Alignment Error: 0
Receive Frame > 1518 bytes with Bad CRC: 0
Receive Fragments: 43
Receive Frame > 1518 bytes
with Good CRC:
Bad Bytes Received: 0
=============================================
SYS_console>
13-2
AT-8116 User’s Guide
get-colls-cnt
This command displays the Ethernet collision statistics for port portnumber.
get-colls-cnt <port-number>
SYS_console>get-colls-cnt 8
Ethernet Collision Counters for port 8
==========================================
Collision count:0
Late Collision Count: 0
==========================================
SYS_console>
get-rmon-cnt
Retrieve the RMON statistics group 1 counters for port.
get-rmon-cnt
<port>
get-sdist-cnt
Retrieve the RMON statistics packet size histogram for port. This
command is available for Fast Ethernet ports only.
get-sdist-cnt
<port>
SYS_console>get-sdist-cnt 6
RMON Packet Size Distribution Counters for
port 6
=============================================
etherStatsPkts64Octets: 330
etherStatsPkts65to127Octets: 175
etherStatsPkts128to255Octets: 71
etherStatsPkts256to511Octets: 18
etherStatsPkts512to1023Octets: 21
etherStatsPkts1024to1518Octets: 3
SYS_console>
13-3
Switching Statistics Commands
get-mgm-brcnt
Retrieve the counters for the management
interface.
SYS_console>get-mgm-brcnt
Management Port Counters
=============================================
Frm
Received:
15606
Bytes Received :
Frm
1119792
Filtered :
0
Frm Received Bcast:
Frm Transmited
:
14219
29944
Frm Transmit Ucast:
344
Frm Transmit Mcast:
29556
Frm Transmit Bcast:
44
Received from port:
FRAMES
BYTES
----------------------------------------------1
:
0
0
2
:
0
0
3
:
0
0
4
:
0
0
5
:
0
0
6
:
0
0
7
:
0
0
8
:
0
0
9
:
0
0
10
:
15637
1123754
11
:
0
0
12
:
0
0
13
:
0
0
14
:
0
0
15
:
0
0
16
:
0
0
13-4
Chapter 14
Spanning Tree Commands
Spanning Tree automatically configures a loop-free topology in a
bridged environment. However, note that the bridge on this switch
is not VLAN-based and only one spanning tree is allowed regardless
of the number of VLANs. The Spanning Tree agent is implemented in
conformance to the IEEE 802.1d standard. Once spannning tree is
enabled, it remains enabled even through resets or start ups.
Listed below are the configuration commands pertinent to the
operation of the Spanning Tree algorithm. Type <sp-tree> to view all
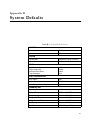
the related commands. For spanning tree defaults, see Appendix B,
“System Defaults”.
get-stp
Retrieve the current state of Spanning Tree. Options are enable or
disable.
Note
The default state is disabled for spanning tree.
set-stp
This command enables or disables the Spanning Tree protocol.
Spanning Tree is enabled by default, in accordance with 802.1d.
Enabling or disabling Spanning Tree will not take effect until the
SNMP agent is reset, via warm-reset, cold-reset or a power cycle.
set-stp {enable|disable}
14-1
Spanning Tree Commands
get-st-bcfg
This command retrieves the Spanning Tree bridge parameters. If
Spanning Tree is disabled, no parameters will be retrieved.
get-st-pcfg
This command retrieves the Spanning Tree port parameter table. If
Spanning Tree is disabled, no parameters will be retrieved.
get-st-syscfg
This command retrieves the Spanning Tree state of all the ports.
set-br-prio
This command sets the Spanning Tree bridge priority of the Switch.
priority is an integer in the range 0..65535.
set-br-prio <priority>
set-br-maxage
set-br-maxage <maxage>
This command sets the Spanning Tree bridge MaxAge. This is the
amount of time between Spanning Tree configuration messages.
Note that maxage is in units of seconds in the range 6..40.
set-br-hellot
set-br-hellot <hello_time>
This command sets the Spanning Tree bridge Hello Time. hello_time
is an integer in the range 1..10. Note that hello_time is in units of
seconds.
set-br-fwdel
set-br-fwdel <forward_delay>
This command sets the Spanning Tree bridge Forward Delay. This
controls the amount of time between the listening and forwarding
Spanning Tree states, and is completely unrelated to the forwarding
latency. Note that forward_delay is an integer in units of seconds in
the range 4..30.
14-2
AT-8116 User’s Guide
set-prt-prio
This command sets the Spanning Tree port priority. port_number is
the decimal port number, and port_priority is an integer in the range
1..255.
set-prt-prio <port_number> <port_priority>
set-prt-enb
set-prt-enb <port_number> {enable|disable}
This command enables or disables a port in the Spanning Tree.
port_number is the integer port number.
set-prt-pcost
set-prt-pcost <port_number> <path_cost>
This command sets the Spanning Tree port path cost. port_number
is the integer port number, and path_cost is an integer path cost in
the range 1..65535.
14-3
Chapter 15
Using an SNMP Manager
This chapter contains instructions for the configuration and
management of the AT-8116 SNMP Management System.
Configuring the AT-8116 SNMP Agent
Once connected to the network and powered ON, the AT-8116 starts
operating according to factory-set default values. However, to ensure
proper operation and maximum performance specific to your
network configuration and to provide SNMP access, some
environment-specific parameters must be configured through the
Command Line Interface.
If you are configuring the switch for the first time:
Global Setup
1. Connect a terminal to the RS-232 connector.
2. Log in to the Command Line Interface.
3. Initialize all the AT-8116 parameters to their default values (see
Table 1, System Default Values). Use the following command
sequence:
init-nvram (deletes all current NVRAM configrations)
warm-reset (loads the NVRAM configuration)
4. Wait until you see the LOGIN prompt again. Login to the CLI. Now
all system parameters have been initialized to their default values.
15-1
Using an SNMP Manager
IP Setup
1. Modify the system IP configuration to match your IP network. Use
the set-ip-cfg command in order to provide an IP address, a
netmask and a broadcast address (see IP Commands). For
example:
set-ip-cfg 129.001.001.064 255 255.255.255.0
129.001.001.000
Check that the actual IP configuration matches the desired one:
SYS_console>get-ip-cfg
The device IP address, netmask and broadcast are:
IP address: 129.001.001.064
IP netmask:255.255.255.000
IP broadcast: 129.001.001.000
2. Set the default gateway address using the set-gatew command.
This should be a station that can route IP packets to non-local IP
networks. For example:
SYS_console>set-gatew 129.1.1.1
3. Confirm that the default gateway IP address was properly
accepted:
SYS_console>get-gatew
Device default gateway address is :
129.001.001.001
15-2
AT-8116 User’s Guide
SNMP Setup
1. Set up the SNMP communities strings for the two access modes:
read and write (see SNMP Commands). Confirm that the read and
write communities were properly accepted. In this example, the
Read community string is public; the Write community string is
private. To set community strings:
SYS_telnet>set-comm read public
New read community is: < public >
SYS_telnet>set-comm write private
New write community is: < private >
SYS_telnet>
to read if accepted:
SYS_telnet>set-comm read public
New read community is: < public >
SYS_telnet>set-comm write private
New write community is: < private >
SYS_telnet>
15-3
Chapter 16
Software Troubleshooting
This chapter provides troubleshooting hints for problems you may
encounter when trying to manage the AT-8116 using an SNMP
Management System.
❑
If your SNMP Manager has trouble communicating with the
SNMP Agent in the Switch, check your SNMP configuration
parameters.
❑
Your Network Administrator can help determine if your IP
configuration (IP Address, netmask and broadcast address) is
correct. If the SNMP management workstation is on a different
network, be sure that you have defined an appropriate Default
Gateway IP Address.
❑
Check the community string configuration by using the getcomm * command.
❑
If you are not receiving any traps, check that you have
correctly entered the SNMP Management Workstation
address in the trap receiver table. Display the table using the
get-trap-tbl command. Check that both the IP Address and
the community string are correct.
❑
If the network management station does not receive
authentication failure traps, check for the Authentication
Mode using the get-auth command.
❑
Check that you have a correct physical connection to the
Switch. Check the LINK status.
❑
Test the connection to the SNMP Management Station by
pinging it. Use the CLI: ping.
❑
If the network’s physical topology has changed recently (e.g.
an SNMP Management Station has been moved from one
segment to another), the ARP cache may be out of date. You
can use the del-arp-entry command to flush the cache.
16-1
Appendix A
Software Downloading
Requirements
❑
Diskette with software file to be downloaded
❑
DOS station host (management console, VT100 terminal or
VT100 terminal emulator) or UNIX host (eg, Sun Sparc)
❑
TFTP program (client or server)
❑
Operational AT-8116
Note
When the file transfer is completed, the AT-8116 automatically resets
itself and reboots with the downloaded software in about two
minutes.
8116 TFTP Client Download Procedure
1. Insure that an IP Address is assigned.
Use your terminal for Steps 2-7.
2. Set the TFTP mode to client using the set-tftp-mode command.
3. Insure that the host system for the TFTP server (if AT-8116 is the
TFTP client , then the host system should be an TFTP sever) and
AT-8116 are interconnected.
4. Insert the diskette with the software file into the host drive of the
TFTP server.
A-1
Software Downloading
5. Select/Create a directory into which to copy the software file, and
enter this directory.
6. Copy the software file into a file with a suitable name.
7. Set the remote software file using the set-sw-file command.
8. Operate TFTP server on the remote system host and use the swdnld command on the AT-8116 to start download.
8118 TFTP Server Download Procedure
1. Insure that an IP Address is assigned.
2. Set the TFTP mode to the server using the set-tftp-mode
command.
3. Set the remote software file using the set-sw-file command.
4. Insure that the host system for the TFTP client (if AT-8116 is the
TFTP sever, then the host system should be an TFTP client) and AT8116 are interconnected.
5. Insert the diskette with the software file into the host drive of the
TFTP client.
6. Select/Create a directory into which to copy the software file, and
enter this directory.
7. Copy the software file into a file with a suitable name.
8. Set the remote software file using the set-sw-file command.
9. Use the sw-dnld command to start download.
10. Operate the remote TFTP client.
11. Select binary transfer mode if the code is in ASCII (equivalent to
octet in UNIX code).
12. Using the TFTP protocol, send the file (to be loaded into Flash
memory) to the IP address of the AT-8116.
A-2
Appendix B
System Defaults
Table B-1 System Default Values
CONSOLE
password
NULL
prompt
SYS_console>
SYSTEM
SW filename
changes according to revision
tftp mode
client
SNMP
Read Community:
Write Community:
Authentication Mode:
Traps Managers:
public
private
enable
none
PORT CONFIGURATION
port duplex
HALF
port select
FORC100
backoff algorithm
aggressive
SPANNING TREE
Spanning Tree
disable
Bridge Priority
32768
0-65535
Bridge Max Age
20
6.0 - 40.0 sec
Bridge Hello Time
2
1.0 - 10.0 sec
Bridge Forward Delay
15
4.0 - 30.0
Port Priority
128
0-255
Port Cost
1000/LAN speed (Mbps)
B-1
Appendix C
Command Line Reference
Table C-1 Console Commands
help-kbd
List the console functional keys
banner
Display banner
clear
Clear console screen
login
Exit AI; do not disconnect a Telnet session
logout
Exit Admin Interface and any active Telnet session
set-page
Set console page
set-prompt
Change console prompt
set-attr-prompt
Set the prompt attributes
set-attr-msg
Set the message attributes
set-attr-text
Set the text attributes
set-passwd
Change the console password
C-1
Command Line Reference
Table C-2 System Commands
C-2
sys-stat
Show system status
get-stst-level
Show self-test level of switch
set-stst-level
Change the self-test level
warm-reset
Warm reset of device
cold-reset
Cold reset of device
get-last-err
Display information about the last fatal error
init-nvram
Initialize NVRAM to default values
get-sw-file
Retrieve SNMP agent software file name
set-sw-file
Set the SNMP Agent Software file name - for download
get-tftp-srvr
Retrieve TFTP download server IP address
set-tftp-srvr
Set TFTP download server IP address
set-tftp-mode
Set the TFTP download mode
get-tftp-mode
Retrieve the TFTP download mode
sw-dnld
Begin software download to TFTP server
set-fg-param
Set the Ethernet frame generator parameters
start-fg
Starts the Ethernet frame generator
stop-fg
Stop the Ethernet frame generator
AT-8116 User’s Guide
Table C-3 IP Commands
get-ip
Show current IP address
set-ip
Set IP address
get-ip-cfg
Show current IP configuration
set-ip-cfg
Set IP address, netmask and broadcast
clear-ip-cfg
Clear IP configuration in NVRAM
get-gatew
Show default gateway
set-gatew
Define default gateway
get-arp-tbl
Display the ARP Table
del-arp-entry
Deletes an entry/all entries (*) of the ARP table
add-arp-entry
Adds an entry to the ARP table
ping
IP traffic generator
ping-stop
Stop the ping process
Table C-4 SNMP Commands
get-comm
Show current read and /or write community
set-comm
Change the read or write community
get-auth
Shows the traps authentication mode
set-auth
Sets the trap authentication mode
get-traps
Show destination stations in the trap list
add-trap
Add destination station to trap list
del-trap
Delete a destination station from trap list
get-rmon-state
Display the RMON session state
C-3
Command Line Reference
Table C-5 Switching Database Commands
get-lt-entry
Gets an LT entry at index
get-lt-16
Gets 16 LT entries starting at a given index
find-lt-addr
Searches for an address in the LT
del-lt-entry
Removes an LT entry at index
del-lt-addr
Removes an LT with a given address
add-lt-entry
Adds an LT entry
get-lt-age
Displays the LT aging period
set-lt-age
Modifies the LT aging period
Table C-6 Virtual LAN Commands
C-4
get-con-matrix
Retrieve the VLAN connectivity matrix
set-vbc-domain
Define a Virtual Broadcast domain
del-vbc-domain
Delete a Virtual Broadcast domain
get-vbc-tbl
Display the Virtual Broadcast domain table
get-vbc-matrix
Retrieve the VBC connectivity matrixmonitor
set-sec-vlan
Define a Security Virtual LAN
del-sec-vlan
Delete a Security Virtual LAN
get-svlan-tbl
Display the Security Virtual LAN table
get-svlan-matrix
Retrieve the Security VLANs connectivity matrix
set-mon-port
Set monitoring port
monitor
Set port monitoring
stop-mon
End port monitoring
get-nv-mon
Retrieve port monitoring information stored in NVRAM
save-mon
Save current port monitoring information into NVRAM
clear-nv-mon
Clear port monitoring information previously stored in
NVRAM
AT-8116 User’s Guide
Table C-7 Port Configuration Commands
get-port-cfg
Display the configuration of all ports
set-port-dplex
Set the port mode: full or half duplex
set-speed-sel
Set the port speed : 10Mbps, 100Mbps or Asense
set-port-state
Enable or disable a port when Spanning Tree algorithm
is not running
set-aggr-mode
Enable or disable switch aggressive mode
Table C-8 Switching Statistics Commands
clr-cnt
Clear the switch Ethernet and bridging counters
get-eth-cnt
Get the Ethernet counters per port
get-colls-cnt
Get the collision distribution counters per port
get-rmon-cnt
Get the Ethernet RMON counters per port
get-sdist-cnt
Get packet size distribution counters per port
get-mgm-brcnt
Get the switching counters of the mgmt port
Table C-9 Spanning Tree Commands
get-stp
Display the Spanning Tree session state
set-stp
Enable/Disable Spanning Tree - for the next session
get-st-bcfg
Retrieve the Spanning Tree Bridge parameters
get-st-pcfg
Retrieve the Spanning Tree port parameter table
get-st-syscfg
Retrieve the Spanning Tree System Ports configuration
set-br-prio
Set the Spanning Tree bridge priority
set-br-maxage
Set the Spanning Tree bridge MaxAge
set-br-hellot
Set the Spanning Tree bridge HelloTime
set-br-fwdel
Set the Spanning Tree bridge Forward Delay
set-prt-prio
Set the Spanning Tree port priority
set-br-enb
Set the Spanning Tree port enable/disable
set-br-pcost
Set the Spanning Tree port path cost
C-5