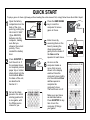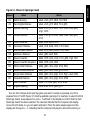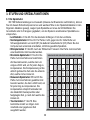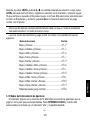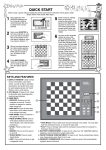
1
Travel Chess Instructions Bedienungsanleitung Mode d’emploi Instrucciones de Funcionamiento Istruzioni d’uso Handleiding QUICK START To play a game of chess right away, without reading the entire manual first, simply follow these Quick Start steps! 1 2 3 Open the battery compartment on the back of the computer by pushing the tab. Insert 2 “AAA” (Type AM4/R03) batteries into the computer, making sure that you observe the correct polarity. Then, reinstall the battery door. 2 x AAA/AM4/R03 Press GO/STOP to turn the unit on. If the computer does not respond, press a paper clip or similar sharp object into the hole marked ACL in the base of the unit, as described in Section 4.1. Set up the chess pieces in the initial starting position for a new game, with the White pieces closest to you. ዛዒዓዔዕዖዘዙዜ ዑ尷尽尻就尯尹尿尵ዑ ዐ屁屃屁屃屁屃屁屃ዐ ዏ巀居巀居巀居巀居ዏ ዎ居巀居巀居巀居巀ዎ ው巀居巀居巀居巀居ው ዌ居巀居巀居巀居巀ዌ ዋ屄层屄层屄层屄层ዋ ዊ尶局尺尴尮尼尾尸ዊ ዝዒዓዔዕዖዘዙዞ 4 Press the NEW GAME key to reset the computer for a new game of chess. 5 Enter moves by executing them on the board, pressing the chess pieces down gently into the holes of the from and to squares for each move. 6 As soon as the computer makes a move, that move is shown in the display window. Press the computer’s piece lightly into the indicated from and to squares to complete the computer’s move. That’s all there is to it! Make your next move as described above. Press GO/STOP at any time to turn the computer off. Enjoy your game! Example move: e7-e5 ዛዒዓዔዕዖዘዙዜ ዑ尷尽尻就尯尹尿尵ዑ ዐ屁屃屁屃屁屃屁屃ዐ ዏ巀居巀居巀居巀居ዏ ዎ居巀居巀居巀居巀ዎ ው巀居巀居屄居巀居ው ዌ居巀居巀居巀居巀ዌ ዋ屄层屄层巀层屄层ዋ ዊ尶局尺尴尮尼尾尸ዊ ዝዒዓዔዕዖዘዙዞ ዛዒዓዔዕዖዘዙዜ ዑ尷尽尻就尯尹尿尵ዑ ዐ屁屃屁屃居屃屁屃ዐ ዏ巀居巀居巀居巀居ዏ ዎ居巀居巀屁巀居巀ዎ ው巀居巀居屄居巀居ው ዌ居巀居巀居巀居巀ዌ ዋ屄层屄层巀层屄层ዋ ዊ尶局尺尴尮尼尾尸ዊ ዝዒዓዔዕዖዘዙዞ QUICK START KEYS AND FEATURES INTRODUCTION 1. USING YOUR CHESS COMPUTER 1.1 Battery Installation 1.2 Making Moves 1.3 The Computer’s Move 1.4 Change Your Mind? Take Back! 1.5 Check, Mate, or Draw! 1.6 Start a New Game 1.7 Change Levels 1.8 Openings Coach 4. TECHNICAL DETAILS 4.1 The ACL Function 4.2 Care and Maintenance 4.3 Technical Specifications 2. ADDITIONAL COMPUTER FEATURES 2.1 Chess Clocks 2.2 Capturing and Special Moves 2.3 Illegal Moves 2.4 Interrupting the Computer’s Search 2.5 Changing Sides with the Computer 2.6 Getting Hints from the Computer 2.7 The Computer Plays Against Itself 2.8 Game Memory and Automatic Power Down 2.9 Openings Library TROUBLESHOOTING GUIDE 3 ENGLISH 3. LEVELS AND SPECIAL MODES 3.1 Levels of Play 3.2 Fun Levels 3.3 Casual Levels 3.4 Blitz Levels 3.6 Bonus Timer Levels 3.7 Tournament Levels 3.8 Fixed Depth Levels 3.9 Tactical Level 3.10 Teach Modes 3.11 Selecting Levels and Teach Modes 3.12 Openings Coach Mode 3.13 Verify Mode: Check Piece Positions! 3.14 Non Auto Mode TABLE OF CONTENTS KEYS AND FEATURES 1. LCD Display Window: The Liquid Crystal Display (LCD) is used to show moves, game information, and chess clocks for both players. For a complete list of the symbols, refer to Figure 1. 2. Piece Symbol Keys: & (King), % (Queen), $ (Rook), # (Bishop), @ (Knight), and ! (Pawn). The Piece Symbol Keys are used to verify positions, select various Teach Modes, and underpromote pawns. 3. Game Keys a. NEW GAME Key: Press to reset the computer for a new game of chess. b. OPENINGS COACH Key: Press to enter Openings Coach Mode for training on opening gambits and responses. c. SOUND Key: Pressing this key causes the sound option to cycle through three different levels of operation. You can tell which level you have selected by the number of high tone beeps you hear, as indicated below: SOUND LEVEL 4. SIGNAL WHEN SELECTED 5. Sound and Coach ........ 3 high tones Sound only .................... 2 high tones Silent ............................. 1 high tone With Coach selected, the computer will evaluate your move immediately after it is completed, emitting two low tones if the move is considered to be bad. With Sound selected, the buzzer beeps to show the computer’s response to your actions. See 6. 7. 4 Figure 1 for the meanings of the beeps. d. TAKE BACK Key: Press to take back the last individual move made. You may take back up to 14 individual moves. Note that an individual move is a move for one side. e. NON AUTO Key: Press to enter Non Auto Mode, which allows moves to be entered manually. Here, the computer monitors the game, but makes no moves. f. LEVEL Key: Press to enter Level Mode to adjust the level of play to the complexity and type of game you desire. Also used to select the Teach Modes. g. PLAY Key: Press to change sides with the computer. Press while the computer is thinking to force it to move, or press during your own turn to get a move suggestion from the computer. h. GO/STOP Key: Press to turn the computer on; press again to turn the unit off. The current game is retained in memory for up to 300 hours. Sensory Chessboard: Each square contains a highly sensitive sensor that registers piece movement. The squares are identified by file (letters) and rank (numbers). ACL (Reset): Recessed reset switch is located in the base of the unit, and used to eliminate static discharge after inserting a new set of batteries. Battery Compartment: Batteries are housed In the base of the unit. The computer uses 2 “AAA” (Type AM4/R03) alkaline batteries. Piece Storage Area: Handy storage compartment for your chess pieces. SOUND SYMBOLS 1 high tone ........ Acknowledge operation of any key or sensory square 1 low tone .......... Error: Wrong move or wrong key pressed 2 low tones ........ Warning from Coach 3 high tones ...... New Game or Sound and Coach set 3 low tones ........ In games against the clock, time has run out 1 ......... 1 A .......... A k ........ King 2 ......... 2 B .......... B q ........ Queen 3 ......... 3 c .......... C r ........ Rook 4 ......... 4 D .......... D b ........ Bishop 5 ......... 5 E .......... E n ........ Knight 6 ......... 6 F .......... F p ........ Pawn 7 ......... 7 G .......... G sb ...... Standard board 8 ......... 8 H .......... H 9 ......... 9 0 ......... 0 PM .......... Indicates player to move S ............. Indicates black to move : ............. Steady colon indicates that figures are Minutes and Seconds : ............. Flashing colon indicates that figures are Hours and Minutes ch:)) ..... Black in check ch:__ ..... White in check EnD) ...... Checkmate – black wins EnD( ...... Draw te: .......... Teach Mode o(:3 ........ Openings Coach (Spanish Opening) – computer plays both sides o_:3 ........ Openings Coach (Spanish Opening) – computer plays white o):3 ........ Openings Coach (Spanish Opening) – computer plays black o :3 ........ Openings Coach (Spanish Opening) – computer plays neither 5 ENGLISH Figure 1. Display Symbols and Sounds 2 x AAA/AM4/R03 INTRODUCTION This electronic chessboard is a powerful computer that will play chess at whatever level of complexity you choose! Or, if you prefer, you can play a game with a friend and the computer will act as referee. The large range of 64 playing levels, combined with 11 extended Teach Modes, make up a total of 768 combinations—enough to satisfy anyone with an interest in chess, both young and old! The Teach Modes and Openings Coaches are also superb learning features at any level of play, and the various modes of timed competition are well-suited for the intermediate player. 1. USING YOUR CHESS COMPUTER Battery Installation Your chess computer runs on 2 “AAA” (Type AM4/R03) batteries. For longer battery life, we recommend using fresh alkaline batteries. Locate the battery compartment on the back of the unit, open the cover by pushing the tab, and insert the batteries as shown in Figure 1-1. Then, reinstall the cover and press GO/STOP to turn the computer on. If the computer does not respond, use a paper clip or another sharp object to press into the hole marked ACL in the base of the unit for at least one second. This will reset the computer. After the batteries are inserted or ACL is pressed, the computer will go through a self-test. Three ‘beeps’ tell you that the test has passed, while a buzz or silence indicates a problem that should be checked with your local distributor. 1. Fig. 1-1 ዛዒዓዔዕዖዘዙዜ ዑ尷尽尻就尯尹尿尵ዑ ዐ屁屃屁屃屁屃屁屃ዐ ዏ巀居巀居巀居巀居ዏ ዎ居巀居巀居巀居巀ዎ ው巀居巀居巀居巀居ው ዌ居巀居巀居巀居巀ዌ ዋ屄层屄层屄层屄层ዋ ዊ尶局尺尴尮尼尾尸ዊ ዝዒዓዔዕዖዘዙዞ Fig. 1-2 Fig. 1-3 Fig. 1-4 6 Making Moves Follow the steps below to start a game. a. If necessary, press GO/STOP to turn the computer on. 2. b. Set up the chess pieces in their starting positions with the White pieces nearest to you, as shown in Figure 1-2, and press NEW GAME. The display will indicate that you should play a White piece: 00:00 PM Note: If NEW GAME is pressed while certain modes are selected (Teach Mode, Openings Coach, or Non Auto Mode), these modes will automatically be cancelled. c. To make a move, lightly press down on the piece you want to move until you hear a ‘beep’ (see Figure 1-3). The computer’s sensory board registers your move, and the display shows the from square that was pressed on the left-hand side. E2:__ d. Take the piece and lightly press it down on the square you want to move to. A second ‘beep’ sounds, and the computer briefly shows the to square on the right-hand side of the display. E2:E4 As soon as your move is finished (if you have Sound and Coach selected), the display will show Coch while it 7 ዛዒዓዔዕዖዘዙዜ ዑ尷尽尻就尯尹尿尵ዑ ዐ屁屃屁屃屁屃屁屃ዐ ዏ巀居巀居巀居巀居ዏ ዎ居巀居巀居巀居巀ዎ ው巀居巀居屄居巀居ው ዌ居巀居巀居巀居巀ዌ ዋ屄层屄层巀层屄层ዋ ዊ尶局尺尴尮尼尾尸ዊ ዝዒዓዔዕዖዘዙዞ Fig. 1-5a ዛዒዓዔዕዖዘዙዜ ዑ尷尽尻就尯尹尿尵ዑ ዐ屁屃屁屃居屃屁屃ዐ ዏ巀居巀居巀居巀居ዏ ዎ居巀居巀屁巀居巀ዎ ው巀居巀居屄居巀居ው ዌ居巀居巀居巀居巀ዌ ዋ屄层屄层巀层屄层ዋ ዊ尶局尺尴尮尼尾尸ዊ ዝዒዓዔዕዖዘዙዞ Fig. 1-5b Fig. 1-6a Fig. 1-6b ENGLISH Note that inserting new batteries or pressing ACL will reset the computer’s memory, causing any current game to be lost. evaluates your move. Two low tones are emitted if the move is considered bad. e. Next, it is the computer’s turn, and the computer will start thinking about its move. Note that in the early stages of a game, the computer’s response is often virtually instantaneous. This is because it is playing moves already stored in its openings library (see Section 2.9). The Computer’s Move When the computer is ready, it ‘beeps’ and displays the from and to coordinates of its move, as shown in Figure 1-4. For an example of a move, see Figures 1-5a and b. Press the indicated piece down on its from square (E7, in this case), until you hear a ‘beep’ and the from side of the display changes to show the color and symbol for that piece. For a chart of the symbols, see Figure 1. Next, press that same piece down on the second square in the display—the square the computer wants to move to (E5, here). Once you press E5, the display clears and you have completed the computer’s move! The display then indicates that it is once again your turn to move. 3. Change Your Mind? Take Back! If you change your mind about a move, you can take it back. Press TAKE BACK while it is still your turn to move, and the display shows the to square. Press the piece down on that square. You now see the piece symbol and the square that piece came from. Press the piece down on the from square to finish the take-back. If the move taken back was a capture, the computer reminds you to put the captured piece back on the board by displaying the piece type and its square location. Press this piece down on the indicated square. To take back another move, press TAKE BACK again. You can take back up ዛዒዓዔዕዖዘዙዜ ዑ巀居巀尮巀居巀尭ዑ ዐ居巀居巀居巀居巀ዐ ዏ巀居巀居巀居巀居ዏ ዎ居巀居巀屁屄居巀ዎ ው巀居巀居巀居巀居ው ዌ居巀居巀居巀居巀ዌ ዋ巀居巀居巀居巀居ዋ ዊ居巀居巀居巀居巀ዊ ዝዒዓዔዕዖዘዙዞ Fig. 2-1a ዛዒዓዔዕዖዘዙዜ ዑ巀居巀尮巀居巀尭ዑ ዐ居巀居巀居巀居巀ዐ ዏ巀居巀居屄居巀居ዏ ዎ居巀居巀居巀居巀ዎ ው巀居巀居巀居巀居ው ዌ居巀居巀居巀居巀ዌ ዋ巀居巀居巀居巀居ዋ ዊ居巀居巀居巀居巀ዊ ዝዒዓዔዕዖዘዙዞ Fig. 2-1b 4. 8 Fig. 2-1c ዋ巀居巀居巀居巀居ዋ ዊ居巀居巀尮巀居尸ዊ ዝዒዓዔዕዖዘዙዞ Fig. 2-2 Note that en passant captures cannot be replayed if the take back of the previous move was not allowed. Check, Mate, or Draw! When a King is in check, the display shows the check symbol (alternately with the clock display, if the clock is running). When the game ends in checkmate or a draw (by stalemate, immediate 3-fold repetition, or the 50-move rule), various End symbols are displayed. These symbols are shown in Figure 1. 5. Note that stalemate is determined either by 3-fold repetition of the same move, or by the 50-move rule. Start a New Game Press NEW GAME to start a new game at any time, using the currently selected level and sound setting. Since pressing NEW GAME clears your current game from the computer’s memory, be very careful not to press this key by mistake. 6. Change Levels Your chess computer offers 64 levels of play, each of which corresponds to one of the 64 board squares. Together with the 11 built-in Extended Teach Modes, you have a choice of 768 level settings! Press LEVEL to enter Level Mode, and the current level is displayed (e.g., the level equivalent to board square A3 shows L:A3 alternately with Fun3). To change the level, simply press a board square, and that level will show in the display. Press LEVEL again to exit Level Mode. For more information on the playing levels, see Section 3. 7. 9 ENGLISH to 14 individual moves (or 7 moves for each side), allowing you to experiment and try out various “What if...?” approaches. To continue the game, either make your next move or press PLAY to have the computer make a move for you. Figures 1-6a and b show an example of taking back a Knight move from G8 to F6. After pressing TAKE BACK, the display shows F6, the square the Knight moved to (Figure 1-6a). Press down on F6, and the display changes to show the piece color and symbol (Black Knight) and the square that piece came from (Figure 1-6b). Press the Knight back down on G8. Openings Coach Your computer has 16 opening sequences for you to study, such as the Italian Opening and the Queen’s Gambit. Press OPENINGS COACH, and then press one of the squares from A1 to B8 to select one of the openings. Press the square again to choose how much help you would like to get from the computer, and then press OPENINGS COACH once more to start practicing or to test your knowledge. For more details, see Section 3.12. 8. 2. ADDITIONAL COMPUTER FEATURES 2.1 Chess Clocks Built in chess clocks keep track of the time for your side and the computer’s side, with a four-digit display showing the total elapsed time or remaining time for each player alternately during his turn. After you have entered the computer’s move, the display shows your chess clock until a key or square is pressed, keeping track of your time until the to square is pressed. After you make your move, the display immediately switches to the computer’s clock while it thinks, until the computer indicates that it is ready to move. Note that the computer may also display Coch after your move has been made, while it analyzes whether you have made a good move or a bad one. If it thinks your move is not good, it sounds two low tones. For the first hour of the game, or whenever the remaining time is less than a hour, the display will show MINUTES:SECONDS, with a steady colon. If the total elapsed time exceeds one hour or the remaining time exceeds one hour, the display will show HOURS:MINUTES, and the colon will flash while the clock is showing. Please also note the following: • The clock stops if you verify the level, verify the board, or turn the computer off. In each of these cases, however, the times are retained in memory, and the clock display resumes when play is continued. • The clock resets if you change the level or press a square while in Level Mode. • When your King is in check, the display shows check alternately with the chess clock. • If you are playing on a level which is against the clock, the clock counts down from your selected time to show time remaining. When the first clock reaches zero, three low tone ‘beeps’ will signal that time has run out. The clock will then begin counting time up from 10 2.2 Capturing and Special Moves a. CAPTURES: To capture, press down lightly on the piece you want to move, take the captured piece off the board, and press your piece on the square of the captured piece. b. EN PASSANT: In an en passant capture, the computer reminds you to remove the captured pawn from the board by displaying the pawn’s location. Press down on the captured pawn before removing it from the board. For an example, see Figures 2-1a, b, and c. c. PAWN PROMOTION AND UNDERPROMOTION: When you promote a pawn, first press your pawn down on its from square, as usual. The computer displays your from square and the Queen symbol (alternately with the clock display). As soon as you press your pawn down on the to square, it automatically becomes a Queen. Remember to change your piece on the board! If you wish to underpromote your pawn to a Rook, Bishop, or Knight, simply press the appropriate Piece Symbol Key between pressing the from and to squares. When the computer promotes a pawn, it will show its from and to squares as usual. After you press its from square, the display indicates the promotion piece type by showing the piece symbol and the to square. Press down on the to square with the indicated new piece to complete the computer’s promotion move. d. CASTLING: The computer automatically recognizes castling after the King is moved. After you have pressed the King down on its from and to squares, the computer displays the Rook’s from square. Press down on this square, and the computer then displays the Rook symbol, along with the square the Rook should move to. Press down on the Rook’s to square to complete the move (see Figure 2-2). 2.3 Illegal Moves Your computer will never accept an illegal move. If you attempt an illegal move, the computer gives a low tone error ‘beep’ and the display keeps showing the from square. Press on that square to clear the illegal move, and then move again. If you should move the computer’s piece incorrectly, you will also hear an error ‘beep’. This 11 ENGLISH zero. On levels where time is not part of the competition, the clock counts upwards to show the total elapsed time. • If you take back while playing against the clock, the clock does not reverse for each take back. It simply stops until you start making a move again. can occur if you move the wrong piece or move a piece to the wrong square. Check the display and move again. If you press a piece and the from square shows in the display, but you decide not to make that move, press that same square once again to cancel. Be careful not to make mistakes when the sound is off, as you will not be able to hear the error ‘beeps’. 2.4 Interrupting the Computer’s Search To interrupt the computer while it is thinking, press PLAY, and the computer will play the best move it has found so far. This can be very useful in games at higher levels of play, when an exhaustive search for the best move can be quite time consuming. 2.5 Changing Sides with the Computer To change sides with the computer, press PLAY when it is your turn to move. The computer will then make the next move for your side. Change sides as often as you wish! 2.6 Getting Hints from the Computer If you need help, you can have the computer show you what it would do in your position! Simply press PLAY on your turn, and the computer will make the next move for you. To keep this move as your own, make the displayed move on the board. Then, press PLAY again and the computer will make its next move. Continue the game by making your own next move. If you do not want to use the computer’s move, first make the displayed move on the board, and then take it back. Once you have cleared the move in this way, you can make your own move. 2.7 The Computer Plays Against Itself To watch the computer play a game against itself, press PLAY for every move. Study the computer’s playing strategies to learn more about chess! 2.8 Game Memory and Automatic Power Down You may interrupt a game by pressing GO/STOP to turn the computer off. The computer will “remember” your position for up to 300 hours (with fresh alkaline batteries). When you switch on again, simply continue where you left off! If you do not press a key or make a move for about 20 minutes (when the computer is not 12 2.9 Openings Library At the beginning of a game, the computer’s reply is usually instantaneous because the computer is playing moves which are stored in its openings library. If the current board position is in its openings library, the computer plays a response to that position from its collection of moves, instead of thinking about the move. 3. LEVELS AND SPECIAL MODES 13 TACTICAL FIXED DEPTH TOURNAMENT BONUS TIMER BRONSTEIN BLITZ CASUAL LEVELS FUN LEVELS 3.1 Levels of Play With 768 level settings to choose from (including the Extended Teach Modes), you can learn and grow with this chess computer! As CHOOSE A LEVEL FROM THE 64 BOARD SQUARES shown in the playing level charts in the following sections, each level corresponds to one of 8 the 64 board squares. The basic levels are categorized into 8 groups, intended to suit 7 users of different abilities. • Fun Levels: A1 to A8. For the early 6 beginner, with A1 being the easiest. • Casual Levels: B1 to C8. For games not 5 played against the clock. Full range of difficulty, from easy (B1) to extremely 4 challenging (C8). When you first power up the computer, B4 will be the selected 3 level. • Blitz Levels: D1 to D8. Also known as 2 Sudden Death. Game must be concluded within the selected time. 1 • Bronstein Levels: E1 to E4. The game A B C D E F G H must be concluded within the selected ENGLISH thinking), the computer will switch off to conserve power, while retaining your game in memory. Press GO/STOP to turn the computer back on and resume your unfinished game. time, which is increased by an amount to compensate for each move. The compensation is the actual time used or the allowed time, whichever is shorter. • Bonus Timer Levels: E5 to E8. The game must be concluded within the selected time, which is increased by a prescribed amount to compensate for each move before the move is made. • Tournament Levels: F1 to F8. A certain number of moves must be made within the given amount of time. • Fixed Depth Levels: G1 to G8. Computer skill is limited by not being able to look ahead more than the selected number of moves. • Tactical Levels: H1 to H8. Computer skill is limited by not being able to look ahead more than the selected number of moves, and by not evaluating strategic advantage. Whenever you set the level, bear in mind that when the computer has more time to think about its moves, it gets stronger and plays better—just like a human player! Sharpen your chess skills—as you beat the computer on each level, graduate to the next. Keep challenging yourself and learn more about the game! 3.2 Fun Levels Selecting any square from A1 to A8 will give you one of the Fun Levels. In this range, the computer does not make an exhaustive search for the best available move. Instead, it disregards scores, and the program also makes use of randomizers which cause the computer to occasionally make a move that is not the best one it has found. This introduces an interesting variability in the computer’s responses, and sometimes it will seem to make quite human errors of judgement. A1 is the lowest skill level, and A8 is somewhat higher. 3.3 Casual Levels When the Casual Levels are selected, you are controlling the skill level of the computer by limiting the average amount of time it can take to select its move. As the skill level is increased, the computer will think ahead progressively more deeply, and as a consequence, play a more skillful game. When one of these levels is selected from the B or C squares, the display will alternate between the level selection and the computer’s average response time, as shown here: 14 B1 B2 B3 B4 B5 B6 B7 B8 C1 C2 C3 C4 C5 C6 C7 C8 Time per Move Display ......................... 1 second ........................... L:B1/00:01 ......................... 2 seconds ......................... L:B2/00:02 ......................... 3 seconds ......................... L:B3/00:03 ......................... 5 seconds ......................... L:B4/00:05 ....................... 10 seconds ......................... L:B5/00:10 ....................... 15 seconds ......................... L:B6/00:15 ....................... 20 seconds ......................... L:B7/00:20 ....................... 30 seconds ......................... L:B8/00:30 ....................... 45 seconds ......................... L:c1/00:45 ......................... 1 minute ............................ L:c2/01:00 ......................... 2 minutes .......................... L:c3/02:00 ......................... 3 minutes .......................... L:c4/03:00 ......................... 4 minutes .......................... L:c5/04:00 ......................... 5 minutes .......................... L:c6/05:00 ....................... 10 minutes .......................... L:c7/10:00 ....................... 15 minutes .......................... L:c8/15:00 3.4 Blitz Levels The levels on the D squares are the Blitz Levels. If you wish to play speed chess, or instant death, you can select from a range of times allowed for the game to be completed. You may choose between a 5 minute “pressure cooker” of a game, up to a more relaxed 1-1/2 hour game. When you select one of these squares, the display will alternate between the square you have selected and the corresponding time limit for the game. Chessboard Square D1 D2 D3 D4 D5 D6 D7 D8 Time per Move Display ......................... 5 minutes .......................... L:D1/05:00 ....................... 10 minutes .......................... L:D2/10:00 ....................... 15 minutes .......................... L:D3/15:00 ....................... 25 minutes .......................... L:D4/25:00 ....................... 30 minutes .......................... L:D5/30:00 ....................... 45 minutes .......................... L:D6/45:00 ....................... 60 minutes .......................... L:D7/1:00 ....................... 90 minutes .......................... L:D8/1:30 15 ENGLISH Chessboard Square 3.5 Bronstein Levels By selecting a square from E1 to E4, you can choose a time limit for the game following the Bronstein system. A basic time is selected for the game, and an increment of a few seconds is then added to that time whenever a move is made. The increment is either the free time shown in the table below, or the actual time taken to move, whichever is shorter. When you choose one of these levels, the display cycles through three different pieces of information, each of which is shown for one second. For example, if you choose E2 you would see: • The selected square: L:E2 and then... • The base time in minutes: 10:00 and then... • The free time in seconds: 00:05 Chessboard Square Time for Game Free Time per Move E1 .................... 5 minutes ................... 3 seconds ........... E2 .................. 10 minutes ................... 5 seconds ........... E3 .................. 15 minutes ................. 10 seconds ........... E4 .................. 20 minutes ................. 10 seconds ........... Display L:E1/05:00/00:03 L:E2/10:00/00:05 L:E3/15:00/00:10 L:E4/20:00/00:10 3.6 Bonus Timer Levels Selection of a square from E5 to E8 gives you the Bonus Timer Levels. These levels are similar to the Bronstein Levels, except the time increment is always 2 seconds, and it is added to the time before the move is made. Chessboard Square Time for Game Free Time per Move E5 .................... 3 minutes ................... E6 .................. 10 minutes ................... E7 .................. 20 minutes ................... E8 .................. 50 minutes ................... 2 seconds ........... 2 seconds ........... 2 seconds ........... 2 seconds ........... Display L:E5/03:00/00:02 L:E6/10:00/00:02 L:E7/20:00/00:02 L:E8/50:00/00:02 3.7 Tournament Levels The F1-F8 squares provide 8 Tournament Levels. When one of these is selected, you and the computer are each required to make a prescribed number of moves within a given amount of time. For example: If you select Level F3, you will be required to make 40 moves within 2 hours under the Primary Time Control. If the game is not finished within that time, the Secondary Time Control period will begin, and you will be required to make 20 moves within 1 hour. If this secondary period does not produce a result, it is repeated until a conclusion is reached. 16 Chessboard Square Primary Time Control Moves Time Secondary Time Control Moves Display Time F1 30 30 min. 30 30 min. L:F1/30/0:30 F2 30 1 hr. 30 min. remaining 1 hr. L:F2/30/1:30 F3 40 2 hr. 20 1 hr. L:F3/40/2:00 F4 40 2 hr. remaining 1 hr. L:F4/40/2:00 F5 40 2 hr. 30 min. 16 1 hr. L:F5/40/2:30 F6 45 1 hr. 30 min. 15 30 min. L:F6/45/1:30 F7 50 2 hr. 30 min. 20 1 hr. L:F7/50/2:30 F8 60 1 hr. 30 30 min. L:F8/60/1:00 In accordance with tournament regulations, any time remaining at completion of the moves of the Primary Time Control is carried forward and added to the time allowed for the Secondary Time Control. For example: If you selected Level F3 and completed the first 40 moves in just one hour, you would be allowed 2 hours for the next 20 moves. Surplus time, if any, is carried forward and accumulated in this way throughout the game. When you select one of these Tournament Levels, the display will cycle through three pieces of information, each of which shows for one second. For example, if square F4 is selected, the display will show • The selected square: L:F4 and then... • The number of moves in the Primary Time Control: 40 and then... • The duration of the Primary Time Control: 2:00 17 ENGLISH Tournament Level Chart 3.8 Fixed Depth Levels The Fixed Depth Levels in file G limit the skill of the computer—not by the time to search for its next move, but by the number of moves it searches ahead. At the lower levels, it behaves like a novice player. At the lowest level, G1, where the computer looks ahead only one individual move, it does not anticipate the game at all, and could even miss a mate that you might make in one more move. At the other end of the scale, on Level G8, the computer will review all the possibilities within the next 8 individual moves. On these levels, the display alternates between the level you have selected, and how many individual moves (ply) ahead the computer searches. • The selected square: L:G5 and then... • The number of individual moves the computer is looking ahead: 5PLy 3.9 Tactical Level The Tactical Levels are found on Squares H1 through H8. These levels limit how many individual moves ahead the computer looks, but in this case the computer does not evaluate strategic advantages, and looks only for material gain such as checkmate or draws. The number of individual moves the computer looks ahead is equivalent to the chessboard square, e.g., H1 equals one individual move ahead, and H8 equals 8 moves ahead. On the Tactical Levels, the display alternates between the level you have selected, and how many individual moves (ply) ahead the computer will search. • The selected square: L:H8 and then... • The number of individual moves the computer is looking ahead: 8PLy 3.10 Teach Modes Your chess computer contains 11 built-in Extended Teach Modes. This feature allows you to learn basic moves and master the tactics of the pieces, one at a time! For each individual Teach Mode, the only pieces on the board will be Kings and Pawns, or Kings and Pawns and one or two selected piece types. This allows beginners to concentrate on one or two pieces at a time, without losing focus and being distracted by other pieces on the board. More developed players can use this feature to practice playing with selected combinations of pieces. 18 • If NEW GAME is pressed during a game, the computer will exit Teach Mode and switch back to the standard 32-piece game, with the current level still in effect. • If you press LEVEL and then decide not to change the current playing level or Teach Mode, simply press LEVEL again—and the current status will remain as it is. • You may select a new level at any time during your turn. If you do so, however, note that the clock will be reset. • If you press more than 2 Piece Symbol Keys during a Teach Mode selection, only the last 2 symbol selections will be valid when you exit Level Mode. • If you accidentally press a Piece Symbol Key in Level Mode, you will lose your current game after exiting Level Mode. To continue with the current game, press the square corresponding to the current level of play before exiting Level Mode. Note, however, that the clock will have been reset. 3.11 Selecting Levels and Teach Modes Press LEVEL to enter Level Mode, and the current level is displayed. For example, Level A3 shows as L:A3, alternating with Fun3 (the level selected by pressing board square A3). To change the level, simply press a board square, and the display will show the new level, alternating with the level details. Press LEVEL again to exit Level Mode. Please note the following key sequences and effects: LEVEL, LEVEL: LEVEL, Square, LEVEL: LEVEL, Piece Symbol, LEVEL: No change; previous level remains selected. New level selected, clock resets. Starting position of selected Teach Mode is set at previously selected level. LEVEL, Square, Piece Symbol, LEVEL: Starting position of selected Teach Mode is set at new level. LEVEL, Piece Symbol, Square, LEVEL: New level is set, previous Teach Mode selection is canceled, existing game is retained. To select Teach Mode, press LEVEL. The display will show the skill level, as indicated by the equivalent chessboard square, alternating with the level details. To select a Teach Mode, press one or two of the Piece Symbol Keys (%, $, #, @ or !) you would like to use. The 19 ENGLISH Please note the following, in regard to Level and Teach Modes: display will then show the selected pieces. For example, if you want to play with Kings, Bishops, Knights, and Pawns, after pressing LEVEL, you should press # and @. The display will show your selection. Then, press LEVEL to exit Level Mode and enter your selection into the computer, and you can begin your game. Since the King is always required for the game, you do not need to select this piece for the Teach Mode. In fact, pressing & is how you select a normal, 32-piece game. Note that Non Auto is automatically canceled whenever a Teach Mode is selected in the existing Level Mode. The 11 Teach Modes and normal game are indicated by the following displays: TEACH MODE DISPLAY te:_p Kings and Pawns Kings, Knights and Pawns ........................................ te:_n Kings, Bishops and Pawns ....................................... te:_b Kings, Rooks and Pawns .......................................... te:_r Kings, Queens and Pawns ........................................ te:_q Kings, Knights, Bishops and Pawns ......................... te:nb Kings, Knights, Rooks and Pawns ............................ te:nr Kings, Knights, Queens and Pawns ......................... te:nq Kings, Bishops, Rooks and Pawns ........................... te:br Kings, Bishops, Queens and Pawns ......................... te:bq Kings, Rooks, Queens and Pawns ........................... te:rq All Pieces (standard board - normal game) ............. te:sb 3.12 Openings Coach Mode Your computer has 16 different opening sequences in memory, all of which can be played through so that you may learn them. Press OPENINGS COACH, and, when first selected, the computer will ‘beep’ and the display will flash o(: 20 Square Name A1 A2 A3 Italian Opening Two Knights Defense Spanish Opening A4 Sicilian Defense A5 A6 A7 A8 B1 B2 B3 B4 B5 B6 B7 B8 French Defense Caro-Kann Defense Scandinavian Defense Alekhine’s Defense Queen’s Gambit Queen’s Gambit Accepted Nimzo-Indian Defense Queen’s Indian Defense King’s Indian Defense Gruenfeld Defense Dutch Defense English Opening Moves e2e4, e7e5, g1f3, b8c6, f1c4, f8c5 e2e4, e7e5, g1f3, b8c6, f1c4, g8f6 e2e4, e7e5, g1f3, b8c6, f1b5, a7a6, b5a4, g8f6, e1g1, b7b5 e2e4, c7c5, g1f3, d7d6, d2d4, c5d4, f3d4, g8f6, b1c3 e2e4, e7e6, d2d4, d7d5 e2e4, c7c6, d2d4, d7d5, b1c3, d5e4 e2e4, d7d5, e4d5, d8d5, b1c3, d5a5 e2e4, g8f6, e4e5, f6d5 d2d4, d7d5, c2c4, e7e6, b1c3, g8f6, c1g5, f8e7 d2d4, d7d5, c2c4, d5c4 d2d4, g8f6, c2c4, e7e6, b1c3, f8b4 d2d4, g8f6, c2c4, e7e6, g1f3, b7b6 d2d4, g8f6, c2c4, g7g6, b1c3, f8g7, e2e4, d7d6 d2d4, g8f6, c2c4, g7g6, b1c3, d7d5 d2d4, f7f5, c2c4, g8f6, b1c3, e7e6 c2c4, e7e5, b1c3, g8f6, g1f3 You can then choose which opening game you want to review by pressing one of the squares from A1 to B8. Figure 3-1 lists the available openings. For example, to select the third Openings Coach, press square A3, and o(:3 will flash in the display to confirm that the third Openings Coach has been selected. The two bars indicate that the computer will display moves for both sides, so you can watch and learn. Press the same square again and the display will change to o_:3, indicating that the computer will play the white side and let you 21 ENGLISH Figure 3-1. Moves in Openings Coach work out the moves for black. Another press on the square changes the bar to show that the computer will play black while you play white. One more press will remove the bars altogether, indicating that the computer will leave all the moves to you while it monitors your moves for legality. Press OPENINGS COACH once again, and the display will indicate that you should move. While you are playing, you can press PLAY to have the computer remind you of the next move. Every time you make a correct move, the computer will confirm the move with a single ‘beep’. If you are wrong, however, it will sound a double ‘beep’ and prevent the from square from being displayed. Press the correct to square to end the move, or press the from square to cancel it. At the end of the opening sequence, you may continue to play the game if you wish. Note that the clock is not used during this mode, and Non Auto Mode, if selected, is only in effect after the opening moves are finished. Note that your current Openings Coach selection is retained in memory until another selection is made. When you want to get back to playing a normal game, simply press NEW GAME, and you will be returned to the standard board. 3.13 Verify Mode: Check Piece Positions! If the pieces get knocked over, or you think some might be in the wrong positions, you can ask the computer to run a check for you. Simply press the Piece Symbol Key for the piece you are questioning. The computer will then show you the symbol for that color and piece type, along with the square on which it should be placed. Pressing the key again shows the position of the next piece of that type, and so on, until all the pieces of that type on the board have Key Press Display Shows Meanings Press @ first time _n:B1 White Knight on B1 Press @ second time )n:B8 Black Knight on B8 Press @ third time )n:F6 Press @ fourth time _n:__ Black Knight on F6 (beep, beep) 22 No more Knights, white to move 3.14 Non Auto Mode Normally, the computer automatically answers with a countermove whenever you enter a move. If you press NON AUTO, however, the computer responds with a ‘beep’ and you can then enter all the moves for both sides, one by one, without allowing the computer to answer! This special feature can be used in a number of different ways: • Play through master chess games. Try pressing PLAY to see what the computer would do in any position! • Study opening book lines by entering them manually. • Play chess against a friend, with the computer acting as referee, checking the legality of all moves and keeping track of the time for both sides! If you need help with a move, press PLAY and the computer will make the next move. After the move, Non Auto Mode remains in effect, and you can continue your game. • Replay to any board position for further study. To exit Non Auto Mode and return to normal play, press NON AUTO once again. A double ‘beep’ will verify that the mode has been canceled. Note that Non Auto Mode is also automatically canceled whenever you press NEW GAME or select a Teach Mode upon exiting Level Mode. 23 ENGLISH been shown. The display shows the white pieces first, and then the black pieces. When there are no more pieces of that type on the board, the display reverts to showing the side to move, and the computer sounds two ‘beeps’ to get your attention. An example of the sequence of displays is shown in this section. This example indicates that one of the white Knights has been captured, and it is now white’s turn to move. To verify other pieces, repeat the same steps using the other Piece Symbol Keys. When you are finished, simply make your next move. Note that the clock stops temporarily during piece verification, and the computer automatically exits Verify Mode if no Piece Symbol Key is pressed within about 5 seconds. 4. TECHNICAL DETAILS 4.1 The ACL Function Computers can sometimes “lock up” due to static discharge or other electrical disturbances. If this should happen, use a pin or a similar sharp object to press into the hole marked ACL in the base of the unit for at least one second. This resets the computer. 4.2 Care and Maintenance Your chess computer is a precision electronic device, and should not be subjected to rough handling or exposed to extreme temperatures or moisture. Do not use chemicals to clean your unit as they may damage the plastic. Weak batteries should be replaced promptly, since they can leak and damage the computer. Please also note the following regarding the use of batteries. Warning: Use only alkaline or zinc carbon batteries. Do not mix different types of batteries or new and used batteries. Do not recharge non-rechargeable batteries. Use only the recommended batteries or equivalent. Be sure to observe the correct polarity when inserting batteries. Worn out batteries should be removed from the unit promptly. Do not short circuit the supply terminals. 4.3 Technical Specifications Keys: 14 LCD Display: Viewing area 18 x 9 mm Sound: Piezo-electric buzzer Batteries: 2 AAA/AM4/R03 (1.5V) Power Consumption: 10 mW Dimensions: 176 X 100 X 35 mm Saitek reserves the right to make technical changes without notice in the interest of progress. 24 1. Warranty period is 2 years from date of purchase with proof of purchase submitted. 2. Operating instructions must be followed. 3. Product must not have been damaged as a result of defacement, misuse, abuse, neglect, accident, destruction or alteration of the serial number, improper electrical voltages or currents, repair, alteration or maintenance by any person or party other than our own service facility or an authorized service center, use or installation of non-Saitek replacement parts in the product or the modification of this product in any way, or the incorporation of this product into any other products, or damage to the product caused by accident, fire, floods, lightning, or acts of God, or any use violative of instructions furnished by Saitek plc. 4. Obligations of Saitek shall be limited to repair or replacement with the same or similar unit, at our option. To obtain repairs under this warranty, present the product and proof of purchase (e.g., bill or invoice) to the authorized Saitek Technical Support Center (listed on the separate sheet packaged with this product) transportation charges prepaid. Any requirements that conflict with any state or Federal laws, rules and/or obligations shall not be enforceable in that particular territory and Saitek will adhere to those laws, rules, and/or obligations. 5. When returning the product for repair, please pack it very carefully, preferably using the original packaging materials. Please also include an explanatory note. 6. IMPORTANT: To save yourself unnecessary cost and inconvenience, please check carefully that you have read and followed the instructions in this manual. 7. This warranty is in Lieu of all other expressed warranties, obligations or liabilities. ANY IMPLIED WARRANTIES, OBLIGATIONS, OR LIABILITIES, INCLUDING BUT NOT LIMITED TO THE IMPLIED WARRANTIES OF MERCHANTABILITY AND FITNESS FOR A PARTICULAR PURPOSE, SHALL BE LIMITED IN DURATION TO THE DURATION OF THIS WRITTEN LIMITED WARRANTY. Some states do not allow limitations on how long an implied warranty lasts, so the above limitations may not apply to you. IN NO EVENT SHALL WE BE LIABLE FOR ANY SPECIAL OR CONSEQUENTIAL DAMAGES FOR BREACH OF THIS OR ANY OTHER WARRANTY, EXPRESS OR IMPLIED, WHATSOEVER Some states do not allow the exclusion or limitation of special, incidental or consequential damages, so the above limitation may not apply to you. This warranty gives you specific legal rights, and you may also have other rights which vary from state to state. Information for Customers in the United States: FCC Compliance and Advisory Statement Warning: Changes or modifications to this unit not expressly approved by the party responsible for compliance could void the user’s authority to operate the equipment. This device complies with Part 15 of the FCC Rules. Operation is subject to the following two conditions: 1. This device may not cause harmful interference, and 2. This device must accept any interference received, including interference that may cause undesired operation NOTE: This equipment has been tested and found to comply with the limits for a Class B digital device, pursuant to Part 15 of the FCC Rules. These limits are designed to provide reasonable protection against harmful interference in a residential installation. This equipment generates, uses and can radiate radio frequency energy and, if not installed and used in accordance with the instructions, may cause harmful interference to radio communications. However, there is no guarantee that interference will not occur in a particular installation. If this equipment does cause harmful interference to radio or television reception, which can be determined by turning the equipment off and on, the user is encouraged to try to correct the interference by one or more of the following measures: • Reorient or relocate the receiving antenna. • Increase the separation between the equipment and receiver. • Connect the equipment into an outlet on a circuit different from that to which the receiver is connected. • Consult the dealer or an experienced radio/TV technician for help. Saitek Industries, 2295 Jefferson Street, Torrance, CA 90501, USA 25 ENGLISH CONDITIONS OF WARRANTY TROUBLESHOOTING GUIDE SYMPTOMS POSSIBLE CAUSES WHAT YOU SHOULD DO • Reinstall the batteries, as shown in The computer doesn’t react or “freezes” during a game. • The batteries are not inserted properly. • The batteries are weak or bad. • Static discharge has caused a lockup. The display is dim. • The batteries are weak. • Non Auto Mode is activated. • Replace the batteries. • Press NON AUTO to de-select. The computer will not play a move. • The computer still thinking. • You may force the computer to make a move by pressing PLAY. The computer will not accept your move. • Is it your turn? Is your King in check? Will your move leave your King in check? Did you move the Rook first when castling? Are you moving to an illegal square? • The computer is thinking. • A low tone indicates you are making an error. Check the chess rules. Use TAKE BACK to reconstruct the last move. • You have entered the computer’s last move incorrectly (pressed the wrong squares). Section 1.1. • Replace the batteries. • Use the ACL reset feature, as described in Section 1.1. • To interrupt the computer, press PLAY. • Check the displayed move. Press the correct square to complete the move. The computer seems to be making illegal moves. • The computer has made a special move, such as en passant, castle, or pawn promotion. • Your board position is incorrect. • Check the chess rules. The computer is silent. • The SOUND Key has been pressed to turn the sound off. • Press SOUND to turn the sound back on. 26 • Verify the board, as described in Section 3.13. KURZANLEITUNG FÜR DEN SCHNELLEN EINSTIEG 1 2 3 Das Batteriefach befindet sich auf der Rückseite des Computers und wird durch Schieben des Deckels geöffnet. Legen Sie 2 “AAA” Batterien (Type AM4/ R03) in den Computer ein, wobei Sie die richtige Polarität beachten müssen. Setzen Sie den Deckel des Batteriefachs wieder ein. (Details in Abschnitt 1.1) Drücken Sie GO/ STOP um das Spiel anzuschalten. Falls der Computer nicht reagiert, drücken Sie eine Büroklammer oder einen ähnlich spitzen Gegenstand in das mit ACL markierte Loch auf der Rückseite des Gerätes wie in Abschnitt 4.1 beschrieben. Stellen Sie die Figuren in der jeweiligen Anfangsstellung auf, die weißen Figuren zu Ihnen gerichtet. 2 x AAA/AM4/R03 4 Drücken Sie die NEW GAME Taste um den Computer auf eine neue Schachpartie einzustellen. 5 Schachzüge werden auf dem Brett ausgeführt, wobei die Figur jeweils sanft in das Loch des “von” und “nach” Feldes gedrückt wird. 6 Sobald der Computer einen Zug ausführt, wird dieser im Anzeigefenster gezeigt. Drücken Sie die Figur des Computers leicht auf das angezeigte Ausgangsfeld und dann auf das Zielfeld, um den Zug abzuschließen. Das ist alles! Führen Sie Ihren nächsten Zug wie oben beschrieben aus. Drücken Sie jederzeit GO/STOP, um den Computer auszuschalten. Viel Spaß bei Ihren Partien! ዛዒዓዔዕዖዘዙዜ ዑ尷尽尻就尯尹尿尵ዑ ዐ屁屃屁屃屁屃屁屃ዐ ዏ巀居巀居巀居巀居ዏ ዎ居巀居巀居巀居巀ዎ ው巀居巀居巀居巀居ው ዌ居巀居巀居巀居巀ዌ ዋ屄层屄层屄层屄层ዋ ዊ尶局尺尴尮尼尾尸ዊ ዝዒዓዔዕዖዘዙዞ Merke: Wenn keine Taste gedrückt wird, schaltet der Computer nach 20 Minuten ab um Strohm zu sparen. (Siehe Abschnitt 2.8) 27 DEUTSCH Um sofort eine Schachpartie zu spielen, ohne zuerst die gesamte Gebrauchsanweisung durchzulesen, folgen Sie einfach den Schritten dieser Kurzanleitung für den schnellen Einstieg. e7-e5: ዛዒዓዔዕዖዘዙዜ ዑ尷尽尻就尯尹尿尵ዑ ዐ屁屃屁屃屁屃屁屃ዐ ዏ巀居巀居巀居巀居ዏ ዎ居巀居巀居巀居巀ዎ ው巀居巀居屄居巀居ው ዌ居巀居巀居巀居巀ዌ ዋ屄层屄层巀层屄层ዋ ዊ尶局尺尴尮尼尾尸ዊ ዝዒዓዔዕዖዘዙዞ ዛዒዓዔዕዖዘዙዜ ዑ尷尽尻就尯尹尿尵ዑ ዐ屁屃屁屃居屃屁屃ዐ ዏ巀居巀居巀居巀居ዏ ዎ居巀居巀屁巀居巀ዎ ው巀居巀居屄居巀居ው ዌ居巀居巀居巀居巀ዌ ዋ屄层屄层巀层屄层ዋ ዊ尶局尺尴尮尼尾尸ዊ ዝዒዓዔዕዖዘዙዞ 2.7 Der Computer spielt gegen sich selbst 2.8 Partienspeicher und Abschaltautomatik 2.9 Eröffnungsbibliothek INHALTSVERZEICHNIS KURZANLEITUNG FÜR DEN SCHNELLEN EINSTIEG TASTEN UND AUSSTATTUNGSMERKMALE 3. STUFEN UND SPEZIALFUNKTIONEN 3.1 Die Spielstufen 3.2 Leichtstufen 3.3 Normalspielstufen 3.4 Blitzspielstufen 3.5 Bronstein-Spielstufen 3.6 Bonuszeit Spielstufen 3.7 Turnierstufen 3.8 Festgelegte Tiefenstufen 3.9 Taktische Spielstufen 3.10 Lehrfunktionen 3.11 Auswahl der Stufen und Lehrfunktionen 3.12 Eröffnungstrainingsfunktion 3.13 Überprüfungsfunktion: Prüfen der Figurenstellung! 3.14 Manueller Modus VORSTELLUNG 1. GEBRAUCH IHRES SCHACHCOMPUTERS 1.1 Einlegen der Batterien 1.2 Züge ausführen 1.3 Der Computer ist am Zug 1.4 Sie haben Ihre Meinung geändert? Nehmen Sie den Zug zurück! 1.5 Schach, Matt oder Remis 1.6 Eine neue Partie beginnen 1.7 Änderung einer Stufe 1.8 Eröffnungstraining 2. ZUSÄTZLICHE COMPUTERAUSSTATTUNGSMERKMALE 2.1 Schachuhren 2.2 Schlagen und Spezialzüge 2.3 Unzulässige Züge 2.4 Unterbrechung der Suche des Computers 2.5 Tauschen der Seiten mit dem Computer 2.6 Hinweise vom Computer bekommen 4. TECHNISCHE DATEN 4.1 Die ACL Funktion 4.2 Pflege und Handhabung 4.3 Technische Spezifikationen FEHLERSUCHE 28 1. LCD Anzeigefenster: Die Flüssigkristallanzeige (LCD) zeigt Züge, Spielinformation und Schachuhren für beide Spieler. Die meisten der verwendeter Symbole sind offensichtlich, aber eine komplette Liste ist in Abbildung 1 dargestellt. 2. Figurensymboltasten &(Könige), %(Damen), $(Türme), #(Läufer), @(Springer), !(Bauer): Die Figurensymboltasten werden zur Überprüfung der Stellungen und zur Auswahl der verschiedenen Lehrfunktionen verwendet und einige Figuren werden zur Bauernunterverwandlung gebraucht. 3. Spieltasten a. NEW GAME Taste: Drücken Sie diese, um den Computer auf eine neue Schachpartie einzustellen. b. ERÖFFNUNGSTRAININGSTaste: Drücken Sie diese, um die Eröffnungstrainingsfunktion zu aktivieren und üben Sie mit anerkannten Eröffnungsgambiten und Gegenzügen. c. SOUND Taste: Drücken dieser Taste bewirkt, daß die Tonausstattung durch seine drei Funktionsstufen zirkuliert. Sie können durch die Anzahl der zu hörenden hohen Pieptöne feststellen, welche Einstellung Sie gewählt haben: TONSTUFE Ton und Training nur Ton Stille 4. HÖRBARES SIGNAL WENN DIESE GEWÄHLT WURDE 5. 3 hohe Töne 2 hohe Töne 1 hoher Ton 6. Wenn Training gewählt wurde, wertet der Computer Ihren Zug sofort nach Ausführung aus und gibt 2 tiefe Töne ab, wenn er den Zug als schlecht empfindet. Wenn Ton gewählt wurde, „piept“ der Summer um anzuzeigen, daß der Computer auf Ihre 7. 29 Aktionen reagiert. Die Bedeutung der verschienenen “Pieptöne” sind in Abbildung 1 gezeigt. d. TAKE BACK Taste: Drücken Sie diese, um den zuletzt ausgeführten Zug zurückzunehmen. Sie können bis zu 14 einzelne Züge zurücknehmen. (Ein einzelner Zug ist ein Zug für eine Seite). e. NON AUTO Taste: Drücken Sie diese, um den Manuellen Modus zu aktivieren, welche die manuelle Eingabe von Zügen erlaubt – der Computer überwacht das Spiel, macht jedoch keinen Zug. f. LEVEL Taste: Drücken Sie diese, um die Spielstufenfunktion zu aktivieren und die Spielstufe auf die von Ihnen gewünschte Kompliziertheit und Partietype einzustellen. Wird auch zur Auswahl der Lehrfunktionen verwendet. g. PLAY Taste: Drücken Sie diese, um die Seiten mit dem Computer zu wechseln. Sie können diese auch drücken, während der Computer denkt, um ihn zum Zug zu zwingen, oder während Ihres eigenen Zuges, um einen Vorschlag vom Computer zu bekommen. h. GO/STOP Taste: Drücken Sie diese, um den Computer einzuschalten. Drücken Sie sie nochmals, um den Computer auszuschalten. Die aktuelle Partie wird bis zu 300 Stunden im Speicher festgehalten. Sensor-Schachbrett: Jedes Feld hat einen hochsensiblen Sensor, welcher die Bewegung von Figuren registriert. Felder werden durch Linien (Buchstaben) und Reihen (Zahlen) identifiziert. ACL (Speicherlöschung): Auf der Rückseite des Gerätes ist eine Unterbrechungs-/ Löschtaste. Sie wird zur Beseitigung von statischer Aufladung nach Einlage von neuen Batterien verwendet. Batteriefach: Die Batterien werden auf der Unterseite des Gerätes eingelegt. Der Computer verwendet 2 “AAA” (Type AM4/R03) Alkalin Batterien. Figurenfach: Handliches Aufbewahrungsfach für Ihre Schachfiguren. DEUTSCH TASTEN UND AUSSTATTUNGSMERKMALE Abbildung 1. Anzeigesymbole und Töne TÖNE SYMBOLE 1 hoher Ton ........ Bestätigungsfunktion jeder Taste oder Sensorfeld 1 .......... 1 A ........... A k ......... König 2 .......... 2 B ........... B q ......... Dame 3 .......... 3 c ........... C r ......... Turm 4 .......... 4 D ........... D b ......... Läufer 5 .......... 5 E ........... E n ......... Springer 6 .......... 6 F ........... F p ......... Bauer 7 .......... 7 G ........... G sb ....... Standardbrett 8 .......... 8 H ........... H 9 .......... 9 0 .......... 0 PM ............ Zeigt den Spieler an, der am Zug ist S ............... Zeigt an, daß Schwarz am Zug ist : ............... Fester Doppelpunkt zeigt an, daß die Ziffern Minuten und Sekunden sind 1 tiefer Ton ......... Fehler falscher Zug oder falsche Taste gedrückt 2 tiefe Töne ........ Warnung vom Trainer 3 hohe Töne ....... Neues Spiel oder Ton und Trainer eingestellt 3 tiefe Töne ........ In Spielen gegen die Uhrzeit, die Zeit ist abgelaufen : ............... Blinkender Doppelpunkt zeigt an, daß die Ziffern Stunden und Minuten sind ch:)) ........ Schwarz im Schach ch:__ ........ Weiß im Schach EnD) ........ Schachmatt – Schwarz gewinnt EnD( ........ Remis te: ............ Lehrfunktion o(:3 .......... Eröffnungstraining (Spanische Eröffnung) – Computer spielt für beide Seiten o_:3 .......... Eröffnungstraining (Spanische Eröffnung) – Computer spielt Weiß o):3 .......... Eröffnungstraining (Spanische Eröffnung) – Computer spielt Schwarz 30 2 x AAA/AM4/R03 Dieses elektronische Schachbrett ist ein starker Computer, der mit Ihnen auf jeder beliebigen Stufe Schach spielt. Oder, falls Sie bevorzugen eine Partie mit einem Freund zu spielen, agiert der Computer als Schiedsrichter. Die riesige Anzahl von Spielstufen (64) kombiniert mit der erweiterten Lehrfunktion (11) wird jeden, der an Schach interessiert ist, zufriedenstellen, ob Jung oder Alt. Es gibt insgesamt 768 Kombinationen: Die Lehrfunktionen und Eröffnungstrainings sind ausgezeichnete Lernausstattungsmerkmale auf jeder Spielstufe und die vielseitigen Funktionen für zeitlich gestoppte Wettkämpfe werden dem mittelstarken Spieler gefallen. 1. GEBRAUCH IHRES SCHACHCOMPUTERS Abbildung 1-1 ዛዒዓዔዕዖዘዙዜ ዑ尷尽尻就尯尹尿尵ዑ ዐ屁屃屁屃屁屃屁屃ዐ ዏ巀居巀居巀居巀居ዏ ዎ居巀居巀居巀居巀ዎ ው巀居巀居巀居巀居ው ዌ居巀居巀居巀居巀ዌ ዋ屄层屄层屄层屄层ዋ ዊ尶局尺尴尮尼尾尸ዊ ዝዒዓዔዕዖዘዙዞ Abbildung 1-2 1. Einlegen der Batterien Ihr Schachcomputer läuft auf 2 “AAA” (AM4/R03) Batterien. Für die längere Lebensdauer der Batterie, verwenden Sie Alkalin Batterien. Schieben Sie die Abdeckung auf der Rückseite des Gehäuses zur Seite, und setzen Sie die Batterien ein, wie in Abb. 1-1 veranschaulicht. Setzen Sie den Deckel wieder ein und drücken Sie GO/STOP, um den Computer einzuschalten. Wenn der Computer nicht reagiert, drücken Sie mit einer Büroklammer oder einem anderen, spitzen Gegenstand für mindestens eine Sekunde in das mit ACL gekennzeichnete Loch auf der Rückseite des Gerätes, um den Computer wieder neu einzustellen. Nachdem die Batterien eingelegt wurden oder ACL gedrückt wurde, durchläuft der Computer einen Selbsttest, 3 Pieptöne zeigen an, daß der Test OK ist, ein Summen oder Stille zeigt ein Problem an und Sie sollten dieses mit Ihrem lokalen Händler prüfen. 31 Abbildung 1-3 Abbildung 1-4 DEUTSCH EINFÜHRUNG Beachten Sie, daß das Einlegen von neuen Batterien oder Drücken von ACL den Computer neu einstellt und seinen Speicher löscht, wodurch er jedes Spiel verliert, das zuvor gespeichert wurde. 2. Züge ausführen Folgen Sie diesen Schritten, um eine Partie zu beginnen. a. Wenn nötig, drücken Sie GO/STOP, um den Computer einzuschalten. b. Stellen Sie die Schachfiguren in ihrer Grundstellung auf, mit den weißen Figuren zu Ihnen gerichtet, wie in Abbildung 1-2 gezeigt, und drücken Sie NEW GAME. Die Anzeige des Computers bedeutet daß Sie eine weiße Figur ziehen sollten. 00:00 PM Beachten Sie, daß das Drücken von NEW GAME die Lehrfunktion oder den Eröffnungstrainer storniert, wenn diese gewählt wurden, oder den Manuellen Modus ausschaltet. c. Um einen Zug auszuführen, drücken Sie die Figur, die Sie ziehen wollen, leicht an, bis Sie einen Piepton hören (Sehen Sie Abb. 1-3). Das Sensorenbrett des Computers registriert Ihren Zug und die Anzeige zeigt auf der linken Seite das Ausgangsfeld welches gedrückt wurde. ዛዒዓዔዕዖዘዙዜ ዑ尷尽尻就尯尹尿尵ዑ ዐ屁屃屁屃屁屃屁屃ዐ ዏ巀居巀居巀居巀居ዏ ዎ居巀居巀居巀居巀ዎ ው巀居巀居屄居巀居ው ዌ居巀居巀居巀居巀ዌ ዋ屄层屄层巀层屄层ዋ ዊ尶局尺尴尮尼尾尸ዊ ዝዒዓዔዕዖዘዙዞ Abbildung 1-5a ዛዒዓዔዕዖዘዙዜ ዑ尷尽尻就尯尹尿尵ዑ ዐ屁屃屁屃居屃屁屃ዐ ዏ巀居巀居巀居巀居ዏ ዎ居巀居巀屁巀居巀ዎ ው巀居巀居屄居巀居ው ዌ居巀居巀居巀居巀ዌ ዋ屄层屄层巀层屄层ዋ ዊ尶局尺尴尮尼尾尸ዊ ዝዒዓዔዕዖዘዙዞ Abbildung 1-5b Abbildung 1-6a E2:__ d. Nehmen Sie die Figur und drücken Sie sie leicht auf das Feld, auf welche Sie sie ziehen möchten. Ein zweiter Piepton ertönt und der Computer zeigt kurz das Zielfeld auf der Anzeige. E2:E4 32 Abbildung 1-6b 3. Der Computer ist am Zug Wenn der Computer bereit ist, piept er und zeigt die Ausgangs- und Zielfeldkoordinaten seines Zuges auf der Anzeige, wie in Abbildung 1.4. gezeigt. Als Beispiel, sehen Sie Abbildung 1-5a und b. Drücken Sie die angezeigte Figur auf das Ausgangsfeld an (E7 in diesem Fall), bis Sie einen Piepton hören und die Ausgangsseite der Anzeige sich ändert, und die Farbe und das Symbol der Figur zeigt (Abbildung 1 zeigt die Symbole). Dann drücken Sie die gleiche Figur auf dem zweiten in der Anzeige gezeigten Feld an – das Feld, auf das der Computer ziehen will. (E5 hier). Sobald Sie E5 gedrückt haben, erlischt die Anzeige und Sie haben den Zug des Computers abgeschlossen! Dann zeigt die Anzeige wieder, daß Sie am Zug sind. 4. Sie haben Ihre Meinung geändert? Nehmen Sie den Zug zurück! Wenn Sie Ihre Meinung über einen Zug ändern, können Sie diesen zurücknehmen. Drücken Sie TAKE BACK während Sie noch am Zug sind. Die Anzeige zeigt das Zielfeld. Drücken Sie die Figur auf diesem Feld an. Sie sehen nun das Figurensymbol und das Feld, von welchem die Figur kam. Drücken Sie die Figur auf das Ausgangsfeld an, um die Rücknahme abzuschließen. 33 ዛዒዓዔዕዖዘዙዜ ዑ巀居巀尮巀居巀尭ዑ ዐ居巀居巀居巀居巀ዐ ዏ巀居巀居巀居巀居ዏ ዎ居巀居巀屁屄居巀ዎ ው巀居巀居巀居巀居ው ዌ居巀居巀居巀居巀ዌ ዋ巀居巀居巀居巀居ዋ ዊ居巀居巀居巀居巀ዊ ዝዒዓዔዕዖዘዙዞ Abbildung 2-1a ዛዒዓዔዕዖዘዙዜ ዑ巀居巀尮巀居巀尭ዑ ዐ居巀居巀居巀居巀ዐ ዏ巀居巀居屄居巀居ዏ ዎ居巀居巀居巀居巀ዎ ው巀居巀居巀居巀居ው ዌ居巀居巀居巀居巀ዌ ዋ巀居巀居巀居巀居ዋ ዊ居巀居巀居巀居巀ዊ ዝዒዓዔዕዖዘዙዞ Abbildung 2-1b Abbildung 2-1c ዋ巀居巀居巀居巀居ዋ ዊ居巀居巀尮巀居尸ዊ ዝዒዓዔዕዖዘዙዞ Abbildung 2-2 DEUTSCH Sobald Ihr Zug abgeschlossen ist, wenn Sie Ton und Trainer gewählt haben, zeigt die Anzeige Coch während er Ihren Zug auswertet. Zwei tiefe Pieptöne ertönen, wenn der Zug als schlecht empfunden wird. e. Dann ist der Computer am Zug, und er beginnt über seinen Zug nachzudenken. Allerdings kommt die Antwort des Computers in den Anfangsphasen einer Partie fast umgehend, da er Züge ausführt, die bereits in seiner Eröffnungsbibliothek gespeichert sind (Siehe Abschnitt 2.9). Wenn der zurückgenommene Zug ein Schlagzug war, erinnert Sie der Computer daran, die geschlagene Figur zurück auf das Brett zu stellen, indem er den Figurentyp und sein Feld für Sie anzeigt. Drücken Sie diese Figur auf das angezeigten Feld an. Um einen weiteren Zug zurückzunehmen, drücken Sie nochmals TAKE BACK. Sie können bis zu 14 individuelle Züge (oder 7 Züge für jede Seite) zurücknehmen, was Ihnen erlaubt zu experimentieren und verschiedene “Was wenn?” Annäherungen auszuprobieren. Um die Partie fortzusetzen, machen Sie entweder Ihren nächsten Zug, oder Sie drücken PLAY, damit der Computer ihn für Sie macht. Abbildung 1-6a und b zeigen ein Beispiel einer Rücknahme des Springers von G8 auf F6. Nach Drücken von TAKE BACK zeigt die Anzeige F6, das Feld, auf welches der Springer gezogen ist (Abbildung 1-6a), drücken Sie auf F6 und die Anzeige ändert sich, um die Figurenfarbe und das Symbol (Schwarzer Springer) und das Feld, von welchem die Figur kam, anzuzeigen (Abbildung 1-6b). Drücken Sie den Springer auf G8 an. Beachten Sie, daß En Passant Schlagzüge, nicht zurückgenommen werden können, wenn der vorangeganene Zug nicht erlaubt war. 5. Schach, Matt oder Remis Wenn ein König im Schach steht, zeigt die Anzeige das Schachsymbol (abwechselnd mit der Uhranzeige, falls die Uhr läuft). Wenn die Partie in Schachmatt endet, Remis durch Patt, Remis durch umgehende, 3-fache Wiederholung, oder Remis durch 50 Züge Regel, wird das Endesymbol angezeigt. Diese Symbole sind in Abbildung 1 gezeigt. 6. Eine neue Partie beginnen Drücken Sie NEW GAME, um jederzeit eine neue Partie zu beginnen, wobei die aktuelle Spielstufe und die vorher eingestellten Tonfunktionen übernommen werden. Da das Drücken von NEW GAME ihr aktuelles Spiel aus dem Speicher des Computers löscht, seien Sie vorsichtig, daß Sie diese Taste nicht aus Versehen drücken. 7. Änderung einer Stufe Ihr Schachcomputer bietet Ihnen 64 Spielstufen, wobei jede davon auf das entsprechende Feld der 64 Brettfelder reagiert. Zusammen mit den elf eingebauten erweiterten Lehrfunktionen haben Sie eine Wahl von 768 Stufeneinstellungen. Drücken Sie LEVEL, um die Stufenfunktionen zu aktivieren, und die aktuelle Stufe wird angezeigt. (z.B. die 34 8. Eröffnungstrainer Ihr Computer hat 16 Eröffnungsabläufe für Sie parat, wie z.B. die “Italienische Eröffnung” oder das “Dame Gambit”. Drücken Sie OPENINGS COACH und drücken Sie dann eines der Felder von A1 bis B8, um eine der Eröffnungen zu wählen. Drücken Sie das Feld nochmals, um auszuzuwählen, wieviel Hilfe Sie vom Computer wünschen, dann drücken Sie OPENINGS COACH nochmals, um die Übung zu beginnen oder Ihre Kenntnisse zu testen. Nähere Details in Paragraph 3.12. 2. ZUSÄTZLICHE COMPUTERAUSSTATTUNG 2.1 Schachuhren Eingebaute Schachuhren mit einer vierstelligen Anzeige halten die Zeit für Sie und ebenfalls für die Seite des Computers. Die gesamt abgelaufene Zeit oder abwechselnd die noch verbleibende Zeit für jeden Spieler wird angezeigt, wenn dieser am Zug ist. Nachdem Sie den Zug des Computers eingegeben haben, zeigt die Anzeige Ihre Schachuhr, bis eine Taste oder ein Feld gedrückt wird. Ihre Zeit wird solange berechnet, bis das Zielfeld gedrückt wird. Nachdem Sie Ihren Zug gemacht haben, wechselt die Anzeige auf die Uhr des Computers um, und berechnet die zeit solange er denkt, bis er anzeigt, daß er zum Zug bereit ist. Wie auch immer, der Computer kann auch Coch anzeigen, nachdem Sie gezogen haben, während er analysiert, ob Sie einen guten oder schlechten Zug gemacht haben. Wenn er denkt, daß Ihr Zug nicht gut ist, ertönen zwei tiefe Töne. Für die erste Stunde der Partie, oder wenn die verbleibende Zeit weniger als eine Stunde beträgt, zeigt die Anzeige MINUTEN:SEKUNDEN, mit einem festen Doppelpunkt. Wenn die gesamt abgelaufene Zeit eine Stunde übertritt, oder die verbleibende Zeit ist mehr als eine Stunde ist, zeigt die Anzeige STUNDEN:MINUTEN und der Doppelpunkt blinkt, während die Uhr gezeigt wird. Bitte beachten Sie: • Die Uhr stoppt, wenn Sie die Stufe überprüfen, wenn Sie das Brett überprüfen oder 35 DEUTSCH Stufe gleichgestellt mit dem Brettfeld A3 zeigt L:A3 abwechselnd mit Fun3). Um die Stufe zu ändern, drücken Sie einfach ein Brettfeld, und diese Stufe wird in der Anzeige gezeigt. Drücken Sie LEVEL nochmals, um aus der Stufenfunktion auszusteigen. Für nähere Informationen über Spielstufen sehen Sie Abschnitt 3. wenn Sie den Computer ausschalten. In all diesen Fällen werden die Zeiten jedoch im Speicher festgehalten, und die Uhranzeige kehrt zurück, wenn die Partie fortgefahren wird. • Die Uhr stellt sich zurück, wenn Sie die Stufe ändern oder ein Feld drücken, während Sie Sich in der Stufenfunktion befinden. • Wenn Ihr König im Schach steht, wechselt die Anzeige zwischen Zeit und Schach. Wenn Sie eine stufe gewählt haben auf der Sie gegen die zeit spielen, läuft die Uhr rückwärts um die verbleibende zeit anzuzeigen. Wenn die erste Uhr Null erreicht, ertönen drei tiefe Pieptöne um zu signalisieren, daß die Zeit abgelaufen ist. Dann beginnt die Uhr die Zeit von Null hinaufzuzählen. In den Stufen, wo die Zeit kein Teil des Wettkampfes ist, zählt die Uhr aufwärts, um die gesamt abgelaufene Zeit anzuzeigen. • Wenn Sie Züge zurücknehmen, während Sie gegen die Uhr spielen, stellt sich die Uhr nicht für jede Rücknahme zurück. Sie stoppt einfach, bis Sie wieder einen Zug machen. 2.2 Schlagen und Spezialzüge a. SCHLÄGE: Um zu schlagen, drücken Sie die Figur, die Sie ziehen wollen, leicht an, nehmen Sie die geschlagene Figur vom Brett und drücken Sie Ihre Figur auf das Feld der geschlagenen Figur. b. EN PASSANT: Bei einem En Passant Schlag erinnert Sie der Computer daran, den geschlagenen Bauern vom Brett zu nehmen, indem er die Stellung des Bauern anzeigt. Drücken Sie den geschlagenen Bauern an, bevor Sie Ihn vom Brett nehmen. Sehen Sie Abbildung 2-1a, b und c. c. BAUERNUMWANDLUNG UND UNTERVERWANDLUNG: Wenn Sie einen Bauern umwandeln, drücken Sie Ihn erst wie üblich auf seinem Ausgangsfeld an. Der Computer zeigt Ihr Ausgangsfeld und das Damesymbol (abwechselnd mit der Uhranzeige). Sobald Sie den Bauern auf das Zielfeld drücken, wird er automatisch zur Dame. Vergessen Sie nicht, Ihre Figur auf dem Brett umzutauschen! Wenn Sie Ihren Bauern zu einem Turm, Läufer oder Springer unterverwandeln wollen, drücken Sie die betreffende Figurensymboltaste zwischen dem Drücken des Ausgangs- und Zielfelders. Wenn der Computer den Bauern umwandelt, zeigt er die Ausgangs- und Zielfelder, wie gewöhnlich. Nachdem Sie das “Ausgangsfeld” Feld gedrückt haben, zeigt die Anzeige den Figurentyp an, in welches der Bauer umgewandelt wird, indem sie das Figurensymbol und das Zielfeld zeigt. Drücken Sie mit der angezeigten, neuen Figur 36 2.3 Unzulässige Züge Ihr Computer akzeptiert niemals einen unzulässigen Zug! Wenn Sie einen unzulässigen Zug versuchen, gibt der Computer einen tiefen Fehlerpiepton und die Anzeige zeigt weiterhin das Ausgangsfeld. Drücken Sie auf dieses Feld, um den unzulässigen Zug zu löschen. Ziehen Sie dann nochmals! Auch wenn Sie die Figur des Computers falsch ziehen sollten, hören Sie den Fehlerpiepton. Dies kann vorkommen, wenn Sie die falsche Figur haben, oder die Figur auf ein falsches Feld ziehen. Prüfen Sie die Anzeige und ziehen Sie nochmals. Wenn Sie eine Figur andrücken, und die Anzeige zeigt das Ausgangsfeld ober Sie entscheiden dann, den Zug nicht auszuführen, drücken Sie das gleiche Feld nochmals um es zu löschen. Seien Sie vorsichtig, keine Fehler zu machen, wenn der Ton ausgeschalten ist, da Sie dann keine Fehlerpieptöne hören. 2.4 Unterbrechung der Suche des Computers Um den Computer zu unterbrechen während er denkt, drücken Sie PLAY, und der Computer führt den besten Zug aus, den er bis zu diesem Moment gefunden hat. Bei Partien auf hohen Spielstufen kann dies nützlich sein, da die umfassende Suche nach dem besten Zug sehr zeitraubend sein kann. 2.5 Tauschen der Seiten mit dem Computer Wenn Sie die Seiten mit dem Computer tauschen möchten, drücken Sie PLAY, wenn Sie am Zug sind. Der Computer macht den nächsten Zug für Ihre Seite. Tauschen Sie die Seiten sooft Sie wollen! 37 DEUTSCH auf das Zielfeld, um den Umwandlungszug des Computers abzuschließen. d. ROCHADE: Der Computer erkennt automatisch eine Rochade, nachdem der König gezogen wurde. Nachdem Sie den König auf seine Ausgangs- und Zielfelder gedrückt haben, zeigt der Computer das “Zielfeld” Feld des Turmes. Drücken Sie auf das Feld. Dann zeigt der Computer das Turmsymbol zusammen mit dem Feld, auf welches der Turm ziehen soll. Drücken Sie auf das Zielfeld des Turmes, um den Zug des Computers abzuschließen (Sehen Sie Abbildung 2-2). 2.6 Hinweise vom Computer bekommen Wenn Sie Hilfe brauchen, kann Ihnen der Computer zeigen, was er in Ihrer Stellung tun würde! Drücken Sie PLAY wenn Sie am Zug sind, und der Computer macht den nächsten Zug für Sie. Um den Zug als Ihren eigenen zu behalten, führen Sie den Zug auf dem Brett aus, drücken Sie nochmals PLAY und der Computer führt seinen nächsten Zug aus. Fahren Sie die Partie fort, indem Sie Ihren eigenen, nächsten Zug machen. Wenn Sie den Zug des Computers nicht ausführen wollen, führen Sie erst den angezeigten Zug auf dem Brett aus und nehmen Sie Ihn dann zurück. Nachdem Sie den Zug auf diese Weise gelöscht haben, können Sie Ihren eigenen Zug ausführen. 2.7 Der Computer spielt gegen sich selbst Um den Computer zu beobachten, wie er eine Partie gegen sich selbst spielt, drücken Sie nach jedem Zug PLAY. Studieren Sie seine Spielstrategien, um mehr über Schach zu lernen! 2.8 Partienspeicher und Abschaltautomatik Sie können eine Partie unterbrechen, indem Sie GO/STOP drücken, um den Computer abzuschalten. Der Computer “merkt” sich Ihre Stellung bis zu 300 Stunden (mit frischen Alkalin Batterien). Wenn Sie ihn wieder einschalten, fahren Sie die Partie da fort, wo sie aufgehört haben! Wenn Sie innerhalb von etwa 20 Minuten keine Taste drücken, oder keinen Zug ausführen, schaltet sich der Computer, wenn er nicht denkt, automatisch aus um Strom zu sparen und speichert die Partie. Drücken Sie GO/STOP um die unbeendete Partie wieder aufzunehmen. 2.9 Eröffnungsbibliothek Am Anfang eines Spieles ist die Antwort des Computers meist umgehend, da der Computer Züge ausführt, welche in seiner Eröffnungsbibliothek gespeichert sind. Wenn die momentane Brettstellung in seiner Eröffnungsbibliothek gespeichert ist, spielt der Computer eine Antwort auf diese Stellung aus seiner Sammlung von Zügen, anstatt über einen Zug nachzudenken. 38 39 TAKTISCHE SPIELSTUFEN FESTGELEGTE TIEFENSTUFEN TURNIERSTUFE BRONSTEIN-SPIELSTUFEN BONUSZEIT-SPIELSTUFEN BLITZSPIELSTUFEN NORMALSPIELSTUFEN LEICHTSTUFEN 3.1 Die Spielstufen Mit 768 Stufeneinstellungen zur Auswahl (inklusive der Erweiterten Lehrfunktion), können Sie mit diesem Schachcomputer lernen und wachsen! Wie in den Spielstufentabellen in den folgenden Absätzen gezeigt, reagiert jede Spielstufe auf eines der 64 Brettfelder. Die Grundstufen sind in 8 Gruppen gegliedert, um den Spielern verschiedener Spielstärke zu entsprechen. • Leichtstufen: A1 bis A8. Für die absoluten Anfänger. A1 ist die Leichteste. • Normalspielstufen: B1 bis C8. Für Partien nicht gegen die Uhr. Volle Reihe von Schwierigkeitsstufen von leicht (B1) bis äußerst herausfordernd (C8). Wenn Sie den Computer zum erstenmal einschalten, ist B4 die gewählte Spielstufe. • Blitzspielstufen: D1 bis D8. Auch als “Blitzschach” bekannt. Die Partie muß innerhalb einer bestimmten Zeit beendet werden. WÄHLEN SIE EINE SPIELSTUFE AUS DEN 64 BRETTFELDERN • Bronstein-Spielstufen: E1 bis E4. Die Partie muß innerhalb einer bestimmten 8 Zeit beendet werden, welche dann um einiges erhöht wird, um für jeden Zug zu 7 kompensieren. Die Kompensierung ist die wirklich gebrauchte Zeit oder die erlaubte 6 Zeit, welche immer kürzer ist. • Bonuszeit-Spielstufen: E5 bis E8. Die 5 Partie muß innerhalb der gewählten Zeit beendet werden, die dann erhöht wird, um 4 für jeden Zug zu kompensieren. Die kompensation entspricht entweder der 3 des tatsächlich beanspruchten oder festgelegten Zeit, je nach dem welche die 2 kürzere ist. • Tournierstufen: F1 bis F8. Eine 1 bestimmte Anzahl von Zügen muß A B C D E F G H innerhalb einer gegebenen Zeit ausgeführt werden. DEUTSCH 3. STUFEN UND SPEZIALFUNKTIONEN • Festgelegte Tiefenstufe: G1 bis G8. Die Spielfähigkeit des Computers ist eingeschränkt, da es ihm nicht erlaubt ist, um nicht mehr als die ausgewählte Anzahl von Zügen vorauszusehen. • Taktische Spielstufen: H1 bis H8. Die Spielfähigkeit des Computers ist eingeschränkt, indem er nicht mehr als die ausgewählte Anzahl von Zügen voraussehen kann und er zudem nicht strategische Vorteile auswerten darf. Wenn Sie die Spielstufen einstellen, denken Sie daran, daß der Computer stärker und besser wird, je mehr Zeit er hat um seine Züge zu bedenken – gerade so wie ein menschlicher Spieler! Schärfen Sie Ihr Schachwissen – nachdem Sie den Computer auf jeder Stufe geschlagen haben, gehen Sie zur nächsten über. Fordern Sie sich ständig selbst heraus und lernen Sie mehr über das Spiel! 3.2 Leichtstufen Mit den Feldern zwischen A1 bis A8 wählen Sie die Leichtstufen. In dieser Reihe sucht der Computer nicht gründlich nach dem besten Zug. Er beachtet den Spielstand nicht und das Programm macht zusätzlich Gebrauch von Zufallswahlen, welche verursachen daß der Computer gelegentlich einen Zug wählt, der nicht der Beste ist, der ihm möglich wäre. Dies stellt eine interessante Vielfalt in den Antworten des Computers dar und manchmal scheint er recht menschliche Fehler in der Beurteilung zu machen. A1 ist die niedrigste Spielstufe, A8 ist etwas höher. 3.3 Normalspielstufen Wenn die Normalspielstufen gewählt wurden, kontrollieren Sie das Spielkönnen des Computers, indem Sie die durchschnittliche Zeit des Computers zur Wahl seines Zuges beschränken. Wenn das Spielkönnen erhöht wurde, denkt der Computer fortschreitend tiefer voraus und daraus resultierend spielt er eine geschicktere Partie. Wenn eine dieser Spielstufe von den B oder C Feldern gewählt wird, wechselt die Anzeige jede Sekunde zwischen der Stufenwahl und der durchschnittlichen Antwortzeit des Computers. Ihre Auswahl ist unten gezeigt: Schachbrettfeld Zeit pro Zug Anzeige B1 ........................ 1 Sekunde ......................... L:B1/00:01 B2 ....................... 2 Sekunden ........................ L:B2/00:02 B3 ....................... 3 Sekunden ........................ L:B3/00:03 40 ....................... 5 Sekunden ........................ L:B4/00:05 ...................... 10 Sekunden ....................... L:B5/00:10 ...................... 15 Sekunden ....................... L:B6/00:15 ...................... 20 Sekunden ....................... L:B7/00:20 ...................... 30 Sekunden ....................... L:B8/00:30 ...................... 45 Sekunden ....................... L:c1/00:45 .......................... 1 Minute ........................... L:c2/01:00 ......................... 2 Minuten .......................... L:c3/02:00 ......................... 3 Minuten .......................... L:c4/03:00 ......................... 4 Minuten .......................... L:c5/04:00 ......................... 5 Minuten .......................... L:c6/05:00 ........................ 10 Minuten ......................... L:c7/10:00 ........................ 15 Minuten ......................... L:c8/15:00 3.4 Blitzspielstufen Die Spielstufen auf den D Feldern sind die Blitzspielstufen. Wenn Sie Schnellschachpartien oder “Blitzschach” spielen wollen, können Sie aus einer Reihe von Zeiten wählen, welche zur Beendigung der Partie erlaubt sind. Sie können zwischen einer 5 Minuten “Druckkocher” wählen. Partie bis zu einer ruhigeren 1-1/2 Stunden Partie. Wenn Sie eines dieser Felder wählen, zeigt die Anzeige jede Sekunde abwechselnd den Namen des von Ihnen gewählten Feldes und der entsprechenden Zeitgrenze für die Partie. Schachbrettfeld Zeit pro Zug Anzeige D1 ........................... 5 Minuten ..................... L:D1/05:00 D2 .......................... 10 Minuten .................... L:D2/10:00 D3 .......................... 15 Minuten .................... L:D3/15:00 D4 .......................... 25 Minuten .................... L:D4/25:00 D5 .......................... 30 Minuten .................... L:D5/30:00 D6 .......................... 45 Minuten .................... L:D6/45:00 D7 .......................... 60 Minuten .................... L:D7/1:00 D8 .......................... 90 Minuten .................... L:D8/1:30 41 DEUTSCH B4 B5 B6 B7 B8 C1 C2 C3 C4 C5 C6 C7 C8 3.5 Bronstein-Spielstufen Durch Wählen eines Feldes von E1 bis E4 auf dem Schachbrett können Sie eine Zeitbegrenzung für die Partie nach dem Bronsteinsystem wählen. Eine Basiszeit für die Partie ist gewählt und ein Zusatz von einigen Sekunden wird mit jedem ausgeführten Zug zu dieser Zeit hinzugegeben. Der Zusatz ist entweder die Freizeit wie in der Tabelle unten gezeigt, oder die wirklich benötigte Zeit zum Ziehen, je nach-dem welche kürzer ist. Ihre Wahl wird in der Tabelle gezeigt. Wenn Sie eine dieser Spielstufen wählen, zirkuliert die Anzeige durch drei verschiedene Informationen, wobei jede für eine Sekunde gezeigt werden. Wenn Sie zum Beispiel E2 wählen, würden Sie Folgendes sehen: • Das gewählte Feld L:E2 und dann... • Die Basiszeit in Minuten 10:00 und dann... • Die Freizeit in Sekunden 00:05 Schachbrett Feld Zeit für die Partie Freizeit Zug E1 ..................... 5 Minuten .................. 3 Sekunden ......... E2 .................... 10 Minuten ................. 5 Sekunden ......... E3 .................... 15 Minuten ................ 10 Sekunden ........ E4 .................... 20 Minuten ................ 10 Sekunden ........ Anzeige L:E1/05:00/00:03 L:E2/10:00/00:05 L:E3/15:00/00:10 L:E4/20:00/00:10 3.6 Bonuszeit-Spielstufen Auswahl eines Feldes in der Reihe E5 bis E8 ergibt die Bonuszeit-Spielstufen. Diese sind ähnlich der Bronstein-Spielstufen, außer daß die Zeitzugabe jeweils 2 Sekunden beträgt und zu der Zeit hinzugerechnet wird, bevor Sie einen zug ausführen. Schachbrett Feld Zeit für die Partie E5 ..................... 3 Minuten ........... E6 .................... 10 Minuten .......... E7 .................... 20 Minuten .......... E8 .................... 50 Minuten .......... Freizeit Zug 2 Sekunden 2 Sekunden 2 Sekunden 2 Sekunden Anzeige ............... ............... ............... ............... L:E5/03:00/00:02 L:E6/10:00/00:02 L:E7/20:00/00:02 L:E8/50:00/00:02 3.7 Tournierspielstufen Die Reihe der F Felder bietet 8 Turnierspielstufen. Wenn eines dieser Felder gewählt wurde, müssen Sie und der Computer eine vorgegebene Anzahl von Zügen in einer fest42 Sekundäre Zeitkontrolle Züge Zeit Züge Zeit F1 30 30 Minuten 30 30 Minuten L:F1/30/0:30 F2 30 1 Stunde 30 Minuten rest 1 Stunde L:F2/30/1:30 Anzeige F3 40 2 Stunden 20 1 Stunde L:F3/40/2:00 F4 40 2 Stunden rest 1 Stunde L:F4/40/2:00 F5 40 2 Stunde 30 Minuten 16 1 Stunde L:F5/40/2:30 F6 45 1 Stunde 30 Minuten 15 30 Minuten L:F6/45/1:30 F7 50 2 Stunde 30 Minuten 20 1 Stunde L:F7/50/2:30 F8 60 1 Stunde 30 30 Minuten L:F8/60/1:00 gelegten Zeit ausführen. Wenn Sie zum Beispiel F3 wählen, wird verlangt, daß Sie 40 Züge innerhalb von 2 Stunden unter der primären Zeitkontrolle durchführen. Wenn die Partie nicht innerhalb dieser Zeit beendet wurde, beginnt die sekundäre Zeitkontrollperiode, und es wird verlangt, daß Sie 20 Züge innerhalb 1 Stunde durchführen. Und wenn diese sekundäre Periode kein Resultat hervorbringt, wird dies wiederholt, bis eine Lösung gefunden wird. Gemäß den Turnierregeln wird jede übriggebliebene Zeit der primären Zeitkkontrolle bei Beendigung der Partie gutgeschrieben und der erlaubten Zeit für die sekundäre Zeitkontrolle hinzugerechnet. Wenn Sie zum Beispiel Spielstufe F3 gewählt und die ersten 40 Züge in nur einer Stunde abgeschlossen haben, hätten Sie für die nächsten 20 Züge 2 Stunden Zeit. Überschüssige Zeit, wenn vorhanden, wird gutgeschrieben und durch die ganze Partie hindurch zugerechnet. Wenn Sie eine dieser Turnierspielstufen gewählt haben, zirkuliert die Anzeige durch drei Informationen, welche jeweils für eine Sekunde gezeigt werden. Wenn zum Beispiel Feld F4 gewählt wurde, zeigt die Anzeige Folgendes: 43 DEUTSCH Primäere Zeitkontrolle Schachbrett Felder • Das gewählte Feld • Die Anzahl der Züge in der primären Zeitkontrolle • Die Dauer der primären Zeitkontrolle L:F4 40 2:00 und dann.... und dann... 3.8 Festgelegte Tiefenstufen Die festgelegte Tiefenstufen in Reihe G beschränken das Können des Computers nicht in der Zeit, sondern in der Anzahl von bevorstehenden in Zügen. In den niedrigeren Stufen verhält er sich mehr wie ein Anfänger. Auf der untersten Stufe, G1, wo der Computer nur einen individuellen Zug vorausschaut, schätzt er die Partie wirklich überhaupt nicht ein und kann sogar ein Matt übersehen, das Sie in Ihrem nächsten Zug machen könnten. Auf der anderen Seite der Skala überschaut er alle Möglichkeiten innerhalb der nächsten 8 individuellen Züge (G8). In diesem Fall wechselt die Anzeige jede Sekunde zwischen der von Ihnen gewählten Stufe und des Auzahl des individuellen Züge (ply) die der Computer voraussucht. • Das gewählte Feld L:G5 und dann... • Die Anzahl bevorstehender individueller Züge 5PLy 3.9 Taktische Spielstufen Taktische Spielstufen sind in der letzten Reihe von Feldern, “H” Felder, zu finden. Diese Stufen beschränken ebenfalls die Anzahl von individuellen Zügen, die der Computer voraussieht, doch in diesem Fall wertet der Compter keine strategischen Vorteile aus und sucht nur nach Materialgewinn wie Schachmatt oder Remis. Die Anzahl individueller Züge, die der Computer vorausschaut gleicht wieder der Nummer des Schachbrettfeldes – H1 ist ein individueller Zug voraus, H8 ist 8 Züge voraus. Die Anzeige wechselt jede Sekunde zwischen der Spielstufe, die Sie gewählt haben und wieviele individuelle Züge (ply) der Computer voraussucht, in ähnlicher Weise wie bei den festgelegten Tiefenstufen. • Das gewählte Feld L:H6 und dann... • Die Anzahl individueller Züge voraus 8PLY 3.10 Lehrfunktionen Ihr Schachcomputer beinhaltet elf eingebaute erweiterte Lehrfunktionen. Diese erlauben Ihnen gleichzeitig Grundzüge zu lernen und die Taktiken der Figur zu bewältigen. Für jede 44 Beachten Sie im Zusammenhang mit den Spielstufen und Lehrfnfunktionen: • Wenn NEW GAME während irgendeiner Partie gedrückt wird, beendet der Computer die Lehrfunktion und geht zurück zu Standard (32 Figuren), wobei die aktuelle Spielstufe aktiviert bleibt. • Wenn Sie LEVEL drücken und dann beschließen, die aktuelle Spielstufe oder Lehrfunktion nicht zu ändern, drücken Sie einfach nochmals LEVEL, und der aktuelle Stand bleibt wie er ist. • Sie können jederzeit eine neue Spielstufe wählen, wenn Sie am Zug sind, die Uhr wird jedoch zurückgestellt. • Wenn Sie mehr als 2 Figursymboltasten während einer Lehrfunktionswahl drücken, sind nur die letzten 2 Symbolwahlen gültig, sobald Sie aus der Spielstufenfunktion aussteigen. • Wenn Sie versehentlich irgendeine Figursymboltaste in der Spielstufenfunktion drücken, löschen Sie die aktuelle Partie, sobald Sie aus der Spielstufenfunktion ausgestiegen sind. Drücken Sie das Feld entsprechend der aktuellen Spielstufe, um mit der aktuellen Partie fortzufahren, bevor Sie aus der Spielstufenfunktion aussteigen. Allerdings wird die Uhr zurückgestellt. 3.11 Auswahl der Stufen und Lehrfunktionen Drücken Sie LEVEL, um die Spielstufenfunktion zu aktivieren und die aktuelle Spielstufe wird angezeigt (z.B. A3 wird als L:A3 abwechselnd mit Fun3 angezeigt, welches die gewählte Spielstufe durch Drücken des Brettfeldes A3 ist). Um die Spielstufe zu ändern, drücken Sie einfach auf eines der Brettfelder, und die neue Spielstufe wird abwechselnd mit den Spielstufendetails in der Anzeige gezeigt. Drücken Sie nochmals LEVEL, um aus der Spielstufenfunktion auszusteigen. 45 DEUTSCH individuelle Lehrfunktion sind die einzigen Figuren auf dem Brett Könige und Bauern, oder Könige und Bauern und ein oder zwei gewählte Figurentypen. Dies erlaubt Anfängern sich zeitweise auf nur ein oder zwei Figuren zu konzentrieren, ohne die Konzentration zu verlieren und durch andere Figuren auf dem Brett abgelenkt zu werden. Fortgeschrittene Spieler können diese Funktion verwenden, um mit einer ausgewählten Kombination von Figuren zu üben. Beachten Sie die folgenden Tastenreihenfolge und Effekte: LEVEL, LEVEL Keine Änderung. Vorher gewählte Spielstufe bleibt bestehen. LEVEL, Feld, LEVEL Neue Spielstufe gewählt, Uhr wird zurückgestellt. LEVEL, Figurensymbol, LEVEL Anfangsstellung der gewählten Lehrfunktion ist in der vorher gewählten Spielstufe eingestellt. LEVEL, Feld, Figurensymol, LEVEL Anfangsstellung der gewählten Lehrfunktion ist in einer neuen Spielstufe eingestellt. LEVEL, Figurensymbol, Feld, LEVEL Neue Spielstufe ist eingestellt, Lehrfunktion gelöscht, bestehende Partie aktiv. Um die Lehrfunktion zu wählen, drücken Sie LEVEL. Die Anzeige zeigt die Spielstufe entsprechend den Schachbrettfelden, abwechselnd mit den Spielstufendetails. Um eine Lehrfunktion zu wählen, drücken Sie ein oder zwei passende Figursymboltasten (%, $, #, @ oder !) welche Sie verwenden wollen. Die Anzeige zeigt dann die gewählten Figuren. Wenn Sie zum Beispiel mit den Königen, Läufern, Springern und Bauern spielen wollen, nachdem Sie LEVEL gedrückt haben, drücken Sie # und @. Die Anzeige zeigt Ihre Auswahl. Drücken Sie dann nochmals LEVEL, um aus der Spielstufenfunktion auszusteigen und Ihre Auswahl in den Computer zu speichern und beginnen Sie Ihre Partie. Da der König für die Partie immer benötigt wird, müssen Sie diese Figur für die Lehrfunktion nicht wählen. Tatsächlich bewirkt das Drücken dieser Figur in der Lehrfunktion die Auswahl von einer normalen, 32 Figurenpartie. Beachten Sie, daß der manuelle Modus automatisch gelöscht wird, wann immer eine Lehrfunktion auf der bestehenden Spielstufe gewählt wird. Die elf Lehrfunktionen und normale Partien sind durch die folgende Anzeige gezeigt: Lehrfunktion Anzeige Könige und Bauern ................................................................ Könige, Springer und Bauern ................................................ Könige, Läufer und Bauern ................................................... Könige, Türme und Bauern .................................................... 46 te:_p te:_n te:_b te:_r te:_q te:nb te:nr te:nq te:br te:bq te:rq te:sb 3.12 Eröffnungstrainingsfunktion Der Computer hat 16 verschiedene Eröffnungsreihen in seinem Speicher, welche demonstriert werden, damit Sie diese lernen können. Drücken Sie OPENINGS COACH und wenn diese zum erstenmal gewählt wurde, piept der Computer und die Anzeige blinkt o(: Sie können wählen welche Eröffnungspartie Sie ansehen wollen, indem Sie eines der Felder von A1 bis B8 drücken. Ziffer 3-1 listet die vorhandenen Eröffnungen auf. Um zum Beispiel das dritte Eröffnungstraining zu wählen, drücken Sie Feld A3 und o(:3 blinkt in der Anzeige. Dies bestätigt, daß das dritte Eröffnungstraining gewählt wurde und die zwei Balken zeigen an, daß der Computer die Züge für beide Seiten anzeigen wird, damit Sie beobachten und lernen können. Drücken Sie das gleiche Feld nochmals und die Anzeige wechselt zu o_:3, welches anzeigt, daß der Computer die weiße Seite spielt und Sie die Züge für Schwarz ausführen läßt. Ein weiteres Drücken des Feldes ändert den Balken auf der rechten Seite um zu zeigen, daß der Computer schwarz spielt, während Sie weiß spielen und ein weiteres Drücken entfernt die Balken völlig, was bedeutet, daß der Computer alle Züge Ihnen überläßt, während er die Zulänigkeit Ihrer Züge überwacht. Drücken Sie OPENINGS COACH nochmals, und die Anzeige zeigt, daß Sie ziehen sollten. Während Sie spielen, können Sie PLAY drücken, um den Computer zu bitten, Sie an den nächsten Zug zu erinnern. Jedesmal, wenn Sie einen richtigen Zug ausführen, bestätigt der Computer diesen Zug mit einem einzelnen Piepton, wenn Sie jedoch falsch ziehen, gibt er einen Doppelpiepton ab und das Ausgangsfeld wird fortwährend angezeigt. Drücken Sie das richtige Zielfeld, um den Zug 47 DEUTSCH Könige, Damen und Bauern .................................................. Könige, Springer, Läufer und Bauern ................................... Könige, Springer, Türme und Bauern .................................... Könige, Springer, Damen und Bauern .................................. Könige, Läufer, Türme und Bauern ....................................... Könige, Läufer, Damen und Bauern ...................................... Könige, Türme, Damen und Bauern ...................................... Alle Figuren (normale Partie) ................................................ Abbildung 3-1. Züge im Eröffnungstraining Feld Name Züge A1 A2 A3 Italienische Eröffnung Zwei-Springer-Verteidigung Spanische Eröffnung A4 Sizilianische Verteidigung A5 A6 A7 A8 Französische Verteidigung Karo-Kann-Verteidigung Skandinavische Verteidigung Aljechin-Verteidigung e2e4, e7e5, g1f3, b8c6, f1c4, f8c5 e2e4, e7e5, g1f3, b8c6, f1c4, g8f6 e2e4, e7e5, g1f3, b8c6, f1b5, a7a6, b5a4, g8f6, e1g1, b7b5 e2e4, c7c5, g1f3, d7d6, d2d4, c5d4, f3d4, g8f6, b1c3 e2e4, e7e6, d2d4, d7d5 e2e4, c7c6, d2d4, d7d5, b1c3, d5e4 e2e4, d7d5, e4d5, d8d5, b1c3, d5a5 e2e4, g8f6, e4e5, f6d5 B1 B2 B3 B4 B5 B6 B7 B8 Damengambit angenommenes Damengambit Nimzo-Indische Verteidigung Damenindische Verteidigung Königindische Verteidigung Grünfeld-Indische Verteidigung Holländische Verteidigung Englische Eröffnung d2d4, d7d5, c2c4, e7e6, b1c3, g8f6, c1g5, f8e7 d2d4, d7d5, c2c4, d5c4 d2d4, g8f6, c2c4, e7e6, b1c3, f8b4 d2d4, g8f6, c2c4, e7e6, g1f3, b7b6 d2d4, g8f6, c2c4, g7g6, b1c3, f8g7, e2e4, d7d6 d2d4, g8f6, c2c4, g7g6, b1c3, d7d5 d2d4, f7f5, c2c4, g8f6, b1c3, e7e6 c2c4, e7e5, b1c3, g8f6, g1f3 abzuschließen, oder das Ausgangsfeld, um den Zug zu löschen. Am Ende der Eröffnungsreihe können Sie die Partie fortfahren, wie es Ihnen beliebt. Die Uhr wird während dieser Funktion nicht gebraucht und der manuelle Modus, wenn ausgewählt, wird erst dann aktiviert, wenn die Eröffnungszüge abgeschlossen sind. Wenn Sie zu einer normalen Partie zurückgehen wollen, drücken Sie einfach NEW GAME und Sie kehren auf ein Standardbrett zurück. 48 3.13 Überprüfungsfunktion: Prüfen der Figurenstellung! Wenn die Figuren umgeworfen werden, oder Sie vermuten, daß sie auf ein falsches Feld gestellt wurden, kann der Computer eine Prüfung für Sie durchführen. Drücken Sie einfach die Figursymboltaste, welche Sie anfragen möchten. Der Computer zeigt Ihnen das Symbol die Farbe und Figurtyp zusammen mit dem Feld, auf welchem sie stehen sollte. Weiteres Drücken der Taste zeigt die Stellung der nächsten Figur dieses Types und so weiter bis all diese Figuren die auf dem Brett sein sollten, gezeigt wurden. Die Anzeige zeigt zuerst die weißen Figuren und dann die schwarzen. Wenn es keine weiteren Figuren dieses Types mehr anzuzeigen gibt, geht die Anzeige zurück zur Seite die am Zug ist und zwei Pieptöne ertönen, um Ihre Aufmerksamkeit zu bekommen. Ein Beispiel einer Anzeigenreihe ist nachstehend aufgeführt. Taste Drücken Sie @ zum erstenmal Drücken Sie @ zum zweitenmal Drücken Sie @ zum drittenmal Drücken Sie @ zum viertenmal Anzeige _n:B1 )n:B8 )n:F6 _n:__ (piep, piep) Bedeutung Weißer Springer auf B1 Schwarzer Springer auf B8 Schwarzer Springer auf F6 Keine weiteren Springer, Weiß am Zug Dieses Beispiel zeigt an, daß einer der weißen Springer geschlagen wurde und daß nun Weiß am Zug ist. Um andere Figuren zu überprüfen, wiederholen Sie die gleichen Schritte und verwenden Sie die anderen Figursymboltasten. Wenn Sie fertig sind, führen Sie einfach Ihren nächsten Zug aus. Währenddessen wurde die Uhr momentan gestoppt. Der Computer steigt automatisch aus der Überprüfungsfunktion aus, wenn innerhalb von 5 Sekunden keine Figursymboltaste gedrückt wurde. 49 DEUTSCH Beachten Sie, daß die gewählte Methode des Eröffnungstrainings solange gespeichert bleibt, bis eine neue Auswahl getroffen wird. 3.14 Manueller Modus Normalerweise antwortet der Computer mit einem Gegenzug, wann immer Sie einen Zug eingeben. Wenn Sie NON AUTO drücken, antwortet der Computer mit einem Piepton und Sie können dann alle Züge für beide Seiten eingeben, einen nach dem anderen, ohne dem Computer zu erlauben zu anworten! Dieses spezielle Funktion kann in verschiedenen Arten und Weisen verwendet werden: • Spielen Sie durch Meisterpartien. Es ist interessant PLAY zu drücken, um zu sehen, was der Computer in bestimmten Stellungen tun würde! • Studieren Sie Eröffnungsbibliothekreihen, indem Sie diese manuell eingeben. • Spielen Sie eine Partie gegen einen Freund, wobei der Computer als Schiedsrichter agiert, um die Zulässigkeit aller Züge zu überprüfen und die Zeit für beide Seiten hält. Wenn Sie Hilfe bei einem Zug brauchen, drücken Sie PLAY und der Computer führt den nächsten Zug für Sie aus. Nach diesem Zug bleibt der manuelle Modus aktiviert, und Sie können die Partie fortfahren! • Wiederholen Sie jegliche Brettstellung zum weiteren Studieren! Um aus dem manuellen Modus auszusteigen und zu einer normalen Partie zurückzukehren, drücken Sie einfach nochmals NON AUTO und der Doppelpiepton zeigt an, daß der Modus gelöscht wurde. Beachten Sie, daß der Manuelle Modus ebenfalls gelöscht wird, wann immer Sie NEW GAME drücken oder eine Lehrfunktion auf der bestehenden Spielstufe wählen. 4. TECHNISCHE DATEN 4.1 Die ACL Funktion Computer können manchmal aufgrund von statischer Aufladung oder elektrischen Störungen “blockieren”. Wenn dies passieren sollte, entnehmen Sie die Batterien und drücken Sie für mindestens eine Sekunde mit einer Büroklammer oder einem ähnlichen, spitzen Gegenstand in das mit ACL markierte Loch auf der Rückseite des Computers. Dies stellt den Computer neu ein. 50 4.3 Technische Spezifikationen Tasten: 14 LCD Anzeige: Sichtfenster 18 x 9 mm Ton: Piezo-elektrischer Summer Batterien: 2 AAA/AM4/R03 (1.5V) Zellen Stromverbrauch: 10 mW Dimensionen: 176 x 100 x 35 mm Saitek behält sich das Recht auf technische Änderungen ohne vorangegangene Information im Interesse des Fortschrittes vor. Leisten Sie einen Beitrag zum Umweltschutz: – Verbrauchte Batterien und Akkumulatoren (Akkus) gehören nicht in den Hausmüll. – Sie können sie bei einer Sammelstelle für Altbatterien bzw. Sondermüll abgeben Informieren Sie sich bei Ihrer Gemeinde. 51 DEUTSCH 4.2 Pflege und Handhabung Ihr Computer ist ein präzises, elektronisches Gerät und sollte keiner groben Handhabung oder extremen Temperaturen oder Feuchtigkeit ausgesetzt werden. Vergewissern Sie Sich, daß die Batterien entnommen wurden, bevor Sie das Gerät reinigen. Verwenden Sie keine chemischen Reinigungsmittel, um das Gerät zu reinigen, da diese das Plastik beschädigen könnten. Schwache Batterien sollten sofort ersetzt werden, da diese auslaufen und den Computer beschädigen können. Bitte beachten Sie auch Folgendes in Bezug auf den Gebrauch von Batterien. Warnung: Verwenden Sie nur Alkalin oder Zinkkarbonat Batterien. Mischen Sie keine verschiedenen Typen oder neue und alte Batterien. Laden Sie keine nichtaufladbaren Batterien auf. Verwenden Sie nur die empfohlenen oder gleiche Batterien. Beachten Sie die korrekte Polarität, wenn Sie die Batterien einlegen. Aufgebrauchte Batterien sollten sofort aus dem Gerät genommen werden. Schalten Sie das Gerät nicht kurz. FEHLERSUCHE SYMPTOME MÖGLICHE URSACHEN WAS SIE TUN SOLLTEN Computer reagiert nicht oder “gefriert” während einer Partie. • Batterien sind nicht richtig eingelegt. • Batterien sind schwach oder schlecht. • Statische Aufladung verursachte die Blockade. • Legen Sie die Batterien nochmals, wie in 1.1 gezeigt, ein. • Ersetzen Sie die Batterien. • Verwenden Sie die ACL Neueinstellung wie in 4.1. beschrieben. Anzeige ist matt. • Batterien sind schwach. • Ersetzen Sie die Batterien. Computer macht keinen Zug. • Manueller Modus ist aktiviert. • Drücken Sie NON AUTO um den Modus zu löschen. • Sie können den Computer zum Ziehen zwingen, indem Sie PLAY drücken. • Hohe Spielstufe eingestellt – Computer denkt noch. Computer akzeptiert Ihren Zug nicht. • Sind Sie am Zug? Steht Ihr König im Schach? Wird Ihr Zug Ihren König im Schach lassen? Haben Sie den Turm zuerst gezogen, um eine Rochade anzuzeigen? Ziehen Sie auf ein unzulässiges Feld? • Der Computer denkt. • Sie haben den letzten Zug des Computers falsch eingegeben (die falschen Felder gedrückt). Der Computer scheint unzulässige Züge zu machen. Der Computer ist still. • Ein tiefer Ton zeigt an, daß Sie einen Fehler gemacht haben. Prüfen Sie die Schachregeln. Verwenden Sie TAKE BACK um den letzten Zug neu auszuführen. • Um den Computer zu unterbrechen, drücken Sie PLAY. • Prüfen Sie den Anzeigezug. Drücken Sie die korrekten Felder, um den Zug abzuschließen. • Der Computer hat einen der speziellen Züge wie en passant, Rochade oder Bauernumwandlung ausgeführt. • Ihre Brettposition ist falsch. • Prüfen Sie die Regeln. • Die Tontaste wurde gedrückt, um den Ton auszuschalten. • Drücken Sie SOUND, um den Ton einzuschalten. 52 • Überprüfen Sie das Brett wie in 3.13 beschrieben. MISE EN ROUTE RAPIDE Pour entamer d’emblée une partie, sans avoir à lire intégralement le présent manuel, il suffira de suivre ces quelques étapes de Mise en Route Rapide ! 2 3 4 Ouvrez le logement des piles situé au dos de l’ordinateur en poussant la languette. Insérez dans l’ordinateur 2 piles “AAA” (de type AM4/ R03) en veillant à respecter la polarité exacte. Remettez à sa place le volet du logement des piles. (Voir détails à la Section 1.1.) Appuyez sur la touche GO/STOP pour allumer l’appareil. Si l’ordinateur ne réagit pas, enfoncez un trombone ou tout autre objet pointu dans l’orifice ACL prévu à la base de l’appareil, en procédant de la manière indiquée à la Section 4.1. Disposez les pièces en position pour une nouvelle partie d’échecs, les Blancs de votre côté. 2 x AAA/AM4/R03 5 Enregistrez chaque coup sur l’échiquier en enfonçant légèrement les pièces du jeu dans les trous prévus sur les cases de ‘départ’ et ‘d’arrivée’. 6 Quand l’ordinateur joue, il affiche son coup à l’écran. Appuyez légèrement la pièce de l’ordinateur sur les cases de ‘départ’ et ‘d’arrivée’ indiquées pour conclure le coup de l’ordinateur. Ce n’est pas plus compliqué ! Faites vos coups suivants en procédant de la même manière. Vous pourrez à n’importe quel moment appuyer sur la touche GO/ STOP pour éteindre l’ordinateur. Bon amusement ! ዛዒዓዔዕዖዘዙዜ ዑ尷尽尻就尯尹尿尵ዑ ዐ屁屃屁屃屁屃屁屃ዐ ዏ巀居巀居巀居巀居ዏ ዎ居巀居巀居巀居巀ዎ ው巀居巀居巀居巀居ው ዌ居巀居巀居巀居巀ዌ ዋ屄层屄层屄层屄层ዋ ዊ尶局尺尴尮尼尾尸ዊ ዝዒዓዔዕዖዘዙዞ e7-e5 : ዛዒዓዔዕዖዘዙዜ ዑ尷尽尻就尯尹尿尵ዑ ዐ屁屃屁屃屁屃屁屃ዐ ዏ巀居巀居巀居巀居ዏ ዎ居巀居巀居巀居巀ዎ ው巀居巀居屄居巀居ው ዌ居巀居巀居巀居巀ዌ ዋ屄层屄层巀层屄层ዋ ዊ尶局尺尴尮尼尾尸ዊ ዝዒዓዔዕዖዘዙዞ ዛዒዓዔዕዖዘዙዜ ዑ尷尽尻就尯尹尿尵ዑ ዐ屁屃屁屃居屃屁屃ዐ ዏ巀居巀居巀居巀居ዏ ዎ居巀居巀屁巀居巀ዎ ው巀居巀居屄居巀居ው ዌ居巀居巀居巀居巀ዌ ዋ屄层屄层巀层屄层ዋ ዊ尶局尺尴尮尼尾尸ዊ ዝዒዓዔዕዖዘዙዞ Remarque : Afin de conserver l’énergie, l’ordinateur, lorsqu’il n’est pas en phase de réflexion, s’éteindra automatiquement si aucune touche n’est enfoncée pendant 20 minutes environ (Voir Section 2.8). Appuyez sur la touche NEW GAME pour réinitialiser l’ordinateur en prévision d’une nouvelle partie d’échecs. 53 FRANÇAIS 1 2.8 TABLE DES MATIERES 2.9 Mémorisation de la partie et mise hors circuit automatique Bibliothèque d’ouvertures MISE EN ROUTE RAPIDE 3. NIVEAUX ET MODES SPECIAUX 3.1 Les Niveaux de Jeu 3.2 Les Niveaux Divertissement 3.3 Les Niveaux Amateur 3.4 Les Niveaux Blitz 3.5 Les Niveaux Bronstein 3.6 Les Niveaux à Temps Supplémentaire 3.7 Les Niveaux Tournoi 3.8 Les Niveaux Profondeur Fixe 3.9 Les Niveaux Tactiques 3.10 Les Modes Enseignement 3.11 Sélection des niveaux et des modes d’Enseignement 3.12 Les Modes Entraînement aux Ouvertures 3.13 Le Mode Vérification. Vérifiez les positions des pièces ! 3.14 Le Mode Non Automatique LES TOUCHES ET LEURS FONCTIONS INTRODUCTION 1. UTILISATION DE L’ORDINATEUR D’ECHECS 1.1 Installation des piles 1.2 Faites vos Coups 1.3 A l’ordinateur de jouer 1.4 Vous changez d’avis ? Revenez en arrière! 1.5 Echec, mat ou nul ! 1.6 Entamez une nouvelle partie 1.7 Changez de niveau 1.8 Entraînement aux ouvertures 2. D’AUTRES CARACTERISTIQUES DE BASE 2.1 Les pendules d’échecs 2.2 Prises et coups spéciaux 2.3 Coups illégaux 2.4 Interruption de la recherche de l’ordinateur 2.5 Changement de camp avec l’ordinateur 2.6 Demandez conseil à l’ordinateur 2.7 L’ordinateur joue contre lui-même 4. DETAILS TECHNIQUES 4.1 La Fonction ACL 4.2 Entretien 4.3 Fiche Technique GUIDE DE DEPANNAGE 54 1. L’écran d’affichage LCD : l’écran d’affichage à cristaux liquides (LCD) sert à afficher les coups, les informations inhérentes à la partie et les pendules d’échecs pour les deux joueurs. La plupart des symboles utilisés sont évidents, mais la liste intégrale des symboles figure au Schéma 1. 2. Les touches-symboles des pièces &(Roi), %(Dame) $(Tour), #(Fou), @(Cavalier), !(Pion) : les touches-symboles des pièces sont utilisées pour vérifier les positions et pour choisir les divers modes d’enseignement, et certaines pièces sont utilisées pour la sous-promotion des pions. 3. Les touches de jeu a. La touche NEW GAME (nouvelle partie) : appuyez sur cette touche pour réinitialiser l’ordinateur en prévision d’une nouvelle partie d’échecs. b. La touche OPENINGS COACH (entraînement aux ouvertures) : appuyez sur cette touche pour accéder au Mode Entraînement aux Ouvertures et pour vous exercer aux gambits d’ouverture reconnus et à leurs réponses. c. La touche SOUND (son) : appuyez sur cette touche pour faire tourner dans une boucle les trois niveaux de fonctionnement. Vous pourrez reconnaître l’état sélectionné au nombre de bips sonores que vous entendrez : NIVEAU SONORE Son et Entraînement Son uniquement Silence 4. SIGNAUX SONORES EMIS SUITE A LA SELECTION 5. 3 tonalités aiguës 2 tonalités aiguës 1 tonalité aiguë Si le programme d’entraînement est sélectionné, l’ordinateur évaluera votre coup dès que celui-ci sera conclu et émettra deux sons graves s’il estime que ce coup est mauvais. Si la fonction sonore est sélectionnée, le signal ‘bip’ retentira pour indiquer que l’ordinateur est en train de réagir à vos actions. La signification des divers signaux ‘bip’ figure au Schéma 1. 6. 7. 55 d. La touche TAKE BACK (retour en arrière) : appuyez sur cette touche pour revenir en arrière sur le dernier demi-coup. Il vous est possible de revenir en arrière sur 14 demi-coups. (Un demicoup est un coup pour l’un des deux camps). e. La touche NON AUTO : appuyez sur cette touche pour accéder au Mode Non Automatique, permettant d’enregistrer manuellement les coups – ici, l’ordinateur surveille la partie mais ne joue pas. f. La touche LEVEL (niveaux) : appuyez sur cette touche pour accéder au Mode Niveaux et régler le niveau de jeu en fonction de la complexité et du type de partie souhaités. Cette touche est également utilisée pour la sélection des modes d’Enseignement.. g. La touche PLAY (jeu) : appuyez sur cette touche pour changer de camp avec l’ordinateur. Vous pourrez aussi appuyer sur cette touche pendant que l’ordinateur est en phase de réflexion pour le forcer à jouer ou, lorsque c’est à vous de jouer, pour demander à l’ordinateur de vous suggérer un coup. h. La touche GO/STOP (démarrage/arrêt) : appuyez sur cette touche pour allumer l’ordinateur. Appuyez de nouveau sur cette touche pour éteindre l’ordinateur. La partie en cours sera conservée dans la mémoire pour une durée pouvant aller jusqu’à 300 heures. L’échiquier à plateau sensitif : chaque case est munie d’un senseur ultrasensible qui détecte les déplacements des pièces. Les cases sont identifiées par leurs colonnes (lettres) et leurs rangées (chiffres). La touche ACL (réinitialisation) : un commutateur encastré est situé à la base de l’appareil. Ce commutateur sert à éliminer les décharges statiques après l’insertion d’une nouvelle série de piles. Le logement des piles : les piles sont logées à la base de l’appareil. L’ordinateur utilise 2 piles “AAA” alcalines (type AM4/R03). Le compartiment de rangement des pièces : un compartiment pratique destiné au rangement des pièces de votre jeu d’échecs. FRANÇAIS LES TOUCHES ET LEURS FONCTIONS Schéma 1. Symboles d’affichage et sons SONS SYMBOLES 1 ............ 1 A ............. A k ........... Roi 2 ............ 2 B ............. B q ........... Dame 3 ............ 3 c ............. C r ........... Tour 4 ............ 4 D ............. D b ........... Fou 5 ............ 5 E ............. E n ........... Cavalier 6 ............ 6 F ............. F p ........... Pion 7 ............ 7 G ............. G 8 ............ 8 H ............. H sb ......... Standard normal 9 ............ 9 0 ............ 0 PM ............. Indique le joueur dont c’est le tour de jouer S ................ Indique que c’est aux Noirs de jouer : ................. Les deux points fixes indiquent que les chiffres représentent les minutes et les secondes : ................. Les deux points clignotants indiquent que les chiffres représentent les heures et les minutes ch:)) ......... Noirs en échec ch:__ ......... Blancs en échec EnD) .......... Echec et mat - victoire des Noirs EnD( .......... Nul te: .............. Mode d’enseignement o(:3 ........... Entraînement aux Ouvertures (Ouverture Espagnole) – l’ordinateur joue pour les deux camps o_:3 ........... Entraînement aux Ouvertures (Ouverture Espagnole) – l’ordinateur joue pour les Blancs o):3 ........... Entraînement aux Ouvertures (Ouverture Espagnole) – l’ordinateur joue pour les Noirs o :3 ........... Entraînement aux Ouvertures (Ouverture Espagnole) – l’ordinateur ne joue pour aucun camp 1 son aigu ............ Signale le fonctionnement d’une touche ou case du plateau sensitif 1 son grave .......... Erreur - coup erroné ou pression d’une touche erronée 2 sons grave ........ Avertissement de la part de l’entraîneur 3 sons aigus ........ Nouvelle partie ou réglage des fonctions sonore et d’entraînement 3 sons grave ........ Indiquent le dépassement du délai imparti, dans les parties contre la pendule out 2 x AAA/AM4/R03 INTRODUCTION 1. UTILISATION DE L’ORDINATEUR D’ECHECS Schéma 1-1 ዛዒዓዔዕዖዘዙዜ ዑ尷尽尻就尯尹尿尵ዑ ዐ屁屃屁屃屁屃屁屃ዐ ዏ巀居巀居巀居巀居ዏ ዎ居巀居巀居巀居巀ዎ ው巀居巀居巀居巀居ው ዌ居巀居巀居巀居巀ዌ ዋ屄层屄层屄层屄层ዋ ዊ尶局尺尴尮尼尾尸ዊ ዝዒዓዔዕዖዘዙዞ Schéma 1-2 1. Installation des piles Votre ordinateur d’échecs fonctionne avec 2 piles “AAA” (AM4/R03). Pour une plus longue autonomie des piles (jusqu’à 600 heures), utilisez des piles alcalines fraîches. Faites coulisser en arrière le volet situé au dos du coffret et insérez les piles comme illustré au Schéma 1-1. Remettez le volet à sa place et appuyez sur la touche GO/STOP pour allumer l’ordinateur. Si l’ordinateur ne réagit pas, réinitialisez-le en enfonçant pendant une seconde au moins un trombone ou tout autre objet pointu dans l’orifice ACL situé à la base de l’appareil. Une fois que vous aurez inséré les piles ou appuyé sur l’orifice ACL, l’ordinateur se soumettra à un auto-test. 2 ‘bips’ sonores indiqueront que le test est concluant ; un vibreur sonore ou le silence signaleront un problème et vous inviteront à faire examiner votre appareil par votre distributeur local. 57 Schéma 1-3 Schéma 1-4 FRANÇAIS Cet échiquier électronique est un puissant ordinateur qui jouera aux échecs avec vous, quel que soit le niveau de complexité que vous aurez choisi, ou qui vous permettra, si vous préférez, de jouer une partie avec un ami en prenant l’ordinateur pour arbitre. L’immense gamme de niveaux de jeu (64) combinée aux modes d’enseignement poussé (11) combleront tous les amateurs d’échecs, du plus jeune au plus vieux. Il existe en tout 768 combinaisons. Les modes d’enseignement et les programmes d’entraînement aux ouvertures constituent de superbes options d’apprentissage à tous les niveaux de jeu, et les divers modes de compétition minutée feront la joie des joueurs intermédiaires. A noter que l’insertion de piles neuves ou la pression de l’orifice ACL entraîneront la réinitialisation de l’ordinateur et de sa mémoire et la perte de toute partie susceptible d’y être conservée. 2. Faites vos coups Suivez ces étapes pour entamer une partie. a. Appuyez éventuellement sur la touche GO/STOP pour allumer l’ordinateur. b. Disposez les pièces en position de départ, les Blancs de votre côté comme indiqué au Schéma 1-2 et appuyez sur la touche NEW GAME. L’écran vous indiquera que vous devez jouer une pièce blanche. 00:00 PM A noter que la pression de la touche NEW GAME annulera le Mode Enseignement ou Entraînement aux Ouvertures si ceux-ci ont été sélectionnés, ou désactivera la fonction Non Auto. c. Pour jouer, appuyez légèrement sur la pièce que vous souhaitez déplacer jusqu’à ce que vous entendiez un ‘bip’ sonore (Voir Schéma 1-3). Le plateau sensitif de l’ordinateur reconnaîtra automatiquement votre pièce et l’écran affichera, à gauche, la case de ‘départ’ sur laquelle vous avez appuyé. ዛዒዓዔዕዖዘዙዜ ዑ尷尽尻就尯尹尿尵ዑ ዐ屁屃屁屃屁屃屁屃ዐ ዏ巀居巀居巀居巀居ዏ ዎ居巀居巀居巀居巀ዎ ው巀居巀居屄居巀居ው ዌ居巀居巀居巀居巀ዌ ዋ屄层屄层巀层屄层ዋ ዊ尶局尺尴尮尼尾尸ዊ ዝዒዓዔዕዖዘዙዞ Schéma 1-5a ዛዒዓዔዕዖዘዙዜ ዑ尷尽尻就尯尹尿尵ዑ ዐ屁屃屁屃居屃屁屃ዐ ዏ巀居巀居巀居巀居ዏ ዎ居巀居巀屁巀居巀ዎ ው巀居巀居屄居巀居ው ዌ居巀居巀居巀居巀ዌ ዋ屄层屄层巀层屄层ዋ ዊ尶局尺尴尮尼尾尸ዊ ዝዒዓዔዕዖዘዙዞ Schéma 1-5b Schéma 1-6a E2:__ d. Prenez la pièce et appuyez-la légèrement sur sa case d’arrivée. L’ordinateur émettra un second ‘bip’ et 58 Schéma 1-6b Aussitôt que vous aurez conclu votre coup, si vous avez choisi les fonctions Sonore et d’Entraînement, la mention Coch s’affichera à l’écran pendant que l’ordinateur évaluera votre coup. Deux tonalités graves retentiront si le coup est jugé mauvais. e. Ce sera ensuite à l’ordinateur de jouer et celui-ci commencera à réfléchir sur son coup. Toutefois, en début de partie, l’ordinateur réagit virtuellement de manière instantanée car il joue des coups issus de sa mémoire en se servant de sa bibliothèque d’ouvertures (voir Section 2.9). 3. A l’ordinateur de jouer Lorsque l’ordinateur est prêt à jouer, il émet un ‘bip’ sonore et affiche à l’écran les coordonnées des cases de ‘départ’ et ‘d’arrivée’ de la pièce qu’il souhaite déplacer, comme illustré au Schéma 1-4. Les Schémas 1-5a et b vous en offrent un exemple. Appuyez la pièce indiquée sur sa case de ‘départ’ (la case E7, en l’occurrence) jusqu’à ce que vous entendiez un ‘bip’ sonore et que l’affichage de la case de ‘départ’ cède la place à la couleur et au symbole de cette pièce. (Le Schéma 1 indique les symboles). Appuyez ensuite cette même pièce sur la seconde case de l’écran - la case vers laquelle l’ordinateur souhaite déplacer sa pièce (la case E5, en l’occurrence). Une fois que vous aurez appuyé sur la case E5, l’affichage s’effacera et vous aurez conclu le coup de l’ordinateur ! L’écran indiquera que c’est de nouveau à vous de jouer. ዛዒዓዔዕዖዘዙዜ ዑ巀居巀尮巀居巀尭ዑ ዐ居巀居巀居巀居巀ዐ ዏ巀居巀居巀居巀居ዏ ዎ居巀居巀屁屄居巀ዎ ው巀居巀居巀居巀居ው ዌ居巀居巀居巀居巀ዌ ዋ巀居巀居巀居巀居ዋ ዊ居巀居巀居巀居巀ዊ ዝዒዓዔዕዖዘዙዞ Schéma 2-1a ዛዒዓዔዕዖዘዙዜ ዑ巀居巀尮巀居巀尭ዑ ዐ居巀居巀居巀居巀ዐ ዏ巀居巀居屄居巀居ዏ ዎ居巀居巀居巀居巀ዎ ው巀居巀居巀居巀居ው ዌ居巀居巀居巀居巀ዌ ዋ巀居巀居巀居巀居ዋ ዊ居巀居巀居巀居巀ዊ ዝዒዓዔዕዖዘዙዞ Schéma 2-1b Schéma 2-1c ዋ巀居巀居巀居巀居ዋ ዊ居巀居巀尮巀居尸ዊ ዝዒዓዔዕዖዘዙዞ Schéma 2-2 59 FRANÇAIS affichera brièvement la case ‘d’arrivée’ à droite de l’écran. E2:E4 4. Vous changez d’avis ? Revenez en arrière! Si vous changez d’avis sur un coup, il vous est possible de revenir en arrière. Appuyez sur la touche TAKE BACK pendant que c’est encore à vous de jouer. L’écran affichera la case ‘d’arrivée’. Appuyez la pièce sur la case indiquée. Vous verrez maintenant le symbole de la pièce ainsi que sa case de départ. Appuyez la pièce sur la case de ‘départ’ pour conclure le retour en arrière. Si le coup faisant l’objet du retour en arrière est une prise, l’ordinateur vous rappellera de remettre la pièce prise sur l’échiquier. Il le fera en affichant le type de la pièce ainsi que sa case. Appuyez cette pièce sur la case indiquée. Pour revenir en arrière sur un autre coup, appuyez de nouveau sur la touche TAKE BACK. Vous pourrez revenir en arrière sur 14 demi-coups (ou 7 coups pour chaque camp), ce qui vous permettra de tenter diverses expériences et d’essayer les diverses méthodes d’attaque “Et si ?”. Pour poursuivre la partie, il suffira de faire un autre coup ou d’appuyer sur la touche PLAY pour inviter l’ordinateur à jouer à votre place. Les Schémas 1-6a et b illustrent un exemple de retour en arrière du Cavalier, de la case G8 vers la case F6. Une fois que vous aurez appuyé sur la touche TAKE BACK, l’écran affichera F6, la case d’arrivée du Cavalier (Schéma 1-6a). Appuyez sur la case F6 et l’écran passera à l’affichage de la couleur et du symbole de la pièce (Cavalier Noir) ainsi que de la case de départ de la pièce (Schéma 1-6b). Appuyez de nouveau le Cavalier sur la case G8. A noter que les prises en passant ne peuvent pas être rejouées si le retour en arrière de leur coup précédant n’était pas autorisé. 5. Echec, mat ou nul ! Lorsqu’un Roi est en échec, le symbole d’échec s’affiche à l’écran (alternativement avec la pendule si celle-ci est en fonction). Lorsqu’une partie s’achève en échec et mat, nul par pat, triple répétition consécutive de la position ou nul par la règle des 50 coups, le symbole de fin de partie s’affiche à l’écran. Les symboles figurent au Schéma 1. 6. Entamez une nouvelle partie Appuyez à tout moment sur la touche NEW GAME pour entamer une nouvelle partie utilisant le niveau sélectionné en cours ainsi que la sélection antérieure de la fonction sonore. La pression de la touche NEW GAME effaçant la partie en cours de la mémoire de l’ordinateur, il vous faudra faire très attention à ne pas appuyer sur cette touche par inadvertance ! 60 7. 8. Entraînement aux ouvertures Votre ordinateur peut vous vous enseigner 16 séquences d’ouvertures telles que “l’Ouverture italienne”, le “Gambit de la Dame”. Appuyez sur la touche OPENINGS COACH et appuyez ensuite sur une des cases de A1 à B8 pour sélectionner une des ouvertures. Appuyez de nouveau sur la case pour choisir le degré d’assistance que vous recevrez de l’ordinateur et appuyez ensuite de nouveau sur la touche OPENINGS COACH pour commencer à vous exercer ou pour éprouver vos connaissances. Voir détails complémentaires à la Section 3.12. 2. D’AUTRES CARACTERISTIQUES DE BASE 2.1 Les pendules d’échecs Les pendules d’échecs incorporées, dont l’affichage à quatre chiffres indique alternativement pour chaque joueur, lorsque c’est à lui de jouer, le temps écoulé total ou le temps restant, surveillent vos temps ainsi que les temps de l’ordinateur. Une fois que le coup de l’ordinateur aura été enregistré, l’écran affichera votre pendule d’échecs jusqu’au moment où vous appuierez sur une touche ou sur une case. L’appareil tiendra cependant le compte de vos temps jusqu’au moment où vous appuierez sur la touche ‘d’arrivée’. Lorsque vous aurez joué, l’écran passera immédiatement à l’affichage de la pendule de l’ordinateur, qui restera affichée pendant que celui-ci est en phase de réflexion et jusqu’au moment où il indiquera qu’il est prêt à jouer. L’ordinateur pourrait toutefois, à la place des temps, afficher la mention Coch 61 FRANÇAIS Changez de niveau Votre ordinateur d’échecs vous propose 64 niveaux de jeu, correspondant chacun à une case de l’échiquier. Avec les onze modes d’enseignement poussé, vous avez le choix entre 768 sélections de niveaux. Appuyez sur la touche LEVEL pour accéder au Mode Niveaux. Le niveau en cours s’affichera à l’écran (par exemple, le niveau correspondant à la case A3 de l’échiquier sera représenté par L:A3 et Fun3 alternativement). Pour changer de niveau, il suffira d’appuyer sur une des cases de l’échiquier et le niveau correspondant s’affichera à l’écran. Appuyez de nouveau sur la touche LEVEL pour quitter le Mode Niveaux. Pour toute information complémentaire sur les niveaux de jeu, voir Section 3. consécutivement à votre coup, cependant qu’il analyse si le coup que vous avez fait est bon ou mauvais. S’il estime que votre coup n’est pas bon, il émettra deux tonalités graves. Pendant la première heure de la partie ou si le temps restant est inférieur à une heure, l’écran affichera les MINUTES:SECONDES séparées par deux points fixes. Si le temps écoulé total dépasse une heure ou si le temps restant dépasse une heure, l’écran affichera les HEURES:MINUTES et les deux points clignoteront tout le temps que sera affichée la pendule. Remarques : la pendule s’arrêtera si vous vérifiez le niveau, si vous vérifiez l’échiquier ou si vous éteignez l’appareil. Les temps demeureront cependant conservés dans la mémoire et la pendule s’affichera de nouveau à l’écran dès que vous reprendrez la partie. La pendule se réinitialisera si vous changez de niveau ou si, en Mode Niveaux, vous appuyez sur une case. Lorsque votre Roi est en échec le symbole d’échec s’affiche à l’écran alternativement avec la pendule. Aux niveaux où vous jouez contre elle, la pendule comptera à rebours à partir du temps que vous aurez sélectionné pour indiquer le temps restant. Lorsque la première pendule atteindra zéro, trois ‘bips’ sonores graves retentiront pour signaler que le temps est dépassé. La pendule entamera alors le comptage progressif du temps à partir de zéro. Aux niveaux où le temps est étranger à la compétition, la pendule compte progressivement pour indiquer le temps écoulé total. Si vous revenez en arrière pendant que vous jouez contre la pendule, aucune inversion de la pendule n’accompagnera les retours en arrière. La pendule s’arrêtera tout simplement jusqu’à ce que vous fassiez votre prochain coup. 2.2 Prises et coups spéciaux a. LES PRISES : pour prendre une pièce, appuyez légèrement sur la pièce à déplacer, retirez la pièce prise de l’échiquier et appuyez votre pièce sur la case de la pièce prise. b. LES PRISES EN PASSANT : dans ce type de prise, l’ordinateur vous rappelle de retirer de l’échiquier le pion pris en affichant les coordonnées du pion. Appuyez sur le pion pris avant de le retirer de l’échiquier. Voir Schémas 2-1a, b et c. 62 2.3 Coups illégaux Votre ordinateur n’acceptera jamais de coups illégaux. Si vous tentez d’en faire, vous entendrez un ‘bip’ d’erreur de tonalité grave et l’écran affichera la case de ‘départ’ de la pièce. Appuyez de nouveau la pièce sur cette case pour annuler le coup illégal et faites un nouveau coup. Si vous n’exécutez pas correctement un coup de l’ordinateur, vous entendrez également un ‘bip’ d’erreur. Cela signifie que vous avez soit déplacé une pièce erronée, soit déplacé la pièce sur une case erronée. Vérifiez l’affichage et faites un nouveau coup. Si vous avez appuyé sur une pièce et la case de ‘départ’ s’est affichée à l’écran et vous décidez ensuite de ne pas faire ce coup, il suffira d’appuyer de nouveau sur cette même case pour annuler l’entrée. Faites attention à ne pas commettre d’erreurs lorsque la fonction sonore est désactivée car vous ne pourrez pas entendre les ‘bips’ d’erreur. 63 FRANÇAIS c. PROMOTION ET SOUS-PROMOTION DES PIONS : Pour promouvoir un pion, appuyez d’abord comme d’habitude votre pion sur sa case de ‘départ’. L’ordinateur affichera votre case de ‘départ’ ainsi que le symbole de la Dame (alternativement avec la pendule). Dès que vous appuierez votre pion sur la case ‘d’arrivée’, celui-ci sera automatiquement promu au rang de Dame. N’oubliez pas d’échanger votre pièce sur l’échiquier ! Pour sous-promouvoir votre pion au rang de Tour, Fou ou Cavalier, il vous faudra appuyer sur la touche-symbole appropriée entre les pressions des cases de ‘départ’ et ‘d’arrivée’. Lorsque l’ordinateur décide de promouvoir un pion, il indique comme à l’accoutumée les cases de ‘départ’ et ‘d’arrivée’. Une fois que vous aurez appuyé sur sa case de ‘départ’, l’écran affichera le type de pièce que le pion est destiné à remplacer en affichant le symbole de la pièce et la case ‘d’arrivée’. Appuyez la nouvelle pièce ainsi indiquée sur la case ‘d’arrivée’ pour conclure la promotion de l’ordinateur. d. LE ROQUE : l’ordinateur identifie automatiquement une manoeuvre de roque après le déplacement du Roi. Une fois que vous aurez appuyé le Roi sur sa case de ‘départ’ puis sur sa case ‘d’arrivée’, l’ordinateur affichera la case de ‘départ’ de la Tour. Appuyez sur cette case. L’ordinateur affichera alors le symbole de la Tour, accompagné de la case d’arrivée de la Tour. Appuyez sur la case ‘d’arrivée’ de la Tour pour conclure le coup (Voir Schéma 2-2). 2.4 Interruption de la recherche de l’ordinateur Pour interrompre l’ordinateur pendant qu’il est en phase de réflexion, appuyez sur la touche PLAY et il fera le meilleur coup qu’il ait trouvé à ce stade. Cette fonction peut s’avérer utile aux niveaux supérieurs où la recherche du meilleur coup possible peut être plutôt longue. 2.5 Changement de camp avec l’ordinateur Pour changer de camp avec l’ordinateur, appuyez sur la touche PLAY lorsque c’est à vous de jouer. L’ordinateur fera le coup suivant pour votre camp. Changez de camp aussi souvent que vous le souhaitez ! 2.6 Demandez conseil à l’ordinateur Si vous avez besoin d’aide, l’ordinateur vous indiquera ce qu’il ferait à votre place ! Appuyez sur la touche PLAY lorsque c’est à vous de jouer et l’ordinateur fera votre prochain coup. Pour adopter ce coup, faites le coup affiché à l’écran, appuyez de nouveau sur la touche PLAY et l’ordinateur fera son prochain coup ; poursuivez ensuite la partie en faisant votre propre coup suivant. Si vous ne souhaitez pas utiliser le coup suggéré par l’ordinateur, faites d’abord sur l’échiquier le coup affiché et revenez ensuite en arrière sur ce coup. Le coup sera ainsi annulé et vous pourrez faire votre propre coup. 2.7 L’ordinateur joue contre lui-même Pour observer l’ordinateur jouer contre lui-même, appuyez sur la touche PLAY à l’occasion de chaque coup. Etudiez ses stratégies de jeu pour approfondir vos connaissances en matière d’échecs ! 2.8. Mémorisation de la partie et mise hors circuit automatique Vous pouvez interrompre une partie en appuyant sur la touche GO/STOP pour éteindre l’ordinateur. L’ordinateur “se souviendra” de votre position pendant une durée pouvant aller jusqu’à 300 heures (avec des piles alcalines neuves). Lorsque vous rallumerez votre ordinateur, vous pourrez reprendre la partie exactement où vous l’avez abandonnée ! Si, lorsque l’ordinateur n’est pas en phase de réflexion, vous n’appuyez sur aucune touche ou ne faites aucun coup pendant 20 minutes, l’ordinateur s’éteindra pour économiser l’énergie et conservera la partie dans sa mémoire. Appuyez sur la touche GO/STOP pour reprendre la partie inachevée. 64 2.9 Bibliothèque d’ouvertures En début de partie, l’ordinateur jouera souvent de manière instantanée. C’est parce qu’il joue des coups issus de sa mémoire en se servant de sa bibliothèque d’ouvertures. Si la position en cours existe dans sa bibliothèque d’ouvertures, l’ordinateur jouera automatiquement en réponse un coup directement issu de sa mémoire, sans avoir à réfléchir à son coup. 65 TACTIQUES PROFONDEUR FIXE TOURNOI TEMPS SUPPLEMENTAIRE BRONSTEIN BLITZ NIVEAUX AMATEUR NIVEAUX DIVERTISSEMENT 3.1 Les Niveaux de Jeu Avec sa gamme de 768 sélections (y compris les modes d’Enseignement poussé), cet ordinateur d’échecs vous offre la possibilité d’apprendre et de vous perfectionner ! Comme le décrit le tableau des niveaux de jeu ci-dessous, chaque niveau correspond à l’une des 64 cases de l’échiquier. Les niveaux classiques CHOISISSEZ UN NIVEAU PARMI LES 64 CASES DE L’ECHIQUIER sont classés en 8 catégories s’adaptant aux aptitudes des divers utilisateurs : 8 • Les Niveaux Divertissement : A1 à A8. Pour les vrais débutants. Le niveau A1 est 7 le plus facile. • Les Niveaux Amateur : B1 à C8. Pour 6 les parties où la pendule n’intervient pas. Gamme de difficulté complète allant du 5 facile (B1) à l’extrêmement complexe (C8). Le niveau sélectionné lors de la 4 mise en circuit initiale de l’ordinateur est le niveau B4. 3 • Le Blitz : D1 à D8. Connu également sous le nom de “K.O.”. La partie doit 2 s’achever dans le temps sélectionné. • Bronstein : E1 à E4. La partie doit 1 s’achever dans le temps sélectionné, A B C D E F G H auquel vient ensuite s’ajouter un délai à FRANÇAIS 3. NIVEAUX ET MODES SPECIAUX titre de compensation pour chaque coup. La compensation est le temps le plus bref entre le temps réel employé et le temps autorisé. • Temps Supplémentaire : E5 à E8. La partie doit s’achever dans le temps sélectionné, auquel vient ensuite s’ajouter le délai prescrit à titre de compensation pour chaque coup avant que le coup ne soit fait. • Tournoi : F1 à F8. Un certain nombre de coups doivent être faits dans le temps imparti. • Profondeur Fixe : G1 à G8. La force de l’ordinateur est limitée du fait qu’il ne peut pas prévoir un nombre de coups supérieur au nombre sélectionné. • Tactiques : H1 à H8. La force de l’ordinateur est limitée du fait qu’il ne peut pas prévoir un nombre de coups supérieur au nombre sélectionné et qu’il ne peut pas non plus estimer son avantage stratégique. N’oubliez pas, lorsque vous sélectionnez votre niveau, que quand l’ordinateur dispose de plus de temps pour réfléchir, il devient plus fort et joue mieux - exactement comme un joueur humain ! Aiguisez vos aptitudes ! - Après avoir, à chaque niveau, remporté une victoire sur l’ordinateur, maîtrisez le niveau suivant. Défiez-vous sans cesse et approfondissez vos connaissances en matière d’échecs ! 3.2 Les Niveaux Divertissement La sélection d’une des cases de A1 à A8 vous livrera les niveaux de divertissement. A ces niveaux, l’ordinateur ne se livre pas à une recherche approfondie pour trouver le meilleur coup disponible. Il ne tient aucun compte des points et se sert, en outre, de programmes de calcul d’adresses qui l’obligent de temps en temps à faire un coup qui n’est pas le meilleur qu’il ait trouvé. Une variabilité toute neuve est ainsi introduite dans les réponses de l’ordinateur, qui semblera même parfois commettre des erreurs d’évaluation quasi humaines. Le niveau A1 est le niveau le plus faible et le niveau A8 est légèrement plus fort. 3.3 Les Niveaux Amateur La sélection des niveaux amateur vous permet de contrôler le niveau de difficulté du jeu de l’ordinateur en limitant le temps moyen dont il dispose pour sélectionner son coup. Au fur et à mesure que le niveau de difficulté augmentera, l’ordinateur se mettra à prévoir ses coups avec plus de profondeur et jouera donc un jeu plus fort. Lorsqu’un de ces niveaux aura été sélectionné parmi les colonnes de cases B ou C, l’écran affichera toutes les secondes, en les faisant alterner, la sélection du niveau et le temps 66 de réponse moyen de l’ordinateur. Votre choix figure au tableau ci-dessous : Temps par coup Affichage B1 .............................. 1 sec .............................. L:B1/00:01 B2 .............................. 2 sec .............................. L:B2/00:02 B3 .............................. 3 sec .............................. L:B3/00:03 B4 .............................. 5 sec .............................. L:B4/00:05 B5 ............................. 10 sec ............................. L:B5/00:10 B6 ............................. 15 sec ............................. L:B6/00:15 B7 ............................. 20 sec ............................. L:B7/00:20 B8 ............................. 30 sec ............................. L:B8/00:30 C1 ............................. 45 sec ............................. L:c1/00:45 C2 .............................. 1 min ............................. L:c2/01:00 C3 .............................. 2 min ............................. L:c3/02:00 C4 .............................. 3 min ............................. L:c4/03:00 C5 .............................. 4 min ............................. L:c5/04:00 C6 .............................. 5 min ............................. L:c6/05:00 C7 ............................. 10 min ............................ L:c7/10:00 C8 ............................. 15 min ............................ L:c8/15:00 3.4 Les Niveaux Blitz Les niveaux de la colonne de cases D constituent les niveaux Blitz. Si vous souhaitez jouer une partie d’échecs rapides ou une partie “K.O.”, il vous est possible de puiser dans la gamme des temps autorisés pour terminer la partie. Vous pouvez choisir une partie de 5 minutes de type “autocuiseur” ou une partie plus calme d’1 H 30. Lorsque vous sélectionnez une de ces cases, l’écran affiche toutes les secondes, en les faisant alterner, le nom de la case que vous avez sélectionnée et la limite de temps autorisée pour la partie. Case de l’échiquier Temps par coup Affichage D1 ................................ 5 min ........................... L:D1/05:00 D2 ............................... 10 min .......................... L:D2/10:00 D3 ............................... 15 min .......................... L:D3/15:00 67 FRANÇAIS Case de l’échiquier D4 ............................... D5 ............................... D6 ............................... D7 ............................... D8 ............................... 25 min .......................... L:D4/25:00 30 min .......................... L:D5/30:00 45 min .......................... L:D6/45:00 60 min ........................... L:D7/1:00 90 min ........................... L:D8/1:30 3.5 Les Niveaux Bronstein La sélection d’une case de E1 à E4 sur l’échiquier vous permettra de sélectionner une limite de temps pour la partie d’après le système Bronstein. Un temps de base sera sélectionné pour la partie et un incrément de quelques secondes viendra ensuite s’ajouter à ce temps pour accompagner chaque coup. L’incrément est le temps le plus bref entre le temps gratuit indiqué au tableau ci-dessous et le temps réel employé pour le coup. Votre choix figure au tableau. Lorsque vous sélectionnez un de ces niveaux, l’écran fait tourner dans une boucle trois éléments d’information, dont chacun s’affichera pendant 1 seconde. Par exemple, si vous choisissez E2, vous verrez : • La case choisie L:E2 puis ... • Le temps de base, exprimé en minutes 10:00 puis ... • Le temps gratuit, exprimé en secondes 00:05 Case de l’échiquier Durée de la partie Temps gratuit par coup Affichage E1 ......................... 5 min .......................... 3 sec ..................... L:E1/05:00/00:03 E2 ........................ 10 min ......................... 5 sec ..................... L:E2/10:00/00:05 E3 ........................ 15 min ........................ 10 sec .................... L:E3/15:00/00:10 E4 ........................ 20 min ........................ 10 sec .................... L:E4/20:00/00:10 3.6 Les Niveaux à Temps Supplémentaire La sélection d’une case dans la gamme de E5 à E8 vous livrera les Niveaux à Temps Supplémentaire. Ces niveaux ressemblent aux Niveaux Bronstein sauf que l’incrément de temps est toujours de 2 secondes et qu’il s’ajoute au temps avant que le coup ne soit fait. Case de l’échiquier Durée de la partie Temps gratuit par coup Affichage E5 ......................... 3 min .......................... 2 sec ..................... L:E5/03:00/00:02 E6 ........................ 10 min ......................... 2 sec ..................... L:E6/10:00/00:02 68 3.7 Les Niveaux Tournoi La colonne de cases F fournit 8 niveaux tournoi. Lorsque qu’une de ces cases est sélectionnée, le joueur ainsi que l’ordinateur doivent faire le nombre de coups prescrits dans le temps imparti. Par exemple, si vous choisissez F3, il vous faudra faire 40 coups en 2 heures en vertu du premier contrôle de temps. Si la partie ne s’achève pas dans ce délai, la période de second contrôle de temps entrera en jeu et il vous faudra faire 20 coups en 1 heure. Et si ce second contrôle de temps s’avère inefficace, il sera réitéré jusqu’à ce qu’une conclusion soit atteinte. Conformément aux règles du tournoi, le temps restant lors de la conclusion des coups durant le premier contrôle de temps est reporté et ajouté au temps autorisé pour le second contrôle de temps. Par exemple, si vous choisissez le niveau F3 et si vous concluez les 40 premiers coups dans l’intervalle d’une heure seulement, vous aurez droit à 2 heures pour les Premier contrôle de temps Second contrôle de temps Case de l’échlquler Coups Temps Coups Temps F1 30 30 min 30 30 min L:F1/30/0:30 F2 30 1 h 30 min temp restant 1h L:F2/30/1:30 F3 40 2h 20 1h L:F3/40/2:00 F4 40 2h temp restant 1h L:F4/40/2:00 F5 40 2 h 30 min 16 1h L:F5/40/2:30 Affichage F6 45 1 h 30 min 15 30 min L:F6/45/1:30 F7 50 2 h 30 min 20 1h L:F7/50/2:30 F8 60 1h 30 30 min L:F8/60/1:00 69 FRANÇAIS E7 ........................ 20 min ......................... 2 sec ..................... L:E7/20:00/00:02 E8 ........................ 50 min ......................... 2 sec ..................... L:E8/50:00/00:02 20 coups suivants. Le temps excédentaire éventuel sera reporté et s’accumulera ainsi tout au long de la partie. Lorsque vous sélectionnez l’un de ces niveaux tournoi, l’écran fait tourner dans une boucle trois éléments d’information, dont chacun s’affichera pendant 1 seconde. Par exemple, si vous choisissez F4, l’écran affichera : • La case choisie L:F4 puis ... • Le nombre de coups dans le premier contrôle de temps 40 puis ... • La durée du premier contrôle de temps 2:00 3.8 Les Niveaux Profondeur Fixe Les niveaux profondeur fixe de la colonne G limitent la force de jeu de l’ordinateur, non pas en limitant le temps de recherche de son prochain coup, mais en limitant le nombre de coups à prévoir. Aux niveaux inférieurs, l’ordinateur se comporte plus comme un débutant. Au niveau le plus faible, G1, où l’ordinateur ne prévoit qu’un demi-coup, il n’anticipe pas du tout sur la partie et pourrait même laisser échapper un mat que votre prochain coup vous permettra de réaliser. Par contre, l’ordinateur passera en revue toutes les possibilités comprises dans les 8 demi-coups suivants (G8). Dans ce cas, l’écran affichera toutes les secondes, en les faisant alterner, le niveau que vous avez sélectionné et le nombre de demi-coups à portée de la recherche de l’ordinateur : • La case sélectionnée L:G5 et ensuite ... • Le nombre de demi- coups à portée de l’ordinateur 5PLY 3.9 Les Niveaux Tactiques Les niveaux tactiques se situent dans la dernière colonne de cases, la colonne ‘H’. Ces niveaux limitent également le nombre de demi-coups que l’ordinateur prévoit, mais dans ce cas l’ordinateur n’évalue pas les avantages stratégiques et ne recherche que les gains de matériel tels que la mise en échec et mat ou en pat. De nouveau, le nombre de demi-coups à sa portée que l’ordinateur passe en revue correspond à la case de l’échiquier – H1 signifie que l’ordinateur a devant lui un demi-coup ; H8 signifie qu’il en a 8. L’écran affichera toutes les secondes, en les faisant alterner, le niveau que vous avez sélectionné et le nombre de demi-coups à portée de la recherche de l’ordinateur, exactement 70 L:H8 8PLY et ensuite ... 3.10 Les Modes Enseignement Votre ordinateur d’échecs comporte onze Modes d’Enseignement Poussé incorporés. Cette fonction vous permet d’apprendre les coups classiques et de maîtriser à tour de rôle les tactiques des pièces. Dans chacun des modes Enseignement individuels, les seules pièces qui se trouveront sur l’échiquier seront les Rois et les Pions, ou les Rois et les Pions et un ou deux types de pièces sélectionnés. Ceci permettra aux débutants de concentrer leur attention sur une pièce à la fois, sans se laisser égarer ou distraire par d’autres pièces qui se trouveraient sur l’échiquier. Les joueurs plus chevronnés pourront faire usage de cette fonction pour s’exercer à jouer avec des combinaisons de pièces sélectionnées. Il conviendra de noter les points suivants concernant les Niveaux et les Modes Enseignement : • Si, à n’importe quel point de la partie, vous appuyez sur la touche NEW GAME, l’ordinateur quittera le Mode Enseignement pour retourner au jeu normal (32 pièces), le niveau en cours restant en vigueur. • Si, après avoir appuyé sur la touche LEVEL, vous décidez de ne pas changer de niveau ou de mode d’Enseignement, il suffira d’appuyer de nouveau sur la touche LEVEL et l’état en cours demeurera inchangé. • Vous pourrez choisir un nouveau niveau à tout moment lorsque c’est à vous de jouer. La pendule toutefois sera réinitialisée. • Si, au cours de la sélection d’un mode d’Enseignement, vous appuyez sur plus de 2 touches-symboles, les sélections des 2 derniers symboles seront seules valables au moment de quitter le Mode Niveaux. • Si, en Mode Niveaux, vous appuyez par inadvertance sur une touche-symbole, la partie en cours sera perdue dès que vous quitterez le Mode Niveaux. Pour poursuivre la partie en cours, appuyez sur la case correspondant au niveau de jeu en cours avant de quitter le Mode Niveaux. La pendule, cependant, devra être réinitialisée. 71 FRANÇAIS comme pour les niveaux profondeur fixe : • La case sélectionnée • Le nombre de demi- coups à portée de 3.11 Sélection des niveaux et des modes d’enseignement Appuyez sur la touche LEVEL pour accéder au Mode Niveaux. Le niveau en cours s’affichera (par exemple, le Niveau 3 sera représenté alternativement par L:A3 et Fun3, représentant le niveau sélectionné par la pression de la case de l’échiquier A3). Pour changer de niveau, il suffira d’appuyer sur une case de l’échiquier et le nouveau niveau s’affichera à l’écran, alternativement avec les détails inhérents au niveau. Appuyez sur la touche LEVEL pour quitter le Mode Niveaux. Les séquences de touches suivantes ainsi que l’effet qu’elles produisent sont dignes d’être notés : LEVEL, LEVEL Aucun changement. Leniveau préalablement sélectionné reste en vigueur LEVEL, Case, LEVEL Sélection d’un nouveau niveau et réinitialisation de la pendule. LEVEL, Touche-symbole, LEVEL La position de départ du mode d’Enseignement sélectionné est réglée au niveau préalablement sélectionné. LEVEL, Case, Touche-Symbole, LEVEL La position de départ du mode d’Enseignement sélectionné est réglée à un nouveau niveau. LEVEL, Touche-Symbole, Case, LEVEL Un nouveau niveau est réglé, la sélection antérieure du mode d’Enseignement est annulée, la partie présente est retenue. Pour sélectionner le mode d’enseignement, appuyez sur la touche LEVEL. L’écran affichera le niveau de difficulté, indiqué par la case de l’échiquier correspondante, alternativement avec les détails inhérents au niveau. Pour sélectionner un mode d’enseignement, appuyez sur la ou les deux touche(s)-symbole(s) appropriée(s) (%, $, #, @ ou !) que vous souhaitez utiliser. L’écran affichera alors les pièces sélectionnées. Par exemple, si vous souhaitez jouer les Rois, Fous, Cavaliers et Pions, après avoir appuyé sur la touche LEVEL, il vous faudra appuyer sur # et @. L’écran affichera votre sélection. Appuyez ensuite sur la touche LEVEL pour quitter le Mode Niveaux, enregistrer votre sélection dans l’ordinateur et entamer la partie. Etant donné que le roi est toujours requis dans toute partie, il n’est pas nécessaire de sélectionner cette pièce en Mode Enseignement, et en fait, la pression de la touche & constitue la manière de sélectionner un jeu normal de 32 pièces. 72 A noter que la fonction Non Auto sera automatiquement annulée chaque fois que vous sélectionnerez un mode d’enseignement au mode niveaux présent. Les onze modes d’enseignement et le jeu normal sont indiqués par les affichages suivants : Affichage 3.12 Le Mode Entraînement aux Ouvertures 16 séquences d’ouvertures différentes sont enregistrées dans la mémoire de l’ordinateur. Ces séquences sont jouées pour que vous puissiez les apprendre. Appuyez sur la touche OPENINGS COACH et, lors de la sélection initiale, l’ordinateur émettra un ‘bip’ sonore et l’affichage se mettra à clignoter : o(: Vous pourrez ensuite choisir l’ouverture que vous souhaitez revoir en appuyant sur une des cases de A1 à B8. La liste des ouvertures disponibles figure au Schéma 3-1. Par exemple, pour sélectionner le troisième programme d’entraînement aux ouvertures, appuyez sur la case A3 et le symbole o(:3 s’affichera en clignotant à l’écran. Ceci confirmera que le troisième programme d’entraînement aux ouvertures a été sélectionné et les deux barres indiquent que l’ordinateur affichera les coups des deux camps, afin que vous puissiez les observer et en tirer un enseignement. Appuyez de nouveau sur la même case et l’écran 73 FRANÇAIS Mode Enseignement Rois et Pions ............................................................. te:_p Rois, Cavaliers et Pions ............................................ te:_n Rois, Fous et Pions ................................................... te:_b Rois, Tours et Pions .................................................. te:_r Rois, Dames et Pions ............................................... te:_q Rois, Cavaliers, Fous et Pions .................................. te:nb Rois, Cavaliers, Tours et Pions ................................. te:nr Rois, Cavaliers, Dames et Pions .............................. te:nq Rois, Fous, Tours et Pions ........................................ te:br Rois, Fous, Dames et Pions ..................................... te:bq Rois, Tours, Dames et Pions ..................................... te:rq Toutes les pièces (jeu normal) .................................. te:sb Schéma 3-1 Les coups incorporés aux programmes d’Entraînement aux Ouvertures Case Nom A1 A2 A3 L’ouverture italienne La défense des Deux Cavaliers L’ouverture espagnole A4 La défense sicilienne A5 A6 A7 A8 B1 B2 B3 B4 B5 B6 B7 B8 La défense française La défense Caro-Kann La défense scandinave La défense Alekhine Le gambit de la Dame Le gambit de la Dame accepté La défense Nimzo-indienne La défense Ouest-indienne La défense Est-indienne La défense Gruenfeld La défense hollandaise L’ouverture anglaise Coups e2e4, e7e5, g1f3, b8c6, f1c4, f8c5 e2e4, e7e5, g1f3, b8c6, f1c4, g8f6 e2e4, e7e5, g1f3, b8c6, f1b5, a7a6, b5a4, g8f6, e1g1, b7b5 e2e4, c7c5, g1f3, d7d6, d2d4, c5d4, f3d4, g8f6, b1c3 e2e4, e7e6, d2d4, d7d5 e2e4, c7c6, d2d4, d7d5, b1c3, d5e4 e2e4, d7d5, e4d5, d8d5, b1c3, d5a5 e2e4, g8f6, e4e5, f6d5 d2d4, d7d5, c2c4, e7e6, b1c3, g8f6, c1g5, f8e7 d2d4, d7d5, c2c4, d5c4 d2d4, g8f6, c2c4, e7e6, b1c3, f8b4 d2d4, g8f6, c2c4, e7e6, g1f3, b7b6 d2d4, g8f6, c2c4, g7g6, b1c3, f8g7, e2e4, d7d6 d2d4, g8f6, c2c4, g7g6, b1c3, d7d5 d2d4, f7f5, c2c4, g8f6, b1c3, e7e6 c2c4, e7e5, b1c3, g8f6, g1f3 passera à o_:3, indiquant que l’ordinateur jouera les Blancs et vous laissera exécuter les coups des Noirs. Une autre pression de la touche modifiera la barre de droite pour indiquer que l’ordinateur jouera les Noirs pendant que vous jouez les Blancs, et une nouvelle pression éliminera toutes les barres, ce qui signifie que l’ordinateur vous laissera maître de faire tous les coups et se contentera de surveiller que vous les exécutez correctement. Appuyez de 74 nouveau sur la touche OPENINGS COACH et l’écran indiquera que vous devez jouer. Pendant que vous jouez, vous pourrez appuyer sur la touche PLAY pour demander à l’ordinateur de vous rappeler le prochain coup. Chaque fois que vous jouerez correctement, l’ordinateur confirmera le coup en émettant un ‘bip’ sonore unique, mais si vous avez fait un coup erroné, il émettra un double ‘bip’ sonore et la case de ‘départ’ restera affichée à l’écran. Appuyez sur la case ‘d’arrivée’ correcte pour conclure le coup ou sur la case de ‘départ’ pour l’annuler. Au terme de la séquence d’ouvertures, vous pourrez, si vous le souhaitez, continuer et poursuivre la partie. La pendule n’est pas utilisée dans ce mode et le mode Non Automatique, s’il a été sélectionné, n’entre en vigueur qu’une fois conclus les coups d’ouverture. Pour retourner à un jeu normal, il vous suffira d’appuyer sur la touche NEW GAME et vous retrouverez l’échiquier normal. 3.13 Le Mode Vérification. Vérifiez les positions des pièces ! Si vous renversez les pièces ou si vous estimez que la position de l’une des pièces est incorrecte, vous pourrez demander à l’ordinateur de procéder à une vérification. Il vous suffira d’appuyer sur la touche-symbole de la pièce en question. L’ordinateur affichera le symbole de la couleur et du type de la pièce, ainsi que la case sur laquelle elle devrait se trouver. Appuyez de nouveau sur la touche pour voir la position de la pièce suivante du même type, et ainsi de suite jusqu’à ce que toutes les pièces qui devraient se trouver sur l’échiquier soient affichées. Les pièces blanches s’afficheront d’abord, suivies des pièces Noires. Lorsqu’il n’y aura plus de pièces de ce type à signaler, l’écran retournera à l’affichage du camp qui doit Pression des touches Appuyez une première fois sur @ L’écran affiche Signification Cavalier Blanc sur B1 _n:B1 Appuyez une deuxième fois sur @ )n:B8 Cavalier Noir sur B8 Appuyez une troisième fois sur @ )n:F6 Cavalier Noir sur F6 Appuyez une quatrième fois sur @ _n:__ (bip, bip) Plus de Cavaliers, aux Blancs de jouer 75 FRANÇAIS A noter que la méthode choisie pour jouer les programmes d’Entraînement aux Ouvertures sera conservée en mémoire jusqu’à ce qu’elle soit choisie à nouveau. jouer et deux ‘bips’ sonores retentiront pour attirer votre attention. L’exemple ci-dessous illustre la séquence d’affichage. Cet exemple illustre que l’un des cavaliers blancs a été pris et que c’est maintenant aux blancs de jouer. Pour vérifier d’autres pièces, refaites les mêmes étapes en vous servant des autres touches-symboles. Lorsque vous aurez fini, il vous suffira de faire votre prochain coup. La pendule, entre-temps, sera momentanément arrêtée. L’ordinateur quittera automatiquement le Mode Vérification si aucune touche-symbole n’est enfoncée pendant 5 secondes environ. 3.14 Le Mode Non Automatique Normalement, chaque fois que vous enregistrez un coup, l’ordinateur riposte automatiquement par un contrecoup. Si vous appuyez sur la touche NON AUTO, l’ordinateur répondra par un ‘bip’ sonore et vous pourrez enregistrer tous les coups pour les deux camps, un à la fois, sans permettre à l’ordinateur de riposter. Cette fonction particulière pourra être utilisée de plusieurs façons différentes : • Explorez les parties de Maitre. Il est intéressant d’appuyer sur la touche PLAY pour voir ce que ferait l’ordinateur dans n’importe quelle position ! • Etudiez les variantes d’ouvertures en les entrant manuellement ! • Jouez aux échecs contre un ami, l’ordinateur contrôlant la légalité des coups des deux camps et surveillant les temps pour les deux camps ! Si vous avez besoin d’aide pour un coup, appuyez sur la touche PLAY et l’ordinateur fera le coup suivant. Après que l’ordinateur aura joué, le Mode Non Auto restera activé et vous pourrez poursuivre votre partie ! • Rejouez jusqu’à n’importe quelle position de l’échiquier pour réétudier vos coups Pour quitter le Mode Non Auto et retourner au jeu normal, appuyez de nouveau sur la touche NON AUTO. Un double ‘bip’ sonore vérifiera que ce mode a été annulé. Notez que le Mode Non Auto est aussi automatiquement annulé lorsque vous appuyez sur la touche NEW GAME ou choisissez un des modes d’Enseignement en quittant le Mode Niveaux. 76 4. DETAILS TECHNIQUES 4.2 Entretien Votre ordinateur d’échecs est un appareil électronique de précision. Il doit être manipulé avec précaution et ne doit pas être soumis à des températures extrêmes ou exposé à l’humidité. Veillez à ôter les piles avant de nettoyer l’appareil. N’utilisez aucun produit chimique pour le nettoyer car ceci risquerait d’endommager les surfaces en plastique. Les piles faibles doivent être remplacées au plus tôt car elles risquent de fuir et d’endommager l’appareil. Il convient de noter également les consignes suivantes concernant l’utilisation de piles. Avertissement : utilisez exclusivement des piles alcalines ou au carbone-zinc. Ne mélangez pas des piles de types différents, ou des piles neuves et usagées. Ne rechargez pas de piles non rechargeables. Utilisez exclusivement des piles du même type que les piles recommandées ou de type équivalent. Veillez à respecter la polarité exacte lors de l’installation des piles. Les piles vides seront retirées sans tarder de l’appareil. Ne court-circuitez pas les bornes d’alimentation. 4.3 Fiche Technique Touches : Affichage LCD : Son : Piles : Consommation d’énergie : Dimensions : 14 Surface de visualisation 18 x 9 mm Vibreur sonore piézo-électrique 2 piles “AAA”/AM4/R03 (de 1,5V) 10 mW 176 x 100 x 35 mm La société Saitek se réserve le droit d’apporter, sans préavis, toute modification technique susceptible d’améliorer ses produits. 77 FRANÇAIS 4.1 La Fonction ACL Les ordinateurs risquent parfois de se “verrouiller” sous l’effet d’une décharge d’électricité statique ou d’autres perturbations électriques. Si cela se produit, il conviendra d’ôter les piles et d’enfoncer pendant au moins une seconde, une épingle ou tout autre objet pointu dans l’orifice ACL situé à la base de l’appareil. Ceci réinitialisera l’appareil. GUIDE DE DEPANNAGE SYMPTOMES CAUSES POSSIBLES QUE FAIRE ? L’ordinateur ne réagit pas ou se “verrouille” en cours de partie. • Les piles ne sont pas installées correctement. • Les piles sont faibles ou gâtées. • Une décharge électrostatique ou une perturbation électrique a provoqué le verrouillage. • Réinstallez les piles comme illustré au Schéma 1-1. • Remplacez les piles. • Utilisez la fonction ACL pour réinitialiser l’ordinateur en procédant de la manière décrite à la Section 4.1. L’affichage est faible. • Les piles sont faibles. • Remplacez les piles. L’ordinateur ne joue pas de coup. • Le Mode Automatique est activé. • Appuyez sur la touche NON AUTO pour désactiver ce mode. • Appuyez sur la touche PLAY pour forcer éventuellement l’ordinateur à jouer. • Vous avez sélectionné un niveau élevé l’ordinateur est encore en phase de réflexion. L’ordinateur n’accepte pas votre coup. • Est-ce à vous de jouer ? Votre Roi est-il en échec ? Votre coup mettra-t-il votre Roi en échec ? Avez-vous déplacé d’abord votre Tour pour entamer une manoeuvre de roque ? Etes-vous en train de vous déplacer vers une case illégale ? • L’ordinateur réfléchit. • Vous n’avez pas correctement enregistré le dernier coup de l’ordinateur (vous avez appuyé sur une case erronée). L’ordinateur semble jouer des coups illégaux. L’ordinateur est muet. • Une tonalité grave signifie que vous faites erreur. Vérifiez les règles du jeu d’échecs. Servez-vous de la touche TAKE BACK pour refaire le dernier coup. • Pour interrompre l’ordinateur, appuyez sur la touche PLAY. • Vérifiez le coup affiché. Appuyez sur la touche correcte pour conclure le coup. • L’ordinateur a fait un des coups spéciaux comme une prise en passant, une manoeuvre de roque ou une promotion de pion. • La position sur l’échiquier n’est pas correcte. • Vérifiez les règles. • La touche du Son a été enfoncée pour supprimer le son. • Appuyez sur la touche SOUND pour rétablir le son. 78 • Vérifiez l’échiquier en procédant de la manière décrite à la Section 3.13. INIZIO RAPIDO Per cominciare subito a giocare senza dover prima leggere tutto il manuale, seguite questi semplici passi di Inizio Rapido! Aprito il comparto pile situato sul retro del computer premendo la chiusura. Inserite 2 pile tipo “AAA” (AM4/ R03), osservando la corretta polarità. Richiudete il comparto. (Dettagli alla Sezione 1.1). 2 Premete GO/STOP per accendere il computer. Se il computer non risponde, riattivatelo premendo una graffetta o un altro oggetto appuntito nel foro segnato con ACL alla base dell’apparecchio, come descritto nella Sezione 4.1. 3 Ponete i pezzi nella posizione iniziale di gioco per una nuova partita, i pezzi Bianchi dalla vostra parte. 4 Premete NEW GAME per far ripartire il computer e iniziare una nuova partita di scacchi. 2 x AAA/AM4/R03 5 Fate le mosse sulla scacchiera, premendo i pezzi dolcemente nei fori delle case “di origine” e “di destinazione” per ogni mossa. 6 Appena il computer fa una mossa, questa viene segnalata sullo schermo. Premete il pezzo del computer dolcemente sulle due case “di origine” e “di destinazione” segnalate per completare la mossa del computer. Ecco fatto! Fate la vostra prossima mossa come descritto qui sopra. Premete GO/ STOP in qualunque momento per spegnere il computer. Divertitevi! ዛዒዓዔዕዖዘዙዜ ዑ尷尽尻就尯尹尿尵ዑ ዐ屁屃屁屃屁屃屁屃ዐ ዏ巀居巀居巀居巀居ዏ ዎ居巀居巀居巀居巀ዎ ው巀居巀居巀居巀居ው ዌ居巀居巀居巀居巀ዌ ዋ屄层屄层屄层屄层ዋ ዊ尶局尺尴尮尼尾尸ዊ ዝዒዓዔዕዖዘዙዞ e7-e5: ዛዒዓዔዕዖዘዙዜ ዑ尷尽尻就尯尹尿尵ዑ ዐ屁屃屁屃屁屃屁屃ዐ ዏ巀居巀居巀居巀居ዏ ዎ居巀居巀居巀居巀ዎ ው巀居巀居屄居巀居ው ዌ居巀居巀居巀居巀ዌ ዋ屄层屄层巀层屄层ዋ ዊ尶局尺尴尮尼尾尸ዊ ዝዒዓዔዕዖዘዙዞ ዛዒዓዔዕዖዘዙዜ ዑ尷尽尻就尯尹尿尵ዑ ዐ屁屃屁屃居屃屁屃ዐ ዏ巀居巀居巀居巀居ዏ ዎ居巀居巀屁巀居巀ዎ ው巀居巀居屄居巀居ው ዌ居巀居巀居巀居巀ዌ ዋ屄层屄层巀层屄层ዋ ዊ尶局尺尴尮尼尾尸ዊ ዝዒዓዔዕዖዘዙዞ Nota: il computer si spegnerà automaticamente per conservare l’energia se nessun tasto viene premuto per 20 minuti quando il computer non sta pensando (Vedere Sezione 2.8). 79 ITALIANO 1 3. LIVELLI DI GIOCO E FUNZIONI SPECIALI 3.1 Livelli di gioco 3.2 Livelli divertenti 3.3 Livelli disinvolti 3.4 Livelli Blitz 3.5 Livelli Bronstein 3.6 Livelli ad orologio Bonus 3.7 Livelli di Torneo 3.8 Livelli a profondità fissa 3.9 Livelli tattici 3.10 Funzione d’apprendimento 3.11 Selezionare Livelli e Funzioni d’apprendimento 3.12 Funzione Guida alle aperture 3.13 Funzione di Verifica. Controllare la posizione dei pezzi! 3.14 Funzione Non Auto INDICE INIZIO RAPIDO TASTI E FUNZIONI INTRODUZIONE 1. COME USARE IL VOSTRO COMPUTER SCACCHISTICO 1.1 Installazione delle pile 1.2 Come muovere 1.3 La mossa del computer 1.4 Avete cambiato idea? Ritirate la mossa! 1.5 Scacco, scaccomatto e patta 1.6 Iniziare una nuova partita 1.7 Cambio di livello 1.8 Guida alle aperture 4. DETTAGLI TECNICI 4.1 La Funzione ACL 4.2 Cure e manutenzione 4.3 Specifiche Tecniche 2. FUNZIONI ADDIZIONALI DEL COMPUTER 2.1 Orologi 2.2 Catture e mosse speciali 2.3 Mosse illecite 2.4 Interrompere la ricerca del computer 2.5 Scambiare di lato con il computer 2.6 Ottenere suggerimenti dal computer 2.7 Il computer gioca contro sé stesso 2.8 Memoria di partita e spegnimento automatico 2.9 Libreria d’aperture GUIDA ALLA SOLUZIONE DI PROBLEMI 80 1. Finestra di schermo LCD: Lo Schermo a Cristalli Liquidi (LCD) è usato per mostrare le mosse, le informazioni relative a una partita e gli orologi per entrambi i giocatori. Molti dei simboli che usa sono ovvi, ad ogni modo una loro lista completa è mostrata nella Figura 1. 2. Tasti dei Simboli dei Pezzi &(Re), %(Regina), $(Torre), #(Alfiere), @(Cavallo), !(Pedone): I Tasti dei Simboli dei Pezzi sono usati per verificare posizioni e per selezionare diverse Funzioni di Apprendimento, e alcuni pezzi sono usati per la sottopromozione di pedoni. 3. Tasti di Gioco a. Tasto NEW GAME: Premetelo per passare ad una nuova partita. b. Tasto di OPENING COACH: Premetelo per entrare nella Funzione di Guida alle Aperture e allenarvi su gambetti e risposte d’aperture riconosciute. c. Tasto SOUND: La pressione di questo tasto fa ruotare la funzione suono tra i suoi tre livelli operativi. Potete capire quale posizione avete scelto ascoltando il numero di suoni acuti che udrete: LIVELLO DI SUONO SEGNALE EMESSO QUANDO SELEZIONATO Suono e Allenatore Solo Suono Silenzioso 3 toni acuti 2 toni acuti 1 tono acuto 4. 5. Quando l’Allenatore è selezionato, il computer valuterà la vostra mossa immediatamente fino a che non viene completata, e emetterà due toni bassi se la considera non buona. Quando il Suono è selezionato, il cicalino “suona” per 6. 7. 81 mostrare che il computer sta rispondendo alla vostra azione. I significati dei diversi “Suoni” sono mostrati nella Figura 1. d. Tasto TAKE BACK: Premetelo per ritirare l’ultima mossa individuale fatta. Potete ritirare fino a 14 mosse individuali. (Una mossa individuale è una mossa per un lato). e. Tasto NON AUTO: Premetelo per entrare in Funzione Non Auto, che permette mosse da impostare manualmente – il computer controlla il gioco ma non esegue mosse. f. Tasto LEVEL: Premetelo per entrare in Selezione Livello e scegliere il livello di gioco cosicché corrisponda alla complessità ed al tipo di gioco che desiderate. Usato anche per scegliere Funzioni di Apprendimento. g. Tasto PLAY: Premetelo per scambiare lato di gioco con il computer. Potete anche premerlo quando il computer sta pensando per spingerlo a muovere, o durante la vostra mossa per avere un suggerimento dal computer. h. Tasto GO/STOP: Premetelo per accendere e spegnere l’apparecchio. La partita in corso viene mantenuta nella memoria per un massimo di 300 ore. Scacchiera sensibile: Ogni quadratino contiene un sensore ad alto rendimento che registra i movimenti dei pezzi. Le case sono identificate per fila (lettere) e riga (numeri). ACL (Riattivazione): Nella base dell’apparecchio c’è un interruttore di riattivazione protetto. Usato per eliminare la scarica statica dopo l’inserimento di nuove pile. Scomparto pile: Nella base dell’apparecchio. Il computer usa 2 pile “AAA” (AM4/R03) alcaline. Scomparto di deposito pezzi: Un comodo scomparto per i vostri scacchi. ITALIANO TASTI E CARATTERISTICHE Figura 1. Simboli sullo Schermo e Suoni SUONI SIMBOLI 1 ............ 1 A ........... A k .......... Re 1 Tono acuto ........ Riconosce l’uso di un tasto o della tastiera sensibile 2 ............ 2 3 ............ 3 B ........... B c ........... C q .......... Regina r .......... Torre 1 tono basso ........ Errore – mossa errata o tasto premuto per errore 4 ............ 4 5 ............ 5 D ........... D E ........... E b .......... Alfiere n .......... Cavallo 2 toni bassi .......... Avviso dalla Guida 6 ............ 6 7 ............ 7 F ........... F G ........... G 8 ............ 8 9 ............ 9 H ........... H p .......... Pedone sb ....... Scacchiera Standard 3 toni acuti ........... Nuova partita o Suono e disposizione Guida 3 toni bassi .......... Durante partite a tempo determinato, il tempo è trascorso tutto. 0 ............ 0 PM ............ Indica il giocatore che muove S ............... Indica che il nero muove : ............... Due punti fissi indicano che le cifre sono minuti e secondi : ............... Due punti lampeggianti indicano che le cifre sono ore e minuti ch:)) ....... Nero sotto scacco ch:__ ....... Bianco sotto scacco EnD) ........ Scaccomatto – il nero vince EnD( ........ Patta te: ............ Funzione di Apprendimento o(:3 .......... Guida alle Aperture (Aperture Spagnole) – il computer gioca per entrambi i lati o_:3 .......... Guida alle Aperture (Aperture Spagnole) – il computer gioca col bianco o):3 .......... Guida alle Aperture (Aperture Spagnole) – il computer gioca col nero o :3 .......... Guida alle Aperture (Aperture Spagnole) – il computer non gioca per nessun lato 82 2 x AAA/AM4/R03 INTRODUZIONE 1. COME USARE IL VOSTRO COMPUTER SCACCHISTICO Figura 1-1 ዛዒዓዔዕዖዘዙዜ ዑ尷尽尻就尯尹尿尵ዑ ዐ屁屃屁屃屁屃屁屃ዐ ዏ巀居巀居巀居巀居ዏ ዎ居巀居巀居巀居巀ዎ ው巀居巀居巀居巀居ው ዌ居巀居巀居巀居巀ዌ ዋ屄层屄层屄层屄层ዋ ዊ尶局尺尴尮尼尾尸ዊ ዝዒዓዔዕዖዘዙዞ Figura 1-2 ITALIANO Questa scacchiera elettronica è un potente computer che giocherà a scacchi con voi a qualunque livello di complessità scegliate, o, se preferite, vi farà giocare contro un vostro amico e agirà da arbitro. La vastissima gamma di livelli di gioco (64) combinata con le funzioni di apprendimento estese (11) soddisferà chiunque abbia un interesse per gli scacchi, sia i giovani che i meno giovani. In totale sono disponibili 768 combinazioni. Le funzioni di apprendimento e le guide di apertura sono una superba caratteristica didattica per qualunque livello di gioco, e le diverse selezioni di competizione a tempo daranno soddisfazione al giocatore di livello intermedio. 1. Installazione delle pile Il vostro computer scacchistico fa uso di 2 pile “AAA” (Tipo AM4/R03) alcaline. Usate pile alcaline nuove per assicurarne una vita utile più lunga (fino a 300 ore). Premeta la chiusura del coperchio sul retro dell’apparecchio e inseritevi le pile come mostrato in Figura 1-1. Richiudete il tutto e premete GO/STOP per accendere il computer. Se il computer non risponde utilizzate l’estremità di una graffetta o un altro oggetto appuntito per esercitare una pressione nel foro segnato ACL nella base dell’apparecchio per almeno un secondo. Questo riattiverà il computer. Dopo che le pile sono state inserite o il tasto ACL è stato premuto, il computer farà partire un controllo automatico. Tre “suoni” indicano che il controllo ha dato esito positivo: un 83 Figura 1-3 Figura 1-4 suono o nessun suono indicano un problema: riferitevi in tal caso al vostro distributore locale. Notate che l’inserimento di nuove pile o la pressione di ACL farà ripartire il computer e pulirà la memoria, facendo perdere qualunque partita contenga. 2. Come muovere Seguite questi passi per iniziare una partita. a. Se necessario premete GO/STOP per accendere il computer. b. Mettete i pezzi nella posizione di partenza, i Bianchi dalla vostra parte, come mostrato in Figura 1-2, e premete NEW GAME. Il computer indicherà sullo schermo che dovete muovere un pezzo Bianco 00:00 PM Notate che la pressione di NEW GAME cancellerà la Funzione di Apprendimento o la Guida alle Aperture se selezionate, o disattiverà la Funzione Non Auto. c. Per fare una mossa, premete dolcemente verso il basso il pezzo che volete muovere fino a che non sentite un suono (Vedere Figura 1-3). La tastiera sensibile del computer registra la vostra mossa, e lo schermo mostra sulla sinistra la casa “di origine” che è stata premuta. ዛዒዓዔዕዖዘዙዜ ዑ尷尽尻就尯尹尿尵ዑ ዐ屁屃屁屃屁屃屁屃ዐ ዏ巀居巀居巀居巀居ዏ ዎ居巀居巀居巀居巀ዎ ው巀居巀居屄居巀居ው ዌ居巀居巀居巀居巀ዌ ዋ屄层屄层巀层屄层ዋ ዊ尶局尺尴尮尼尾尸ዊ ዝዒዓዔዕዖዘዙዞ Figura 1-5a ዛዒዓዔዕዖዘዙዜ ዑ尷尽尻就尯尹尿尵ዑ ዐ屁屃屁屃居屃屁屃ዐ ዏ巀居巀居巀居巀居ዏ ዎ居巀居巀屁巀居巀ዎ ው巀居巀居屄居巀居ው ዌ居巀居巀居巀居巀ዌ ዋ屄层屄层巀层屄层ዋ ዊ尶局尺尴尮尼尾尸ዊ ዝዒዓዔዕዖዘዙዞ Figura 1-5b Figura 1-6a E2:__ d. Prendete il pezzo e premetelo gentilmente verso il basso sulla casa dove volete muovere. Un secondo suono e il computer mostra brevemente la casa “di destinazione” sulla destra dello schermo. 84 Figura 1-6b Appena avete finito la mossa, se avete selezionato Suono e Guida, lo schermo mostrerà Coch mentre valuta la vostra mossa. Due toni bassi vengono emessi se la mossa è considerata non buona. e. Poi tocca al computer, che comincia a pensare alla propria mossa. Considerate che all’inizio del gioco la risposta del computer è spesso virtualmente istantanea, perché esegue mosse che sono memorizzate nella sua libreria di mosse d’apertura (Vedere Sezione 2.9). 3. La mossa del computer Quando il computer è pronto, suona e mostra le coordinate “da” e “a” che indicano la mossa sullo schermo, come mostrato nella Figura 1.4. Per esempio, vedete le Figure 1-5a e b. Premete il pezzo indicato sulla casa “di origine” (E7, in questo caso) fino a che non udite un suono e il lato “da” dello schermo varia per mostrare il colore ed il simbolo di quel pezzo. (La Figura 1 mostra i simboli). Muovete lo stesso pezzo fino alla seconda casa indicata sullo schermo – quella dove il computer vuole andare (E5 qui). Appena premete E5, lo schermo si pulisce e avete completato la mossa del computer! Lo schermo ora indica che tocca di nuovo a voi. 4. Avete cambiato idea? Ritirate la mossa! Se cambiate idea su una mossa, potete ritirarla. Ogni volta che tocca a voi muovere, semplicemente premete TAKE BACK. Lo schermo mostrerà la casa “di destinazione”. Premete il pezzo indicato sulla casa in questione. Ora vedrete il simbolo del pezzo e la casa di origine. Premete il pezzo sulla casa “di origine” indicata per completare il ritiro della mossa. Se la mossa 85 ዛዒዓዔዕዖዘዙዜ ዑ巀居巀尮巀居巀尭ዑ ዐ居巀居巀居巀居巀ዐ ዏ巀居巀居巀居巀居ዏ ዎ居巀居巀屁屄居巀ዎ ው巀居巀居巀居巀居ው ዌ居巀居巀居巀居巀ዌ ዋ巀居巀居巀居巀居ዋ ዊ居巀居巀居巀居巀ዊ ዝዒዓዔዕዖዘዙዞ Figura 2-1a ዛዒዓዔዕዖዘዙዜ ዑ巀居巀尮巀居巀尭ዑ ዐ居巀居巀居巀居巀ዐ ዏ巀居巀居屄居巀居ዏ ዎ居巀居巀居巀居巀ዎ ው巀居巀居巀居巀居ው ዌ居巀居巀居巀居巀ዌ ዋ巀居巀居巀居巀居ዋ ዊ居巀居巀居巀居巀ዊ ዝዒዓዔዕዖዘዙዞ Figura 2-1b Figura 2-1c ዋ巀居巀居巀居巀居ዋ ዊ居巀居巀尮巀居尸ዊ ዝዒዓዔዕዖዘዙዞ Figura 2-2 ITALIANO E2:E4 ritirata era una cattura, il computer vi ricorderà di porre sulla scacchiera il pezzo catturato mostrandone il tipo e la sua casa. Premete tale pezzo sulla casa indicata. Per ritirare un’altra mossa, premete ancora TAKE BACK. Potete ritrattare fino a 14 mosse singole (o 7 per lato), potendo quindi sperimentare e provare vari approcci “E se io...?” Per ricominciare a giocare, semplicemente fate una mossa o premete PLAY per farla fare al computer al vostro posto. Le Figure 1-6a e b mostrano un esempio di ritiro della mossa del Cavallo da G8 a F6. Dopo la pressione di TAKE BACK, lo schermo mostra F6, la casa alla quale il Cavallo ha mosso (Figura 1-6a). Premete su F6, e lo schermo cambierà a mostrare il colore del pezzo ed il simbolo (Cavallo Nero) e la casa dalla quale il pezzo proveniva (Figura 1-6b). Premete il Cavallo su G8. Notate che la Cattura En Passant non può essere ritirata se il ritiro della mossa precedente non era permesso. 5. Scacco, scaccomatto e patta! Quando un Re è sotto scacco, il computer sullo schermo mostra il simbolo di scacco (insieme all’orologio se questo sta contando). Quando una partita termina in scaccomatto, patta da stallo, patta per immediata tripla ripetizione o patta per la regola delle cinquanta mosse, lo schermo mostra il segnale End. Tali simboli sono mostrati nella Figura 1. 6. Iniziare una nuova partita Premete NEW GAME per iniziare una nuova partita in qualunque momento, usando i livelli selezionati al momento e la selezione già effettuata di funzioni sonore. Visto che la pressione di NEW GAME elimina dalla memoria la partita corrente, state molto attenti a non premerlo per errore. 7. Cambio di livello Il vostro computer scacchistico vi offre 64 livelli di gioco, ognuno dei quali corrisponde ad una della case della scacchiera. Insieme alle 11 funzioni estese di Apprendimento, avete una scelta totale di 768 livelli. Premete LEVEL per entrare in Selezione livello, e vi verrà mostrato il livello attuale (ad es., il livello equivalente alla casa A3 mostra L:A3 in alternanza con Fun3.). Per cambiare livello, premete semplicemente una casa della scacchiera, ed il livello verrà mostrato sullo schermo. Premete ancora LEVEL per uscire dalla selezione livello. 86 Per più informazioni sui livelli di gioco, vedete la Sezione 3. 8. Guida alle Aperture Il vostro computer ha 16 sequenze d’apertura come l’”Apertura Italiana”, o il “Gambetto di Regina”, dalle quali potete imparare. Premete OPENINGS COACH e poi premete una delle case da A1 a B8 per selezionare una delle aperture. Premete la casa ancora una volta per scegliere quanto aiuto avere dal computer, e poi premete ancora OPENINGS COACH per iniziare a far pratica o per verificare la vostra conoscenza. Maggiori dettagli sono al Paragrafo 3.12. 2.1 Orologi Orologi scacchistici incorporati seguono il tempo per voi e per il lato del computer, con una schermata a quattro cifre che mostra il tempo totale trascorso o il tempo restante per ogni giocatore alternativamente quando tocca a lui muovere. Dopo aver eseguito la mossa del computer, lo schermo mostra il vostro orologio fino a che un tasto o una casa non vengono premuti. Comunque, l’orologio segue il vostro tempo fino a che la casa “di destinazione” non viene premuta. Dopo che avete fatto la vostra mossa, lo schermo passa subito all’orologio del computer mentre pensa, fino a che indica che è pronto a muovere. Ad ogni modo, il computer potrebbe invece mostrare Coch dopo la vostra mossa mentre analizza se è buona o meno. Se pensa che la vostra mossa non sia buona, emetterà due toni bassi. Per la prima ora della partita o se il tempo rimasto è inferiore ad un’ora, lo schermo mostrerà MINUTI:SECONDI con due punti fissi in mezzo. Se il tempo totale trascorso eccede un’ora, o il tempo rimanente eccede un’ora, lo schermo mostrerà ORE:MINUTI e i due punti diventano due punti lampeggianti tra le cifre dell’ora. Note: • L’orologio si ferma se verificate il livello, la scacchiera, o se spegnete il computer. In ognuno di questi casi comunque i tempi sono conservati in memoria, e l’orologio ritorna quando il gioco continua. • L’orologio si azzera se cambiate livello o se premete una casa quando siate in Selezione livello. 87 ITALIANO 2. FUNZIONI ADDIZIONALI DEL COMPUTER • Quando il vostro Re è sotto scacco, lo schermo mostra scacco insieme all’orologio in alternanza. Se giocate ad un livello a tempo determinato, l’orologio conta all’indietro dalla quota fissata e mostra il tempo che vi resta. Quando il primo orologio raggiunge lo zero, ci saranno tre suoni a tono basso per dire che il tempo è terminato. L’orologio inizierà quindi a contare da zero. Nei livelli nei quali il tempo non è parte della sfida, l’orologio conta in addizione e mostra il tempo totale trascorso. • Se ritirate una mossa quando giocate a tempo determinato, l’orologio non torna indietro ad ogni ritiro. Semplicemente si ferma fino a che non ricominciate a muovere. 2.2 Catture e Mosse Speciali a. CATTURE: Per catturare, premete sul pezzo che volete muovere, poi rimuovete dalla scacchiera il pezzo catturato, e premete successivamente il pezzo da voi mosso sulla casa del pezzo catturato. b. EN PASSANT: Durante una cattura en passant, il computer vi ricorda che dovete rimuovere il pedone catturato indicandovi la posizione del pedone. Dovete premere sul pedone in questione prima di rimuoverlo dalla scacchiera. Vedete le Figure 2-1a, b e c. c. PROMOZIONE DI PEDONE E SOTTOPROMOZIONE: Quando promuovete un pedone, premete prima il pedone sulla sua casa “di origine”, come di solito. Il computer mostra la casa “di origine” e il simbolo di Regina (in alternanza con l’orologio). Appena premete il pedone sulla casa “di destinazione”, diventa subito una Regina. Ricordate di cambiare il pezzo sulla scacchiera! Se volete sottopromuovere il vostro pedone a Torre, Alfiere o Cavallo, premete allora il tasto di pezzo appropriato dopo la pressione della casa “da” e prima della pressione della casa “a”. Quando il computer promuove un pedone, mostra le case “da” e “a” come di solito. Dopo che avete premuto la sua casa “di origine”, lo schermo indica il tipo di pezzo al quale il pedone sarà promosso mostrando il simbolo del pezzo e la casa di “destinazione”. Premete sulla casa “di destinazione” con il nuovo pezzo scelto per completare la promozione del computer. d. ARROCCO: Il computer riconosce automaticamente le manovre di arrocco appena dopo il movimento del Re. Dopo che avete premuto sul Re sulle sue due case “di origine” e “di destinazione”, il computer mostra la casa “di origine” della Torre. Il computer mostra poi il simbolo della Torre, insieme alla casa alla quale la Torre deve muovere. Premete la torre sulla casa “di destinazione” per completare la mossa (Vedete la Figura 2-2). 88 2.3 Mosse Illecite Il vostro computer non accetterebbe mai mosse illecite. Se tentate una simile mossa, il computer emetterà un suono basso, e lo schermo indicherà la casa “di origine” del pezzo. Premete allora su quella casa per annullare la mossa illecita: poi muovete ancora. Se eseguite una mossa del computer in modo scorretto, udrete un suono di errore. Ciò indica che voi state cercando di muovere il pezzo sbagliato o che state muovendo un pezzo del computer ad una casa sbagliata. Se premete su di un pezzo e la casa “di origine” appare sullo schermo, ma voi decidete di non fare la mossa, premete semplicemente sulla stessa casa per cancellare la mossa. State attenti a non fare errori se il suono è disattivato, dato che non potrete udire i suoni di errore. 2.5 Scambiare di lato con il computer Per scambiare lato con il computer basta che premiate PLAY quando è il vostro turno – il computer farà la prossima mossa dal vostro lato. Cambiate lato quante volte volete! 2.6 Ottenere suggerimenti dal computer Se avete bisogno di aiuto, potete chiedere al computer di mostrarvi che cosa farebbe al vostro posto! Premete PLAY quando tocca a voi, e il computer farà la prossima mossa per voi. Per tenere tale mossa come vostra, fatela come mostrato dallo schermo, poi premete PLAY ancora e il computer farà un’altra mossa: poi continuate facendo la vostra mossa. Se non volete usare la mossa del computer, fate prima la mossa mostrata sullo schermo, poi ritiratela. Quando avrete azzerato la mossa in tal modo, potete fare la vostra mossa. 2.7 Il computer gioca contro sé stesso Per vedere il computer giocare contro sé stesso, premete PLAY ad ogni mossa. Studiate le sue strategie di gioco per imparare di più sugli scacchi! 89 ITALIANO 2.4 Interrompere la Ricerca del computer Per interrompere il computer mentre pensa premete PLAY, e ciò lo bloccherà e porterà a compiere la migliore mossa che è stato capace di trovare fino a quel punto. Questa funzione può essere molto utile per i livelli più alti, quando il computer può richiedere molto tempo per pensare. 2.8 Memoria di Partita e Spegnimento Automatico Potete interrompere una partita con la pressione di GO/STOP per spegnere il computer. Il computer “ricorderà” la vostra posizione per anche 300 ore (con pile alcaline nuove). Quando lo riaccendete, continuate da dove avevate lasciato! Se non premete un tasto o non fate una mossa per 20 minuti quando il computer non sta pensando, il computer si spegnerà per conservare l’energia, e terrà la partita in memoria. Premete GO/STOP per ritornare alla partita non ultimata. 2.9 Libreria d’Aperture All’inizio di una partita il computer risponde alle mosse quasi istantaneamente in molti livelli. Questo accade perché usa mosse memorizzate nella sua libreria di aperture incorporata. Se la posizione nella quale siete è nel libro, il computer non pensa alla mossa ma usa direttamente una mossa memorizzata. 90 2 1 A B C D E TATTICI 3 PROFONDITA’ FISSA 4 BLITZ 5 LIVELLI DISINVOLTI 6 TORNEO 7 BRONSTEIN 8 LIVELLI DIVERTENTI 3.1 Livelli di Gioco Con 768 combinazioni di livelli tra i quali scegliere (includendo le funzioni di Apprendimento Estese), potete imparare e crescere con questo computer scacchistico! Come mostrato nel diagramma dei livelli di gioco nei paragrafi seguenti, ogni livello corrisponde ad una delle 64 case della scacchiera. I livelli di base sono divisi in 8 gruppi pensati per soddisfare le esigenze di giocatori con diverse abilità: • Livelli Divertenti: A1 - A8. Per principianti totali. A1 è il più facile. • Livelli Disinvolti: B1 - C8. Per partite non giocate a tempo determinato. Una gamma completa da difficile a facile (B1) fino a OROLOGIO BONUS SCEGLIETE UN LIVELLO TRALE 64 CASE DI SCACCHIERA 3. LIVELLI E FUNZIONI SPECIALI F G H 3.2 Livelli Divertenti La selezione di una delle case da A1 a A8 vi porta nei livelli divertenti. In questa gamma di opzioni il computer non fa una ricerca completa della migliore mossa disponibile. Non presta attenzione al punteggio, e svolge ricerche randomizzate che lo portano a volte a compiere mosse che non sono sempre le migliori tra quelle che ha trovato. Questo fa sì che ci sia una grossa variabilità nella risposta del computer, e a volte sembra che faccia errori di giudizio piuttosto umani. A1 è il livello più semplice, A8 il più alto in abilità richiesta. 3.3 Livelli Disinvolti Quando selezionate i livelli disinvolti, voi controllate l’abilità del computer limitando la media del tempo che ha per muovere. Al crescere dell’abilità, il computer guarderà in avanti con sempre maggiore profondità, e conseguentemente giocherà con maggiore abilità. 91 ITALIANO estremamente esigente (C8). Quando accendete il computer esso si posizionerà da solo sul livello B4. • Blitz: D1 - D8. Conosciuti anche come “Morte Improvvisa”. La partita va conclusa entro il tempo determinato. • Bronstein: E1 - E4. La partita va conclusa entro il tempo determinato, che viene accresciuto di una certa quantità per compensare ogni mossa. La compensazione attuata è il tempo più breve tra quello attualmente usato e quello determinato. • Orologio Bonus: E5 - E8. La partita va conclusa entro il tempo determinato, che viene accresciuto di una certa quantità prescritta per compensare ogni mossa prima che venga fatta. • Torneo: F1 - F8. Un certo numero di mosse va fatto entro il tempo determinato. • Profondità fissa: G1 - G8. L’abilità del computer viene limitata permettendogli di guardare avanti solo per un prefissato numero di mosse. • Tattici: H1 - H8. L’abilità del computer è limitata dal non poter guardare avanti per più mosse di quelle fissate, e dal non valutare il vantaggio strategico. Quando fissate un nuovo livello, ricordatevi che se il computer ha più tempo per pensare alla propria mossa, diventa più forte e gioca meglio, proprio come una persona! Affinate la vostra abilità di gioco: se battete il computer su un livello, accedete al seguente. Continuate a tenervi impegnati e imparate di più su questo gioco! Quando uno di questi livelli viene selezionato dalle file B o C di case, lo schermo mostrerà ad intervalli di un secondo la selezione di livello ed il tempo medio di risposta del computer. La vostra scelta è mostrata qui sotto: Casa B1 B2 B3 B4 B5 B6 B7 B8 C1 C2 C3 C4 C5 C6 C7 C8 Tempo per Mossa Schermo ......................... 1 secondo ......................... L:B1/00:01 ......................... 2 secondi .......................... L:B2/00:02 ......................... 3 secondi .......................... L:B3/00:03 ......................... 5 secondi .......................... L:B4/00:05 ........................ 10 secondi ......................... L:B5/00:10 ........................ 15 secondi ......................... L:B6/00:15 ........................ 20 secondi ......................... L:B7/00:20 ........................ 30 secondi ......................... L:B8/00:30 ........................ 45 secondi ......................... L:c1/00:45 .......................... 1 minuto ........................... L:c2/01:00 ........................... 2 minuti ........................... L:c3/02:00 ........................... 3 minuti ........................... L:c4/03:00 ........................... 4 minuti ........................... L:c5/04:00 ........................... 5 minuti ........................... L:c6/05:00 .......................... 10 minuti .......................... L:c7/10:00 .......................... 15 minuti .......................... L:c8/15:00 3.4 Livelli Blitz I livelli nella fila D di case sono i livelli Blitz. Se volete giocare scacchi veloci, o “di morte improvvisa”, potete scegliere tra una gamma di tempi entro i quali la partita va completata. Potete scegliere tra 5 minuti di “cottura a pressione” e una partita più rilassata di un’ora e mezza. Quando selezionate una di queste case, lo schermo mostrerà ad ogni secondo un’alternanza del nome della casa scelta ed il tempo corrispondente che limita la partita. Casa Tempo per Partita Schermo D1 ............................. 5 minuti ...................... L:D1/05:00 D2 ............................ 10 minuti ..................... L:D2/10:00 92 ..................... L:D3/15:00 ..................... L:D4/25:00 ..................... L:D5/30:00 ..................... L:D6/45:00 ..................... L:D7/1:00 ..................... L:D8/1:30 3.5 Livelli Bronstein Selezionando una casa tra E1 e E4 sulla scacchiera, voi selezionate un tempo limite per la partita che segue il sistema Bronstein. Un tempo base viene scelto per la partita, ed un incremento di alcuni secondi viene poi aggiunto a tale tempo ogni volta che viene fatta una mossa. L’incremento può essere il tempo ancora disponibile mostrato nella tabella qui sotto, o il tempo attualmente richiesto per muovere, ed è sempre il minore tra questi due. La vostra scelta è mostrata nella tabella. Quando scegliete tra uno di questi livelli, lo schermo illustra tre diverse informazioni, ognuna delle quali viene fatta vedere per un secondo. Per esempio, se scegliete E2 vedrete: • La casa selezionata L:E2 e poi... • Il tempo base in minuti 10:00 e poi... • Il tempo libero in secondi 00:05 Casa Tempo per Partita Tempo Iibero per Mossa E1 ....................... 5 minuti .................... 3 secondi ........... E2 ...................... 10 minuti ................... 5 secondi ........... E3 ...................... 15 minuti .................. 10 secondi .......... E4 ...................... 20 minuti .................. 10 secondi .......... Schermo L:E1/05:00/00:03 L:E2/10:00/00:05 L:E3/15:00/00:10 L:E4/20:00/00:10 3.6 Livelli ad Orologio Bonus La selezione di case tra E5 e E8 porta ai livelli di Orologio Bonus. Sono simili ai livelli Bronstein, fatta eccezione per il fatto che il tempo incrementato è fissato a 2 secondi, e viene aggiunto al tempo disponibile prima che la mossa venga effettuata. 93 ITALIANO D3 ............................ 15 minuti D4 ............................ 25 minuti D5 ............................ 30 minuti D6 ............................ 45 minuti D7 ............................ 60 minuti D8 ............................ 90 minuti Casa Tempo per Partita Tempo Iibero per Mossa E5 ....................... 3 minuti .................... E6 ...................... 10 minuti ................... E7 ...................... 20 minuti ................... E8 ...................... 50 minuti ................... 2 secondi ........... 2 secondi ........... 2 secondi ........... 2 secondi ........... Schermo L:E5/03:00/00:02 L:E6/10:00/00:02 L:E7/20:00/00:02 L:E8/50:00/00:02 3.7 Livelli di Torneo La fila di case F vi fa accedere a 8 livelli di torneo. Quando ne scegliete uno, voi ed il computer dovete fare un numero di mosse stabilito entro un tempo determinato. Per esempio, se selezionate F3 dovete fare 40 mosse entro 2 ore, secondo il Controllo di tempo Primario. Se la partita non è finita entro il tempo dato, il Controllo di Tempo Secondario inizia a contare, e dovrete allora fare 20 mosse entro un’ora. Se anche all’interno di tale tempo secondario non si raggiunge un risultato, esso viene ripetuto fino a raggiungere la fine. In accordo con le regole di torneo, quantità di tempo rimaste al completamento del numero di mosse entro il Controllo di Tempo Primario vengono aggiunte al tempo dato nel Controllo di Case Tempo di Controllo Primario Mosse Tempo Tempo di Controllo Secondario Mosse Schermo Tempo F1 30 30 min. 30 30 min. L:F1/30/0:30 F2 30 1 ora 30 min. restante 1 ora L:F2/30/1:30 F3 40 2 ore 20 1 ora L:F3/40/2:00 F4 40 2 ore restante 1 ora L:F4/40/2:00 F5 40 2 ore 30min. 16 1 ora L:F5/40/2:30 F6 45 1 ora 30 min. 15 30 min. L:F6/45/1:30 F7 50 2 ore 30 min. 20 1 ora L:F7/50/2:30 F8 60 1 ora 30 30 min. L:F8/60/1:00 94 3.8 Livelli a Profondità Fissa I livelli a profondità fissa della fila G limitano l’abilità del computer, non influendo sul tempo dato per cercare sulla prossima mossa, ma limitando il numero di mosse in avanti. Ai livelli più bassi gioca come un principiante. Al livello più basso, G1, nel quale il computer guarda avanti di una sola mossa, non anticipa il gioco per nulla, e può anche non vedere un matto che voi farete in una mossa seguente. All’altro capo della gamma il computer vaglierà tutte le possibilità entro le 8 mosse successive (G8). In tal caso lo schermo si alterna ogni secondo tra il livello da voi scelto, e il numero di mosse singole (ply) che il computer guarda in avanti: • La casa selezionata L:G5 e poi... • Il numero di mosse singole in avanti 5PLY 3.9 Livelli Tattici I livelli tattici sono posti nell’ultima fila di case, la H. Questi livelli limitano il numero di mosse che il computer può investigare in avanti, ma in questi livelli il computer non valuta il vantaggio strategico, e cerca invece solo posizioni per guadagnare un matto o una patta. Di nuovo, il numero di mosse che il computer investiga in anticipo è equivalente al numero della casa – H1 è una mossa in avanti; H8 sino a 8 mosse. Lo schermo si alterna ogni secondo tra il livello selezionato, ed il numero di mosse singole (ply) investigate dal computer, in modo del tutto simile ai livelli a Profondità Fissa. • La casa selezionata L:H8 e poi... • Il numero di mosse singole in avanti 8PLY 95 ITALIANO Tempo Secondario. Per esempio, se avete selezionato F3 e completato 40 mosse in una sola ora, avrete 2 ore per fare le successive 20 mosse. Il tempo in eccesso, se ce ne sarà, viene messo da parte ed accumulato durante la partita. Quando selezionate uno di questi livelli di torneo, lo schermo passerà tra tre tipi di informazione, ognuna delle quali viene mostrata per un secondo. Per esempio, se la casa F4 è stata scelta, lo schermo mostrerà: • La casa scelta L:F4 e poi... • Il numero di mosse nel Controllo di Tempo Primario 40 e poi... • La durata del Controllo di Tempo Primario 2:00 3.10 Funzione di Apprendimento Il vostro computer scacchistico comprende 11 funzioni di Apprendimento Estese incorporate. Questo vi permette di imparare mosse di base e di destreggiarvi nella tattica dei pezzi, uno per volta. Per ogni funzione di Apprendimento gli unici pezzi sulla scacchiera saranno Re e Pedoni, oppure Re e Pedoni e uno o due pezzi selezionati. Ciò permette ad un principiante di concentrarsi su uno o due pezzi la volta, senza perdere la concentrazione ed essere distratto da altri pezzi sulla scacchiera. I giocatori più avanzati, invece, possono usare questa funzione per impratichirsi in partite con una selezione appposita di pezzi. Considerate quanto segue, a riguardo di Livelli e Funzioni di Apprendimento • Se NEW GAME viene premuto durante una partita, il computer cesserà la funzione d’Apprendimento e tornerà allo standard (32 pezzi), con il livello corrente ancora attivo. • Se premete LEVEL e poi decidete di non cambiare il livello attuale o l’attuale funzione di Apprendimento, premete semplicemente LEVEL ancora, e lo status corrente resterà invariato. • Potete selezionare un nuovo livello in ogni momento quando tocca a voi. L’orologio verrà però azzerato. • Se premete più di due Tasti dei Simboli dei Pezzi durante una selezione di Funzione di Apprendimento, solo le ultime due selezioni di pezzo saranno valide quando uscirete dalla Selezione Livello. • Se premete accidentalmente un tasto dei simboli dei pezzi mentre siete in Selezione Livello, perderete la partita in corso quando uscirete dalla Selezione Livello. Per continuare con tale partita, premete la casa corrispondente al livello attuale prima di uscire dalla Selezione Livello. Ad ogni modo, anche in tal caso l’orologio verrà azzerato. 3.11 Selezionare Livelli e Funzioni di Apprendimento Premete LEVEL per entrare in Selezione Livello, e vedrete sullo schermo il livello attuale (ad es. il Livello A3 mostrerà L:A3 in alternanza con Fun3, che è il livello scelto quando si preme la casa A3). Per cambiare di livello, premete una casa sulla scacchiera, ed il nuovo livello verrà mostrato sullo schermo in alternanza con i dettagli di livello. Premete LEVEL ancora per uscire dalla selezione livello. 96 Notate le seguenti sequenze di tasti ed i loro effetti: Nessun cambiamento. Il livello precedente resta selezionato. LEVEL, Casa, LEVEL Nuovo livello selezionato, orologio azzerato. LEVEL, Simbolo pezzi, LEVEL La posizione iniziale della Funzione di Apprendimento selezionata è fissata al livello scelto in precedenza. LEVEL, Casa, Simbolo pezzi, LEVEL La posizione iniziale della Funzione di Apprendimento selezionata è fissata ad un livello nuovo. LEVEL, Simbolo pezzi, Casa, LEVEL Un nuovo Livello è selezionato, la Funzione di Apprendimento precedente è cancellata, la partita in corso conservata. Per selezionare una Funzione di Apprendimento, premete LEVEL. Lo schermo mostrerà il livello di abilità, come indicato dalla casa, in alternanza con i dettagli di livello. Per selezionare una Funzione di Apprendimento premete uno o due Tasti dei Simboli dei Pezzi (%, $, #, @ o !) che volete usare. Lo schermo mostrerà i pezzi scelti. Per esempio, se volete giocare con Re, Alfieri, Cavalli e Pedoni, dopo aver premuto LEVEL premete anche # e @. Lo schermo mostrerà la vostra selezione. Premete poi LEVEL per uscire dalla selezione livello e far attivare dal computer la vostra scelta e iniziare così la partita. Visto che il re è sempre richiesto per la partita, non avete bisogno di sceglierlo per le Funzioni di Apprendimento, per cui la pressione di & vi fa scegliere una normale partita a 32 pezzi. La funzione Non Auto viene cancellata automaticamente quando selezionate una Funzione di Apprendimento sul livello di gioco attuale. Le 11 funzioni di Apprendimento e partita normale sono indicate dalle seguenti schermate: Funzione di Apprendimento Schermo Re e Pedoni ............................................................... te:_p Re, Cavalli e Pedoni .................................................. te:_n Re, Alfieri e Pedoni ................................................... te:_b Re, Torri e Pedoni ...................................................... te:_r 97 ITALIANO LEVEL, LEVEL Re, Regine e Pedoni ................................................. te:_q Re, Cavalli, Alfieri e Pedoni ...................................... te:nb Re, cavalli, Torri e Pedoni ......................................... te:nr Re, Cavalli, Regine e Pedoni .................................... te:nq Re, Alfieri, Torri e Pedoni .......................................... te:br Re, Alfieri, Regine e Pedoni ...................................... te:bq Re, Torri, Regine e Pedoni ........................................ te:rq Tutti i pezzi (partita normale) .................................... te:sb 3.12 Funzione Guida alle Aperture Il computer ha 16 diverse sequenze d’apertura di partita in memoria, che vengono giocate cosicché voi possiate impararle. Premete OPENINGS COACH, che alla prima selezione porterà il computer ad emettere un suono e mostrare sullo schermo o(: Voi potete poi scegliere quale apertura volete ripassare premendo una delle case da A1 a B8. La Figura 3-1 mostra le aperture disponibili. Per esempio, per selezionare la terza Guida di Apertura, premete la casa A3, e o(:3 verrà fatto lampeggiare sullo schermo. Ciò conferma che la terza guida d’aperture è stata selezionata e le due barre indicano che il computer mostrerà le mosse di entrambi i lati, cosicché voi possiate vederle e imparare. Premete la stessa casa ancora e lo schermo passerà a o_:3, che indica che il computer giocherà col bianco e vi lascerà fare le mosse del nero. Un’altra pressione sulla stessa casa cambia la barra di destra per mostrare che il computer giocherà col nero mentre voi giocate col bianco, e una successiva pressione rimuoverà le barre, che significa che il computer lascerà fare tutte le mosse a voi e controllerà la loro correttezza. Premete OPENINGS COACH ancora, e lo schermo indicherà che voi dovreste muovere. Mentre state giocando potete premete PLAY per chiedere al computer di ricordarvi la mossa seguente. Ogni volta che fate una mossa corretta, il computer la confermerà con un suono singolo, mentre la mossa errata provocherà un doppio suono e la casa “di origine” verrà mostrata lampeggiante sullo schermo. Premete la casa “di destinazione” corretta per finire la mossa, o la casa “di origine” per cancellarla. Alla fine della sequenza di apertura potete continuare la partita se lo volete. L’orologio non è attivo 98 in questa funzione e NonAuto, se selezionato, è attivo solo quando l’apertura è stata ultimata. Notate che il metodo scelto per giocare la Guida alle Aperture viene mantenuto in memoria finché non viene re-selezionato. Quando volete tornare ad una normale partita, premete NEW GAME e tornerete alla scacchiera standard. Figura 3-1. Mosse della Guida alle Aperture Nome A1 A2 A3 Apertura Italiana Difesa a due Cavalli Apertura Spagnola A4 Difesa Siciliana A5 A6 A7 A8 B1 B2 B3 B4 B5 B6 B7 B8 Difesa Francese Difesa Caro-Kann Difesa Scandinava Difesa Alekhine Gambetto di Regina Gambetto di Regina Accettato Difesa Nimzo-Indiana Difesa Indiana di Regina Difesa Indiana di Re Difesa Gruenfeld Difesa Olandese Apertura Inglese Mosse e2e4, e7e5, g1f3, b8c6, f1c4, f8c5 e2e4, e7e5, g1f3, b8c6, f1c4, g8f6 e2e4, e7e5, g1f3, b8c6, f1b5, a7a6, b5a4, g8f6, e1g1, b7b5 e2e4, c7c5, g1f3, d7d6, d2d4, c5d4, f3d4, g8f6, b1c3 e2e4, e7e6, d2d4, d7d5 e2e4, c7c6, d2d4, d7d5, b1c3, d5e4 e2e4, d7d5, e4d5, d8d5, b1c3, d5a5 e2e4, g8f6, e4e5, f6d5 d2d4, d7d5, c2c4, e7e6, b1c3, g8f6, c1g5, f8e7 d2d4, d7d5, c2c4, d5c4 d2d4, g8f6, c2c4, e7e6, b1c3, f8b4 d2d4, g8f6, c2c4, e7e6, g1f3, b7b6 d2d4, g8f6, c2c4, g7g6, b1c3, f8g7, e2e4, d7d6 d2d4, g8f6, c2c4, g7g6, b1c3, d7d5 d2d4, f7f5, c2c4, g8f6, b1c3, e7e6 c2c4, e7e5, b1c3, g8f6, g1f3 99 ITALIANO Casa 3.13 Funzione di Verifica. Controllare la Posizione dei Pezzi! Se avete fatto cadere dei pezzi o se pensate che la posizione sulla scacchiera non sia corretta, il computer può verificare la posizione per voi. Quando tocca a voi, premete il Tasto dei Simboli dei Pezzi del pezzo che volete verificare. Il computer mostra il simbolo del colore e del pezzo, insieme alla casa sulla scacchiera dove dovrebbe trovarsi. Premere lo stesso tasto dei simboli dei pezzi ancora mostra la posizione del secondo pezzo di quello stesso tipo, e così fino a che tutti i pezzi non sono stati segnalati. Tutti i pezzi bianchi vengono mostrati all’inizio, poi i neri. Quando non ci sono più pezzi di un certo tipo da localizzare, lo schermo indica il lato che muove e suona due volte per attirare la vostra attenzione. Un esempio di questa sequenza è mostrato nella seguente tabella. Azione Schermo Situazione Premete @ una volta _n:B1 Cavallo Bianco in B1 Premete @ la seconda volta )n:B8 Cavallo Nero in B8 Premete @ la terza volta )n:F6 Cavallo Nero in F6 Premete @ la quarta volta _n:__ (due suoni) Nessun altro Cavallo, il bianco muove Questo esempio indica che uno dei cavalli bianchi è stato catturato, e che il bianco ora deve muovere. Se volete verificare altri pezzi, ripetete la stessa procedura usando gli altri Tasti dei Simboli dei Pezzi. Quando avete finito, fate la vostra prossima mossa. L’orologio sarà stato temporaneamente fermato nel corso del controllo. Il computer esce da solo dalla Funzione Verifica se nessun tasto dei simboli dei pezzi viene premuto per 5 secondi. 3.14 Funzione Non Auto Il computer di solito risponde automaticamente con una contromossa ogni volta che voi avete fatto una mossa. Se premete NON AUTO udrete un suono di conferma e potrete fare varie mosse una dopo l’altra senza che il computer risponda. Questa funzione può essere usata in vari modi: • Giocate partite di maestri. È interessante premere PLAY per vedere ciò che il computer farebbe in ogni posizione! 100 • Studiate linee di apertura inserendole manualmente. • Giocate contro un amico, con il computer che fa da arbitro per controllare la liceità delle mosse e seguire il tempo per entrambi i lati! Se avete bisogno di aiuto dal computer, premete PLAY e il computer farà la prossima mossa. Dopo la mossa, la funzione Non Auto resta attiva e voi potete continuare la vostra partita! • Rigiocate da una certa posizione per uno studio successivo. Per uscire dalla funzione Non Auto e tornare alla partita normale, premete ancora NON AUTO ed un doppio suono vi avvertirà che tale funzione è terminata. Notate che la Funzione Non Auto viene cancellata automaticamente se premete NEW GAME o se selezionate una Funzione di Apprendimento su un livello attuale. 4.1 La funzione ACL Certe volta il computer “si chiude” a causa di scarica statica o altri disturbi elettrici. Se ciò accade, togliete le pile e usate un oggetto appuntito per premere dentro il foro segnato con ACL che è presente alla base dell’apparecchio: la pressione va esercitata per almeno un secondo. Ciò riattiva il computer. 4.2 Cure e Manutenzione Il vostro computer scacchistico è un apparecchio elettronico di precisione, e non dovrebbe mai essere soggetto ad un brusco trattamento, così come non esposto a temperature eccessive o all’umidità. Assicuratevi di togliere le pile prima di pulire l’apparecchio. Non utilizzate sostanze chimiche per la pulizia dell’apparecchio, perché potrebbero danneggiarne la plastica. Batterie quasi esaurite vanno rimpiazzate subito, perché potrebbero essere soggette a perdite e danneggiare l’apparecchio. Leggete anche le seguenti avvertenze sulle pile. Attenzione: usate solo pile alcaline o zinco-carbone. Non mescolate pile diverse o pile vecchie e usate e nuove. Non cercate di ricaricare pile non ricaricabili. Usate solo le pile raccomandate o loro equivalenti. Assicuratevi di osservare la corretta polarità 101 ITALIANO 4. DETTAGLI TECNICI quando inserite le pile. Pile esaurite vanno immediatamente rimosse dall’apparecchio. Non esponete i terminali di contatto a corto circuito. 4.3 Specifiche tecniche Tasti: Schermo a cristalli liquidi: Suono: Pile: Consumo d’energia: Dimensioni: 14 Superficie 18 x 9 mm Emettitore piezoelettrico 2 AAA/AM4/R03 (1,5 volts) 10 mW 176 x 100 x 35 mm Saitek si riserva il diritto di operare variazioni tecniche senza preavviso nell’interesse del progresso. 102 GUIDA ALLA SOLUZIONE DI PROBLEMI POSSIBILI CAUSE CHE COSA FARE • Le pile non sono inserite nel modo corretto. • Le pile sono scariche o difettose. • Una scarica statica ha causato la chiusura del computer. • Reinstallate le pile come mostrato in 1.1. • Rimpiazzate le pile. • Premete nel foro segnato con ACL come descritto in 4.1. Lo schermo a cristalli liquidi si legge con difficoltà. • Le pile sono scariche o difettose. • Rimpiazzate le pile. Il computer non fa una mossa. • L’opzione Non Auto è stata attivata. • Un alto livello di gioco è attivo - il computer sta pensando. • Premete NON AUTO per deselezionare. • Potete interrompere il computer mentre pensa e forzarlo a muovere premendo PLAY. Il computer non accetta la vostra mossa. • E’ il vostro turno? Il vostro Re è forse sotto scacco? La vostra mossa pone il Re sotto scacco? Avete mosso la Torre per prima per arroccare? Vi state muovendo su una casa illecita? • Il computer sta pensando. • Un tono basso indica che state facendo un errore. Rivedete le regole degli scacchi. Usate TAKE BACK per ricostruire l’ultima mossa. • Avete attuato l’ultima mossa del computer non correttamente (avete premuto la casa errata). Il computer sembra star compiendo delle mosse illecite. Il computer non emette suoni. • Per interrompere il computer premete PLAY. • Controllate la mossa sullo schermo. Premete la casa giusta per completarla. • Il computer ha fatto una mossa particolare, come un en passant, arrocco o promozione di pedone. • La vostra posizione non è corretta. • Rivedete le regole. • Il tasto Sound è stato premuto e quindi non c’è suono. • Premete SOUND per riavere il suono. 103 • Verificate la posizione come descritto in 3.13. ITALIANO SINTOMI Il computer non reagisce oppure si “congela” durante il gioco. COMIENZO RAPIDO ¡Para aquellos que quieren empezar a jugar a ajedrez inmediatamente, sin tener que leer primero todo el manual, aquí tienen un procedimiento de Comienzo Rápido! 1 2 3 Abra el compartimiento de pilas al dorso del ordenador deslizando la tapa. Inserte 2 pilas AAA ( tipo AM4/ R03) en el ordenador, asegurándose de observar la polaridad correcta. Vuelva a poner la tapa (Detalles en Sección 1.1). 2 x AAA/AM4/R03 4 Pulse la tecla NEW GAME para reinicializar el ordenador y empezar una nueva partida de ajedrez. 5 Registre las jugadas en el tablero empujando suavemente las piezas de ajedrez dentro de los hoyos de lascasillas “origen” y “destino” para cada jugada. 6 Tan pronto como el ordenador ejecuta una jugada, esta jugada se registra en la pantalla. Presione ligeramente la pieza del ordenador en las casillas “origen” y “destino” indicadas para terminar la jugada del ordenador. ¡Ya está! Pulse la tecla GO/ STOP para encender el ordenador. Si el ordenador no responde, utilice un alfiler o algún otro objeto puntiagudo para empujar en el agujero marcado ACL en la base de la unidad como detallado en Sección 4.1. Coloque las piezas en sus posiciones de partida para una nueva partida, con las piezas Blancas por su lado. Ejecute su próxima jugada como se describe arriba. Puede apagar el ordenador en cualquier momento pulsando la tecla GO/STOP. ¡Disfrute su partida! ዛዒዓዔዕዖዘዙዜ ዑ尷尽尻就尯尹尿尵ዑ ዐ屁屃屁屃屁屃屁屃ዐ ዏ巀居巀居巀居巀居ዏ ዎ居巀居巀居巀居巀ዎ ው巀居巀居巀居巀居ው ዌ居巀居巀居巀居巀ዌ ዋ屄层屄层屄层屄层ዋ ዊ尶局尺尴尮尼尾尸ዊ ዝዒዓዔዕዖዘዙዞ Nota: El Ordenador se apagará automáticamente para conservar la energía si no se pulsa ninguna tecla durante unos 20 minutos mientras el ordenador no está pensando (lea Sección 2.8). 104 e7-e5: ዛዒዓዔዕዖዘዙዜ ዑ尷尽尻就尯尹尿尵ዑ ዐ屁屃屁屃屁屃屁屃ዐ ዏ巀居巀居巀居巀居ዏ ዎ居巀居巀居巀居巀ዎ ው巀居巀居屄居巀居ው ዌ居巀居巀居巀居巀ዌ ዋ屄层屄层巀层屄层ዋ ዊ尶局尺尴尮尼尾尸ዊ ዝዒዓዔዕዖዘዙዞ ዛዒዓዔዕዖዘዙዜ ዑ尷尽尻就尯尹尿尵ዑ ዐ屁屃屁屃居屃屁屃ዐ ዏ巀居巀居巀居巀居ዏ ዎ居巀居巀屁巀居巀ዎ ው巀居巀居屄居巀居ው ዌ居巀居巀居巀居巀ዌ ዋ屄层屄层巀层屄层ዋ ዊ尶局尺尴尮尼尾尸ዊ ዝዒዓዔዕዖዘዙዞ 2.8 Memoria de juego y Apagado Automático 2.9 Biblioteca de Aperturas INDICE COMIENZO RAPIDO INTRODUCCION 1. UTILIZACIÓN DE SU ORDENADOR DE AJEDREZ 1.1 Instalación de las pilas 1.2 Ejecutar jugadas 1.3 El ordenador ejecuta una jugada 1.4 Cambio de opinión? Anule! 1.5 ¡Jaque, mate y Tablas! 1.6 Empiece una nueva partida 1.7 Cambie de niveles 1.8 Guía de aperturas 2. MÁS CARACTERÍSTICAS DEL ORDENADOR 2.1 Relojes de ajedrez 2.2 Capturas y jugadas especiales 2.3 Jugadas Ilegales 2.4 Interrumpiendo la Búsqueda del Ordenador 2.5 Cambiando Bandos con el Ordenador 2.6 Obtener las Recomendaciones del Ordenador 2.7 El ordenador Juega contra si mismo 4. DETALLES TECNICOS 4.1 La Función ACL 4.2 Cuidado y Mantenimiento 4.3 Especificaciones Técnicas GUIA PARA SOLUCIONAR PROBLEMAS 105 ESPAÑOL 3. NIVELES Y MODOS ESPECIALES 3.1 Niveles de Juego 3.2 Niveles de Diversión 3.3 Niveles de Juego Casual 3.4 Niveles Blitz 3.5 Niveles Bronstein 3.6 Niveles de gratificación de Tiempo 3.7 Niveles de Torneo 3.8 Niveles de Profundidad Fijada 3.9 Niveles de Táctica 3.10 Modos de Enseñanza 3.11 Para Escoger los Niveles y Modos de Enseñanza 3.12 Modos de Entrenamiento de Aperturas. 3.13 Verifique el Modo. ¡Verifique las Posiciones de las Piezas! 3.14 Modo TECLAS Y CARACTERISTICAS TECLAS Y CARACTERISTICAS 1. AFICHAJE PCL: La PCL (pantalla de cristal líquido) se utiliza para mostrar las jugadas, informaciones sobre la partida y los relojes de ajedrez para los dos jugadores. La mayoria de los símbolos que utiliza son obvios pero una lista completa está detallada en Dibujo 1. 2. Las teclas de Símbolo de las Piezas &(Reyes), %(Dama), $(Torre), #(Alfil), @(Caballo), !(Peón): Las Teclas de Símbolo de las piezas se utilizan para verificar las posiciones y para escoger los diferentes modos de Enseñanza y algunas piezas se utilizan para la coronación de peones. 3. Teclas de Juego a. Tecla NEW GAME (NUEVA PARTIDA): Púlsela para reinicializar el ordenador para una nueva partida de ajedrez. b. Tecla OPENINGS COACH (Entrenamiento de Aperturas): Púlsela para entrar en el Modo de Entrenamiento de Aperturas y para entrenarse sobre gambitos reconocidos de aperturas y respuestas. c. Tecla SOUND (de Sonido): El pulsar esta clave hace que el programa sonido rote por sus 3 niveles de operación. Puede decir qué condición ha escogido al oír el número de altos pitidos altos : NIVELES DE SONIDO 4. SEÑAL EMITIDO CUANDO ESTÁ SELECCIONADO 5. Sonido y Entrenamiento 3 pitidos altos Sonido solo 2 pitidos altos Silencio 1 pitido alto Cuando se selecciona Entrenamiento, el ordenador valora su jugada nada más esté hecha, y emite 2 pitidos bajos si la considera mala. Cuando se selecciona Sonido, el timbre “pita” para mostrar que el ordenador está 6. 7. 106 reaccionando a sus jugadas. Las significaciones de los varios “pitidos” van detalladas en Dibujo 1. d. Tecla TAKE BACK (de retroceso.): Púlsela para cancelar la última jugada individual. Se pueden cancelar hasta 14 jugadas individuales (Una jugada individual es una jugada por un solo bando). e. Tecla NO AUTO (de no-auto): Púlsela para entrar en el modo No-Auto que permite que las jugadas se registren de manera manual – el ordenador controla la partida pero no ejecuta ninguna jugada. f. Tecla LEVEL (De Niveles): Púlsela para entrar en el modo de Niveles y ajustar el nivel de juego a la complejidad y al tipo de juego que desea usted. Se utiliza también para escoger los modos de Enseñanza. g. Tecla PLAY (de Juego): Púlsela para cambiar bandos con el ordenador. Se puede también pulsar mientras el ordenador está pensando para obligarlo a ejecutar una jugada, o más bien durante su propia jugada para que el ordenador le dé un consejo. h. Tecla GO/STOP: Púlsela para encender el ordenador. Púlsela otra vez para apagar el ordenador. La partida en curso se queda en memoria hasta 300 horas. Tablero sensible: Cada casilla lleva un sensor muy sensible que registra los movimientos de las piezas. Las casillas se identifican con columnas (letras) y líneas (cifras). ACL (Encender de nuevo): En la base de la unidad se encuentra un interruptor recóndito de reinicialización. Se utiliza para eliminar las descargas estáticas después de insertar pilas nuevas. Compartimiento de las Pilas: Las pilas se colocan en la base de la unidad. El ordenador utiliza 2 pilas “ AAA” (tipo AM4/R03) alcalinas. Zona de Estocamiento de las Piezas: Compartimiento práctico de estocamiento de las piezas de ajedrez. Dibujo 1. SIMBOLOS SONIDOS 1 pitido alto ........ Indica que ha sido pulsada una tecla o una casilla sensible 1 ............ 1 A ........... A k .......... Rey 2 ............ 2 B ........... B q .......... Dama 3 ............ 3 c ........... C r .......... Torre 4 ............ 4 D ........... D b .......... Alfil 5 ............ 5 E ........... E n .......... Caballo 6 ............ 6 F ........... F p .......... Peón 7 ............ 7 G ........... G sb ........ Tablero normal 8 ............ 8 H ........... H 9 ............ 9 0 ............ 0 PM ............. Señala al jugador a quien le toca jugar S ................ Señala que le toca jugar a los negros : ................ 2 puntos inmóviles señalan que las cifras son Minutos y Segundos : ................ 2 puntos destellando señalan que las cifras son Horas y Minutos ch:)) ........ Negro en jaque ch:__ ........ Blanco en jaque EnD) ......... Jaquemate – negro gana EnD( ......... Tablas te: ............. Modo de Enseñanza o(:3 ........... Entrenamiento de Aperturas (Apertura Española) – el ordenador juega por los dos bandos 1 pitido bajo ....... Error – jugada incorrecta o tecla pulsada incorrecta 2 pitidos bajos ... Advertencia de parte de Entrenamiento 3 pitidos altos .... Nuevo juego o activación de Sonido y Entrenamiento ESPAÑOL 3 pitidos bajos ... En los juegos de reloj atrás, el tiempo se agotó o_:3 ........... Entrenamiento de Aperturas (Apertura Española) – el ordenador juega las blancas o):3 ........... Entrenamiento de Aperturas (Apertura Española) – el ordenador juega las negras o :3 ........... Entrenamiento de Aperturas (Apertura Española) – el ordenador juega con ningún color 107 2 x AAA/AM4/R03 INTRODUCCION Este ajedrez electrónico es un ordenador potente que jugará a ajedrez con usted en cualquier nivel de complejidad que escoja usted, o si prefiere, puede jugar una partida con un amigo y el ordenador actuará como árbitro. La gama muy grande de niveles de juego (64) combinada a los modos de enseñanza extensivos (11) satisfacerá a cualquier persona con un interés por ajedrez que sea joven o mayor. Hay 768 combinaciones en total. Los modos de enseñanza y entrenamientos de aperturas son magníficas opciones para aprender en cualquier nivel de juego, y los varios modos de competición cronometrada le gustarán al jugador intermediario. 1. UTILIZACION DE SU ORDENADOR DE AJEDREZ Dibujo 1-1 ዛዒዓዔዕዖዘዙዜ ዑ尷尽尻就尯尹尿尵ዑ ዐ屁屃屁屃屁屃屁屃ዐ ዏ巀居巀居巀居巀居ዏ ዎ居巀居巀居巀居巀ዎ ው巀居巀居巀居巀居ው ዌ居巀居巀居巀居巀ዌ ዋ屄层屄层屄层屄层ዋ ዊ尶局尺尴尮尼尾尸ዊ ዝዒዓዔዕዖዘዙዞ Dibujo 1-2 1. Instalación de las Pilas. Su ordenador de ajedrez funciona con tres “AAA” (AM4/ R03) pilas. Para una vida más larga de las pilas (hasta 600 horas), use pilas alcalinas nuevas. Deslize la tapa del compartimiento al dorso de la caja e inserte las pilas como demostrado en Dibujo 1-1. Vuelva a poner la tapa en su sitio y pulse GO/STOP para encender el ordenador. Si el ordenador no responde, utilice un alfiler o algún otro objeto puntiagudo para empujar en el agujero marcado ACL en la base de la unidad durante por lo menos un segundo para reinicializar el ordenador. Una vez la pila colocada o el agujero ACL pulsado, el ordenador empieza un auto-examen. 3 “pitidos” indican que el examen está bien. Un pitido o el silencio indican un problema y tendría usted que averiguarlo con el distribuidor local. Dibujo 1-3 Dibujo 1-4 108 2. Ejecutar jugadas. Siga los siguientes pasos para empezar una partida. a. Si es necesario, pulse GO/STOP para encender el ordenador. b. Coloque las piezas de ajedrez en su posición de principio de partida, con las piezas Blancas las más cerca de usted, como demostrado en Dibujo 1-2, y pulse NEW GAME. El ordenador indicará en la pantalla que tiene usted que mover una pieza Blanca. 00:00 PM Anote que al pulsar NEW GAME, se cancelan los modos de Enseñanza o de Entrenamiento de Aperturas en caso de que cualquier de los dos haya sido elegido, o que se desactiva la función No-Auto. c. Para hacer una jugada, pulse ligeramente la pieza que desea mover hasta oír un “pitido” (ver Dibujo 1-3). El tablero sensible del ordenador registra su jugada y la pantalla muestra por la izquierda la casilla “origen” que ha sido pulsada. E2:__ d. Coja la pieza y púlsela ligeramente en la casilla donde quiere usted colocarla. Un segundo “pitido” se oye y el ordenador muestra brevemente la casilla “destino” en la derecha de la pantalla. E2:E4 109 ዛዒዓዔዕዖዘዙዜ ዑ尷尽尻就尯尹尿尵ዑ ዐ屁屃屁屃屁屃屁屃ዐ ዏ巀居巀居巀居巀居ዏ ዎ居巀居巀居巀居巀ዎ ው巀居巀居屄居巀居ው ዌ居巀居巀居巀居巀ዌ ዋ屄层屄层巀层屄层ዋ ዊ尶局尺尴尮尼尾尸ዊ ዝዒዓዔዕዖዘዙዞ Dibujo 1-5a ዛዒዓዔዕዖዘዙዜ ዑ尷尽尻就尯尹尿尵ዑ ዐ屁屃屁屃居屃屁屃ዐ ዏ巀居巀居巀居巀居ዏ ዎ居巀居巀屁巀居巀ዎ ው巀居巀居屄居巀居ው ዌ居巀居巀居巀居巀ዌ ዋ屄层屄层巀层屄层ዋ ዊ尶局尺尴尮尼尾尸ዊ ዝዒዓዔዕዖዘዙዞ Dibujo 1-5b Dibujo 1-6a Dibujo 1-6b ESPAÑOL Anote que al instalar nuevas pilas o pulsar ACL se reinicializa el ordenador y su memoria, perdiendo asi cualquier partida que pueda contener. Nada más su jugada ejecutada, si ha sido seleccionado Sound and Coach (Sonido y Entrenamiento), la pantalla mostrará Coch mientras valora su jugada. Se emiten dos pitidos bajos si la jugada está juzgada mala. e. Después, es el turno del ordenador, y el ordenador empieza a pensar en su jugada. Sin embargo, al principio de una partida, la respuesta del ordenador es a menudo casi instantánea porque está ejecutando jugadas que ya están almacenadas en su biblioteca de aperturas (ver seccion 2.9). 3. Las Jugadas del Ordenador Cuando el ordenador está pronto, “pita” y muestra en la pantalla las referencias “origen” y “destino” de su jugada, como en Dibujo 1.4. Por ejemplo, ver Dibujos 1-5 a y b. Pulse sobre la pieza indicada en su casilla “origen” (E7 en este caso) hasta oír un pitido y la parte “origen” de la pantalla cambia para mostrar el color y símbolo de esta pieza. (Dibujo 1 muestra los símbolos). A continuación, pulse sobre esa misma pieza en la segunda casilla en la pantalla – la casilla adonde el ordenador quiere ir (aquí E5). Una vez haya pulsado en E5, la pantalla se borra y acaba usted de completar la jugada del ¡ordenador! Luego, la pantalla indica que le toca a usted jugar otra vez. ዛዒዓዔዕዖዘዙዜ ዑ巀居巀尮巀居巀尭ዑ ዐ居巀居巀居巀居巀ዐ ዏ巀居巀居巀居巀居ዏ ዎ居巀居巀屁屄居巀ዎ ው巀居巀居巀居巀居ው ዌ居巀居巀居巀居巀ዌ ዋ巀居巀居巀居巀居ዋ ዊ居巀居巀居巀居巀ዊ ዝዒዓዔዕዖዘዙዞ Dibujo 2-1a ዛዒዓዔዕዖዘዙዜ ዑ巀居巀尮巀居巀尭ዑ ዐ居巀居巀居巀居巀ዐ ዏ巀居巀居屄居巀居ዏ ዎ居巀居巀居巀居巀ዎ ው巀居巀居巀居巀居ው ዌ居巀居巀居巀居巀ዌ ዋ巀居巀居巀居巀居ዋ ዊ居巀居巀居巀居巀ዊ ዝዒዓዔዕዖዘዙዞ Dibujo 2-1b 4. Cambio de Opinión? Retroceso! Si usted cambia de opinión respecto a una jugada, puede cancelarla. Pulse TAKE BACK cuando todavía es su turno de jugar. La pantalla muestra la casilla “destino”. Pulse la pieza en esta casilla. Ahora usted puede ver el símbolo de la pieza y la casilla de donde vino la pieza. Pulse la pieza en la casilla “origen” para terminar el retroceso. Si la jugada cancelada era una captura, el ordenador le recuerda que vuelva a poner la Dibujo 2-1c ዋ巀居巀居巀居巀居ዋ ዊ居巀居巀尮巀居尸ዊ ዝዒዓዔዕዖዘዙዞ Dibujo 2-2 110 pieza capturada en el tablero mostrando el tipo de pieza y su casilla para usted. Pulse dicha pieza en la casilla indicada. Para cancelar otra jugada más, pulse TAKE BACK otra vez. Se pueden cancelar hasta 14 jugadas individuales (o 7 jugadas por cada bando), lo que le permite experimentar y intentar diversas “¿Y qué pasa si..?” opciones. Para seguir con el juego, haga otra jugada o pulse PLAY para que el ordenador la haga para usted. Dibujos 1-6a y b muestran un ejemplo de cómo cancelar la jugada del Caballo de G8 a F6. Despues de que haya sido pulsado TAKE BACK, la pantalla muestra F6, la casilla adonde movió el Caballo (Dibujo 1-6a). Pulse F6, y la pantalla cambia para mostrar el color de la pieza y su símbolo (Caballo negro) y la casilla de donde vino esta pieza (Dibujo a-6b). Pulse el Caballo en G8 otra vez. Anote que las capturas al paso no pueden ser jugadas otra vez si el retroceso de su última jugada no había sido permitido. 5. Jaque, Mate o Tablas Cuando un Rey está en jaque, la pantalla muestra el símbolo jaque (en alternancia con el reloj de ajedrez si ése está activado). Cuando la partida acaba con jaquemate, tablas por ahogado, tablas fotográficas inmediatas o tablas por la regla de las 50 jugadas, el símbolo End (fin) aparece. Estos símbolos se detallan en Dibujo 1. Para empezar una nueva partida Pulse NEW GAME para empezar una partida nueva en cualquier momento, utilizando el nivel elegido en ese momento y el último ajuste del programa sonido. Ya que el pulsar NEW GAME borra de la memoria del ordenador la partida en curso, tenga cuidado a no pulsar esa tecla por error. 7. Para cambiar de niveles Su ordenador de ajedrez le ofrece 64 niveles de juego, cada uno correspondiendo a una de las casillas del tablero. En conjunto con los once modos de Enseñanza incorporados, usted tiene 768 diferentes niveles entre los cuales escoger. Pulse LEVEL para entrar en el modo LEVEL, y el nivel actual se indica (ejemplo: el Nivel equivalente a la casilla A3 muestra con alternancia L:A3 con Fun3. Para cambiar de nivel, no tiene más que pulsar una casilla del tablero, y este nivel se indicará en la pantalla. Vuelva a pulsar LEVEL para salir del modo 111 ESPAÑOL 6. LEVEL. Para más informaciones sobre los niveles de juego, ver Sección 3. 8. Entrenamiento de aperturas Su ordenador dispone de 16 secuencias de aperturas tan como “la Apertura Italiana” o el “Gambito de Dama” para que usted aprenda. Pulse OPENINGS COACH y a continuación, pulse una de las casillas entre A1 y B8 para seleccionar una de las aperturas. Vuelva a pulsar la casilla para determinar hasta qué punto desea que el ordenador le ayude, y pulse OPENINGS COACH una vez más para empezar a entrenarse o para probar su conocimiento. Aparecen más detalles en Parágrafo 3.12 2. MAS CARACTERISTICAS DEL ORDENADOR 2.1 Relojes de Ajedrez Relojes de ajedrez incorporados calculan el tiempo para usted y para el ordenador, con una pantalla de 4 números mostrando el tiempo transcurrido o el tiempo restante para cada uno de los jugadores en alternancia cuando le toca a uno jugar. Después de que haya ejecutado la jugada del ordenador, la pantalla muestra su reloj de ajedrez a usted hasta que una tecla o casilla sea pulsada. Sin embargo, registra su tiempo hasta que la casilla “destino” sea pulsada. Una vez su jugada ejecutada, la pantalla de repente vuelve a enseñar el reloj de ajedrez del ordenador mientras está pensando, hasta que éste indique que está listo para mover. Sin embargo, en vez de ello, la pantalla puede indicar Coch después de su jugada mientras está juzgando si dicha jugada era bien o mala. Si piensa el ordenador que la jugada que ejecutó usted no es bien, emite dos pitidos bajos. Durante la primera hora de la partida o si el tiempo restante es inferior a una hora, la pantalla indicará MINUTOS:SEGUNDOS, con dos puntos inmóviles. Si el tiempo transcurrido en total es superior a una hora o el tiempo restante es superior a una hora, la pantalla indicará HORAS:MINUTOS y los dos puntos se convierten en dos puntos destellando mientras está visible el reloj de ajedrez. Notas: El reloj se para si verifica usted el nivel, el tablero, o si apaga el ordenador. Sin embargo, en cada uno de esos casos, los tiempos se quedan en memoria y el reloj de ajedrez reanuda cuando la partida está reinicializada. 112 2.2 Las capturas y las Jugadas Especiales a. CAPTURAS: Para capturar, pulse ligeramente la pieza que desea quitar, quítela del tablero, y presione su pieza en la casilla de la pieza capturada. b. AL PASO: En una captura al paso, el ordenador le recuerda que quite usted el peón capturado del tablero, indicando asi la localización del peón. Presione el peón capturado antes de quitarlo del tablero. Ver Dibujo 2-1 a, b y c. c. Coronación de Peones y de las Demás Piezas (excepto Damas): Cuando corona un peón, por primero, pulse el peón en su casilla “origen” como siempre. El ordenador indica la casilla “origen” de usted y el símbolo de la Dama (en alternación con el reloj de ajedrez). En cuanto pulse usted el peón en la casilla “destino”, se convierte de repente en una Dama. ¡No se olvide de cambiar su pieza en el tablero! Si desea coronar su peón en Torre, Alfil o Caballo, pues pulse la tecla de Símbolo de Pieza adecuada entre el momento cuando se presionan las casillas “origen” y “destino”. Cuando el ordenador corona un peón, indicará las casillas “origen” y “destino” como siempre. Después de que haya pulsado la casilla “origen”, la pantalla indica el tipo de pieza en que será coronado el peón mostrando el símbolo de pieza y la casilla “destino”. Pulse en la casilla “destino” con la nueva pieza indicada para terminar con la jugada de coronación del ordenador. d. ENROQUE: El ordenador reconoce automáticamente los enroques cuando ha sido movido el Rey. Después de que haya pulsado el Rey en sus casillas “origen” y “destino”, el ordenador indica la casilla “origen” de la Torre. Pulse esta casilla. A 113 ESPAÑOL El reloj se reinicializa si se cambia de nivel o si se pulsa una casilla en el Modo Nivel. Cuando su Rey está en jaque, la pantalla indica jaque en alternancia con el reloj de ajedrez. Si usted está jugando en un nivel con un reloj con cuenta atrás, el reloj cuenta atrás a partir del tiempo que seleccionó usted para enseñar el tiempo restante. Cuando alcanza zero el primero reloj, se oyen tres “pitidos” bajos para indicar que ya se agotó el tiempo. A continuación el reloj empezará a contar el tiempo a partir de zero de manera normal. En los niveles donde el tiempo no forma parte de la competición, el reloj cuenta adelante para enseñar el tiempo transcurrido total. Si cancela una jugada mientras está jugando en cuenta atrás, el reloj no vuelve a contar atrás para cada cancelación. Se para simplemente hasta que usted ejecute su próxima jugada. continuación el ordenador indica el símbolo de la Torre, junto con la casilla adonde tendría que ir la Torre. Pulse en la casilla “Destino” de la Torre para terminar con la jugada (ver Dibujo 2-2). 2.3 Jugadas Ilegales Su ordenador nunca aceptará una jugada ilegal. Si intenta ejecutar un jugada ilegal, el ordenador emite un pitido bajo de error y la pantalla no deja de indicar la casilla “origen”. Pulse esta casilla para cancelar la jugada ilegal y vuelva a jugar. Tambien, si usted mueve las piezas del ordenador de manera incorrecta, oirá un “pitido” de error. Eso sucede si usted mueve una pieza incorrecta o si mueve una pieza hasta una casilla incorrecta. Verifique la pantalla y vuelva a mover. Si pulsa una pieza y que la casilla “origen” aparece en la pantalla, pero que usted decide por fin no ejecutar esta jugada, vuelva a pulsar esa misma casilla para cancelar. Tenga cuidado no hacer errores cuando está apagado el sonido, ya que en este caso usted no podrá oir los pitidos de error. 2.4 Para interrumpir la Búsqueda del Ordenador Para interrumpir el ordenador mientras está pensando, pulse PLAY y el ordenador ejecutará la mejor jugada que haya encontrado hasta este momento. Ello puede resultar muy conveniente en partidos de nivel de juego alto, cuando una búsqueda sin límite para la mejor jugada puede tardar mucho. 2.5 Para cambiar Bandos con el Ordenador Para cambiar bandos con el ordenador, pulse PLAY cuando le toca a usted jugar. El ordenador ejecutará la próxima jugada por su bando. ¡Cambie bandos tantas veces como quiera! 2.6 Obtener Recomendaciones de parte del Ordenador Si usted necesita ayuda, el ordenador le puede enseñar lo que haría si estuviese en su posición. Pulse PLAY cuando le toca a usted jugar, y el ordenador ejecutará la jugada para usted. Para registrar esta jugada como siendo su propia jugada, ejecute la jugada en el tablero, vuelva a pulsar PLAY y el ordenador ejecutará su proxima jugada; luego, siga con el juego ejecutando su propia jugada. Si no desea utilizar la jugada del ordenador, primero 114 ejecute la jugada indicada en el tablero, y luego cancélela. Una vez la jugada cancelada de esa manera, puede usted ejecutar su propria jugada. 2.7 El ordenador Juega contra sí Mismo Para observar el ordenador mientras juga contra sí mismo, pulse PLAY para cada jugada. Estudie sus estrategias de juego para aprender más sobre ajedrez. 2.8 Memoria de la Partida y Apagado Automático Se puede interrumpir una partida pulsando GO/STOP para apagar el ordenador. El ordenador “recordará” su posición durante hasta 300 horas (con pilas alcalinas nuevas). !Cuando vuelve a encender el ordenador, siga donde lo dejó! Si usted no pulsa ninguna tecla o no ejecuta ninguna jugada durante aproximadamente 20 minutos cuando no está pensando el ordenador, el ordenador se apagará para conservar la energía, y conservará la partida en memoria. Pulsa GO/STOP para volver a empezar la partida donde se dejó. 3. NIVELES Y MODOS ESPECIALES 3.1 Niveles de Juego Con 768 niveles entre los cuales escoger (incluyendo los modos extensivos de enseñanza), usted puede aprender y evolucionar con este ordenador de ajedrez. Como se indica en los díagramas de niveles de juego en los parágrafos siguientes, cada nivel corresponde a una de las 64 casillas del tablero. Los niveles básicos se dividen en 8 grupos destinados a satisfacer a utilizadores de habilidades distinctas. • Niveles de Diversión: A1 to A8.Para los principiantes. A1 es el más fácil. 115 ESPAÑOL 2.9 Biblioteca de Aperturas A principio de una partida, la respuesta del ordenador suele ser instantánea porque el ordenador está ejecutando jugadas que lleva almacenadas en su bibioteca de aperturas. Si la posición en curso en el tablero se encuentra en su biblioteca de aperturas, el ordenador responde a esa posición, escogiendo dentro de su colección de jugadas, en lugar de pensar en una jugada. 116 D BONUS TIMER E TACTICA C PROFUNDIDAD FIJADA B TORNEO A BRONSTEIN 1 BLITZ NIVELES DE DIVERSION NIVELES DE JUEGO CASUAL • Niveles para Juego Casual: B1 to C8. Para los juegos que no son con cuenta atrás. Gama completa de dificultades, desde fácil (B1) hasta sumamente desafíante (C8). Cuando enciende el ordenador por primera vez, B4 será el nivel seleccionado • Blitz: D1 a D8. Tambien llamado “Muerte Súbita”. La partida debe concluirse dentro del tiempo seleccionado. • Bronstein: E1 a E4. La partida debe concluirse dentro del tiempo seleccionado, que se ve aumentado luego para compensar para cada jugada. La compensación es el tiempo actual transcurrido o el tiempo permitido, depiende de qué es más corto. • Bonus timer: E5 a E8. La partida debe concluirse dentro del tiempo seleccionado, que se ve aumentado por una cierta duración para compensar para cada jugada antes de que sea ejecutada. • Torneo: F1 a F8. Un cierto número de jugadas deben ser ejecutadas dentro de un tiempo dado permitido. • Profundidad fijada: G1 a G8. La capacidad del ordenador está limitada, por el ordenador no poder anticipar más que el SELECCIONA UN NIVEL ENTRE LAS 64 CASILLAS número seleccionado de jugadas. • Táctica: H1 a H8. La capacidad del 8 ordenador está limitada, por el ordenador no poder anticipar más que el número 7 seleccionado de jugadas, y por no valorar las ventajas estratégicas. 6 ¡Cuando escoge el nivel, tenga en cuenta que cuando el ordenador tiene más tiempo 5 para pensar en sus jugadas, se convierte en más fuerte y juega mejor – propio como un 4 jugador de ajedrez humano! Mejore su destreza con el ajedrez – después de ganar 3 contra el ordenador en un nivel, pase al nivel superior. ¡Siga desafiándose y aprendiendo 2 más sobre el juego! F G H 3.2 Niveles de Diversión Una selección entre cualquier de las casillas desde A1 hasta A8 le llevará a los niveles de diversión. En esa gama, el ordenador no busca sin límite para la mejor jugada posible. No se preocupa de los puntos y además, el programa hace jugadas aleatorias resultando en que a veces el ordenador ejecute una jugada que no es la mejor que haya encontrado. Ello introduce una diversidad interesante en las respuestas del ordenador, y a veces parece que está haciendo errores de juzgamiento muy humanas. A1 es el nivel de dificultad más bajo, y A8 está algo más alto. 3.3 Niveles de Juego Casual Cuando los niveles casuales están seleccionados, usted es quien controla el nivel de habilidad del ordenador, limitando el tiempo medio que tiene para escojer sus jugadas. Cuando el nivel de habilidad está aumentado el ordenador va pensando con más profundidad poco a poco, y por lo tanto juega partidas mas finas. Cuando uno de estos niveles está seleccionado en las columnas de Casillas B o C, la pantalla indicará alternativamente cada segundo la selección de nivel y el tiempo medio de respuesta del ordenador. Su selección se detalla abajo: B1 B2 B3 B4 B5 B6 B7 B8 C1 C2 C3 C4 C5 Tiempo por Jugada Pantalla ............................. 1 seg ............................. L:B1/00:01 ............................. 2 seg ............................. L:B2/00:02 ............................. 3 seg ............................. L:B3/00:03 ............................. 5 seg ............................. L:B4/00:05 ............................ 10 seg ............................ L:B5/00:10 ............................ 15 seg ............................ L:B6/00:15 ............................ 20 seg ............................ L:B7/00:20 ............................ 30 seg ............................ L:B8/00:30 ............................ 45 seg ............................ L:c1/00:45 ............................. 1 min ............................. L:c2/01:00 ............................. 2 min ............................. L:c3/02:00 ............................. 3 min ............................. L:c4/03:00 ............................. 4 min ............................. L:c5/04:00 117 ESPAÑOL Casilla del Tablero C6 ............................. 5 min ............................. L:c6/05:00 C7 ............................ 10 min ............................ L:c7/10:00 C8 ............................ 15 min ............................ L:c8/15:00 3.4 Niveles Blitz Los niveles in la columna D de casillas son los niveles Blitz. Si desea jugar una partida de ajedrez de velocidad o de “muerte súbita”, puede escoger entre una gama de tiempos que se permiten para concluirse el juego. Puede escoger entre una partida “con estrés” de 5 minutos y una partida mas relajante de 1-1/2 horas. Cuando selecciona una de esas casillas, la pantalla indicará con alternancia cada segundo las referencias de la casilla que escogió usted, y el tiempo límite correspondiente para la partida. Casilla del Tablero Tiempo por Jugada Pantalla D1 ............................... 5 min ........................ L:D1/05:00 D2 .............................. 10 min ....................... L:D2/10:00 D3 .............................. 15 min ....................... L:D3/15:00 D4 .............................. 25 min ....................... L:D4/25:00 D5 .............................. 30 min ....................... L:D5/30:00 D6 .............................. 45 min ....................... L:D6/45:00 D7 .............................. 60 min ....................... L:D7/1:00 D8 .............................. 90 min ....................... L:D8/1:30 3.5 Niveles Bronstein Al seleccionar una casilla de E1 a E4 en el tablero, puede usted escoger un tiempo límite para la partida según el sistema Bronstein. Un tiempo básico está seleccionado para la partida, y un aumento de algunos segundos va añadiéndose luego a este tiempo cada vez que se ejecuta una jugada. El aumento puede ser o el tiempo gratis indicado en la tabla abajo o más bien el tiempo que se tarda realmente para mover, depiende de qué tiempo es más corto. Su selección aparece en la tabla. Cuando escoge uno de dichos niveles, la pantalla rota por 3 diferentes grupos de información, y cada uno de ellos va señalado durante un segundo. 118 • La casilla seleccionada • El tiempo básico en minutos • El tiempo gratis en minutos Casilla del Tablero L:E2 10:00 00:05 Tiempo por Juego y luego … y luego … Tiempo Gratis por Jugada E1 ......................... 5 min .......................... 3 seg .............. E2 ........................ 10 min ......................... 5 seg .............. E3 ........................ 15 min ........................ 10 seg ............. E4 ........................ 20 min ........................ 10 seg ............. Pantalla L:E1/05:00/00:03 L:E2/10:00/00:05 L:E3/15:00/00:10 L:E4/20:00/00:10 3.6 Niveles de Grateficación de Tiempo La selección de una casilla entre E5 y E8 lleva al nivel de Gratificación de Tiempo. Se parece a los niveles Bronstein, con la excepción de que el aumento de tiempo es siempre de dos segundos, y se añade al tiempo antes de ser ejecutada la jugada. Tiempo por Juego Tiempo Gratis por Jugada E5 ......................... 3 min .......................... 2 seg E6 ........................ 10 min ......................... 2 seg E7 ........................ 20 min ......................... 2 seg E8 ........................ 50 min ......................... 2 seg .............. .............. .............. .............. Pantalla L:E5/03:00/00:02 L:E6/10:00/00:02 L:E7/20:00/00:02 L:E8/50:00/00:02 3.7 Niveles de Torneo La columna de casillas F propone 8 niveles de torneo. Cuando uno de ellos está seleccionado, al ordenador y a usted se le pide ejecutar un número determinado de jugadas dentro de un cierto tiempo. Por ejemplo, si usted selecciona F3, tendrá que hacer 40 jugadas dentro de dos horas bajo el Control de Tiempo Primario. Si el juego no está terminado durante este tiempo, el Control de Tiempo Segundario empezará, y usted tendrá que ejecutar 20 jugadas dentro de 1 hora. Y en caso de que este segundo periodo no produzca ningun resultado, se repite hasta llegar a una conclusión. Según las reglas de torneo, el tiempo restante después de que hayan sido ejecutadas las jugadas en el Control de Tiempo Primero se traspasa y se añade al tiempo permitido en el Control de Tiempo Segundario. Por ejemplo, si usted escogió el nivel F3 y ejecutó las primeras 40 jugadas en solo una hora, será entregado 2 horas para las próximas 20 jugadas. 119 ESPAÑOL Casilla del Tablero Casilla del tablero Control de Tiempo Primario Jugada Tiempo Control de Tiempo Segundario Jugada Tiempo Pantalla F1 30 30 min 30 30 min L:F1/30/0:30 F2 30 1 hr 30 min restante 1 hr L:F2/30/1:30 F3 40 2 hr 20 1 hr L:F3/40/2:00 F4 40 2 hr restante 1 hr L:F4/40/2:00 F5 40 2 hr 30 min 16 1 hr L:F5/40/2:30 F6 45 1 hr 30 min 15 30 min L:F6/45/1:30 F7 50 2 hr 30 min 20 1 hr L:F7/50/2:30 F8 60 1 hr 30 30 min L:F8/60/1:00 El tiempo restante, en caso de que haya, se traspasa y se añade asi a lo largo del juego. Cuando selecciona uno de estos niveles de torneo, la pantalla rotará por esos 3 grupos de información, enseñando cada uno de ellos por un segundo. Por ejemplo, si está seleccionada la casilla F4, la pantalla indicará: • La casilla seleccionada L:F4 y luego... • El número de jugadas en el Control de Tiempo Primario 40 y luego... • La duración del Control de Tiempo Primario 2:00 3.8 Niveles de Profundidad Fijada Los niveles de Profundidad Fijada en la columna G limitan la habilidad del ordenador, no por medio del tiempo que tiene para buscar su próxima jugada, sino por medio del número de jugadas futuras en las que puede pensar. En los niveles más bajos, se comporta más como un principiante. En el nivel más bajo, G1, donde el ordenador solo pensa en su próxima jugada, no anticipa el juego para nada, y podría aun pasar por alto un mate que usted podría ejecutar con una sola jugada más. Al otro lado de la escala el ordenador repasará todas las 120 posibilidades para las 8 próximas jugadas (G8). En ese caso, la pantalla rota cada segundo entre el nivel que escogió usted, y el número de jugadas próximas que busca el ordenador: • La casilla seleccionada L:G5 y luego... • El número de jugadas individuales próximas 5PLy 3.10 Modos de Enseñanza Su ordenador de ajedrez ofrece once modos de Enseñanza Extensivos incorporados. Esta función le permite a usted aprender jugadas básicas y dominar las tácticas de las piezas, una a la vez. Para cada modo de Enseñanza individual, las únicas piezas en el tablero serán los Reyes y Peones o Reyes y Peones y uno o dos tipos de piezas seleccionadas. Ello le permite a los principiantes concentrarse en una o dos piezas a la vez, sin perder su atención y ser distraídos por otras piezas en el tablero. Los jugadores más avanzados pueden utilizar esta característica para entrenarse a jugar con combinaciones seleccionadas de piezas. Anote lo siguiente, en relación con los modos de Niveles y de Enseñanza: • Si se pulsa la tecla NEW GAME durante una partida, el ordenador abandonará el modo de Enseñanza y se colocará de nuevo en la posición estándar (32 piezas), con el nivel actual todavía en efecto. • Si pulsa LEVEL y luego decide no cambiar el nivel de juego en curso o el modo de enseñanza, no tiene más que volver a pulsar LEVEL y el estado de juego se quedará igual. 121 ESPAÑOL 3.9 Niveles de Táctica Los niveles de táctica se encuentran en la última columna de casillas, la columna “H”. Dichos niveles limitan también el número de jugadas próximas en las que piensa el ordenador, pero en ese caso el ordenador no evalua las ventajas estratégicas, y solo busca ganancias sustanciales como jaquemate o tablas. De nuevo, el número de jugadas individuales próximas que repasa el ordenador es equivalente a las casillas del tablero. H1 es una jugada individual próxima. H8 representa 8 jugadas próximas. La pantalla rota cada segundo entre el nivel que usted ha seleccionado y el número de jugadas próximas que busca el ordenador (ply), en una manera similar a los niveles de Profundidad Fijada. • La casilla seleccionada L:H8 y luego… • El número de jugadas individuales próximas 8P Ly • Puede escoger un nuevo nivel en cualquier momento durante su turno. Sin embargo, el reloj de ajedrez volverá a ser ajustado. • Si pulsa más que teclas de Símbolo de Piezas durante una selección de modo de Enseñanza, las dos últimas selecciones de símbolos son las únicas que se quedarán válidas cuando salga del Modo Nivel. • Si pulsa por error cualquier tecla de símbolo de pieza en el modo Nivel, perderá la partida actual después de salir del modo Nivel. Para seguir con la partida actual, pulsa la casilla correspondiente al nivel de juego actual, antes de salir del modo Nivel. Anote que el reloj habrá sido ajustado de nuevo. 3.11 Escoger los Modos de Niveles y Enseñanza Pulsa LEVEL para entrar en el modo Nivel y se enseña el nivel actual (ejemplo Nivel A3 aparece como L:A3 en rotación con Fun3, que es el nivel escogido cuando se pulsa la casilla A3 en el tablero). Para cambiar de nivel, no tiene más que pulsar una casilla en el tablero, y el nuevo nivel, en alternancia con los detalles del nivel, Estará enseñado en la pantalla. Pulsa LEVEL de nuevo para salir del modo Nivel. Anote las secuencias de teclas siguientes y sus effectos : LEVEL, LEVEL LEVEL, Casilla, LEVEL LEVEL, Símbolo de Pieza, LEVEL No cambio. El último nivel queda seleccionado Nuevo nivel seleccionado, reloj ajustado. Posición de inicio del nivel de Enseñanza seleccionado es fijada al nivel anterior Seleccionado. LEVEL, Casilla Símbolo de Pieza, LEVEL Posición de inicio del modo de Enseñanza seleccionado es fijada en un nuevo nivel. LEVEL, Símbolo de Pieza, Casilla, LEVEL Un nuevo nivel es fijado, el modo de Enseñanza anterior seleccionado es anulado, el juego existante conservado. Para seleccionar el modo Enseñanza, pulsa LEVEL. La pantalla indicará el nivel de habilidad, como mostrado por la casilla del tablero correspondiente, en alternación con los detalles del nivel. Para seleccionar un modo de Enseñanza pulsa la o las dos teclas de Símbolo de Piezas (%, $, #, @, !) que quiere utilizar. A continuación, la pantalla enseñará las piezas escogidas. Por ejemplo, si desea jugar con Reyes, Alfiles, Caballos y Peones, 122 después de pulsar LEVEL, pulsará # y @. La pantalla enseñará su selección. Luego, pulse LEVEL para salir del modo Nivel y registrar su selección en el ordenador y empezar a jugar. Ya que siempre se necesita el Rey para el juego, no le hace falta seleccionar esta pieza para el modo de Enseñanza, y de hecho, pulsando & es la manera de seleccionar un juego normal, con 32 piezas. Anote que No Auto se cancela automáticamente cada vez que un modo de enseñanza está seleccionado en el modo de nivel en curso. Los once modos de enseñanza y juego normal se indican en la pantalla de manera siguiente : Pantalla 3.12 Modos de Entrenamiento de Aperturas El ordenador dispone en su memoria de 16 diferentes secuencias de aperturas, que se jugan en turno para que pueda aprenderlas. Pulsa OPENINGS COACH y cuando está seleccionado por primera vez, el ordenador “pita” y la pantalla destella. o(: 123 ESPAÑOL Modo de Enseñanza Reyes y Peones ........................................................ te:_p Reyes, Caballos y Peones ........................................ te:_n Reyes, Alfiles y Peones ............................................ te:_b Reyes, Torres y Peones ............................................ te:_r Reyes, Damas y Peones ........................................... te:_q Reyes, Caballos, Alfiles y Peones ............................ te:nb Reyes, Caballos, Torres y Peones ............................ te:nr Reyes, Caballos, Damas y Peones .......................... te:nq Reyes, Alfiles, Torres y Peones ................................ te:br Reyes, Alfiles, Damas y Peones ............................... te:bq Reyes, Torres, Damas y Peones ............................... te:rq Todas las piezas (juego normal) ............................... te:sb Dibujo 3-1. Jugadas en Entrenamiento de Aperturas Casilla Nombre A1 A2 A3 Apertura italiana Defensa de dos Caballos Apertura Española A4 Defensa Siciliana A5 A6 A7 A8 B1 B2 B3 B4 B5 B6 B7 B8 Defensa Francesa Defensa Caro-Kann Defensa Escandinava Defensa Alekhine Gambito de Dama Gambito de Dama aceptado Defensa Nimzo-India Defensa India de Dama Defensa india de Rey Defensa Gruenfeld Defensa Holandesa Defensa Inglesa Jugada e2e4, e7e5, g1f3, b8c6, f1c4, f8c5 e2e4, e7e5, g1f3, b8c6, f1c4, g8f6 e2e4, e7e5, g1f3, b8c6, f1b5, a7a6, b5a4, g8f6, e1g1, b7b5 e2e4, c7c5, g1f3, d7d6, d2d4, c5d4, f3d4, g8f6, b1c3 e2e4, e7e6, d2d4, d7d5 e2e4, c7c6, d2d4, d7d5, b1c3, d5e4 e2e4, d7d5, e4d5, d8d5, b1c3, d5a5 e2e4, g8f6, e4e5, f6d5 d2d4, d7d5, c2c4, e7e6, b1c3, g8f6, c1g5, f8e7 d2d4, d7d5, c2c4, d5c4 d2d4, g8f6, c2c4, e7e6, b1c3, f8b4 d2d4, g8f6, c2c4, e7e6, g1f3, b7b6 d2d4, g8f6, c2c4, g7g6, b1c3, f8g7, e2e4, d7d6 d2d4, g8f6, c2c4, g7g6, b1c3, d7d5 d2d4, f7f5, c2c4, g8f6, b1c3, e7e6 c2c4, e7e5, b1c3, g8f6, g1f3 Entonces, puede escoger usted qué juego de apertura desea estudiar pulsando una de las casillas de A1 a B8. Dibujo 3-1 detallan las aperturas disponibles. Por ejemplo, para seleccionar el tercero entrenamiento de aperturas, pulse la casilla A3 y o(:3 destellará en la pantalla. Eso confirma que el tercero entrenamiento de aperturas ha sido seleccionado y las dos barras indican que el ordenador enseñará las jugadas de ambos bandos, para que pueda usted mirar y aprender. Vuelva a pulsar la misma casilla y la pantalla se cambiará en o_:3, lo 124 que significa que el ordenador jugará para las piezas blancas y le dejará encontrar las jugadas para las negras. El pulsar otra vez la casilla cambia la barra en la derecha para indicar que el ordenador jugará para el bando negro, mientras usted jugará para el blanco, y una presión más quitará todas las barras, lo que significa que el ordenador le dejará jugar todas las jugadas mientras le asesora para la exactitud. Vuelva a pulsar OPENINGS COACH y la pantalla indicará que usted tiene que mover. Mientras está jugando, puede usted pulsar PLAY para pedir al ordenador que le recuerde la próxima jugada. Cada vez que usted ejecuta una jugada correcta, el ordenador la confirma con un solo “pitido”, pero si usted está equivocado, “pita” dos veces y no deja de indicar la casilla “origen” en la pantalla. Pulse la casilla “destino” correcta para terminar la jugada o la casilla “origen” para cancelarla. A final de la secuencia de aperturas, puede seguir y jugar la partida si lo desea. El reloj no está activado en este modo y No Auto, cuando ha sido seleccionado, funciona solo una vez las jugadas de apertura terminadas. Anote que el método escogido para el Entrenamiento de Aperturas se queda en memoria hasta que vuelva a ser seleccionado. 3.13 Verifique el modo. ¡Compruebe las Posiciones de Piezas! Si las piezas son volcadas, o si piensa que una de ellas ha sido colocada en un sitio equivocado, puede pedirle al ordenador que haga una verificación para usted. Solo pulse la tecla símbolo de pieza para la pieza que le hace dudar. El ordenador le enseñará el símbolo para el tipo y color de la pieza, junto con la casilla donde tendría que estar colocada. El pulsar la tecla otra vez indica la posición de la pieza siguiente del mismo tipo, y asi hasta que todas las piezas que tienen que estar en el tablero hayan sido enseñadas. La pantalla indica las piezas blancas primero, y luego las negras. Cuando ya no quedan piezas de este tipo para enseñar, la pantalla vuelve a indicar el bando al qué le toca jugar, y emite dos “pitidos” para atraer su atención. Un ejemplo de la secuencia de pantallas está detallado abajo. Este ejemplo indica que uno de los caballos blancos ha sido capturado, y ahora le tocan a los blancos jugar. Para comprobar otras piezas, repita los mismos pasos utilizando otros teclas de Símbolo de Pieza. Cuando ha terminado, simplemente ejecute su próxima jugada. Mientras tanto el 125 ESPAÑOL Cuando desea volver a un juego normal, no tiene más que pulsar NEW GAME y se devolverá a un tablero normal. Tecla que pulsar Indicación en la pantalla Significación Pulse @ primera vez _n:B1 Caballo Blanco en B1 Pulse @ segunda vez )n:B8 Caballo Negro en B8 Pulse @ tercera vez )n:F6 Caballo Negro en F6 Pulse @ cuarta vez _n:__ (Pita, pita) Ya no quedan Caballo, Le tocan jugar a los blancos reloj ha sido temporalmente parado. El ordenador sale automáticamente del Modo Verificación si no se pulsa ninguna tecla de símbolo de pieza durante unas 5 segundas. 3.14 Modo No Automático Normalmente, el ordenador automáticamente responde con una contra- jugada cada vez que ejecuta usted una jugada. Si usted pulsa NON AUTO el ordenador responde con un “pitido” y entonces usted puede registrar todas las jugadas para ambos bandos, una después de otra, sin permitir que el ordenador responda! Esta característica especial puede ser utilizada en maneras diversas : • Jugue partidas magistrales x. ¡Resulta interesante pulsar PLAY para ver lo que haría el ordenador en cualquier posición! • Estudie las líneas de libro de apertura registrándolas manualmente. • ¡Juegue a ajedrez contra un amigo, mientras el ordenador actúa como árbitro para verificar la legalidad de todas las jugadas y cronómetra el tiempo para ambos bandos! Si necesita una ayuda para una jugada, no tiene más que pulsar PLAY y el ordenador ejecutará la próxima jugada. ¡Después de la jugada, el modo No Auto queda activado, y puede usted seguir con el juego! • Vuelva a jugar en cualquier posición del tablero para estudiar más. Para salir del modo No Auto y volver al juego normal, pulse NON AUTO otra vez más, y un doble “pitido” confirma que el modo ha sido cancelado. Anote que el modo No Auto se cancela automáticamente tambien cada vez que pulsa NEW GAME o que escoge un modo de Enseñanza al salir del modo Nivel. 126 4. DETALLES TECNICOS 4.1 La función ACL Los ordenadores se quedan algunas veces “inertes” debido a descargas estáticas o otras perturbaciones eléctricas. Si ocurriera algo de esto, quite las pilas y utilice un alfiler o algún otro objeto puntiagudo para empujar en el agujero marcado ACL en la base de la unidad por lo menos un segundo. Esto reinicializará el ordenador. 4.3 Especificaciones Técnicas Teclas: 14 Pantalla PCL: Zona visible 18 x 9 mm Sonido: Timbre Piezo-electric Pilas: 2 AAA/AM4/R03 (1.5 V) Células Consumo de Energía: 10 mW Dimensiones: 176 x 100 x 35 mm Sailek reserva el derecho a introducir cambios técnicos sin previo aviso en beneficio del progreso. 127 ESPAÑOL 4.2 Cuidado y Mantenimiento Su ordenador de ajedrez es un instrumento electrónico de precisión y no debe ser sometido a un trato brusco y no debe ser expuesto a temperaturas extremas o a la humedad. Asegúrese de quitar las pilas antes de limpiar la unidad. No utilice agente químicos o líquidos para limpiar la unidad ya que podrían dañar el plástico. Pilas débiles deben ser sustituidas rápidamente ya que pueden presentar escapes y dañar el ordenador. Por favor anote lo siguiente respecto al uso de las pilas. Atención : Use solo pilas alcalinas o carbono zinc. No mezcle diferentes tipos de pilas o pilas nuevas con usadas. No recargue pilas no recargables. Utilice solamente las pilas recomendadas o equivalentes. Asegúrese de observar la polaridad correcta cuando inserte las pilas. Pilas viejas tienen que ser retiradas de la unidad de inmediato. No provoque el corto circuito de la alimentación de los terminales. GUIA DE SOLUCION DE PROBLEMAS SINTOMAS CAUSAS POSIBLES LO QUE TIENE QUE HACER El ordenador no reacciona o “congela” durante una partida. • Pilas no instaladas correctamente. • Pilas débiles o malas. • Una descarga estática ha causado un bloque. • Vuelva a instalar las pilas (Ver sección 1.1). • Sustituya las pilas. • Utilize el reajuste ACL (Ver Sección 4.1). La pantalla es difícil de leer. • Pilas débiles. • Sustituya las pilas. El ordenador no ejecuta una jugada. • Modo No Auto activado. • Se encuentra en un nivel alto de juego – el ordenador está pensando. • Pulse NON AUTO para desactivar. • Puede forzar el ordenador a jugar, si lo desea, pulsando PLAY. El ordenador no acepta su jugada. • ¿Le toca a usted jugar? ¿Está en jaque su Rey? ¿Pondrá su próxima jugada a su Rey en jaque? ¿Movió la Torre primero para empezar la coronación? ¿Está moviendo a una casilla Ilegal? • El ordenador está pensando. • Un pitido bajo indica que está haciendo un error. Utilice TAKE BACK para volver a construir la última jugada. • Registró la última jugada del ordenador incorrectamente (pulsó casillas equivocadas). Parece que el ordenador está haciendo jugadas ilegales. El ordenador está silencioso. • Pulse PLAY para interrumpir el ordenador. • Compruebe la jugada enseñada en la pantalla. Pulse la casilla correcta para terminar la jugada. • El ordenador ha ejecutado una de las jugadas especiales, tan como al paso, enroque, o coronación de peón. • Su posición en el tablero está incorrecta. • Revise las reglas de ajedrez. • La tecla Sonido ha sido pulsada para desactivar los sonidos. • Pulse SOUND para activarlo. 128 • Verifique el tablero (Ver 3.13). EEN SNELLE START Om onmiddelijk een schaakpartij te spelen zonder eerst de hele handleiding te lezen, dient u gewoon deze Snelle Start procedure te volgen! 2 3 Open het batterijvak aan de achterkant van de computer door het tapje neer te drukken. Zet 2 “AAA” (type AM4/R03) batterijen in de computer, op de juiste polariteit lettend. Plaats het deksel van het batterijvak terug. (Details in Sectie 1.1) 2 x AAA/AM4/R03 Druk op GO/STOP om de computer aan te schakelen. Als de computer niet reageert, moet u met een papier-clip of gelijkaardig scherp voorwerp in de opening gemarkeerd ACL aan de onderkant van het apparaat drukken zoals beschreven in Sectie 4.1. Zet de schaakstukken op in de beginstand voor een nieuwe partij, met de Witte stukken naar u toe. 4 Om de computer in te stellen voor een nieuwe partij, druk op de NEW GAME toets. 5 Voer zetten uit op het bord door de schaakstukken zachtjes in de openingen van de ‘van’ en ‘naar’ velden te drukken voor elke zet. 6 Zodra de computer een zet doet, laat hij deze zet zien in de display. Druk het stuk van de computer zachtjes aan op de aangegeven “van” en “naar” velden om de zet van de computer af te maken. En dat is het dan! Maak uw volgende zet zoals hierboven beschreven. Druk op GO/STOP om de computer uit te zetten. Geniet van uw partij! ዛዒዓዔዕዖዘዙዜ ዑ尷尽尻就尯尹尿尵ዑ ዐ屁屃屁屃屁屃屁屃ዐ ዏ巀居巀居巀居巀居ዏ ዎ居巀居巀居巀居巀ዎ ው巀居巀居巀居巀居ው ዌ居巀居巀居巀居巀ዌ ዋ屄层屄层屄层屄层ዋ ዊ尶局尺尴尮尼尾尸ዊ ዝዒዓዔዕዖዘዙዞ Opmerking: de computer schakelt vanzelf uit om energie te besparen wanneer gedurende ongeveer 20 minuten geen enkele toets wordt aangeraakt en de computer niet nadenkt (zie Sectie 2.8). 129 e7-e5: ዛዒዓዔዕዖዘዙዜ ዑ尷尽尻就尯尹尿尵ዑ ዐ屁屃屁屃屁屃屁屃ዐ ዏ巀居巀居巀居巀居ዏ ዎ居巀居巀居巀居巀ዎ ው巀居巀居屄居巀居ው ዌ居巀居巀居巀居巀ዌ ዋ屄层屄层巀层屄层ዋ ዊ尶局尺尴尮尼尾尸ዊ ዝዒዓዔዕዖዘዙዞ ዛዒዓዔዕዖዘዙዜ ዑ尷尽尻就尯尹尿尵ዑ ዐ屁屃屁屃居屃屁屃ዐ ዏ巀居巀居巀居巀居ዏ ዎ居巀居巀屁巀居巀ዎ ው巀居巀居屄居巀居ው ዌ居巀居巀居巀居巀ዌ ዋ屄层屄层巀层屄层ዋ ዊ尶局尺尴尮尼尾尸ዊ ዝዒዓዔዕዖዘዙዞ NEDERLANDS 1 2.6 Tips van de Computer Ontvangen 2.7 De Computer Speelt tegen Zichzelf 2.8 Partijgeheugen en Automatisch Uitzetten 2.9 Openingenboek INHOUDSOPGAVE EEN SNELLE START TOETSEN EN KENMERKEN 3. NIVEAUS EN SPECIALE MODI 3.1 Spelniveau’s 3.2 Pretniveau’s 3.3 Gewone Spelniveau’s 3.4 Snelschaakniveau’s 3.5 Bronstein Niveau’s 3.6 Bonustijd Niveau’s 3.7 Toernooiniveau’s 3.8 Niveau’s met Bepaalde Diepte 3.9 Tactisch Niveau 3.10 Trainings Modi 3.11 Keuze van Niveau’s en Trainings Modi 3.12 Opening Coach Modus 3.13 Verificatie Modus. Controleer Opstelling van Stukken! 3.14 Manuele Modus INLEIDING 1. GEBRUIK VAN UW SCHAAKCOMPUTER 1.1 Batterijen Inzetten 1.2 Zetten Uitvoeren 1.3 Een Zet van de Computer 1.4 Van Gedachten Veranderd? Neem Uw Zet Terug! 1.5 Schaak, Mat, of Remise! 1.6 Een Nieuwe Partij Beginnen 1.7 Van Niveau Veranderen 1.8 Openings Coach 2. BIJKOMENDE COMPUTERKENMERKEN 2.1 Schaakklokken 2.2 Slaan en Bijzondere Zetten 2.3 Zetten Tegen de Regels van het Spel 2.4 Stopzetten van het Zoeken van de Computer 2.5 Van Kleur Verwisselen met de Computer 4. TECHNISCHE BIJZONDERHEDEN 4.1 De ACL Functie 4.2 Verzorging en Onderhoud 4.3 Technische Gegevens PROBLEEMOPLOSSINGSGIDS 130 1. LCD Display Raampje: De Liquid Crystal Display (LCD) wordt gebruikt voor het aangeven van zetten, partij informatie, en schaakklokken voor beide partijen. De meeste gebruikte symbolen zijn vanzelfsprekend, maar u vindt een volledige lijst in Figuur 1. 2. Stuk Symbool Toetsen &(Koningen), %(Dame), $(Toren), #(Loper), @(Paard), !(Pion): De Stuk Symbool Toetsen worden gebruikt om opstelling van stukken te verifiëren en om verschillende trainings modi te kiezen, terwijl sommige stukken voor minor promotie van pionnen worden gebruikt. 3. Partijtoetsen a. NIEUW SPEL (NEW GAME) toets: Indrukken om de computer terug in te stellen voor een nieuwe schaakpartij. b. OPENINGS COACH toets: Indrukken om de Openings Coach modus binnen te komen en te oefenen met erkende openingsgambieten en responsen. c. KLANK (SOUND) toets: Wanneer u deze toets indrukt circuleert de klankfunctie door drie werkingsniveau’s. U kunt horen welke conditie u gekozen heeft naargelang het aantal pieptonen dat u hoort: GELUIDSNIVEAU 4. SIGNAAL WANNEER GEKOZEN 5. Klank en Coach 3 hoge tonen Enkel klank 2 hoge tonen Zonder klank 1 hoge toon Wanneer u Coach selecteert, evalueert de computer uw zet meteen na de uitvoering, en laat twee lage tonen horen indien hij niet akkoord is. Wanneer u Klank (Sound) selecteert, ‘piept’ een buzzer om bekend te maken dat de computer op uw zet reageert. De betekenis van de verschillende ‘pieptonen’ wordt verklaard in Figuur 1. 6. 7. 131 d. TERUGNEEM (TAKE BACK) toets: Indrukken om de laatst uitgevoerde individuele zet terug te nemen. U kunt tot een maximum van 14 individuele zetten terugnemen. (Een individuele zet is een zet van één kleur.) e. MANUEEL SCHAKEN (NON AUTO) toets: Indrukken om de Manueel Schaken modus binnen te komen, waarbij u zetten manueel kunt uitvoeren – de computer overziet de partij doch voert zelf geen zetten uit. f. NIVEAU (LEVEL) toets: Indrukken om de Niveau modus binnen te komen en het spelniveau van de moeilijkheidsgraad en het soort partij van uw voorkeur te selecteren. g. SPEEL (PLAY) toets: Indrukken om met de computer van kleur te verwisselen. U kunt deze toets ook indrukken tijdens het ‘denken’ van de computer om hem te dwingen een zet te doen, of terwijl u zelf een zet uitvoert om advies van de computer te krijgen. h. GO/STOP toets: Indrukken om de computer aan te zetten. Opnieuw indrukken om de computer uit te zetten. De huidige partij blijft tot 300 uur in het geheugen staan. Sensor Schaakbord: Elk veld is voorzien van een uiterst gevoelige sensor die het verplaatsen van de stukken registreert. Velden worden benoemd volgens lijn (letters) en rangorde (cijfers). ACL (Reset = Opnieuw Instellen): Aan de onderkant van het apparaat bevindt zich een opening met de resetschakelaar. Wordt gebruikt om statische ontlading te elimineren na het inzetten van nieuwe batterijen. Batterijvak: De batterijen worden aan de onderkant van het apparaat ingezet. De computer werkt op 2 “AAA” (Type AM4/R03) alkaline batterijen. Opslagplaats voor Stukken: Handig vak voor het opslaan van uw schaakstukken. NEDERLANDS TOETSEN EN KENMERKEN Figuur 1. Displaysymbolen en Klanken KLANK SYMBOLS 1 .......... 1 A ........... A k ......... Koning 2 .......... 2 B ........... B q ......... Dame 3 .......... 3 c ........... C r ......... Toren 4 .......... 4 D ........... D b ......... Loper 5 .......... 5 E ........... E n ......... Paard 6 .......... 6 F ........... F p ......... Pion 7 .......... 7 G ........... G sb ....... Normaal bord 8 .......... 8 H ........... H 9 .......... 9 0 .......... 0 PM ........... Vraagt de speler een zet te maken S .............. Vraagt Zwart een zet te maken : ............... Een blijvend dubbelpunt geeft aan dat de cijfers Minuten en Seconden zijn : ............... Een knipperend dubbelpunt geeft aan dat de cijfers Uren en Minuten zijn ch:)) ....... Zwart staat schaak ch:__ ....... Wit staat schaak EnD) ........ Schaakmat –zwart wint EnD( ........ Remise te: ............ Trainings modus o(:3 ......... Openings Coach (Spaanse opening) – Computer speelt beide kleuren o_:3 ......... Openings Coach (Spaanse opening) – Computer speelt wit o):3 ......... Openings Coach (Spaanse opening) – Computer speelt zwart o :3 ......... Openings Coach (Spaanse opening) – Computer speelt geen van beiden 132 1 hoge toon ........ Bevestigt de werking van eender welke toets of sensorveld 1 lage toon .......... Fout – verkeerde zet of verkeerde toets ingedrukt 2 lage tonen ........ Waarschuwing van de Coach 3 hoge tonen ...... Nieuwe partij of Klank en Coach ingesteld 3 lage tonen ........ Partij tegen de klok in, tijd is op 2 x AAA/AM4/R03 INLEIDING 1. GEBRUIK VAN UW SCHAAKCOMPUTER 1. Batterijen Inzetten Uw schaakcomputer werkt op 2 “AAA” (AM4/R03) batterijen. Gebruik nieuwe alkaline batterijen voor een langere levensduur (tot en met 300 uren). Druk op het tapje van het deksel aan de achterkant van het apparaat, en zet de batterijen in zoals aangegeven in Figuur 1-1. Plaats het deksel terug en druk op GO/STOP om de computer aan te zetten. Als de computer niet reageert, moet u met een papier-clip of ander scherp voorwerp in de opening gemarkeerd ACL aan de onderkant van de computer tenminste een seconde lang drukken, om de computer opnieuw in te stellen. Nadat de batterijen zijn ingezet of ACL ingedrukt, doet de computer een zelftest. 3 ‘pieptonen’ geven aan dat de test OK is; een buzz of stilte wijst op een probleem dat u moet laten nakijken bij uw verdeler. Figuur 1-1 ዛዒዓዔዕዖዘዙዜ ዑ尷尽尻就尯尹尿尵ዑ ዐ屁屃屁屃屁屃屁屃ዐ ዏ巀居巀居巀居巀居ዏ ዎ居巀居巀居巀居巀ዎ ው巀居巀居巀居巀居ው ዌ居巀居巀居巀居巀ዌ ዋ屄层屄层屄层屄层ዋ ዊ尶局尺尴尮尼尾尸ዊ ዝዒዓዔዕዖዘዙዞ Figuur 1-2 Figuur 1-3 Figuur 1-4 133 NEDERLANDS Dit electronisch schaakbord is een krachtige computer die met u zal schaken op de moeilijkheidsgraden van uw keuze, of u kunt een partij met een vriend spelen en de computer als referentie gebruiken. Het enorme aantal spelniveau’s (64) in combinatie met de uitgebreide trainings modi (11) geven iedereen die zich voor schaken interesseert voldoening, jong en oud. Er zijn in totaal 768 combinatiemogelijkheden. De trainings modi en openings coachen bieden ideale oefeningen voor alle spelniveau’s, en de verschillende modi voor tijdgecontroleerde toernooien zullen de middelmatige speler vergenoegen. Let erop dat het inzetten van nieuwe batterijen of indrukken van ACL de computer en het geheugen opnieuw instelt, zodat de partijen die zich in het geheugen bevonden verloren gaan. 2. Zetten Uitvoeren Volg de volgende stappen om een partij te beginnen: a. Indien nodig, druk op GO/STOP om de computer aan te zetten. b. Zet de schaakstukken in hun beginstand met de Witte stukken naar u toe, zoals aangegeven in Figuur 1-2, en druk op NIEUWE PARTIJ (NEW GAME). De computer geeft op de display aan dat u een Wit stuk moet zetten. 00:00 PM Let erop dat het indrukken van NEW GAME de Trainings modus of Openings coach annuleert indien één van beide geselecteerd was, of de Manueel Schaken functie uitschakelt. c. Om een zet te doen, druk zachtjes op het stuk dat u wilt verzetten totdat u een pieptoon hoort (zie Figuur 1-3). Het sensorbord van de computer registreert uw zet en de display geeft op de linkerzijde het ingedrukte ‘van’ veld aan. E2:__ ዛዒዓዔዕዖዘዙዜ ዑ尷尽尻就尯尹尿尵ዑ ዐ屁屃屁屃屁屃屁屃ዐ ዏ巀居巀居巀居巀居ዏ ዎ居巀居巀居巀居巀ዎ ው巀居巀居屄居巀居ው ዌ居巀居巀居巀居巀ዌ ዋ屄层屄层巀层屄层ዋ ዊ尶局尺尴尮尼尾尸ዊ ዝዒዓዔዕዖዘዙዞ Figuur 1-5a ዛዒዓዔዕዖዘዙዜ ዑ尷尽尻就尯尹尿尵ዑ ዐ屁屃屁屃居屃屁屃ዐ ዏ巀居巀居巀居巀居ዏ ዎ居巀居巀屁巀居巀ዎ ው巀居巀居屄居巀居ው ዌ居巀居巀居巀居巀ዌ ዋ屄层屄层巀层屄层ዋ ዊ尶局尺尴尮尼尾尸ዊ ዝዒዓዔዕዖዘዙዞ Figuur 1-5b Figuur 1-6a d. Neem het stuk en druk het zachtjes aan op het veld waarheen u het wilt bewegen. U hoort een tweede pieptoon en de computer geeft even het ‘naar’ veld op de rechterkant van de display aan. Figuur 1-6b E2:E4 134 Zodra u klaar bent, en wanneer u Klank (Sound) en Coach geselecteerd heeft, geeft de display Coch aan terwijl de computer uw zet evalueert. U hoort twee lage tonen als uw zet niet goed bevonden wordt. e. Nu is de computer aan de zet, en begint hij over zijn zet te denken. Let wel, aan het begin van een partij antwoordt de computer vaak bijna onmiddelijk, omdat hij zetten speelt die opgeslagen zijn in zijn openingenboek (zie Sectie 2.9). 3. Een Zet van de Computer Wanneer de computer klaar is, hoort u een pieptoon en laat hij de ‘van’ en ‘naar’ coordinaten van zijn zet op de display zien zoals aangegeven in Figuur 1.4. Voor een voorbeeld, zie Figuren 1-5a en b. Druk het betreffende stuk aan op het ‘van’ veld (E7 in dit geval) tot u een pieptoon hoort en de ‘van’ kant van de display verandert om de kleur en het symbool voor dat stuk aan te geven. (Figuur 1 verklaart de symbolen.) Vervolgens, druk datzelfde stuk aan op het tweede veld van de display – het veld waarheen de computer het stuk wil bewegen (E5 hier). Eenmaal u E5 heeft aangedrukt geeft de display niets aan en heeft u de zet van de computer afgemaakt! De display geeft nu opnieuw teken dat u aan zet bent. ዛዒዓዔዕዖዘዙዜ ዑ巀居巀尮巀居巀尭ዑ ዐ居巀居巀居巀居巀ዐ ዏ巀居巀居巀居巀居ዏ ዎ居巀居巀屁屄居巀ዎ ው巀居巀居巀居巀居ው ዌ居巀居巀居巀居巀ዌ ዋ巀居巀居巀居巀居ዋ ዊ居巀居巀居巀居巀ዊ ዝዒዓዔዕዖዘዙዞ Figuur 2-1a ዛዒዓዔዕዖዘዙዜ ዑ巀居巀尮巀居巀尭ዑ ዐ居巀居巀居巀居巀ዐ ዏ巀居巀居屄居巀居ዏ ዎ居巀居巀居巀居巀ዎ ው巀居巀居巀居巀居ው ዌ居巀居巀居巀居巀ዌ ዋ巀居巀居巀居巀居ዋ ዊ居巀居巀居巀居巀ዊ ዝዒዓዔዕዖዘዙዞ Figuur 2-1b 4. 135 Figuur 2-1c ዋ巀居巀居巀居巀居ዋ ዊ居巀居巀尮巀居尸ዊ ዝዒዓዔዕዖዘዙዞ Figuur 2-2 NEDERLANDS Van Gedachten Veranderd? Neem Uw Zet Terug! Als u van gedachten verandert over een uitgevoerde zet kunt u hem terugnemen. Druk op TAKE BACK terwijl u aan de zet bent. De display geeft het ‘naar’ veld aan, druk het stuk aan op dat veld. U ziet nu het stuk symbool en het veld waar het stuk vandaan kwam. Druk het stuk aan op het ‘van’ veld om de terugneemzet af te maken. Indien de terugneemzet een zet was waarbij geslagen werd, herinnert de computer u er aan het geslagen stuk terug op het bord te zetten door het type stuk en de positie op de display te vertonen. Zet dat stuk terug op het aangegeven veld. Om een andere zet terug te nemen, druk opnieuw op TAKE BACK. U kunt tot 14 individuele zetten terugnemen (of 7 zetten voor elke kleur), hetgeen u toelaat te experimenteren and verschillende “Wat als...?” benaderingen uit te proberen. Om met de partij door te gaan, maak uw volgende zet of druk op PLAY om de computer uw zet te laten maken. Figuren 1-6a en b geven een voorbeeld van het terugnemen van een zet met een Paard van G8 naar F6. Nadat u op TAKE BACK gedrukt heeft vertoont de display F6, het veld waarheen het Paard was bewogen (Figuur 1-6a). Druk aan op F6, en de display verandert om de kleur van het stuk en het stuk symbool (Zwart Paard) aan te geven, evenals het veld waar dat stuk vandaan kwam (Figuur 1-6b). Druk het Paard terug aan op G8. Let erop dat en passant slagzetten niet opnieuw gespeeld kunnen worden als de terugname van de vorige zet niet toegestaan was. 5. Schaak, Mat, of Remise! Wanneer een Koning schaak staat, vertoont de display het schaaksymbool (afgewisseld met de klokdisplay wanneer de klok loopt). Als de partij eindigt in schaakmat, pat remise, remise vanwege onmiddelijke 3-voudige herhaling, of remise vanwege de 50 zetten regel, vertoont de display het End (Einde) symbool. Deze symbolen worden verklaard in Figuur 1. 6. Om een nieuwe partij te beginnen Druk op NEW GAME om op elk willekeurig moment een nieuwe partij te starten, waarbij het huidig geselecteerde niveau en de vorige instellingen van de klankfunctie aangehouden worden. Gezien het indrukken van NEW GAME uw huidige partij uit het geheugen van de computer wist, moet u voorzichtig zijn deze toets niet per ongeluk in te drukken. 7. Veranderen van Niveau’s Uw schaak computer bijàt u 64 spelniveau’s, die elk overeenkomen met één van de 64 bordvelden. Samen met de elf ingebouwde Uitgebreide Trainings modi heeft u de keuze uit 768 niveau’s. Druk op NIVEAU (LEVEL) om de niveau modus binnen te komen. Hierdoor wordt het huidige niveau op de display weergegeven (bijv. Het Niveau dat overeenkomt met het bordveld A3 vertoont L:A3 afgewisseld met Fun3. Om van niveau te veranderen, druk gewoon op een bordveld om dat niveau op de display te zien. Druk opnieuw op LEVEL om de niveau modus te verlaten. Voor meer informatie over de spelniveau’s, zie Sectie 3. 136 8. Openings Coach Uw computer heeft 16 openingssequensen zoals de “Italiaanse Opening” of “Dame’s Gambiet” waar u mee kan oefenen. Druk op OPENINGS COACH en druk daarna op één van de velden van A1 tot B8 om een opening te kiezen. Druk opnieuw op het veld om te kiezen voor de hoeveelheid hulp die u van de computer verwacht, en druk daarna nogmaals op OPENINGS COACH om te beginnen oefenen of om uw kennis te testen. U vindt meer details in Paragraaf 3.12. 2.1 Schaakklokken Ingebouwde schaakklokken houden de tijd zowel voor u als voor de computer bij, met een 4-cijfer display die afwisselend de totale voorbije tijd of resterende tijd voor elke speler aangeeft wanneer hij aan de beurt is. Nadat u de zet van de computer heeft afgemaakt, vertoont de display uw schaakklok tot een toets of veld wordt aangedrukt. De klok blijft dan uw tijd bijhouden tot het ‘naar’ veld is aangedrukt. Nadat uw zet afgemaakt is, schakelt de display meteen over naar de klok van de computer terwijl hij nadenkt, tot aangegeven wordt dat hij klaar is om zijn zet te doen. De computer kan echter Coch vertonen na uw zet, wanneer hij analyseert of uw zet goed of slecht was. Wanneer hij denkt dat uw zet niet goed was, laat hij twee lage tonen horen. Tijdens het eerste uur van de partij of als de resterende tijd minder dan een uur is, vertoont de display de MINUTEN:SECONDEN met een vast dubbelpunt. Als de totale voorbije tijd langer dan een uur of the resterende tijd meer dan een uur is, geeft de display de UREN:MINUTEN aan met een knipperend dubbelpunt terwijl de klok vertoond wordt. Opmerkingen: • De klok stopt wanneer u het niveau nakijkt of wanneer u de computer uitzet. In beide gevallen wordt de tijd echter in het geheugen bijgehouden, en de klok wordt opnieuw op het scherm vertoond wanneer u de partij verder zet. • De klok stelt zich opnieuw in als u verandert van niveau of een veld aandrukt terwijl in de Niveau Stand. • Wanneer uw Koning schaak staat vertoont de display schaak afgewisseld met de schaakklok. 137 NEDERLANDS 2 BIJKOMENDE COMPUTER KENMERKEN • Als u speelt op een niveau dat tegen de klok loopt, telt de klok af vanaf de gekozen tijd om de resterende tijd aan te geven. Als de eerste klok nul bereikt hoort u drie lage pieptonen die signaleren dat uw tijd op is. Daarna begint de klok vanaf nul terug op te tellen. In de niveau’s waar de tijdsduur geen onderdeel van de partij uitmaakt telt de klok opwaarts om de totale voorbije tijd aan te geven. • Indien u terugneemt terwijl u tegen de klok in speelt draait de klok de tijdstelling niet om voor elke terugname. Ze stopt eenvoudig tot u opnieuw een zet begint te doen. 2.2 Slaan en Bijzondere Zetten a. SLAAN: Wanneer u wilt slaan dient u het stuk dat u wilt verzetten zachtjes aan te drukken, het geslagen stuk van het veld nemen en uw stuk op het veld van het geslagen stuk aandrukken. b. EN PASSANT: Wanneer er en passant geslagen wordt, herinnert de computer u eraan de geslagen pion van het bord te nemen door de positie van de pion op de display te vertonen. Druk de geslagen pion aan voor u hem van het bord te verwijdert. Zie Figuur 2-1a, b en c. c. PROMOTIE VAN EEN PION OF MINOR PROMOTIE: Wanneer u een pion laat promoveren, dient u zoals gewoonlijk eerst uw pion aan te drukken op zijn ‘van’ veld. De display vertoont uw ‘van’ veld en het Dame symbool (afgewisseld met de klok display). Zodra u de pion op het ‘naar’ veld aandrukt, wordt hij automatisch een Dame. Onthoud dat u het stuk op het bord moet veranderen! Indien u een minor promotie met uw pion wilt uitvoeren naar Toren, Loper of Paard, druk dan het passende Stuk Symbool aan tussen het aandrukken van de ‘van’ en ‘naar’ velden. Wanneer de computer een pion laat promoveren, vertoont hij het ‘van’ en ‘naar’ veld zoals gewoonlijk. Nadat u zijn ‘van’ veld aangedrukt heeft, geeft de display het type stuk aan waartoe de pion gepromoveerd gaat worden door het stuk symbool en het ‘naar’ veld te vertonen. Druk het aangegeven nieuwe stuk aan op het ‘naar’ veld om de promotiezet van de computer af te maken. d. ROKADE: De computer herkent automatisch rokademanoeuvres nadat de Koning is verzet. Nadat u de Koning op de ‘van’ en ‘naar’ velden hebt aangedrukt vertoont de display het ‘van’ veld van de Toren. Druk aan op dat veld. De computer vertoont vervolgens het Toren symbool, samen met het veld waarheen de Toren moet bewegen. Druk aan op het ‘naar’ veld van de Toren om de zet af te maken (zie Figuur 2-2). 138 2.3 Zetten Tegen de Regels van het Spel Uw computer zal nooit een zet tegen de regels van het spel aanvaarden. Als u zo’n zet probeert te doen, laat de computer een lage pieptoon horen terwijl de display het ‘van’ veld blijft vertonen. Druk op dat veld om de zet te annuleren, en doe uw zet opnieuw. Als u het stuk van de computer niet correct zet, hoort u eveneens een pieptoon. Dit kan gebeuren wanneer u het verkeerde stuk verzet of u beweegt het stuk naar het verkeerde veld. Controleer de display en maak de zet opnieuw. Indien u een stuk aandrukt en het ‘van’ veld wordt in de display aangegeven, maar u beslist deze zet toch niet te doen, druk opnieuw op hetzelfde veld aan om te annuleren. Wees voorzichtig geen fouten te maken wanneer de klank niet aanstaat, want dan hoort u de foutpiepen niet. 2.4 Het Stopzetten van het Zoeken van de Computer Wenst u de computer te onderbreken terwijl hij nadenkt, druk op PLAY, om hem te dwingen de beste zet te maken die hij tot dusverre gevonden heeft. Dit kenmerk kan erg nuttig zijn op de hogere spelniveau’s, waar de computer uiterst langdurig blijft doorzoeken naar de beste zet. 2.6 Tips van de Computer Ontvangen Als u hulp nodig hebt kan de computer u tonen wat hij in uw plaats zou doen! Druk op PLAY wanneer het uw beurt is, en de computer maakt de volgende zet voor u. Om deze zet voor uzelf te houden, maak de aangegeven zet op het bord, druk opnieuw op PLAY en de computer maakt zijn volgende zet; vervolgens zet u de partij verder door uw eigen volgende zet te doen. Indien u de zet van de computer niet wenst uit te voeren, maak eerst de zet op het bord zoals in de display aangegeven staat en neem hem daarna terug. Eenmaal u op die manier de zet geannuleerd hebt, kan u uw eigen zet maken. 139 NEDERLANDS 2.5 Van Kleur Verwisselen met de Computer Om met de computer van kleur te verwisselen drukt u op PLAY wanneer het uw beurt is. De computer maakt dan de volgende zet voor uw kleur. U kunt zoveel van kleur verwisselen als u wilt! 2.7 De computer Speelt tegen Zichzelf Om de computer een partij tegen zichzelf te zien spelen drukt u op PLAY voor elke zet. Bestudeer zijn spelstrategieën om meer over schaken te leren! 2.8 Partijgeheugen en Automatisch Uitzetten U kunt een partij onderbreken door op GO/STOP te drukken en de computer uit te zetten. De computer zal uw positie in zijn geheugen bewaren gedurende 300 uur (met nieuwe alkaline batterijen). Wanneer u hem weer aanschakelt, kunt u de partij voortzetten vanaf waar u gebleven was! Indien u geen enkele toets indrukt of zet uitvoert gedurende ongeveer 20 minuten wanneer de computer niet nadenkt, schakelt de computer vanzelf uit om energie te besparen, doch de partij blijft in het geheugen bewaard. Druk op GO/STOP om de partij te hervatten. 2.9 Openingenboek Aan het begin van een partij wordt de tegenzet van de computer gewoonlijk onmiddelijk gespeeld, omdat de computer zetten speelt die opgeslagen staan in zijn openingenboek. Indien de huidige bordstelling in zijn openingenboek staat, speelt de computer volgens die bordstelling een tegenzet uit zijn verzameling van zetten, in plaats van over zijn zet na te denken. 3. NIVEAU’S EN SPECIALE MODI 3.1 Spelniveau’s Met een keuze uit 768 niveau instellingen (de Uitgebreide Trainings modi inbegrepen), kunt u leren en met uw schaakcomputer groeien! Zoals uitgelegd wordt in de lijst van spelniveau’s in de volgende paragrafen, komt elk niveau overeen met één van de 64 bordvelden. De basis niveau’s zijn ondergebracht in 8 categorieën, die geschikt zijn voor spelers met een verschillende behendigheidsgraad: • Pretniveau’s: A1 tot A8. Voor de nieuwe beginner. A1 is makkelijkst. • Gewone Spelniveau’s: B1 tot C8. Voor partijen die niet tegen de klok ingaan. Volledige waaier van moeilijkheidsgraden van gemakkelijk (B1) tot uiterst uitdagend (C8). Wanneer u voor het eerst de computer aanzet is B4 het gekozen niveau. 140 C D BONUSTIJD E TACTISCH SCHAKEN B BEPAALDE DIEPTE A TOERNOOI 1 BRONSTEIN 2 SNELSCHAKEN 3 F G H NEDERLANDS 141 4 PRETNIVEAU’S 3.2 Pretniveau’s Keuze uit de velden van A1 tot A8 geeft u de pretniveau’s. In deze categorie zoekt de computer niet langdurig naar de best mogelijke zetten. Hij negeert de scores, en bovendien maakt het programma gebruik van randomizers die de computer af en toe een zet laten maken die niet de beste is die hij kon vinden. GEWONE SPELNIVEAU’S • Snelschaken: D1 tot D8. Ook genaamd “Plotse Dood”. De partij moet afgerond worden binnen de gekozen tijd. • Bronstein: E1 tot E4. De partij moet afgerond worden binnen de gekozen tijd, die toeneemt om elke zet te compenseren. De compensatie is de feitelijke gebruikte tijd voor een zet of de toegestane tijd, afhankelijk van welke de kortste is. • Bonus Tijd: E5 tot E8. De partij moet afgerond worden binnen de gekozen tijd, die met een voorgeschreven hoeveelheid toeneemt om elke zet te compenseren vóór de zet wordt gedaan. • Toernooi: F1 tot F8. Een bepaald aantal zetten moet binnen een gegeven tijdspan gemaakt worden. • Bepaalde Diepte: G1 tot G8. De behendigheid van de computer is beperkt doordat hij niet ‘dieper’ kan kijken dan het gekozen aantal zetten. • Tactisch schaken: H1 tot H8. De behendigheid van de computer is beperkt doordat hij niet verder kan kijken dan het gekozen aantal zetten, en doordat hij het strategisch voordeel niet evalueert. KIES EEN NIVEAU UIT DE 64 BORDVELDEN Wanneer u het niveau instelt, dient u te onthouden dat de computer sterker wordt en 8 beter speelt naargelang hij meer tijd heeft om over zijn zetten na te denken – net als een 7 mens die schaakt! Scherp uw behendigheid in het schaken – telkens wanneer u de computer 6 verslaat op één niveau kunt u overgaan naar een hoger niveau. Blijf uzelf uitdagen en leer 5 meer over het spel! Dit brengt een interessante variatie in de tegenzetten van de computer mee, en soms lijkt het wel of de computer ook menselijke fouten maakt. A1 is het laagste behendigheidsniveau, en A8 is enigszins hoger. 3.3 Gewone Spelniveau’s Wanneer u de gewone spelniveau’s instelt, beperkt u de behendigheid van de computer door de gemiddelde toegestane tijd voor het kiezen van zijn zetten te verkorten. Als u het behendigheidsniveau doet toenemen, denkt de computer verder en verder vooruit, en speelt bijgevolg een steeds behendiger spel. Wanneer u instelt op één van deze niveau’s op de B of C veldlijnen, vertoont de display per seconde afwisselend de niveauselectie en de gemiddeld toegestane tegenzettijd van de computer. Uw keuze wordt als volgt aangegeven: Veld op het schaakbord B1 B2 B3 B4 B5 B6 B7 B8 C1 C2 C3 C4 C5 C6 C7 C8 Tijd per zet Display ............................. 1 sec .............................. L:B1/00:01 ............................. 2 sec .............................. L:B2/00:02 ............................. 3 sec .............................. L:B3/00:03 ............................. 5 sec .............................. L:B4/00:05 ............................ 10 sec ............................. L:B5/00:10 ............................ 15 sec ............................. L:B6/00:15 ............................ 20 sec ............................. L:B7/00:20 ............................ 30 sec ............................. L:B8/00:30 ............................ 45 sec ............................. L:c1/00:45 ............................. 1 min ............................. L:c2/01:00 ............................. 2 min ............................. L:c3/02:00 ............................. 3 min ............................. L:c4/03:00 ............................. 4 min ............................. L:c5/04:00 ............................. 5 min ............................. L:c6/05:00 ............................ 10 min ............................ L:c7/10:00 ............................ 15 min ............................ L:c8/15:00 142 3.4 Snelschaakniveau’s De niveau’s in de D-veldlijn zijn de snelschaakniveau’s. Indien u snelschaken of “plotse dood” wilt spelen kunt u uit een reeks tijden kiezen die toegestaan zijn om de partij af te ronden. U kunt kiezen tussen een 5-minuten “snelkoker” of een partij van een meer ontspannen anderhalf uur. Als u één van deze velden kiest, wisselt de display elke seconde af tussen de naam van het veld dat u kiest, en de overeenkomstige tijdslimiet voor de partij. Veld op het schaakbord D1 D2 D3 D4 D5 D6 D7 D8 Tijd per zet Display ............................. 5 min ............................. L:D1/05:00 ............................ 10 min ............................ L:D2/10:00 ............................ 15 min ............................ L:D3/15:00 ............................ 25 min ............................ L:D4/25:00 ............................ 30 min ............................ L:D5/30:00 ............................ 45 min ............................ L:D6/45:00 ............................ 60 min ............................. L:D7/1:00 ............................ 90 min ............................. L:D8/1:30 Veld op het schaakbord Tijd voor Partij Vrije Tijd per Zet Display E1 .............................. 5 min ..................... 3 sec .............. L:E1/05:00/00:03 E2 ............................. 10 min .................... 5 sec .............. L:E2/10:00/00:05 143 NEDERLANDS 3.5 Bronstein Niveau’s Door op het schaakbord een veld van E1 tot E4 te kiezen, kiest u een tijdslimiet voor het afronden van een partij volgens het Bronstein systeem. U selecteert een basistijd voor de partij, en een extra tijd van enkele seconden wordt aan die tijd toegevoegd na elke zet. De toegevoegde tijd is ofwel de vrije tijd als aangegeven in de tabel hieronder, of de feitelijke tijd gebruikt voor elke zet, afhankelijk van dewelke het kortst is. Uw keuze wordt in de tabel getoond. Als u één van deze niveau’s kiest, circuleert de display door drie verschillende blokken informatie, die elk gedurende 1 seconde vertoond worden. Bij voorbeeld, indien u E2 kiest zult u het volgende zien: • Het gekozen veld L:E2 en daarna.... • De basistijd in minuten 10:00 en daarna.... • De vrije tijd in seconden 00:05 E3 ............................. 15 min ................... 10 sec ............. L:E3/15:00/00:10 E4 ............................. 20 min ................... 10 sec ............. L:E4/20:00/00:10 3.6 Bonustijd Niveau’s Keuze van een veld in de reeks E5 tot E8 biedt u de Bonustijd Niveau’s. Dit is gelijkaardig aan de Bronstein Niveau’s, behalve dat de extra tijd altijd 2 seconden bedraagt, en dat die aan de tijd wordt toegevoegd vóór de zet gemaakt wordt. Veld op het schaakbord Tijd voor Partij Vrije Tijd per Zet E5 .............................. 3 min ..................... 2 sec E6 ............................. 10 min .................... 2 sec E7 ............................. 20 min .................... 2 sec E8 ............................. 50 min .................... 2 sec .............. .............. .............. .............. Display L:E5/03:00/00:02 L:E6/10:00/00:02 L:E7/20:00/00:02 L:E8/50:00/00:02 3.7 Toernooiniveau’s De F-lijnvelden bieden u 8 toernooiniveau’s. Als u één van deze velden kiest, wordt zowel van u als van de computer verwacht dat een bepaald aantal zetten uitgevoerd wordt binnen een gegeven tijdslimiet. Bij voorbeeld, als u F3 kiest moet u 40 zetten uitvoeren in 2 uur onder de Primaire Tijdscontrole. Als de partij niet binnen deze tijd wordt afgerond, gaat de periode van de Secondaire Tijdscontrole in, en moet u 20 zetten uitvoeren in 1 uur. En als de secondaire periode geen resultaat oplevert wordt dit herhaald tot de partij afgerond is. In overeenkomst met de toernooireglementen, wordt de ongebruikte tijd na het uitvoeren van de zetten onder de Primaire Tijdscontrole overgedragen en toegevoegd aan de toegestane tijd onder de Secondaire Tijdscontrole. Bij voorbeeld, als u het niveau F3 kiest en u voert de eerste 40 zetten uit in precies één uur, dan is de toegestane tijd voor de volgende 20 zetten 2 uur. Indien er nog tijd overblijft, wordt deze telkens op die wijze overgedragen en geäccumuleerd tot het einde van de partij. Als u één van deze toernooiniveau’s kiest, circuleert de display door drie blokken informatie die telkens gedurende een seconde vertoond worden. Bij voorbeeld, koos u voor F4, dan geeft de display het volgende aan: • Het gekozen veld L:F4 en daarna.... • Het aantal zetten in de Primaire Tijdscontrole 40 en daarna.... • De duur van de Primaire Tijdscontrole 2:00 144 Primaire Zetten Secundaire Tijdscontrole Veld op het Schaakbord Zetten F1 30 30 min 30 30 min L:F1/30/0:30 F2 30 1 hr 30 min resterend 1 hr L:F2/30/1:30 F3 40 2 hr 20 1 hr L:F3/40/2:00 F4 40 2 hr resterend 1 hr L:F4/40/2:00 F5 40 2 hr 30 min 16 1 hr L:F5/40/2:30 Tijd Zetten Tijd Display F6 45 1 hr 30 min 15 30 min L:F6/45/1:30 F7 50 2 hr 30 min 20 1 hr L:F7/50/2:30 F8 60 1 hr 30 30 min L:F8/60/1:00 3.9 Tactisch niveau Tactische niveau’s zijn te vinden in de laatste veldlijn, de H-lijn. Deze Niveau’s beperken eveneens het aantal zetten dat de computer kan anticiperen, maar in dit geval evalueert de 145 NEDERLANDS 3.8 Niveau’s met Bepaalde Diepte De niveau’s met bepaalde diepte in de G-lijn beperken de behendigheid van de computer, niet door het inkrimpen van de tijd toegestaan voor zijn volgende zet, maar door het beperken van zijn vooruit denken over de volgende zetten. Op de lagere niveau’s gedraagt hij zich een beetje als een groentje in het spel. Op het laagste niveau, G1, waar de computer slechts één individuele zet vooruit denkt en dus de partij helemaal niet anticipeert, kan het zelfs gebeuren dat hij een mat mist die u in de eerstvolgende zet kan geven. Aan het andere uiteinde van de reeks onderzoekt de computer alle mogelijkheden voor de volgende 8 individuele zetten (G8). In dit geval wisselt de display elke seconde af tussen het niveau dat u gekozen hebt, en het aantal individuele zetten (halfzet) in het vooruitzicht die de computer onderzoekt: • Het gekozen veld L:G5 en dan... • Het aantal individuele zetten in het vooruitzicht 5PLy computer de strategische voordelen niet, en zoekt enkel naar materiele winst zoals schaakmat of remises. Gelijkwijs komt het aantal individuele zetten dat de computer anticipeert overeen met het veld op het schaakbord – H1 is 1 individuele zet vooruit; H8 is 8 zetten vooruit. De display wisselt elke seconde af tussen het niveau dat u koos en het aantal individuele zetten (halfzet) dat de computer anticipeert, op dezelfde wijze als bij de Bepaalde Diepte Niveau’s. • Het gekozen veld L:H8 en dan... • Het aantal individuele zetten in het vooruitzicht 8PLY 3.10 Trainings modi Uw schaakcomputer bevat elf ingebouwde Uitgebreide Trainings modi. Dit kenmerk stelt u in staat basiszetten te leren en de tactiek van de stukken één voor één te beheersen. Voor elke individuele Trainings modus bevinden zich op het bord enkel de Koningen en Pionnen, of Koningen, Pionnen en één of twee gekozen soorten stukken. Dit staat beginners toe zich te concentreren op één of twee stukken op een gegeven moment, zonder de aandacht te verliezen of door andere stukken op het bord afgeleid te worden. Meer ervaren spelers kunnen dit kenmerk ook gebruiken om te oefenen met een gekozen combinatie van stukken. Let op het volgende betreffende de Niveau’s en Trainings Modi: • Als u tijdens een partij op NEW GAME drukt, verlaat de computer de Trainings Modus, en schakelt hij terug naar de normale modus (32 stukken), terwijl het huidige niveau ingesteld blijft. • Als u LEVEL indrukt, maar u besluit daarna het huidig spelniveau of de trainings modus toch niet te veranderen, druk dan eenvoudig opnieuw op LEVEL om de huidige status onveranderd te laten. • U kunt op eender welk ogenblik tijdens uw beurt een nieuw niveau kiezen. Hierdoor wordt de klok echter terug ingesteld. • Indien u meer dan 2 Stuk Symbooltoetsen indrukt terwijl in een Trainings Modus, worden enkel de laatste twee keuzes ingesteld als u de Niveau Modus verlaat. • Indien u per ongeluk een stuk symbool in de Niveau Modus indrukt, verliest u de huidige partij na het verlaten van de Niveau Modus. Om met de huidige partij door te gaan, druk 146 op het veld dat overeenkomt met het huidige spelniveau vóór u de Niveau Modus verlaat. De klok wordt hierdoor echter terug ingesteld. 3.11 Keuze van Niveau’s en Trainings Modi Druk op LEVEL om de Niveau Modus binnen te komen. Het huidig niveau wordt nu aangegeven (bvb. Niveau A3 wordt aangegeven als L:A3 afgewisseld met Fun3, wat het niveau is dat gekozen wordt door op het bordveld A3 te drukken). Om het niveau te veranderen drukt u gewoon op een bordveld, en het nieuwe niveau wordt afwisselend met de details van het niveau op de display vertoond. Druk nogmaals op LEVEL om de Niveau Modus te verlaten. Let op de volgende toetsensekwenties en effecten: LEVEL, Veld, Stuk Symbool, LEVEL LEVEL, Stuk Symbool, Veld, LEVEL Geen verandering. Vorig niveau blijft ingesteld Nieuw niveau gekozen, klok stelt terug in Trainings Modus ingesteld op het vorig gekozen niveau. Beginopstelling van gekozen Trainings Modus wordt ingesteld op een nieuw niveau Nieuw niveau wordt ingesteld, vorige keuze van trainings modus geannuleerd, huidige partij blijft in het geheugen bewaard. Druk op LEVEL om de Trainings Modus binnen te komen. De display vertoont de behendigheidsgraad aan de hand van het overeenkomstig bordveld, afgewisseld met de details van het niveau. Om een Trainings Modus te kiezen drukt u op één of twee Stuk Symbooltoetsen (%, $, #, @ of !) die u wilt gebruiken. De display vertoont nu de gekozen stukken. Bij voorbeeld, indien u met Koningen, Lopers, Paarden en Pionnen wilt spelen drukt u op # en @ nadat u op LEVEL hebt gedrukt. De display geeft uw selectie aan. Druk vervolgens op LEVEL om de Niveau Modus te verlaten, voer uw keuze in de computer en begin uw partij. Gezien de Koning bij elk spel noodzakelijk is, hoeft u dit stuk niet te kiezen voor de Trainings Modus. Eigenlijk is het indrukken van & de manier om een normale, 32stukken partij te kiezen. 147 NEDERLANDS LEVEL, LEVEL LEVEL, Veld, LEVEL LEVEL, Stuk Symbool, Let erop dat Manueel Schaken automatisch geannuleerd wordt telkens wanneer u een trainings modus kiest in de huidige niveau modus. De elf trainings modi en gewone partij worden als volgt op de display vertoond: Trainings Modus Display Koningen en Pionnen ................................................ te:_p Koningen, Paarden en Pionnen ................................ te:_n Koningen, Lopers en Pionnen .................................. te:_b Koningen, Torens en Pionnen ................................... te:_r Koningen, Dames en Pionnen .................................. te:_q Koningen, Paarden, Lopers en Pionnen ................... te:nb Koningen, Paarden, Torens en Pionnen ................... te:nr Koningen, Paarden, Dames en Pionnen .................. te:nq Koningen, Lopers, Torens en Pionnen ...................... te:br Koningen, Lopers, Dames en Pionnen ..................... te:bq Koningen, Torens, Dames en Pionnen ..................... te:rq Alle Stukken (gewone partij) ..................................... te:sb 3.12 Openings Coach Modus Het geheugen van de computer bevat 16 verschillende openingssequensen, die doorgespeeld worden zodat u ze kunt leren. Druk op OPENINGS COACH. Doet u dit voor het eerst, dan laat de computer een pieptoon horen en de display knippert: o(: U kunt vervolgens de openingspartij die u wilt herzien kiezen door één van de velden van A1 tot B8 aan te drukken. Figuur 3-1 toont een lijst van de beschikbare openingen. Bij voorbeeld, om de derde openings coach te kiezen drukt u op A3, en o(:3 knippert op de display. Dit bevestigt dat de derde openings coach gekozen is en de twee streepjes geven aan dat de computer de zetten van beide kleuren vertoont, zodat u ze kunt bekijken en ervan kunt 148 Figuur 3-1. Zetten in Openings Coach Naam A1 A2 A3 Italiaanse Opening Twee Paarden Verdediging Spaanse Opening A4 Siciliaanse Verdediging A5 A6 A7 A8 B1 B2 B3 B4 B5 B6 B7 B8 Franse Verdediging Caro-Kann Verdediging Scandinavische Verdediging Aljechin Verdediging Damegambiet Damegambiet aanvaard Nimzo-Indische Verdediging Dame-Indische Verdediging Koningsindische Verdediging Grünfeld Verdediging Hollandse Verdediging Engelse Opening Zetten e2e4, e7e5, g1f3, b8c6, f1c4, f8c5 e2e4, e7e5, g1f3, b8c6, f1c4, g8f6 e2e4, e7e5, g1f3, b8c6, f1b5, a7a6, b5a4, g8f6, e1g1, b7b5 e2e4, c7c5, g1f3, d7d6, d2d4, c5d4, f3d4, g8f6, b1c3 e2e4, e7e6, d2d4, d7d5 e2e4, c7c6, d2d4, d7d5, b1c3, d5e4 e2e4, d7d5, e4d5, d8d5, b1c3, d5a5 e2e4, g8f6, e4e5, f6d5 d2d4, d7d5, c2c4, e7e6, b1c3, g8f6, c1g5, f8e7 d2d4, d7d5, c2c4, d5c4 d2d4, g8f6, c2c4, e7e6, b1c3, f8b4 d2d4, g8f6, c2c4, e7e6, g1f3, b7b6 d2d4, g8f6, c2c4, g7g6, b1c3, f8g7, e2e4, d7d6 d2d4, g8f6, c2c4, g7g6, b1c3, d7d5 d2d4, f7f5, c2c4, g8f6, b1c3, e7e6 c2c4, e7e5, b1c3, g8f6, g1f3 leren. Druk nogmaals hetzelfde veld aan en de display schakelt over naar o_:3, hetgeen aangeeft dat de computer Wit speelt en u de zetten van Zwart laat uitvoeren. Nogmaals op datzelfde veld aandrukken verandert het streepje rechts om aan te geven dat de computer Zwart gaat spelen en u Wit. Een andere maal aandrukken verwijdert beide streepjes, wat betekent dat de computer alle zetten aan u overlaat terwijl hij enkel op de juistheid van uw zetten let. Druk opnieuw op OPENINGS COACH, en de display geeft aan dat u schaak staat. 149 NEDERLANDS Veld Tijdens uw beurt kunt u op PLAY drukken om de computer u er aan te laten herinneren dat het uw beurt is. Telkens wanneer u een juiste zet maakt bevestigt de computer die met een enkele pieptoon, maar als u een verkeerde zet doet laat hij een dubbele pieptoon horen en blijft hij het ‘van’ veld op de display vertonen. Druk op het juiste ‘naar’ veld om de zet af te maken of op het ‘van’ veld om de zet te annuleren. Aan het eind van een openingssequens kunt u de partij verder uitspelen indien u wilt. De klok wordt in deze Modus niet gebruikt, en Manueel Schaken, indien gekozen, wordt enkel ingesteld nadat de openingszetten gedaan zijn. Let erop dat de gekozen methode voor het spelen van de Openings Coach in het geheugen bewaard blijft tot een andere keuze is ingevoerd. Wanneer u terug wilt overschakelen naar een gewone partij drukt u gewoon op NEW GAME om naar het standaardbord terug te keren. 3.13 Verificatie Modus. Controleer Opstelling van Stukken! Wanneer u de schaakstukken omgooit of denkt dat een stuk op de verkeerde plaats staat, kunt u dit door de computer laten controleren. Druk eenvoudig op de Stuk Symbooltoets van het stuk waarover u twijfelt. De computer vertoont het symbool voor de kleur en het type stuk, samen met het veld waar het thuishoort. Druk nogmaals op de toets om de opstelling van het volgende stuk van hetzelfde type te zien, en zo verder tot alle soortgelijke stukken op het bord vertoond zijn. De computer laat eerst de witte stukken zien en daarna de zwarte stukken. Wanneer er van dat type geen stukken meer zijn, geeft de display opnieuw de kleur aan die schaak staat, en laat hij twee pieptonen horen om uw aandacht te vragen. Hieronder volgt een voorbeeld van de displayvolgorde. Toets indrukken Display Vertoont Betekenis Eerste keer @ indrukken _n:B1 Wit Paard op B1 Tweede keer @ indrukken )n:B8 Zwart Paard op B8 Derde keer @ indrukken )n:F6 Zwart Paard op F6 Vierde keer @ indrukken _n:__ Geen Paard meer Wit staat schaak (biep beip) 150 Dit voorbeeld geeft aan dat één van de witte paarden geslagen werd en dat wit nu aan zet is. Om andere stukken te verifiëren, herhaalt u dezelfde stappen met de andere Stuk Symbooltoetsen. Wanneer u klaar bent, maakt u gewoon uw volgende zet. Ondertussen is de klok tijdelijk stopgezet. De computer gaat vanzelf uit de Verificatie Modus wanneer binnen de 5 seconden geen enkel stuk symbool ingedrukt wordt. 3.14 Manueel Schaken Modus De computer reageert gewoonlijk vanzelf met een tegenzet, elke keer dat u een zet invoert. Als u echter NON AUTO indrukt, antwoordt de computer met een pieptoon, waarna u alle zetten voor beide kleuren één voor één kunt invoeren, zonder dat de computer tegenzetten doet! Dit bijzonder kenmerk kan van pas komen in verschillende situaties: • Speel door meesterpartijen. Het is interessant om op PLAY te drukken en te zien wat de computer in een bepaalde situatie zou doen! • Bestudeer de lijnen van het openingenboek door ze manueel in te voeren. • Speel schaak tegen een vriend, terwijl u de computer als referentie gebruikt om de juistheid van alle zetten te controleren en de tijd van beide kleuren bij te houden! Als u bij een zet hulp nodig hebt, druk gewoon op PLAY om de computer de volgende zet te laten doen. Na die zet blijft de Manueel Schaken Modus ingesteld en kunt u de partij verderzetten. • Speel op eender welke bordstelling opnieuw om meer te leren. Om de Manueel Schaken Modus te verlaten en terug naar gewoon spelen over te schakelen, drukt u nogmaals op NON AUTO, waarna een dubbele pieptoon bevestigt dat de Modus geannuleerd is. 151 NEDERLANDS Let erop dat de Manueel Schaken Modus ook vanzelf geannuleerd wordt telkens wanneer u op NEW GAME drukt of een Trainings Modus kiest bij het verlaten van de Niveau Modus. 4 TECHNISCHE BIJZONDERHEDEN 4.1 De ACL Functie Computers blijven soms “hangen” vanwege statische ontlading of andere electrische storingen. Als dit gebeurt, verwijder de batterijen en gebruik een speld of ander scherp voorwerp om in het ACL gemarkeerde gaatje aan de onderkant van het toestel gedurende tenminste één seconde lang te drukken. Dit stelt de computer opnieuw in. 4.2 Verzorging en Onderhoud Uw schaakcomputer is een electronisch precisie-apparaat. Ga er niet ruw mee om en stel het niet bloot aan extreme temperaturen of vochtigheid. Verwijder in ieder geval de batterijen vóór het schoonmaken. Gebruik geen chemische middelen of vloeistoffen om het apparaat schoon te maken, daar het plastic hierdoor beschadigd kan worden. Bijna lege batterijen moeten terstond vervangen worden, gezien zij kunnen gaan lekken wat de computer zou beschadigen. Gelieve ook op het volgende te letten betreffende het gebruik van batterijen. Waarschuwing: Gebruik enkel alkaline of zink-koolstof batterijen. Meng geen batterijen van verschillende types of nieuwe en gebruikte batterijen. Laad geen niet-oplaadbare batterijen opnieuw op. Gebruik enkel de aanbevolen batterijen of equivalent. Zorg ervoor steeds op de juiste polariteit te letten wanneer u batterijen inzet. Oude batterijen moeten steeds terstond uit het apparaat verwijderd worden. Breng de voedingscontactpunten niet in kortsluiting. 4.3 Technische Gegevens Toetsen: 14 LCD Display: Schermgrootte 18 x 9 mm Klank: Piezo-electrische zoemer Batterijen: 2 AAA/AM4/R03 (1.5V) cellen Stroomverbruik: 10 mW Afmetingen: 176 X 100 X 35 mm Saitek behoudt zich het recht voor, zonder voorafgaande kennisgeving veranderingen aan te brengen in het belang van de vooruitgang. 152 PROBLEEMOPLOSSINGSGIDS SYMPTOMEN MOGELIJKE OORZAKEN Computer reageert niet of blijft ‘hangen’ tijdens een partij. • Batterijen zijn niet op de juiste manier ingezet. • Batterijen zijn bijna leeg of in slechte staat. • Statische ontlading is er de oorzaak van dat de computer slecht werkt. • Zet batterijen opnieuw in als aangegeven in 1.1. • Vervang batterijen. Display is onduidelijk. • Batterijen zijn bijna leeg. • Vervang batterijen. Computer speelt geen zet. • De Manueel Schaken Modus staat aan. • U bent op een hoog niveau ingesteld – de computer denkt nog na. • Druk op NON AUTO om te annuleren. • U kunt de computer dwingen een zet te doen door op PLAY te drukken. Computer weigert uw zet uit te voeren laatste zet te herstellen. • Bent u aan de beurt? Staat uw Koning schaak? Hebt u eerst de Toren verzet om rokade te initiëren? Beweegt u naar een illegaal veld? • Een lage toon geeft aan dat u een fout maakt. Kijk de regels van het schaakspel na. Gebruik TAKE BACK (Terugname) om de laatste zet te herstellen. • Om de computer te onderbreken, druk op PLAY. • Controleer de aangegeven zet en druk het juiste veld aan om de zet af te maken. • U hebt de laatste zet van de computer niet juist uitgevoerd. • Druk op de ACL toets als beschreven in 4.1. De computer lijkt zetten tegen de regels van het spel te maken. • De computer heeft één van zijn speciale zetten gemaakt zoals en passant, rokade, of promotie van een pion. • Uw bordstelling is niet juist. • Kijk de spelregels na. De computer is stil. • De Klank toets is ingedrukt om de klank uit te schakelen. • Druk op SOUND om klank aan te zetten. 153 • Controleer de opstelling als beschreven in 3.13. NEDERLANDS • De computer is aan het nadenken. WAT U MOET DOEN www.saitek.com ©2003 Saitek Ltd. Made and printed in China All trademarks are the property of their respective owners. XXXXXX XXX P/N XXXXXX-XXXXX 0303