1
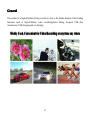
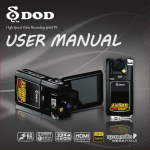
S1+ Use Manual
Table of Contents
·························································································· 03
Preface
Preface··························································································
························································································· 04
General
General·························································································
··········································································
05
Product Features
Features··········································································
··········································································05
········································································ 07
Product Structure
Structure········································································
·····································································
08
Use and Installation
Installation·····································································
·····································································08
································································· 09
Operating Instruction
Instruction·································································
ing
·················································
12
Files Saving and Videos Play
Playing
ing·················································
·················································12
···········································································
13
Button Function
Function···········································································
···········································································13
·················································································· 14
Menu Setup
Setup··················································································
··············································································· 15
Specifications
Specifications···············································································
·····································································
16
Package Accessories
Accessories·····································································
·····································································16
·································································· 16
Easy Troubleshooting
Troubleshooting··································································
··········································· 1 7
Installation Instruction for Bracket
Bracket···········································
1
Preface
Thank you for purchasing the DOD series products, this S1+ product can capture the moving
photos efficiently. It has a high definition lens with one million pixels, which is uniquely
lens of 180° overturn. The product is designed for safety recording of car driving process and
can also be used as a DV for video recording/taking photos. It is exquisite in appearance and
has won many patents and certifications, in a word, S1+ will make your life more wonderful.
This manual will teach you how to use the product and give you more detailed information,
including the use, operation and installation precautions and technical specifications, etc.
Before the use, please read it carefully and keep it properly. We hope that the product can
meet your demand and serve you permanently.
3
General
This product is a high-definition driving recorder to cater to the market demand. It has leading
functions such as high-definition video recording/photos taking, hi-speed USB data
transmission, USB charging and car charging.
Widely Used, Convenient for Video Recording at any time any where
4
Product Features
� lens rotation design with multi-functions, easy for high-definition video recording/photo
taking at anywhere, capture high-resolution photo at will.
� Lens: 100° wide-angle lens
� Exposure Compensation: EV(-2.0/+2 adjustable)
� Screen: 2.5 inch high-definition TFT LCD
� 4X digital zoom
� Infrared rays
� In-built microphone/loudspeaker
� High-capacity rechargeable lithium battery
� Support high-capacity SD (SDHC) memory card
� Cycle video recording
� Motion detection
� Seamless connection
� Outage auto-save
� Recording time can be set
� Video recording is realizable while charging
� Auto power on to make records when starting car
� Manual emergency lock (SOS)
� G-SENSOR gravity file protection
5
Capacity Display
1440*1080(FPS15)
1280*720(FPS30)
848*480(FPS60)
10M
8M
5M
3M
1G
17min
16min
18min
287photos
354photos
572photos
1003photos
2G
34min
32min
36min
574photos
708photos
1144photos
2006photos
4G
69min
65min
73min
1148photos
1416photos
2288photos
4012photos
8G
139min
130min
146min
2296photos
2832photos
4576photos
8024photos
The number of videos or photos vary with different setting of host machine, brand of
memory card, file size etc.
6
Product Structure
7
Use and Installation
� Install and Take out Battery
1. Slide battery cover downward to open it.
2. Put battery into battery case based on plus-minus marks on it until it is installed in position.
3. Battery power symbols are shown as below:
4. Push open the battery cover and take it out.
� Install and Take out Memory Card
1. Insert memory card into the slot as instructed until it is fixed in the slot.
2. When taking memory card out, press it down gently and take it out after the card pops up.
Attentions:
1. Insert in the SD memory card before use.
2. Before use, check if the write-protect switch on the card is on or off.
3. Please pay attention to the direction of card, if it is inserted reversely, the machine and
card might be damaged.
4. If the memory card is incompatible with the machine, please insert it again or retry
with another card.
8
Operating Instruction
� Set Menu Mode
1. In photo taking/video/replay mode, press “MENU” to set relevant menus, please refer to the
“Set Menu” for details.
2. In “Set Menu” in any mode, press OK to get into the next menu, press Up and Down to
select relevant settings, and then press OK to confirm and then press MENU to exit.
� Turn on/off and Auto-off Settings of Camera
1. Press on Power button for about 1s to turn on the camera, when it is on, press on the Power
button for 3s and then release it to turn it off.
2. To save battery power, you can set auto-off time in the menu. When no operation happens
within the setting time, it will shut down automatically.
3. Turn the power on, press MENU button twice to switch to Setup Menu, and then press
Down to select “Auto-off” and then press OK to get into the next menu. The auto-off time can
be set as “OFF, 2Min, 5Min and 10Min”.
� Set Date and Time
Turn the power on, press MENU button twice and switch to the Setup Menu, then press Down
to select “Date/Time” and then press OK to enter into Year, Month, Day, Hour, Minute and
Second, then press Up, Down, Left and Right to select the item to be set and then press OK.
When the item turns red, press Up or Down to make adjustment, after that, press OK to exit,
and then press Down to move to “√” and then press OK.
9
� Video Mode
1. Turn the power on, the camera is then started. The Camera mode appears on the screen,
then the symbol “
” appears at the top right corner, and the screen shows video information
and time displays at the bottom right corner. If the “ ” twinkles on the screen, it means it has
already got into the auto-recording mode.
2. Press “REC” button to start video recording and press it again to stop.
While video recording, red “ ” and timer will appear at the bottom of screen, and they will
disappear once it stops.
3. Infrared rays
When you take videos with your hand, you can press “Right” arrow key to open or close
infrared rays. If open infrared rays in nonluminous condition, you can see photos through
screen that cannot be seen due to darkness.
� Photo Mode
Turn the power on, the camera is then started. Press “MODE” button in video mode, then the
symbol “
” will appear at the top left corner, which means it has already got into photo
mode.
1. Aim the lens at the subjects and press Up or Down button to realize digital zoom, at this
time, hold on the camera tightly and do not shake it.
2. Press “REC” button, the camera give a crack sound, and then the photo is taken.
Shooting Method
Select “MENU” button in photo mode, then press “Down” to select “Shooting Method”, and
then press OK to select the “Continuous Shooting, Single Shot, 2s, 5s and 10s” for self-timer.
Notes
Notes:
1. Press “MODE
MODE”” in Video or Photo mode can switch to the other mode.
2. Press “MODE
MODE”” Video or Photo mode can enter replay mode.
10
� Replay Mode
1. Press “MODE” Photo or Video mode can replay photos or videos, and then select the
photo or video with Left or Right button. When browsing the photos, press REC button to
play or stop, and press “Preview” button to pause.
2. Delete
When replaying photos or videos, press “MENU” button to select the current file mode, and
then press OK to delete the current video or photo. Select all files and press OK to confirm,
and then press OK again to delete all files.
� Set Motion Detection
When the Motion Detection Function is open, the relative displacement in photos will be
detected automatically, if the object moves out of the default displacement, the record is
started automatically. Each time, the record lasts for 15s, after that, the machine will continue
detecting.
When the power is on, press “MENU” button to select detected item, and then press Up or
Down to select ON/OFF, and then press OK to save or exit.
� Set G-SENSOR Function
After starting of gravity sensing function, in case of vehicle collision or impact during video
recording, it will lock and save current video automatically and set to avoid the previous video
and following video files of loop recording cycle from being covered by the loop recording
lock of the machine in order to guarantee safety of important video.
In the “ON” status, press MENU key to enter the option of gravity sensing strength. Press up
or down key to select sensitivity. Press OK key to save the option and exit.
11
� Set SOS Emergency Lock File
When the SOS emergency lock file is started, you can save any photo segment at will during
the recording without being covered.
In the video mode, long press OK button, then “ ” appears and the current video is saved,
but the video will disappear automatically when next video starts.
� Charging-Recording Mode
when the power is off, connect the car charger power to the machine. Once the car is started, it
will turn on automatically and starts recording, meanwhile, the battery will be charged.
Attention: when the car stops, it will use battery power until auto power-off.
ing
Files Saving and Videos Play
Playing
� USB Backup Mode
When the power is on, connect the machine to computer with USB cable, if disc drive and IP
camera appear on the screen, then it is in USB mode. Open “My Computer” on the desktop
and find the saved files in “DCIM\********”.
� Connect to TV and Play Videos
1. Connect camera to TV with TV connecting line to browse or play Videos/Photos.
Note: without the need to install driver, the portable disk can only be used when the
camera is on.
12
Button Function
Video/Photo Mode ·
Power
Shutter
Arrow Key (Up)
Arrow Key (Down)
Arrow Key (Left)
Arrow Key (Right)
OK
Menu
Mode
On/Off
Record/Stop Recording/Photo Taking
Select Up to zoom in
Select Down to zoom out
Adjust EV value
Open/Close infrared rays
Confirm
Menu(SOS button)
Mode selection/browse photos and videos
Replay Mode ·
Power
Arrow Key (Left)
Arrow Key (Right)
Menu
OK
Mode
Off
Last/fast backward
Next/fast forward
Menu selection
Confirm/replay: start/pause
Back to video/photo/pause play
13
Menu Setup
Mode
Video
Recordi
ng
Camera
Replay
Setting
Menu
Resolution
Cycle recording
Motion detection
Audio
G-sensor
Audio
Date record
Shooting method
Resolution
Image quality
Sharpness
White balance
Special effect
Exposure
compensation
ISO
Face detection
Anti-shake
Quick view
Date record
Delete
Formatting
Frequency
Screen protection
Tone
Auto-off
TV output
Default
Language
Version
Date/time
Menu Setup
1080I/720P/QVGA
OFF/2 min/5 min
ON/OFF
ON/OFF
OFF/High/ Medium/Low
ON/OFF
ON/OFF
Continuous shooting/single shot/2s/5s/10s
10M/8M/7MHD/5M/3M/2MHD
Best/good/ordinary
Strong/ordinary/soft
Auto/sunlight/cloudy/bulb/daylight lamp
Color/black & white/nostalgic
+2.0、+5/3、+4/3、+1.0、+2/3、+1/3+0.0、-1/3、
-2.3、-1.0、-4/3、-5/3、-2.0
Auto/100/200/400
Off/Face detection
ON/OFF
Off/2s/5s
Off/Date/Date, time
Current file/all files
Built-in RAM/Memory card
50HZ/60HZ
Off/2 min/5min/10 min/
√/×
OFF/2 min/5 min/10 min
NTSC/PAL
√/×
Multinational language
S12012*****
Year, month, day/hour, minute, second
14
Note
Specifications
Sensor
Lens
Focal range
LCD screen
Video output
Photo format
Video format
Video signal
Zoom
Video medium
Audio
Shutter
Shutter speed
White balance
LED
Connector
Battery
USB
Size
Work temperature/humidity
1 Mage pixels CMOS
3.5mm
10cm -Infinity
2.5" TFT LCD
TV synthetic symbol: NTSC/PAL
Photo format: JPEG
Maximum output: 10M(3648 x 2736)
H.264
1440*1080(15/s)
1280*720(30/s)
848*480(60/s)
4x digital zoom
SD card(maximum 32G)
Built-in microphone/loudspeaker(Mono)
Electronic shutter
1/2-1/1000s
Auto/sunlight/cloudy/CFL/Tungsten lamp
On/Off
USB2.0/HDMI/TV
External lithium battery, 3.7V 800mAh
USB2.0 hi-speed transmission
Length 111×Width 59× Thickness 29mm
-10℃-60℃/10%-80%
15