1
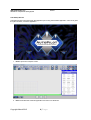
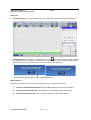
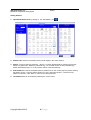
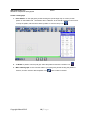
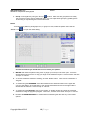
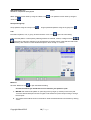
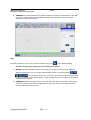
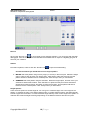
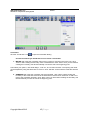
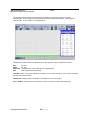
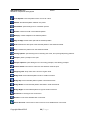
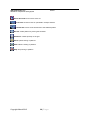
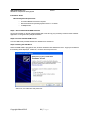
IMIM-1215
INSTRUCTION MANUAL
2013
Version 4.00.00
January
®
ABM International
AUTOPILOT
USER INTERFACE MANUAL
ABM INTERNATIONAL, INC.
2013
Copyright
Proprietary information of ABM International, Inc. furnished for customer use only.
No other uses are authorized without the prior written permission of
ABM INTERNATIONAL, INC.
ABM INTERNATIONAL, INC.
AUTOPILOT Computerized Quilting System
IM-1215
Table of Contents
TOPIC
PAGE
Table of Contents .............................................................................................................. 2
Introduction ........................................................................................................................ 4
Safety ................................................................................................................................ 5
The Startup Screen............................................................................................................ 6
Setting Up .......................................................................................................................... 6
Import Patterns .................................................................................................................. 7
Adding Patterns ................................................................................................................. 9
Create a Pantograph ......................................................................................................... 10
Resize................................................................................................................................ 12
Rotate ................................................................................................................................ 13
Flip and Mirror ................................................................................................................... 13
Reverse Sew ..................................................................................................................... 13
Pattern Center ................................................................................................................... 13
Attach and Link .................................................................................................................. 13
Group and Ungroup ........................................................................................................... 14
Trim ................................................................................................................................... 14
Measure............................................................................................................................. 14
Align .................................................................................................................................. 15
Record ............................................................................................................................... 16
AutoFit ............................................................................................................................... 16
Crosshatch ........................................................................................................................ 17
Wreath ............................................................................................................................... 18
Multiply .............................................................................................................................. 19
Edge to Edge ..................................................................................................................... 19
Pushpins and Pushpin Options .......................................................................................... 20
Sewing Options.................................................................................................................. 21
Sew ................................................................................................................................... 21
View................................................................................................................................... 21
Free View and Needle View ............................................................................................... 22
Advancing and Repositioning............................................................................................. 22
Tension Check ................................................................................................................... 22
Save Patterns .................................................................................................................... 23
Delete Pattern Files ........................................................................................................... 24
Export Patterns .................................................................................................................. 24
Tag Patterns ...................................................................................................................... 25
Master Tags....................................................................................................................... 26
Viewport............................................................................................................................. 26
Icon Key............................................................................................................................. 28
Installation Guide ............................................................................................................... 31
Notice ................................................................................................................................ 33
Software Disclaimer ........................................................................................................... 33
Copyright March 2013
2|Page
ABM INTERNATIONAL, INC.
AUTOPILOT Computerized Quilting System
Copyright March 2013
IM-1215
3|Page
ABM INTERNATIONAL, INC.
AUTOPILOT Computerized Quilting System
IM-1215
Introduction
ABM International would like to thank you for the purchase of an AutoPilot Computerized Robotics System
for your Innova Quilting Machine. ABM is confident that this system will meet or exceed your expectations
for cost, speed and durability.
If at any time you experience problems with any of your ABM products we ask that you contact your
nearest Dealer or us directly- 24 hours a day by calling our service department at (888)99-Quilt. We can
help you solve the problem quickly, and correctly. Your calls, questions, and comments will in turn help us
to perfect the quality of our products and services in the future.
Once again, we thank you for your purchase.
ABM International, Inc.
Engineering Department
Copyright March 2013
4|Page
ABM INTERNATIONAL, INC.
AUTOPILOT Computerized Quilting System
IM-1215
Safety
Safety Introduction
As with the operation of all machinery, safe operation of the AutoPilot system and Innova quilting machine
is a major concern of ABM International, Inc. The purpose of this section is to inform the owner/operator
further referred to as “User” of the safe and prudent operation of an Innova quilting machine when
equipped with AutoPilot Robotics.
We have attempted to recommend the most effective methods and calculations to warn against actions
that could result in personal injury, or make equipment unsafe. It is important to understand that ABM
cannot anticipate, or list all conceivable safety methods and warn of all the possible hazards. In the
interest of promoting safety, ABM advises that the user should always make sure that personal safety and
the safe operation of the machine will not be adversely affected by their actions.
It is imperative that the User of the Innova with AutoPilot read and understand the information in this
manual before operating the machine.
Safety Practices
These safety factors must be observed to ensure safe operation of an AutoPilot equipped Innova.
1.
2.
3.
4.
5.
6.
7.
8.
Read and understand the operating instructions of the AutoPilot and Innova before operating.
Use caution when working around the AutoPilot electrical controls.
Keep hands or other body parts away from the moving parts of the AutoPilot.
Stop the AutoPilot immediately at any sign of malfunction or danger.
Do not reach into the Innova sewing area at any time during the operation of the machine.
Do not climb, walk, or stand on the Innova at any time.
Do not tamper with installed motor guards and or safety devices.
Before starting the Innova or AutoPilot, ensure that no loose tools, needles, or parts are lying in or
on any part of the machine.
9. Always disconnect the power when working on the machine.
10. Do not wear loose clothing or jewelry when operating the Innova or AutoPilot.
11. Always keep hair from coming in contact with moving parts.
Copyright March 2013
5|Page
ABM INTERNATIONAL, INC.
AUTOPILOT Computerized Quilting System
IM-1215
The Startup Screen
The startup screen is the first screen that appears upon running the AutoPilot application. The user is given
the option to Enter, or Exit the application.
1. Enter: Opens the viewport screen.
2. Exit: Terminates the AutoPilot application and returns to Windows.
Copyright March 2013
6|Page
ABM INTERNATIONAL, INC.
AUTOPILOT Computerized Quilting System
IM-1215
Setting Up
1. Create Quilt Grid: click on the “Settings” tab, click “Quilt Size”, enter and accept quilt dimensions.
and move the sewing machine head to
2. Create Sew Zone: by clicking on “Create Sew Zone” icon
the upper right corner of quilt top, next click Done on the dialog box. Then move the sewing machine
head to the lower left corner of the quilt top and click Done on the dialog box.
This will create the area that your machine will safely sew in.
Import Patterns
Patterns are represented by a unique ID as well as their name, displayed in brackets.
1. To import included AutoPilot patterns: insert ABM AutoPilot thumb drive into USB port.
2. To import purchased patterns: insert USB drive with downloaded files into USB port.
3. Open Import Pattern Screen: click on “Pattern Library” tab, click “Import Pattern”.
Copyright March 2013
7|Page
ABM INTERNATIONAL, INC.
AUTOPILOT Computerized Quilting System
IM-1215
4. Open Pattern File: in the left hand window go to “Computer”, then “Removable Disk”, open
AutoPilot Pattern file, or the file containing purchased downloaded pattern files.
5. Choose Patterns to Import: from the list of patterns in the second window choose the patterns to
import by double clicking on the file. The file name will appear in the green box along with an
image of the pattern in the black box. Choose as many patterns as desired to import.
6. Tag Patterns: choose tags for the patterns being imported in the right hand window. Note: see
Tagging Patterns pg. 16 for more tagging information.
7. Import: by clicking on the “Import” icon. Then click “Done” to return to AutoPilot application.
Copyright March 2013
8|Page
ABM INTERNATIONAL, INC.
AUTOPILOT Computerized Quilting System
IM-1215
Adding Patterns
1. Open Build Pattern Pad: by clicking on the “Add Pattern” icon
2. Pattern Files: stored in the Pattern Library will all display in the center window.
3. Search: narrow a search by selecting: “Search”, to search alphabetically by entering the first few
letters of a pattern title; “Match Any Checked Tag”, for a broader search of many selected tags;
“Match All Checked Tags”, for a very specific search of the selected tags.
4. Select Patterns: to add to the Pattern Pad for possible use on the current project by double clicking
the pattern chosen. Then the pattern will show up in the right hand window. Choose as many
patterns as desired. Click “Done” to return to the Viewport Screen.
5. The Pattern Pad: can be cleared by selecting the “Clear” button.
Copyright March 2013
9|Page
ABM INTERNATIONAL, INC.
AUTOPILOT Computerized Quilting System
IM-1215
Create a Pantograph
1. Place Pattern: on the quilt grid by double clicking the (double finger tap on screen) chosen
pattern on the Pattern Pad. The Pattern will be “attached” to the needle crosshair on the screen.
To drop the pattern, either double click the pattern or click the “Drop” icon.
2. To Delete: a pattern from the quilt grid, select the pattern and click the “Delete” icon.
3. Make a Pantograph: to fit across the width of your quilt grid by double clicking the pattern to
select it; and then click the “More Repeats” icon
Copyright March 2013
10 | P a g e
until the width is reached.
ABM INTERNATIONAL, INC.
AUTOPILOT Computerized Quilting System
IM-1215
4. Reposition the Pantograph: by double clicking the pattern to highlight (dark green), then drag
the pattern by dragging finger on touchpad or click the “Grab” icon
head.
5. Make fine adjustments: by pressing the “Nudge” arrows.
6.
Add More Rows: using the “Copy”
Copyright March 2013
function.
11 | P a g e
to move with the sew
ABM INTERNATIONAL, INC.
AUTOPILOT Computerized Quilting System
IM-1215
7. Group: rows together by using the “Group”
feature. After rows are grouped as one entity
they may be moved in sets of positioned rows. You can adjust entire groups by grabbing them
and moving or repositioning them at the same time.
Resize
To resize single patterns, pantograph rows, or groups of rows, select the pattern then click the
”Resize” icon
to open the resize dialog.
Choose the method you would like to use to resize your pattern.
1. MOUSE: will resize the pattern using touch by finger (or mouse) on the touch pad. Touch the
desired start point and touch or drag your finger to the desired end point. Click “Preview” and then
“Accept” or “Cancel”.
2. To choose a different method of resizing, click the “Reset” button. Then choose “Sewhead” or
“Keypad”.
3. To resize using the SEWHEAD: move the sewhead to the desired location for the upper left
corner of the pattern, click “Start Point”, then pull the sewhead down and to the right until the
desired size is achieved. Click “Accept” or “Cancel”.
4. To resize using the KEYPAD: click on the “Height” or “Width” window and enter the preferred
dimensions using the popped up keypad. Click “OK”, “Preview” then either “Accept” or “Cancel”.
5. Deselect the MAINTAIN RATIO: to resize without maintaining the ratio with any of the resize
options.
Copyright March 2013
12 | P a g e
ABM INTERNATIONAL, INC.
AUTOPILOT Computerized Quilting System
IM-1215
Rotate
First select a pattern, row, or group, and then click the “Rotate” icon
Rotate: selected pattern using “90 degree” icons
Left” icons
or the “Rotate Right” icons
to open the Rotate Dialog.
or nudge to desired angle using the “Rotate
. Click and drag to rotate using the mouse. Click
the “Start Point” icon
to rotate around the start point of the pattern. Right click on the colored
anchors to select a different rotation point. Click “Accept” or “Cancel”.
Flip and Mirror
Use the “Flip” icon
or “Mirror” icon
to flip or mirror selected pattern.
Reverse Sew
The pink triangle marks the stitching start point of each pattern. Use the “Reverse Sew” icon
reverse the sew direction of selected pattern.
Pattern Center
Use the “Pattern Center” icon
to show the pattern center point.
Attach and Link
Copyright March 2013
13 | P a g e
to
ABM INTERNATIONAL, INC.
AUTOPILOT Computerized Quilting System
IM-1215
Attach patterns to each other by using the “Attach” icon
Link patterns to each other by using the
“Link” icon
Group and Ungroup
Group patterns using the “Group” icon
Ungroup selected patterns using the ungroup icon
Trim
First select a pattern, row, or group, and then click the “Trim” icon
to open the Trim Dialog.
Trim: selected pattern or entire quilt by selecting either the horizontal, vertical, or diagonal icons
Click invert to switch the selection to be trimmed away, the black portion is the selection that will be
trimmed away. Click “Reset” to clear all selected options. Click “Accept” or “Cancel”.
Measure
Click the “Measure” icon
to open the Measure Dialog.
Choose the method you would like to use to measure your pattern or quilt.
1. MOUSE: will measure the pattern or quilt using touch by finger (or mouse) on the touch pad.
Touch the desired start point and touch again to set desired end point. Keep touching to change
the end point.
2. The measurement will be shown in the textbox. Clear the measurement to do another by clicking
“Clear”.
Copyright March 2013
14 | P a g e
ABM INTERNATIONAL, INC.
AUTOPILOT Computerized Quilting System
IM-1215
3. SEWHEAD: move the sewhead to the desired location for the start of measurement, click “Start
Point”, then pull the sewhead to the desired end point of measurement. Keep moving the
sewhead to change the end point.
Align
First select a pattern, row, or group, and then click the “Align” icon
to open the Align Dialog.
Choose the method you would like to use to align your pattern.
1. MOUSE: will align the pattern using touch by finger (or mouse) on the touch pad. Select the
alignment type to use, Left, Top, Center Vertical, Right, Bottom, or Center Horizontal
. Then touch the “Place Line”, and click to place the line. When line placement
is where you want it, press “Select Patterns”. Click the patterns you want to align. Click “Reset” to
clear all selected options.
2. SEWHEAD: Select the alignment type to use, then touch the “Place Line” button, and move the
sewhead to place the line. When line placement is where you want it, press “Select Patterns”.
Click the patterns you want to align.
Copyright March 2013
15 | P a g e
ABM INTERNATIONAL, INC.
AUTOPILOT Computerized Quilting System
IM-1215
Record
Click on the “Record” icon
to record what you are stitching freehand. You can do this with the belts
disengaged. Save as a new pattern and edit with the AutoPilot tools or export to a digitizing program to
fine tune your creations.
AutoFit
First select a pattern, and then click the “AutoFit” icon
to open the AutoFit Dialog.
Choose the method you would like to use to fit your pattern.
1. MOUSE: will fit the pattern using touch by finger (or mouse) on the touch pad. Select the height
option, and then click to place your starting point. Click again to place the end point, and the
pattern will then fit between the two created points. Click “Accept” when you are finished.
2. SEWHEAD: will fit the pattern using the sewhead. Select the height option, and then move your
sewhead to desired start location. Click “Add Point” to place the start point. Move sewhead to
desired end location and click “Add Point” to place the end point, and the pattern will then fit
between the two created points. Click “Accept” when you are finished.
Height Options:
There are three options to set the height at. You can type in a defined height, lock in the height of the
pattern, or maintain the ratio. In the defined height mode, no matter what the width is, the height will stay
at what is typed into the textbox. In locked mode the height will stay at the current height of the pattern. In
maintain ratio mode the height will change depending on the distance between start and end point.
Copyright March 2013
16 | P a g e
ABM INTERNATIONAL, INC.
AUTOPILOT Computerized Quilting System
IM-1215
Crosshatch
Click the “Crosshatch” icon
to open the Crosshatch Dialog.
Choose the method you would like to use to create a crosshatch.
1. MOUSE: will create the crosshatch using touch by finger (or mouse) on the touch pad. Click
“Start” to start creating the boundary of the crosshatch area. Click “Done” when you are finished
creating the boundary, this will automatically connect the end to the beginning point.
Then select your options, “Sew Outer Edge”, “Lock XY”, and “Continuous Sew”. The spacing and offset
can be adjusted by using the slider bars for X and Y. Click “Preview” to see what the crosshatch will look
like.
2. SEWHEAD: will create the crosshatch using the sewhead. Click “Start” to start creating the
boundary of the crosshatch area. Move the sewhead around and click “Add Point” to add a new
point to the crosshatch boundary. Click “Done” when you are finished creating the boundary, this
will automatically connect the end to the beginning point.
Copyright March 2013
17 | P a g e
ABM INTERNATIONAL, INC.
AUTOPILOT Computerized Quilting System
IM-1215
Wreath
First select a pattern, and then click the “Wreath” icon
to open the Wreath Dialog.
Wreath the selected pattern by choosing how many patterns you want wreathed, how far you want them
from the center, and if you want to add an angle of rotation. Also you have the option to link the wreathed
patterns together. Press “Preview” to see what the wreath will look like. To make changes, click “Reset”
and change the values. Click “Accept” or “Cancel”.
Copyright March 2013
18 | P a g e
ABM INTERNATIONAL, INC.
AUTOPILOT Computerized Quilting System
IM-1215
Multiply
First select a pattern, and then click the “Multiply” icon
to open the Multiply Dialog.
Multiply the selected pattern by choosing how many patterns you want across and how many patterns you
want down. Then choose spacing for Horizontal, Vertical, or Offset. Choose if you want to Flip
Rows/Columns. Place a checkmark for either All or Alt, then choose Hrz or Vert. Press “Preview” to see
what the multiply will look like. To make changes, click “Reset” and change the values. Click “Accept” or
“Cancel”.
Edge to Edge
First select a pattern, and then click the “Edge to Edge” icon
to open the Edge to Edge Dialog.
Choose the method you would like to use for edge to edge.
1. TRIM: Will fill the quilt with the edge to edge and trim the sides, and bottom of the quilt.
2. FIT: Will figure out the best fit for the edge to edge and fill the quilt.
Options: Row Gap: Enter a negative number to make the rows closer together, enter a positive
number to make the rows further apart. Offset will move the rows horizontally either positive or
negative depending on number entered. Flip options you can flip horizontal/vertical all rows, or
every other row.
3. Then click “Preview” and a progress bar will appear, when the progress bar is filled, the edge to
edge will appear. Click “Reset” to change any options. Click “Accept” or “Cancel”.
Copyright March 2013
19 | P a g e
ABM INTERNATIONAL, INC.
AUTOPILOT Computerized Quilting System
IM-1215
Pushpins and Pushpin Options
Pushpins: Move your sewhead to the desired pushpin location, once positioned press the “Pushpin” icon
Continue to move sewhead around to place more pushpins.
to open the pushpin options dialog. Click from
Pushpin Options: Click the “Pushpin Options” icon
pushpin to pushpin to connect the pushpins together. Click “Center” to show the center point of the
connected pushpins. Click “Clear” to clear all pushpins from the quilt. Click “Accept” or “Cancel”.
Copyright March 2013
20 | P a g e
ABM INTERNATIONAL, INC.
AUTOPILOT Computerized Quilting System
IM-1215
Sewing Options
Click the “Sewing Options” icon
to open the Option Dialog.
The AutoPilot stitches out the patterns in the order placed into the sewing area by default. With this option
you can select to order sew sequence of patterns, queue patterns individually or queue all patterns,
dequeue individual patterns or dequeue all patterns. Patterns outside the Sew Zone will not stitch.
Sew
Start stitching by pressing the “Start” icon
Pause by pressing the “Pause” icon
.
You may then restart by pressing the “Start” icon.
Stop stitching by pressing the “Stop” icon
View
Adjust your View: using the “Zoom” icons, or click the “Full View” button to quickly view the entire quilt
layout.
Zoom in to the needle position.
Zoom out from the needle position.
Turn active zoom on, and zoom in to the point where the mouse clicks.
Turn active zoom off.
Full View shows the full quilt grid on viewport screen. This is the preferred selection for laying out
patterns. Zoom in or out as preferred. Use slider bars to adjust viewing position of grid on the screen.
Copyright March 2013
21 | P a g e
ABM INTERNATIONAL, INC.
AUTOPILOT Computerized Quilting System
IM-1215
Actual Size shows the screen and patterns at approximate actual size.
Free View and Needle View
Under the “view” tab choose “Free View” to scroll or zoom to any position on the screen. Use “Needle
View” to view the screen with the sewhead locked to the center position of the viewport screen.
Advancing and Repositioning
Reposition: by clicking the “Reposition” icon
quilt.
and choosing the checkbox for drag and drop or align to
Tension Check
The AutoPilot software comes equipped with software to accommodate the use of a self mounted web
camera. Use industrial strength Velcro to attach the camera to the lower sew arm pointing up at the
bottom of the quilt. Plugging the camera into the computer will allow you to view the underside of your
quilt when you select the “Tension Check” icon.
For best results use a web camera such as a Logitech or GigaWare with auto focus and a minimum of 2.0
megapixels.
Copyright March 2013
22 | P a g e
ABM INTERNATIONAL, INC.
AUTOPILOT Computerized Quilting System
IM-1215
Save Patterns
Save Patterns, rows, or groups as new patterns.
1. Select pattern, row or group desired. Under tabs click “File”, then “Save” and Save Pattern File to
open Save Pattern screen.
Rename new pattern in As Pattern text box. Click “Save”. Viewport screen will reopen with prompt
confirming pattern saved. Click “OK” and continue.
Copyright March 2013
23 | P a g e
ABM INTERNATIONAL, INC.
AUTOPILOT Computerized Quilting System
IM-1215
Delete Pattern Files
To Delete pattern files, under tabs click “File”, “Delete”, Delete Pattern Files to open Delete Files screen.
Select pattern file you wish to delete then click “Delete” button. Then click “Done”.
Export Patterns
To export patterns, under tabs click “File”, “Export”, Export Pattern to open Export Pattern screen.
Select pattern and destination file. Click “Export” then “Done”.
Copyright March 2013
24 | P a g e
ABM INTERNATIONAL, INC.
AUTOPILOT Computerized Quilting System
IM-1215
Tag Patterns
To tag patterns, under tabs click “Pattern Library”, then Tag Patterns to open Assign Tags to Patterns
screen.
1. To select pattern, double click the pattern thumbnail. The pattern file name will then show in the
green box.
2. Select Tags as desired and then click “Assign” then “Done”. If adding tags to a previously tagged
pattern choose all tags desired for the selected pattern as new tagging procedure will overwrite
any previous tags for that pattern.
3. Click “Clear” to remove patterns from the green box.
Copyright March 2013
25 | P a g e
ABM INTERNATIONAL, INC.
AUTOPILOT Computerized Quilting System
IM-1215
Master Tags
Edit your list of master tags by clicking “Pattern Library” tab, then “Master Tags”.
1. Insert new tag by clicking “Insert” then typing new tag name in text box. Click “Accept” or “Cancel”.
2. Change a tag by clicking on the tag name, then click “Change” and type the new name that the
tag should be changed to, then click “Accept” or “Cancel”.
3. Delete a tag by clicking on the tag name then click “Delete”. Click “Accept” or “Cancel”.
Viewport
Copyright March 2013
26 | P a g e
ABM INTERNATIONAL, INC.
AUTOPILOT Computerized Quilting System
IM-1215
The viewport window shows the arrangement of patterns in the active project on a virtual
representation of the quilt layout as well as the machine’s defined sewing area. It also features
selection tabs, an icon toolbar, and a pattern pad.
Gridlines are visible to assist in positioning and sizing patterns. They are defined as follows:
Blue
White
Dark Gray
Red
4 inches
one inch
one quarter inch (only visible at high magnification)
outer edges of the sewing area
Tabs Bar: allows for function selections included on icon tool bar as well as more function selections
that are used less frequently.
Pattern Pad: displays patterns selected for possible use on current project.
Icon Tool Bar: contains icon touch buttons for quick access to functions used frequently.
Copyright March 2013
27 | P a g e
ABM INTERNATIONAL, INC.
AUTOPILOT Computerized Quilting System
IM-1215
Icon Key
Select: activates selection function and deactivates active zoom selection.
Add Pattern: opens Build Pattern Pad screen to enable placement of patterns to the Pattern Pad.
Delete: deletes pattern, row, or group that is selected on screen.
Copy: places copy of selected pattern, row, or group on screen.
Reposition: reposition quilt top.
Flip: flips the selected pattern upside-down.
Mirror: creates a mirror of the selected pattern sideways.
Reverse Sew: reverses the sew direction of the selected pattern.
Resize: opens dialog box for resize options to resize selected pattern.
Rotate: opens dialog box for rotate options to rotate selected pattern.
Measure: opens dialog box for measure options.
Trim: opens dialog box for trim options to trim selected pattern.
Pattern Center: shows the center of the selected pattern.
Align: opens dialog box for align options for selected pattern.
Attach: attaches selected patterns together.
Link: links selected patterns together.
Group: patterns to make them editable as one pattern.
Ungroup: patterns that have been grouped and this will cause the patterns to become unrelated and
individually editable.
More Repeats: adds another pattern and attaches to selected pattern to create rows.
Copyright March 2013
28 | P a g e
ABM INTERNATIONAL, INC.
AUTOPILOT Computerized Quilting System
IM-1215
Less Repeats: removes patterns from row one at a time.
AutoFit: fits selected pattern between two points.
Crosshatch: opens dialog box for crosshatch options.
Wreath: creates a wreath of the selected pattern.
Multiply: creates multiples of the selected pattern.
Edge to Edge: fill the entire quilt with the selected pattern.
Grab: attaches the start point of the selected pattern to the sewhead needle.
Drop: releases the pattern from the sewhead needle.
Sewing Options: opens dialog box for selecting sew order, and queuing/dequeuing patterns.
Pushpin: place a pushpin on the quilt.
Pushpin Options: opens dialog box for connecting pushpins, and clearing pushpins.
Tension Check: uses add-on camera to view stitches under the quilt.
Shopping Cart: shop online at the Innova Longarm store.
Nudge Left: moves selected pattern to left in small increments.
Nudge Up: moves selected pattern upward in small increments.
Nudge Down: moves selected pattern downward in small increments.
Nudge Right: moves selected pattern to right in small increments.
Zoom Out: to see larger view of sew area.
Zoom In: to see more detailed view of sew area.
Active Zoom On: use mouse to click to zoom to more detailed view of sew area.
Copyright March 2013
29 | P a g e
ABM INTERNATIONAL, INC.
AUTOPILOT Computerized Quilting System
IM-1215
Active Zoom Off: turns click to zoom off.
Full View: shows full view of quilt width in viewport window.
Actual Size: zooms to the actual size of the selected pattern.
Record: create patterns by moving the sewhead.
Sew Zone: creates quilt top on the grid.
Pause: pause sewing of patterns.
Start: start the sewing of patterns.
Stop: stop sewing of patterns.
Copyright March 2013
30 | P a g e
ABM INTERNATIONAL, INC.
AUTOPILOT Computerized Quilting System
IM-1215
Installation Guide
Minimum System Requirements
o
o
o
A Pentium Based Personnel Computer
Microsoft Windows Operating System Version 7 or Newer
512MByte Ram
Step1: Run Install AutoPilot.EXE install file.
On the CD provided run the file Install AutoPilot.EXE. This will copy any necessary drivers and the AutoPilot
application “C:\Program Files (x86)\AUTOPILOT”.
Step2: Connect AutoPilot USB to a PC
Connect USB Cable provided between the AutoPilot box and the PC.
Step3: Installing the USB Driver
When the USB Cable is plugged into PC, windows will detect “New Hardware Found”. A popup box similar to
the following will be displayed. Select ‘No, not at this time and press next.
Select ‘No, not at this time and press next.
Copyright March 2013
31 | P a g e
ABM INTERNATIONAL, INC.
AUTOPILOT Computerized Quilting System
IM-1215
Windows will prompt and ask how to load software for the AutoPilot.
Select “Install from a list or specific location” and press next.
Windows will allow you to set search path.
Include the search path where you installed the application in step 1.
Copyright March 2013
32 | P a g e
ABM INTERNATIONAL, INC.
AUTOPILOT Computerized Quilting System
IM-1215
Notice
For Technical assistance call ABM at 888-99Quilt.
ABM standard warranty terms and conditions apply to the ABM control system and hardware and can be
found on our website at www.abminternational.com.
ABM makes no warranty, expressed or implied with regards to the touch screen Computer PC and any
Microsoft or Windows products. ABM makes no warranties whatsoever as to the Merchantability, nor
Fitness for a particular purpose of any Computer PC and Microsoft or Windows products. ABM shall not
be liable for any consequential damages, incidental or contingent liabilities resulting in loss from the use of
its merchandise. If you have a problem with the Computer PC please contact the Computer PC
manufacturer.
Software Disclaimer
License and Disclaimer of Warranty Information
By downloading, wiring to or using the AutoPilot program and hardware, you acknowledge acceptance of
the following DISCLAIMER OF WARRANTY:
DISCLAIMER OF WARRANTY
ALL THE COMPUTER PROGRAMS AND SOFTWARE ARE SOLD "AS IS" WITHOUT WARRANTY OF
ANY KIND. WE MAKE NO WARRANTIES, EXPRESS OR IMPLIED, THAT THEY ARE FREE OF
ERROR, OR ARE CONSISTENT WITH ANY PARTICULAR STANDARD OF MERCHANTABILITY, OR
THAT THEY WILL MEET YOUR REQUIREMENTS FOR ANY PARTICULAR APPLICATION. THEY
SHOULD NOT BE RELIED ON FOR SOLVING A PROBLEM WHOSE INCORRECT SOLUTION COULD
RESULT IN INJURY TO A PERSON OR LOSS OF PROPERTY. IF YOU DO USE THEM IN SUCH A
MANNER, IT IS AT YOUR OWN RISK. THE AUTHOR AND PUBLISHER DISCLAIM ALL LIABILITY FOR
DIRECT, INDIRECT, OR CONSEQUENTIAL DAMAGES RESULTING FROM YOUR USE OF THE
PROGRAMS OR FROM CONNECTING IT TO YOUR MACHINE.
The computer programs AUTOPILOT are Copyright © 2013 of Neal A. Schwarzberger and ABM
International, Inc.. AutoPilot is a trademark of ABM International, Inc. AutoPilot is a proprietary product,
its concept, design and functionality are Property of ABM International, Inc.
Copyright March 2013
33 | P a g e