1
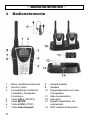
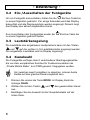
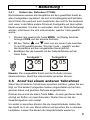
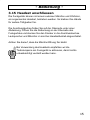
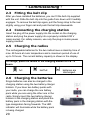
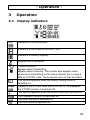
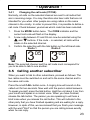
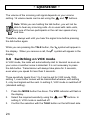
Sprechfunkgeräte-Set
Mobil Radio Set
Bedienungsanleitung
Operating Instructions
PMR Easy 009
PMR easy 009
Bedienungsanleitung __________ 1
Operating instructions ________ 17
Declaration of Conformity_____ 31
2
- Inhaltsverzeichnis 1
2
Bedienelemente ............................. 4
Inbetriebnahme ............................. 5
2.1
2.2
2.3
2.4
2.5
2.6
3
Bedienung ..................................... 7
3.1
3.2
3.3
3.4
3.5
3.6
3.7
3.8
3.9
3.10
3.11
3.12
3.13
3.14
3.15
4
Verpackungsinhalt prüfen ..................... 5
Akkupacks einsetzen ............................ 5
Gürtelclip anbringen............................. 6
Ladestation anschliessen ...................... 6
Funkgeräte laden................................. 6
Akkupacks laden ................................. 6
Displayanzeigen .................................. 7
Ein-/Ausschalten der Funkgeräte ........... 8
Lautstärkeregelung .............................. 8
Kanalwahl........................................... 8
3.4.1 Ändern des Rufcodes (CTCSS) .... 9
Anruf bei einem anderen Teilnehmer...... 9
VOX-Modus einschalten .......................10
Tastatursperre ...................................11
Reichweite der Funkgeräte...................11
Erhöhung der maximalen Reichweite.....12
Automatischer Energiesparmodus .........12
Kanalsuche (Scan-Modus)....................13
Rufton auswählen ...............................13
Tastentöne ein-/ausschalten ................14
Funkgerät als Stoppuhr benutzen .........14
Headset anschliessen ..........................15
Wichtige Informationen ..................16
4.1
4.2
Technische Daten ...............................16
Pflegeanleitung...................................16
3
- Bedienelemente 1
1.
2.
3.
4.
5.
6.
7.
4
Bedienelemente
Mikro- Kopfhöreranschluss
Ein/Aus-Taste
Auswahltasten Auf/Ab für
Lautstärke, Kanalwahl,
Funktionen
Taste CALL (START)
Taste MODE
Taste LOCK (STOP)
Taste Auto-Squelch
8. Gesprächstaste
9. Headset
10. Doppelladestation mit zwei
Funkgeräten
11. Akku-Ladeeinsätze
12. Akkupack
13. Doppel-Ladestation mit
Ladeeinsatz
14. LED Ladekontrollleuchten
- Inbetriebnahme 2
2.1
Inbetriebnahme
Verpackungsinhalt prüfen
Zum Lieferumfang gehören:
zwei Funkgeräte mit Gürtelclip
zwei Akkupacks
zwei Ladeeinsätze für Akkupacks
eine Bedienungsanleitung
2.2
eine Ladestation
ein Steckernetzteil
zwei Headsets
Akkupacks einsetzen
Ihre Funkgeräte wurden mit zwei wiederaufladbaren Akkupacks
geliefert, die vor der Inbetriebnahme eingebaut werden müssen.
1.
2.
3.
4.
Entriegeln Sie den Akkufachdeckel auf der Rückseite, indem Sie
die Lasche am unteren Ende aufklappen.
Öffnen Sie dann das Fach. Sollte der Gürtelclip befestigt sein,
muss dieser zuerst entfernt werden.
Legen Sie nun den Akkupack ein und achten Sie auf die richtige
Polung. Falsche Polung kann sowohl das Akkupack als auch das
Gerät beschädigen.
Schliessen Sie das Akkufach und schliessen Sie die Lasche.
Hinweis: Wenn das Akkupack schwach ist und wieder geladen
werden muss, blinkt im Display das Batteriesymbol
Ladung erscheint die Anzeige
. Bei voller
.
Batterien nicht ins Feuer werfen oder ins Wasser tauchen. Alte oder
defekte Batterien nicht mit dem normalen Hausmüll entsorgen.
Hinweis: Anstelle des Akkupacks können Sie auch vier nicht
wiederaufladbare 1,5V AAA Alkaline-Batterien verwenden. Bitte
verwenden Sie nur beste Qualität. Beim Einlegen achten Sie bitte auf
die richtige Polung.
5
- Inbetriebnahme 2.3
Gürtelclip anbringen
Nachdem Sie die Akkupacks eingebaut haben, können Sie die
mitgelieferten Gürtelclips befestigen. Schieben Sie den Gürtelclip von
unten in die Führung bis er hörbar einrastet. Um den Gürtelclip wieder
zu lösen, ziehen Sie die Befestigungslasche mit dem Fingernagel
etwas nach hinten und schieben Sie den Gürtelclip nach unten.
2.4
Ladestation anschliessen
Stecken Sie den Stecker des Netzteils in die Buchse an der
Ladestation und das Steckernetzteil in eine vorschriftsmässig
installierte Netzsteckdose mit 230V. Verwenden Sie aus
Sicherheitsgründen nur das mitgelieferte Steckernetzteil.
2.5
Funkgeräte laden
Die wiederaufladbaren Akkupacks der beiden Funkgeräte besitzen
eine Standby-Zeit bei Zimmertemperatur von max. 49 Stunden und
eine maximale Nutzungsdauer von bis zu 18 Stunden. Die aktuelle
Batteriekapazität wird im Display angezeigt:
Zum Laden stellen Sie die Funkgeräte für ca. 12 Stunden in die
Ladestation.
voll
2.6
halb voll
Batterien sind entladen.
Akkupacks laden
Mit den beiden Ladeeinsätze für Akkupacks
können auch einzelne Akkus in der
Ladestation geladen werden. Besitzen Sie zu
jedem Funkgerät zwei Akkupacks, können Sie
den einen Akkupack laden, während Sie das
andere Akkupack im Funkgerät benutzen.
Setzen Sie einfach die beiden Ladeeinsätze in
die Ladestation ein und stellen Sie das
Akkupack mit der Typbezeichnung nach vorne
in die Ladestation. Die LED-Anzeige leuchtet,
während das Akkupack geladen wird.
6
- Bedienung 3
Bedienung
3.1
Displayanzeigen
Anzeige der eingestellten Lautstärke.
Anzeige des eingestellten Kanals von 1 bis 8
Anzeige der Batteriekapazität.
Tastensperre ist eingeschaltet
Senden/Emfpangen
erscheint beim Senden
erscheint beim Empfangen. Das Symbol erscheint auch,
wenn jemand auf dem gleichen Kanal sendet, aber einen
anderen CTCSS-Code verwendet. Diese Signale sind dann
nicht zu hören.
Dieses Symbol erscheint bei eingeschaltetem
Batteriesparmodus.
Anzeige des CTCSS-Codes von 01 bis 38. Bei der Anzeige –
ist die CTCSS-Funktion ausgeschaltet.
Dieses Symbol erscheint bei ausgeschalteten Tastentönen.
Die Stoppuhr-Funktion ist eingeschaltet.
Die Scan-Funktion ist eingeschaltet.
Der VOX-Modus ist eingeschaltet.
7
- Bedienung 3.2
Ein-/Ausschalten der Funkgeräte
Um ein Funkgerät einzuschalten, halten Sie die
Ein/Aus-Taste bis
zu einem Signalton gedrückt. Für einige Sekunden wird das Display
beleuchtet und alle Displaysymbole werden angezeigt. Danach zeigt
das Display den aktuell eingestellten Kanal.
Zum Ausschalten des Funkgerätes wieder die
zu einem Signalton gedrückt halten.
3.3
Ein/Aus-Taste bis
Lautstärkeregelung
Die Lautstärke des eingebauten Lautsprechers kann mit den Tasten
und
auf der rechten in 16 Lautstärkestufen angezeigt werden.
Die eingestellte Lautstärke wird im Display angezeigt.
3.4
Kanalwahl
Die Funkgeräte verfügen über 8 verschiedene Übertragungskanäle,
die von dem europäischen Komitee für Funkkommunikation als
„Private Mobile Radio“, kurz PMR genannt, freigegeben wurden.
Um zwischen zwei Funkgräten zu sprechen, müssen beide
Geräte auf den gleichen Kanal eingestellt sein.
1.
Drücken Sie einmal die Taste MODE. Im Display blinkt die
Anzeige CHAN.
2.
Wählen Sie mit den Tasten
und
den gewünschten Kanal
aus.
Bestätigen Sie die Auswahl mit der Gesprächstaste auf der
linken Seite.
3.
8
- Bedienung 3.4.1
Ändern des Rufcodes (CTCSS)
Normalerweise werden alle Gespräche auf dem gewählten Kanal an
allen Funkgeräten signalisiert, die sich im Empfangsbereich befinden.
Somit hören Sie eventuell auch Gespräche, die nicht für Sie bestimmt
sind, wenn in der Nähe andere Personen Funkgeräte auf dem selben
Kanal verwenden. Um dies zu vermeiden, kann ein Rufcode festgelegt
werden. Informieren Sie sich untereinander, welcher Code gewählt
wurde.
1.
Drücken Sie zweimal die Taste MODE. Im Display blinkt die
Anzeige CODE und der aktuelle Rufcode.
2.
Mit den Tasten
und
kann nun ein neuer Code zwischen
01 und 38 gewählt werden. Wird der Code -- gewählt, werden
alle Gespräche auf dem eingestellten Kanal geführt.
Bestätigen Sie die Auswahl mit der Gesprächstaste auf der
linken Seite.
3.
Funkgerät 1
Funkgerät 2
3
3
05
05
Hinweis: Der ausgewählte Kanal und der Rufcode müssen
übereinstimmen, damit Sie untereinander sprechen können.
3.5
Anruf bei einem anderen Teilnehmer
Wenn Sie mit anderen Teilnehmern sprechen möchten, gehen Sie wie
folgt vor: Die beiden Funkgeräte müssen eingeschaltet und auf den
gleichen Kanal und gleichem Rufcode eingestellt sein.
Drücken Sie einmal die kleine Taste CALL. An dem gerufenen Gerät
erklingt ein Rufton von zwei Sekunden. Warten Sie nun bis der
Gesprächspartner sich meldet.
Um selbst zu sprechen drücken Sie die Gesprächstaste. Halten Sie
das Gerät ca. 5 cm vom Mund entfernt und sprechen Sie in normaler
Lautstärke. Lassen Sie danach die Gesprächstaste wieder los.
9
- Bedienung Ihr Gesprächspartner hört ein kurzes Schaltgeräusch als Signal, wenn
Sie die Gesprächstaste losgelassen haben. Damit wird dem anderen
Teilnehmer angezeigt, dass Sie mit dem Sprechen fertig sind und auf
eine Antwort warten. Wir empfehlen Ihnen aber trotzdem Ihre
Nachricht mit dem Wort „Ende“ abzuschließen, damit der
Gesprächspartner genau informiert wird, wann er antworten kann.
Mit den Tasten
werden.
und
können 16 Lautstärkestufen eingestellt
Hinweis: Während Sie die Gesprächstaste festhalten, können
Sie keine ankommenden Anrufe hören. Von beiden
Gesprächspartnern kann, wie bei Funkgeräten üblich, nur ein
Gesprächspartner sprechen.
Warten Sie also immer, bis Sie den Signalton hören, bevor Sie wieder
die Gesprächstaste drücken.
Während Sie die Gesprächstaste drücken, erscheint im Display das
Symbol
. Wenn Sie ein Gespräch empfangen, erscheint im Display
das Symbol
3.6
.
VOX-Modus einschalten
Im VOX-Modus beginnt das Funkgerät automatisch zu senden, sobald
Ihre Stimme oder ein anderes Geräusch erkannt wird. Die
Gesprächstaste braucht nicht gedrückt zu werden. Es wird immer für 2
Sekunden gesendet, auch wenn Sie kürzer als 2 Sekunden sprechen.
Für den VOX-Modus können drei Empfindlichkeitsstufen von 1 bis 3
eingestellt werden. Bei der Einstellung 1 werden auch leisere
Geräusche übertragen, während bei der Einstellung 3 nur laute
Signale gesendet werden. Mit der Einstellung 0 ist der VOX-Modus
ausgeschaltet (Standardeinstellung).
10
- Bedienung 1.
Drücken Sie fünfmal die Taste MODE. Die Anzeige VOX blinkt
im Display.
2.
und
die gewünschte
Wählen Sie mit den Tasten
Empfindlichkeit. Mit der Einstellung 0 ist der VOX-Modus
ausgeschaltet.
Bestätigen Sie die Auswahl mit der Gesprächstaste auf der
linken Seite.
3.
3.7
Tastatursperre
Um zu verhindern, das Sie unbeabsichtigt etwas verstellen, können
Sie die Tastatursperre einschalten. Halten Sie dazu die Taste LOCK
für eine Sekunde gedrückt. Im Display erscheint das Symbol
und
die Tasten sind gesperrt. Die Gesprächstaste kann weiterhin benutzt
werden. Während die Gesprächstaste gedrückt wird, kann über die
Taste
ein Rufton ausgelöst werden.
Um die Tastatursperre wieder aufzuheben, halten Sie die Taste LOCK
wieder für eine Sekunde fest. Das Symbol verschwindet und die
Tastatursperre ist aufgehoben.
Nach jedem neuen Einschalten des Funkgerätes ist die
Tastatursperre automatisch wieder ausgeschaltet.
3.8
Reichweite der Funkgeräte
Die Funkgeräte haben eine Reichweite von bis zu 3-5 km. Diese
maximale Reichweite kann durch bestimmte Umstände verringert
werden. Bei flachen, offenen Bedingungen erreichen Sie die maximale
Reichweite. Befinden sich Gebäude oder Bäume im Signalweg wird
die Reichweite verringert. Die Reichweite wird in hügeligem Gelände
noch weiter verringert.
11
- Bedienung 3.9
Erhöhung der maximalen Reichweite
Die Funkgeräte sind mit einem sogenannten Auto-Squelch
ausgestattet, mit dem automatisch schwache Übertragungen und
unerwünschte Geräusche während der Benutzung ausgeblendet
werden. Dieser Auto-Squelch kann vorübergehend ausgeschaltet
werden, um die Reichweite zu erhöhen.
Halten Sie die Taste AUTO-SQUELCH auf der linken Seite gedrückt.
Die automatische Unterdrückung ist abgeschaltet, und es können nun
auch sehr schwache Signale empfangen werden. Bleibt die Taste
AUTO-SQUELCH bis zu einem Signalton gedrückt, wird der AutoSquelch ganz abgeschaltet.
Um das Auto-Squelch wieder einzuschalten, drücken Sie erneut die
Taste AUTO-SQUELCH .
3.10 Automatischer Energiesparmodus
Die Funkgeräte sind mit einem Stromsparmodus ausgestattet. Wenn
innerhalb von einer bestimmten Zeit keine Übertragungen
vorkommen, schaltet sich das Gerät automatisch aus. Die Zeit kann
auf 1, 2 oder 3 Stunden eingestellt werden. Bei der Einstellung 0 ist
der Energiesparmodus ausgeschaltet.
1.
Drücken Sie siebenmal die Taste MODE. Die Anzeige
im Display.
2.
und
die gewünschte
Wählen Sie mit den Tasten
Empfindlichkeit. Mit der Einstellung 0 ist der Energiesparmodus
ausgeschaltet.
Bestätigen Sie die Auswahl mit der Gesprächstaste auf der
linken Seite.
3.
blinkt
Die Anzeige
erscheint im Display, sobald der Energiesparmodus
eingeschaltet ist.
12
- Bedienung 3.11 Kanalsuche (Scan-Modus)
Bei eingeschalteter Kanalsuche (Scan) werden alle 8 Kanäle
permanent abgefragt, bis das Funkgerät einen Kanal gefunden hat,
auf dem gesprochen wird.
1.
2.
3.
4.
Drücken Sie dreimal die Taste MODE. Die Anzeige
im Display.
Mit der Taste
blinkt
wird die Kanalsuche eingeschaltet (on) und
mit der Taste
abgeschaltet (of).
Bestätigen Sie die Auswahl mit der Gesprächstaste auf der
linken Seite.
Nacheinander werden nun alle Kanäle abgesucht. Sobald gerade
benutzter Kanal gefunden wird, wird die Kanalsuche für 2
Sekunden unterbrochen. Drücken Sie in dieser Zeit die
Gesprächstaste, wenn Sie den gefundenen Kanal behalten und
die Kanalsuche beenden möchten. Mit der Taste MODE kann die
Kanalsuche jederzeit abgeschaltet werden.
3.12 Rufton auswählen
Sie können an die anderen Funkgeräte mit der Taste CALL einen
Rufton senden (siehe 3.5), sobald Sie das Gespräch beginnen
möchten. Es stehen 10 unterschiedliche Melodien zur Verfügung.
1.
Drücken Sie viermal die Taste MODE. Die Anzeige CA TONE
blinkt im Display.
2.
Wählen Sie mit den Tasten
und
den gewünschten
Rufton zwischen 1 und 10 aus.
Bestätigen Sie die Auswahl mit der Gesprächstaste auf der
linken Seite.
3.
13
- Bedienung 3.13 Tastentöne ein-/ausschalten
Normalerweise erklingt bei jedem Tastendruck auf dem Funkgerät ein
Bestätigungston. Diese Bestätigungstöne können wie folgt
ausgeschaltet werden.
1.
2.
Das Funkgerät mit der Taste
ausschalten.
Zum Wiedereinschalten die Taste AUTO-SQUELCH auf der
linken Seite gedrückt halten und erneut die Taste
Das Display zeigt die Anzeige
drücken.
.
Zum Wiedereinschalten wiederholen Sie die Schritte 1. und 2.
3.14 Funkgerät als Stoppuhr benutzen
Ihr Funkgerät kann auch als Stoppuhr verwendet werden.
1.
2.
3.
Drücken Sie sechsmal die Taste MODE. Die Anzeige
im Display und es erscheint die Anzeige der Stoppuhr.
Mit der Taste
wird die Stoppuhr eingeschaltet (on) und mit
der Taste
abgeschaltet (of).
Bestätigen Sie die Auswahl mit der Gesprächstaste auf der
linken Seite. Bei eingeschalteter Stoppuhr erscheint die
Stoppuhranzeige in Stunden, Minuten und Sekunden.
Starten der Stoppuhr
Taste CALL drücken
Zurückstellen der Anzeige
Erneut auf LOCK drücken,
während die Stoppuhr angehalten
ist.
14
blinkt
Anhalten der Stoppuhr
Taste LOCK drücken
Zwischenzeit nehmen
Taste CALL, während die
Stoppuhr läuft drücken. Taste
CALL erneut drücken, um die
Anzeige wieder zu aktualisieren.
- Bedienung 3.15 Headset anschliessen
Die Funkgeräte können mit einem externen Mikrofon und Ohrhörer,
ein sogenanntes Headset, betrieben werden. So bleiben Ihre Hände
für andere Tätigkeiten frei.
Die Anschlussbuchse finden Sie auf der Oberseite unter einer
Abdeckung. Öffnen Sie die Abdeckung an der Oberseite des
Funkgerätes und stecken Sie den Stecker in die Anschlussbuchse.
Lautsprecher und Mikrofon im sind bei Headsetbetrieb abgeschaltet.
Achten Sie darauf, dass die Mikrofonöffnung frei bleibt.
Bei Verwendung des Headsets empfehlen wir die
Tastatursperre am Funkgerät zu aktivieren, damit nichts
unbeabsichtigt verstellt werden kann.
15
- Wichtige Informationen 4
4.1
Wichtige Informationen
Technische Daten
PMR Kanal Frequenzen (MHz) :
Kanal 1: 446,00625
Kanal 2: 446,01875
Kanal 3: 446,03125
Kanal 4: 446,04375
Kanal 5: 446,05625
Kanal 6: 446,06875
Kanal 7: 446,08125
Kanal 8: 446,09375
38 CTCSS Ruffreqeuenzen:
CH1=67.0Hz
CH2=71.9Hz
CH3=74.4Hz
CH4=77.0Hz
CH5=79.7Hz
CH6=82.5Hz
CH7=85.4Hz
CH8=88.5Hz
CH9=91.5Hz
CH10=94.8Hz
CH11= 97.4Hz
CH12=100.0Hz
CH13=103.5Hz
CH14=107.2Hz
CH15=110.9Hz
CH16=114.8Hz
CH17=118.8Hz
CH18=123.0Hz
CH19=127.3Hz
CH20=131.8Hz
Kanaltrennung
Stromversorgung
Standby-Zeit
Gemischter Betrieb
CH21= 136.5Hz
CH22=141.3Hz
CH23=146.2Hz
CH24=151.4Hz
CH25=156.7Hz
CH26=162.2Hz
CH27=167.9Hz
CH28=173.8Hz
CH29=179.9Hz
CH30=186.2Hz
CH31= 192.8Hz
CH32=203.5Hz
CH33=210.7Hz
CH34=218.1Hz
CH35=225.7Hz
CH36=233.6Hz
CH37=241.8Hz
CH38=250.3Hz
12.5 kHz
Akkupacks
ca. 49 Stunden
ca. 18 Stunden
Die technischen Daten können ohne vorherige Ankündigung geändert
werden.
4.2
Pflegeanleitung
Die Gehäuseoberfläche kann mit einem trockenen, weichen und
fusselfreien Tuch gereinigt werden. Niemals Reinigungsmittel oder gar
aggressive Lösungsmittel verwenden.
Legen Sie das Gerät niemals an einen feuchten oder staubigen Platz.
Vermeiden Sie die Nähe zu Wärmequellen wie Heizkörpern und
setzen Sie das Gerät keiner direkten Sonnenbestrahlung aus.
16
- Contents 1
2
Operational Elements .....................18
Commissioning..............................19
2.1
2.2
2.3
2.4
2.5
2.6
3
Operation .....................................21
3.1
3.2
3.3
3.4
3.5
3.6
3.7
3.8
3.9
3.10
3.11
3.12
3.13
3.14
3.15
4
Check contents of pack .......................19
Fitting the battery packs......................19
Fitting the belt clip..............................20
Connecting the charging station ...........20
Charging the radios ............................20
Charging the batteries.........................20
Display indicators ...............................21
Switching the radios on and off ............22
Volume control ...................................22
Channel selection ...............................22
3.4.1 Changing the call code (CTCSS) ..23
Calling another subscriber ...................23
Switching on VOX mode ......................24
Keypad lock .......................................25
Range of the radios.............................25
Increasing the maximum range ............26
Automatic energy saving mode ............26
Channel search (scan mode) ................27
Selecting a call tone............................27
Switching key tones on and off.............28
Using the radio as a stopwatch.............28
Connecting the headset .......................29
Important information....................30
4.1
4.2
Technical data ....................................30
Care instructions ................................30
17
- Operational elements 1
1.
2.
3.
4.
5.
6.
7.
18
Operational Elements
Microphone and headphone
connection
On/Off button
Volume louder/softer
select buttons
CALL button
MODE button
LOCK button
AUTO-SQUELCH button
8. TALK button
9. Headset
10. Double charging station with
two radios
11. Battery charger holder
12. Battery pack
13. Double charging station with
battery charger holder
14. LED charging indicator
- Commissioning 2
2.1
Commissioning
Check contents of pack
The following items are supplied
two radios with belt clip
two battery packs
two battery charger holder
one instruction manual
2.2
one charging station
one mains power supply
two headsets
Fitting the battery packs
Your radio units are supplied with two rechargeable battery packs,
which must be fitted before using the equipment.
1.
2.
3.
4.
Unlock the battery compartment cover on the rear by opening the
flap on the bottom end.
Then open the compartment. If the belt clip has been fitted, this
must be removed first.
Now insert the battery pack taking care to ensure that the polarity
is correct. The wrong polarity can damage both the battery pack
and the unit.
Close the battery compartment and close the flap.
Note: When the battery pack is weak and needs to be recharged, the
battery symbol
charged, the
will flash in the display. When the battery is fully
symbol will appear.
Do not throw batteries into the fire or immerse in water. Do not
dispose of old or defective batteries with the normal household waste.
Note: In place of the battery pack you can also use four not
rechargeable 1.5V AAA alkaline batteries. Please use only the best
quality. Take care to ensure that the polarity is correct when inserting.
19
- Commissioning 2.3
Fitting the belt clip
After you have installed the batteries, you can fit the belt clip supplied
with the unit. Slide the belt clip into the guide from down until it audibly
engages. To remove the belt clip again, pull the fixing strap to the rear
slightly using your finger nail and push the belt clip downwards.
2.4
Connecting the charging station
Insert the plug of the power supply into the socket on the charging
station and plug the power supply into a properly installed 230 V
mains socket. For safety reasons, use only the plug-in mains power
supply provided.
2.5
Charging the radios
The rechargeable batteries for the two radios have a stand-by time of
max. 49 hours at room temperature and a maximum period of use of
up to 18 hours. The current battery capacity is shown in the display.
To charge, place the radios in the charging station for ca. 12
hours.
full
2.6
half full
Charging the batteries
Single batteries can also be charged in the
charging station using the two battery charger
holders. If you have two battery packs with
your radio, you can charge the one battery
pack while you are using the other one in the
radio. Simply insert the two battery charger
holders in the charging station and place the
battery pack in the charging station with the
type designation facing forwards. The LED
indicator will illuminate while the battery pack
is being charged.
20
batteries are
discharged.
- Operation 3
Operation
3.1
Display indicators
Indication of the set volume.
Indication of the channel set from 1 to 8
Indication of battery capacity.
Keypad lock is activated
Transmit/receive
appears when transmitting
appears when receiving. The symbol also appears when
someone is transmitting on the same channel but is using a
different CTCSS code. These signals can not then be heard.
This symbol appears when the battery saving mode is
switched on.
Display of the CTCSS code from 01 to 38. If – is displayed,
the CTCSS function is switched off.
This symbol appears when the button tones are switched off.
The stopwatch function is switched on.
The scan function is switched on.
The VOX mode is switched on.
21
- Operation 3.2
Switching the radios on and off
To switch on the radio, hold the On/Off button
pressed until a
signal tone sounds. The display will be illuminated for some seconds
and all the symbols will be shown in the display. After this the display
will show the currently selected channel.
To switch the radio off, hold the On/Off button
until a signal tone sounds.
3.3
pressed once more
Volume control
The volume of the built-in loudspeaker can be displayed in 16 volume
and
steps using the
be shown in the display.
3.4
buttons on the right. The volume set will
Channel selection
The radios have 8 different transmission channels, which are released
by the European Committee for Radio Communications as " Private
Mobile Radio" channels, known as PMR for short.
In order to be able to speak between two radios, both units
must be set to the same channel.
1.
Press the MODE button once. The CHAN indicator will flash in
the display.
2.
3.
Select the required channel using the
and
buttons.
Confirm the selection with the talk button on the left-hand side.
22
- Operation 3.4.1
Changing the call code (CTCSS)
Normally, all calls on the selected channel are sent to all radios that
are in receiving range. You may therefore also hear calls that are not
intended for you when other people are using radios on the same
channel in the vicinity. In order to prevent this, it is possible to define a
call code. Check between yourselves which code has been selected.
1.
2.
3.
Press the MODE button twice. The CODE indicator and the
current call code will flash in the display.
A new code between 01 and 38 can now be selected using the
and
buttons. If the code -- is selected, all calls will be
made on the selected channel.
Confirm the selection with the talk button on the left-hand side.
Radio 1
Radio 2
3
05
3
05
Note: The selected channel and the call code must correspond for
you to be able to talk to one another.
3.5
Calling another subscriber
When you want to talk to other subscribers, proceed as follows: The
two radios must be switched on and set to the same channel and to
the same call code.
Press the small CALL button once. A ringing tone will sound on the
called unit for two seconds. Now wait until the person called answers.
To speak yourself, press the talk button. Hold the unit about 5 cm from
your mouth and speak in a normal voice. When you have finished,
release the talk button. The person you are speaking to will hear a
brief noise when you release the call button. This will indicate to the
other party that you have finished speaking and are waiting for a reply.
However, in spite of this, we recommend that you finish your message
with the word "End" so that the person you are calling knows exactly
when he can reply.
23
- Operation The volume of the incoming call signal depends on your volume
setting. 16 volume levels can be set using the
and
buttons.
Note: While you are holding the talk button, you will not be
able to hear any incoming calls. As is usual with radio units,
only one of the two participants in the call can speak at any
one time.
Therefore, always wait until you hear the signal tone before pressing
the talk button again.
While you are pressing the TALK button, the
the display. When you receive a call, the
display.
3.6
symbol will appear in
symbol will appear in the
Switching on VOX mode
In VOX mode, the radio will automatically start to transmit as soon as
your voice or another noise is detected. It is not necessary to press
the talk button. Transmission will always take place for 2 seconds,
even when you speak for less than 2 seconds.
Three sensitivity levels from 1 to 3 can be set for VOX mode. With
setting 1, even softer noises will be transmitted whereas, with setting
3, only loud signals will be sent. In setting 0, VOX mode is switched off
(standard setting).
1.
Press the MODE button five times. The VOX indicator will flash in
the display.
2.
Select the required sensitivity using the
and
buttons. In
setting 0, VOX mode is switched off.
Confirm the selection with the TALK button on the left-hand side.
3.
24
- Operation 3.7
Keypad lock
In order to prevent settings from being changed unintentionally, you
can switch on the keypad lock. To do this, press and hold the
LOCK button for one second. The symbol
will appear in the
display and the keys will be locked. It will still be possible to use the
talk button. While the talk button is being pressed, a call tone can be
transmitted using the
button.
To turn the keypad lock off once more, press and hold the LOCK
button again for one second. The symbol will disappear and the
keypad lock will be deactivated.
Each time the radio is switched on afresh, the keypad lock is
automatically switched off again.
3.8
Range of the radios
The radios have a range of up to 3-5 km. This maximum range can be
reduced under certain circumstances. You can achieve maximum
range in open, flat conditions. If there are buildings or trees in the
signal path then the range will be reduced. The range is even further
reduced in hilly terrain.
25
- Operation 3.9
Increasing the maximum range
The radios are equipped with a so-called Auto-Squelch system, by
means of which weak transmissions and undesirable noises are
automatically filtered out during use. This Auto-Squelch system can be
temporarily switched off in order to increase the range.
Press and hold the AUTO-SQUELCH button on the left-hand side.
The automatic suppression will be switched off and it will now be
possible for even very weak signals to be received. If the AUTOSQUELCH button is kept pressed until a signal tone sounds, the
Auto-Squelch will be switched off completely. To switch the AutoSquelch on again, press the AUTO-SQUELCH button once more.
3.10 Automatic energy saving mode
The radios are designed with a power saving mode. If no
transmissions take place within a certain time, the unit switches itself
off automatically. The time can be set to 1, 2 or 3 hours. In setting 0,
energy saving mode is switched off.
1.
Press the MODE button seven times. The
in the display.
2.
and
buttons.
Select the required sensitivity using the
Energy saving mode is switched off with the setting 0.
Confirm the selection with the talk button on the left-hand side.
3.
indicator will flash
The
indicator appears in the display when the energy saving
mode is switched on.
26
- Operation 3.11 Channel search (scan mode)
When channel search (scan) is switched on, all 8 channels are
continuously polled until the radio finds a channel that is being used
for speech.
1.
2.
3.
4.
Press the MODE button three times. The
in the display.
Channel search is switched on with the
indicator will flash
button and switched
off with the
button.
Confirm the selection with the talk button on the left-hand side.
All channels will now be scanned one after the other. As soon as
a channel is found that is currently in use, channel search will be
interrupted for 2 seconds. Press the TALK button during this time
if you want to keep the channel that has been found and exit the
channel search. Channel search can be switched off at any time
with the MODE button.
3.12 Selecting a call tone
You can transmit a call tone to the other radios using the CALL button
(see 3.5) when you want to begin a call. 10 different melodies are
available.
1.
Press the MODE button four times. The CA TONE indicator will
flash in the display.
2.
Select the required call tone between 1 and 10 using the
3.
buttons.
Confirm the selection with the talk button on the left-hand side.
and
27
- Operation 3.13 Switching key tones on and off
Normally, a confirmation tone will sound each time a button on the
radio is pressed. These confirmation tones can be switched off as
follows.
1.
2.
Switch the radio off with the
button.
To switch on again, hold the AUTO-SQUELCH button on the left
side pressed and press the
show the
button again. The display will
indicator.
To switch on again, repeat steps 1 and 2.
3.14 Using the radio as a stopwatch
Your radio can also be used as a stopwatch.
1.
2.
3.
Press the MODE button six times. The
indicator will flash
in the display and the stopwatch display will appear.
The stopwatch function is switched on with the
Starting the stopwatch
Press the CALL button.
Resetting the display
Press LOCK again while the
stopwatch is stopped.
28
button and
switched off with the
button.
Confirm the selection with the talk button on the left-hand side.
When the stopwatch is switched on, the stopwatch display
appears in hours, minutes and seconds.
Stopping the stopwatch
Press the LOCK button
Reading intermediate times
Press the CALL button while the
stopwatch is running. Press the
CALL button again to update the
display once more.
- Operation 3.15 Connecting the headset
The radios can be used with an external microphone and earpiece, a
so-called headset. In this way, you can keep your hands free for other
activities.
You will find the connecting socket on the upper side underneath a
cover. Open the cover on the upper side of the radio and insert the
plug into the socket. The loudspeaker and microphone in the radio are
switched off when the headset is in use.
Make sure that the microphone opening remains unobstructed.
When using the headset, we recommend that the keypad lock
on the radio is activated so that no settings can be changed
unintentionally.
29
- Important information 4
4.1
Important information
Technical data
PMR channel frequencies (MHz):
Channel 1: 446.00625
Channel 2: 446.01875
Channel 3: 446.03125
Channel 4: 446.04375
Channel 5: 446.05625
Channel 6: 446.06875
Channel 7: 446.08125
Channel 8: 446.09375
38 CTCSS call frequencies:
CH1=67.0Hz
CH2=71.9Hz
CH3=74.4Hz
CH4=77.0Hz
CH5=79.7Hz
CH6=82.5Hz
CH7=85.4Hz
CH8=88.5Hz
CH9=91.5Hz
CH10=94.8Hz
CH11= 97.4Hz
CH12=100.0Hz
CH13=103.5Hz
CH14=107.2Hz
CH15=110.9Hz
CH16=114.8Hz
CH17=118.8Hz
CH18=123.0Hz
CH19=127.3Hz
CH20=131.8Hz
Channel separation
Power supply
Standby time
Mixed operation
CH21= 136.5Hz
CH22=141.3Hz
CH23=146.2Hz
CH24=151.4Hz
CH25=156.7Hz
CH26=162.2Hz
CH27=167.9Hz
CH28=173.8Hz
CH29=179.9Hz
CH30=186.2Hz
CH31= 192.8Hz
CH32=203.5Hz
CH33=210.7Hz
CH34=218.1Hz
CH35=225.7Hz
CH36=233.6Hz
CH37=241.8Hz
CH38=250.3Hz
12.5 kHz
Battery packs
ca. 49 hours
ca. 18 hours
Technical data are subject to change without previous notice.
4.2
Care instructions
The surface of the case can be cleaned with a dry, soft and lint-free
cloth. Never use cleaning agents, particularly aggressive solvents.
Never leave the unit in a damp or dusty place. Avoid proximity to
sources of heat such as radiators and do not expose the unit to direct
sunlight.
30
- Declaration of conformity WE
OF
AUDIOLINE GmbH
HELLERSBERGSTR. 2a
D-41460 NEUSS
GERMANY
DECLARE UNDER OUR SOLE RESPONSIBILITY AS EU
DISTRIBUTOR THAT THE PRODUCT
MODEL:
DESCRIPTION:
PMR Easy 009
Mobil Radio Frequence 446 MHz
IS IN CONFORMITY WITH THE BASIC REQUIREMENTS OF
DIRECTIVE: 1999/5/EC
AUTHORISED SIGNATORY:
Signature:
Name:
Position in the company:
Date of issue
:
__________________
MANFRED ZINNOW
MANAGING DIRECTOR
21.08.2002
A copy of this declaration will be retained for 10 years after cessation
of production.
SUPPLIER:
PRODUCT:
AUDIOLINE GmbH
HELLERSBERGSTR. 2a
D-41460 NEUSS
Mobil Radio
CE0359
This product was developed for the operation within
Germany. This product transmits
in a non-EU-harmonised frequency band (466MHz) and
may thus only be used in Germany.
31
AUDIOLINE GmbH
Neuss
Service Hotline 0180 5 00 13 88
Internet: www.audioline.de
E-mail: [email protected]