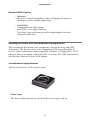
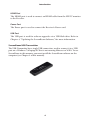
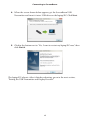
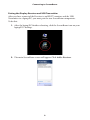
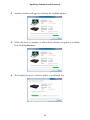
1
ScreenBeam
Wireless Display Kit
Model #: SBWD100A, SBT100U
User Manual
Ver 1.5
Solutions for the Digital Life™
Table of Contents
Introduction
1
Package Contents
Features
System Requirements
Getting to Know the ScreenBeam Components
Connecting to ScreenBeam
Connecting the Display Receiver…
Setting Up a Windows 7/8 Laptop/PC
Setting Up a Miracast-enabled Device
Setting Up an Intel® WiDi-enabled Device
Setting Wireless Display Preferences
Preferences Window
Windows 7/8 Viewing Configuration
Updating Software and Firmware
Updating Software on Windows 7/8 Devices
Updating the Display Receiver Firmware Only
1
2
2
3
5
5
6
11
12
13
13
15
16
16
20
Frequently Asked Questions
21
Specifications and Technical Support
26
Software and USB Transmitter
Wireless Display Receiver
LED Indicators
Environmental
Technical Support
ii
26
27
28
28
29
1
Introduction
Thank you for purchasing Actiontec’s ScreenBeam Wireless Display Kit.
ScreenBeam allows you to wirelessly display the content on your laptop/PC, tablet,
or smartphone screen, onto an HDTV monitor. ScreenBeam is compatible with
laptops/PCs running Windows 7 or 8, and connects seamlessly with smartphones,
tablets and other devices running Miracast™ or Intel’s WiDi technology.
Package Contents
The following items are in the ScreenBeam Kit package:
s
ScreenBeam Display Receiver (SBWD100A)
s
ScreenBeam USB Transmitter (SBT100U)
s
ScreenBeam Wireless Display software CD
s
High-speed HDMI® cable
s
Power supply
s
Quick Start Guide
1
Introduction
Features
s
s
s
s
Wireless display; mirror and extend modes
Compatible with almost every HDTV monitor
The only wireless display solution to support compatible Windows 7/8 laptops, Miracast devices, and Intel WiDi-enabled laptops
No existing wireless network or line of sight connection required
System Requirements
Wireless Display Receiver
sHDTV
monitor with one free HDMI port
sAvailable
power outlet
Wireless Display Software
sLaptop
or PC
sWindows
7 or 8 (32/64 bit)
sMinimum
system requirements (for web browsing, presentations, or
slideshows):
Processor: AMD® A6 or Intel® Gen 3 Core™ i3 equivalent processor
Memory: 2GB RAM or more
Hard disk space: 150MB or more
Miscellaneous: Available USB port
sRecommended
system requirements (for video streaming):
Processor: AMD® A8 or Intel® Gen 3 Core™ i5 equivalent processor
Memory: 3 GB RAM or more
2
Introduction
Miracast/WiDi Devices
s
Miracast:
Miracast-certified smartphone, tablet, or laptop with native or
third party wireless display application
s
Intel WiDi:
Compatible Intel WiDi laptop
Intel WiDi 3.5 or higher software
(See http://www.intel.com/go/wirelessdisplayupdate for latest
software and drivers)
Getting to Know the ScreenBeam Components
The ScreenBeam Kit contains two components: Display Receiver and USB
Transmitter. The Receiver is the main component of the ScreenBeam Kit. It
receives video transmissions from compatible Windows 7/8 laptops/PCs, Wi-Fi
Miracast devices, or laptops with Intel WiDi 3.5 or later. The USB Transmitter is
used for non-Miracast or non-WiDi laptops.
ScreenBeam Display Receiver
The Receiver features 1 LED and two ports:
Power Light
The Power light glows green when the Receiver is powered up.
3
Introduction
HDMI Port
The HDMI port is used to connect an HDMI cable from the HDTV monitor
to the Receiver.
Power Port
The Power port is used to connect the Receiver’s Power cord.
USB Port
The USB port is used for software upgrades via a USB flash drive. Refer to
Chapter 4, “Updating the ScreenBeam Software,” for more information.
ScreenBeam USB Transmitter
The USB Transmitter has a single USB connection, used to connect it to a USB
port on a Windows 7/8 laptop/PC that is not running Miracast or WiDi. To use
ScreenBeam in this manner, you must install the ScreenBeam software on the
computer (see Chapter 2 of this manual).
4
2
Connecting to
ScreenBeam
This chapter details how to connect the ScreenBeam Display Receiver to an HDTV
monitor, as well as connecting to either a compatible Windows 7/8 laptop, Wi-Fi
Miracast device, or laptop with Intel WiDi 3.5 or higher.
Connecting the Display Receiver to an HDTV Monitor
To connect the ScreenBeam Display Receiver to an HDTV monitor, make sure you
have the following items handy:
s
ScreenBeam Display Receiver
sHDMI
cable
sDisplay
Receiver power cord
To connect the Receiver to an HDTV monitor:
1. Plug one end of the power cord into the power port on the back panel of
the Receiver.
2. Plug the other end of the power cord into a nearby electrical outlet. The
Receiver’s Power LED will illuminate green.
5
Connecting to ScreenBeam
3. Plug one end of the HDMI cable into the HDMI port on the back panel of
the Receiver.
4. Plug the other end into an HDMI port on the HDTV monitor.
5. Set your HDTV monitor to display content from the HDMI port (HDMI 1,
HDMI 2, etc.) used in step 4.
The Receiver is now connected to the HDTV monitor. To connect it to either a
compatible Windows 7/8 laptop/PC, Wi-Fi Miracast device, or laptop with Intel
WiDi 3.5 or later, refer to one of the following sections of this chapter.
Setting Up a Windows 7/8 Laptop/PC
If your Windows 7/8 laptop/PC does not have Miracast or WiDi enabled, you must
load the ScreenBeam Wireless Display software onto the laptop, connect the USB
Transmitter, and then pair the Display Receiver to the USB Transmitter. Make sure
you have the following items handy:
sScreenBeam
USB Transmitter
sScreenBeam
Wireless Display software CD
sA
compatible laptop/PC running Windows 7 or 8
6
Connecting to ScreenBeam
Loading the Wireless Display Sofware and Connecting the USB
Transmitter
To load the ScreenBeam Wireless Display software and connect the USB
Transmitter to a laptop/PC:
1. Insert the ScreenBeam CD (included in the ScreenBeam package) into the
CD drive of the laptop/PC.
2. An AutoPlay window will appear. Click Run setup.exe, then follow the
onscreen instructions.
If you don’t see the AutoPlay screen, locate the CD-ROM folder from
Windows Explorer, then double-click on setup.exe. If your laptop/PC does
not have a CD/DVD drive, go to
http://www.actiontec.com/products/sbupdate.php
to download the ScreenBeam software.
3. A series of screens will appear, detailing the steps to connect the Display
Receiver to the HDTV monitor (see the previous section of this chapter).
Click through them.
7
Connecting to ScreenBeam
4. When the screen shown below appears, get the ScreenBeam USB
Transmitter and insert it into a USB drive on the laptop/PC. Click Next.
5. Click in the button next to “Yes, I want to restart my laptop/PC now,” then
click Finish.
The laptop/PC reboots. After it finishes rebooting, go on to the next section,
“Pairing the USB Transmitter and Display Receiver.”
8
Connecting to ScreenBeam
Pairing the Display Receiver and USB Transmitter
After you have connected the Receiver to an HDTV monitor, and the USB
Transmitter to a laptop/PC, you must pair the two ScreenBeam components.
To do this:
1. After the laptop/PC finishes rebooting, click the ScreenBeam icon on your
laptop/PC’s desktop.
2. The main ScreenBeam screen will appear. Click Add a Receiver.
9
Connecting to ScreenBeam
3. A new screen will appear. Select your Receiver, then click Connect.
4. A PIN (Personal Identification Number) will appear on the screen of the
HDTV monitor connected to the Receiver.
10
Connecting to ScreenBeam
5. Enter the PIN in the ScreenBeam screen on your laptop/PC within 60
seconds, then click Next.
The ScreenBeam Display Receiver and USB Transmitter are now paired. As a
result, you should see the laptop/PC’s screen on the HDTV monitor. See Chapter 4,
“Preferences,” to adjust the picture on the HDTV monitor.
Setting Up a Miracast-enabled Device
You can set up ScreenBeam to display what is on your smartphone or tablet screen,
if your device is Miracast-enabled. To do this:
1. Disconnect the laptop/PC from the Display Receiver if it is connected to a
laptop/PC via the USB Transmitter.
2. From your compatible Miracast device, launch the wireless display
application. If using an Android-native wireless display application, refer to
the Android user guide to launch the application. If using a third party
wireless display application, refer to that application’s user guide to launch.
3. Search for the Display Receiver’s name “SBWD-XXXX” and select it from
the menu. The Miracast device will pair with the ScreenBeam Wireless
Display Receiver.
The content on your Miracast device is now displayed on the HDTV monitor
connected to the Display Receiver.
Note: Go to http://www.actiontec.com/wirelessdisplay for the latest updates on
how to connect Miracast-enabled mobile devices.
11
Connecting to ScreenBeam
Setting Up an Intel WiDi-enabled Device
You can also set up ScreenBeam to display what is on your laptop/PC, smartphone,
or tablet screen, if your device is Intel WiDi-enabled.
Note: ScreenBeam supports laptops or devices with WiDi 3.5 or higher only. Make
sure your device or tablet is running the latest WiDi software.
To set up:
1. Disconnect the laptop/PC from the Display Receiver if it is connected to a
laptop/PC via the USB Transmitter.
2. From your Intel WiDi-enabed laptop or device, launch the Intel WiDi 3.5
(or higher) application.
3. Search for the Receiver’s name “SBWD-XXXX” and select it from the menu.
The content on your Intel WiDi device is now displayed on the HDTV monitor
connected to the Receiver.
Note: Your WiDi system must be updated with the latest drivers and software (version 3.5 or higher) to work properly with ScreenBeam. For more information, go to
the following link: http://www.intel.com/go/wirelessdisplayupdate
12
Setting Wireless
Display Preferences
3
This chapter details how to adjust the options available to you when transmitting
a device’s display to an HDTV monitor using ScreenBeam. Most of these settings
reside in the ScreenBeam Preferences window.
Preferences Window
To open the Preferences window, right-click on the ScreenBeam icon from the
system tray of the laptop/PC’s desktop. When the ScreenBeam options menu
appears, click Preferences.
Note: Changing these preferences affects Windows 7/8 laptops/PCs only.
13
Setting Preferences
Language
Select the language used by ScreenBeam.
Wireless Channel
The wireless channel on which ScreenBeam operates can be changed here. “Auto”
is recommended; this setting automatically selects the clearest channel available.
To manually select a channel:
1. Make sure the laptop/PC is disconnected from the Display Receiver.
2. Select a desired channel.
3. Click Ok.
4. Reconnect the Receiver to the laptop/PC. The selected channel will be used.
Display Content
Display Content allows ScreenBeam to be configured for an optimal viewing
experience on the HDTV. By default, “Video Playback” is selected for better video
display. Select “Presentation/Slidehsow” for a better still image display.
Adjust Screen Size
Adjusting this slider changes the size of the picture on the HDTV monitor. This
setting is useful if the picture on the HDTV screen is overscanned–that is, the
picture looks too big to fit on the screen. If this occurs, adjust the slider until the
entire picture appears on the HDTV screen.
Enable Push Button pairing
Activating this option allows devices or laptops to connect with this Display
Receiver without having to enter a Personal Identification Number (PIN).
14
Setting Preferences
Enable Low Resolution mode
Activating this option transmits a lower resolution picture to the HDTV monitor,
which can be useful when viewing video content (movies, television shows, etc.).
Start ScreenBeam on Windows startup
Activating this option causes the ScreenBeam software to start up anytime the
laptop/PC is turned on or rebooted.
Restore defaults
Click Restore defaults to reset all settings in the Preferences window to their
factory default settings. After changing any of the settings in the Preferences
window, click OK to save the changed settings.
Windows 7/8 Viewing Configuration
Mirroring
By default, ScreenBeam Wireless Display mirrors the screen on your compatible
Windows 7/8 laptop, Miracast device, or laptop with Intel WiDi (3.5 or higher) on
the HDTV monitor.
Extended Desktop
ScreenBeam can be used to take advantage of Windows Extended Desktop mode
on the laptop/PC, which creates a single desktop that stretches across both the
laptop/PC screen and the HDTV monitor. To use Extended Desktop, toggle the
display output type on the Windows 7/8 laptop/PC. Additionally, you can use a hot
key, or manually configure it from the system’s Display settings. Refer to your laptop/PC user guide for more information.
15
Updating Software
and Firmware
4
This chapter details the procedures to upgrade the ScreenBeam software and
firmware. The first section details updating the ScreenBeam software if you are
using ScreenBeam with a Windows 7/8 laptop/PC; the second explains how to
update the firmware on the ScreenBeam Display Receiver if you are using Miracast
or Intel WiDi.
Updating Software on Windows 7/8 Devices
This section explains how to update your ScreenBeam software if you are using
both the ScreenBeam Display Receiver and Transmitter with a Windows 7/8
laptop/PC.
1. Make sure that ScreenBeam is disconnected. Then, right-click on a profile
from the main ScreenBeam window and select “Check for updates…”
Note: Performing a software update may cause the ScreenBeam application
to restart. If this occurs, relaunch ScreenBeam after the update is completed.
16
Updating Software and Firmware
2. Another window will appear, checking for available updates.
3. When the check is complete, it will indicate whether an update is available.
If so, click Update now.
4. The Display Receiver’s software update is performed first.
17
Updating Software and Firmware
5. The software will be transferred to the Receiver. Do not power off the
Receiver during this transfer.
6. Once the software transfer is complete, the Receiver will reboot. If there are
more updates available for the ScreenBeam application, click Next.
WARNING: DO NOT power off the ScreenBeam Receiver or the laptop/
PC, or remove the USB Transmitter during the upgrade process. Doing so can
cause the software to fail.
18
Updating Software and Firmware
7. The ScreenBeam application update will download the upgrade
installation files.
8. When the download is complete, click Update and follow the onscreen
instructions to upgrade the ScreenBeam installation.
The Receiver’s software has been updated, as well as the ScreenBeam application.
19
Updating Software and Firmware
Updating the Display Receiver Firmware Only
If you are using ScreenBeam with a Miracast or Intel WiDi device, use the
following procedure to update the Display Receiver’s firmware.
1. Download the latest ScreenBeam firmware at:
http://www.actiontec.com/screenbeam
2. Extract the “install.img” from the zip file.
3. Copy “install.img” file to to the root folder of a USB flash drive.
Note: Do not use a portable USB hard drive. Use a USB flash drive only.
4. Ensure that the HDTV connected to the Receiver is powered on and the
correct HDMI input is selected, then plug the USB flash drive into the USB
port on the Receiver.
5. Unplug the Power cord from Receiver.
6. Press and hold the Reset button on the Receiver with the tip of a pen.
7. While holding the Reset button, plug the Power connector into the Receiver
and wait.
8. When the Upgrade message appears on your HDTV screen, release the
Reset button.
WARNING: Do not power off the Receiver or remove USB flash drive
while the Receiver is upgrading. This may cause the firmware to fail.
9. Wait until the upgrade completes and then remove the USB flash drive.
The Display Receiver’s firmware is now upgraded.
20
Frequently Asked
Questions
5
This chapter lists a series of frequently asked questions concerning the operation of
the ScreenBeam components.
Note: Go to http://www.actiontec.com/screenbeam to access any FAQs created
or updated after the publication date of this manual.
Do I need to install ScreenBeam software or the USB Transmitter
included with the ScreenBeam Kit to connect to a Wi-Fi Miracast or Intel
WiDi device?
No. For Miracast devices, refer to the user guide of the device’s manufacturer. For
WiDi (3.5 and higher) laptops, make sure your system driver and WiDi software
are up-to-date.
Why can’t I see anything on my TV screen?
If you’re not getting a picture on your TV, make sure the ScreenBeam Receiver is
connected, powered on, and the correct TV input (HDMI 1, HDMI 2, etc.) has
been selected.
I’ve inserted the software CD into the CD-ROM drive, but it doesn’t
install. What should I do?
In Windows Explorer, browse to the CD-ROM drive (e.g., D:), then locate and
double-click on the “Setup.exe” file.
21
Frequently Asked Questions
My laptop computer does not have a CD-ROM drive. How can I install
the ScreenBeam display software?
If your computer doesn’t have a CD-ROM drive, go to the following link: http://
www.actiontec.com/products/sbupdate.php. You will need information from
the sticker on the bottom of the ScreenBeam Receiver. Once you have entered the
information, download the software as indicated on the web page.
The ScreenBeam display software can’t launch– it says it can’t find a USB
Transmitter. How can I solve this?
First, if the display software doesn’t launch, wait about a minute before trying
anything else. Then, unplug and plug the USB Transmitter dongle back in, and
try launching the display software again. If that doesn’t work, open the Windows
Device Manager and make sure the ScreenBeam Transmitter is NOT disabled
(locate it under “Network”).
Should I be concerned if Windows’ firewall or anti-virus software warns
that ScreenBeam is trying to open a port?
ScreenBeam requires Windows to temporarily open a port to stream content to
the TV. Click Allow when the message appears. Some anti-virus software settings
can be more restrictive than others, and you may not get a notification at all. If
you are using anti-virus software and ScreenBeam is not operating properly, you
may need to temporary disable the anti-virus software, and re-enable it after using
ScreenBeam. If the problem persists, consult your anti-virus user guide to
configure the proper settings for ScreenBeam.
I cannot detect the ScreenBeam Receiver from my laptop computer
using the ScreenBeam display software. What’s wrong?
First, make sure the ScreenBeam Transmitter is connected to the USB port. Then,
select “Add a receiver” and try again.
My laptop/PC displays the following message: “Color scheme has been
changed.” Is this a problem?
No. Select “Keep the current color scheme and don’t show this message again.”
22
Frequently Asked Questions
ScreenBeam displays a screen that seems to be larger than my TV can
handle. How can I fix this?
Hover the computer’s cursor over the ScreenBeam icon in Windows system tray
at the bottom right of the desktop. A menu will appear. From the menu, select
Preferences, then adjust the screen size.
Why is my laptop/PC’s audio muted once I connect to ScreenBeam
receiver?
It is muted because the audio is now being broadcast through the TV.
Why am I experiencing stuttering video and out-of-sync audio?
If this occurs, make sure your system meets the recommended requirements for
optimal video playback experience. You can also place the ScreenBeam Receiver
in an open space and try again. If running your laptop on battery, make sure its
power settings are configured for “Maximum Performance” or plug-in your laptop’s
power cable.
My video quality is poor, or I’m seeing a mosaic display on my HDTV.
What should I do?
First, make sure the laptop/PC meets the recommended system requirements. If
you’re seeing constant mosaic picture/video display, disconnect, and then reconnect the ScreenBeam connection.
When viewing video, sometimes I see a horizontal line appears across
the screen. What should I do?
This may occur when you use Windows Media Player to play video. You may try
another video/media player application to resolve this issue.
How can I update my ScreenBeam Wireless Display software?
Open the ScreenBeam Wireless Display application. Right-click on the
ScreenBeam Receiver you’ve previously connected to and select “Check for
updates…” Make sure the laptop/PC is connected to the Internet.
23
Frequently Asked Questions
Why am I unable to play a DVD or Blu-ray disc when connected to
ScreenBeam?
Currently, ScreenBeam USB Transmitter and wireless display software do not
support streaming of protected content such as DVD/Blu-ray movies, TV shows,
etc. However, the ScreenBeam Receiver supports playback of protected content
(HDCP 2.1).
What should I do if the ScreenBeam Wireless Display software cannot
connect or pair with ScreenBeam Receiver?
Reboot the laptop and power cycle the Wireless Display Receiver. Also, try selecting a different wireless channel before connecting. To do this, from the “Add a
Receiver” screen, click on the wireless channel drop-down menu, then select a different wireless channel.
How can I update my Wireless Display Receiver firmware?
Go to http://www.actiontec.com/screenbeam to download the latest firmware
and refer to the upgrade instructions posted online.
Why can’t my Android device connect even though I have the Wi-Fi
Direct option?
For an Android device to connect, it must have the Wireless Display software
application. Check your device user guide to see if the “Wireless display” or
“Miracast screen mirroring” feature is available. Refer to your Miracast mobile
device latest user guide for more information.
Can I connect my Apple iPad or iPhone to the ScreenBeam Receiver?
No. Currently, ScreenBeam only supports Windows 7/8 computers, WiDi-capable
systems, and Miracast-enabled devices.
24
Frequently Asked Questions
Does ScreenBeam support iTunes Airplay?
No. ScreenBeam is not designed for Airplay. However, once the laptop computer
is connected to the ScreenBeam Receiver, you’ll be able to play your iTunes content
and it will display on the TV.
Can I connect to multiple ScreenBeam Receivers simultaneously?
No. You can only connect to one ScreenBeam Receiver at a time.
I initially selected “Disconnect” on my PC device, and then I selected
“Connect” on my PC device. My laptop/PC shows “Pairing failed.” What
should I do next?
Unplug the power cable attached to the ScreenBeam Receiver, wait 5 seconds, then
connect the power cable to the Receiver. Afterwards, select “Connect” on your
laptop/PC.
25
Specifications and
Technical Support
General
Model Number
SBWD100A, SBT100U
Software and USB Transmitter
Minimum System Requirements
AMD® A6 or Intel® Gen 3 Core™ i3 equivalent processor
2GB of RAM
150MB of hard disk space
Available USB port
Recommended System Requirements
AMD® A8 or Intel® Gen 3 Core™ i5 equivalent processor or faster
3GB of RAM or higher
Features
Wireless display
Mirroring
Extended desktop mode
OS Supported
Windows 7, Windows 8 (32/64-Bit)
26
A
Specifications
Video Output (from USB Transmitter)
Up to 720p display resolution1
1280 x 720 (Windows 7)
1280 x 768 (Windows 8)
Audio Output (from USB Transmitter)
Stereo audio
Wireless Display Receiver
Wireless Display Technology
Actiontec Wireless Display (requires ScreenBeam Transmitter and software)2
Intel Wireless Display (WiDi) 3.5 and higher
Wi-Fi Miracast™ standard
Features
Wireless display
Mirroring3
Extended desktop mode3
A/V Interface
HDMI®
Video
Up to 720p1 for ScreenBeam Wireless Display software and USB Transmitter
Up to full 1080p1 for Intel WiDi laptops and Wi-Fi Miracast devices
Audio
LPCM
AAC
Stereo1 for ScreenBeam Wireless Display software and USB Transmitter
Surround1 for Intel WiDi laptops and Wi-Fi Miracast devices
1 Audio/video quality depends on the transmission source.
2 Requires laptop/PC that meets minimum system requirements.
3 Feature availability depends on device software and model. Consult with your device manufacturer
or carrier user guide for more information.
27
Specifications
Wireless
IEEE 802.11a/b/g/n
Dual-band 5GHz and 2.4GHz
Wireless security
WPA2, WPS PIN Pairing, and AES 128-bit
Content Protection
No support for protected content (e.g. Blu-ray/DVD) if using ScreenBeam
Wireless Display software and USB Transmitter
Protected content (HDCP 2.1) support for WiDi laptops and Miracast devices
Power Input
5V/2A
Power Consumption
Less than 4W
LED Indicators
Power
Environmental
Power
External, 110 - 240v 0.2a, 50 - 60 Hz
Regulatory
FCC part 15, IC, UL
Operating Temperature
0º C to 40º C (32ºF to 104ºF)
Storage Temperature
0ºC to 70ºC (32ºF to 158ºF)
28
Specifications
Operating Humidity
10% to 85% non-condensing
Storage Humidity
5% to 90% non-condensing
Note: Specifications are subject to change without notice.
Technical Support
If you need technical assistance, contact Actiontec’s Technical Support Department
through the following:
Phone (USA)
1-888-436-0657
Email
http://support.actiontec.com/email_support/support_form.php
Internet
http://www.actiontec.com/support
29