1
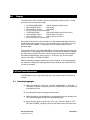
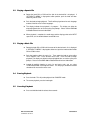
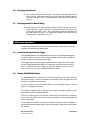
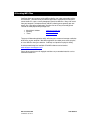
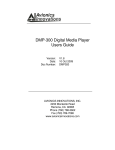
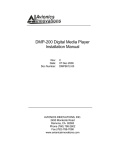
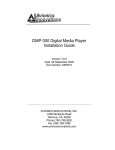
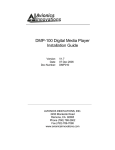
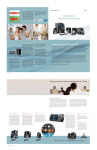
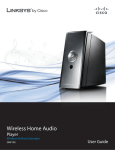
DMP-200 Digital Media Player
Users Guide
Rev:
Date:
Doc Number:
C
22 June 2011
DMP8011-00
AVIONICS INNOVATIONS, INC.
2450 Montecito Road
Ramona, CA 92065
Revision History
Revision
Date
A
14-Jun-06
Initial Release
SB
B
20-Jul-06
Updates per firmware V2.03
SB
C
22-Jun-11
Added Instructions for Continued Airworthiness
SB
DMP-200 USERS GUIDE
P/N DMP8011-00 REV C
Description
By
PAGE 2 OF 24
Table of Contents
of Con
REVISION HISTORY ....................................................................................................2
TABLE OF CONTENTS................................................................................................3
1.0
OVERVIEW..........................................................................................................5
1.1
File Types........................................................................................................................................................... 6
1.1.1
Speech Files ............................................................................................................................................... 6
1.1.2
Music Files................................................................................................................................................. 6
1.2
Memory Cards.................................................................................................................................................. 6
2.0
DISPLAY..............................................................................................................7
3.0
FRONT PANEL OPERATIONS ..........................................................................7
3.1
Selecting Languages......................................................................................................................................... 7
3.2
Playing a Speech File ....................................................................................................................................... 8
3.3
Playing a Music File......................................................................................................................................... 8
3.4
Pausing Playback ............................................................................................................................................. 8
3.5
Canceling Playback.......................................................................................................................................... 8
3.6
Changing Volume Level.................................................................................................................................. 9
3.7
Changing Selections While Playing ............................................................................................................... 9
4.0
EXTERNAL OPERATIONS ................................................................................9
4.1
Track Selection by External Trigger............................................................................................................. 9
4.2
Remote PAUSE/PLAY Button....................................................................................................................... 9
5.0
CREATING MP3 FILES ....................................................................................10
6.0
PREPARING A MEMORY CARD WITH DMP200 CARDPREP.....................11
6.1
Installing DMP200 CardPrep .....................................................................................................................11
DMP-200 USERS GUIDE
P/N DMP8011-00 REV C
PAGE 3 OF 24
6.2
Running CardPrep ........................................................................................................................................11
6.2.1
To add Speech Files: ...............................................................................................................................11
6.2.2
To add Music Files:.................................................................................................................................12
6.2.2.1 Adding Music Files Individually........................................................................................................12
6.2.2.2 Adding a Folder of Music Files..........................................................................................................14
6.2.2.3 Adding an Exported Playlist of Music Files ......................................................................................14
6.3
To Select Triggers or Attributes: .................................................................................................................15
6.3.1
Discrete Triggers .....................................................................................................................................15
6.3.2
Endless Looping ......................................................................................................................................16
6.3.3
Normal vs. LOUD Volume.....................................................................................................................16
6.3.4
Resume or Cancel if Interrupted.............................................................................................................16
6.3.5
Play Automatically at Power-up or When Idle ......................................................................................16
6.4
To Select Setup Items: ...................................................................................................................................17
6.4.1
Default Languages Enabled ....................................................................................................................17
6.4.2
Custom Card Titles..................................................................................................................................17
6.4.3
Chiming Between Speech Tracks...........................................................................................................17
6.4.4
Selecting Internal or External Chime......................................................................................................18
6.4.5
Changing System Prompts......................................................................................................................18
6.5
To Copy all Files and Settings to the Card:................................................................................................20
6.6
To Save or Open a Card File........................................................................................................................21
6.7
Notes on Interrupting and Restoring Audio Tracks.................................................................................21
7.0
TROUBLESHOOTING AND ERROR MESSAGES ........................................22
7.1
Troubleshooting..............................................................................................................................................22
7.2
Error Messages...............................................................................................................................................23
8.0
INSTRUCTIONS FOR CONTINUED AIRWORTHINESS................................24
DMP-200 USERS GUIDE
P/N DMP8011-00 REV C
PAGE 4 OF 24
1.0 Overview
The DMP-200 Digital Media Player is a self-contained unit which stores and replays prerecorded audio tracks. The audio tracks are encoded in “Motion Picture Expert Group
(MPEG) Level 3” format, commonly referred to as “MP3”. Audio files are stored in a
removable Compact Flash™ memory card which is prepared and installed by the user.
Audio tracks are selected via a single rotary pushbutton on the front panel of the DMP200. Optionally, the DMP-200 may be connected to a maximum of three external discrete
trigger inputs, each of which can be configured in software to select a particular audio
track.
The DMP-200 memory card must be prepared using DMP200 CardPrep software, which
is provided with the DMP-200 and may also be downloaded from the Avionics Innovations
website at www.avionicsinnovations.com. CardPrep is a Windows application which
assembles your desired MP3 files into the DMP-200 format, and allows you to specify
attributes such as language or trigger information.
The DMP-200 memory card can contain up to 9995 individual MP3 audio files. Speech
files can be organized into as many as 16 languages, and music files can be organized
into as many as 127 music lists. Each language or music list can contain as many as 511
tracks.
Total audio capacity is determined by the memory size of each card. In general, a DMP200 memory card will hold approximately one minute of sound per megabyte of memory
at CD-quality data rates.
CardPrep gives you control over many aspects of DMP-200 operation. You can:
♦
♦
♦
♦
♦
♦
♦
♦
♦
Display a custom two-line message on power up
Automatically play a selected speech track on power up, which will then play once
for each language enabled (also selectable)
Automatically play a selected music track, an entire music list, or a continuous
random mix of all music tracks on power up
Attach a discrete trigger to any audio track, music list, or “continuous mix”
Designate any music track to be played as a continuous loop
Designate, for each track, whether or not it should resume playing after it is
interrupted by a new play command
Designate, for each track, whether it is played at the normal volume level or at a
pre-determined “LOUD” setting. This allows background music to play at a quiet
volume setting, while important safety messages are played at a higher level.
Select whether or not a chime is sounded between each language of a speech
track
Select whether the DMP-200 sounds an external chime for speech tracks or
whether it plays a specified MP3 file (two different MP3 recordings of chime
sounds are provided).
All configuration data is contained on the memory card, and can be changed by simply
inserting a different card. Each card also contains the latest version of DMP-200 firmware,
which is automatically loaded by the unit if needed.
DMP-200 USERS GUIDE
P/N DMP8011-00 REV C
PAGE 5 OF 24
1.1
File Types
Each audio file contained in the DMP-200 memory card must be designated as either
“speech” or “music”. While the actual audio content is irrelevant, this designation controls
how each file is presented on the DMP-200 display.
1.1.1
Speech Files
Every “Speech” file has a title and a language, as well as trigger and display attributes.
Speech files may be selected individually for playback either from the front panel or via an
external trigger.
When a speech file is selected, it will be played once in each language currently enabled
on the DMP-200. Language selections may be changed from the front panel at any time
by selecting CHOOSE LANGUAGES (this option is not available unless the card contains
speech tracks in more than one language.) The selected languages are retained when the
DMP-200 is powered down, unless default languages have been specified for the card in
CardPrep.
1.1.2
Music Files
Every “Music” file has a title and is a member of a “music list.” Like Speech files, Music
files also have trigger and display attributes when can be set in CardPrep. Music files may
be selected individually for playback either from the front panel or via an external trigger.
When a music file is selected, it will play to completion and stop, unless the track has been
designated to “loop continuously” in CardPrep.
Music files are contained within Music Lists. A Music List could be the entire contents of a
CD or playlist, or could be a collection of similar music such as “Light Jazz”. When a
Music List is selected on the DMP-200, the first choice presented for playback is “Play
Whole List”, followed by each individual music track.
1.2
Memory Cards
The DMP-200 is supplied with a CompactFlash™ memory card which will hold
approximately one hour of CD-quality audio for every 64 MB of capacity. These cards are
widely used in portable devices such as PDAs and digital cameras, and are available
through most computer supply sources. At this writing, the largest card capacity available
is 4GB (4000MB), which would provide about 64 hours of audio.
.
DMP-200 USERS GUIDE
P/N DMP8011-00 REV C
PAGE 6 OF 24
2.0
Display
Turning the knob CCW or CW will scroll left or right through the top-level menu. The toplevel menu consists of (from left to right):
♦
♦
♦
♦
♦
♦
♦
♦
“CHOOSE LANGUAGES”
(click for language selection menu)
(title of SPEECH FILE 1)
(click to play)
(title of SPEECH FILE 2)
(click to play)
(etc., for each speech file on the card)
“CONTINUOUS MIX”
(click to play random from all music tracks)
(name of MUSIC LIST 1)
(click to select music tracks)
(name of MUSIC LIST 2)
(click to select music tracks)
(etc., for each music list on the card)
Pressing the knob when the name of a Music List is displayed will drop down into that list
and display the name of each music file. The first and last entry in every Music List is the
choice: “RETURN TO MENU”. Clicking either will return you to the top-level menu
described above.
Pressing the knob when “CHOOSE LANGUAGES” is displayed will bring up the language
selection menu. The language choices displayed in this menu will be whatever languages
are contained in the Speech files on the card. Pressing the knob when each language is
displayed will toggle between <ON> and <OFF>. As for music lists, the first and last
entries are the choice: “RETURN TO MENU”.
Note that the default languages enabled can be set in CardPrep. If no default languages
are selected in CardPrep, the language selection will be whatever was in effect when the
unit was last turned off.
3.0 Front Panel Operations
The DMP-200 uses only a single rotary knob with a push-button action for all front panel
functions.
3.1
Selecting Languages
Rotate the knob fully CCW until “CHOOSE LANGUAGES” is displayed. If
“RETURN TO MENU” is displayed at the most CCW position, push the knob and
then rotate fully CCW.
Push the knob to enter the language selection menu.
Rotate the knob to scroll through the list of languages found in the memory card.
Push the knob to toggle selection of the displayed language.
When finished, rotate the knob fully CW or fully CCW until “END OF LIST –
RETURN TO MENU” is displayed, and push the knob to return to the main menu.
DMP-200 USERS GUIDE
P/N DMP8011-00 REV C
PAGE 7 OF 24
3.2
3.3
3.4
3.5
Playing a Speech File
Rotate the knob CW or CCW until the title of the desired file is displayed. If
“RETURN TO MENU” is displayed at either position, push the knob and then
rotate fully CW or CCW.
Push the knob to begin playback. The file will be played once for each language
enabled, if the file exists in those languages.
The display indicates that playback is in progress. This display can either be
elapsed playback time, or can be cycling user prompts. Please see the DMP-200
Installation Manual for more information.
When playback is complete, the audio stops and the display points to the NEXT
speech file, as if the knob had been turned CW once.
Playing a Music File
Rotate the knob CW or CCW until the name of the desired music list is displayed.
If “RETURN TO MENU” is displayed at either end, push the knob and then rotate
CW or CCW to select.
Push the knob to select the music list. Then rotate the knob to select either
“PLAY WHOLE LIST” or the desired music track. Push the knob to begin
playback. The display can either be elapsed playback time, or can be cycling user
prompts. Please see the DMP-200 Installation Manual for more information.
Instead of explicitly choosing a music list and music track, you can select
“CONTINUOUS MIX” at the top-level menu. This will play a continuous random
selection of all music tracks on the card.
Pausing Playback
Press the knob. This will put the playback into “PAUSED” mode.
To resume playback, press the knob again.
Canceling Playback
Press and hold the knob for at least three seconds.
DMP-200 USERS GUIDE
P/N DMP8011-00 REV C
PAGE 8 OF 24
3.6
Changing Volume Level
3.7
Push and turn the knob in either direction. The volume can be adjusted even if no
track is playing. When adjusting the volume, the display will temporarily display:
“Volume: XX” where “XX” is a number between 8 (min volume) and 100 (max
volume).
Changing Selections While Playing
Simply make your new track selection and push the knob (note that if the knob is
not turned for four seconds while you are selecting the new track, the display will
revert to the “PLAYING” screen). The currently-playing audio will fade down and
your new selection will begin. If so configured in CardPrep, the original track will
resume when the new track has finished.
4.0 External Operations
In addition to the front panel controls, the DMP-200 provides several means of remotely
controlling the audio selection and playback.
4.1
Track Selection by External Trigger
The DMP-200 provides three configurable discrete inputs for controlling audio playback
via external switches or sensors. Refer to documentation specific to your installation for
the exact function of each of the external triggers.
Typical applications for external triggering would be aircraft signals such as the “fasten
seat belt” light or dedicated pushbuttons for certain types of briefing announcements or
music. In CardPrep, these three triggers can each be assigned to a speech or music
track, an entire music list, or the “CONTINUOUS MIX” selection.
4.2
Remote PAUSE/PLAY Button
The DMP-200 provides an input which can be used to parallel the pushbutton function of
the front panel knob. An external pushbutton connected to this input will perform the same
function as pushing the front panel knob.
If a track is playing, pushing the remote button will cause playback to pause. Pushing
again will cause playback to resume.
The external pushbutton works in parallel with the front panel knob: playback may be
paused with one and resumed with the other.
If no track is playing, you can turn the front panel knob until a desired track is displayed.
Then, at some later point, you can push the external button to select the displayed track
and to start playback.
The only difference between the external pushbutton and the front panel pushbutton is
that holding the external button down will not cancel playback. Holding the external button
has no effect.
DMP-200 USERS GUIDE
P/N DMP8011-00 REV C
PAGE 9 OF 24
5.0 Creating MP3 Files
CardPrep allows you to prepare existing MP3 audio files, but it does not provide facilities
to create them. There are literally hundreds of applications available which allow you to
convert audio CDs, tapes, or even phonograph records into MP3 files. Many also record
from your computer’s microphone directly into MP3, allowing you to generate your own
speech files. Most of these applications are either free or are very reasonably priced.
Three of the more popular MP3 packages are:
♦
♦
♦
Music Match Jukebox
WinAmp
iTunes
www.musicmatch.com
www.winamp.com
www.itunes.com
These are full-featured applications which will allow you to create and manage a collection
of MP3 files on your computer. Most MP3 applications also allow you to create “playlists”,
or lists of MP3 files from your collection. CardPrep can import these playlists directly.
A rather overwhelming list of available CD-to-MP3 software can be found at
www.dailymp3.com/cdrippers.html.
Please observe and respect all copyright restrictions on pre-recorded materials such as
commercial audio CDs.
DMP-200 USERS GUIDE
P/N DMP8011-00 REV C
PAGE 10 OF 24
6.0 Preparing a Memory Card with DMP200 CardPrep
6.1
Installing DMP200 CardPrep
The DMP200 CardPrep software may be distributed on either the CompactFlash™ card
included with the DMP-200, on a CD-ROM or downloaded from the Avionics Innovations
website at www.avionicsinnovations.com. Please note that the DMP100 and DMP200
each have their own CardPrep application, and are not interchangeable.
To install the software, simply run SETUP.EXE and follow the prompts.
6.2
Running CardPrep
CardPrep displays a simple menu bar across the top, and five different selection tabs.
Click on each tab to bring up the associated section.
6.2.1
To add Speech Files:
DMP-200 USERS GUIDE
P/N DMP8011-00 REV C
PAGE 11 OF 24
1. Click on the small box under (1), type the display title of the speech file, and press
Add. Repeat for all remaining speech files.
2. Click on the small box under (2), type the first language to be displayed, and
press Add. Repeat for all remaining languages.
3. Click on a title in the large box under (1), and then click on a language in the large
box under (2). Next, click on the box under (3) and either type in the path or click
Browse to identify the MP3 file which corresponds to the selected title and
language. Repeat this procedure for every title and language combination for
which a track is to be added.
4. Click on the up and down arrows next to each box to move a highlighted
selection within the box. This allows you to control the order in which speech
tracks or languages are displayed on the DMP-200.
6.2.2
To add Music Files:
Music files may be added either individually, like speech files, or in groups. You can add
all the MP3 files in a particular folder, or you can add MP3 files contained in a playlist.
Playlists are created using an MP3 manager such as iTunes, WinAmp or MusicMatch.
Cardprep can read playlists that have been saved as either “.txt” or as “.m3u” files.
6.2.2.1 Adding Music Files Individually
If you are adding a small number of files, or if the files are scattered in different locations,
follow these steps to add each file individually:
DMP-200 USERS GUIDE
P/N DMP8011-00 REV C
PAGE 12 OF 24
1. Click on the empty box under (1), type the name of the desired Music List, and
press Add. Repeat for all remaining Music Lists.
2. Click on the empty box under (2), type the first music track to be displayed, and
press Add. Repeat for all remaining music tracks.
3. Click on a Music List in the large box under (1), then click on a Music Track in the
large box under (2). Next, click on the empty box under (3) and either type in the
path or click Browse to identify the MP3 file which corresponds to the selected
Music Title and Music List. Repeat this procedure for every title and list
combination for which a track is to be added.
4. Click on the up and down arrows next to each box to move a highlighted
selection within the box. This allows you to control the order in which music
tracks or music lists are displayed on the DMP-200.
Note 1: Use the Edit button to change the text for a selected music list or music track.
Note 2: CardPrep will not allow two Music Lists with the same name, or two Music Tracks with the
same name in the same Music List. In these cases, CardPrep will automatically insert two digits before
the name to avoid duplicates.
DMP-200 USERS GUIDE
P/N DMP8011-00 REV C
PAGE 13 OF 24
6.2.2.2 Adding a Folder of Music Files
If all your desired music files are organized by folder, it may be much more convenient to
import an entire folder per music list. Click on Add Folder… and CardPrep will use the
folder name as the name of the newly created Music List, and will add the contents of the
folder as Music Tracks. Use the Edit buttons to fix up the List or Track names as needed.
If you have imported CDs into an MP3 manager such as iTunes or WinAmp, you may find
Add Folder to be a convenient way to include an entire CD onto the DMP200 memory
card. Simply Browse to the root folder of your music library (C:\My Documents\My
Music\iTunes\iTunes Music, for example) and navigate to the folder containing the entire
CD.
6.2.2.3 Adding an Exported Playlist of Music Files
Most MP3 manager applications allow you to create and manage Playlists. A Playlist is
simply a list of MP3 tracks that you would like to group together. You could create a
separate playlist for each CD in your collection (“White Album”, for example), or you can
create a playlist with tracks from many different sources (“Night-Flying Music”, for
example).
DMP-200 USERS GUIDE
P/N DMP8011-00 REV C
PAGE 14 OF 24
MP3 managers such as WinAmp and MusicMatch save their playlists in either “.txt” or
“.m3u” format, both of which can be read directly by CardPrep. iTunes playlists are
embedded in the iTunes library and cannot be read directly by CardPrep. iTunes users
must first export their playlists to “.txt” so the playlists can be read by CardPrep. (In
iTunes, right-click the playlist, select “Export Song List…”, and change the “Save as type:”
box to “Text files”.)
6.3
To Select Triggers or Attributes:
The “Triggers and Attributes” tab allows you to select either Speech or Music tracks, and
then to specify the following information:
6.3.1
Discrete Triggers
Click on the check box next to any available discrete trigger to associate that track
with the corresponding trigger. More than one trigger may be assigned to a single
track. Clicking on “View” will display the track which has been associated with that
trigger. If the corresponding audio track is later deleted, the trigger will also be
deleted.
DMP-200 USERS GUIDE
P/N DMP8011-00 REV C
PAGE 15 OF 24
6.3.2
Endless Looping
This attribute is only available for music tracks. When set, the selected music track
will repeat endlessly when it is played either via a trigger or by an explicit selection
from the front panel. The track will not loop if it has been selected via either
“CONTINUOUS MIX” or via “PLAY WHOLE LIST”.
6.3.3
Normal vs. LOUD Volume
Any track can be played at either the currently-set volume level or at a pre-determined
“LOUD” setting. This allows background music to play at a quiet volume setting, while
important safety messages are played at a higher level. The actual volume level of
the LOUD setting is selected in Setup Mode. Please refer to the “DMP-200
Installation Guide”, AI document number DMP8010-00, for information on entering
Setup Mode and changing this setting. Note that the internal chime sound is always
played at the LOUD volume level.
6.3.4
Resume or Cancel if Interrupted
This setting determines the behavior of a currently playing track which is interrupted
by another track which then finishes. If set to “Resume”, the original track will rewind
approximately 3 seconds and then resume playback. If set to “Cancel”, the original
track is simply cancelled when the new track begins. By default, Speech tracks are
set to “Resume” while Music tracks are set to “Cancel”.
6.3.5
Play Automatically at Power-up or When Idle
This attribute can be attached to a speech or music track, an entire music list, or the
“CONTINUOUS MIX” selection. Only one selection may be given this attribute.
The selection will begin to play on power-up immediately after the opening screen and
any custom titles are displayed. In addition, the selection will play any time the DMP200 is idle after having played any audio tracks. Note that if more than one interrupt
has occurred, the power-up track will be re-selected, and will not resume from where
it was interrupted but instead will restart at the beginning.
For a full explanation of how tracks are interrupted and restored, see “Notes on
Interrupting and Restoring Audio Tracks” on page 21.
DMP-200 USERS GUIDE
P/N DMP8011-00 REV C
PAGE 16 OF 24
6.4
6.4.1
To Select Setup Items:
Default Languages Enabled
Select and highlight one or more languages to be enabled on power up. Note that
this screen is potentially confusing: the desired language(s) must be highlighted to be
selected. If none are highlighted, the list simply displays the languages on the card.
6.4.2
Custom Card Titles
Up to two lines of 16 characters each can be displayed on the DMP-200 after the
initial screen on power up. This can be used to identify the card, to greet the operator,
to provide special instructions, etc.
6.4.3
Chiming Between Speech Tracks
If a chime (either internal or external) is enabled, these setting controls whether the
chime sounds between the playing of each language of a speech track, or just once
(before the first language).
DMP-200 USERS GUIDE
P/N DMP8011-00 REV C
PAGE 17 OF 24
6.4.4
Selecting Internal or External Chime
The DMP-200 may be interfaced to an external cabin chime or tone generator. A
chime will be sounded whenever a speech track is selected or triggered (selecting or
triggering a music track will not sound a chime.) When sounding an external chime,
the DMP-200 will pause for several seconds before starting to play the track, to allow
the chime to finish. The exact length of this pause can be configured in Setup Mode.
Please refer to the “DMP-200 Installation Guide”, AI document number DMP8010-00,
for information on entering Setup Mode and changing this setting.
You can also choose an MP3 file to be played as the chime sound. Select Internal
Chime and then click Browse to select the MP3 file to be played. Several chime
sounds are provided in the /Chimes directory under the main CardPrep directory.
Note that when internal chime is selected, the DMP-200 does not activate the external
chime signal. This allows you to switch between cards using internal or external
chimes without having to physically disable the external chime.
To defeat chiming completely, select Disable chime. There will be no delay when
playing a speech track, and the external chime signal will not be activated.
6.4.5
Changing System Prompts
Most of the text displayed by the DMP-200 in normal operation is actually stored on the
memory card and can be changed via CardPrep. This was intended to allow for
translation of the system prompts into languages other than English. Clicking on the
“System Text...” button brings up the following screen:
DMP-200 USERS GUIDE
P/N DMP8011-00 REV C
PAGE 18 OF 24
To make changes to the text, simply click in a box on the right side, type in your new text
and click “Save”. Use caution (and common sense) when making changes! Always refer
to the original text in the left column to be sure you are not changing the intent of the text.
As with all the other configuration settings in this section, any changes made here will only
apply to this card. Inserting a different card will cause the unit to reload the configuration
and clear the changes.
DMP-200 USERS GUIDE
P/N DMP8011-00 REV C
PAGE 19 OF 24
6.5
To Copy all Files and Settings to the Card:
When you are ready to generate the actual memory card, click on the “Create Card” tab:
CardPrep will run through your configuration settings and check for inconsistencies, such
as languages with no associated speech tracks or empty music lists. Any inconsistencies
will be displayed and described. The Create Card button will be disabled as long as any
inconsistencies are flagged.
Once the configuration settings are verified, CardPrep verifies that the CompactFlash card
is present and has sufficient capacity to hold all the selected tracks.
When everything is verified, click Create Card to erase the current CompactFlash card
and copy all the new tracks and configuration settings to it. Be patient! It may take
several minutes to create the card, especially when many music tracks are involved.
If you have already prepared a card and simply want to change attributes or settings, click
on Update Settings Only. This will bypass the lengthy copying of audio files and will
simply generate a new configuration. DO NOT USE THIS if you have added or deleted
any audio tracks – the resulting card will cause unpredictable behavior.
DMP-200 USERS GUIDE
P/N DMP8011-00 REV C
PAGE 20 OF 24
6.6
To Save or Open a Card File
Your entire “workspace” can be saved to a card file (*.CRD2) so that you can easily
maintain multiple cards. Click on File in the menu bar at the top of the window, and then
either Open, Save, or Save As as is typically used in most Windows applications.
6.7
Notes on Interrupting and Restoring Audio Tracks
If a new audio track is selected (either manually or via any trigger) while another track is
playing, the DMP-200 can resume playing the interrupted track after the new one finishes.
This will only occur, however, for the most recently interrupted track. Any previously
interrupted tracks will not resume, and must be manually restarted if desired.
An interrupted audio track will resume if the attribute “Resume or Cancel” is set
accordingly. See page 16 for a description of this attribute.
For example, consider the following:
1) “Song #5” is selected manually, and starts playing.
2) Halfway through “Song #5”, an external trigger selects “Speech #1”.
3) “Song #5” will fade down, “Speech #1” will play to completion and “Song #5” will
fade back up, restarting at the point where it was interrupted.
In most cases, this behavior is desirable in that it prevents previously-selected tracks from
“mysteriously” restarting. The one notable exception, however, is background music.
If a music track or music list is selected with the intention of providing continuous
background music, it will appear to “fail” if two consecutive interrupts occur. As described
above, after the second interrupting track finishes the first interrupting track will be
restored. When that track finishes, however, the DMP-200 goes silent!
To avoid this situation, consider using the attribute called “Play Automatically at Power-up
or When Idle”. If this attribute is assigned to a Music Track, a Music List, or “Continuous
Mix”, the selection will be made whenever the DMP-200 is idle.
For example, assume that “Continuous Mix” has been set to “Play Automatically at Powerup or When Idle”. Here is what will happen:
1) At power-up, a music track is randomly selected. Let’s say “Song #8” begins to
play.
2) A discrete trigger selects “Speech #14”. The music fades down, “Speech #14”
plays to completion, and “Song #8” resumes where it left off (this is because
“Song #8” is the most recently interrupted track).
3) Halfway through playback of “Speech #2”, another trigger interrupts it with
“Speech #29”.
4) After completion of “Speech #29”, playback of “Speech #2” will resume where it
left off.
DMP-200 USERS GUIDE
P/N DMP8011-00 REV C
PAGE 21 OF 24
5) After “Speech #2” completes, “Song #8” will not resume. Instead, the DMP-200
becomes idle, which causes the “Continuous Mix” to be selected. Continuous
Mix will then choose a random music track, which will start at its beginning.
The final situation is that after all triggered audio tracks are completed; the DMP-200 will
always be playing some kind of music. In many applications, this is exactly the desired
effect.
7.0 Troubleshooting and Error Messages
7.1
Troubleshooting
Here are a few common problems and their potential causes:
Symptom
Possible Causes/Solutions
No audio, even though
display shows track
playing.
•
Volume turned down. Last volume setting is retained between
power cycles, and previous user may have turned volume way
down. Push-and-turn knob to change volume.
•
Invalid MP3 file used. The DMP200 will not play MP3-PRO, MP4
(AAC), WAV or WMF files.
•
MP3 file recorded at an extremely low volume level. Try playing
the file on a PC to make sure it is audible.
•
Incorrect active levels selected. Each trigger must be configured
to be active high or active low, depending on the installation.
Refer to the DMP200 Installation Manual for details.
•
Trigger inputs were not installed with pull-up or pull-down resistor.
One or the other must be present, depending on the installation.
Refer to the DMP200 Installation Manual for details.
Display is too bright or
too dim.
•
The display is set to one of eight levels of brightness at installation.
This selection cannot be changed in normal operation. It must be
changed from SETUP mode. Refer to the DMP200 Installation
Manual for details.
Tracks being played do
not match the description
on the display.
•
In CardPrep, “Update Settings Only” was selected on the
Create Card tab even though MP3 tracks were changed. This
button may only be used when items such as Triggers and
Attributes have changed, but not the actual MP3 tracks.
Regenerate the card using the Create Card button.
External triggers do not
work, or a track triggers
repeatedly.
DMP-200 USERS GUIDE
P/N DMP8011-00 REV C
PAGE 22 OF 24
7.2
Error Messages
In addition, the DMP-200 may display the following error messages:
Display
Meaning
Invalid Card, no
firmware.
The firmware update file,
“0000.hex”, cannot be opened
on the CompactFlash card.
Invalid Card, no MP3
config.
The MP3 configuration file,
“0000.xd3”, cannot be opened
on the CompactFlash card.
Internal error number
XX
An fault has occurred between
the two internal processors of
the DMP200.
Memory Card Not
Inserted!
The DMP200 is not detecting
the presence of a
CompactFlash card.
DMP-200 USERS GUIDE
P/N DMP8011-00 REV C
Possible Causes
•
The card was not prepared
using DMP200 CardPrep
software
•
The card was created for a
DMP100
•
The card was not prepared
using DMP200 CardPrep
software
•
The card was created for a
DMP100
Contact Avionics Innovations.
Please record the error number
shown on the display.
•
No card is inserted
•
The card is defective
•
The card is not fully seated
PAGE 23 OF 24
8.0 Instructions for Continued Airworthiness
The DMP-200 is designed to not require regular general maintenance. No action is
required.
DMP-200 USERS GUIDE
P/N DMP8011-00 REV C
PAGE 24 OF 24