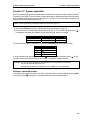
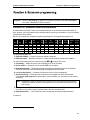
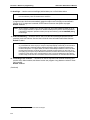
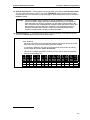
1
Administrator’s Manual
0450-0381
Rev. D
About ESI
ESI (Estech Systems, Inc.) is a privately held corporation based in Plano, Texas. Founded in 1987, ESI
designs and builds innovative telecommunications products for businesses like yours. Because of their
powerful combination of value and features, ESI products are consistently recognized by industry
publications and leaders.
Copyright © 2004 ESI (Estech Systems, Inc.).
IVX is a registered trademark of ESI. Microsoft, Windows, and Outlook are registered trademarks of Microsoft Corporation.
Panasonic and DBS are registered trademarks of Matsushita Electric Corporation of America. Information contained herein is
subject to change without notice. ESI products are protected by U.S. Patents No. 6,067,349 and 6,252,944, and others pending.
ESI is an ISO 9001-certified company. Visit ESI on the Web at www.esi-estech.com.
.
Table of contents
Administrator programming: An introduction ............................................................................................A.1
Administrator’s duties...................................................................................................................................................................................A.1
Telephone system features .........................................................................................................................................................................A.1
Voice mail features .......................................................................................................................................................................................A.3
ACD features ................................................................................................................................................................................................A.3
Feature Phone overlays ..............................................................................................................................................................................A.3
Programming basics....................................................................................................................................................................................A.4
System programming overview ..................................................................................................................................................................A.4
Programming keys .......................................................................................................................................................................................A.5
Entering alphanumeric characters..............................................................................................................................................................A.5
System fixed numbering plan......................................................................................................................................................................A.6
Remote setting of day, night, holiday and auto modes .............................................................................................................................A.6
Function 1: System parameters..................................................................................................................B.1
Function 13: Administrator password........................................................................................................................................................B.1
Function 14: System clock ..........................................................................................................................................................................B.1
Function 17: System speed-dial..................................................................................................................................................................B.3
Function 3: Extension programming ..........................................................................................................C.1
Function 32: Extension feature authorization.............................................................................................................................................C.1
Function 5: Voice mail programming..........................................................................................................D.1
Function 53: Guest/info mailboxes .............................................................................................................................................................D.1
Function 54: Group mailboxes and the broadcast mailbox......................................................................................................................D.2
Function 55: Message notification ..............................................................................................................................................................D.3
Function 56: Cascade paging mailboxes ...................................................................................................................................................D.4
Function 57: Q & A mailboxes .....................................................................................................................................................................D.5
Function 6: Recording ................................................................................................................................E.1
Function 61: Re-record system and auto attendant branch prompts ......................................................................................................E.1
Function 62: Record directory names ........................................................................................................................................................E.2
Function 63: Message-on-hold (MOH) programming...............................................................................................................................E.3
Function 7: Reports .................................................................................................................................... F.1
Report printing ...............................................................................................................................................................................................F.1
Reporting functions .......................................................................................................................................................................................F.1
Feature description: SMDR.........................................................................................................................G.1
Tabular SMDR format ..................................................................................................................................................................................G.1
CSV SMDR format.......................................................................................................................................................................................G.1
Reporting conventions and rules ................................................................................................................................................................G.2
Index
(This page included for pagination purposes only.)
IP E-Class Administrator’s Manual
Administrator programming: An introduction
Administrator programming: An introduction
You can program ESI’s IP E-Class system (IP 200e or IP 40e) locally or remotely from a 48-Key IP Feature
Phone while the system is operating. You also can program using ESI’s Esi-Admin, a Windows-based
software application your ESI Reseller can provide.
Read the E-Class User’s Guide first. Programming features require a clear understanding of user
interface and application.
Administrator’s duties
The System Administrator can perform the following tasks:
• Administering station assignments
• Managing station feature authorization
• Maintaining the employee directory (if it’s used)
• Re-recording system prompts
• Administering manual change of Day/Night mode (if required)
User assistance
Each ESI phone system’s Verbal User Guide includes all of the information printed in the User’s Guide
(except for special features). Additionally, the ESI system users’ Web site, www.esiusers.com, includes
all the information in the User’s Guide, and more.
Telephone system features
The IP E-Class PBXs support a comprehensive array of robust features, including:
• IP Feature Phone – Compact and rugged design includes a high-quality speakerphone, large and
informative multi-functional display, and a specially designed key layout with several dedicated keys
to minimize or eliminate the need to memorize codes. The IP phone is TAPI-compliant, and a TAPI
driver is available as a free download from the ESI Web site.
™
• Extensive help – Verbal User Guide uses spoken and displayed help prompts to assist everyone
from the installer through the administrator down to the least experienced end user. Easily accessible
with one press of the HELP key.
• Enhanced Caller ID – Allows one-touch automatic message return.
• Live call recording — Can record any conversation or personal memo, with moving or copying of
any recording to another user’s voice mailbox (see “Voice mail features,” page A.3).
• Call waiting — Includes helpful display, showing both calls’ Caller ID information, and easy one-key
toggling between calls.
• Conference calling — Includes 24 conference bridges, and a conference may contain up to four
parties, so the IP E-Class systems can support six conferences of four parties each or eight conferences of three parties each.
™
• Esi-Dex speed-dialing — Calls any number from any of the three separate lists (personal, station,
and system); uses Caller ID information or direct keypad entries.
• Dedicated overhead paging interface — Allows overhead paging through the user’s own overhead
paging system.
A.1
Administrator programming: An introduction
IP E-Class Administrator’s Manual
• Intelligent call forwarding — Lets users of compatible PRI-equipped ESI systems view the original
Caller ID data of a call forwarded to an off-premises phone.
Important:
See the Intelligent Call Forwarding Feature Overview (0450-0674) for more details.
• 911 alert — Provides immediate line access if any station dials 9 1 1 to report an emergency; sends a
message via the serial port indicating the start date, time, station number and end-time of the 911; also
sounds a warning tone at the operator station and displays (for example):
911 CALL FROM
X102 JOHN JAMES
• Status indicator lamp — Indicates three conditions of the IP Feature Phone (local or Remote):
off-hook, ringing and new voice mail message.
• Optional NSP (Network Services Processor) — Allows system programming via TCP/IP. Comes in
four formats that can be adapted to fit a variety of phone system configurations, small to large.
• Optional unified message notification — Provides an optional, value-added interface to an
NSP-enabled IP E-Class system. Delivers voice mail notification to Microsoft® Outlook® 2000/2002.
Remote network features (VoIP)
In addition to a robust set of telephony features, the IP E-Class PBXs have the capability for extending
PBX operation to any location that has access to a suitable high-speed data connection. This capability
is provided with the Remote IP Feature Phone and Esi-Link.
• Remote IP Feature Phone — Ideal for the remote site installation requiring one, or no more than a
few, extensions. Once installed, the remote user is provided a near identical capability and connectivity of the phone user in the main office. Numerous remote sites can be supported from a single
IP PBX. Refer to the Remote IP Feature Phone Product Overview and the E-Class User’s Guide for
more information.
• Esi-Link support — Provides the capability of connecting up to 100 IP PBXs at different locations into
a single private phone system. The ESI IP PBX features that, without Esi-Link, are available to just a
single location can now be extended across several locations, greatly enhancing the integration opportunities of a business with multiple locations. Refer to the Esi-Link Product Overview for a full
explanation of Esi-Link capabilities.
A.2
IP E-Class Administrator’s Manual
Administrator programming: An introduction
Voice mail features
• Nine message-on-hold sources — Among these are three prerecorded tracks and five customerrecordable tracks; also supports live input.
• Message Recycle Bin (undelete) — Remembers, and can restore, each mailbox’s 10 most recently
deleted messages
™
• Quick Groups — Makes it easy to leave voice mail messages for several users.
• Quick Move™— Allows recording conversations or calls directly into a designated mailbox.
• Virtual Mailbox Key™ — Allows easy monitoring of a second mailbox.
ACD features
• Routes calls within designated departments for quickest possible call answering.
• Uses IP Feature Phone display to provide up-to-the-second information on queues and wait times.
• Sends calls to longest-idle agent.
Feature Phone overlays
Each ESI Feature Phone comes with one overlay for the programmable feature keys. To order additional overlays, visit the DESI™ Web site at www.desi.com. You can also download the free Windows®based software, DESI Lite, which allows you to print on the overlays. For assistance with DESI products, please consult the DESI Web site.
Tip:
Remember that ESI’s Esi-Access software, available from www.esiresellers.com, also lets you print on
the overlays as well as perform many other programming tasks.
A.3
Administrator programming: An introduction
IP E-Class Administrator’s Manual
Programming basics
As mentioned earlier, you may program from any IP Feature Phone in the system:
1. Press PROGRAM. The normal station programming menu prompt will begin to play. Press HOLD
to stop the prompt.
1
2. Enter the Administrator password , followed by #. You are now in programming mode (during this
time, the extension will be automatically placed in DND).
3. Follow the system programming menu to program as you wish; and, when finished, hang up.
Note: The system will automatically exit programming mode after 10 minutes of inactivity.
Example: If your Administrator password is 864, enter programming mode by pressing
PROGRAM HOLD 8 6 4 #
(To exit programming mode, hang up.)
System programming overview
Once you’ve accessed programming mode on an IP Feature Phone, the system will prompt for — and
confirm — each keystroke action via voice commands and the display. You program both configuration
data and recordings in the same manner. The following menu shows Administrator programming functions available on the IP E-Class system:
1 System parameters
13 Administrator password
14 System clock
141 Set time/date
142 Automatic time setting
17 System speed dial
3 Extension programming
32 Extension feature authorization
5 Voice mail programming
53 Guest/info mailboxes
54 Group mailboxes
55 Message notification options
551 Station delivery options
552 Delivery/paging parameters
56 Cascade paging mailboxes
57 Q & A mailboxes
1
Default is 4 5 6.
A.4
6 Recording
61 Record system prompts
62 Record directory names
63 MOH programming
631 MOH source
632 Record MOH
633 MOH volume
7 Reports
73 ACD department report
74 Voice mail statistics report
75 System speed-dial list
IP E-Class Administrator’s Manual
Administrator programming: An introduction
Programming keys
During programming, the first line of the display will show the current item being programmed, and the
second line will be the entry line. You can enter values as directed by the combination of the voice
prompts and display. To enter multiple values, such as a list of extension numbers, separate each value
by # (to exit the list, enter # #).
To...
Press ...
Enter
#
Back up (i.e.,
reverse direction)
Delete
Exit
Help
Select/scroll
½
HOLD
[Hang up]
HELP
W
(left-side
scroll key)
V
(right-side
scroll key)
What this does
Confirms new or existing entry and advances to next
programming step.
Backs up to previous prompt without changing its value.
Deletes data or recording.
Exits programming mode and removes extension from DND.
Provides more detailed instructions during programming.
• During entry of a value, backs up.
• If a list is present (“>” is displayed), scrolls to left.
• Selects from options presented.
• If a list is present (“>” is displayed), scrolls to right.
• Inserts a space during entry of a name.
Note: Either < or > in the display indicates that additional choices or values are available by pressing a corresponding scroll key (Wor V).
Entering alphanumeric characters
You enter names for extensions and departments by pressing the dial pad key that corresponds to the
character to be entered. The key’s possible entries will change each time the key is pressed, and the
display will show this. When the desired character appears on the display, press # to confirm; the cursor
will move to the next character position. You may move the cursor left (to correct an entry) by pressing
the left scroll key (W) or move right (to add a space) by pressing the right scroll key (V).
Key
0
1
2
3
Options
0, - (hyphen), _ (underline)
Q, Z, 1, “_” (space)
A, B, C, 2
D, E, F, 3
4
G, H, I, 4
5
6
J, K, L, 5
M, N, O, 6
Key
7
8
9
W (left
scroll key)
V (right
scroll key)
#
##
Options
P, R, S, 7
T, U, V, 8
W, X,Y, 9
Backs up and erases
Adds a space
[Enter]
Ends the name
Example: To enter a B, press 2 twice (the possible options to scroll through are A, B, C and 2). When B is
displayed, press # to confirm; the cursor will move to the next character to be entered. To complete
the name, press # #.
A.5
Administrator programming: An introduction
IP E-Class Administrator’s Manual
System fixed numbering plan
Numbers
0
1–66
100–195
199
200–229
290–299
300–489
490–499
500
Function
Operator
CO lines
User extensions
Overhead paging port
Analog ports
Department numbers
Guest/info mailboxes
Q & A mailboxes
Broadcast mailbox
Numbers
501–516
520–529
530–550
560–589
590–598
600–699
700–799
988
Function
Group mailboxes
Cascade paging mailboxes
Recordable system prompts
Feature codes
MOH recordings
System speed dial
Esi-Link locations
Modem
Remote setting of day, night, holiday and auto modes
Normally, the system’s day/night mode operation will be manually controlled at an ESI Feature Phone
and/or set to follow the day/night mode tables (programmed by the Installer) automatically. In addition,
the Administrator can remotely change the mode and/or re-record the holiday greeting to handle unexpected closings such as for inclement weather.
Remotely logging into the system with the Administrator password lets the caller re-record the ID 1
greetings (day, night, day2 and night2) and the holiday greeting, as well as change the mode to
day/night/holiday/day2/night2 (or auto).
1. At the main greeting, enter ½ ½ 4 5 6 # — or ½ ½ [the new password] # — to enter remote
programming mode.
2. You’ll hear prompts that will allow you to change the answer mode (day, night, day2, night2, holiday
or auto) and/or to re-record the holiday greeting and the main greeting (ID 1). Follow the prompts to
perform the desired operation.
3. Exit by pressing ½ and hanging up.
Prompts for remote settings: an outline
1 Set answer mode
1
2
3
4
5
6
Day mode
Night mode
Holiday mode
Use day/night table*
Day2 mode
Night2 mode
2 Record holiday main greeting
3 Record daytime main greeting
4 Record nighttime main greeting
5 Record day2 main greeting
6 Record night2 main greeting
Note: If the system is answered live and call is then routed to a mailbox., the Administrator can press 8 to
return to the main greeting and then follow the steps for making remote settings.
* This is used if the Installer has programmed an automatic calendar.
A.6
IP E-Class Administrator’s Manual
Function 1: System parameters
Function 1: System parameters
Function 13: Administrator password
These functions will display the existing password and prompt for entry of a new password. The passwords can be 2–8 digits long, followed by #. The Installer can change either the Installer or
Administrator password. Only those functions listed in the Administrator Manual can be programmed via the Administrator password. The default Administrator password is 4 5 6.
Notes: You can use the Administrator password to access a user’s station programming. At the station, when
prompted for the user’s password, enter either the Administrator password, then follow normal user programming procedures.
Accessing user station programming
Should a user forget his password or if an employee leaves the organization, this feature allows the
Installer or Administrator to enter a user's station programming and operate within it as if he were the
user. From the user’s station, enter the Administrator password when the system prompts for the
user password.
Example: From station 105, entering 4 5 6 # instead of the user password (1 0 5 #) will enter the station’s
user programming. (Default password shown for this example).
Function 14: System clock
Function 141: Set time/date
1. Enter a new time in a twelve-hour format.
Example: Enter 1 2 3 3 for 12:33, or 3 1 5 for 3:15 (note that you need no leading zero for the time).
2. Select AM or PM by pressing a scroll key (either W or V).
3. Enter a new date in an eight-digit format, including leading zeroes.
Example: Enter 0 7 0 4 2 0 0 3 for July 4, 2003 (note that leading zeroes are required here, unlike in
Step 1).
4. Press # to finish the entry.
Note: A built-in battery maintains the correct time and date, even in the event of a power loss.
B.1
Function 1: System parameters
IP E-Class Administrator’s Manual
Function 142: Automatic time setting
1. Synchronize with CID
This function, when enabled, synchronizes the real-time clock with Caller ID (CID) messaging:
call processing compares the time of a CID message to the system real-time clock and, if the
difference is more than two minutes, resets the real-time clock to match the time (hours and
minutes) of the CID message. The system will analyze each such message (or — if it receives
more than four calls with CID information within a one-minute period — as is needed). Select
ENABLE or DISABLE by pressing a scroll key (either W or V). Choosing ENABLE will allow the
CID data to update the time and date.
Default: Enabled.
Notes: If this function is enabled, Esi-Link time synchronization (from location 700) will be disabled.
If this function is disabled, Esi-Link time synchronization will be allowed (minutes only).
2. Adjust for Daylight Savings Time
This function, when enabled, causes the real-time clock to adjust itself automatically for Daylight Savings Time (DST). Select AUTO or DISABLE for DST by pressing a scroll key (either
W or V). Choosing DISABLE is best for those areas that don’t observe DST.
Default: Disabled.
Note: If this function is enabled and it causes an automatic time change, the system won’t update
the real-time clock from either Caller ID messages (Function 1421, above) or Esi-Link time
synchronization for 25 hours before and 25 hours after the time change is due to be effective
(i.e., 2:00 AM Sunday).
B.2
IP E-Class Administrator’s Manual
Function 1: System parameters
Function 17: System speed-dial
Up to 100 system speed dial names and associated numbers can be stored, in location numbers 600–699,
for access by any station. A user can initiate a system speed-dial by dialing the speed dial location number
or by accessing the name through the Esi-Dex feature. In Function 32, access to system speed-dial can
be denied to individual stations (see page C.1).
Note: System speed-dialing overrides toll restrictions (Function 32, page C.1).
1. Enter the 3-digit location number to program,
2. Enter a ten-character name (see “Entering alphanumeric characters,” page A.5).
3. Enter the number to be dialed (including the line group 9, 8, or 71–76). Press the left scroll key (W)
to backspace and delete any character or digit entered in error. Here’s an example:
1.
Speed-dial number
601
2.
Name
AUTO RENTL
3.
Number
915552221212
The number dialed in Step 3 can be up to 30 digits long including the following special codes:
Code
#
½
F
P
What it produces
# DTMF tone
½ DTMF tone
Flash hook
2-second pause
To insert a special code, press the right scroll key (V) to select the desired special code: # , ½ , F or P.
Press # to confirm the inserted character and continue. Press # # to complete the entry.
Example: To create a System Speed Dial number that dials 9, then 972-555-5644, then pauses for
four seconds and finally dials #104, enter:
9 9 7 2 5 5 5 5 6 4 4 (then scroll to) P # (then scroll to) P # (then scroll to) # # 1 0 4 #
Deleting a speed dial number
To delete an entire speed dial number and name, delete the location number (6 X X) by pressing HOLD
or the left scroll key (W) during Step 1 in the speed-dialing procedure described above.
B.3
Function 1: System parameters
IP E-Class Administrator’s Manual
(This page included for pagination purposes only.)
B.4
IP E-Class Administrator’s Manual
Function 3: Extension programming
Function 3: Extension programming
Important:
Where any gray shading (■) appears in an example, it represents values either unavailable to
the function or unused in the particular example.
Function 32: Extension feature authorization
An Administrator can allow or deny many extension features on an extension-by-extension basis. A
User, however, can only program and use allowed features (by using a combination of voice and display
prompts) from his/her phone.
Below is an example of a completed Programming Worksheet. The programming sequence is:
1.
2.
Ext.
Name
3.
Call
wait
XXX
100
101
102
110*
Default
Jane
Roger
Sally
Bill
Y
Y
Y
Y
Y
4.
DND
Y
Y
Y
Y
5.
AA
block
N
N
N
N
N
6.
Rec.
7.
Svc.
obs.
8.
Toll
allow
Y
Y
Y
N
N
N
N
N
Y
Y
Y
Y
Y
9.
10.
Sys.
Auto
spd. dial Page
Y
Y
Y
Y
Y
N
Y
N
Y
N
11.
Ext.
fwdg.
N
N
N
N
N
12.
13.
14.
Fwdg. to Trk-to-trk Unified
toll nos.
xfer
msgg.
N
N
N
N
N
N
N
N
N
N
N
N
N
N
The programming steps are:
1. Extension number — Enter the extension number to program.
2. Extension name — Name the extension (if it hasn’t previously been named by the Installer).
For each of the following features, press a scroll key (W or V) to select YES or NO.
3. Call waiting — Allows the user to turn call waiting on or off for his station.
4. Do not disturb — Allows the user to activate DND from his station.
5. Auto attendant block — Blocks calls from being transferred to the station from the auto attendant;
follows the extension’s call forward day/night as programmed by the Installer.
6. Live recording feature — If enabled, will allow the user to record conversations.
7. Service observing — Allows the user to monitor the conversations of those stations listed
in the service observing list for his/her station. If this is enabled, you must enter a list of allowed
extensions.
Note: A Department number can be entered as an extension in the Service Observing list and will then
automatically include all members of the Department even if the members of the Department are
later changed.
8. Toll restriction — “YES” allows the user to place toll calls. If you select “NO,” the user can make
only either non-toll calls or calls to numbers listed in the allow exception table.
9. System speed dial — “YES” allows the user to access and place system speed dial calls.
(Continued)
* An example of an analog phone.
C.1
Function 3: Extension programming
IP E-Class Administrator’s Manual
10. AutoPage — Lets the user turn AutoPage (defined below) on or off at his/her station.
Note: This feature is used in conjunction with the directory names recorded in Function 62 and is not active until a directory name is recorded for the extension.
If the station user has his/her mailbox set to answer with personal greeting 3 and a caller presses 3
to page that user, this feature automatically pages the station user in the page zones entered in
Function 31. If no page zone is entered, all ESI Feature Phones on the system are paged.
Default: Disabled.
Note: When AutoPage is enabled, the IP E-Class system will use the last installed idle digital port to perform the page. Therefore, if a phone is on the last installed port, the phone’s user may experience
a brief delay in telephone operation if he/she picks up the handset (or presses SPEAKER) during
the AutoPage.
11. External forwarding — Allows the station user to use the call forwarding/off-premises and offpremises “reach-me” features. See the User’s Guide for more information about these features.
Default: Enabled.
Note: After the system dials the external forwarding number, it will play a prompt saying, “You are receiving a forwarded call. Press any key to accept.” This prompt will play continuously for 30 seconds. If
the forwarded call is answered and the called person dials a digit, the forwarded call will be connected to that person. If no digit is dialed, the caller is automatically forwarded to voice mail. While
the two lines (trunks) are connected, the system constantly monitors the line for open loop conditions (hang-up). If an open loop is detected on either line, the call is disconnected. The system also
monitors for voice activity on the connected lines; if voice is no longer detected, the call is disconnected. Finally, if both lines are connected for more than 60 minutes1, the call will be disconnected.
12. Forwarding to toll numbers — This feature is used in conjunction with external forwarding (see
previous item). When enabled, this feature lets the user program a long-distance number for external forwarding.
Default: Disabled.
(Continued)
1
Default timer setting. To adjust this, contact ESI Technical Support.
C.2
IP E-Class Administrator’s Manual
Function 3: Extension programming
13. Trunk-to-trunk transfer — When enabled, this lets the station user initiate a trunk-to-trunk transfer.
The user, while connected to a CO line, can press TRANSFER, dial an off-site number and then
complete the trunk-to-trunk transfer by simply hanging up. Both outside parties are then connected.
Default: Disabled.
Important:
USE OF FEATURES, SUCH AS TRUNK-TO-TRUNK TRANSFER, THAT REQUIRE
TRUNK-TO-TRUNK CONNECTIONS WILL INCREASE THE RISK OF TOLL FRAUD. IN
NO EVENT SHALL ESI (ESTECH SYSTEMS, INC.) BE LIABLE FOR ANY DIRECT, INDIRECT, INCIDENTAL OR CONSEQUENTIAL DAMAGES WHATSOEVER INCLUDING, BUT
NOT LIMITED TO, FRAUDULENT TOLL CHARGES, LOSS OF BUSINESS PROFITS,
BUSINESS INTERRUPTIONS OR ANY OTHER COSTS OR DAMAGES RELATED
THERETO ARISING FROM THE USE OF THESE FEATURES.
14. Unified messaging — [The Installer should refer to “VIP programming” in the Network Services
Processor Installation Manual (ESI document 0450-0439).]
Example: Here is a portion of a completed Programming Worksheet for extension feature authori-
zation. Note that:
• Extension 100 cannot record calls but can make toll calls (except those listed in the
deny table) and can access the system speed dial numbers.
• In comparison, Extension 102 cannot make general toll calls but also can call any
system speed dial number, even if it’s a toll call.
• (Extension 112 doesn’t have DND, AA block, record or service observing capability
because it’s an analog port.)
1.
Ext.
2.
Name
3.
Call
wait
4.
DND
5.
AA
block
6.
Rec.
7.
8.
Svc.
Toll
obsv. allow
9.
Sys.
spd. dial
10.
AutoPage
11.
Ext.
fwdg.
12.
Fwdg.
to toll
nos.
13.
Trk-totrk xfer
14.
Unified
msg.
100
Jane
Y
Y
N
N
N
Y
Y
N
N
N
N
N
102
Sally
Y
Y
N
Y
N
N
Y
Y
N
N
N
N
112*
Bill
Y
Y
Y
N
N
N
N
N
* An example of an analog phone.
C.3
Function 3: Extension programming
IP E-Class Administrator’s Manual
(This page included for pagination purposes only.)
C.4
IP E-Class Administrator’s Manual
Function 5: Voice mail programming
Function 5: Voice mail programming
To simplify initial installation, all programmed extensions will automatically have the generic personal
greeting, “You have reached the mailbox for extension [xxx].” The mailbox user should replace this with
a personalized greeting. Each guest/info, group, cascade paging or Q & A mailbox must have a greeting
recorded for the IP E-Class system to consider the mailbox active.
Important:
A mailbox will not receive broadcast messages until a greeting has been recorded for it. Additionally: if the default greeting is deleted, the mailbox will be considered inactive.
Function 53: Guest/info mailboxes
Mailboxes numbered 300–489 can be programmed as either a guest or info mailbox. Enter the mailbox
number and select Guest or Info by pressing a scroll (W or V) key.
Guest mailboxes
Guest mailboxes are designed to be used by personnel, such as in outside sales or manufacturing,
who do not have an extension assigned to them. A guest mailbox requires no programming other than
the assigning of a name.
Note: A guest mailbox can be handled like a regular extension (i.e., listed in the directory, assigned a station
key, etc.), and is password-protected by default.
If a programmable feature key is programmed as a virtual mailbox key with a guest mailbox number, the
1
key’s LED will blink, to indicate that new messages exist. To retrieve messages from a station, press
VOICEMAIL ½ and then either press the DSS key or enter the mailbox number.
To record a greeting, press PROGRAM ½ and the mailbox number; then press # to confirm, and follow
the prompts. The default password is the mailbox number.
To retrieve messages from the outside, press ½ and the mailbox number during the Main Greeting.
Default: 300–489 as Guest.
Info mailboxes
Info mailboxes can be used to give callers information on a variety of different subjects by “publishing”
these mailbox numbers. Info Mailboxes are identical to Guest Mailboxes except that the caller will not
be given a record tone after the personal greeting (the information to be played). Instead, the caller will
be forwarded as programmed in this function (default is the caller will be disconnected after the information is played). The maximum length of the record time is 14 minutes. Guest/info mailboxes are created or
deleted here, but are turned “on” only when a personal greeting (the information to be played) has been
recorded. Deleting the personal greetings will turn “off” the mailbox.
To record a greeting, press PROGRAM ½ and the mailbox number; then press # to confirm, and follow
the prompts. The default password is the mailbox number.
Below is an example of a completed Programming Worksheet, showing the sequence of programming:
1.
MB
400
402
1
2.
Name
Dana
Literature
3.
Type
Guest
Info
4.
CF day
5.
CF night
MB 302
MB 302
Otherwise, the key is a DSS key that allows for single-key transfer of a call with no message indication.
D.1
Function 5: Voice mail programming
IP E-Class Administrator’s Manual
Each programming step is defined as follows:
1. Mailbox number — Enter a mailbox number, 300–489.
2. Name — The mailbox name is used for the display, reports, and as a programming aid. The name
length can be no longer than 10 characters (see “Entering alphanumeric characters,” page A.5).
Default: The Mailbox number.
3. Type — Select a mailbox type: Guest or Info.
Default: Guest.
4. and 5. Call forward (info mailbox only) — An info mailbox can be set to call forward after the personal greeting has played to an extension, department, a mailbox or a branch ID for day mode and
differently for night mode.
Default: ID9999 (automatic disconnect).
Function 54: Group mailboxes and the broadcast mailbox
Broadcast mailbox
Mailbox 500, the broadcast mailbox, is a special group mailbox which can be used to leave messages
for all of the system’s station users (extensions 100–183) who have recorded a personal greeting. The
broadcast mailbox’s user list cannot be edited. Guest mailboxes are not included in the broadcast group.
Group mailboxes
You can assign up to 16 group mailboxes (501–516) to the IP E-Class system; each group mailbox can
1
have up to 32 members. Anyone who knows the password can leave messages for all users listed as
members of that group and who have recorded a personal greeting. The Installer, Administrator or group
mailbox “owner(s)” may set or change the list of Group Mailbox members. To record a greeting, press
PROGRAM ½ and the mailbox number; then press # to confirm, and follow the prompts. The default
password is the mailbox number.
Important:
A group mailbox is turned “on” (able to record and playback messages) only when its “owner”
has recorded a greeting for it, such as “This is the group mailbox for East Coast Regional Sales.”
Similarly, deleting the group mailbox greeting will turn “off” the group mailbox; any outstanding
messages will remain in its members’ mailboxes until erased by each member.
Notes: If 0 (zero) is programmed as the password, anyone can leave group messages or program the
Group Mailbox.
If a user saves a group message, it will be saved as a new message.
1.
MB
501
2.
Group member mailboxes’ numbers
102 104 106 107 122 303 314
Here is the programming sequence:
1. Enter the group mailbox number — Range: 501–516.
2. Enter group member mailboxes’ numbers — Separate each by #; enter # # to end the list.
Range: User mailboxes (100–183) and guest mailboxes (300–489).
1
Although it cannot be in the broadcast group, a guest mailbox can be a member of any other group mailbox.
D.2
IP E-Class Administrator’s Manual
Function 5: Voice mail programming
Function 55: Message notification
On a mailbox-by-mailbox basis for user or guest mailboxes, the system can be programmed to call an
off-premises number or another extension to deliver messages and/or dial to an external commercial
paging network to activate a user's pager. The IP E-Class system will call and/or page when the first
new message has been left in a mailbox and will repeat (at the interval of minutes programmed in this
function) until the new message(s) have been deleted, saved or moved.
The user can program the numbers and delay and can also select to have only messages marked as
urgent delivered.
The Installer and Administrator can set, on an individual-station basis:
• The number to be called
• A delay period
• The number of attempts (maximum of 99)
• The interval between attempts
• A “quiet period" to suspend phone delivery — e.g., late at night (the quiet period is an on-and-off time
that applies to all days of the week)
Function 551: Station delivery options
Programming of the station options, as shown below, can be performed by the Installer or Administrator. In addition, the user can change his phone number and pager number (but not phone or
pager delay time). The phone number’s maximum length is 24 digits.
1. Phone
2. Pager
1.
Number
9725556789
9725551234
2.
Delay
30
0
3.
Attempts
6
10
4.
Interval
60
30
5.
Quiet on
10:30PM
6.
Quiet off
7:15AM
To program, enter the extension number to program and select phone or pager to program. Then,
enter:
1. Phone/pager number — The number to be dialed (without the CO line Group [9, 8 or 71–76).
2. Delay — How many minutes the system is to wait before dialing the phone or pager number.
This allows the user to pick up a message if he is in the office.
Range: 0–500. Default: 0.
3. Attempts — How many times that the system will call/page.
Range: 0–99. (0 turns off delivery.) Default: 3.
4. Interval — How many minutes should elapse between attempts.
Range: 10–1440. Default: 30.
5. Quiet period on — When the quiet period should begin.
Default: (None.)
6. Quiet period off — When the quiet period should end.
Default: (None.)
Use the V scroll key to enter special characters; use the W scroll key to backspace. Press # to confirm the inserted character and continue. Press # # to complete the entry.
D.3
Function 5: Voice mail programming
IP E-Class Administrator’s Manual
Function 552: Delivery/paging parameters
The sequence of programming is as follows:
1. CO line access — Enter the CO line group (9, 8, or 71–76) that is to be accessed for delivery.
Default: 9.
2. Maximum lines — Enter the maximum number of lines (in the selected CO line group) that the
system can access simultaneously. Make enough lines available to accommodate high notification traffic (but be careful: if you make available all lines in the selected line group and high
notification traffic occurs, the system could tie up all lines).
Range: 1–19. Default: 1.
3. Pager dialing pause — When paging, the IP E-Class system will send the mailbox number to be
shown in the pager’s display. To allow time for the paging service to answer, enter the pause, in
seconds, to occur between when the IP E-Class system dials the pager number and when it then
dials the mailbox number.
Range: 0–20. Default: 6.
Function 56: Cascade paging mailboxes
In addition to individual mailbox paging, the IP E-Class system can support up to 10 cascade paging
mailboxes (520–529). These can be assigned to anyone who requires escalating levels of paging
beyond the single level available in all user mailboxes. In this function, you program the paging numbers
and number of times each is to be paged before the next paging number is added; additionally, the mailbox owner can program these settings. To record a greeting, press PROGRAM ½ and the mailbox
number; then press # to confirm, and follow the prompts. The default password is the mailbox number.
Cascade mailbox options
The user can program up to three paging numbers, of up to 24 digits each, to be paged whenever the
mailbox takes a new or urgent message. The system will page the first paging number (for the number of
times listed), then add the second paging number (for the number of times listed), then add the third
paging number and will continue to page all three pagers until the message has been retrieved.
1.
MB
520
2.
1st Number
9725553232
3.
Attempts
2
4.
2nd Number
9725554254
5.
Attempts
3
6.
3rd Number
9725555452
To program this, enter:
1. The mailbox number — Range: 520–529. [Then press 1 to enter number programming, and
proceed to Step 2.]
2. First pager number — The number to be dialed (without the CO line Group [9, 8 or 71–76]).
3. Attempts — How many times the system will page (up to 20) before adding the second
pager number. Range: 0–99. (0 turns off delivery.)
4. Second pager number — The number to be dialed (without the CO line Group [9, 8 or 71–76]).
5. Attempts — How many times the system will page (up to 20) before adding the third
pager number. Range: 0–99. (0 turns off delivery.)
6. Third pager number — The number to be dialed (without the CO line Group [9, 8 or 71–76]).
Use the V scroll key to enter special characters; use the W scroll key to backspace. Press # to confirm
the inserted character and continue. Press # # to complete the entry.
D.4
IP E-Class Administrator’s Manual
Function 5: Voice mail programming
Cascade paging parameters
The cascade paging mailboxes will use the same CO line group and pager dialing pause as programmed in Function 552 (see page D.4).
Paging interval
To program the paging interval parameter for a cascade paging mailbox:
1. Enter the mailbox number (520–529).
2. Press 2 to set parameters for the mailbox.
3. Enter the number of minutes for the interval between attempts.
Range: 10–1440. Default: 0.
Note: Once you change this setting from 0, you cannot reset it to 0.
Function 57: Q & A mailboxes
You can create up to 10 question and answer (Q & A) mailboxes (490–499). Each Q & A mailbox
owner can record up to 10 questions. The questions are recorded in the same manner as recording
users’ multiple personal greetings (see User’s Guide). The individual answer segments recorded by the
caller are stored as a single message, with the answer segments separated by short beep tones. Each
answer segment's maximum length will be as programmed by the Installer. Normal message handling
capability — delete, save, etc. — applies to the entire message (all segments).
The caller, when recording each answer, can be instructed to conclude by pressing 1 or to pause for the
next question (the system advances when it detects either a 3-second period of silence or the pressing
of 1) — e.g., "Record your name at the tone and press 1 when finished”… “Record your address at the
tone and press 1 when finished." If the caller fails to respond to two questions in a row, the system
disconnects the call.
Important:
This programming creates or deletes Q & A mailboxes, but these mailboxes are turned “on”
only when the mailbox owner has recorded questions. Similarly, deleting all questions turns “off”
the mailbox.
To record questions, press PROGRAM ½ and the mailbox number; then press # to confirm, and follow the
prompts. The default password is the mailbox number. Here is an example of a completed programming
worksheet (numbers correspond to steps below):
1.
MB
490
491
2.
Name
Employment
Survey
3.
CF day
MB 490
MB 491
4.
CF night
MB 490
MB 491
Each programming step is defined as follows:
1. Mailbox number — Enter a mailbox number 490 to 499.
2. Name — The mailbox name is used for the display, reports, and as a programming aid. The name
length can be no longer than 10 characters (see “Entering alphanumeric characters,” page A.5).
Default: The mailbox number.
3. & 4. Call forward — A Q & A mailbox can be set to call forward, after the last question has been
answered, to an extension, department, a mailbox or a branch ID for day mode and differently for
night mode.
Default: ID9999 (automatic disconnect).
Tip:
If you need a Q & A mailbox with more than 10 questions, set the call-forwarding to another
Q & A mailbox.
D.5
Function 5: Voice mail programming
IP E-Class Administrator’s Manual
(This page included for pagination purposes only.)
D.6
IP E-Class Administrator’s Manual
Function 6: Recording
Function 6: Recording
Function 61: Re-record system and auto attendant branch prompts
The IP E-Class system plays the system prompts to an outside caller at different points in the call
routing or mailbox functions. These system prompts have been pre-recorded at the factory but you may
re-record them, if preferred — e.g., in a different voice or with different instructions.
The auto attendant branch prompts (such as the main greeting or sub-menus) are also recorded here
— enter the branch ID number as the prompt number.
Recording a prompt
1. Practice the prompt by recording and re-recording (start and stop by pressing 1).
2. When satisfied with its quality, press # to confirm.
Note: Deleting a system prompt by pressing HOLD (instead of #) restores to the default recording.
System prompts
• Busy Prompt: 530 — Plays to the outside caller if an extension is busy.
Default: "That extension is busy.”
• No Answer Prompt: 531 — Plays to the caller if an extension does not answer.
Default: "That extension does not answer.”
• Hold Prompt: 532 — Plays to the caller who makes a menu selection or enters an extension number.
Default: "One moment, please.”
• Q/Z Prompt: 534 — Plays to a caller who has selected an alphabetic directory; instructs the caller to
press 1 for the letters Q or Z since these two letters do not appear on the phone keypad; plays at the
end of the first directory prompt (but only if a name in the directory starts with a Q or Z).
Default: "For the letters Q or Z, use key number 1.”
• No Names Matched Prompt: 535 — Played to the caller if, in a directory branch, the first letter he/she
selected does not have any names associated with it, or if he/she has listened to all of the names played
and has not made a selection. After playing the prompt, the IP E-Class system forwards the call to the
extension, branch or mailbox as programmed in call forward no response.
Default: "No names matched; one moment please.”
• End of Message Prompt: 537 — Plays after a caller leaving a message presses 1 to stop recording;
the prompt then tells the caller his/her options.
Default: “To continue this recording, press 1; to return to the main menu, press 8; or, if finished,
press ½ and hang up.”
• ACD Queue Prompt: 538 — The first prompt played to a caller when all extensions are busy in an
ACD department.
Default: “All agents are currently assisting other customers. Please hold; your call will be answered
in the order received.”
(Continued)
E.1
Function 6: Recording
IP E-Class Administrator’s Manual
• ACD Hold Prompt: 539 — Is periodically played to callers on hold in an ACD department when all
extensions are busy.
Default: “All agents are still busy assisting other customers. Please hold; your call will be answered
in the order received.”
• Holiday Main Greeting Prompt: 540 — Plays to callers when the system has been manually placed
in holiday mode.
Default: "Thank you for calling. Our office is closed in observance of the holiday. You may dial your
party’s extension, at any time, or please call back during regular business hours.”
Note: While in holiday mode, the IP E-Class system follows night mode programming for call routing. The
day/night mode setting and holiday greeting can be activated remotely (for more information, contact
the Installer).
Function 62: Record directory names
This function is accessible only if a directory branch has been created as part of auto attendant programming. Enter the extension number and record the name (and, if this is a by-alpha branch, enter the
name key.)
Important:
Make photocopies of the blank worksheet for preparing directories and making future changes.
1.
Ext.
102
113
2.
Recorded name
George Straite
Janet Smith
3.
Key
4
5
Each programming step is defined as follows:
1. Extension number — Enter the extension number for the directory name.
2. Record name — Press 1 to begin recording and press 1 again when finished.
3. Name key — (Necessary if the directory type is by-alpha [for more information, contact the Installer].) Enter the numeric equivalent to the letters appearing on a phone keypad (for Q or Z, use 1).
Note: To re-record the prompt that says, “Enter the first letter of the person’s last name,” you must enter Function 61 and then enter the ID number of the directory branch.
E.2
IP E-Class Administrator’s Manual
Function 6: Recording
Function 63: Message-on-hold (MOH) programming
MOH can be:
• A live feed from an external music source connected to the MOH connector located on the side of
the cabinet.
• One of three default, generic MOHs pre-recorded by the factory.
• One of up to five custom MOHs loaded into the system by using a cassette recorder connected to the
MOH connector.
Note: If ACD is used, we recommend that you use Prompt 590, Prompt 591 or a custom prompt without periodic “voice-overs,” since the ACD Hold Prompt also will be played while a caller is on hold.
Function 631: MOH source
This selects the source that will be played to callers on hold.
Code
590
591
592
593
594–598
Source
Live external source*
Pre-recorded music
Pre-recorded with “please continue to hold”
Pre-recorded with “dial 0 or extension from hold”
Customer-recorded message on hold
* Dialing off-hold doesn’t work.
Default: 592 (generic message-on-hold).
Function 632: MOH recording
1. Connect the message/music source to the MOH port on the side of the cabinet.
Note: The connector is monophonic-only — if you use a stereo source, you must either set it to output
mono, if possible, or use a stereo-to-mono conversion cable (or adapter).
2. Enter the prompt number to be recorded.
3. Press 1 to begin recording. To aid you in queuing, the source will be played through the phone’s
speaker.
Note: The recorded material should not have a “beginning” or “end” — so that playback can loop
continuously.
4. Press 1 when finished. The recording will play back so you can review it.
5. Press # to accept the recording.
Function 633: MOH volume
If a custom MOH is recorded, the output volume can be adjusted in this function.
Range: 1 (faint)–12 (loudest).
Default: 6.
Notes: If an external audio source such as a radio is used for MOH, adjust the volume at
the source.
To turn live MOH volume completely off, turn off volume at the source.
To turn recorded MOH volume completely off, select (in Function 631, above) one of the prompts
in the range of 594–598, but make sure it’s blank. These prompts are blank by default; if you have
recorded some audio on all of them, just select one and record a few seconds of silence.
E.3
Function 6: Recording
IP E-Class Administrator’s Manual
(This page included for pagination purposes only.)
E.4
IP E-Class Administrator’s Manual
Function 7: Reports
Function 7: Reports
Important:
You may wish to read “SMDR” (pp. G.1–G.2) before using this function.
Report printing
The system’s built-in reports can be output to a printer or a PC via the Maintenance/SMDR port.
When printing captured reports from the PC to a laser printer, use a fixed monoproportional font (such
as Andale Mono, Courier New or Letter Gothic), 9 points or smaller.
From either the Administrator programming menu, select the desired report as shown in Functions 71,
74 and 75 (below). The reports can be printed with either: (1) the data saved for inclusion in future
reports, or (2) the data and totals cleared. (You can’t clear data in either the system program report or
the system speed-dial report.)
Note: Outbound calls shorter than one minute are not counted in system totals.
Reporting functions
• Function 73: ACD department detail report — (See below.)
• Function 74: Voice mail statistics report — Provides statistics indicating the message activity in
each mailbox since the data was last cleared.
• Function 75: System speed-dial list — Lists the current system speed-dial numbers. Distribute a
copy to those who are authorized to use them.
Function 73: ACD department detail report
The ACD department detail report provides extension usage by ACD department. This report includes
the following “fixed” information:
• All ACD departments will be included.
• The current report’s start date and time will be the previous report’s end date and time.
• The current report’s end date and time will be the current date and time.
Function 73 offers two choices:
1. Current report (“Press 1 to print the current ACD report”) — Outputs the current ACD department
report. All information is automatically copied to the previous report (see next choice) and cleared
from the current report.
2. Previous report (“Press 2 to repeat the previous ACD report”) — Re-sends the last report printed.
Note: After the current report is requested, it will be stored indefinitely (as the “previous” report) until the next
“current” report is selected.
F.1
Function 7: Reports
IP E-Class Administrator’s Manual
Sample Function 73 report
Function 73 report description
The ACD department detail report is divided into four major sections: the report header, the incoming
ACD call statistics, the PBX call statistics, and the report footer.
Report header
The report header includes the report name (“ACD Report by Department, Current” or “ACD Report
by Department, Previous”), ACD department name and number, report start date and time, and ending
data and time:
•
Start — Beginning date and time of the reporting period. This will match the ending date and time of
the previous report.
•
End — Ending date and time of the reporting period.
(Continued)
F.2
IP E-Class Administrator’s Manual
Function 7: Reports
Incoming ACD call statistics
The incoming ACD call statistics section
shows ACD calls offered to each ACD agent position.
These are calls that are transferred to, or ring into, the department number and then are distributed to
the agent positions (extensions).
Column name
Description
Ext
ACD extension
Name
Extension name
Number of ACD incoming calls answered at that extension (includes Esi-Link calls to
the ACD department)
Answer
Duration
Total time connected to ACD calls
1
Recovered
Number of ACD calls unanswered at that extension and returned to the ACD queue.
PBX call statistics
The PBX call statistics section shows non-ACD calls for each extension — i.e., all calls that weren’t
delivered directly through the ACD department number.
Column name
Description
Answer
Number
Duration
Total time connected to incoming PBX calls
Out
Duration
Number of PBX calls originated at that extension
Total time connected to outgoing PBX calls
Report footer
The report footer
includes totals of the incoming ACD call statistics and PBX call statistics; it also
includes the average and maximum queue times, as well as total abandoned calls and rerouted calls,
for each ACD department:
•
Average CO queue time — The average length of time callers were holding (‘queued”) for an
available agent over the reporting period.
•
Max CO queue time — The maximum length of time one or more callers had been queued for an
available agent over the reporting period.
•
Abandoned calls — Total ACD calls that disconnected (hanged up) while held in queue or listening
to the ACD queue or hold prompt (announcement).
•
Rerouted calls — Total ACD calls that followed the ACD department call forwarding assigned in
Function 33 after expiration of the ACD exit timer (assigned in Function 154).
1
Each time a call is recovered, that ACD extension will be automatically logged-out of the ACD department. For more information,
see the ESI Feature Phone User’s Guide for IP E-Class, IVX X-Class, and IVX E-Class. (ESI part # 0450-0366).
F.3
Function 7: Reports
IP E-Class Administrator’s Manual
Notes:
F.4
1.
A CO call transferred to an ACD department or ACD extension will be counted as a new call each time
it’s successfully transferred.
2.
An ACD call transferred to the same, or another, ACD department will be counted as a new ACD call for
that department.
3.
An ACD call transferred to an ACD extension will be counted as a PBX incoming call for that extension.
4.
A PBX call (outgoing or incoming) transferred to an ACD department will be counted as an ACD call.
5.
A call retrieved from hold will be counted as an incoming PBX call.
6.
PBX calls that forward to voice mail or other forwarding destinations are not included in the ACD department report.
7.
An incoming ACD call that disconnects (hangs up) while ringing at an ACD extension won’t be counted
as an abandoned call.
IP E-Class Administrator’s Manual
Maintenance/SMDR
Feature description: SMDR
SMDR (station message detail reporting) call records are output in real time via an ESI phone
system’s Maintenance/SMDR serial port. SMDR may be output in one of two formats, selected in
system programming: tabular or CSV. The tabular format is the default.
Tabular SMDR format
ESI’s tabular SMDR output format, which is compatible with the standard Panasonic® DBS® format
except for the last two (ESI-exclusive) items, is as shown below:
1
2
3
4
5
6
7
123456789012345678901234567890123456789012345678901234567890123456789012345678
T MM/DD HH:MM:SS HH:MM:SS NNN XXXXXXXXXXXXXXXXXXXXXXXXXXXX
EEE RRR LL
The columns are:
• Call type — Outbound (“O”), inbound (“I”) or transferred (“T”) at column 1.
• Date (“MM/DD”) — Begins at column 3.
• Start time (“HH:MM:SS”) — Begins at column 9.
• Duration (“HH:MM:SS”) — Begins at column 18.
• Extension number (“NNN”) — Begins at column 27.
• Digits dialed (right-justified)/Caller ID (left-justified) — Begins at column 31 (28 characters).
• Esi-Link home location number (“EEE”)1 — Begins at column 69.
• Esi-Link remote location number (“RRR”)1 — Begins at column 73.
• CO line number (“LL”) — Begins at column 77.
Each record is terminated with a line feed and carriage return character.
CSV SMDR format
The comma-separated value (CSV) format is compatible with Microsoft® Excel® and other spreadsheet
applications. A CSV record will be output for each completed call, and will be represented as follows
(word-wrapped):
Format:
"T","MMDDYYYY","HHMMSS","HHMMSS","NNN","XXXXXXXXXX. . .XXX","CCCCCCCCCC. . .CCC","LL"
Example A:
"I","07042002","000852","000059","101","2144229700","ESTECH SYS INC. ","54"
Example B:
"O","10312003","221502","020512","190","12125551212","","11"
(Continued)
1
Used only when Esi-Link is enabled and programmed.
G.1
Maintenance/SMDR
IP E-Class Administrator’s Manual
The fields are:
• Call type (“T”) — Outbound (“O”), inbound (“I”) or transferred (“T”).
• Start date (“MMDDYYYY”) — Six characters, zero-filled.
• Start time (“HHMMSS”) — Six characters, zero-filled; 24-hour clock.
• Duration (“HHMMSS”) — Six characters, zero-filled.
• Extension number (“NNN”) — Three characters, space-filled, right-justified.
• Digits dialed/Caller ID (“XXXXXXXX . . . XXX”) — Up to 28 characters, null-filled.
• Caller ID name (“CCCCCCCCC . . . CCC”) — Up to 24 characters, null-filled.
• Esi-Link home location number (“EEE”)1 — Three characters.
• Esi-Link remote location number (“RRR”)1 — Three characters, null-filled.
• Line number (“LL”) — Two characters, null-filled, right-justified.
Each field is delimited with double quote marks and separated with a single comma. Null fields are still
included as place holders (see Example B, p. G.1). Each record is terminated with a line feed and
carriage return character.
Reporting conventions and rules
• Inbound and outbound call records are generated only for calls between a station and a CO line.
• The duration of each call record represents the period of time that that station controlled its portion of
a call. A record is generated each time a station does any of the following:
– Disconnects.
– Places a call on hold.
– Transfers a call.
A single CO call could be included in multiple records if it is transferred from station to station.
• Periods when calls are placed on hold or attempts at supervised transfers are unsuccessful are
included in the station's record.
• Periods when calls are on hold, in the auto attendant, leaving/retrieving voice mail or in an ACD
queue are not included in call records.
• A new record begins when a station answers a call or a hold recall.
• Records will be generated independently for all stations in a conference. If more than one CO line is
involved in a conference, each call record generated by that conference will be associated with only
the last line disconnected.
• Dialed digits don’t include the line group or location number.
• Outbound calls begin a call record 10 seconds after the call has cleared toll restriction.
Serial port interface
SMDR records can be collected by a call accounting system or PC connected to the ESI system’s
Maintenance/SMDR serial port. Contact your ESI Reseller for additional information about call accounting systems.
1
Used only when Esi-Link is enabled and programmed.
G.2
Index
ACD department detail report, F.1
Administrator password, B.1
Alphanumeric characters, entering, A.5
Auto attendant block, C.1
Call waiting, C.1
Day/night/holiday modes, A.6
Remote setting, A.6
Do not disturb (DND), C.1
Esi-Dex, B.3
System speed dial, C.1
System speed-dial list, F.1
Features overview, A.1–A.3
Phone, A.1
Voice mail, A.3
Functions
Function 5 — voice mail programming, D.1–D.5
Function 6 — recording, E.1–E.3
Function 7 — Reports, F.1
Holiday mode
Remote setting, A.6
Re-recording greeting, E.2
Mailboxes
Cascade paging, D.4–D.5
Group, D.2
Guest/info, D.1–D.2
Q & A, D.5
Maintenance port, G.1
MOH, E.3
Overlays, A.3
Password, Administrator, B.1
Programming
Accessing user station programming, B.1
Keys, A.5
System, A.4
System fixed numbering plan, A.6
Prompts, re-recording, E.1–E.2
Recording, C.1, E.1–E.3
MOH programming, E.3
Recording directory names, E.2
Re-recording system prompts, E.1–E.2
Reports, F.1, G.1
ACD department detail report, F.1
SMDR, G.1
System speed-dial list, F.1
Voice mail programming report, F.1
Voice mail statistics report, F.1
Serial ports, G.1
Service observing, C.1
SMDR report, G.1
Speed-dialing. See Esi-Dex
System modes. See Day/night/holiday modes
System prompts, re-recording, E.1–E.2
Time/date, setting, B.1
Toll restriction, C.1
Voice mail programming, D.1–D.5
Cascade paging mailboxes, D.4–D.5
Group mailboxes, D.2
Guest/info mailboxes, D.1–D.2
Message notification, D.2–D.4
Q & A mailboxes, D.5
Voice mail statistics report, F.1
www.esi-estech.com