1
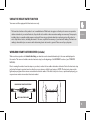
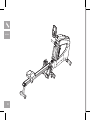
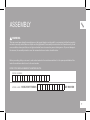
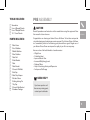
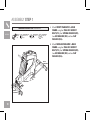
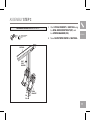
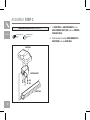
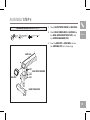
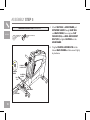
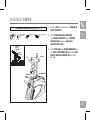
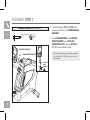
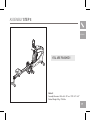
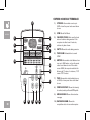
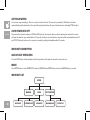
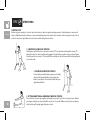
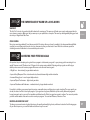
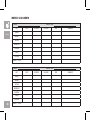
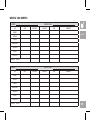
OXFORD 5
AIR ROWER OWNER’S MANUAL
Read all precautions and instructions in this manual before using this equipment. Save this manual for future reference.
WARNING
To reduce the risk of serious injury, read the important safety
precautions before using this equipment:
OXFORD 5
••
••
••
••
••
••
••
••
••
••
••
••
••
••
••
••
••
Read all instructions in this manual before using this equipment.
Use this equipment only as described in this Owner’s Manual.
Never allow children to use this unit.
Inspect and tighten all parts before using this equipment. Replace any worn parts immediately.
Observers should be warned to stay away from unit while in use. Failure to do so may cause injury to observer and/or exerciser.
Never stick fingers or foreign objects through fan cover. Keep small children away from the air rower while in use. Failure to do so
could cause injury to child or unit.
Never remove any of the safety guards that are attached to your air rower. If removal is required for any service or maintenance,
this should be done only by your authorized dealer and must be replaced before use.
Wear appropriate workout attire, including running or aerobic shoes, when using the rower.
If you experience any kind of pain, including but not limited to chest pains, nausea, dizziness, or shortness of breath, stop
exercising immediately and consult your physician before continuing.
Keep the topside of the foot support clean and dry.
Care should be taken when mounting or dismounting the equipment.
At no time should more than one person be on the rower while in operation.
Do not use other attachments that are not recommended by the manufacturer. Attachments may cause injury.
Do not operate where aerosol (spray) products are being used or when oxygen is being administered.
The equipment shall be installed on a stable base.
It is essential that this machine is home product that only for indoors use.
The folded equipment should stored at horizontal place for possible stability risk.
1. Before beginning any exercise program, always consult your physician. If you experience chest pains, nausea, dizziness or
shortness of breath, stop exercising and consult your physician before continuing.
2. Before using rowing machine, ensure the FOLDING LOCKING PIN being fixed firmly on the frame.
2
At NO time should pets or children under the age of 14 be closer to the rower than 10 feet.
At NO time should children under the age of 14 use the rower.
Children over the age of 14 or disabled persons should not use the rower without adult supervision.
OXFORD 5
3
LOCATION OF THE Rower
1 ft
31 cm
Place the rower on a level surface. We advice there should be clearance around your rower
trainer (see guide). Do not place the rower in any area that will block any vent or air openings.
OXFORD 5
WORKOUT OPTIONS
Adjust the footplate and tighten the footstraps. Grip the handle bar and start the rowing stroke in
leaning slightly forward with the knees bent and the arms straight.
3 ft
3 ft
92 cm
92 cm
Push backwards straightening and legs simultaneously. Return to the starting position, continue
the movement forward and backward.
7 ft
MOVING the ROWER
4
214 cm
Using the HEART RATE function
Your rower could be equipped with heart rate sensor only.
The heart rate function on this product is not a medical device. While heart rate grips or a thumb pulse sensor can provide a
relative estimation of your actual heart rate, they should not be relied on when accurate readings are necessary. Some people,
including those in a cardiac rehab program, may benefit from using an alternate heart rate monitoring system like a chest or
wrist strap. Various factors, including movement of the user, may affect the accuracy of your heart rate reading. The heart rate
reading is intended only as an exercise aid in determining heart rate trends in general. Please consult your physician.
OXFORD 5
WIRELESS HEART RATE RECEIVER (include)
When used in conjunction with a heart rate strap, your heart rate can be transmitted wirelessly to the rower and displayed on
the console. The rower not include a wireless heart rate strap (see the beginning of the assembly section of your owner’s
manual).
Prior to wearing the wireless heart rate strap on your chest, moisten the two rubber electrodes with water. Center the heart rate strap
just below the breast or pectoral muscles, directly over your sternum, with the logo facing out. NOTE: The heart rate strap must be
tight and properly placed to receive an accurate and consistent readout. If the chest strap is too loose, or positioned improperly, you
may receive an erratic or inconsistent heart rate readout.
BACKSIDE OF HEART RATE STRAP
LOGO
APPLY MOISTURE HERE
5
OXFORD 5
6
ASSEMBLY
WARNING
There are several areas during the assembly process that special attention must be paid. It is very important to follow the assembly
instructions correctly and to make sure all parts are firmly tightened. If the assembly instructions are not followed correctly, the air
rower could have frame parts that are not tightened and will seem loose and may cause irritating noises. To prevent damage to
the air rower, the assembly instructions must be reviewed and correct actions should be taken.
Before proceeding, find your air rower’s serial number located on the main frame and enter it in the space provided below. Also
locate the model name which is next to the serial number.
ENTER YOUR SERIAL NUMBER IN THE BOXES BELOW:
SERIAL NUMBER:
MODEL NAME:
Horizon FITNESS
Air rower
7
Z10
Z14
TOP CAP
2-Z09
CONSOLE WITH MAST
Z14
Z12
2-Z02
CONSOLE MAST BRACKET
Z11
OXFORD 5
FRONT STABILIZER
FOLDING LOCKING PIN
2-Z04
SEAT
2-Z09
2-Z08
ROTATION
SLEEVE
4-Z13
SEAT BRACKET
MAIN FRAME
2-Z04
4-Z13
4-Z02
2-Z03
SEAT RAIL
4-Z06
4-Z05
SEAT STOP
BUMPER
MIDDLE STABILIZER
PEDAL BRACKET
2-Z07
4-Z02
END CAP
REAR STABILIZER
8
4-Z01
4-Z02
4-Z01
2-Z03
4-Z02
TOOLS INCLUDED:
FF
FF
FF
FF
Screwdriver
5 mm L-Shaped Wrench
5 mm T-Shaped Wrench
13 / 15 mm Wrench
PARTS INCLUDED:
FF
FF
FF
FF
FF
FF
FF
FF
FF
FF
FF
FF
FF
FF
FF
FF
1 Main Frame
1 Front Stabilizer
1 Middle Stabilizer
1 Rear Stabilizer
1 Seat Rail
1 Pedal Bracket
1 Seat
1 Seat Bracket
1 Console With Mast
1 End Cap
2 Seat Stop Bumper
1 Rotation Sleeve
1 Folding Locking Pin
1 Top Cap
1 Console Mast Bracket
1 Hardware Package
PRE ASSEMBLY
CAUTION
Read all precautions and instructions in this manual before using this equipment. Save
this manual for future reference.
OXFORD 5
Congratulations on choosing an Horizon Fitness Air Rower. You’ve taken an important
step in developing and sustaining an exercise program! Your Horizon Fitness Air Rower
is a tremendously effect tool for achieving your personal fitness goals. Regular use of
your Horizon Fitness Rower can improve the quality of your life in so many ways.
Here are a few of the health benefits of aerobic exercise:
•• Weight Loss
•• A Healthier Heart
•• Improved Muscle Tone
•• Increased Daily Energy Levels
•• Reduced Stress
•• Help in Countering Anxiety and Depression
•• An Improved Self Image
NEED HELP?
If you have questions or if
there are any missing parts,
contact your local dealer.
9
ASSEMBLY STEP 1
HARDWARE PACKAGE STEP 1 CONTENTS :
OXFORD 5
BOLT (Z13)
M8 x 30L
Qty: 8
SPRING WASHER (Z02)
Ø8.2 x Ø15.4 x 2.0T
Qty: 8
ARC WASHER (Z03)
Ø8.4 x Ø17 x 1.0T
Qty: 4
MAIN FRAME
Z04
Z13
Z02
Z03
MIDDLE
STABILIZER
10
Z13
Z02
Z03
Attach FRONT STABILIZER to MAIN
FRAME using four OVAL HEX SOCKET
BOLT (Z13), four SPRING WASHER (Z02),
two ARC WASHER (Z03) and two FLAT
WASHER (Z04).
B
Attach MIDDLE STABILIZER to MAIN
FRAME using four OVAL HEX SOCKET
BOLT (Z13), four SPRING WASHER (Z02),
two ARC WASHER (Z03) and two FLAT
WASHER (Z04).
FLAT WASHER (Z04)
Ø8.2 x Ø20 x 1.5T
Qty: 4
FRONT
STABILIZER
Z04
A
ASSEMBLY STEP 2
HARDWARE PACKAGE STEP 2 CONTENTS :
BOLT (Z01)
M8 x 20L
Qty: 4
SPRING WASHER (Z02)
Ø8.2 x Ø15.4 x 2.0T
Qty: 4
A
B
Attach PEDAL BRACKET to SEAT RAIL using
four OVAL HEX SOCKET BOLT (Z01) and
four SPRING WASHER (Z02).
OXFORD 5
Screw SEAT STOP BUMPER to SEAT RAIL.
SEAT RAIL
SEAT
STOP
BUMPER
Z02
PEDAL
BRACKET
Z01
11
ASSEMBLY STEP 3
HARDWARE PACKAGE STEP 3 CONTENTS :
OXFORD 5
OVAL CROSS BOLT (Z05)
M6 x 15L
Qty: 4
SPRING WASHER (Z06)
Ø6.1 x Ø12.2 x 1.5T
Qty: 4
SEAT PAD
SEAT BRACKET
Z06
Z05
SEAT RAIL
12
A
Fix SEAT PAD on SEAT BRACKET by four
OVAL CROSS BOLT (Z05) and four SPRING
WASHER (Z06).
B
Slide the Seat Assembly (SEAT BRACKET +
SEAT PAD) onto the SEAT RAIL.
ASSEMBLY STEP 4
HARDWARE PACKAGE STEP 4 CONTENTS :
BOLT (Z01)
M8 x 20L
Qty: 4
SPRING WASHER (Z02)
Ø8.2 x Ø15.4 x 2.0T
Qty: 4
Oval Cross Tapping Screw (Z07)
Ø4 x 10L
Qty: 2
A
Screw SEAT STOP BUMPER to SEAT RAIL.
B
Attach REAR STABILIZER to SEAT RAIL by
four OVAL HEX SOCKET BOLT (Z01) and
four SPRING WASHER (Z02).
OXFORD 5
C Insert the END CAP to SEAT RAIL and use
two SCREWS (Z07) to fix the end cap.
SEAT RAIL
Z07
END CAP
SEAT STOP BUMPER
Z02
Z01
REAR STABILIZER
13
ASSEMBLY STEP 5
HARDWARE PACKAGE STEP 5 CONTENTS :
OXFORD 5
FLAT WASHER (Z08)
Ø8.6 x Ø26 x 2T
Qty: 2
Z09
Z08
ROTATION
SLEEVE
MAIN FRAME
SEAT RAIL
14
Attach SEAT RAIL to MAIN FRAME, put
ROTATION SLEEVE through SEAT RAIL
and MAIN FRAME, then using two FLAT
WASHER (Z08) and OVAL HEX SOCKET
BOLT (Z09) to tighten SEAT RAIL on the
MAIN FRAME.
B
Plug the FOLDING LOCKING PIN into the
hole on MAIN FRAME and then screw it tightly
by clockwise.
OVAL HEX SOCKET BOLT (Z09)
M8 x 15L
Qty: 2
FOLDING
LOCKING PIN
ROTATION
SLEEVE
A
ASSEMBLY STEP 6
HARDWARE PACKAGE STEP 6 CONTENTS :
BOLT (Z09)
M8 x 15L
Qty: 2
SPRING WASHER (Z02)
Ø8.2 x Ø15.4 x 2.0T
Qty: 2
OVAL CROSS BOLT (Z10)
M4 x 15L
Qty: 2
Oval Cross Tapping Screw (Z14)
Ø4 x 10L
Qty: 2
CONSOLE
MAST
BRACKET
P01
A
Put wire (P01) through the slot of CONSOLE
MAST BRACKET.
B
Attach CONSOLE MAST BRACKET
onto FRAME BRACKET by two SPRING
WASHER (Z02) and two OVAL HEX
SOCKET BOLT (Z09).
OXFORD 5
C Attach TOP CAP onto FRAME BRACKET use
FRAME
BRACKET
Z10
TOP CAP
Z14
Z09
two OVAL CROSS BOLT (Z10) and two OVAL
CROSS TAPPING SCREW (Z14) to fix the
top cap.
Z14
Z02
CONSOLE
MAST
BRACKET
FRAME BRACKET
15
ASSEMBLY STEP 7
HARDWARE PACKAGE STEP 7 CONTENTS :
OXFORD 5
OVAL HEX SOCKET BOLT (Z11)
M8 x 45-15L
Qty: 1
NUT (Z12)
M8 x 1.25P
Qty: 1
CONSOLE WITH MAST
Z12
Connect the plug of (P01) and (P02) then
insert the wire to the slot of CONSOLE MAST
BRACKET.
B
Attach CONSOLE MAST onto CONSOLE
MAST BRACKET by one OVAL HEX
SOCKET BOLT (Z11) and one NUT (Z12),
DO NOT screw the bolt too tight.
Note: Before tighten the mast to bracket, remember to
connect the wires P01 & P02 to ensure the console
works normally.
CONSOLE MAST BRACKET
Z11
P02
P01
16
A
CONSOLE
MAST
BRACKET
ASSEMBLY STEP 8
OXFORD 5
YOU ARE FINISHED!
Oxford 5
Assembly Dimension: 253 x 54 x 101 cm / 100” x 21” x 40”
Product Weight: 47kg / 103.5 lbs.
17
INSTRUCTION-FOLDING AND SET UP
A FOLDING
OXFORD 5
Turn loose and pull out the
folding locking pin
Lift up the seat rail
Vertical fold and lock
the rail
Pull the seat at the top position
of rail, then plug the folding
locking pin to the rear of rail to
prevent seat fall down.
Step the foot plate
Pull down the rail
Plug the folding locking pin
and screw tightly
B SET UP
Lift and hold the seat, turn loose
and pull out the folding locking pin,
put the seat down to the end of rail.
18
CAUTION
OXFORD5 is foldable, please take care not to step the foot plate when pass by.
AIR ROWER OPERATION GUIDE
This section explains how to use your air rower’s console and program. The BASIC OPERATION section in the air rower
guide has instructions for the following:
• GETTING STARTED
• AUTO POWER ON/OFF
• OXFORD 5 OPERATION
• OXFORD 5 FUNCTIONS
19
OXFORD 5 DISPLAY FEEDBACK
8
1) STROKES: Accumulates counts up to
9900 or from the preset value count down
to zero.
2) SPM: Stroke Per Minute
OXFORD 5
3
CALORIES
2
SPM
1
4
WATTS
PULSE
TIME/500M
6
STROKES
METRES
TIME
5
7
9
10
USER
PACER
Display Change
Anzeigenwechsel
On/Off
A
Ein/Aus
B
Row
Rudern
Recovery
Mode
Erholung
Modus
Back
•
Pause
Enter
Zurück
Eingabe
C
3) CALORIES/PULSE: Auto scan the heart
rate and calories during exercise. If the
computer not detect user’s heart rate,
calories only been shown.
4) WATTS: Shows the watts during exercise.
5) TIME/500M: Estimated time to reach
500M
6) METRES: Accumulates total distance from
zero up to 9999 metres, or from the preset
values count down to zero. If the values
excess 9999, the computer calculate the
distance by 10 metres, for instance, 10.01
means 10010 metres.
7) TIME: Accumulates total working time up
to 99:59, or from preset time count down
to zero.
8) PROFILE DISPLAY: Shows the intensity
of workout, watts profile and SPM profile.
9) MESSAGE BAR: Shows the instruction
message.
20
D
E
F
G
H
10) RACING DIAGRAM: Shows the
competition status of user and computer.
OXFORD 5 OPERATION
A) DISPLAY SWITCH: Press to change the profile display, press to change “ROWING INTENSITY” to “CALORIES PROFILE
DISPLAY” and “SPM PROFILE DISPLAY”.
B) ON/OFF: Press to turn on or turn off the power of console.
C) UP/DOWN ARROW BUTTON: Press to adjust the selection.
D) ROW: Press to quick start.
E) RECOVERY: Press to recover the heart rate of user from intensely workout.
F) BACK/PAUSE: Press to last selection when set up program. Press to PAUSE or Press and hold to rest the computer during
exercise.
G) ENTER: Press to confirm.
H) MODE: Press to enter programs list.
OXFORD 5
* Maximum user’s body weight = 130 kg / 286 lbs.
NOTE: Please adjust the console and console mast in a comfortable angle of view before workout.
There is a thin protect sheet of clear plastic on the overlay of the console that should be removed.
BRAKE SYSTEM
OXFORD 5 equip with air resistance system that is speed-dependent on the load.
21
GETTING STARTED
Your air rower is powered by you. There is no motor or brake in this unit. The console is powered by 2 AA batteries, which are
replaceable through the back side of the console. Removing the batteries will erase all functional values (including TOTAL function)
AUTO POWER ON/OFF
OXFORD 5
The power will be turned on when you PUSH the ON button on the computer. After you have completed your workout the console
will retain the data from your workout data for 30 seconds. In order to conserve batteries, the power will be automatically turned off if
you DO NOT push any buttons on the computer or workout by pulling the handlebar within 30 seconds.
WORKOUT DESCRIPTION
QUICK START OPERATION
Press the ROW button and the machine will start the operation, all the workout value will count up from zero.
MODE
Press MODE button to enter WORKOUT list and use ARROW button/MODE button to select and ENTER button to confirm.
WORKOUT LIST
MODE
22
BEGINNER
MANUAL
RACE
HR FUNCTION
INTERMEDIATE
ADVANCED
MAXIMUM HR
TARGET HR
MANUAL
Manual is a workout that allows you to manually adjust the STROKES, METRES and TIME as the target, all the value will count down
until zero, as long as one of them going down to zero, this workout will complete and console display the workout data (WATTS,
CALORIES, SPM, TIME/500M) on screen for 30 seconds.
RACE
OXFORD 5
User can choose the difficulty of RACE game includes BEGINNER, INTERMEDIATE and ADVANCED. After decide the difficulty
then press ROW to start the competition, if the speed of user is faster than computer, user’s boat will move forward than the
computer. Once the boat reaches the terminal, the flag twinkles and message bar shows the result of competition.
HR FUNCTION (HEART RATE FUNCTION)
This function is required HEART RATE STRAP. Due to the fact a user must wear a heart rate strap, heart rate readings on a rowing
machine may be erratic. This is because the user’s heart rate signal will be close to the console and then at the back of the stroke be
over the recommended 24”-36” away from the console, so this signal strength varies with each stroke pattern.
There are two options for the function, includes MAXIMUM HR and TARGET HR. Once enter MAXIMUM HR, message bar will ask
the user to enter maximum heart rate, if you exceed this maximum heart rate value, the console will warn you by creating an audible
beep. This function can help the user to monitor the heart rate and control the workout intensity. Once enter TARGET HR, message
bar will ask the user to enter age, then console comes out a reference target heart rate value as default, if the heart rate of user is
15% higher or lower the default heart rate, the message bar will shows “SLOW DOWN” or “WORKOUT HARDLY” to encourage the
user exercise in high intensity by safe method.
WARNING
Heart rate monitoring systems may be inaccurate. Over exercise may result in serious injury or death.
RECOVERY
This function is required HEART RATE STRAP. RECOVERY is kind of concept similar to cool down, at any moment when press
RECOVERY button, all the programs will STOP and go into RECOVERY mode, at this moment, console will record current heart rate
as workout heart rate, if user’s heart rate is 30% lower than workout heart rate or 3 minutes ending, RECOVERY function will stop
automatically.
23
CONDITIONING GUIDELINES
Always consult your physician before beginning an exercise program.
OXFORD 5
HOW OFTEN? (Frequency of Workouts)
The American Heart Association recommends that you exercise at least 3 to 4 days per week to maintain cardiovascular fitness. If
you have other goals such as weight or fat loss, you will achieve your goal faster with more frequent exercise. Whether it’s 3 days or 6
days, remember that your ultimate goal should be to make exercise a lifetime habit. Many people are successful staying with a fitness
program if they set aside a specific time of day to exercise. It doesn’t matter whether it’s in the morning before breakfast, during lunch
hour or while watching the evening news. What’s more important is that it’s a time that allows you to keep a schedule, and a time
when you won’t be interrupted. To be successful with your fitness program, you have to make it a priority in your life. So decide on a
time, pull out your day planner and pencil in your exercise times for the next month!
HOW LONG? (Duration of Workouts)
For aerobic exercise benefits, it’s recommended that you exercise from between 24 and 60 minutes per session. But start slowly and
gradually increase your exercise times. If you’ve been sedentary during the past year, it may be a good idea to keep your exercise
times to as little as five minutes initially. Your body will need time to adjust to the new activity. If your goal is weight loss, a longer
exercise session at lower intensities has been found to be most effective. A workout time of 48 minutes or more is recommended for
best weight loss results.
HOW HARD? (Intensity of Workouts)
How hard you workout is also determined by your goals. If you use your air rower to prepare for a 5K run, you will probably work out
at a higher intensity than if your goal is general fitness. Regardless of your long term goals, always begin an exercise program at low
intensity. Aerobic exercise does not have to be painful to be beneficial! There are two ways to measure your exercise intensity. The
first is by monitoring your heart rate (using the grip pulse handlebars or a wireless chest transmitter - may be sold separately), and the
second is by evaluating your perceived exertion level (this is simpler than it sounds!).
PERCEIVED EXERTION LEVEL
A simple way to gauge your exercise intensity is to evaluate your perceived exertion level. While exercising, if you are too winded to
maintain a conversation without gasping, you are working out too hard. A good rule of thumb is to work to the point of exhilaration,
not exhaustion. If you cannot catch your breath, it’s time to slow down. Always be aware of these warning signs of overexertion.
24
ROUTINE MAINTENANCE
WHAT KIND OF ROUTINE MAINTENANCE IS REQUIRED?
We use sealed bearings throughout our air rowers so lubrication is not needed. The most important maintenance step is to simply
wipe your perspiration off the air rowers after each use.
HOW DO I CLEAN MY HORIZON AIR ROWER?
Clean with soap and water cleaners only. Never use solvents on plastic parts. Cleanliness of your Horizon Fitness air rower and
its operating environment will keep maintenance problems and service calls to a minimum. For this reason, Horizon preventative
recommends that the following preventative maintenance schedule be followed.
OXFORD 5
AFTER EACH USE (DAILY)?
Clean with soap and water cleaners only.
WARNING! Wipe down the air rower with a damp cloth. Never use solvents, as they can cause damage to the air rower.
EVERY WEEK
Clean underneath the air rower, following these steps:
• Move the air rower to a remote location.
• Wipe or vacuum any dust particles or other objects that may have accumulated underneath the air rower.
• Return the air rower to its previous position.
EVERY MONTH
Inspect all assembly bolts and pedals on the machine for proper tightness.
Note: Replace defective components immediately and keep the equipment out of use until repair.
25
TIP S
OXFORD 5
STRETCHING
STRETCH FIRST
Before using your product, it is best to take a few minutes to do a few gentle stretching exercises. Stretching prior to exercise will
improve flexibility and reduce chances of exercise related injury. Ease into each of these stretches with a slow gentle motion. Do not
stretch to the point of pain. Make sure not to bounce while doing these stretches.
1. STANDING CALF MUSCLE STRETCH
Stand near a wall with the toes of your left foot about 18” from the wall, and the right foot about 12”
behind the other foot. Lean forward, pushing against the wall with your palms. Keep your heels flat and
hold this position for a count of 15 seconds. Make sure that you do not bounce while stretching. Repeat
on the other side.
2. STANDING QUADRICEP STRETCH
Using a wall to provide balance, grasp your left ankle
with your left hand and hold your foot against the
back of your thigh for 15 seconds. Repeat with your
right ankle and hand.
26
3. SITTING HAMSTRING & LOWER BACK MUSCLE STRETCH
Sit on the floor with your legs together and straight out in front of you. Do not lock your knees. Extend
your fingers towards your toes and hold for a count of 15 seconds. Make sure that you do not bounce
while stretching. Sit upright again. Repeat one time.
TIP S
THE IMPORTANCE OF WARM UP & COOL DOWN
WARM UP
The first 2 to 5 minutes of a workout should be devoted to warming up. The warm-up will limber your muscles and prepare them for
more strenuous exercise. Make sure that you warm-up on your product at a slow pace. The warm up should gradually bring your heart
rate into your Target Heart Rate Zone.
OXFORD 5
COOL DOWNN
Never stop exercising suddenly! A cool-down period of 3-5 minutes allows your heart to readjust to the decreased demand. Make
sure that your cool down period consists of a very slow pace to allow your heart rate to lower. After the cool-down, repeat the
stretching exercises listed above to loosen and relax your muscles.
TIP S
ACHIEVING YOUR FITNESS GOALS
An important step in developing a long term fitness program is to determine your goals. Is your primary goal for exercising to lose
weight? Improve muscle? Reduce stress? Prepare for the spring racing schedule? Knowing what your goals are will help you
develop a more successful exercise program. Below are some common exercise goals:
• Weight Loss - lower intensity, longer duration workouts
• Improve Body Shape and Tone - interval workouts, alternate between high and low intensities
• Increased Energy Level - more frequent daily workouts
• Improved Sports Performance - high intensity workouts
• Improved Cardiovascular Endurance - moderate intensity, longer duration workouts
If possible try to define your personal goals in precise, measurable terms, and then put your goals in writing. The more specific you
can be, the easier it will be to track your progress. If your goals are long term, d5ide them up into monthly and weekly segments.
Longer term goals can lose some of the immediate mot5ation benefits. Short term goals are easier to achieve. Your console provides
you with several readouts that can be used to record your progress. You can track Distance, Calories or Time.
KEEPING AN EXERCISE DIARY
To make your personal exercise log book, photocopy the weekly and monthly log sheets, which are located on the following pages.
As your fitness improves, you can look back and see how far you’ve come!
27
WEEKLY LOG SHEETS
WEEK #
DAY
OXFORD 5
WEEKLY GOAL
DATE
DISTANCE
CALORIES
TIME
COMMENTS
TIME
COMMENTS
SUNDAY
MONDAY
TUESDAY
WEDNESDAY
THURSDAY
FRIDAY
SATURDAY
WEEKLY TOTALS:
WEEK #
DAY
SUNDAY
MONDAY
TUESDAY
WEDNESDAY
THURSDAY
FRIDAY
SATURDAY
28
WEEKLY TOTALS:
WEEKLY GOAL
DATE
DISTANCE
CALORIES
WEEKLY LOG SHEETS
WEEK #
DAY
WEEKLY GOAL
DATE
DISTANCE
CALORIES
TIME
COMMENTS
SUNDAY
OXFORD 5
MONDAY
TUESDAY
WEDNESDAY
THURSDAY
FRIDAY
SATURDAY
WEEKLY TOTALS:
WEEK #
DAY
WEEKLY GOAL
DATE
DISTANCE
CALORIES
TIME
COMMENTS
SUNDAY
MONDAY
TUESDAY
WEDNESDAY
THURSDAY
FRIDAY
SATURDAY
WEEKLY TOTALS:
29
MONTHLY LOG SHEETS
MONTH
MONTHLY GOAL
WEEK #
DISTANCE
CALORIES
TIME
OXFORD 5
MONTHLY TOTALS:
MONTH
MONTHLY GOAL
WEEK #
MONTHLY TOTALS:
DISTANCE
CALORIES
TIME
MONTHLY LOG SHEETS
MONTH
MONTHLY GOAL
WEEK #
DISTANCE
CALORIES
TIME
OXFORD 5
MONTHLY TOTALS:
MONTH
MONTHLY GOAL
WEEK #
MONTHLY TOTALS:
DISTANCE
CALORIES
TIME
oxford 5 EXPLODED VIEW
9
Q09x12
Q11x12
Q13x6
Q16
Q09
OXFORD 5
Q18
Q15
Q04
Q17
Q14
Q15
Z10
Q18
12
Q03
Z14x2
5
Z09x2
Z02x2
Z11
1
Q09x3
Q12x4
R44x3
Z12
R32x2
R41x3
R29x3
S01
B28x2
B27x2
K03
K08x2
4
R18
13
Z03x2
Z13x4
Z02x4
Z04x2
K04x2
F13
14
Q09
R41x3
R29x3
R44x3
R28x3
7
F05x2
10
3
Z07x2
F14
Z06x4
Z05x4
Z02x4
Z01x4
32
Z03x2
K07
K02
D06
8
R31x2
R38x2
Z13x4
Z02x4
Z04x2
AB1
Z08x2 V05
Z09x2
K06x2
K05x2
K01
P04
P03
14
R28x3
11
P05
P01
AC1
6
15
Z02x4
Z01x4
Q09x3
1
2
7
11
L11x4
L06x2
J03x2
L07x2
AL1
D07x2
J04x2
D02
J02
L08x2
L05x2
L09x2
J01
Q08
L10x2
Q07
3
D08x3
8
D01
OXFORD 5
Q10x3
M05x4
M03x2
Q02
AM1
D04x3
D03x3
D03x3
M04x2
D05x3
R03x9
12
D04x3
R17
9
N03
N08x4
N02
缺:1. 內置式接收器組x1
N09x2
AR1
N63
N06x7
N01
21x3
31
N60
N61
R37x4
4
N04
R42x2
AF1
R35x2
R21
R05
R34
V01
F15x6
F06x2
10
R39x4
R13
F08x6
F01
F10x6
Q01
F11
R25
R27
R22
R25R22
F09
V02
F16
R02
F11
Q05
F12
5
R08
R06
6
V13
R07
R36
R20
Q06
Q10x3
AG3
G01
G04x2
H05x2
AH1
R14 R10
R25
G02
H06x2
G03x2
R11
B26
R39x2
R24
R26
R22
R09
R27
R12
R12
R11
R13
R39x4
V13
33
oxford 5 PARTS LIST
OXFORD 5
34
NO.
DESCRIPTION
QYT.
NO.
1
Idler Set;Semi-Assy;-;AR50
1
B27
Screw;Round;M5x0.8Px16L;
DESCRIPTION
QYT.
2
3
Seat Slide Set;Semi-Assy;-;AR50;SBOM
1
B28
NUT;HX;M5X0.8P;SS41;
2
4
Guid Rail Set;-;1;AR50;SBOM
1
D01
Seat Slide Set;-;-;painting;DM362;Black2
1
5
Handlebar Set;Semi-Assy;-;AR50;SBOM
1
D02
Cylinder;Slipping Base;POM;White;AR06D
3
6
Rack set;Semi-Assy;back;AR50¡FSBOM;-
1
D03
Spacer; Sleeve; CST; BAN
6
7
Stabilizer set;Semi-Assy;mid;AR50;S-BOM
1
D04
Washer;SPL;13.0x19.0x2.0t;Rubber; Black
6
8
Stabilizer set;Semi-Assy;front;AR50;S-BO
1
D05
Screw; HH; M8x130L; MT; HE; CST;BAN; P-T
3
1
9
Console set;Semi-Assy;AR50;SBOM
1
D06
Seat Pad-Extrawork;Screen print;AR50;
10
Cover set;Semi-Assy;right;AR50;SBOM;-
1
D07
BEARING;BALL;608ZZ;TPI
6
11
Frame Cover Set;Semi-Assy;left;AR50;SBOM
1
D08
NUT;HX;M8X1.25P;SS41;BAN
3
12
Drive Axle Set;Semi-Assy;-;AR50;SBOM;-
1
F01
AL Rail;Guide Rail;Back;-;AL 6063;Anodiz
1
13
Belt pulley set;-;-;AR50
1
F05
Stopper Block;NR;BL/Black C;AR50
2
14
Spiral Spring Set;L/R;KM;AR06D
1
F06
Screw;Hex Socket;BH;M8x1.25Px15L;Cr
2
15
Pedal Set;semi-manufactured goods;-;AR50
1
F08
WASHER;SPL;Φ8.2XΦ15.4X2.0T;WZN
6
21
Slipping Base Cylinder Set;W;KM;AR06D;
3
F09
Attached Plate;Frame Rack;-;SPC;BZN;AR50
1
31
6
Wheel Rim Set;Semi-Assy;-;AR50;-
1
F10
SCREW;SH;M8X1.25PX15L;HS;CHM;BP
AB1
frame set;AR50
1
F11
RVN;;ALS7-8125-3.8(0.5-3.8);YZN
2
AC1
Console Mast Fixing Plate Set;-;-;weldin
1
F12
SCREW;FH;M5X0.8PX15L;HS;BZN
2
AF1
Limit folder set;Guide Rail;F;painting;D
1
F13
Swivel Axle;Guide Rail;-;45#;AR50
1
AG3
Semi-Assy;Fabricate Drawing; Fix Ring;AR
1
F14
Rear Decorate Cover-Exreawork;Guide Rail
1
AH1
Rack Set;-;-;painting;DM362;Black2;AR50
1
F15
WASHER;FLT;Φ8.2XΦ16.0X2.0T;CHM
6
AL1
stabilizer set;-;M;painting;DM362;Black2
1
F16
RVN;ALS7-1015-1.5(0.5-3.8);YZN
1
AM1
stabilizer set;-;F;painting;DM362;Black2
1
G01
Horizon Tube;Handlebar;painting;Black2
1
AR1
Front Wheel Drum Set;-;-;AR50
1
G02
POS Ring;Handlebar;-;-;AR50
1
AT1
Pedal Set;-;-;painting;DM362;Black2;AR50
1
G03
Foam;singleside;BLACK;φ28.6x3.0t;A
2
B26
Fix Plate;Steel Rope;SPC;1.6t;Zinc;AR01
1
G04
Screw;Settle;M6x1.0Px8.0L;BED;
2
NO.
QYT.
NO.
H05
End-Cap;Guide Rail;PP;BL;EP136-B26B
DESCRIPTION
2
N03
Battery Cover;Console;ABS/PA757;Q610-7-
DESCRIPTION
QYT.
1
H06
ADJUSTABLE LEVELER
2
N04
Key Pad-Extrawork;console;;Screen print;
1
J01
Axle;Pulley;-;S45C;AR50
1
N06
SCREW;BH;Φ3X8L;SM;PH;BAN;POT
7
J02
Pulley;POM;BL/Black C;AR50
1
N08
SCREW;BH;Φ4x12L;TC;PH;BAN;POT
4
J03
NUT;HX;M10X1.5P;SS41;BAN;G10;
2
N09
SCREW;RND;Φ2.5X6L;SM;PH;BZN;POT
2
J04
WASHER;FLT;Φ10.2XΦ20.0X2.0T;BZN
2
N60
(Up)Control panel;Console;Dip;HAPA;S101
1
K01
Stopper Axle;Folding;-;20#;AR50
1
N61
Documentation;Overlay;Display Manipulate
1
K02
Location Plate;Spring;-;SPC;1.5t;AR50
2
N63
Battery Base;AA;3V;1500mA;Alkaline
1
K03
PEDAL;Folding;painting;Black2;AR50
1
P01
Speed Sensor;w/ wire;End;Black;AR50-P01
1
K04
Spring;Extension;-;-;Black Annodized
2
P02
Speed Sensor;w/ wire;Front;Black;AR50-P0
1
1
K05
Circlip;External C Type;S-10;BAN
2
P03
Fixing Plate;Reed;-;AL;ADZ;AR50
K06
SCREW;BH;M6X1.0PX20L;HS;BZN
2
P04
SCREW;TRH;Φ4X10L;SM;PH;BZN;POT
1
K07
NUT;NLK;M6X1.0P;;BAN
2
P05
SCREW;BH;Φ3X10L;SM;PH;BZN;POT
2
K08
WASHER;FLT;Φ8.0XΦ15.0X1.0T;TFN
2
Q01
Cover;Frame;right;ABS/PA757;Q610-7-5-MAT
1
L05
transports wheel;pc;black;FC16
2
Q02
Cover;Frame;left;ABS/PA757;Q610-7-5-MATT
1
L06
End-Cap;Guide Rail;PP;BL;EP136-B26B
2
Q03
Cover;Frame;up;ABS/PA757;Light Black;AR
1
L07
SCREW;BH;M8X1.25PX45L-19L;HS;P-T
2
Q04
Cover;Frame;back;PP;Light Black;AR50
1
L08
Washer;Flat;φ8.2xφ16.0x1.0t;BZN
2
Q05
Fan Net;Side Cover;R;painting;;SL+clear
1
L09
NUT;NLK;M8X1.25P;BAN
2
Q06
Logo Cover;Frame;right;ABS/PA757;Light B
1
L10
ADJUSTABLE LEVELER
2
Q07
Fan Net;Side Cover;L;painting;SL+clear
1
L11
RVN;HX;M8X1.25P;YZN;
4
Q08
Logo Cover;Frame;left;ABS/PA757;Light Bl
1
M03
End-Cap;Guide Rail;PP;BL;EP136-B26B
2
Q09
SCREW;BH;Φ4X15L;TC;PH;G8.8;NKL;POT
20
M04
ADJUSTABLE LEVELER
2
Q10
SCREW;BH;Φ4X6L;SM;PH;BZN;POT
3
M05
RVN;HX;M8X1.25P;;YZN;
4
Q10
SCREW;BH;Φ4X6L;SM;PH;BZN;POT
3
N01
Console Uipper Cover;ABS/PA757;Q610-7-
1
Q11
Clip;Standard;WUSN-4039;
12
N02
Console Down Cover;ABS/PA757;Q610-7-5-
1
Q12
Fix Pillar;PP;TM81
4
OXFORD 5
35
oxford 5 PARTS LIST
NO.
Q13
OXFORD 5
36
DESCRIPTION
BRACKET SIDE COVER
QYT.
R29
SCREW;SH;3/16X3/8L;HS;BZN
6
6
R31
FIX PLATE;EYE BOLT;SPC;1.3T;AB01
2
NUT;NLK;1/4’’-20UNC;BZN
Q14
Console Mast;AR50;ABS;Black
1
R32
Q15
SCREW;Φ4X15L
2
NO.
DESCRIPTION
2
QYT.
Q16
SCREW;BH;M8X1.25PX50L-18L;HS;BZN;P-T
1
R34
Fix Ring;AB01
1
Q17
NUT;HX;M8X1.25P;SS41;BAN
1
R35
Fixing Bracket;Magnet;-;ABS/PA757;BL/Bla
2
Q18
Cap;Consoel Mast
2
R36
BEARING;ONE-WAY;RC162110;CHENG GE
1
R02
BEARING HOUSING;FIX;SS41;AR01
1
R37
SCREW;BH;Φ3X10L;SM;PH;BZN;POT
4
R05
PULLEY;SS41;Φ59;BOX;RB02
1
R38
SCREW;EB;1/4-20UNCX40L;BZN;
2
R06
PULLEY;ROPE;SPC;Φ216;AR01
1
R39
SCREW;BH;Φ3X10L;SM;PH;BZN;POT
2
8
R07
Hub;Pulley;S45C;54.0x32.0L;AR01
1
R39
SCREW;BH;Φ3X10L;SM;PH;BZN;POT
R08
Ring;Rope Wheel;SS41;ψ21.0x6.1L;WZN
1
R41
WASHER;SPL;SW3/16’’;ES
6
R09
BEARING HOUSING;SLIDE;SS41;AR01
1
R42
MAGNET SPARE SINGLE
2
R10
Axle;Pulley;SCM4;Anti Rust;AR01
1
R44
WASHER;FLT;Φ5.0XΦ10.0X1.0T;BAN
6
R11
Fixing Base;Spring;POM;AR01
2
S01
Knob;M10;AR50
1
R12
SPRING;RCL;SK5
2
T05
Foot Pad Rubber; Heel
2
R13
Cover;Spring;SPC;1.5t;Zinc Plate;AR01
2
T06
Fixing Base;Pedal;Nylon;AR06
2
R14
Pulley;Rope;POM;AR03
1
T07
Foot Strap;AR06
2
R18
Belt;TRIANGLE TOOTHLIKE;POLYESTER;3V-114
1
T08
SCREW;BH;M5X0.8PX12L;CT;PH;BZN
6
R20
Fix Ring;S18C;5.0t;AR01
1
T09
SCREW;BH;M5X0.8PX12L;PH;SSTSUS304;BAN
2
R21
Key;Round;Dual-End;5x5x10L
1
T10
NUT;NLK;M5X0.8P;BZN
2
R22
BEARING;BALL;6003ZZ;Ψ17XΨ35X10T;TPI
3
T12
WASHER;FLT;Φ5.2XΦ12.0X1.2T;BZN
4
R24
Key;Round;Dual-End;6x6x30L
1
T13
SCREW;BH;M5X0.8PX25L;CT;PH;BZN
2
R25
CLIP CC R-35 INTERNAL
3
V01
Model Label;Console;AR50
1
R26
Clamp;External C-Shaped;S-19
1
V02
Direction Label;Knob;AR50
1
R27
Clamp;External C-Shaped;S-17
2
V05
Warning Label
1
R28
SCREW;SH;3/16X5/8L;HS;BZN
6
V13
Decal;Swirl Spring;AR01
2
Z01
SCREW;BH;M8X1.25PX20L;HS;BZN;BP
4
Z01
SCREW;BH;M8X1.25PX20L;HS;BZN;BP
4
Z02
WASHER;SPL;Φ8.2xΦ15.4x2.0T
2
Z02
WASHER;SPL;Φ8.2xΦ15.4x2.0T
4
NO.
DESCRIPTION
QYT.
Z02
WASHER;SPL;Φ8.2xΦ15.4x2.0T
4
Z02
WASHER;SPL;Φ8.2xΦ15.4x2.0T
8
4
Z03
WASHER;ARC;Φ8.4XΦ17.0X1.0T
Z04
WASHER;FLT;Φ8.2XΦ20.0X1.5T;BZN
4
Z05
SCREW;BH;M6X1.0PX15L;PH;BZN
4
Z06
WASHER;SPL;Φ6.1XΦ12.2X1.5T
4
Z07
SCREW;BH;Φ4X10L;SM;PH;BAN;POT
2
Z08
Washer;Flat;φ8.6xφ26.0x2.0t;
2
Z09
SCREW;BH;M8X1.25PX15L;;HS;BZN;BP
2
Z09
SCREW;BH;M8X1.25PX15L;HS;BZN;BP
2
Z10
SCREW;BH;M4X0.7PX15L;CT;PH;BZN;
4
Z11
SCREW;BH;M8X1.25PX45L-15L;;HS;P-T
1
Z12
NUT;HX;M8X1.25P;SS41;BAN;
1
Z13
SCREW;BH;M8X1.25PX30L;HS;BZN;BP
8
Z14
SCREW;;Φ4X10L
2
OXFORD 5
37
D: Entsorgungshinweis
Horizon Fitness - Produkte sind recyclebar. Führen Sie das Gerät am Ende der Nutzungsdauer einer sachgerechten
Entsorgung zu (örtliche Sammelstelle).
GB: Waste Disposal
OXFORD 5
Horizon Fitness products are recyclable. At the end if its useful life please dispose of this article correctly and safely
(local refuse sites).
F: Remarque relative à la gestion des dèchets
Horizon Fitness sont recyclables. A la fin sa durrèe d`utilisation, remettez I´appareil à un centre de gestion de dèchets
correct (collecte locale).
NL: Verwijderingsaanwijzing
Horizon Fitness producten zijn recycleerbaar. Breng het apparaat aan het einde van de gebruiksduur naar een op
recycling gespecialiseerd bedrijf (plaatselijk verzamelpunt).
E: Informaciones para la evacuaciòn
Los productos de Horizon Fitness son riciclables. Cuando se termina la vida ùtil de un aparato o una màquina,
entrèguelos an una impresa local de eleiminaciòn de residuos para su reciclaje.
I: Indicazione sullo smaltimento
I prodotti Horizon Fitness sono reciclabill. Quando I`apparecchio non servirà più, portatelo in un apposito punto di
raccolta della Vostra città (Punti di raccolta comunall).
PL: Wskazòwka dotyczàca usuwania odpadòw.
Producty firmy Horizon Fitness podlegajà recyklingowi. Pod koniec okresu o`ywalnoÈcl pros`z oddac urzàdzenie do
wlaÈciwego punkto usuwania odpadòw (lokalny punkt zbiorczy).
38
AIR ROWER OWNER’S MANUAL
Oxford 5 Air Rower Owner’s Manual 081513’ Rev1.0 © 2013 Horizon Fitness
1600 Landmark Drive Cottage Grove, WI 53527, USA