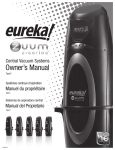
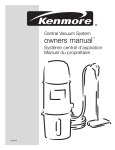
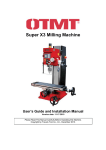
1
Central Vacuum Systems
Owner’s Manual
Type E
Systèmes centraux d’aspiration
Manuel du propriétaire
Type E
Sistemas de aspiradora central
Manual del Propietario
Typo E
high efficiency
haute efficacité • alta eficiencia
# 460528-r1
Important Safeguards.......................................... 3
General Information............................................. 4
CONTENTS
Your central vacuum system package consists of the following items.
Installation........................................................... 4
System Test......................................................... 5
How to use.......................................................... 5
LED Indication Buttons........................................ 5
1- Vacuum Bag
Bag Adaptor........................................................ 6
Utility Valve.......................................................... 6
Emptying the Dirt Receptacle.............................. 6
90° Elbow Bag
Adapter
Filter Maintenance............................................... 6
External Exhaust
Adapter
Paper Bag Filter................................................... 6
Warranty - USA................................................... 8
Intake Plug
Warranty - CANADA............................................ 9
Bag Adapter
Intake Insert
LCD Instruction Manual...................................... 10
Images............................................................... 27
Power Unit
Wall Mount,
2 Screws
IMPORTANT SAFEGUARDS
When using an electronic appliance, basic precautions should always be followed.
READ ALL INSTRUCTIONS BEFORE USING THIS CENTRAL VACUUM SYSTEM.
This central vacuum power unit is intended for the removal of normal household dust.
WARNING
• Connect to a properly grounded outlet only
(refer to grounding instructions).
To reduce the risk of fire, electric shock or injury:
• Do not use extension cords or outlets with inadequate current
carrying capacity.
• Do not use outdoors or on wet surfaces.
• Do not block the motor hood or ventilation openings and duct on
the top of the power unit. Lack of ventilation airflow will cause the
motor to overheat.
• Do not locate the power unit in a high temperature area or where it
is inaccessible, for example, an attic or crawl space.
• Mount the power unit no less than 12in (30 cm) from the ceiling
or any adjacent wall and at least 27.5in (70 cm) from the floor.
Additionally, review any local codes and regulations that may apply.
• Do not allow to be used as a toy. Close attention is necessary
when used by or near children.
• This appliance is not intended for use by persons (including
children) with reduced physical, sensory, or mental capabilities,
or lack of experience and knowledge. This is unless they have been
given supervision or instruction concerning the use of this appliance
by a person responsible for their safety.
• Use only as described in this manual. Use only manufacturer’s
recommended attachments.
• Do not use with damaged cord or plug. If vacuum cleaner is not
working as it should, has been dropped, damaged, left outdoors
or dropped in water, return it to a service center.
• Turn off all controls before unplugging.
• Do not unplug by pulling on cord. To unplug, grasp the receptacle
plug that is connected to the cord.
• Do not handle plug or cord with wet hands.
• Do not put any object into openings. Do not use with any openings
blocked; keep free of dust, lint, hair and anything that may reduce
airflow.
• This vacuum cleaner creates suction. Keep hair, loose clothing,
fingers and all parts of body away from openings and moving parts.
• Do not pick up anything that is burning or smoking, such as
cigarettes, matches, or hot ashes.
• Use extra care when cleaning on stairs.
• Do not pick up flammable or combustible liquids such as gasoline,
or use in areas where they may be present.
• Keep your work area well lighted.
• Unplug electrical appliances before vacuuming them.
• If the supplied power cord is damaged, it must be replaced by a
special cord available from the authorized local dealer/distributor
• Do not use without dust bag and/or filter in place.
SAVE THESE INSTRUCTIONS
3
GENERAL INFORMATION
The central vacuum is designed for dry pick-up of household dirt and
dust. Avoid picking up hard or sharp objects with this system to prevent
hose and plastic pipe damage or clogs.
This manual will cover the final steps of installation of the power unit in
your home. It will also provide the necessary information for maintenance
and trouble shooting, in the unlikely event that it will be needed. If you
require further information about installation or inquires on the product
please contact your local authorized dealer/distributor.
INSTALLATION SAFETY EQUIPMENT
For wall preparations and cover preparations,
safety equipment such as helmet, gloves, goggles
and hearing protection are recommended.
CAUTION
Use caution when drilling holes in walls as gas pipelines and water pipes
and electrical wires may be present.
If you have any questions regarding the product, spare parts, service, warranty
or anything else, please contact your local authorized dealer or distributor.
GROUNDING INSTRUCTIONS
This appliance must be grounded. If it should malfunction or breakdown,
grounding provides a path of least resistance for electrical current to reduce
the risk of electrical shock. This appliance is equipped with a cord having
an equipment-grounding conductor and grounding plug. The plug must
be plugged into an appropriate outlet that is properly installed and
grounded in accordance with all local codes and ordinances.
WARNING
Improper connection of the equipment-grounding conductor can result in
electrical shock. Check with a qualified electrician or service person if you are
in doubt as to whether the outlet is properly grounded, or if the plug does
not fit into an outlet. Do not modify the plug provided with the appliance.
Have a proper outlet installed by a qualified electrician.
This appliance is for use on a nominal 120 volt circuit and has a grounding plug
that looks like the plug illustrated in Figure A. Make sure that the appliance is
connected to an outlet having the same configuration as the plug.
No adapter should be used with the appliance.
NOTE: In Canada, the use of a temporary adapter
is not permitted by the Canadian Electrical Code.
WARNING
If the supply cord is damaged, it must be replaced by a special cord
available from your local authorized dealer/distributor.
SERVICE INFORMATION
The instructions in this booklet serve as a guide to routine maintenance. For
additional information, contact you’re nearest authorized dealer/distributor.
RATING PLATE
The type, model, and serial numbers are indicated on the rating plate
located on the control panel or motor hood. For prompt and complete service
information, always refer to these numbers when inquiring about service.
WARNING
Non-observance of the safety directions may result in bodily harm.
PRODUCT DIMENSIONS
Refer to page 27 - Image 1
WASTE OF ELECTRIC AND ELECTRICAL
EQUIPMENT (WEEE)
This symbol on the product or on its packaging indicates that this product
may not be treated as household waste. Instead it should be handed over
to applicable collection point for the recycling of electronics and electrical
equipment. By ensuring this product is disposed of correctly, you will help
prevent potential negative consequences for the environment and human
health, which could otherwise be caused by inappropriate waste handling
of this product. For more detailed information about this product, please
contact your local waste disposal service or the shop where you purchased
the product.
INSTALLATION
Your home is most likely already fitted with the system of plastic pipes
and inlet valves and you are ready to install the central power unit. If your
home is not fitted for a central vacuum system, you can contract to have
the Central Vacuum System installed by a professional by contacting
your local dealer or distributor or choose to do-it-yourself.
The central power unit should be located as far away from the general living
area as possible, yet accessible so you can remove the dirt receptacle, reach
the filter, and inspect the central power unit. A typical location would be in a
garage, where you could vacuum your car or garage area, and where emptying
the dirt receptacle and cleaning the filter would be more convenient. Other suitable locations are in the basement, laundry room, or ventilated storage room.
CAUTION
Use caution when drilling holes in walls as gas pipelines and water pipes
and electrical wires may be present. Holes in the masonry are only
allowable through it if its standing stability is not impaired. Holes in wood
studs should be drilled. Depending on what material your home is
built with, use the appropriate anchors to hang your power unit. Power unit
simply slides onto mounting bracket and clicks into place.
Refer to page 27 - Image 3
• Place the central power unit in a place that is removed from the general
living area. The exhaust should be easy to connect to a ventilation pipe.
This can be done regardless of the house’s construction material.
• Locate the two low voltage wires near the main pipe. Remove the
insulation from the low volt wire. Insert the low volt wire into the spring
loaded low volt connectors. Be certain you comply with your local
electrical codes and regulations.
Refer to page 27 - Image 4
• Make sure there is a dedicated electric socket for the power unit.
• Plug in your CVS with the supplied power cord.
4
Your power unit does not require the assembly of a muffler. Your CVS has
the muffler installed internally. You may however desire to exhaust the air
outside. In this case you will need to attach the exhaust adapter. This will
convert the size of the exhaust to the diameter of the central vacuum pipe.
Refer to page 27 - Image 5
• Place the power unit in order to make the exhaust pipe as short as
possible. Exhausts should be limited to no longer than 16.5ft (5m).
• Keep in mind that you may need space on the sides of your
central unit to be able to access the dirt receptacle.
LED INDICATION BUTTONS
Your power unit is equipped with a multi color LED panel. This LED
panel will provide you with necessary information on your power unit’s
performance, maintenance and diagnostics.
You machine may be equipped with some or all of the indicators listed below.
Refer to page 27 - Image 9
MODEL ECV5200 AND MODEL ECV5300
Refer to page 27 - Image 6
• Align the power unit intake fitting to the main trunk line projecting from the
wall. DO NOT GLUE. Attach the exhaust pipe to the motor exhaust if
exhausting outdoors. Make sure the exhaust pipe is as short as possible.
On/Off
NOTE: Mount central power unit at least 12in (30cm) from the ceiling
and any adjacent wall, at least 27.5in (70cm) from the floor and within 6ft
(1.8m) of an electrical outlet. Review any local regulations that may apply.
When the power unit is OFF and considered to be in standby mode the
LED button will be RED.
Refer to page 27 - Image 2
MOTOR FAULT
WARNING
Do not block the hood ventilation openings on the top of the central
power unit. Lack of ventilation will cause the motor to overheat.
WARNING
Do not locate the central power unit in a high temperature area where it
is inaccessible for example, an attic or crawl space.
For the ultimate in air control, you may have purchased the true HEPA
filtration for models ECV5500 & ECV5600. The True HEPA filter may
be simply attached to your power unit as shown. Wash the removable
filters up to 20 times until a new filter and adapter are required. Note:
The filter cartridges and HEPA filter adapter are recyclable.
Refer to page 27 - Image 7
Motor Fault
NORMAL OPERATION
When the power unit is ON and in use the LED will be GREEN.
The central vacuum system employs features that monitor the AC line
voltage, current draw and motor temperature.
Temporary voltage and current problems may prevent the power unit
from starting. The motor fault LED will flash. These conditions will
automatically reset and the LED functions will return to normal. If conditions persist, contact your authorized dealer or distributor.
In the event of an overheated motor or disconnected internal motor wire,
the power unit will not turn on. The On/Off LED will illuminate both red
and green and the motor fault LED will illuminate amber. Unplug the
power unit for 30 minutes, allowing the motor to cool down. Reconnect
the power cord and check for normal operation. If conditions persist,
contact your authorized dealer or distributor.
MODEL ECV5400
On/Off
Motor Fault
Empty Dirt Receptacle
Reset
SYSTEM TEST
Normal Operation and Motor Fault function will be as described above
for ECV5200 and ECV5300.
Be certain to comply with local electrical codes and regulations. Plug
the unit into a regular electrical outlet. You are now ready to check the
installation of the unit:
EMPTY DIRT RECEPTACLE
• Be sure the filter is properly installed in the power unit.
• Be sure the dirt receptacle is properly secured to the power unit.
• Plug the hose into each inlet valve to be sure the electrical
contacts operate properly.
• Check each inlet valve for air leaks.
• Check each pipe connection for air leaks.
Refer to page 27 - Image 8
HOW TO USE CENTRAL VACUUM SYSTEM
Your central vacuum system is controlled by a switch on your hose.
Simply insert the hose into the valve and turn the switch to the on position.
This will start the power unit and the flow of air.
When you are finished, turn the switch on the hose to the off position
and remove the hose from the inlet valve. When unplugging the hose,
hold the inlet cover open for a few seconds to allow suction to decrease
thus, protecting the inlet valve seal.
Every 25 hours of use (approximately 6 months) the “empty dirt receptacle”
indicator will illuminate. This is an indication to check the dirt receptacle
and empty it.
To manually reset the Empty Dirt Receptacle indicator, simply press
the Reset button, and hold for 10 seconds.
Since this is time based, you may find the dirt receptacle too empty
or too full. If you have pets, a workshop or other factors that cause waste
more frequently, you may wish to check the dirt receptacle more frequently.
MODELS ECV5500 AND ECV5600
In addition to the 4 LED indication buttons, the ECV5500 and
ECV5600 models also have an LCD screen. Refer to page 10 LCD
Image Guide for more information.
NORMAL OPERATION
When the power unit is Off and in standby mode, the product logo will
scroll across the LCD screen and the 4 LED buttons will illuminate red.
The left button with the Power symbol can be used to activate the unit.
When the power unit is ON and in use the LED will be GREEN.
5
IN USE
SCROLLING YOUR LCD
When not in use, you can scroll through the features of your LCD to
observe the dirt receptacle status, life monitor measure or most recent
recorded power level.
When in use the power indicator turns green. The five progressive
performance bars will appear. A normally functioning unit should
have all five performance bars lit. If there are consistently less than
two bars, you should check for the problem. Possible issues causing
the performance bars to lessen could be:
1. Blocked suction at the hose end
2. Clogged pipe in system
3. Air restrictive tool being used, such as a crevice tool
4. Full dirt receptacle
To scroll through these features simply push the button corresponding
with the right pointing arrow symbol.
The next screen you will see will be the Life Meter. Scroll right further
and you will find Bucket Status. Yet another scroll will show you last
recorded performance levels of the power unit, using the Performance
Meter on the In-Use screen. The final scroll right will show you the
customer service phone number.
The button lining up with the left scroll button will allow you to scroll
backwards through the screens.
BAG ADAPTOR
5. Clogged filtration system
EMPTY DIRT RECEPTACLE
Your power unit can be fitted with an ARM & HAMMER® replaceable
bag for more convenient dirt disposal.
Refer to page 27 - Image 10
Every 25 hours of use (approximately 6 months) the empty dirt receptacle
indicator will flash on the screen. This is an indication to check the dirt
receptacle and empty it. Since this is time based, you may find the dirt
receptacle too empty or too full. If you have pets, a workshop or other
factors that cause waste more frequently, you may wish to check the
dirt receptacle more frequently.
Once the dirt receptacle is emptied, you push the return button to reset
the 25 hours timer. If your power supply is interrupted, or otherwise
unplugged, the empty dirt receptacle indicator will keep a memory of
its previous status and continue life measure.
To manually reset the Empty Dirt Receptacle indicator, simply press
the button lining up with the Enter symbol, and hold for 10 seconds.
SERVICE INDICATOR
Refer to page 10 LCD Image Guide
for more information.
If there is a system fault, or malfunction with your power unit, the service
indicator will flash. Upon seeing this symbol, we recommend that you
turn the power unit off, unplug the power supply for 10 seconds
and then plug it back in. If the service symbol is still on the screen,
we recommend that you call for service.
This symbol may appear due to the following faults:
• Maximum system run time
• Motor problem
• Electronic problem
UTILITY VALVE
The utility valve is similar to an Inlet valve, but is located near the power
unit. This valve is present for your convenience, as it can help clean up
any dirt spilled close to the central vacuum.
EMPTYING THE DIRT RECEPTACLE
Most models feature dirt receptacles with windows to tell at a glance when
the dirt receptacle should be emptied. In most cases, the dirt receptacle
only needs to be emptied two to three (2-3) times a year. To remove the dirt
receptacle, press the buttons on the receptacle handles. Remove and empty
the contents. Return the receptacle by attaching the bucket to the power
unit. To avoid suction loss make sure the receptacle is securely attached.
Refer to page 27 - Image 11
FILTER MAINTENANCE
The internal Triumph HEPA filter is permanent and self cleaning.
However, if you have questions about your permanent self-cleaning
filter, please contact your local authorized dealer/distributor.
PAPER BAG FILTERS - OPTIONAL
The volume of the ARM & HAMMER® paper bag is 22 liters. A full dust
bag reduces the systems performance. Depending on how often you
use your central vacuum system, the dust bag may need to be changed
2-3 times per year – and can be obtained at your local dealer/distributor.
• Voltage or current problem (too high or too low)
Instructions for changing the dust bag:
• Power unit not responding to electronics
1.Remove the power unit dirt receptacle.
SYSTEM RUN TIME
2.Loosen the dust bag from the intake tube, remove and dispose.
Your Eureka central vacuum will track the total running time of the
system and notify you when it time for service.
3.Place and press the new dust bag firmly into the tube.
Turn the dust bag’s opening to make it fasten firmly on the tube.
Refer to page 10 LCD Image Guide
for more information.
4.Put the dirt receptacle back on the central power unit.
PARTIAL/TOTAL LOSS OF SUCTION POWER
• Be sure dirt receptacle is on properly.
After the power unit has ran to its maximum allotted time, the LCD
screen will indicate that a service call is required. Call your central
vacuum service professional to diagnose your system, perform routine
maintenance and ensure optimum efficiency.
• Empty dirt receptacle.
• Remove debris from filter.
• Be sure each inlet valve is properly closed.
6
Instructions to install utility inlet – optional
Low voltage wire to cleaner control box
Inlet valve
(low voltage)
Power unit
PVC pipe Insert (length optional)
Sweep 90 tee
PVC pipe to system
7
EUREKA WARRANTY - USA
WHAT THIS WARRANTY COVERS
FURTHER LIMITATIONS AND EXCLUSIONS
Your Eureka Vacuum System Unit is warranted to be free from all
defects in material and workmanship in normal household use for
seven to ten years (dependant on model) from the date of purchase
for all parts and one year for labor.
This is the sole and exclusive warranty of The Eureka Company.
Any warranty that may be implied in connection with your purchase
or use of the cleaner, including any warranty of Merchantability or any
warranty for fitness for a particular purpose is limited to the duration
of this warranty. Some states do not allow exclusions of warranties
or limitation of damages so the above limitations may not apply to
you. Your relief for the breach of this warranty is limited to the relief
expressly provided above. In no event shall Eureka be liable for any
consequential or incidental damages you may incur in connection
with your purchase or use of the cleaner. Some states do not allow
the exclusion or limitation of incidental or consequential damages,
so the above limitation or exclusion may not apply to you. This warranty
gives you specific legal rights. You may also have other rights, which
VARY, BY STATE.
Model:
Model:
Model:
Model:
Model:
ECV5200
ECV5300
ECV5400
ECV5500
ECV5600
7 Year Motor and Electrical Guarantee
7 Year Motor and Electrical Guarantee
10 Year Motor and Electrical Guarantee
10 Year Motor and Electrical Guarantee
10 Year Motor and Electrical Guarantee
Your vacuum system accessories are warranted for a period of
two years. The warranty is granted only to the original purchaser
and members of his or her immediate household. The warranty is
subject to the following provisions.
WHAT THIS WARRANTY DOES NOT COVER
QUESTIONS & ANSWERS ABOUT GENUINE
EUREKA PRODUCTS
•Damages or malfunctions caused by negligence, abuse, acts of God,
Failure to provide proper maintenance, or use not in accordance with
Owner’s Guide.
Q: Why should I use only Genuine Eureka paper bags, belts,
and parts in my Eureka Vacuum cleaner?
•Installation materials or damage caused by faulty or improper
installation, modification, or alteration of the power unit.
A: Using Genuine Eureka Products, Which are made to our exacting
specifications and engineered with emphasis on quality, performance,
and customer satisfaction, ensures the long life and cleaning efficiency
of your vacuum cleaner. Overall, this saves you money and helps to
keep your home clean.
•Parts of the Accessories that require replacement under
normal use, such as drive belts, light bulbs, and brush roll bristles.
Q: How can I be sure I am using only genuine Eureka products
in my vacuum cleaner?
WHAT THE EUREKA COMPANY WILL DO
A: Typically, packaged products and paper bags can be identified by
the Eureka logo. For further identification assistance, you may call
our toll-free number, 1-800-282-2886, for the location of a nearby
Eureka Authorized Warranty Station.
•Defects or damages caused by unauthorized service or the use of
other than Genuine Eureka parts.
The Eureka Company will, at its option, repair or replace a defective
power unit, accessory, or part that is covered by this warranty. As
a matter of warranty policy, the Eureka Company will not refund the
consumer’s purchase price.
PRODUCT REGISTRATION
Keep all payment records and proof of purchase. The date on these
records established the warranty period. If proof of purchase cannot
be supplied, the warranty period will be determined from the date
of manufacture of the product. To place on file proof of the required
information, fill out and return the registration card accompanying
your cleaner or registration online at www.eureka.com.
Q: Are there any differences between “made to fit” or “imitation”
and Genuine Eureka Paper bags, belts, and parts?
A: Yes, there are some very important differences in materials, quality,
and reliability. Many customers have mistakenly purchased “imitation”
paper bags and parts while thinking they purchased genuine.
Unfortunately, many of these customers discovered the differences
after they experienced related difficulties.
For Genuine Eureka Value, Accept No Imitations!
THE EUREKA COMPANY • Bloomington, IL 91701• www.eureka.com
OBTAINING WARRANTY SERVICE
To obtain warranty service you must return the defective cleaner or
cleaner part along with proof of purchase to any Eureka Authorized
Station. Be certain that the Warranty Station is “Eureka Authorized
Service and Repair.” For the Location of the nearest Eureka Authorized
Warranty Station or for service information, telephone toll free:
USA: 1-800-282-2886
8
EUREKA WARRANTY - CANADA
LIFETIME LIMITED WARRANTY
WHAT THIS WARRANTY DOES NOT COVER
The materials and workmanship in your new central vacuum are
guaranteed against material defects for as long as you own the system.
The foregoing warranty applies only to the power unit body, the filters,
the inlet valves and the Eureka ducting system, which is also
guaranteed against clogs.
•Damages or malfunctions caused by negligence, abuse, acts of God,
Failure to provide proper maintenance, or use not in accordance with
Owner’s Guide.
90 DAY MONEY-BACK GUARANTEE
Your Eureka central vacuum is guaranteed to bring you total satisfaction.
If, for any reason, it does not perform as advertised within 90 days
from the date of purchase, you can return it to your dealer for exchange,
refund, or model upgrade credit on the full product price.
•Defects or damages caused by unauthorized service or the use of
other than Genuine Eureka parts.
•Installation materials or damage caused by faulty or improper
installation, modification, or alteration of the power unit.
•Parts of the Accessories that require replacement under
normal use, such as drive belts, light bulbs, and brush roll bristles.
THREE YEAR GUARANTEE ON ACCESSORIES
WHAT THE EUREKA COMPANY WILL DO
If any Eureka central vacuum accessory (power head, currentcarrying hose and cleaning tools) fail to perform as advertised due to
faulty workmanship or material for a period of three years from data
of purchase, simply return it to your Eureka warranty centre. The item
will be repaired or replaced free of charge. The foregoing warranty
does not apply to naturally wearable items such as bags, belts, or
bulbs. Repair labour on parts replacements is covered for a period of
one year.
The Eureka Company will, at its option, repair or replace a defective
power unit, accessory, or part that is covered by this warranty. As
a matter of warranty policy, the Eureka Company will not refund the
consumer’s purchase price.
MOTOR AND ELECTRICAL GUARANTEE
The electrical components and the motor of your Eureka central
vacuum, including the carbon brushes will be free from defects in
(dependant on model) from the date of purchase for all parts and
one year for labour.
Model: ECV5200 7 Year Motor and Electrical Guarantee
Model: ECV5300 7 Year Motor and Electrical Guarantee
Model: ECV5400 10 Year Motor and Electrical Guarantee
Model: ECV5500 10 Year Motor and Electrical Guarantee
Model: ECV5600 10 Year Motor and Electrical Guarantee
N.B. These warranties apply only under normal conditions of residential
use of your Eureka Vacuum In Canada. Except for the 90 day money-back
guarantee, the sole and exclusive remedy for any of the foregoing
warranties shall he the repair or replacement of the product, at our
option, provided that the product is retained during the warranty period.
This warranty does not meet (a) damage born any cause other than
manufacturer’s defect including, without limitation, misuse, abuse or
unreasonable use of the product (including use of the product on drywall
dust), neglect or accident relating the use of the product. This warranty
is in lieu of all other warranties and conditions of any kind whether
expressed, implied or statutory including, without imitation implied
warranties and conditions of merchantability and fitness for a particular
purpose. A bill of sale, or copy, will be required when making warranty
claims. Modifications to the product may void the warranty.
Eureka is not responsible for any consequential incidental damages
arising from use of the system.
OBTAINING WARRANTY SERVICE
To obtain warranty service you must return the defective cleaner or
cleaner part along with proof of purchase to any Eureka Authorized
Station. Be certain that the Warranty Station is “Eureka Authorized
Service and Repair.” For the Location of the nearest Eureka Authorized
Warranty Station or for service information, telephone toll free:
1-800-282-2886.
QUESTIONS & ANSWERS ABOUT GENUINE
EUREKA PRODUCTS
Q: Why should I use only Genuine Eureka paper bags, belts,
and parts in my Eureka Vacuum cleaner?
A: Using Genuine Eureka Products, Which are made to our exacting
specifications and engineered with emphasis on quality, performance,
and customer satisfaction, ensures the long life and cleaning efficiency
of your vacuum cleaner. Overall, this saves you money and helps to
keep your home clean.
Q: How can I be sure I am using only genuine Eureka products
in my vacuum cleaner?
A: Typically, packaged products and paper bags can be identified by
the Eureka logo. For further identification assistance, you may call
our toll-free number, 1-800-282-2886, for the location of a nearby
Eureka Authorized Warranty Station.
Q: Are there any differences between “made to fit” or “imitation”
and Genuine Eureka Paper bags, belts, and parts?
A: Yes, there are some very important differences in materials, quality,
and reliability. Many customers have mistakenly purchased “imitation”
paper bags and parts while thinking they purchased genuine.
Unfortunately, many of these customers discovered the differences
after they experienced related difficulties.
For Genuine Eureka Value, Accept No Imitations!
THE EUREKA COMPANY • Mississauga, ON L5V 3E4 • www.eureka.com
9
LCD INSTRUCTION MANUAL - READ THIS MANUAL THOROUGHLY BEFORE USE
Power Button Toggle Buttons Enter Button
Power Button Toggle Buttons Enter Button
Temperature Customization
Time Format Customization
Time Setting
Review User Setup Settings
System Checks
Main Screen
Dirt Receptacle and Happy Face
Three to Five Performance Bars
and Happy Face
Motor Icon and Happy Face
Telephone Icon and Happy Face
System Run Time
System Alerts
Main Screen
Dirt Receptacle and Sad Face
Three to Five Performance Bars
and Sad Face
Motor Icon and Sad Face
Telephone Icon and Sad Face
MAIN SCREEN
The main screen is shown when the system is connected to an
electrical outlet. This is the screen displayed in regular operations
mode with full system performance. The system performance plus
local time and temperature can be viewed from the Main Screen.
Along the bottom of the screen the following icons are displayed
from left to right, the Power( ) icon, the Left( ) and Right( )
Toggle Arrow icons and the Enter ( ) icon. To scroll through
the LCD menus, the button directly below each corresponding
icon executes the navigational feature.
USER SETUP
Your LCD enabled power unit provides the ability to customize the
temperature (Celcius or Fahrenheit) and time formats (12-hour or
24-hour). Formats can be customized using the USER SETUP
menu. To enter the USER SETUP menu, press the <Enter> button.
Temperature Customization
Use the Left and Right toggle buttons to select the temperature
format of either C or F. Once the correct format has been selected,
press the <Enter> button to proceed to the next screen.
Time Format Customization
Use the Left and Right toggle arrows to select the temperature
format of either 12 or 24 hours. Once the correct format has been
selected, press the <Enter> button to proceed to the next screen.
Time Setting
The time can be changed by using the Left and Right toggle
buttons. The first number field in the display is underlined with
a bar, indicating that it can be adjusted with the toggle buttons.
Press the <Enter> button to proceed to the next number field.
Review User Setup Settings
The next screen displays the temperature and time with the user
selected formats. Press the <Enter> button to return to the Main Screen
SYSTEM CHECKS
The System Checks menu provides the ability to monitor overall
system performance. Specific elements monitored include the dirt
receptacle level, airflow performance, motor and electrical systems,
and the need for power unit service. The happy face indicates that
each monitored element of the power unit is performing at optimal
levels. Use the right and left toggle buttons to scroll through the
SYSTEM CHECK screens to view each system monitoring element.
Main Screen
Dirt Receptacle and Happy Face
This display denotes that the dirt receptacle does NOT currently
need to be emptied.
Three to Five Performance Bars and Happy Face
This display indicates the system is performing at the optimal airflow
level. The power unit motor is operating at optimum performance
when all five power bars are illuminated. Normal operating
performance is when three to five bars are shown. Performance
levels will decrease as the filter is loaded with debris or as the
motor has significant wear. Fewer bars will be illuminated as
performance decreases.
When the power unit is off, the display will illuminate the airflow
level of the last operating cycle. Note: It is also normal to see
changes in performance when specialty attachments are used.
Motor Icon and Happy Face
This display indicates all electrical and motor components are
functioning properly.
System Run Time
This display shows you the overall number of hours that the
power unit has operated. It shows your total time of vacuuming
with the system.
SYSTEM ALERTS
Your LCD enabled power unit is constantly monitoring the system
status. In the event of an error condition, it will provide a system
alert on the LCD in place of the Main Screen. The sad face
indicates that the power unit has experienced an error condition.
The power unit may display the following alerts:
Main Screen Appears Flashing
If the power unit receives an excess of electricity such as an
over current situation, the Main Screen will start flashing.
The flashing Main Screen indicates that the power unit has
automatically recovered from an error situation and will
operate properly when powered on.
Bucket Icon with Sad Face
This screen will be displayed when the dirt receptacle needs
to be checked for emptying. After checking (and possibly
emptying) the bucket, press the <Enter> button to return to the
Main Screen. This will reset the timer for the bucket monitor.
Empty/Flashing Power Bars with Sad Face
This screen is displayed when the power unit motor is unable
to operate at optimal system performance. When only 2 bars or
less are illuminated, the airflow is restricted, meaning the vacuums
cleaning power has decreased. If the remaining bars are flashing,
the airflow restriction has been present for more than 12 minutes
of vacuuming and attention is urgent. Air flow can be restricted by
several factors:
1) Loaded Filter (see “Filter Maintenance” section of the
Power Unit Owner’s Manual) 2) System Blockage (see “Trouble Shooting” section of the Power Unit Owner’s Manual) 3) Motor Wear (contact an authorized service technician)
The most common cause is a loaded filter, and the system
performance can be restored by cleaning the filter. Alternatively,
there may be a system blockage, and the hose and piping
system needs to be checked for blockage.
Motor Icon with Sad Face
This screen indicates that the motor has shut down due to an
electrical fault. When the system experiences an electrical failure
it will attempt to automatically reset after a 15 to 30 second
delay. Once recovered, the display will return to the flashing Main
Screen, indicating that the power unit has been reset and will
operate properly when powered on.
In the event that the system is unable to automatically reset,
the display will switch to the Phone Icon with a Sad Face screen,
indicating the need to contact your dealer for service. This
indicates a motor failure, where service is needed.
Phone Icon with Sad Face
This screen will be displayed for either of two reasons:
1) The system experiences a failure that requires repairs
by an authorized service technician.
2) The power unit has reached the maximum hours in its
life-cycle. Service is now required. To resolve this system alert, contact your dealer.
Telephone Icon and Happy Face
This screen indicates that the system has NOT encountered any
error conditions and it is NOT necessary to call for service at this time.
10
1
2
3
Mín. 30 cm (12’’)
10 cm (4")
38 cm (15")
Mín. 30 cm
(12’’)
Mín. 30 cm
(12’’)
4
Maximum
1,8 m (6’)
from outlet
103,2 cm (40,5")
Maximum
1,8 m (6’)
de la prise
de courant
Máximo
1,8 m
(6 pies) del
tomacorrientes
38 cm (15")
Mín. 70 cm (27,5’’)
48,6 cm (19")
5
6
7
Max. 5 m (16,5’)
Máx. 5 m (16,5 pies)
8
9
10
LCD
Screen
Écran
ACL
Pantalla
LCD
LED Buttons - On/Off Motor Status Empty Dirt Receptacle Reset
Touches - Marche/Arrêt État du Cuve à poussière Réenclechement
à DEL
moteur
pleine
Botones - Encendido/ Estado del Limpieza del Restablecer
LED
Apagado
motor contenedor de polvo
11
12
13
27
April 2011
ARM & HAMMER and the ARM & HAMMER logo are trademarks of Church & Dwight Co., Inc.