Transcript
Introduction
Features
Taking Pictures
How To Use Your Camera
How To Use Your Binocular
Taking Pictures
Press Power/Mode button(4) for 3 seconds to turn on, the
How to use your binocular
appears for 2 seconds and then appears
1
11
hunting or bird-watching. VistaPix lets you record memories and sights
7
Looking at or near the Sun may cause instant and irreversible damage
to your eye. Eye damage is often painless, so there is no warning to
the observer that damage has occurred until it is too late. Do not
point the binocular at or near the Sun.
Children should always have adult supervision while observing.
Attention!!:
5
views and capture images to take home with you at the same time.
8
9
6
2
4
VistaPix makes it possible to share your fun with others by
Adjustment of eye-relief for eyeglass wearers
3
11
7
to e-mail to your friends and family.
Fold down the rubber eyecups and place them against your glasses to
get the best viewing result.
Main Features:
7
Steps to install VistaPix driver software
2.Perform "Installation Wizard"
automatically
The distance between your eyes is called interpupillary distance.
The interpupillary distance is different from one person to another.
It is important to adjust to your interpupillary distance before using
your VistaPix:
- Hold the VistaPix firmly in the normal viewing position.
- Adjust the barrels by pushing together or pulling apart until you see a
single circle field with both of your eyes.
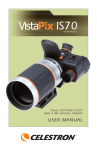
1. Diopter Knob(on underside)
6. USB Port
2. Center Focus Knob
7. Eyepiece
3. Objective Lens
8. Camera Lens
4. Mode/ Power Button(M)
9. LCD Display
5. Shutter/Set Button(S)
10. Battery Compartment Lid
Steps to install Photo Manager
1. Insert the CD
2. Select "Install Photo Manager"
3.Choose the language and press
confirm button
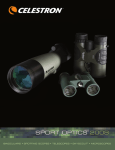
1. Continuous picture taking mode (VIdeo Capture mode).
2. Press the Mode button (4) to select "Ct" mode.
3. Press the Shutter/Set Button (5) to activate the operations.
(During the operation, the LCD appears blank. You can take up to 2 minutes of continuous video, depending on the amount of images stored .
4. Press the Shutter/Set button again to finish the operation.
NOTE:
1. 10 second delay self-timer.
2. Press the Mode button (4) to select "St" Mode.
3. Press the Shutter/Set (5) and image will be taken after10 seconds.
Image Taking System Requirement
1.Please use USB Cable to connect with VistaPix.
2.Stored images can be viewed and saved from the "Removable disk" drive
form the "My Computer" icon, or downloaded using Photo Manager.
Maintenance
1. Delete the last photograph.
2. Press the Mode button (4) to select "CL" Mode.
3. Press the Shutter/Set Button (5). The "CL" screen will blink.
4. To delete the last image, press the Shutter button again while the
display is blinking.
5. If you don't want to delete the image, press the Mode button to cancel.
Care of your VistaPix
1.Never immerse VistaPix into any fluid or liquid.
Remove dust or stains with a soft cloth dampened with water or neutral
detergent. Keep in a dry and cool dust-free environment or a container
when it is not used.
2.Take the batteries out when VistaPix is not to be used over a long
period.
3. Avoid dropping the VistaPix. Do not disassemble VistaPix.
4.Before removing the batteries download pictures to your PC .
Steps to install Photo Manager
1. Delete all photographs.
2. Press the Mode button (4) to select "CA" Mode.
3. Press the Shutter/Set Button (5). The "CA" screen will blink.
4. To delete all images, press the Shutter button again while the
display is blinking.
5. If you don't want to delete the images, press the Mode button to cancel.
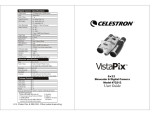
Description of product specifications
Downloading Images with Photo Manager
1. Open Photo Manager.
Select "Removable Device" as indicated.
9.Confirm the file location
2. Enter " Removable Disk" from the "Look in"
box. Double-click on the " Dcim " folder.
2
1
72200
Digital Camera Specifications
3
4
Resolution
Photograph measure
Image sensor
640X480(Hr) / 320X240(Lr)
Hr- 160 P / Lr- 580 P
CMOS sensor
Close focusing distance
Focus range
10m (32.8ft) ~ infinity
Package Contents
Exposure
Auto
White balance
Auto
Memory inside
8MB SDRAM
Battery
AAA alkaline battery x 2
Binocular specifications
Specifications
3.After confirming, please press
"Next" button
4.After confirming, please press
"Next" button
4.Enter installing screen
5.After confirming, please press
"Next" button
10. Begin installing software
11.Software installation finished, please
press "Finish" for confirmation
3. Double-click on the "100MEDIA " folder.
6
5
4. In " 100MEDIA " folder, choose the
pictures you want or choose all images.
Angular field of view
8 x22 mm
o
7.0 Field of view:
112 m ( 367ft ) at 914 m ( 1000YDS )
Exit pupil
2.6 mm
Eye Relief
10 mm
Coatings
USB Cable
Software
User Guide
Binocular Dimensions
Binocular Weight
Single layer, fully coated
5 m (16.4ft)
x1
x1
x1
112mm x 91.8mm x 50.2mm
264.5 g
System Requirements:
1. Window 98SE/ Me/ 2000/ XP
2. The processor above Pentium 233MHz
3. 128MB SDRAM
4. Video(VGA) card with 2MB of RAM for
minimum 16-bit (High Color) display.
5. CD-ROM
6. USB port
7. 600MB of free hard
disk space.
7
72201
8
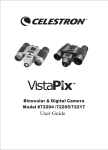
Digital Camera Specifications
5.Start installation
6.Installation finished. Please press
"Finish" button
6.After confirming, please press "Yes"
7.The serial number is located on the front
of the CD. Press "Next" when entered.
5. Images download finished.
After installing VistaPix software. Please restart your computer.
How to use Photo Manager
Select the buttons as indicated.
"Help" will give you detailed information on
Photo Manager's many features.
Resolution
Photograph measure
Image sensor
640X480(Hr) / 320X240(Lr)
Focus range
10m (32.8ft) ~ infinity
Exposure
Auto
Hr-160 P / Lr-580 P
CMOS sensor
Auto
USB Cable
8MB SDRAM
Battery
AAA alkaline battery x 2
Software
User Guide
Specifications
To un-install the software, simply insert the CD and re-install the program. The screen
will ask if you would like to remove the program and all of its components.
Angular field of view
1
Close focusing distance
Memory inside
Un-installing the Software
2
Coatings
8 x30 mm
o
5.8 Field of view:
92.7m ( 304ft ) at 914 m ( 1000YDS )
Exit pupil
4 mm
Eye Relief
12.5 mm
Single layer, fully coated
3.5 m (11.48ft)
Package Contents
White balance
Binocular specifications
If you have windows 2000 /XP Operation system installed on yourcomputer,
it should not be necessary toinstall the driver. See PCmode on other side.
VistaPix is a Mass Storage Device. This means that while connected to
a PC through the USB port, Windows will add a "Removable Disk" hard
drive under the "My Computer" icon. Simply access the removable disk to
retrieve,view and save images to a permanent location.
When connected to a PC, the LCD screen will display the [PC] screen.
1. Power Off Mode.
2. Press the Shutter/Set (5) button to turn off the VistaPix Manually.
Operating Environment: 41 to 104 F (5 to 40 C). 20%-85% relative
humidity, non-condensing
1. Set the Diopter Knob on underside of VistaPix at its center
point between + and - .
2. Choose an object that is at least 10 meters (30 ft) away .
3. Looking with just your left eye, rotate the Center Focus Knob
until the object you are viewing is in best focus.
4. Looking with just your right eye, rotate the Diopter Knob until the
object you are viewing is in best focus.
5. Viewing your object with both eyes, turn the Center Focus Knob
to bring it in best focus.
8. Choose "Typical" or "Custom" form
for installation
1. Photograph taking mode. This shows the number of images taken.
2. Press the Shutter/Set button(5) to take an image.
Download method Instruction
Focusing the Binocular
1. To switch to low resolution mode (320 x 240):
2. Press the Mode button (4) to display the current mode ("Hr").
3. Press the Shutter/Set Button (5). The display will blink "Lr".
4. Press the Shutter/Set Button again to switch to low res mode.
5. If you don't want to change, press the Mode button to return
to the image taking mode.
LCD Display modes and operation instruction
Lift the battery compartment lid (10) and insert two AAA size alkaline batteries.
10
11. Objective Barrel
1.On the Installation screen, select
"Installation Driver"
* To extend battery life, remove the batteries when not using the camera.
Failure to do so will result in dead battery after several days.
Make sure all images have been downloaded before removing batteries.
* Note: When batteries are removed, memory of pictures can maintain for 30
seconds. Batteries must be replaced within 30 seconds to avoid losing
pictures. Be sure VistaPix is OFF before replacing the batteries.
Inserting Batteries
Adjusting the eyepieces
* Use as a fully functional binocular.
* Take up to two minutes of continuous video.
* Save single image as a JPG file and video captures as
AVI file.
* With included Photo Manager software, you can transfer images
or video onto your computer for viewing, editing and printing.
* Capture images at the same magnification as seen through binocular.
* An LCD screen that displays the mode and numbers of photographs.
* Automatic White Balance for color correction in different lighting
conditions.
* Automatic ( 90 seconds ) shut off mode to extend the battery life.
The Initial setting. (This mode is the default setting. If you don't
choose another setting, this default setting is high resolution.)
Never use a VistaPix to look at the sun !
3
at the touch of a button. Use the full-featured binocular for closer
downloading images from the camera right to your computer
.
WARNING !
VistaPix is a binocular integrated with a digital camera that
is great for spoting events, concerts and wildlife activities such as
1. To switch to high resolution mode (640 x 480):
2. Press the Mode button (4) to display the current mode ("Lr").
3. Press the Shutter/Set Button (5). The display will blink "Hr".
4. Press the Shutter/Set Button again to switch to hi res mode.
5. If you don't want to change, press the Mode button to return
to the image taking mode.
screen
Binocular Dimensions
Binocular Weight
x1
x1
x1
143mm x 93mm x 49mm
349.5 g
System Requirements:
1. Window 98SE/ Me/ 2000/ XP
2. The processor above Pentium 233MHz
3. 128MB SDRAM
4. Video(VGA) card with 2MB of RAM for
minimum 16-bit (High Color) display.
5. CD-ROM
6. USB port
7. 600MB of free hard
disk space.
When no action is performed on each chosen mode, it will return to the photograph
taking mode automatically after 10 seconds.
When the VistaPix memory is full, the LCD displays "Fu". In this case, you need
to download pictures or erase pictures before taking any more pictures.
1. Window 98/SE/ 2000 Me/ 2000 XP
2. 233MHz(or equivalent) processor or faster.
3. 128 MB SDRAM.
4. Video(VGA) card with 2MB of RAM for minimum 16-bit(High Color) display.
5. CD-ROM
6. USB port
7. 600 MB of free hard disk space.
8. If you have any problem with system specifications, please contact your
computer manufacturer.
Installing the Driver Software
Since VistaPix is a Mass Storage Device you can access captured images
just as if it were a hard drive, therefore no software driver is needed (See
PC Mode above).
If using VistaPix with an older version of Windows (98 or earlier) it may be necessary
to install the software driver.