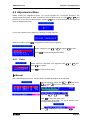
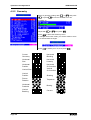
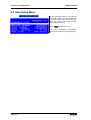
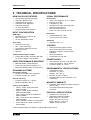
1
BARCO N.V.
Communication Systems
Th. Sevenslaan 106
B-8500 Kortrijk (Belgium)
Tel.: +32.56.233.211
Fax: + 32.56.233.461
E-mail: [email protected]
Web site: http://www.barco.com
HIGH DEFINITION MONITOR
HDM 5049 PLUS
USER’S MANUAL
Serial Number:
Edition: May 27 th, 1999
Part Number: V598958/01
HDM 5049 PLUS
Contents
Contents
1
SAFETY INSTRUCTIONS.............................................................................1-1
1.1
1.2
1.3
FCC NOTICE .....................................................................................................................1-1
POWER CONNECTION .........................................................................................................1-1
W ATER AND MOISTURE.......................................................................................................1-1
2
FEATURES ...................................................................................................2-1
3
HDM 5049 PLUS INSTALLATION ................................................................3-1
3.1 PRECAUTIONS....................................................................................................................3-1
3.2 RACK MOUNTING ...............................................................................................................3-1
3.3 SIGNAL CONNECTION .........................................................................................................3-1
3.3.1
Factory-stored HDTV Modes ...................................................................................3-2
3.3.2
Vivaldi Modes..........................................................................................................3-2
3.3.3
Sync Input Conditions .............................................................................................3-3
4
OPERATION AND ADJUSTMENT ...............................................................4-1
4.1 USING THE KEYBOARD .......................................................................................................4-1
4.2 MAIN MENU .......................................................................................................................4-2
4.3 STATUS MENU ...................................................................................................................4-2
4.4 SETTINGS MENU ................................................................................................................4-2
4.4.1
Modename ..............................................................................................................4-3
4.4.2
AKB.........................................................................................................................4-3
4.4.3
Orbiter .....................................................................................................................4-3
4.4.4
Degauss rate...........................................................................................................4-4
4.4.5
Color temp...............................................................................................................4-4
4.4.6
White level...............................................................................................................4-4
4.4.7
Change password ...................................................................................................4-4
4.4.8
Other Menu Items....................................................................................................4-4
4.5 ADJUSTMENTS MENU .........................................................................................................4-5
4.5.1
Color .......................................................................................................................4-5
0DQXDO ........................................................................................................................4-5
$XWRPDWLF ....................................................................................................................4-6
4.5.2
Geometry ................................................................................................................4-8
4.5.3
Uniformity................................................................................................................4-9
0RLUpFDQFHOHU .............................................................................................................4-9
'\QDPLF+IRFXV .........................................................................................................4-9
9:+8QLIRUPLW\ ..........................................................................................................4-9
$;:+8QLIRUPLW\ .......................................................................................................4-9
4.6 INFORMATION MENU .........................................................................................................4-10
5
TECHNICAL SPECIFICATIONS ...................................................................5-1
Page i
HDM 5049 PLUS
Safety Instructions
1 SAFETY INSTRUCTIONS
•
•
•
•
Read the safety and operating instructions before operating the monitor.
Retain safety and operating instructions for future reference.
Adhere to all warnings on the monitor and in the operating instructions manual.
Follow all instructions for operation and use.
This monitor conforms to the following rules: DHHS21, IEC950/EN60950, UL1950, C-UL950.
1.1 FCC Notice
This equipment has been tested and found to comply with the limits of a class A digital device,
pursuant to Part 15 of the FCC rules. These limits are designed to provide reasonable protection
against harmful interference when the equipment is operated in a commercial environment. This
equipment generates, uses and can radiate radio frequency energy and, if not installed and used in
accordance with the instruction manual, may cause harmful interference to radio communications.
Operation of this equipment in a residential area is likely to cause harmful interference in which
case the user will be required to correct the interference at his own expense.
1.2 Power Connection
•
Power requirements: connect the monitor to an AC voltage as indicated at its back. Using a
lower voltage, the monitor will not be able to operate. Using a higher voltage may damage the
monitor.
WARNING!
THIS APPARATUS MUST BE EARTHED!
The wires in the mains lead are colored in accordance to the following code :
CEE7 and British Standard:
Green-and-yellow: Earth (safety earth)
Blue: Neutral
Brown: Live
ANSI 73.11:
Green-and-yellow: Ground
White: Neutral
Black: Live
•
•
Do not overload wall outlets and extension cords as this may result in fire or electric shock.
Mains lead protection (U.S.: Power cord): Supply cords should be routed so that they are not
likely to be walked upon or pinched by items placed upon or against them, paying particular
attention to cords at plugs and receptacles.
1.3 Water and Moisture
•
•
Never expose the monitor to rain or moisture.
Never use the monitor near water.
Page 1-1
HDM 5049 PLUS
Features
2 FEATURES
The HDM 5049 PLUS is equipped with a super high resolution CRT and a dark and flat face plate,
ensuring high contrast ratio and natural looking pictures.
Resolution is maintained by excellent spot performance and ultra fine pitch (= 0.26 mm). Its sleek
16:9 aspect ratio and reduced rack space requirements make it the ideal studio picture quality
monitor for today’s crammed control and equipment rooms.
Standard features are:
•
•
•
•
•
•
•
•
•
•
•
•
16:9 aspect ratio
19” picture tube (17” visible)
Occupies only 8 RU space in a 19” rack
Superfine dot pitch of 0.26 mm
Small spot size over the entire screen
Automatically adjusts to different HD input formats, up to 1080L x 1920P, interlaced.
Short and long term color stability thanks to the AKB system (Automatic Kinescope Biasing)
High bandwidth RGB inputs
User-friendly keyboard and OSD guide the operator through the basic operation and menus for
color and geometry alignment
Automatic Color Alignment with Thoma Color Analyzer.
Orbiting to avoid burn-in of the CRT phosphors
Compatible with BARCO’s VIVALDI display system products
Page 2-1
HDM 5049 PLUS
HDM 5049 PLUS Installation
3 HDM 5049 PLUS INSTALLATION
3.1 Precautions
•
•
•
•
•
Keep your original packaging. It is designed for this monitor and is the ideal protection during
transport.
Do not lift the monitor alone to avoid injury.
Avoid reflections in the picture tube to reduce eye strain.
Keep the monitor away from heat sources and provide enough ventilation if it is installed in a
rack or console.
Keep the monitor away from strong sources of magnetic radiation.
3.2 Rack Mounting
The monitor should be mounted in a 19” rack. Four retaining screws in the handles keep the
monitor in place.
WARNING!
Do not cover or block the ventilation openings in the cover.
3.3 Signal Connection
Voltage Range:
100 - 240V AC
SERVICE
75E
R
G
B
HS/CS
VS
LINE
POWER
Five BNC connectors are available at the rear of the monitor: R, G, B, HS/CS and VS. When the
monitor is the only monitor connected to the source or the last one in a chain, the 75 ohm
termination switch should be set in the lower position.
To loop-through the video signals, use T- or Y-connectors and place the 75 ohm termination switch
in the upper position.
A Thoma Color Analyzer can be connected to the SERVICE connector using the optional
ThomaLink cable (order number Z345501).
Page 3-1
HDM 5049 PLUS Installation
HDM 5049 PLUS
3.3.1 Factory-stored HDTV Modes
480L x
704P
60P
System:
720L x
1280P
60P
1035L x
1920P
60I
SMPTE293M SMPTE296M
(483L x 720P)
Mode Name:
Horizontal Timings:
Horizontal Scan Frequency:
1080L x
1920P
60I
SMPTE240M- SMPTE274M
260M
Units
kHz
31,5
45
33,75
33,75
Total Line Time:
µs
31,75
22,22
29,63
29,63
Active Line Time:
µs
26,64
17,24
25,86
25,86
Horizontal Blanking:
µs
5,1
4,98
3,77
3,77
Horizontal Sync Width:
µs
2.33(*)
0.54(*)
0.6 (*)
0.6(*)
Horizontal Front Porch:
µs
0.63(*)
1.50(*)
1.2 (*)
1.2(*)
Horizontal Back Porch:
µs
2.15
2.95
1.99
1.99
Vertical Timings:
Units
Scan System:
Vertical Scan Frequency:
Active Lines / Frame:
Active Frame Time:
Blanking Lines / Frame:
Blanking Time Frame:
I/P
P
P
I
I
Hz
60
60
60
60
Lines
483
720
1035
1080
ms
15,33
16
30,66
32
Lines
42
30
90
45
ms
1,33
0,67
2,66
1,34
Total Lines / Frame:
Lines
525
750
1125
1125
Active Lines / Field:
Lines
517,5
540
ms
15,33
16
Lines
45
22,5
Active Field Time:
Blanking Lines / Field:
Blanking Time / Field:
ms
1,33
0,67
Total Lines / Field:
Lines
562,5
562,5
Vertical Sync Width:
Lines
5
5
6
5
Vertical Front Porch:
Lines
6
5
2-2.5
2
Vertical Back Porch:
Lines
30
20
38-37.5
15
(*) Conversion from tri-level sync to bi-level sync
1035Lx1920P 60I is not stored as a separate mode, but the HDM 5049 PLUS displays this signal
type using the 1080Lx1920P 60I mode. The only difference is the number of active lines.
3.3.2 Vivaldi Modes
Two VIVALDI Modes (only for 525 lines / 60 Hz) are factory-stored as well: 4 Pictures and 1 Picture
Full Screen.
IMPORTANT!
Page 3-2
When connected to a VIVALDI, you have to configure the VIVALDI for positive
horizontal and vertical sync, no composite sync, no sync on green. Set the
VIVALDI to 4/3 (positive vertical sync). The HDM 5049 PLUS is already
aligned for 16/9. Do not toggle between 4/3 and 16/9 on the VIVALDI, since
this changes the vertical sync polarity.
HDM 5049 PLUS
HDM 5049 PLUS Installation
3.3.3 Sync Input Conditions
GREEN
SOG
HS / CS
VS
CS
VS
HS
+
1
2
+
3
+
HDM5049 PLUS Picture
Remove CS (⇒ condition 7) or
remove SOG (⇒ condition 16)
+ Clamping problem
/
Solution
No vertical sync due to addition of
two opposite pulses
Clamping problem
Remove VS to solve Vert Sync problem and
Remove CS to solve Clamping problem
(⇒ condition 9) or
Remove VS to solve Vert Sync problem and
remove SOG (⇒ condition 18)
Clamping problem
Remove CS (⇒ condition 9 ) or
Remove SOG (⇒ condition 18)
+ OK
4
No vertical sync due to addition of
two opposite pulses
5
/
6
7
/
8
/
9
/
OK
+ OK
No vertical sync due to addition of
two opposite pulses
/
+
10
Remove VS to solve Vert Sync problem
(⇒ condition 6)
11
+
12
+
OK
+ Clamping problem
/
Remove HS (⇒ condition 7)
No vertical sync due to addition of
two opposite pulses
Clamping problem
Remove VS to solve Vert Sync problem and
Remove HS because no vertical sync is present
any more (enable SOG, ⇒ condition 9) or
remove SOG (⇒ condition 26)
No vertical sync due to CS/HS
priority on SOG
Clamping problem
Remove HS (enable SOG, ⇒ condition 9)
13
+ OK
14
OK
15
Remove VS (⇒ condition 9)
/
No vertical sync due to CS/HS
priority on SOG
+
OK
Remove HS (enable SOG, ⇒ condition 9)
16
/
+
17
/
+
18
/
+
19
/
20
/
21
/
22
/
/
+ No horizontal sync
⇒ Valid condition
23
/
/
No horizontal sync
⇒ Valid condition
24
/
/
No Sync
⇒ Valid condition
25
/
+
+ OK
26
/
+
OK
27
/
+
28
/
+ OK
29
/
OK
30
/
No vertical sync due to addition of
two opposite pulses
/
Remove VS (⇒ condition 18)
OK
+ OK
No vertical sync due to addition of
two opposite pulses
/
+: Positive Sync
/
/
/
Remove VS (⇒ condition 21)
OK
No vertical sync
No vertical sync
: Negative Sync
⇒ Valid condition
⇒ Valid condition
/: Not connected
Page 3-3
HDM 5049 PLUS
Operation And Adjustment
4 OPERATION AND ADJUSTMENT
4.1 Using The Keyboard
Power On / Off: Press this button to start-up the monitor if it is in standby mode (red led is
on). The green led turns on if the monitor has started up. A blinking red led indicates a
problem.
Degauss (demagnetization).
Contrast: Use to reveal / remove the Contrast setting. Adjust with
keys simultaneously to return to the calibrated value.
Brightness: Use to reveal / remove the Brightness setting. Adjust with
both keys simultaneously to return to the calibrated value.
or
. Press both
or
. Press
Menu In: Use to enter a submenu or to select an item to change.
Menu Out: Use to leave a submenu or to save a changed value.
Toggle: Use to change menu items that are displayed in magenta.
,
Down, Up: Use to scroll through the menu items or to decrease / increase a value.
Page 4-1
Operation And Adjustment
HDM 5049 PLUS
4.2 Main Menu
Press
to enter the main menu.
Select a submenu with
Press
or
and press
to enter.
to exit from the main menu.
The menu disappears automatically after 20 seconds of keyboard
inactivity.
4.3 Status Menu
The Status Menu shows the current display
mode with its corresponding syncs, the
current settings and the detected actual
sync frequencies.
You cannot make changes in this menu. To
make changes, refer to the Settings Menu.
Depending on the resolution of the input
signal, the middle part of this menu is split
into two parts that are displayed alternately.
Press
to leave the Status menu.
The menu disappears automatically after 20
seconds of keyboard inactivity.
4.4 Settings Menu
Before entering the Settings menu, you will be prompted for a four-figure password. The default
or
and press to
password is 0000. To enter a password, select a figure from 0 to 9 with
after you have entered the last figure will open
move the cursor to the next figure. Pressing
the Settings menu.
If you have entered a wrong password, following message appears:
Wait 10 seconds or press
Page 4-2
, the password entrance menu reappears.
HDM 5049 PLUS
Operation And Adjustment
Select an item with
or
.
If the item has a red background, press
to change it. If the item has a
to
magenta background, press
change it.
Changes become active immediately.
These settings (except Modename) are
valid for all modes.
Press
to leave the Settings menu.
4.4.1 Modename
With
or
, scroll through the available characters and move the cursor with
at the end of the line, the cursor returns to the first character. Press
pressing
the Mode name.
. When
to store
If the mode is a new mode, you cannot change the mode name unless you save the geometry
parameters for this new mode:
See 4.5 Adjustments Menu.
4.4.2 AKB
With
, select AKB On, Off or Auto.
The AKB system guarantees color stability by changing the DC-levels of the RGB cathode drive
signals in order to keep the light output of the AKB measuring lines constant. Note that AKB is not
active when a menu is displayed.
With AKB on, the monitor requires up to a minute to stabilize each time the input signal has
dropped or was changed to another line system. When stabilized however, you can turn AKB off.
The monitor will now keep the current DC-levels, even when the input signal drops.
AKB Auto leaves the AKB on for half an hour, then turns it off. AKB Auto starts the AKB when the
monitor is powered up or when AKB is set to Auto. In the Status Menu, you can see if AKB is
currently on or off.
4.4.3 Orbiter
The Orbiter unnoticeably moves around the entire picture to avoid burn-in of the phosphors on
static pictures. Turn it on or off with
.
Page 4-3
Operation And Adjustment
HDM 5049 PLUS
4.4.4 Degauss rate
The monitor can periodically degauss itself. Press
or
between off (non-active) and 12 hours. Leave the menu with
to change the degauss rate
.
4.4.5 Color temp.
Press
or
to change the color temperature from 5000 to 9900 K in steps of 100 K.
This setting is also used during automatic color temperature alignment. Leave the menu with
.
4.4.6 White level
Press
or
to change the light output from 60 to 120 cd/m² (nit) in steps of 1 cd/m².
This setting is also used during automatic color temperature alignment. Leave the menu with
.
4.4.7 Change password
The default password is 0000. To enter a new password, select a figure from 0 to 9 with
or
and press to move the cursor to the next figure. Pressing
after you have entered the last
figure will activate the new password.
4.4.8 Other Menu Items
Menu items that are not mentioned in this list are non-functional in the HDM 5049 PLUS and
should be left off or unchanged for correct operation of the monitor.
Page 4-4
HDM 5049 PLUS
Operation And Adjustment
4.5 Adjustments Menu
Before entering the Adjustments menu, you will be prompted for a four-figure password. The
default password is 0000. To enter a password, select a figure from 0 to 9 with
or
and
after you have entered the last figure will
press to move the cursor to the next figure. Pressing
open the Adjustments menu.
If you have entered a wrong password, following message appears:
Wait 10 seconds or press
, the password entrance menu reappears.
Select a submenu with
Press
or
and press
to enter.
to leave the Adjustments menu.
4.5.1 Color
Select manual or automatic color alignment with
press
to continue.
Press
or
and
to leave the Color menu.
Manual
In the manual alignment menu, the Red, Green and Blue Highlights can be adjusted.
Select a Highlights setting with
or
and press
, or press
first to turn Scrollbar on or off.
Scrollbar on:
Scrollbar off:
Adjust with
or
then press
.
to leave the Color menu.
Press
If changes have been made, you will be asked to save
or to discard these changes:
Press
to select yes or no, then press
.
Page 4-5
Operation And Adjustment
HDM 5049 PLUS
Automatic
Remember that the monitor will be aligned according to the Color temp. and White level settings
you have made in the Settings menu. If you align the monitor to 6000 K and 80 nit, you can set it to
6500 K and 90 nit in the Settings menu, but then, the color temperature and light output will be
approximate. To obtain 6500 K and 90 nit, make sure you make the correct settings before starting
automatic alignment.
The HDM 5049 PLUS can be automatically aligned with a Thoma TMF3 or TMF 6 Color Analyzer
or with a Philips® PM5639/90 Color Sensor.
Required for alignment with Thoma TMF3 or TMF6:
• Thoma TMF3 or TMF6 Color Analyzer
• ThomaLink connector cable, order number Z345501.
Required for alignment with Philips® PM 5639/90 Color Sensor
• HDM 5049 PLUS Software version 1.03 or higher (see Information Menu on page 4-10)
• Philips® PM 5639/90 Color Sensor
• Power Supply box for PM 5639/90 Color Sensor
• Power cord
• Interface cable between monitor and Power Supply box (male and female SubD-9 connectors)
• Interface cable between Color Sensor and Power Supply box (FCC68 connectors)
All required items are included in the Philips® PM 5639/01 kit or the combined PM 5639/02 and PM
5639/62 kits.
To align the HDM 5049 PLUS, proceed as follows:
With Thoma Color Analyzer:
1. Connect the Thoma TMF3 or TMF6 Color Analyzer to the Service connector on the rear of the
monitor using a ThomaLink connector cable (order number Z345501).
2. Cover the Thoma sensor and press [ADJ] twice. This will start the zero calibration. Then press
[XYZ]. The Thoma should now read values between -4 and +4.
3. Connect the grounding clip on the Thoma sensor to one of the monitor’s handles before
placing the sensor on the screen. This prevents damage to the Thoma in case the monitor
flashes.
With Philips® PM 5639 Color Sensor:
1. Connect the Color Sensor to the Power Supply box via the interface cable with FCC68
connectors.
2. Connect the HDM 5049 PLUS Service connector (on the rear) to the RS232-C IN connector on
the Power Supply box using the interface cable with the male and female SubD-9 connectors.
3. Apply power to the Power Supply box.
For Thoma and Philips® :
1. Connect a 100% White Field to the monitor.
2. Place the sensor in the center of the screen. Do not turn on or off the monitor while the sensor
is on the screen!
3. With
or
select Automatic in the Color menu and press
to start the alignment.
If the monitor does not recognize the Thoma Color Analyzer or the Philips® Color Sensor, following
message is displayed after a while:
Page 4-6
HDM 5049 PLUS
Press
Operation And Adjustment
to return to the Color menu, correct the problem and restart alignment.
After alignment is finished, the HDM 5049 PLUS displays following message:
Press
to return to the Color menu.
If alignment failed, the HDM 5049 PLUS displays following message:
Press
to return to the Color menu. The old alignment values are restored.
An alignment can fail due to following reasons:
•
•
•
The Thoma has not been adjusted for offset (see procedure above).
Too much ambient light.
Incorrect 100% White Field connected to the monitor.
Page 4-7
Operation And Adjustment
HDM 5049 PLUS
4.5.2 Geometry
Select a geometry setting with
or
and press
, or press
first to turn Scrollbar on or off.
Scrollbar on:
Scrollbar off:
Adjust with
or
then press
.
to leave the Geometry menu.
Press
If changes have been made, you will be asked to save
or to discard these changes:
Press
Page 4-8
to select yes or no, then press
Correct
Geometry
Horizontal
Blanking
Horizontal
Size
Horizontal
Linearity
Horizontal
Position
Horizontal
S-Correction
Vertical Size
Vertical
S-Correction
Vertical
Position
Skewing
Picture
Rotation
Trapezium
Horizontal
Parabola
Bowing
Vertical
Blanking
Corners
.
HDM 5049 PLUS
Operation And Adjustment
4.5.3 Uniformity
Select a setting with
or
and press
, or press
first to turn Scrollbar on or
off.
Scrollbar on:
Scrollbar off:
Adjust with
or
then press
. Press
to leave the Uniformity menu. If changes
have been made, you will be asked to save or to
discard these changes:
Press
to select yes or no, then press
.
Moiré canceler
When a disturbing Moiré pattern is visible caused by the superposition of the image pattern and the
display’s raster pattern, you can eliminate it by adjusting the Moiré canceler.
The visibility of Moiré patterns depends on the geometry settings. Making small changes to the
vertical size of the picture can reduce Moiré significantly.
Dynamic H focus
Adjust in case horizontal lines appear to be unsharp in the middle of the picture.
V WH Uniformity
N
Vertical
Axial
The Vertical White Uniformity compensates for the
vertical component of the earth’s magnetic field. The
vertical component causes a horizontal deviation of
the electron beam. The compensation is a DC current
through the degauss coils in the top and bottom of the
monitor’s bezel. After adjusting this setting, the monitor
degausses automatically.
Adjust in case of purity or white uniformity errors, in
particular in the middle of the screen, using a
microscope to check the beam landing.
AX WH Uniformity
The Axial White Uniformity compensates for the axial
S
component of the earth’s magnetic field. When this
axial component enters the monitor from the front or
rear side, it causes an electron beam rotation. As a result the beam landing is affected. The factory
adjustment is 127 (no compensation), since it is factory-aligned with the picture tube facing east,
with the axial component entering from the left side of the monitor. The compensation is a DC
current through a coil surrounding the tube’s front side.
Adjust in case of purity or white uniformity errors at the edges of the screen, using a microscope to
check the beam landing.
Page 4-9
Operation And Adjustment
HDM 5049 PLUS
4.6 Information Menu
In the Information Menu, you can find
the serial number, the part number, the
software number and version and the
time the monitor has been running
since it left the factory.
Press
to leave the menu.
The menu disappears automatically
after 20 seconds of keyboard inactivity.
Page 4-10
HDM 5049 PLUS
Technical Specifications
5 TECHNICAL SPECIFICATIONS
HDM 5049 PLUS FEATURES
VISUAL PERFORMANCE
•
•
•
•
•
•
•
Picture tube
• Dot-In-Line, diagonal: 19” (17” visible)
• Dot pitch: 0.26 mm
• Transparency: 46%
• Phosphor type: P22, rare-earth (red),
sulfide (blue and green)
• Max. convergence error:
Zone A: 0.3 mm, Zone B: 0.4 mm.
User-friendly keyboard and OSD
AKB color stability circuit
Orbiting pixel shift system
Automatic Color Alignment
Password protection
19” rack-mountable
Programmable quick degauss
INPUT CONFIGURATION
RGB Input
• Nominal level: 0.7 Vpp ± 3 dB
• BNC connectors
• 75 ohm termination switch
Sync Input
• Nominal level: 2 Vpp,
• Min. 1 Vpp, max 5 Vpp
• Composite or separate H/V sync
• BNC connectors
• 390 ohm
Communication Input / Output
• Female Sub-D 9-pin connector (RS-232)
for Thoma / Philips Color Analyzer
VIDEO PERFORMANCE RGB DRIVE
•
•
•
RBG bandwidth: 135 MHz typical
Pulse rise and fall time: typical 3.5 ns
Black level stability: 0.5% (0-100% APL)
SCANNING SYSTEMS
Horizontal scanning
• Multisync microprocessor controlled
• Frequency range: 30 - 82 kHz
Vertical scanning
• Frequency range: 48 – 150 Hz
• Minimum blanking: 420 µs
Factory-stored Modes
• 1080L x 1920P, 60 Hz Interlaced
(SMPTE 274M)
• 1035L x 1920P, 60 Hz Interlaced
(SMPTE 240M-260M)
• 720L x 1280P, 60 Hz Non-interlaced
(SMPTE 296M)
• 480L x 704P, 60 Hz Non-interlaced
(SMPTE 293M)
• VIVALDI 525 lines / 60Hz 4 Pictures Mode
• VIVALDI 525 lines / 60Hz 1 Picture Full
Screen Mode
Resolution
• Addressable pixels: 1240
• Focus control: DAF system
Geometry
• Maximum error: 1%
CONTROL
•
•
•
•
OSD (On Screen Display) menus
Direct access buttons for contrast,
brightness, Degauss, Power On/Off
(standby)
Menu push-buttons
Power switch at rear side
POWER SUPPLY
•
•
•
Auto-selection: 90–135 / 195–265 V AC
Power consumption: 120 W nominal
Frequency limits: 45 – 65 Hz
ENVIRONMENTAL SPECIFICATIONS
•
•
•
Temperature range:
Operation: 0 / +45 °C
Storage: -20 / +65 °C
Altitude: 10,000 ft / 3000 m
Humidity (relative): 95% maximum, noncondensing
MAGNETIC IMMUNITY
•
•
Automatic Quick Degauss system (minimum
interval: 10 s)
Vertical and Axial White Uniformity
correction
PHYSICAL SPECIFICATIONS
•
•
Number of 19” rack units: 8
Dimensions (without handles):
Width: 438 mm / 17.24 inch
Height: 354 mm / 13.97 inch
Depth: 483 mm / 19.01 inch
Weight: 25 kg / 55.12 lb.
Technical specifications are subject to change without prior notice.
Page 5-1