1
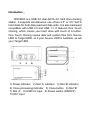
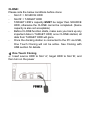
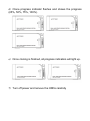
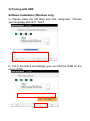
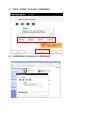
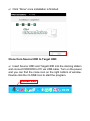
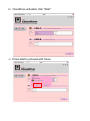
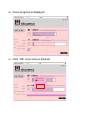
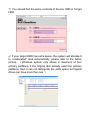
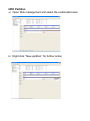
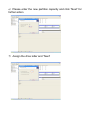
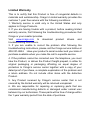
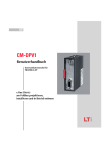
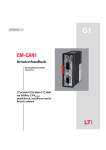
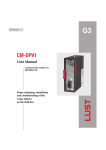
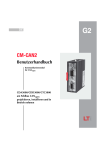
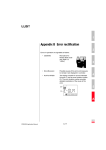
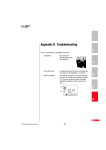
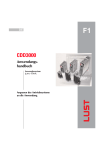
Dual Hard Drive Docking Station
CDD3000
User Manual
Introduction:
CDD3000 is a USB 3.0 dual-SATA 2.0 hard drive docking
station. It supports simultaneous use of two 2.5” or 3.5” SATA
hard disks for both data read and data write. It is also backward
compatible with USB 2.0 and USB 1.1. It features One Touch
Cloning, which clones your hard drive with touch of a button.
One Touch Cloning copies data and system files from Source
HDD to Target HDD, so if your Source HDD is bootable, so will
your Target HDD.
1) Power indicator 2) Slot ‘A’ indicator 3) Slot ‘B’ indicator
4) Clone processing indicator 5) Clone button 6) Slot ‘B’
7) Slot ‘A’ 8) USB 3.0 input 9) Power switch (ON/OFF)
10) DC input
Note:
When using E-SATA interface, the PC can only recognize one
HDD in the docking station. If two HDDs are in the docking
station, only Slot ‘A’ HDD will be recognized by the PC. If only
one HDD is inserted to the dock, then you may use either
Slot ’A’ or Slot ’B’.
Function:
• Complies with Gen2i/Gen2m of Serial ATA II Electrical
Specification 2.6
• Supports SATA II Asynchronous Signal Recovery (Hot Plug)
feature
• Supports SATA to SATA pass through
• Complies with USB 3.0 Specification, USB Mass Storage
Class, Bulk-Only Transport Specification
• Supports USB Super-Speed/High-Speed/Full-Speed Operation
• Supports USB HID operation
• Supports USB2.0/USB3.0/eSATA power saving mode
• Supports Dual LUN for USB2.0/USB3.0
• One Touch Cloning
• Easy to Install and Set-up
• Design for Windows 2000/XP/Vista/7, Mac OS X or later
version.
CLONE:
Please note the below conditions before clone:
Slot ‘A’ = SOURCE HDD
Slot ‘B’ = TARGET HDD
TARGET HDD’s capacity MUST be larger than SOURCE
HDD, otherwise the CLONE cannot be completed. (Same
capacity is also not acceptable)
Before CLONE function starts, make sure you back up any
important data in TARGET HDD; once CLONE started, all
data from TARGET HDD will gone.
Once the docking station is connected to the PC via USB,
One Touch Cloning will not be active. See Cloning with
USB section for details.
1) One Touch Cloning
a) Insert source HDD to Slot ‘A’; target HDD to Slot ‘B’, and
then turn on the power
b) Once the Slot indicators are on, that means CDD3000 is
ready for cloning.
c) Press and hold the clone button for 3 seconds until the
indicator light is on, press the button once more for Clone
confirmation. Cloning process begins.
d) Clone progress indicator flashes and shows the progress
(25%, 50%, 75%, 100%).
e) Once cloning is finished, all progress indicators will light up.
f) Turn off power and remove the HDDs carefully
2) Cloning with USB
Software Installation (Windows only)
a) Please insert the CD drive and click “setup.exe”. Choose
your language and click “ Next”
b) Fill in the S/N # accordingly (you can find the S/N# on the
cover of CD)
c) Click “Install” to begin installation
d) Installation progress is displayed
e) Click “Done” once installation is finished
Clone from Source HDD to Target HDD
a) Insert Source HDD and Target HDD into the docking station
and connect CDD3000 to PC via USB cable. Turn on the power,
and you can find the clone icon on the right bottom of window.
Double click the CLONE Icon to start the program.
CLONE Icon
b) CloneDrive activated, click “Start”
c) Press start to proceed with Clone
d) Clone progress is displayed
e) Click “OK” once clone is finished
f) You should find the same contents of Source HDD in Target
HDD
g) If your target HDD has extra space, the system will allocate it
to “unallocated” area automatically, please refer to the below
picture. (Windows system only allows a maximum of four
primary partitions, if the original disc already exist four primary
partitions, then it can not distinguish the extra space but logical
drives can have more than one )
HDD Partition
a) Open Disk management and select the unallocated area
b) Right click “New partition” for further action
c) “Next”
d) Base on your need and click “Next”
e) Please enter the new partition capacity and click “Next” for
further action
f) Assign the drive letter and “Next”
g) Select “Quick Format” to format the new partition
h) Click “Finish”
i) mPartition completed, the new partition can be found.
Limited Warranty
This is to certify that this Product is free of congenital defects in
materials and workmanship. Cirago’s Limited warranty provides the
customer 1-year free service with the following conditions:
1. Warranty service is valid only in the United States and only
applies to Cirago Products.
2. If you are having trouble with a product, before seeking limited
warranty service, first following the troubleshooting procedures that
Cirago or your reseller provides.
Visit www.cirago.com to download product drivers and
troubleshooting instructions.
3. If you are unable to correct the problem after following the
troubleshooting instructions, please call the Cirago service hotline at
408-331-8824. Have your product’s serial number and your date of
purchase available when you make the call to expedite service.
4. If the problem cannot be corrected over the telephone, you must
take the Product, or deliver the Product freight prepaid, in either its
original packaging or packaging affording an equal degree of
protection to Cirago’s service center together with a copy of your
dated proof of purchase, a complete explanation of the problem and
a return address. Do not include other items with the defective
Product.
5. Any Product received by Cirago's service center that is not
covered by the limited warranty will be returned unrepaired.
6. We are responsible for repairing or replacing parts that are
considered manufacturing defects or damaged under normal user
behavior by our technicians. These parts will be free of charge within
the 1-year warranty period from the date of purchase.
7. All damaged parts will become Cirago’s property.
8. Free warranty service will not be provided if:
i) The Product has been explicitly or implicitly modified, tampered
with, altered or repaired in any way by persons other than our
technicians or approved vendors; or
ii) The Product has been damaged due to misuse, negligence,
accident, shipment, inserts or natural calamities; or iii) The Product
has been installed, maintained or operated not in accordance with
the instructions furnished by Cirago; or iv) Any damage,
deterioration or malfunction is caused by power interruption or
abnormal voltage input.
9. Warranty will only be valid if the date of purchase on the warranty
card corresponds with that of the official purchase receipt.
10. The warranty card should be properly completed and mailed
back to the address indicated within 14 Days of purchase.
11. The original purchase receipt shall be provided upon request for
service.
12. Under no circumstances will Cirago be liable for any
consequential damages caused in relation to the use of this product.
13. This warranty gives you specific legal rights, and you may have
other rights which vary from state to state.
For your convenience, Cirago has established a service hotline for
frequently asked questions and service assistance or resolution of a
service problem, or for product information or operation:
Cirago Service Center
Address: 611 Vaqueros Ave., Sunnyvale, CA 94085
Service : 408-331-8824