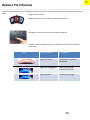
1
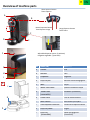
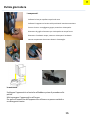
IT EN
INSTRUCTION BOOK
MANUALE DI ISTRUZIONI
Please read this Instruction Manual and the safety instructions before operating the appliance!
Leggere e conservare con cura queste istruzioni prima di utilizzare all’apparecchio.
Capsule espresso maker
Model No: ST-503,
Model name: Carina
1
IT EN
Service contact:
Contatto di servizio:
GAP-MAC Srl
Tel +393669044560 Fax +393669052697
[email protected] www.gap-mac.it
index
Safety precautions
Notes on this manual
Unpacking
Starting up
– Capsule type can be used
– An overview of machine parts and controls
– Before using for the first time
– Installation/power connection
– Filling/refilling the water tank
– Starting up/preheating
– Flushing out the machine/internal piping
– Making coffee
– After making coffee
– Energy saving mode
– Emptying the capsule container/drip tray
Cleaning
Decalcification / Maintenance
Storage / Final disposal
Troubleshooting
Technical data
Indice
Avvertenze di sicurezza
Leggere attentamente queste istruzioni
Disimballo
operaioni preliminari..
–Tipi di capsule utilizzabili
– Descrizione dei componenti.
– Descrizxione operazioni primo utilizzo
– Accensione dell’apparecchio.
– Riempimento del serbatoio acqua.
– Riscaldamento
– Risciacquo l’apparecchio.
– Erogazione caffe.
– Operazionisucessive all'erogazione caffe.
– Risparmio energia.
– Svuotamento del serbatoio porta capsule
Pulizia
Decalcificazione.
Messa in dimora
Soluzione prolemi
Dati techici.
2
IT EN
The appliance has been manufactured using high
quality materials that can be reused or recycled.
Dispose of the appliance in a suitable waste collection
center.
L’apparecchio è costruito con materiali di alta qualità
che possono essere riutilizzati o riciclati. Smaltire
l’apparecchio in un apposito centro di raccolta.
When you decide to dispose of the appliance, unplug
it from the power outlet. Then cut off the power cord
as close to the body of the appliance as possible.
Quando si decide di smaltire l’apparecchio, scollegarlo
dalla rete elettrica staccando la spina. Quindi
tagliare il cavo alimentazione il più vicino possibile
all’apparecchio.
Directions for correct disposal of the product
according to European Directive 2002/96/EC and
Italian Legislative Decree no. 151 of 25 July 2005. At
the end of its useful life, the product should not be
disposed of with unsorted household waste. It should
be taken to a suitable selective waste collection
center set up by the local authorities or returned
to a retailer who provides this service. Separate
collection of an electric household appliance avoids
a possible negative impact on the environment and
health arising from improper disposal and enables
the materials it is made of to be recovered so as to
achieve signifi cant savings of energy and resources.
The crossed-out wheelie bin symbol applied on the
product highlights the need to dispose of electric
appliances separately. Improper disposal of the
product by the user shall be subject to specifi c
administrative sanctions as provided for under current
regulations. The packaging is made from recyclable
materials. Contact the competent authorities for
information regarding local legislation.
Avvertenze per il corretto smaltimento del prodotto
ai sensi della direttiva europea 2002/96/EC e del
Decreto Legislativo n. 151 del 25 Luglio 2005. Alla fi ne
della sua vita utile il prodotto non deve esser smaltito
insieme ai rifi uti urbani. Può essere consegnato
presso gli appositi centri di raccolta diff erenziata
predisposti dalle amministrazioni comunali, oppure
presso i rivenditori che forniscono questo servizio.
Smaltire separatamente un elettrodomestico
consente di evitare possibili conseguenze negative
per l’ambiente e per la salute derivanti da un suo
smaltimento inadeguato e permette di recuperare
i materiali di cui è composto al fi ne di ottenere un
importante risparmio di energia e di risorse. Per
rimarcare l’obbligo di smaltire separatamente gli
elettrodomestici, sul prodotto è riportato il marchio
del contenitore barrato. Lo smaltimento abusivo del
prodotto da parte dell’utente comporta l’applicazione
delle sanzioni amministrative previste dalla
normativa vigente. L’imballo è in materiale riciclabile.
Rivolgersi alle autorità competenti per informazioni
relative alla normativa locale.
3
IT EN
Notes
Osservazioni
This operating manual cannot cover all possible
circumstances. For further information or in case
of problems not adequately covered in this
operating manual, please contact the service and
sales centre.
Please keep this operating manual safe and
pass it on to the next user.
Questo manuale non comprende tutte le possibili
cause di lavoro. Per ulteriori informazioni in caso
di problemi non sufficientemente spiegati in
questo manuale bisogna di contattare il servizio di
assistenza tecnica piu vicino oppure chi vi ha
venduto la macchina.
E' necessario mantenere il manuale in maniera
corretta e consegnarlo all'utilizzatore suicessivo in
caso di cessione della macchinar.
Unpacking
− Remove your espresso capsule
coffee machine from its packaging
− After unpacking, please check that the following
parts are included:
1. water tank
2. coffee machine
3.
Manual
4.
Warantee card
Note:
− Check that your home power supply voltage is the
same as marked on the machine rating plate
Tip:
keep the packaging for transporting the machine
(e.g. for servicing, etc.)
Note:
You may find a little water remaining in the machine.
In order to ensure that this machine works perfectly, it was
tested with water before leaving the factory.
Disimballaggio
− Dopo aver tolto l’apparecchio dalla confezione, bisogna
controllare se tutti i componenti sono inclusi:
1. Serbatoio di acqua.
2. Macchina da caffe.
3.
Manuale di Istruzione.
4.
Garanzia
Note:
assicurarsi che la tensione della rete eletrica corrisonda a
quella indicata nella targhetta dati sul fondo del
apparecchio.
Suggerimenti:
(Conservare il conferzione per trasportare l’apparecchio
(per esempio: per riparazioni )
Note:
Presenza di acqua nel serbatotio capsule e nella macchina
Per assicurare che questa macchina funzioni perfettamente,
è stato eseguito un controllo con acqua prima di lasciare la
fabbrica.
4
IT EN
Safety warnings
After use, the hot water/steam wand is very hot. Do
not touch! Risk of burns!
Always close the lever. Never open the lever while the
appliance is operating. Always use the appliance with
the drip tray and grill in place.
If the program is set to dispense more than 150 ml
per cup of coffee, you must wait 5 minutes before
preparing another cup.
Never place your hands inside the capsule
compartment. Danger of injury! Never remove
parts of the appliance. Do not insert objects into
the openings. This could cause electric shocks! Any
operation that is not described in this instruction
manual should only be performed by an Authorized
Service Center!
Clean the appliance carefully and regularly. If it is not
cleaned, the build-up that forms may be hazardous to
your health. Unplug the appliance and allow it to cool
before cleaning.
Descale the appliance regularly, following the
instructions provided. If you do not, the appliance
may be damaged and may become harmful to your
health.
Make sure the electrical elements, plug and cord
are dry.
Never submerge the appliance in water. Protect the
appliance from sprays and drips. Water and electricity
together constitute a risk of electrocution
If you do not expect to use the appliance for a long
period of time (leaving on vacation, etc.), unplug it.
Before using for the first time
to avoid overheat to the pump if working without
water,please fill the water tank to Maximum level or
at least not less than MINIMUM level. Pls always
place the drip tray set in place, in particularly, when
opening the handle to eject the used capsule into
the used capule container. Do not open the handle
when the machine is brewing coffe.
Capsule type can be used:
-This capsule coffee machine can use Nespresso
compatible capsules such as Gimoka, if to use others,
please contact service to check if the type of your
compatible capsule has been verified or not, the machine
does not work with all compatible capsules.* Nespresso
is the trademark of Nespresso. S.A. which has no
connection with this machine distributor.
Avvertenze di sicurezza
Dopo l’uso, il tubo erogatore di acqua calda/vapore è
molto caldo. Non toccare! Rischio di scottature!
Richiudere sempre la leva. Mai aprire la leva quando
l’apparecchio è in funzione. Utilizzare l’apparecchio
sempre con la vasca raccogligocce e la sua griglia
inserite.
Se si programma l’erogazione di caffè superiore a 150
ml, bisogna attendere 5 minuti prima di procedere
alla preparazione di un nuovo caff è.
Mai mettere le mani dentro il vano portacapsule.
Pericolo di lesioni! Mai rimuovere parti della
macchina. Non inserire alcun oggetto nelle aperture.
Questo potrebbe causare scosse elettriche! Qualsiasi
intervento non illustrato in queste istruzioni non deve
essere eseguito
Pulire scrupolosamente e regolarmente l’apparecchio.
Il deposito che si crea in caso di mancata pulizia,
potrebbe essere dannoso per la salute. Scollegare
l’apparecchio e lasciarlo raff reddare prima di
procedere alla pulizia.
Procedere con la decalcifi cazione ad intervalli regolari,
come indicato dalle istruzioni. In caso contrario
l’apparecchio potrebbe danneggiarsi e potrebbe
provocare danni alla salute.
Assicurarsi che gli elementi elettrici, spine e cavi siano
asciutti.
Mai immergere l’apparecchio in acqua. Proteggere
l’apparecchio da schizzi o gocciolamenti. Elettricità
e acqua insieme provocano pericolo di morte per
scariche elettriche.
Nel caso si preveda di non utilizzare l’apparecchio per
lunghi periodi (vacanze, ecc.), scollegare la spina dalla
presa elettrica.
Note bene: Per evitare che la pompa funzioni a vuoto e si
surriscaldi, mantenere sempre acqua nel serbatoio entro
il livello di Massimo oppure Minimo.Utilizzare
l’apparecchio sempre con la vasca raccogligocce e griglia
inserite, in particolare, quando si apre la leva per
espellere la la capsula che cade neel’apposito
contenitore. Mai aprire la leva quando l’apparecchio é in
funzione e sta erogando caffè
Tipi di capsule da utilizzare:
Questo apparecchioè compatibile con capsule
Nespresso*, o formati analoghi per esempio, Gimoka, se
vengono utilizzate altre capsule, bisogna controllare con
il centro Assitenza autorizzato. L’apparecchio potrebbe
non funzionare con tutte le capsule.
*Nespresso é il marchio di Nespresso. S.A, che non ha
collegamento a questo distributore di macchina.
5
IT EN
Overview of machine parts
Short espresso button
Tasto espresso
A
B
Normal espresso button
Tasto Espresso Lungo
Lungo Espresso button
Tasto Tisana
C
D
E
F
Adjustable dispenser spout (2 positions)
Erogatore regolabile (2 posizioni)
No
Name (EN)
Nome (IT)
A
Handle
Leva
H
B
Buttons
Tasti
I
C
Dispenser
Erogatore
D
Drip tray set
Assieme Vasca raccogligocce
E
Wall
Corpo
F
Water tank cover
Sportello serbatoio acqua
G
Water tank
(removable)
Serbatoio (rimovibile)
H
Power cord
Cavo di alimentazione
I
Main switch
Interruttore principale
J
Used capsule container
Contenitore capsule esauste
K
Drip tray cover
Griglia
L
Drip tray
(removable)
Vasca raccogligocce
(rimovibile)
G
D
J
K
L
EN
Fill/refill water.
There are two ways to fill the water tank: directly into the
machine, by
using for example a jug, or by removing the water tank.
Filling without removing the tank
– raise the water tank lid
– Fill the tank up to the “MAX” mark with cold fresh water (the
maximum capacity is 0.8 litre), or at least the “Min” mark .
– low down the lid
1
2
Filling by removing the water tank
–hold the water grip at tilting angle as shown in direction 1 to
remove the water tank from the machine.
– Fill the tank up to Fill the tank up to the “MAX” mark with
cold fresh water (the maximum capacity is 0.8 litre). or at least
the “Min” mark .
– slide the water tank slowly on water tank base, when the
water tank outlet is inserted in the inlet receptacle, pushing
firmly on the water grip as shown in direction 2 to lock the
water tank .
Flushing out the machine and internal piping/first use
Before using for the first time or after long pauses (e.g.
holidays) the machine must be flushed out. This short
procedure can flush out and cleans the internal piping
thoroughly and remove the residual taste from last brew.
Fill water tank to maximum level.
Plug in the appliance and turn it on.
the lights on the control buttons are blinking , blue lights
in used-capsule container is lighted in blue which goes
off after 1 minute .
Tips: you can check easier if the used container is full or
not when the blue light is on.
The indicator will blink in red for first use, meaning the internal circuit is empty.
Please fill up water tank and open the handle, press any button to start pump, once
water is detected entering the internal circuit, the red indicators becomes blue.
Before to start rinsing,make sure that:
– the handle is closed without capsule inside.
– the drip tray set is in place.
– a large bowl ( 250ml size or above) is placed under the dispenser.
press the normal espresso button to start flush out, the flush
out process will stop automatically.
– Open the handle to empty brewing chamber.
– Empty the drip tray set.
7
IT
Riempimento serbatoio acqua.
Ci sono 2 modi per riempire il serbatoio acqua.
A. Riempire con acqua direttomente ;
B. prendere il serbatoio e riempire di acqua sotto il rubinetto.
A:
– sollevare il Sportello di serbatoio acqua.
–Riempire il serbatoio con acqua fresca (non gasata) a Maximum,
oppure Minimum almeno.
– chiudere il Sportello di serbatoio acqua.
B:
–Rimuovere serbatoio acqua per direzione 1.
– Riempire il serbatoio con acqua fresca (non gasata) a
Maximum, oppure Minimum almeno.
– Reinserire il serbatoio inclinandolo leggermente come
direzione 2 e appoggiarlo sulla valvola dell’acqua, premere il
serbatoio acqua fino a sentire uno scatto. Onde evitare
fuoriuscite d’acqua, controllare che il serbatoio sia fissato.
1
2
Lavaggio circuiti interni
Al primo utilizzo, oppure se la macchina e rimasta spenta per un periodo
prolungato, deve essere risciaquata. Tramite questo breve procedimento I circuiti
interni vengono risciacquati.
Riempire il serbatoio acqua
Inserire la spina nella presa di corrente e accendere l’apparecchio.
I tasti e lampeggiano.
La luce nel Contenitore capsule esaustee lampeggia in blue per un
minuto.
suggerimento :
durante il ampeggio, si può controllare se il contenitore capsule è pieno.
Dopo un minuto la spia lampeggia in rosso al primo utilizzo perchè i circuiti interni
sono vuoti. A questo punto premere un tasto per cominciare riempire con acqua i
circuiti interni.
Quando la macchina sente che l'acqua è entrata nei circuiti, il luce rossa diventa
blue.
Primo di cominciare risciacquo, assicurarsi che:
-La leva è chiusa, controllare che non ci siano capsule all’interno vano.
La vasca raccogligocce gruppo è in posizione.
Porre un bicchieri di capacita 250ml sotto all’erogatore.
Premere il tasto di espresso Lungo, l’erogazione si ferma automaticamento.
sollevare la leva per vuotare il vano capsula.
rimuovere e vuotare la vasca raccogligocce gruppo.
8
EN
Heating up.
The machine starts to heat up automatically when detected water
in circuit with 3 buttons blinking.
The lights on buttons become steady when the
machine is heated up, heating up time is 40 seconds
approximately.
Definition of lighting.
name
status
function
action
First use.
Refer to “flash out the
machine and internal
circuit”
Light steady/Water tank
is empty.
Fill up water tank, open
handle, then press any
button to fill the internal
circuit.
Light steady
Stand-by
Blinking when warming
up.
Wait for ready.
light steady
ready
Each button blinks
circularly.
In energy saving mode.
Blinking when the drip
is full of water.
Empty the drip tray.
light steady when
handle is open.
Check if the used capsule
container is full or not.
indicator
Button light
Light in used
capsule
container
9
IT
Riscaldamento.
L’apparecchio comincia riscaldamento quando
sente che l' acqua è entrata nei circuiti interni e
segnala il riscaldamento con il lampeggio dei tasti
erogazione, fino che i tasti lampeggianti non
diventano a luce fissa.
Il tempo di riscaldamento e 40 secondi circa.
Significato delle luci
Nome
stati
funzioni
Azione.
Spia Rossa, Primo utilizzo
Pronto per “Risciacquo circuiti interni”
Spia rossa fisso durante
erogazione. Il serbatoio
è vuoto.
Sollevare la leva per espellare la capsula,
premere un tasto qualunque per reimpire i
circuiti interni.
Spia rossa fisso durante
erogazione. La leva è apeta
Mai aprire la leva quando l’apparecchio e in
funzione di erogazione. Chiudere la leva.
Spia
Spia blue fisso.
Tasti
Contenitore
di capsule
usauste.
I tasti lampeggiano.
Fase di riscaldamento Aspettare fino a
luce fissa.
I tasti hanno luce fissa.
La temperatura di riscaldatore e pronto
per erogazione del caffe.
I tasti lampeggiano
ciclicmente.
In fase di riparmio energia. Premere
qualsiasi tasti per laciare ed
l’apparecchio comincia riscaldamento.
Lampeggia in blue
La vasca raccogligocce è piena.
Deve essere vuotata la vasca
Luce fissa blue
Tutte le volte che la leva è alzata la luce
del contenitore capsule è accesa per
controllare il livello di capsule
all'interno del contenitore
10
EN
Brewing coffee
1
3
2
– Place an empty cup under the dispenser. For small cups, low down
the dispensing spout.
1. Move the handle back completely
2.
Insert a capsule to fall straight into the compartment correctly.
3.
Close the handle firmly to load the capsule .
4.
Press the desired coffee button only once
5.
The selected button will blink and the machine is brewing coffee,
dispensing will stop automatically when reaching the default
brewing volume (25ml for short espresso, 40ml for normal espresso,
110ml for lungo espresso),default setting can be programmed,
please refer to “how to program volume”.
6.
Raise the handle to eject the used capsule into the container.
7.
Close the handle.
Tips: when using the cold machine (for example, using the machine in
the morning or idle time longer than 1 hour), it is suggested to brew
water first in order to remove the residual taste of the last cup.
Refill internal circuit when water tank is out of water during brewing
* It is strongly suggested to be sure there is enough water in the tank before making coffee , minimum
level at least.
In case water is running out during coffee brewing, you can stop it by pressing the selected button
which is blinking.
Wait for 3 minutes to open the handle to eject the used capsule. CAUTION: Beware of hot steam: danger
of scalding!
Follow the instruction of “Filling/refilling the water tank ” and “Flushing out the machine/internal
piping”
11
IT
Erogazione caffe
1
3
2
-Inserire un contenitore capiente sotto all’erogatore.
-Per l'utilizzo delle tazzine, si deve spostare manualmente la parte terminale
dell'erogatore.
-Inserire la capsula spingendola all’interno vano con una legera pressione.
-Chiudere la leva con decisione.
-Premere una volta sola il tasto del caffe desiderato.
-Il tasto del caffe selezionato lampeggia.
- L’erogazione si ferma quando viene raggiunta la quantita e la macchina emette un
segnale sonoro.
-Sollevare la leva per espellere la capsula che cade nee’apposito contenitore.
-Chiudere la leva.
Suggerimento:
Quando utilizza la macchina freddo (per esempio, la mattina oppure l’apparecchio è
rimasta spento per un periodo prolungato, per evitare che il caffenon sia
abbastanza caldo, fare un risciacquo con acqua per preriscaldare la tazza.
Riempire i circuiti interni quando il serbatoio si vuota durante
erogazione.
Bisogna sempre assicurarsi che ci sia abbastanza acqua nel serbatoio primo di erogare,
L'acqua non deve essere sotto al livello Minimum.
•
Nel caso l'acqua termini durante l'erogazione premere il tasto dei 3 che lampeggiano per fermare il
erogazione.
•
Aspettare a 3 minuti per lasciare raffreddare la macchina prima di sollevare la leva (avvertenze:
scottatura di vapore).
•
Dopo sollevare la leva per espellare la capsula interna (avvertenze: scottatura di vapore), chiudere
la leva.
Riempire acqua come istrizione “riempire il serbatoio acqua” e “ risciacquo l’apparecchio”
•
•
12
EN
Programming the coffee volume.
1
3
2
Be sure there is enough water in the tank before programming coffee volume.
Place an empty cup under the dispenser.
For small cups, low down the dispensing spout.
1. Raise the handle back completely
2.
Insert a capsule into the compartment gently.
3.
Close the handle firmly to load the capsule .
4. Press the desired button and keep it pressed down, (8 s minimum) once the
desired volume has been reached, release the button, now the button is
reprogrammed.
5. After the programming, the size will be recorded in memory. for next use, by
clicking the button normally (ie, press once.)
Do the same for other buttons if required.
Volume range: 25ml ~150ml.
default size is:
25ml (short espresso),
40ml (normal espresso),
110ml (Lungo espresso).
Energy saving mode.
The machine enters energy saving model automatically once the machine is idle for 15 minutes, the 3 buttuns will flash cyclically
in energy saving mode.
If to quite energy saving mode, please press any button, appliance will start to warming up with lights blinking, when the
buttons are lit steadily, the machine is ready to brew coffee.
13
IT
Programmazione quantità caffe in tazza
-Inserire un contenitore capiente sotto all’erogatore.
-Inserire la capsula spingendola all’interno vano con una legera pressione.
-Chiudere la leva con decisione.
-Premere e mantenerlo premuto il tasto del caffe desiderato (8 secondi e minimo.)
-Il tasto del caffe selezionato lampeggia.
Quando avete raggiunto la quantita di caffe desiderata in tazza, rilasciare il tasto.
Ora il tasto e programmato. Per programmare un altro tasto ripetere le operazioni
con nuova capsula.
-Sollevare la leva per espellere la capsula che cade nell’apposito contenitore.
-Chiudere la leva.
Dopo programmata, il quantita e memorizzata nel l’apparecchio, ora, premere una
volta sola il tasto per caffe quantita desiderato .
1
3
2
Gamma programmabile di volume: 25ml ~150ml per tutti tasti .
25ml per espresso tasto.
40ml per nomale espresso tasto
110ml per lungo espresso tasto.
Risparmio energia.
Dopo 15 minuti di inutilizzo, la funzione di “risparmio energia ” è attivata riducendo automaticamente il
consumo energetico del 98% circa .
I tasti lampeggiano ciclicamente
Per uscire dal riparmio energia premere un qualsiasi tasto, l’apparecchio comincia la fase di riscaldamento alle
normali condizioni.
14
EN
Cleaning
Emptying the capsule container and drip tray
The capsule container holds around 10 used capsules.
we recommend emptying the used capsule container and the drip tray
every day, you can see if the used capsule container is full or not
while the blue light is on in the used capsule container.
Raise the handle to ensure there is no capsule inside the brewing
compartment.
2.
Raise the dispensing spout up if it is in low position.
3. Hold the drip tray firmly and pull it out by lifting gently.
4. Dispose of used capsules and drip tray.
5. The used capsule container can be detached, if necessary, from the
lower drip tray (snaplock).
6. Resin out the drip tray set with fresh water.
7. Remove the water from the appliance, resin out the water tank with
fresh water.
8.
After emptying/cleaning, reassemble the parts in reverse order and
insert them back to machine in place.
Important: the plastic parts of the machine are not dishwasher safe.
1.
Coffee machine
– Always pull out the power plug before cleaning the machine
– Never immerse the machine in water or clean it under running water
− Clean the machine with a dry cloth
– Never use abrasive cleaning agents or materials (use e.g. dry rags or
kitchen paper)
15
IT
Pulizia giornaliera
I componenti.
Sollevare la leva per espellare capsula nel vano.
Sollevare l'erogatore se lasciato nella posizione di massima estensione.
Estrarre la vasca raccogligocce gruppo, vuotarlo e risciacquarlo.
Rimuovere la griglia e ilcassetto per risciacquale con acqua fresca.
Rimuovere il serbatoio acqua, svotare e risciacquare il serbatoio.
Nessun componente deve essere lavato in lavastovglie.
La macchina.
Scollegare l’apparecchio e lasciarla raffreddare prima di procedere alla
pulizia.
Mai immergere l’apparecchio nell’acqua.
Per pulire la superficie dell’apparecchio utilizzare un panno morbido e
un detergente neutro.
16
EN
Factory reset
In case you want to have the default setting of the
machine, please follow below instruction
a. Turn off the machine.
b. Press the lungo button and keep the button pressed,
c. switch on the machine while the lungo button is
pressed, release the button after 3 seconds or when
you hear 2 beeps, the reset is done.
d. After above operation, the machine is reset to factory default
setting- the following parameters are reset:
1.
Coffee brewing size,
-25ml
-40ml
-110ml
2. Pre-brew: on
Steaming out / Storage / Transport
Steaming out
– Prior to long periods of disuse or for storage or transport at temperatures
below 5 °C, it is essential to steam out the machine. This removes
water from the system to prevent internal frost damage.
– turn on the machine
– Empty the water tank and place it in its position.
– Put an empty cup under the coffee dispensing spout.
– press “lungo” button to start brewing.
– Steaming out now commences.
After the pump stops automatically, the steaming out process is completed.
– turn off the machine and unplug.
06/11/13
17
IT
RESET Ripristino impostazioni di Fabbrica
Per reimpostare la macchina alle impostazioni di fabbrica
Spegnere l’apparecchio.
Mantere premuto il tasto TISANA e contemporaneamente
Accendere la macchina premendo l’interruttore generale
La spia lampeggia 2 volte con segnale acustico.
Dopo l’operazione reimposta, i seguenti parametri vengono riportati:
1. Quantita dei caffe.
:
25ml per espresso tasto.
40ml per nomale espresso tasto
110ml per lungo espresso tasto.
2. Pre-brew: attivata
Svuotare l’apparecchio
Attenzione:
Quando non si utilizza l’apparecchio per lungo tempo, è necessario svutare il circuito dell’
acqua, I liquidi potrebbero congelare e danneggiare cosi ‘apparecchio. In particolare, nel caso di
la temperatura e inferiore a 5°C .
Accendere l’apparecchio.
Vuotare il serbatoio acqua e metterelo nel posizione
Inserire un contenitore capiente sotto all’erogatore.
Premere il tasto TISANA per cominciare svuotare I circuiti interni.
La pompa si ferma automaticamento
Spegnere l’apparecchio e scollegare la spina.
18
EN
Pre-Brewing option
Pre-brewing is a great function to brew coffee espresso with better
temperature and extraction. you can turn it off if desired or choose
different pre-brewing mode.
To enter pre-brew setting mode, please follow below instruction:
a. Turn off the machine.
b. Press the middle button and keep the button pressed,
c. switch on the machine while the middle button is pressed.
d. release the button in 3 seconds or when you hear 2 beeps.
e. you can choose the setting now.
f. Press the middle button in turn to choose the preferred setting.,
referring to the status table:
status
description
function
Stead light in red.
Disable the pre-brewing
function
Flash light in blue
Short pre-brewing,
Steady light in blue
Long pre-brewing
(default)
19
IT
Opzione Pre Infusione
La funzione Pre Infusione serve per migliorae l'estrazione del caffè e aumentare la temperatura di erogazione del primo
caffè
Spegnere l’apparecchio.
Mantere premuto il tasto LUNGO e contemporaneamente
accendere la macchina premendo l’interruttore generale.
Premere il tasto LUNGO per scegliere di impostare la funzione Pre infusione
come segue
Stati
Descrizione
Funzione
Spia rosso fisso
Pre-infusione fuzione è
disattivata.
Spia blue lampeggiano
Short pre-brewing,
Pre-infusione corta
Spia blue fisso.
Pre-infusione lunga
20
EN
Decalcification
Decalcification / Maintenance
Drinking water varies according to region. The lime particles in hard
drinking water are deposited as residues in the machine and can block
the piping and cause damage. To prevent this, be sure to decalcify the
machine at the very least after making 300 to 400 cups of coffee or,
in any case if the output falls significantly or, after one
or two months.
Decalcification must be done correctly to prevent damage. So it is
essential
to follow these instructions.
Important:
– Never clean the machine with vinegar. This causes damage and
makes your coffee taste bad
– Damage caused by incorrect decalcification or failure to decalcify is
not covered by the guarantee
– Caution: beware of hot water!
1. Recommendations: purchase commercially available decalcifier
(decalcifying liquid), diluted according to the manufacturer‘s instructions;
pour the mixture in the water tank
2. Make sure there is without capsule inside the machine.
3. Place a large bowl under the dispensing head to collect the decalcification diluted and lime residues
4. Fill the water tank with water to maximum level mixed with decalcifying solution, make sure the solution is
dissolved completely.
5. Turn off the main switch, Press the short espresso button and hold it pressed down , turn on the main switch
simultaneously, release the short espresso button once 2 beeps emitted, the indication light is in red.
6. Press the short espresso button to start the pump.
7. The machine will run out 2 tanks of water for the decalcification process, after running out the 1st tank of
water, there is one “beep” to remind to fill in the water tank with decalcifying solution to the maximum
level, once filled, press the button again, the machine will go on the procedure automatically , the red light
becomes blue once the cycle is finished.
8. Repeat the process to Flush out the intern circuit with 2 tank of fresh water (without the decalcifying
solution) to clean the internal circuit completely.
9. Turn off the main switch.
10. The decalcifying process is completed.
Tips: during decalcifying process, if you need to empty the bowl under the dispenser, you can press the button
for pause, press it again to continue
21
IT
Decalcificazione
Il calcare presente nell'acuqa viene depositato nei circuiti interni e può provacare danni
all’apparecchio.
Per evitare questo, assicurarsi di decalcificare dopo aver fatto da 300 a 400 tazze di caffè
oppure dopo uno o due mesi di utilizzo della macchina
Leggere con attenzione le precauzioni d’uso presenti sulla confezione del decalcificante, evitare il
contatto con gli occhi, la pelle e le superfici della macchina.
Durante la decalcificazione non spegnere la macchina.
Non usare aceto: puo danneggiare la vostra macchina.
- danni causati dall'utilizzo decalcificazione errata oppure mancata non è incluso dalla garanzia.
1.
2.
3.
4.
Preparare la soluzione decalcificane come indicato dal produttore e versarne nella serbatoio
al livello massimo.
controllare che non ci siano capsule all’interno vano.
Inserire un contenitore (almeno 250ml) sotto l’erogatore
Spegnere l’apparecchio.
Mantere premuti il tasto Espresso e contemporaneamente accendere la macchina premendo l’interruttore generale.
Rilasciare il tasto quando La spia lampeggia 2 volte con segnale acustico.
Premere il tasto espresso per cominciare pompa.
Il ciclo di decalcificazione prevede l'utilizzo di 2 serbatoio di acqua
Dopo aver eseguito il primo serbatoio di acqua, c'è un "beep" per ricordare di riempire il serbatoio con soluzione decalcificante
fino al livello MASSIMO
Una volta riempito, premere ancora il tasto ESPRESSO
La macchina andrà avanti automaticamento
La luce rossa diventa blu quando che il ciclo è finito.
Ripetere il processo per risciaquo i circuiti interni con 2 serbatoio di acqua fresca(senza la soluzione decalcificante) per pulire
completamente.
Spegnere l’apparecchio.
Suggerimenti:
Durante il processo di decalcificazione, se avete bisogno di svuotare la contenitore sotto l'erogatore, è possibile premere il tasto
ESPRESSO per pausa, ri-premere ESPRESSO per continuare.
22
EN
PROBLEM
CAUSE
SOLUTION
No coffee is brewed.
The water tank is empty.
Fill water in the water tank.
The coffee is not hot
enough.
-the Cold cups / mugs.
- Scale build-up in machine.
-
Preheat cup / mug.
- Descale.
- For cold machine, brewing a cup of water to
warm up the circuit.
Capsule can’t drop down
-The used capsule container
is full.
The capsule is
deformed after
brewing.
Empty the used capsule container.
- Push it down with finger, or close the
handle and open it once again.
steam when handle opened.
- Opened the handle too
quick when brewing
finished.
- Leave a few seconds to let the residual
pressure and pressure to escape.
Water on table
-
Water tank is leaking.
-
Capsule droped down directly to
used capsule container.
Occasional drops drip out of the
dispensing head
-
-
-
Coffee comes out in drips/coffee
goes into the used capsule
container.
Capsule deformed
-
the heater is keeping
warm.
the ground coffee in
capsule is too fine to
pass water. Or
decaffeinated capsule
was used.
Check if the valve on water tank is stuck.
- call service center.
try it again with slight different angle.
use a new capsule.
Occasional drops are normal, it is
not a defect
-
Change to a new capsule.
Suggest to not use decaffeinated capsule.
Technical data:
Rated Voltage:
Rated Frequency:
Rated Power:
N.W./G.W.:
Pump Pressure:
Water Tank Capacity:
Size:
Protection Class:
220-240V AC
50Hz
1,260W
3.1/3.5 kg appr.
Max. 19 Bars
0.8L
118mm(W)* 365mm(L) * 250mm(H)
I
Right for improvements changes are reserved in the interest of technical progress.
23
IT
PROBLEMA
CAUSA
SOLUZIONE
Non esce caffe
Il serbatoio acqua è vuoto, la
spia allarme è di colore rosso.
Riempire il serbatoio con acqua fresca.
Premere il tasto del caffe desiderato.
Il caffe non è sufficientemente
caldo.
-Tazze/Tazzine fredde
- Macchina con calcare.
- La macchina è fredda
Preriscaldare la tazza.
-Decalcificare.
-Eseguire una erogazione senza capsula per
riscaldare la macchina.
-Il contenitore capsule
esauste è pieno.
La capsula viene deformata
dopo la erogazione.
- Vuotare il contenitore capsule esauste
La Capsula non può scendere verso il
basso in fase di apertura.
Esce vapore quando la leva è aperta
Acqua sul tavolo
- La leva è stata aperta
troppo velocemente dalla
fine dell'erogazione.
-
Perdita di serbatoio
acqua.
- Spingere verso il basso la capsula con una
penna o chiudere ed aprire la leva ancora
una volta.
-
-
-
-
Capsula caduta direttamente nel
contenitore delle capsula esausta.
-
La capsula viene
deformata
-
-
Singole gocce furiescono dal gruppo
erogatore soprattutto durante la
fase di riscaldamento.
Caffè esce a gocce / caffè va nel
contenitore capsula esausta.
Dati tecnici:
-
non e un difetto.
il caffè macinato in capsule
è troppo fine per
passare l'acqua.
Lasciare la capsule a raffreddarsi un paio
di secondi.
Non fermare l'erogazione manualmente
(appena programmare la quantita meno).
verificare se la valvola del serbatotio è
bloccata.
rivolgersi al centro assistenza.
provare di nuovo con diversa
angolazione.
mettere una capsula nuova.
la fuoriuscita di singole gocce e nomale, non
e un difetto.
-
-cambiare una capsula nuova.
Alimentazione tensione
220-240V AC
Frequenza :
50Hz
Potenza caldaia:
1,260W
peso netto / peso lordo
3.1/3.5 kg circa.
Pompa
Max. 19 Bars
Capacita serbatoio:
0.8L
Misura:
118mm(W)* 365mm(L) * 250mm(H)
Classe di protezione:
I
24