1
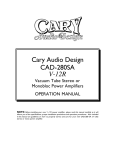
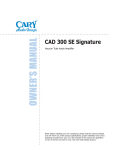
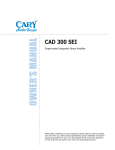
CAD-805 Anniversary Edition
Mono Power Amplifier
Setup and Operation Manual
NOTE: Before installing your new CAD-805 Anniversary Edition power amplifiers,
please read this manual carefully as it will inform you of the product specifications,
proper installation and operation procedures. Included in this manual are guidelines on
how to properly install and/or bias the tubes, adjust Cat Eye tube intensity and to care
for your new CAD-805 Anniversary Edition power amplifiers.
Page 1
Congratulations new CAD-805 Anniversary Editions Owner:
After ten years of continuous production we proudly announce the CAD-805 Anniversary Edition!
Operating the amplifier is a simple procedure. Each unit is designed for long term stability in
virtually any home operating situation. Note that if the unit is operated outside the parameters
outlined in this owner’s manual, damage may result. Please read this manual carefully before
operating your new CAD-805 Anniversary Edition power amplifier.
Cautionary Terms
When the following cautionary terms are used in this manual, these definitions apply:
WARNING! Electrical hazard! Misuse or failure to follow instructions
properly may result in personal injury or death!
CAUTION : No risk of personal injury; however, misuse or failure to follow
instructions may result in damage to equipment.
NOTE: No risk of personal injury or equipment damage; however, misuse or failure to
follow instructions may prevent proper performance equipment
Specifications:
POWER OUTPUT:
50 Watts ‘Class A’ operation mode
FEEDBACK:
0 to 10 dB, continuously variable control
FREQUENCY RESPONSE:
20 to 20 kHz + 0.5 dB
DIMENSIONS:
10” H x 12-1/4” W x 24” D (25.4 x 31.2 x 61 cm)
AC POWER REQUIREMENTS: 100, 110, 117, 220, 240, / 50-60 Hz, set by market
NET WEIGHT:
85 lb. (38.6 kg.)
POWER CONSUMPTION:
230 watts - OPERATE, 76 watts - STANDBY
SHIPPING WEIGHT:
105 lb. (47.7 kg.)
INPUT IMPEDANCE:
150,000 ohms (150 kg.)
OUTPUT IMPEDANCE:
4, 8 and 16 ohm speaker connection terminals
NOISE:
> 80 dB below rated output
SENSITIVITY:
1.0 Volt @ zero feedback for full output
COUPLING CAPACITORS:
Oil filled capacitors
POWER SUPPLY CAPACITORS: 4-1500 mFd @ 450V
TRANSFORMERS:
1- EI Laminated core power transformer
1- special air-gap output transformer
200% duty cycle on all transformers
TUBE COMPLIMENT:
1-1629/6U5 ‘Cat Eye’ tube
In each amplifier chassis
2-6SN7 input tubes
1-300B driver tube
1-845 output tube or (Please choose 845 or 211 during install)
1-211 output tube (Please choose 211 or 845 during install)
WARM-UP TIME:
5 minutes, after initial break in period
BREAK-IN PERIOD:
100 hours of music playing time
FINISH:
Jaguar ‘Anthracite Black’ chassis
AC CORD:
3 conductor cord, detachable
Specifications are subject to change or improvement without notice or obligation.
Page 2
Front Panel Features
CAT EYE TUBE: Indicates approximate power output level. When the eye is completely
closed the amplifier is at full power output.
Top Panel Features
OFF-ON TOGGLE SWITCH: Turns AC power on in the rear position. The output tube
will not light at this point.
STANDBY SWITCH:
Turns the filament of the output tube on in the rear
position.
TUBE SELECTOR SWITCH: Set either to 211 or 845 before installing selected output
tube.
FEEDBACK LEVEL:
Adjusts the level of feedback from 0 to 10 dB
Rear Apron Features
INPUT:
Signal input connection via shielded RCA interconnect cable
OUTPUT:
Three 5-way binding posts provide output to the speaker
system (4, 8 or 16 ohm connections).
FUSE: AC power fuse. Never replace with any other value than 3 AMP
SLOW BLOW FUSE! 250 VOLT!
TUBE FUSE: Never replace with any other fuse than _ amp FAST BLOW
FUSE!
Installation
This section describes the unpacking and installation procedures for your new amplifier.
Unpacking
All shipping containers have been specially designed to protect their contents and special care
has been taken to prevent damage under normal shipping conditions. Mishandling should be
evident upon inspection of the shipping container. If shipping damage is found after visual
inspection, take care not to destroy the evidence. If necessary, document the damage with
photographs and contact the transport carrier immediately. Carefully remove your new CAD805 Anniversary Edition from its packing carton and examine it closely for signs of shipping
damage. It is recommended to save all original packing cartons and crates to protect your
amplifier from damage should you wish to store it or ship it for after-sales service.
Page 3
Warranty Card
IN THE USA: If you are the original purchaser of a new unit from an AUTHORIZED CARY AUDIO
DESIGN DEALER, please fill out the enclosed warranty registration card and return it within 15
days of purchase or register online at www.caryaudio.com. Cary Audio Design suggests that you
keep your original packing cartons in case you need to ship the amps. Warranty restrictions
apply. Consult the warranty section of this manual for details. Keep a copy of your original sales
receipt for proof of purchase if you need service during the warranty period; we will require a
copy to validate the warranty. The warranty is for the original purchaser only and does not
transfer to any subsequent owner.
OUTSIDE THE USA: Your local Authorized Cary Audio Design Distributor will make his own
warranty policy for your country. Please check with them for the terms of warranty for your
new amplifier.
Physical Placement
The CAD-805 Anniversary Edition is designed for use in homes. It must be protected from the
elements and temperature extremes. For example, avoid placing the unit in extremely hot
locations such as near radiators or other heating units. Its location among the user’s audio
components is not critical; however, certain precautions must be taken. Avoid moisture, direct
sunlight, and dusty areas.
Power Requirements
The CAD-805 Anniversary Edition is designed to operate from house current AC mains. The
design voltage is 117 Volts AC at 50/60Hz (Foreign units 234 Volts AC at 50/60Hz).
Speaker Cables
The speaker cables from the output posts of the CAD-805 Anniversary Edition to the speaker
system can be any length that your setup requires. Select speaker cables of sufficient size to
preserve the outstanding performance capabilities and sound quality of your new power
amplifiers.
Heavy duty #14 gauge wire is suitable for distances up to 15 feet; #10 gauge is good for 25-30
feet. Most audio dealers have high performance speaker cable in stock for this purpose. We
strongly urge you to try several types to find the best ones for your combination of components
and speakers.
Interconnect Cables
Signal input connection is made via the RCA input jack on the rear of the amplifier located next
to the output binding posts. The input interconnect cables from the output of the preamplifier
can be any length your installation requires. A shielded high quality interconnect cable is
important to reduce chances for hum or interference. Ask your Authorized Cary Audio Design
audio dealer for advice.
Page 4
Operation
Your new amplifier is ready for operation after the speaker cables, interconnect cables
and the tubes have been installed. Choose either the 211 or the 845 output tube with
the top panel tube selector switch, according to the actual one installed. Only change
this switch setting with the amplifier OFF.
_ WARNING! _
Page 8 shows correct tube placement positions, 300B tube bias settings and ‘Cat Eye’ tube
brightness adjustment. Page 9 shows 300B tube pin configuration. FAILURE TO INSTALL
THE TUBES CORRECTLY WILL DAMAGE THE UNIT. Watch the tube pins
carefully on the 300B tube during installation as it is possible to force the tube to plug in ‘wrong’
during installation. The 300B tube has no ‘safety key’ center pin on the tube to
prevent incorrect installation. It has two large pins and two slightly smaller pins. Please
look carefully at the tube pins and the tube socket holes to note the two different size
connections prior to installation. Incorrectly plugging in the 300B driver tube will
possibly damage the amplifier and is not covered by the manufacturers
warranty.
_ WARNING! _
Off-On Power Toggle Switch
Push the AC toggle switch toward the rear, to the “ON” position. The 6SN7 input tubes, 1629
Cat Eye tube and the 300B driver tube will light up in this setting.
Standby Toggle Switch
Push the toggle switch toward the rear of the unit to operate. The installed output tube will
light up.
‘Break In’ Period
The tubes, capacitors and the output transformers take approximately 100 hours of music
playing to fully settle in for peak performance. Small imperfections in the tube surfaces will
‘boil off’ during the break in period as well. The amplifier will sound good right out of the
box but it will improve as break in occurs. After the first couple of hours you will notice
increased depth and tighter bass. This break in period is true with most high performance audio
amplifiers.
Cleaning and Care of Finish
The chassis may be cleaned with a soft towel and Windex ® or a similar gentle window cleaner.
The frequency of cleaning will be governed by operating environmental cleanliness. Spray the
cleaner on the towel, not on the amplifier! Avoid abrasive cleaners! Feather dusters are good
for cleaning the amp.
Page 5
Replacing Vacuum Tubes
If it becomes necessary to replace the tubes, the same brand as installed new should be used. A
complete new tube kit is available from Cary Audio Design. Although useful tube life varies
depending on the nature and degree of use, under normal home use, the 845 or the 211 output
tube and the 300B driver tube should last many years in the CAD-805. The 6SN7 input tubes
should last even longer.
NOTE: Any current production or New Old Stock (NOS) types of 211, 845, 6SN7 or
300B tubes will work fine in the CAD-805 Anniversary Edition amplifier. The
voltages are fine for all available types.
WARNING!
Make sure the amplifier is unplugged 30 minutes from the AC mains
before replacing the tubes to avoid risk of shock and high heat from
the 211 or 845 tube.
Factory Service
Careful consideration has been given to the design of your CAD-805 Anniversary Edition to
keep maintenance problems to a minimum; however, it is possible that some problems may
arise which cannot be cured by tube substitution. If after reading the Troubleshooting Guide on
page 7 you still have a problem, contact our Customer Service Department to describe your
problem in detail. Do not return the amplifier to the factory without a Return
Authorization Number from the Customer Service Department. Cary Audio
Design will assume no responsibility if the transportation company refuses to pay damage claim
due to your improper packing or lack of insurance should the unit be lost in shipment from you
to us.
Non-Warranty Repairs
Cary Audio Design will provide repair service for its products charging on a time and
expense basis for the repairs. Contact Cary Audio Design at 919-355-0010 from 1 to 5
PM East coast time for an RMA number so that your unit may be serviced.
WARNING!
Make no attempt to put the CAD-805 in service outside of the cabinet
or with the cabinet open! Contact with the high voltages found inside
the unit can be fatal! Remove the AC power plug from the wall and
allow 30 minutes for the high voltage capacitors to discharge through
bleeder resistors before attempting to change the tubes or to clean
the inside the amplifier.
CAUTION:
Never remove or insert the AC plug when the unit is on or the AC
power switch is in the “ON” position. Obstruction of the top portion
of the amplifier will result in the tubes overheating.
Page 6
Page 7
CAD-805 Anniversary Edition Trouble Shooting Guide
SYMPTOM
CAUSE
Hum or “Buzzing” in speakers
Ground loop
REMEDY
Install 2-pin adapter
on AC cord to float
the ground.
-300B tube with high plate current too high
Check bias of 300B. If high, readjust to proper bias setting of 60 mA.
Intermittent or poor connection of interconnect
“Popping” or “Spitting” noise
-Replace bad interconnect cable
Noisy tube
Check bias of output tubes.
-If noise is in one channel,
through the speaker swap
one section of tubes at a
time until the noise swaps
channels. Replace the noisy
tube.
If high or fluctuating rapidly, replace output tube.
AC fuse blows
-Line voltage surge
Tube fuse blows
-Shorted tube (300B &
-Replace tube.
845/211 have separate fuses.)
-Replace fuse.
Cary Audio Design
1020 Goodworth Drive
Apex, North Carolina 27539
www.caryaudio.com
[email protected]
Tel: 919-355-0010
Fax: 919-355-0013
Technical Service: 1 - 5 PM Eastern time, Monday -Friday
Page 8
Set the bias to 60
milliamperes, dc ampere scale.
_” bias plug
WITH THE AMP OFF: Insert the _” bias meter plug into the bias jack on the back of the
amplifier chassis. Connect the bias cable red alligator clip to the positive (+) connection
on your meter. Connect the bias cable black alligator clip to the negative (-) connection
on your meter. Check the 300B tube bias current reading and adjust for a 60 mA
reading on the Volt Ohm Meter (VOM) or DC current meter if the reading is different
than 60 mA. Check and readjust to 60 mA again after the CAD-805 amplifier is warmed
up for 10 minutes. Remove the _” plug from the bias jack and enjoy the music!
Note: Bias is factory preset to 60 mA. Bias should be reset when
installing a replacement
Page 9
300B Tube pin layout for CAD 805 Anniversary Edition
The LARGE pair of 300B tube pins should be installed toward the front of the CAD-805
Anniversary Edition amplifier tube socket. LOOK CAREFULLY at the tube pins to be
sure that you insert them correctly. It is possible to force the tube pins into the socket
the wrong way if you are not careful! If you install the tube wrong you will probably
damage the amplifier and the tube. This damage will not be covered by the
manufacturers warranty for a new amplifier. If you have any doubts about this, have the
300B tube installed by your dealer. If you will look carefully at the pins and install the
large pins to the front of the socket all will be fine! These 300B tube pin
installation instructions are valid for the 805 Anniversary Edition only.
Earlier versions of the 805 amplifier had the 300B tube installed with
the pins in a different position. Look carefully at the tube pins and the
socket holes before installing the 300B tube in earlier model 805
amplifiers.
Page 10