1
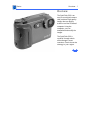
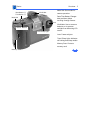
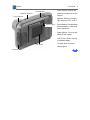
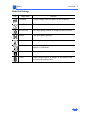
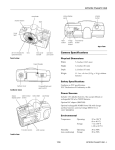
K Service Source
QuickTake 200
K Service Source
Basics
QuickTake 200
Basics
Overview - 1
Overview
The QuickTake 200 is an
easy-to-use digital camera
that produces high-quality
images that can quickly
transfer to a Mac OS-based
computer. Using the
computer, you can
manipulate and modify the
images.
The QuickTake 200 is
repaired through wholeunit exchange in most
countries. Check the service
strategy in your region.
Basics
Overview - 2
Features
Features of the QuickTake 200 include the following:
• 1.8-inch color LCD display that supports frame-byframe and automatic playback modes
• 24-bit VGA images at resolutions of up to 640x480
pixels in more than 16 million colors
• SmartMedia 2 MB memory card that can accommodate 30
standard-quality images or as many as 20 high-quality
images
• User-selectable aperture setting of f2.2 and f8
• Focus selections for close-up, portrait, and distance
• Automatic power-off after 2 minutes of no use
• Self-timer
• Bundled software including Adobe PhotoDeluxe, Adobe
PageMill, and PictureWorks NetCard
Basics
Date Button (+)
Time Button (-)
Overview - 3
Mode Dial: Sets modes for
camera operation.
Viewfinder
Mode Dial
Lens
Shutter Release
Timer/Sleep Light
Date/Time Button: Changes
date and time; allows
scrolling through frames.
Viewfinder: Use to conserve
batteries or to prevent
sunlight from distorting LCD
screen.
Lens: Frames subject.
Timer/Sleep Light: Indicates
self-timing and sleep modes.
Memory Door: Protects
memory card.
Memory Door
Basics
Aperture Selector
Overview - 4
Focus Selector: Selects the
distance from the lens to the
subject.
Action Button
Focus Selector
Aperture Selector: Sets the
light setting to f2.2 or f8.0.
Power Switch
Action Button: Provides data
during playback, erase, and
other operations.
Power Switch: Turns on and
shuts off the camera.
LCD Screen: Allows viewing
of selected images.
LCD Screen
Terminal Door
Terminal Door: Protects
camera ports.
Basics
Overview - 5
Mode Dial Settings
Icon
Mode Name
Function
Computer
Transfer images from the camera to the computer.
Self-Timer
Take a picture after 10 seconds.
Record-Fine
Take high-quality pictures or change the date and time.
Record
Take good quality pictures.
Play
View single or multiple images in the camera.
Auto-Playback
Automatically play back consecutive frames or view
images on a television.
Protect
Prevent images from being erased.
Erase
Erase a single image or all images on the memory card,
or format the memory card.
Basics
Camera Operation - 6
Camera Operation
This section covers basic camera operations. The information can also be found in Chapter 2
of the Apple QuickTake 200 owner’s manual.
Adjusting the LCD Screen Brightness
Use the brightness dial on the bottom of the camera to set the LCD screen to a visible
brightness.
Note: While taking pictures indoors, the brightness of an image might be affected by the
flicker of fluorescent lighting.
Important: The brightness dial does not adjust the brightness of images that you have already
taken; it only adjusts the brightness of the LCD screen.
Using the Camera Mode Dial
The mode dial on the top of the camera provides eight settings (represented by icons) that let
you choose how you want your camera to work.
Record-Fine and Record Modes
You take pictures by turning the mode dial to either Record-Fine ( ) for highest-quality
images or Record ( ) for good-quality images.
• In Record-Fine ( ) mode, high-quality images have 640x480 pixels resolution, and
you can take up to 20 high-quality pictures. Use Record-Fine mode to print or display
the image when you want to preserve the details of the image.
• In Record ( ) mode, good-quality images have 640x480 pixels resolution, and you can
take up to 30 standard-quality pictures. Use Record mode when you don’t need to show as
much detail.
You can mix high-quality and standard-quality images on the camera—all in 24-bit color.
The camera holds a maximum of 30 images.
1
2
3
4
Set the mode dial to either Record-Fine (
) or Record (
).
Live video images appear on the LCD screen.
Frame your picture using the LCD screen as your guide.
Adjust the brightness of the LCD screen using the brightness dial on the bottom of the
camera, and select the correct focus using the focus selector.
Press the shutter release.
The photographed image is displayed for about 5 to 8 seconds. “REC” or “REC-FINE” (to
indicate the camera is recording) appears flashing in the upper-left corner of the LCD
screen.
Basics
Camera Operation - 7
Never open the memory card door while the camera is recording an image.
This can damage the card or corrupt data on the card. You might have to reformat the
card, which means that all of the images on the card will be erased.
±Warning:
When the LCD display is on, the number in the upper-right corner of the LCD screen
shows how many more pictures you can take. The number decreases as you take pictures,
and indicates the number of pictures you can take at the current image quality before the
memory card is full.
Self-Timer Mode
You can take delayed photographs by turning to the Self-Timer (
This setting uses the Record-Fine mode.
1
2
Set the mode dial to Self-Timer (
Press the shutter release.
) mode on the mode dial.
).
The LCD screen displays the countdown—from 10 to 1. The shutter opens after 10
seconds and the camera captures the image. (“REC” flashes in the upper-left corner of
the LCD screen while the image is being recorded.)
3
On the front of the camera, the red self-timer light stays on for 5 seconds and then
flashes for 5 seconds.
To stop the timer, turn the mode dial to another setting.
Play Mode for the Camera and the Television
Use the Play (
) mode to view the images in the camera on your LCD screen or on a
television screen.
To view one image on the LCD screen,
1
2
3
4
Plug the optional power adapter into your camera to conserve the batteries.
Set the mode dial to Play (
).
The last image that you captured is played back.
Use the + and - buttons to scroll forward and backward one frame at a time through your
pictures.
Press the action button to show the Play mode, the frame number, and the date and time
on the LCD screen.
Press the action button again to hide this information.
To view nine images on the LCD screen,
1
2
Plug the optional power adapter into your camera to conserve the batteries.
Set the mode dial to Play (
).
Basics
3
4
5
Camera Operation - 8
Press the + and - buttons at the same time.
Nine images appear on your LCD screen.
Press the + and - buttons to select and view the frames.
To revert to single-frame playback, press the + and - buttons at the same time again.
A single image appears on your LCD screen.
To view images on a color television,
1
2
3
4
5
6
7
Make sure the camera and television are turned off.
Important: Your television must meet NTSC (National Television System Committee)
color television telecasting specifications (adopted mainly in the United States, Canada,
and Japan).
Plug the optional power adapter into your camera to conserve the batteries.
Set the mode dial to Play (
).
Connect the video cable to the Video Out port on the camera.
Connect the other end of the video cable to the video input port on the television.
Use the + and - buttons to scroll forward and backward one frame at a time through your
pictures.
Press the + and - button at the same time to view multiple images.
Auto-Play Mode
Use the Auto-Play (
frames of images.
1
2
3
) mode to have the camera automatically play back consecutive
Set the mode dial to Auto-Play (
).
The Auto-Play settings appear on the LCD screen.
Press the + and - button to select 3, 5, or 10 seconds between each frame.
Press the action button to begin viewing the images.
You can also use Auto-Play mode to play back consecutive frames of images on your
television.
1
2
Follow the steps in Play mode to connect the camera to the television.
Follow the steps in Auto-Play mode to view images on your television.
Computer Mode
In Computer (
) mode, you can connect your camera to your computer to transfer
pictures and perform other camera functions using the Camera Access software. (Refer to
Chapter 3 in the Apple QuickTake 200 owner’s manual.)
Basics
Camera Operation - 9
1
Turn off the camera.
3
Connect the computer cable to the Digital port on the camera.
2
4
5
6
Set the mode dial to Computer (
).
Connect the other end of the computer cable to the modem port.
Turn on the camera.
“PC-MODE” appears on the LCD screen.
To open the Camera Access application, double-click the icon on your computer. (Refer
to Chapter 3 in the Apple QuickTake 200 owner’s manual.)
Erase Mode
When the camera is in Erase ( ) mode, you can erase a single frame, erase all frames on
the memory card, or format the card before you use it. You cannot erase protected frames.
Important: You cannot use Erase mode with write-protected cards.
1
2
3
4
5
6
Turn the mode dial to Erase (
).
The “ERASE-MODE” selections appear on the LCD screen.
Use the + and - buttons to select the function that you want.
• FRAME: Erase one image.
• ALL: Erase all images.
• FORMAT: Format a memory card. (Important: Refer to Chapter 1 in the Apple
QuickTake 200 owner’s manual).
Press the action button.
The function you selected appears in the upper-left corner of the LCD screen: “ERASE
FRAME” or “ERASE ALL”.
Press the action button again.
“OK?” flashes on your screen, giving you a chance to verify that you want to erase the
image.
Press the action button a third time to erase the image.
If you selected “ERASE FRAME”, the next image appears on the screen. You can continue
to erase frame-by-frame or skip a frame by moving forward or backward using the +
and - buttons.
Turn the mode dial to another icon to leave Erase mode.
To view nine images in Erase mode,
1
2
Set the mode dial to Erase (
).
Press the action button to select “ERASE FRAME”.
Basics
3
4
5
6
7
Camera Operation - 10
Press the + and - buttons at the same time.
Nine images appear on your LCD screen.
Press the + and - buttons to select a frame.
Press the action button again to erase a frame.
“OK?” flashes on your screen, giving you the chance to verify that you want to erase the
image.
Press the action button a third time to erase the image.
To revert to single-frame playback, press the + and - buttons at the same time again.
A single image appears on your LCD screen.
Protect Mode
Use Protect (
being erased.
) mode to assign read-only, protected status to an image to prevent it from
Important: Even protected read-only images are erased when the memory card is formatted.
(Refer to Chapter 1 in the Apple QuickTake 200 owner’s manual for information about
formatting the memory card.)
1
Set the mode dial to Protect (
3
Press the action button.
2
).
Press the + or - button to select the frame that you want to protect.
The image is now protected and cannot be erased. The protection icon appears next to the
image number on your LCD screen when you view this image.
Note: After you transfer your images to the computer, you can erase all the images from
your camera. However, the images that you have protected are not erased.
To remove protection,
1
2
While the camera is in Protect (
Press the action button.
) mode, select the protected frame.
The protected icon disappears and the image is no longer protected.
Battery-Saving Mode
To conserve your batteries, you can turn off your LCD screen and still take pictures using
the optical viewfinder.
1
2
Attach the optical viewfinder to your camera.
Turn on the camera using the power switch.
Basics
3
4
5
6
In either Record ( ) or Record-Fine (
the LCD screen to sleep.
Camera Operation - 11
) mode, press the action button twice to put
The red sleep light on the front of the camera goes on. You cannot see live, video images
on the LCD screen when you put the screen to sleep.
Use the viewfinder to focus on the image you want to capture.
Press the shutter release to take a picture.
The LCD screen turns on and captures the image. The image appears on the screen for
about 5 to 8 seconds allowing you to review the picture that you just took, and then the
screen goes to sleep—ready for you to take another picture.
Press the shutter release again to take another picture.
Important: Press the action button once to turn on the LCD screen again.
Auto-Power-Off Function
Your camera automatically switches itself off when you do not use it for more than 2 minutes
as a way to conserve batteries and to save power when you use the optional power adapter.
Important: The auto-power-off function does not operate in Computer mode.
To disable the auto-power-off function in all modes, hold down the action button while
turning on the camera. The camera will continue to use battery power even if you do not use
it for several minutes. When you turn off the camera and then turn it back on, auto-poweroff is again enabled.
It is especially good to disable auto-power-off when you are using a television to view
images or when you are recording a video that you do not want the camera to turn off during
those operations.
Important: Always use the optional power adapter when you disable the auto-power-off
function.
K Service Source
Specifications
QuickTake 200
Specifications
Characteristics - 1
Characteristics
Camera Type
Digital camera with color LCD
Image Size
640 x 480 pixels
Interface
RS-232C
Bit Depth
24-bit color
Memory
Standard: 2 MB SmartMedia image memory card
Optional Accessory: 4 MB SmartMedia image memory card
Lens Field of View
8 mm (equivalent to 48-mm lens on a 35-mm film camera)
Specifications
Liquid Crystal
Display
ISO
Focus Range
Characteristics - 2
1.8 inches color LCD
Equivalent to approximately ISO 100
Close-up: 3.5 to 5.1 in (9 to 13 cm)
Portrait: 17.7 to 35.4 in (45 to 90 cm)
Distant: 35.4 inches and farther (90 cm and farther)
Aperture
f2.2 and f8
Shutter Speed
1/4 second to 1/5000 second
Input/Output Ports
Digital (RS-232C) port
Video Out port (NTIS required)
Specifications
System
Requirements
Characteristics - 3
A Mac OS-based computer with a 68040, PowerPC or later
processor, with 16 MB of RAM and 24 MB of available space on
the hard disk drive.
System software version 7.5 or later
A CD-ROM drive
A display that supports thousands or millions of colors is
recommended for optimal viewing
Specifications
Environmental - 4
Environmental
Temperature
Humidity
Operating: 32 to 104° F (0 to 40° C)
Storage (6 months): -3 to 140° F (-20 to 60° C)
Transit (72 hours): -40 to 149° F (-40 to 65° C)
10 to 85%, noncondensing
Specifications
Electrical - 5
Electrical
Power Requirements
< 500 mW, standby
< 4.5 W, operating
Internal Power
Four AA batteries (3.6 V DC to 5.4 V DC)
External Power
4.5 V DC/1.75 A to 8.0 V DC/1.0 A
Specifications
Physical - 6
Physical
Dimensions
Weight
Height: 3 in. (77 mm)
Width: 5.1 in. (129 mm)
Depth: 1.9 in. (47 mm)
8.5 oz. (240 g)
K Service Source
Troubleshooting
QuickTake 200
Troubleshooting
General - 1
General
The Symptom Charts included in this chapter will help you
diagnose specific symptoms related to your product. Because cures
are listed on the charts in the order of most likely solution, try
the first cure first. Verify whether or not the product continues to
exhibit the symptom. If the symptom persists, try the next cure.
If you are not sure what the problem is, or if the Symptom Charts
do not resolve the problem, contact Apple Technical Support.
Troubleshooting
Symptom Charts/Power - 2
Symptom Charts
Power
No power
1
2
Check connection to power adapter if used.
Replace batteries.
Power stops during
operation
1
If camera overheats, the safety shutoff turns it off. Move
camera to cooler location; wait until camera has cooled down;
and turn it on again. Refer to operating temperature in
Specifications chapter.
After two minutes, auto-power-off turns off the camera to
save power. Turn on camera.
Replace batteries.
2
3
Battery life is short
1
2
3
If camera is used in extremely cold environment (near or
below freezing), place batteries in pocket to warm them.
Load batteries just before taking picture.
Use long life (1,000 mAh) Ni-Cd batteries.
Use auto-power-off feature (see Basics chapter).
Pressing camera
buttons and switches
has no effect
Remove batteries. Reload batteries to confirm + and - ends of
batteries are positioned correctly. Turn on camera.
Camera LCD screen
won’t go on when you
slide power switch
1
2
3
4
5
6
7
Load memory card.
Remove write-protect seal from memory card. Format the
card.
Replace memory card with a new card.
Install batteries correctly.
Replace batteries.
Reconnect power adapter to the camera or make sure it is
plugged in.
Set mode dial to Record-Fine ( ) or Record ( ), and turn
the dial until it clicks into place.
Troubleshooting
Symptom Charts/Operation - 3
Operation
When shutter button
is pressed, no picture
is shown
1
2
3
4
5
6
7
8
Load memory card.
Format memory card.
Load new memory card or erase frame.
Remove write-protection.
Initialize memory card.
Turn on camera.
Replace batteries.
Set mode dial to Record-Fine ( ) or Record (
Playback screen is too
bright
Set aperture to f8 (
Image played back is
blurred
1
2
3
4
5
Playback image does
not appear on LCD or
monitor screen
Check cable connection.
Cannot initialize card
or erase frame
1
2
).
) and take picture again.
Clean camera lens.
Hold camera steady when taking picture.
Check focus and focal range.
Set mode dial to Record-Fine ( ).
Point camera lens away from direct bright light.
Remove write-protection.
Remove protected status.
Computer Use
Computer doesn’t
recognize camera
1
2
3
4
5
6
Not enough memory
Check serial cable connection.
Turn on camera, and verify mode dial is set to Computer
(
).
Replace batteries.
If system software was upgraded after installing QuickTake
camera software, reinstall camera software. Refer to user
manual.
If sharing a serial port needed for another device and
AppleTalk is turned on, turn off AppleTalk. Use the modem
port.
QuickTake camera software will not work correctly if it was
dragged to the hard disk. Reinstall software using Installer
provided on camera software CD-ROM disc.
Quit open programs that are not in use.
Troubleshooting
Symptom Charts/Displayed Warnings - 4
Displayed Warnings
Displayed Warning Symbol
NO CARD
Status
Mode
Explanation
Flashing
All modes
Batteries depleted.
Replace batteries.
Blank
All modes
Flashing
All modes
Batteries depleted, defective, or missing. Replace
batteries.
Card missing. Replace
card. (Appears when shutter button is pressed in
or
CARD NOT INITIALIZED
CARD ERROR
Flashing
Flashing
All modes
mode.)
Initialize card. (Appears
when shutter button is
pressed in
mode.)
All modes
or
Wrong card format or the
camera was turned off
during recording, erasing,
or frame advancing in
mode.
CARD FULL
PROTECTED CARD
FRAME ERROR
UNMATCHED DATA
Flashing
Flashing
Flashes
for 3
seconds
or
or
Flashing
Flashing
--.--.--
or
Flashing
Flashing
No free memory available.
(Appears when shutter
button is pressed.)
or
or
or
or
At power on in
or
Card is write-protected.
Data played back was not
recorded correctly.
Frame played back is not
data recorded by the camera.
Overexposed image.
Underexposed image.
Data not set.