1
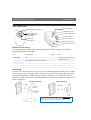
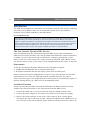
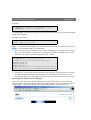
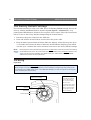
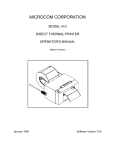
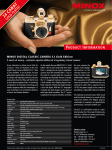
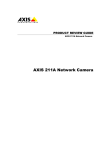
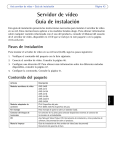
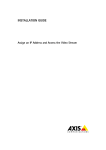
Should you require any technical assistance, please contact your Axis reseller. If your questions cannot be answered immediately, your reseller will forward your queries through the appropriate channels to ensure a rapid response. If you are connected to the Internet, you can: Download user documentation and firmware updates Find answers to previously resolved problems in the FAQ database. Search by product, category or phrases Report problems to Axis support staff by logging in to your private support area Visit the Axis Support Web at www.axis.com/techsup/ www.axis.com ©2003 Axis Communications AB. The Axis logo is registered trademarks of Axis Communications AB. All other company names and products are trademarks or registered trademarks of their respective companies. We reserve the right to introduce modifications without notice. 20862/R1/EN/0308 Axis Communications Technical Support INSTALL ATION GUIDE AXIS 205 Network Camera Goes anywhere your network goes AXIS 205 Network Camera Introduction Introduction Serial number Focus guide (see page 6) Mounting screw Status indicator (surrounding the focus ring) Network indicator Focus ring (see page 6) Power indicator Control button Power connector Network connector Hardware Inventory The items supplied with the AXIS 205 are listed below. Please contact your dealer if anything is missing or damaged. Item Description/type Quantity Network Camera AXIS 205 Network Camera 1 Power adapter PS-H 1 AXIS 205 Network Camera Installation Guide 1 Axis Warranty 1 Stand Includes extension section and 3 mounting screws. 1 Lock washer Used between camera and stand. 1 Printed Materials Notes Country-specific. Please ensure the correct adapter is used. Ready assembled. Mounting To mount on a horizontal surface, place the lock washer between the stand and the camera and screw the camera onto the stand. Loosen the swivel joint lock ring, angle the camera as required and gently re-tighten the lock ring. To mount on a wall, first unscrew and remove the stand extension (see the illustration below.) Angle and fasten the camera as for surface mounting. Wall mounting Surface mounting Please note that the AXIS 205 is intended for indoor use only. Furthermore, it must always be positioned so that it is not exposed to direct sunlight or strong halogen light. 1 2 Installation AXIS 205 Network Camera Installation The AXIS 205 is designed for installation on an Ethernet network. This involves assigning the product an IP address, either via an automated network service (e.g. DHCP) or manually. The available methods are described below. For the advanced user! Upon delivery, the AXIS 205 is set to obtain a dynamic IP address via DHCP. When using a broadband router (NAT-box) that includes a DHCP server, the camera will receive an IP address when power is applied. If a dynamic IP address is not obtained, the IP address will default to 192.168.0.90. After power has been applied, push the control button, wait 20 seconds and a link to your camera will be registered at the Axis Internet Dynamic DNS service. You should then visit www.axiscam.net and follow the instructions found there. See also the complete installation procedure as described below. The Axis Internet Dynamic DNS Service Axis recommends using the Axis Internet Dynamic DNS Service when installing the AXIS 205. The service provides a one-click procedure that installs the camera and makes it available on your local network and on the Internet - simply by pressing the control button on the rear of the camera. The camera receives its own URL (web address), which can then be used to access it. The camera can be unregistered from the service at any time. Requirements To use the Axis Internet Dynamic DNS Service the following is required: • A LAN (Local Area Network), with or without a DHCP server • An Internet connection that does not require a proxy server for HTTP access. Please consult your network administrator to check if your network meets the specified requirements or not. If not, the AXIS 205 must be installed manually. See page 4. Some connection types, such as PPPoE (Point-to-Point Protocol over Ethernet), require an Internet sharing device (e.g. a NAT-box) for managing ISP login. Installation Procedure Please note that this procedure will send the AXIS 205’s IP address, firmware version, product type and serial number to the Axis Internet Dynamic DNS Service. 1. Connect the AXIS 205 to your local network, using a standard network cable. 2. Connect the power adapter to the camera and connect to the main power supply. 3. Wait for the Status indicator on the front of the camera to show a steady green, whereupon the camera will have received a dynamic IP address from a DHCP server on your network. If after 20 seconds the Status indicator remains yellow, the camera’s IP AXIS 205 Network Camera Installation address has not been set dynamically and will instead default to 192.168.0.90 - which may be possible to use, depending on your network. Alternatively, set a valid IP address manually (see page 4) and continue with step 4 below. 4. Now push the control button on the rear panel once. The Status indicator on the front of the camera will blink green while it connects to the Axis Internet Dynamic DNS service. When the registration process succeeds, the indicator returns to steady green. In case of failure, see below. 5. Using an Internet connected PC, you now have 60 minutes to visit www.axiscam.net where you will be guided through the remainder of the procedure. Please have the serial number of your product ready and follow the instructions on the screen. Terms of Service Axis Communications provides the Axis Internet Dynamic DNS Service subject to the terms and conditions as specified during the registration process. By completing the registration process and clicking the "I agree" button, you indicate your agreement to be bound by the terms and conditions of service. Registration After registration is complete, your camera will have received its own DNS name, which can then be used to access it over the Internet. An example of a DNS name is http://axis123456.axiscam.net/. The numbers 123456 in the example correspond to the last six digits in the serial number on the product’s label. Click on the DNS name to open a new window showing the main camera web page. The registration service web page also shows the other available information about your AXIS 205, i.e. its public IP address and the private IP address used on your local network. If the IP address of your PC is on a different IP address segment than the one used for your camera, it might not be possible to access it, unless it is also accessible from the Internet. The DNS name provided for your Axis camera is valid for two weeks by default. If you wish to remove it before this time, select Remove currently registered DNS name. This option is found in the settings under System Options > Network > TCP/IP > Axis Internet Dynamic DNS Service. To keep the product’s DNS name, please follow the Registration instructions found on the DNS service’s web pages. Note: Please note that once your AXIS 205 has been registered at the Axis Internet Dynamic DNS Service, it will automatically contact the service again every time its IP address changes, regardless of whether this is due to an automatic change (DHCP) or a manual change. This can be disabled from the settings under System Options > Network > TCP/IP > Axis Internet Dynamic DNS Service. As long as this setting is disabled, the Dynamic DNS service will not be notified if the IP address for your camera changes, which means the camera will not be accessible via the registered DNS name. 3 4 Installation AXIS 205 Network Camera What to do if registration fails If step 4 in the registration process fails, the Status indicator on the front of the camera will blink red for 10 seconds, after which it returns to steady green. In this case, the camera was unable to contact the Axis Internet Dynamic DNS Service. It may still be possible to access the camera locally via the default IP address. Otherwise, the IP address must be set manually, using one of the methods described below. See also the troubleshooting section. Manual Installation using AXIS IP Utility Important! Although it may be possible to use the default IP address 192.168.0.90, please consult your network administrator to obtain a suitable IP address for your network and your particular subnet. AXIS IP Utility is a software application that quickly and simply installs an Axis device onto your local network. Download the latest version, free of charge, from www.axis.com 1. Connect the AXIS 205 to your local network using a standard network cable. 2. Connect the power adapter to the camera and plug into the main power supply. 3. Start AXIS IP Utility. The following window appears: 4. In the first field, enter the serial number found on the AXIS 205’s label (see the illustration below.) This number always starts with 00408C and is followed by 6 characters unique to your unit. Enter the remainder of the number, (e.g. 181000) so that the whole number reads something like 00408C181000. 5. Enter the IP address for your AXIS 205 and click Set IP. The utility now prompts you to restart your camera and then displays a message confirming that the IP address has been set. To view the camera’s home page, click the button provided. Configure the remaining network parameters from the setup tools. Manual Installation with ARP and Ping As an alternative to the AXIS IP Utility, the AXIS 205 can be installed using the ARP and Ping commands, as described below. 1. Locate the label (see the illustration) containing the product’s serial number. You must know this to set the IP address. 2. Connect a network cable to your AXIS 205 and attach it to the network. Serial number same as MAC/Ethernet address; e.g. 00408c181000 = 00-40-8c-18-10-00 3. From a Windows computer on your network, open a Command Prompt and enter the commands shown below. AXIS 205 Network Camera Installation Example: c:\WINNT>arp -s 192.168.0.125 00-40-8c-18-10-00 c:\WINNT>ping -l 408 -t 192.168.0.125 For Unix/Linux, enter the following: (note that you must be the root user and that the ping length must be 408.) Example (for Linux): >arp -s 192.168.0.125 00:40:8c:18:10:00 temp >ping -s 408 192.168.0.125 Note: In some Unix/Linux systems, the arp command can be located in a directory that is not on the command path; e.g: /usr/sbin/arp 4. Now connect the power adapter to the camera and plug into your main power supply. No more than 2 minutes should have elapsed since the ARP command was run. Text similar to the following is then displayed in the window: c:\WINNT>arp -s 192.168.0.125 00-40-8c-18-10-00 c:\WINNT>ping -l 408 -t 192.168.0.125 Pinging 192.168.0.125 with 408 bytes of data: Request timed out. Request timed out. Request timed out. Reply from 192.168.0.125: bytes=408 time<10ms TTL=64 Reply from 192.168.0.125: bytes=408 time<10ms TTL=64 5. Press Ctrl+C to stop Ping. Ensure that the Power Indicator is permanently lit and that the Network Indicator flashes intermittently. The IP address has now been set. You should now also set the remaining network parameters from the camera’s setup tools. Accessing the Camera from a Browser Open a browser and type in the IP address used to install the camera, as shown in the example below. This opens the Live View page, which shows live video from the camera, and provides a link to the setup tools. See the online help for more information. 5 6 The Factory Default Settings AXIS 205 Network Camera The Factory Default Settings If it becomes necessary to reset your AXIS 205 to the Factory Default settings, this can be done by clicking the Restore button, found in System Options - Maintenance, or by pressing the Control button, found on the rear panel of the camera. Follow the instructions below to reset to the factory default settings using the Control button: 1. Disconnect the power cable from the AXIS 205. 2. Press and hold the Control button and reconnect the power cable. 3. Keep the button pressed until the Status Indicator displays yellow (this may take up to 15 seconds), then release the button. When the Status Indicator displays green (which can take up to 1 minute) the camera will have been reset to the factory default settings. Note: Resetting to the factory default settings with the Control button causes all parameters (including the IP address) to be reset. The camera must then be re-installed. Using the Restore button in the setup tools will save the IP address, the default router, the subnet mask, the Ethernet/MAC address and all users and their passwords. Focusing Important! The AXIS 205 may be used indoors only, and must always be positioned where it is not exposed to direct sunlight or strong halogen light. Exposure to direct sunlight or halogen light may cause permanent damage to the CMOS image sensor in the AXIS 205. Damage as a result of exposure to strong light is not covered by the Axis warranty. A small dot is located over the top of the lens assembly. The focus ring features a raised line. Focus Ring Status Indicator Adjust the focus ring until the raised line is aligned with the dot above the lens. The camera should now be in focus. To check the focus, open a browser and examine the image. If required, adjust the ring again, until the focus is satisfactory. AXIS 205 Network Camera Troubleshooting Troubleshooting This section provides information on how to solve problems you might experience with your AXIS 205 Network Camera. Problems, Possible Causes and Remedial Actions Symptoms The AXIS 205 cannot be accessed via a browser after installing with the Axis Internet Dynamic DNS service. The AXIS 205 cannot be accessed from a browser after setting the IP address manually. The AXIS 205 works locally, but not externally. After successful registration at the Axis Internet Dynamic DNS service, the camera stops being accessible via its registered DNS name. The Power indicator is not constantly lit. The Status and Network indicators flash every 0.5 seconds. No image using Refresh and/or slow updating of images. Blurry imgaes. Noisy images. Possible causes Faulty power or network connection. Remedial actions Check that the power indicator shows steady green and that the network indicator LED flashes intermittently, either orange or green. Check all cables and connections. Try Pinging the camera’s IP address (see the next page), and/or use the same network cable to Ping some other known unit on your network. A proxy server is preventing Check with your network administrator if a proxy server is blocking communication with the Axis access. A proxy server should be configured to allow the AXIS 205 Internet Dynamic DNS to access the Axis Internet Dynamic DNS service via HTTP. After service, and the camera has correctly configuring the proxy server, please reinstall the camera not been correctly registered. and try again. See also page 4. The IP address is already in Disconnect the camera from the network. Run the Ping utility (as use by another device. described below) and follow the appropriate recommendations. The IP address is not located If Ping returns “Destination host unreachable”, the diagnosis is on the same subnet as the probably correct. If the IP addresses for the camera and your one for the workstation from workstation are on different subnets, you will not be able to set the which you are setting the IP IP address. Please contact your network administrator for advice. address. In Windows, you can check the IP address and subnet mask used Possible problem with your proxy server. Faulty connection. Firewall protection for your workstation by typing the following in a Command prompt: ipconfig /all (Win 2000, Win XP), or winipcfg (other Windows versions). Try disabling the proxy default in your browser. See the first item above. Check the Internet firewall with your system administrator. Default routers required. Subnet mask not specified. The option for automatically updating the Axis Dynamic Server on IP address change has been disabled, and the IP address has changed. Faulty or incorrect power supply. Hardware failure. Check if the default router settings need to be configured. Add the subnet mask in the network settings. Press the control button again to re-register the camera at the AXIS Dynamic DNS Service. Follow the installation instructions. This will re-enable automatic updates to the DNS service. Too many simultaneous users. Reduce the maximum number of simultaneous viewers, in System Options > Users. Alternatively, reduce the frame rate allowed to each viewer, in Video & Image > Image Settings. Refocus the camera. See page 6. Increase lighting at the point of installation. Camera performance is best in the range 100-3.000 lux. Poor focus. Insufficient light. Verify that you are using the correct Axis power supply. Contact your Axis reseller. 7 8 Troubleshooting Symptoms Poor quality images. No images in browser. Broad vertical white lines appear across the image. Note: AXIS 205 Network Camera Possible causes Display properties incorrectly configured for desktop. ActiveX disabled. Remedial actions Open the Display Properties in your desktop and configure your display to show at least 16-bit color. In Microsoft Internet Explorer, ensure that ActiveX has not been disabled in the Internet Options menu. Exposure to sunlight or strong halogen light will cause serious damage to the CMOS sensor. Reposition your camera in a more shaded location. Note: damage caused to the AXIS 205 by exposure to direct sunlight or halogen light is not covered by the product warranty. Too much light. This can happen e.g. with sunlight reflexes. If you still have a problem after reading this information, please contact your reseller, or visit the Axis Support Web at www.axis.com/techsup/ Pinging Your IP Address By sending a packet to the specified address and waiting for a reply, the Ping utility can determine whether a specific IP-address is accessible or if there is a conflict. Follow the instructions below to use Ping to troubleshoot TCP/IP problems on your network: 1. Start a Command prompt and type ping x.x.x.x, where x.x.x.x is the IP address used to install the camera. 2. If you receive the reply destination host unreachable, then the camera is not accessible on your subnet. The unit must be reinstalled, using an unoccupied IP address that is valid for use on the same subnet as the workstation from which you are attempting to perform the installation. Please consult your network administrator. If this does not solve the problem, disconnect the camera from the network and run Ping again. See the table below for an interpretation of the results. Ping Reply Interpretation and recommendation Reply from <IP address>: bytes=32 time<10 ms TTL=64 This IP address is already in use and cannot be used again. Please obtain a new IP address. Request timed out This IP address is not used and is available for use with your Axis camera. If you already installed the unit using this IP address, the installation may have failed. Reinstall the unit. Also check all cabling. Note: To start a Windows Command Prompt (also known as a DOS prompt), click the Start button, then click Run and then type cmd. AXIS 205 Network Camera Installation Guide Part no: 20862 Revision 1.0 Dated: September 2003 Copyright ©Axis Communications AB, 2003