1
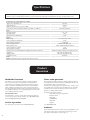
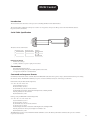
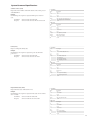
23425 MZ12 MZ8 MULTI ZONE POWER AMPLIFIER Safety Guidelines Class II product CAUTION: To reduce the risk of electric shock, do not remove cover (or back). No user serviceable parts inside. Refer servicing to qualified service personnel. WARNING: To reduce the risk of fire or electric shock, do not expose this apparatus to rain or moisture. The lightning flash with an arrowhead symbol within an equilateral triangle, is intended to alert the user to the presence of uninsulated ‘dangerous voltage’ within the product’s enclosure that may be of sufficient magnitude to constitute a risk of electric shock to persons. This equipment is a Class II or double insulated electrical appliance. It has been designed in such a way that it does not require a safety connection to electrical earth (‘ground’ in the U.S.). The exclamation point within an equilateral triangle is intended to alert the user to the presence of important operating and maintenance (servicing) instructions in the literature accompanying the product. CAUTION: In Canada and the USA, to prevent electric shock, match the wide blade of the plug to the wide slot in the socket and insert the plug fully into the socket. Many of these items are common sense precautions but, for your own safety and to ensure that you do not damage the unit, we recommend that you read them. Important safety instructions This product is designed and manufactured to meet strict quality and safety standards. However, you should be aware of the following installation and operation precautions. 1. Take heed of warnings and instructions You should read all the safety and operating instructions before operating this equipment. Retain this handbook for future reference and adhere to all warnings in the handbook or on the equipment. 2. Water and moisture The presence of electricity near water can be dangerous. Do not use the equipment near water – for example next to a bathtub, washbowl, kitchen sink, in a wet basement or near a swimming pool, etc. 3. Object or liquid entry Take care that objects do not fall and liquids are not spilled into the enclosure through any openings. Liquid-filled objects such as vases should not be placed on the equipment. 4. Lifting and placing the equipment This amplifier weighs up to 27.5kg, so take extreme care when lifting or moving this unit. We recommend that two people are available to lift this unit. Only use a rack or shelf that is stable and strong enough to support the weight of this equipment. 5. Ventilation Do not place the equipment on a bed, sofa, rug or similar soft surface, or in an enclosed bookcase or cabinet, since ventilation may be impeded. Keep a minimum of 5cm (2 inches) clear around the apparatus to allow sufficient passage of air. 10. Power-cord protection Power supply cords should be routed so that they are not likely to be walked on or pinched by items placed upon or against them. Pay particular attention to the point where they exit from the equipment. 11. Power lines Locate any outdoor antenna/aerial away from power lines. 12. Speaker connections Any speakers must be connected to the MZ8/MZ12 using class II wire (i.e. no connection to Earth should be made). Failure to observe this precaution may cause the unit to become damaged. 13. Non-use periods If the equipment is not being used for an extended period, we recommend that you unplug the power cord of the equipment from the outlet, to save power. 14. Abnormal smell If an abnormal smell or smoke is detected from the equipment, turn the power off immediately and unplug the equipment from the wall outlet. Contact your dealer and do not reconnect the equipment. 15. Servicing You should not attempt to service the equipment. Contact your dealer to arrange servicing. 16. Damage requiring service The equipment should be serviced by qualified service personnel when: A. the power-supply cord or the plug has been damaged, or 6. Heat B. objects have fallen, or liquid has spilled into the equipment, or Locate the equipment away from naked flames or heat-producing appliances such as radiators, stoves or other appliances that produce heat. C. the equipment has been exposed to rain, or 7. Climate The equipment has been designed for use in moderate climates and in domestic situations. Unplug this equipment during lightning storms to prevent possible damage from a strike or mains surge. 8. Cleaning Unplug the unit from the mains supply before cleaning. The case should normally only require a wipe with a soft, lint-free cloth. Do not use chemical solvents for cleaning. We do not advise the use of furniture cleaning sprays or polishes as they can cause permanent white marks. 9. Power sources Only connect the equipment to a power supply of the type described in the operating instructions or as marked on the equipment. The primary 2 method of isolating the equipment from the mains supply is to remove the mains plug. The equipment must be installed in a manner that makes disconnection possible. D. the equipment does not appear to operate normally or exhibits a marked change in performance, or E. the equipment has been dropped or the enclosure damaged. Safety compliance This equipment has been designed to meet the IEC/EN60065 international electrical safety standard. This device complies with Part 15 of the FCC Rules. Operation is subject to the following two conditions: (1) This device may not cause harmful interference, and (2) this device must accept any interference received, including interference that may cause undesired operation. Consignes de Sécurité Class II produit ATTENTION : afin de réduire les risques de choc électrique, n’ouvrez pas le boîtier de l’appareil. Les pièces internes ne sont pas réparables par l’utilisateur. Pour tout problème matériel, contactez des techniciens qualifiés. ATTENTION : afin de réduire les risques de choc électrique et d’incendie, veillez à ne pas exposer cet appareil à la pluie ou à l’humidité. Ce produit est un appareil électrique à isolation double (appareil de classe II). Il a été conçu pour ne pas nécessiter de connexion de sécurité à la terre (ou à la masse). Le triangle dans lequel figure le symbole d’un éclair alerte l’utilisateur de la présence, dans le boîtier de l’appareil, d’une tension dangereuse, non isolée et suffisamment importante pour représenter un risque de choc électrique. Le triangle dans lequel figure un point d’exclamation alerte l’utilisateur de la présence d’instructions de fonctionnement et de maintenance (réparation) importantes dans la documentation accompagnant le produit. ATTENTION : au Canada et aux États-Unis, afin de prévenir tout choc électrique, aligner la plus grosse broche de la prise à la fente la plus large de la fiche et insérez entièrement la prise dans la fiche. Bon nombre des consignes ci-dessous sont de simples précautions de bon sens. Nous vous recommandons toutefois de les lire pour votre propre sécurité et pour celle de l’appareil. Instructions de sécurité importantes Cet appareil a été conçu et fabriqué conformément aux normes de qualité et de sécurité les plus strictes. Vous devez cependant observer les précautions qui suivent lors de son installation et de son utilisation. 1. Avertissements et consignes Il est impératif de lire les consignes de sécurité et d’utilisation avant de mettre cet appareil en marche. Conservez ce manuel pour vous y référer par la suite et respectez scrupuleusement les avertissements figurant dans ce manuel ou sur l’appareil lui-même. de façon à pouvoir être débranché si nécessaire. 10. Protection des câbles d’alimentation secteur Veillez à ce que les câbles d’alimentation ne se trouvent pas dans un lieu de passage ou bloqués par d’autres objets. Cette règle s’applique plus particulièrement aux prises et câbles d’alimentation et à leurs points de sortie de l’appareil. 11. Câbles haute tension Évitez de monter l’antenne extérieure de l’appareil à proximité de câbles haute tension. 2. Eau et humidité 12. Branchement des haut-parleurs L’installation d’un appareil électrique à proximité d’une source d’eau présente de sérieux risques. Il ne faut donc pas installer l’appareil près d’une baignoire, d’un lavabo, d’un évier, dans un sous-sol humide, près d’une piscine, etc. Tous les haut-parleurs doivent être connectés à la MZ8/MZ12 avec du câble de classe II (aucune mise à la terre nécessaire). Le non-respect de cette précaution est susceptible d’endommager l’appareil. 13. Périodes de non-utilisation 3. Chute d’objets ou infiltration de liquides Si l’appareil possède une fonction de mise en veille, un courant faible continuera de circuler lorsqu’il sera réglé sur ce mode. Débrancher le cordon secteur de la prise murale si l’appareil doit rester inutilisé pendant une période prolongée. Veillez à ne pas laisser tomber d’objets ni couler de liquides à travers les ouvertures de l’appareil et ne placez pas sur l’appareil d’objet contenant du liquide, tel qu’un vase par exemple. 4. Placement de l’équipement Utilisez uniquement une étagère assez stable et solide pour supporter le poids de cet équipement. 5. Ventilation Évitez de placer l’appareil sur un lit, un canapé, un tapis ou une surface similaire instable ou dans une bibliothèque ou un meuble fermé. Ceci risquerait de nuire à la ventilation du système. 14. Odeur suspecte Arrêtez et débranchez immédiatement l’appareil en cas d’émission de fumée ou d’odeur anormale. Contactez immédiatement votre revendeur. 15. Service N’essayez jamais d’effectuer d’autres opérations que celles mentionnées dans ce manuel. Toute autre intervention doit être effectuée par un personnel qualifié. 6. Exposition à la chaleur 16. Entretien par des techniciens qualifiés Ne placez pas l’appareil à proximité d’une flamme nue ou de tout dispositif produisant de la chaleur : radiateur, poêle ou autre. L’appareil doit être entretenu par du personnel qualifié lorsque : A. la prise ou le câble d’alimentation a été endommagé, 7. Conditions climatiques B. des objets sont tombés ou du liquide a coulé dans l’appareil, L’appareil est conçu pour fonctionner dans des climats modérés. Déconnectez cet équipement pendant un orage pour éviter tous dommages possibles d’un impacte de la foudre ou de surtension. C. l’appareil a été exposé à la pluie, 8. Nettoyage Mettez l’appareil hors-tension avant de le nettoyer. Pour l’entretien du boîtier, utilisez uniquement un chiffon doux, humide et non pelucheux. N’utilisez pas de solvant chimique. L’emploi d’aérosols ou de produits de nettoyage pour meubles est déconseillé, car le passage d’un chiffon humide risquerait de laisser des traces blanches et indélébiles. 9. Alimentation secteur Branchez l’appareil uniquement sur une alimentation secteur du type mentionné dans le manuel d’utilisation ou indiqué sur l’appareil luimême. Le principal moyen d’isoler l’appareil du secteur est d’utiliser l’interrupteur situé à l’arrière de l’appareil. Cet appareil doit être installé D. l’appareil présente des dysfonctionnements, E. l’appareil est tombé ou le boîtier a été endommagé. Respect des consignes de sécurité Cet appareil a été conçu pour répondre à la norme internationale de sécurité électrique EN60065. Cet appareil est conforme à la Section 15 des règles de la FCC. Son fonctionnement est soumis aux deux conditions suivantes : (1) ce produit ne risque pas de causer d’interférences nuisibles et (2) ce produit doit accepter toutes les interférences reçues, y compris celles qui risquent d’entraîner un fonctionnement indésirable. 3 4 Welcome Thank you and congratulations for purchasing your Arcam MZ Amplifier. Contents Safety Guidelines....................................................... 2 Important safety instructions...................................................2 Safety compliance........................................................................2 Consignes de Sécurité.............................................. 3 Instructions de sécurité importantes....................................3 Respect des consignes de sécurité........................................3 Welcome...................................................................... 5 Overview..................................................................... 6 Placing the unit..............................................................................6 Power.................................................................................................6 Standby power...............................................................................6 Interconnect Cables.....................................................................6 Connections................................................................ 7 Speakers...................................................................... 8 Speaker Installation......................................................................8 Connecting speakers...................................................................8 Notes on making speaker connections...............................9 Operation..................................................................10 Zone operation........................................................................... 10 Front panel indicators.............................................................. 11 RS232 remote control............................................................... 11 12V Trigger Input........................................................................ 11 Troubleshooting......................................................................... 11 Arcam has been producing specialist audio products of remarkable quality for over three decades. The new MZ8 and MZ12 multi-zone power amplifiers draw upon all of Arcam’s experience as one of the UK’s most respected audio companies to bring a new level of high fidelity performance to multi-zone installations. This handbook is intended to give you a detailed guide to using both the MZ8 and MZ12 Multi Zone Power Amplifier systems. It starts by giving advice on installation, moves on to describe how to use the product and finishes with additional information on the more advanced features. Use the contents list shown on this page to guide you to the section of interest. We hope that your MZ Amplifier will give you years of troublefree operation. In the unlikely event of any fault, or if you simply require further information about Arcam products, our network of dealers will be happy to help you. Further information can also be found on the Arcam website at www.arcam.co.uk. The MZ development team Product Guarantee..................................................12 Specifications...........................................................12 Introduction................................................................................. 13 Serial Cable Specification........................................................ 13 Conventions................................................................................. 13 Command and response formats........................................ 13 RS232 Control...........................................................13 Example command and response sequence................. 14 Zone numbers............................................................................. 14 Answer codes............................................................................... 14 System Command Specifications....................................... 15 It may be that the MZ amplifier has been installed and set up as part of your Hi-Fi or home cinema installation by a qualified Arcam dealer. In this case, you may wish to skip the sections of this handbook dealing with installation and setting up the unit. Use the Contents list to guide you to the relevant sections. ZONE STATUS ZONE STATUS 1 4 2 3 5 6 POWER MZ12 23425 M U LT I Z O N E H I G H F I D E L I T Y P O W E R A M P L I F I E R 5 Overview Placing the unit Standby power Place the amplifier on a level, firm surface, avoiding direct sunlight and sources of heat or damp. Alternatively, the unit can be installed in a 19” equipment rack using the rack ears supplied. Attach the rack ears to the sides of the MZ amplifier using the supplied bolts, as shown in the diagram below. The front panel power switch powers all circuitry down. The unit may be put into low-power standby operation using RS232 control or the trigger input. In standby, the amplifier’s control power supply is kept powered on, so the amplifier can be powered up remotely. Power consumption in this mode is approximately 0.6W. If the unit is put into standby using the RS232 control or trigger input, it may be possible to hear a slight residual hum coming from the mains transformer inside the amplifier. This is perfectly normal. However, if the unit is to be left unused for an extended period, we recommend that you disconnect it from the mains supply or turn off the power using the front panel switch to save power. • Do not place the MZ8/MZ12 on top of another power amplifier or other source of heat. • Do not place the amplifier in an enclosed space such as a bookcase or rack cabinet unless there is good provision for ventilation. If installed in a rack, leave at least 2U of empty rack space above and below the unit. Use a ventilated blanking plate to cover the gap. The MZ8 and MZ12 are designed to run warm during normal operation. • Do not place any other component or item directly on top of the amplifier as this may obstruct airflow around the heat-sink, causing the amplifier to run hot. (The unit placed on top of the amplifier would become hot, too.) • Do not place your record deck on top of this unit. Record decks are very sensitive to the noise generated by mains power supplies which will be heard as a background ‘hum’ if the record deck is too close. Power The amplifier is supplied with a moulded mains plug already fitted to the lead. Check that the plug supplied fits your supply — should you require a new mains lead, please contact your Arcam dealer. If your mains supply voltage or mains plug is different, please contact your Arcam dealer immediately. Push the IEC plug end of the power cable into the socket on the back of the amplifier, making sure that it is pushed in firmly. Plug the other end of the cable into your mains socket and, if necessary, switch the socket on. Note that when the MZ amplifier is powered on from the front panel switch or bought out of standby the amplifier modules are turned on individually to stagger the surge created when a powerful amplifier is switched on (i.e. it provides a ‘soft start’). This reduces the surge current drawn from the domestic power supply. Interconnect Cables We recommend the use of high-quality screened cables that are designed for the particular application. Other cables will have different impedance characteristics that will degrade the performance of your system (for example, do not use cabling intended for video use to carry audio signals). All cables should be kept as short as is practically possible. It is good practice when connecting your equipment to make sure that the mains power-supply cabling is kept as far away as possible from your audio cables. Failure to do so may result in unwanted noise in the audio signals. If your installation requires very long cables, balanced and/or 100V lines may be necessary. Contact a specialist for advice. Attaching rack ears to the MZ amplifier 6 7 Z1L Z1R TRIM Z1 R _ + R L R L _ + Z6 Z5 AUDIO IN + CLASS 2 WIRING _ R L R Z6 Z6 INPUT Z1 Z6 R TRIM Z6L Z6R R L + _ + _ Z3L Z3R TRIM R R R L Z3 INPUT Z1 Z3 Z3 _ + Z3 Z4 AUDIO IN + CLASS 2 WIRING _ R L R Connect an RS232 remote controller here RS232 Connection Z4 Z4 INPUT Z1 Z4 R Zone 3 & 4 each have inputs, trims and input selection controls as described for Zone 2. Z5 INPUT Z1 Z5 Z5 Zone 3 & 4 Connections and Controls Z5L Z5R TRIM R R Power Inlet + _ Connect the correct mains cable here POWER INLET 1.3kVA MAX RS232 + _ Zone 5 & 6 have identical connections and controls to Zone 3 & 4, but are present on the MZ12 model only. Z2L Z2R TRIM Z2 Select whether Zone 2 speaker outputs are connected to the Zone 2 input or the Zone 1 input. See page 10. Z2 INPUT Z1 Z2 R R Zone 5 & 6 Connections and Controls R L + CLASS 2 WIRING _ Z1 Z2 AUDIO IN L Audio input for Zone 2. Sent to Zone 2 speakers only, see page 10. Zone 2 Input Audio input for Zone 1. Can be connected to other zones, see page 10. Zone 1 Input 12V TRIGGER + R R Zone 2 Input Select Fine adjustment for Zone 1 speakers, see page 10. Zone 1 Trims Used to turn on the amplifier from a remote preamplifier. See page 11. 12V Trigger _ The MZ amplifier speaker terminals are arranged into zones, with one pair of terminals per speaker and two speakers per zone. See page 8 for information on connecting loudspeakers. Speaker terminals Connections TRIM Z4L Z4R R L + _ Speakers Speaker Installation The MZ12 amplifier allows the connection of up to twelve independent loudspeaker channels, arranged in six stereo zones. The MZ8 amplifier provides eight channels in four zones. Each zone is designed to provide amplification to one room of a multi-room installation; further options allow for greater flexibility when installing multiple loudspeaker pairs in a large space. Connecting speakers The MZ amplifiers are designed to drive full bandwidth speakers, rated between 4 and 8 ohms. The unit is fitted with speaker terminals that can accept either spade terminals or bare wires. Arcam’s Muso speakers are compact mini-monitor speakers which ideally match the design values and output characteristics of the MZ amplifier series. Your dealer will be able to advise you of suitable loudspeakers for other applications, for example in-ceiling use. Right speaker terminals Single wiring Single wiring is the conventional wiring method of running a single cable per channel between the amplifier and the speaker; this is the easiest technique. If each speaker has more than one pair of connecting terminals, use the terminals labelled LF or ‘Low Frequency’ for each speaker. Connect the positive terminal of the right speaker connection on the amplifier (coloured red and labelled +R) to the positive terminal of your right speaker. Similarly, connect the negative terminal of the amplifier (coloured black and labelled with R–) to the negative terminal of your speaker. Repeat the process for the left speaker, using the amplifier terminals labelled +L and L–. If your speakers support bi-wiring, then there is a strip of conductive metal on the speakers connecting the low-frequency terminals to those for the higher-frequencies; this must not be removed in a singlewired system. Left speaker terminals R Z1 L R _ _ + + Z2 R L Z5 L R _ _ _ _ _ + + + + + R L R _ _ _ + + + + Z6 Z5 AUDIO IN Zone 1 of an MZ12 amplifier connected to speakers using single wiring 8 Z3 _ R R Z1 Z2 AUDIO IN L L L Source Z6 Z3 INPUT + R Z3 Z4 AUDIO IN L _ L Z1 Z3 Z4 Bi-amping Bi-amping is the separation of the amplification of low- and highfrequency signals over two amplifiers. You will need to connect to loudspeakers that provide separate terminals for the two cables. Each speaker must have two pairs of terminals; one pair labelled HF For ‘High Frequency’, the other pair labelled LF or ‘Low Frequency’. Notes on making speaker connections • Do not make any connections to any amplifier while it is switched on. We recommend that your amplifier is completely disconnected from the mains supply before starting. • Before switching your amplifier(s) on for the first time after connecting to speakers, please check all connections thoroughly. Ensure that bare wires or cables are not touching each other or the amplifier’s chassis (which could cause short circuits), and that you have connected positive (+) to positive and negative (–) to negative. Be sure to check the wiring for both the amplifier and the speaker. • After making connections: switch the amplifier(s) on, select a source signal, then gradually increase the volume to the required listening level. If your speakers support bi-amping, then there will be a strip of conductive metal or a wire on the speakers connecting the low-frequency terminals to those for the higher-frequencies. This connection must be removed in a bi-wired system. Failure to remove this connection is likely to cause damage to the amplifier when used in bi-amping configuration. This damage is not covered by warranty. Bi-amping requires the use of two zones for every pair of speakers. Zone 1 of the amplifier can easily be bi-amplified. Connect the Zone 1 speaker terminals to the low-frequency loudspeaker terminals. Connect a second zone to the high-frequency speaker terminals and set the input switch for this zone to the Z1 position. For best performance, use Zone 3. Zone 1 and Zone 3 have completely independent power supplies, including transformers, making this arrangement equivalent to using two separate amplifier components. If you are unsure as to how your system should be connected, or need advice on bi-wiring or bi-amping, please contact your Arcam dealer who will be happy to help you. Further zones can be bi-amplified by using splitter cables to feed two zone inputs from one source. Contact your dealer for further information. Right speaker terminals Left speaker terminals R Z1 L R Z2 R L Z5 L R Z6 L R Z3 L R Z4 L _ _ _ _ _ _ _ _ _ _ _ _ + + + + + + + + + + + + Source Z1 Z2 AUDIO IN L L R R Z6 Z5 AUDIO IN L R Z1 Z3 Z3 INPUT Z3 Z4 AUDIO IN Zone 1 of an MZ12 amplifier connected to speakers using bi-amping, by means of Zone 3 9 Operation Zone operation Each channel of each zone has a trim control. This recessed control allows each speaker’s volume to be adjusted using a small flat blade or cross-head screwdriver and is ideal for compensating for differences in sensitivity between different speaker types. For everyday volume adjustment, it is recommended to connect source equipment with an adjustable output such as the Arcam C31 preamplifier or Solo Music system. Each zone (except Zone 1) has an input switch. This switch allows the input for the zone to be taken from either the corresponding zone input or the zone 1 input. This allows for the input to zone 1 to be sent to multiple loudspeaker pairs. Switch all input switches to Zone 1 if you require the same stereo source to be reproduced in all zones. Note that if the input switch is set to the other position, then the zone will require its own stereo source (preamplifier or stereo music system). Examples of different setups are shown below: Z1 R L Z2 R Z5 R L L R Z6 L R Z3 L _ _ _ _ _ _ _ _ _ _ + + + + + + + + + + L L L _ + L R R R Z6 Z5 AUDIO IN Z1 Z2 AUDIO IN Arcam C31 Preamplifier Z4 R _ + Z3 Z4 AUDIO IN Arcam Solo Mini System MZ12 Amplifier Arcam CD37 CD Player Independant zones Arcam T32 Tuner ZONE 1 ZONE 4 MZ amplifier with two independant zones R Z1 L R Z2 R L Z5 L R Z6 L R Z3 L R Z4 L _ _ _ _ _ _ _ _ _ _ _ _ + + + + + + + + + + + + L L L R R Z1 Z2 AUDIO IN Z6 Z5 AUDIO IN R Z3 Z4 AUDIO IN Arcam C31 Preamplifier MZ12 Amplifier Arcam CD37 CD Player Arcam T32 Tuner Set Zone 4 input to Z1 Zone 1 system is heard in both zones ZONE 1 ZONE 4 MZ amplifier with one source feeding two zones 10 Front panel indicators Troubleshooting The front panel Zone Status LEDs indicate the status of each of the amplifier zones: If you are having trouble with your amplifier, check the following items: • • • • Red - standby Amber - zone muted Green - zone on Flashing Red - over temperature RS232 remote control The Arcam MZ amplifiers may be remote controlled using an RS232 data connection. The communication protocol is described from page 13 onwards. The following functions are available: • Zone mute on/off • Power/Standby • Query zone status (mute, temperature) 12V Trigger Input If a 12V trigger output is provided by any of the pre-amps connected to the MZ amplifier, it can be connected to the 12V trigger in socket using a 3.5mm jack (shown below). No sound Check the following: • Both the source component (pre-amp) and MZ amplifier are switched on, indicated by the front panel LED being lit green on the MZ amplifier. • The MZ amplifier is not in standby, indicated by the front panel LED being lit red. • The source component (pre-amp) is not muted. • The MZ amplifier is not muted, indicated by the front panel LED being lit amber. Sound cuts-out unexpectedly or suddenly becomes poor or distorted: If the temperature of the internal heatsink rises above a safe level, then a thermal cut-out inside the amplifier will operate. During this time the front panel LED will flash red and the amplifier protection system temporarily removes the power to the speakers. The system will reset itself as the heatsink cools down. • With low-impedance speakers connected (6Ω or less), overloads are more likely. • Overloading the amplifier may cause it to shut down because of overheating. This enables the MZ amplifier to be powered on or off remotely from a pre-amp. Note that the main power switch on the front panel must be depressed to allow the MZ amplifier to be switched in and out of standby using this method. Screen = Ground Tip = +12V trigger signal 3.5mm jack - trigger connections 11 Specifications Continual improvement policy Arcam has a policy of continual improvement for its products. This means that designs and specifications are subject to change without notice. Continuous power output (1kHz at 0.1% THD) Single zone, both channels, 8Ω Single channel, 4Ω Harmonic distortion, 80% power, 8Ω at 1kHz Power output, all zones all channels driven, 8Ω at 1kHz, 0.1% THD+N 80W rms 116W rms 0.01% 65W rms per channel Inputs Nominal sensitivity Input impedance Signal/noise ratio (CCIR, 45W) 0.9V—1.5V 11kΩ 101dB General Mains voltage Power consumption (maximum) Heat dissipation (maximum) Power consumption, idle Heat dissipation, idle Power consumption, standby Heat dissipation in standby Dimensions W x D x H (including feet, excluding rack ears and connectors) Weight (net) Weight (packed) Supplied accessories E&OE NOTE: All specification values are typical unless otherwise stated. 110—120V or 220—240V 600W 1,715 BTU/h MZ12: 110W; MZ8: 73W MZ12: 375BTU/h; MZ8: 256 BTU/h 0.6W 2 BTU/h 432mm x 436.5mm x 144.5mm (19” rackmount x 3U) MZ12: 24.7 Kg; MZ8 19.3 Kg. MZ12: 27.3 Kg; MZ8 21.9 Kg. mains lead Product Guarantee Worldwide Guarantee Claims under guarantee This entitles you to have the unit repaired free of charge, during the first two years after purchase, at any authorised Arcam distributor provided that it was originally purchased from an authorised Arcam dealer or distributor. The manufacturer can take no responsibility for defects arising from accident, misuse, abuse, wear and tear, neglect or through unauthorized adjustment and/or repair, neither can they accept responsibility for damage or loss occurring during transit to or from the person claiming under the guarantee. This equipment should be packed in the original packing and returned to the dealer from whom it was purchased, or failing this, directly to the Arcam distributor in the country of residence. The warranty covers: Arcam Customer Support Department, Pembroke Avenue, Waterbeach, CAMBRIDGE, CB25 9QR, England Parts and labour costs for two years from the purchase date. After two years you must pay for both parts and labour costs. The warranty does not cover transportation costs at any time. On-line registration You can register your product on-line at www.arcam.co.uk. It should be sent carriage prepaid by a reputable carrier – not by post. No responsibility can be accepted for the unit whilst in transit to the dealer or distributor and customers are therefore advised to insure the unit against loss or damage whilst in transit. For further details contact Arcam at: or via www.arcam.co.uk. Problems? If your Arcam dealer is unable to answer any query regarding this or any other Arcam product please contact Arcam Customer Support at the above address and we will do our best to help you. 12 RS232 Control Introduction This document describes the remote control protocol for controlling the MZ8/12 via the RS232 interface. The document relates to MZ RS232 control protocol version 1.0. Any updates to this protocol will be posted on the Arcam Extranet website at http://www.arcam.co.uk/extranet. 1 5 Serial Cable Specification 9 6 DB9 Female DB9 Female 5 1 6 9 The cable is wired as a null modem: Connector 1 pin 2 3 5 Connector 2 pin 3 2 5 Function Rx Tx Tx Rx RS232 Ground Data transfer format • Transfer rate: 38,400bps. • 1 start bit, 8 data bits, 1 stop bit, no parity, no flow control. Conventions All hexadecimal numbers begin 0x. Any character in single quotes gives the ASCII equivalent of a hex value. <n> represents an unknown or variable number. Command and response formats Communication between the remote controller (RC) and the MZ8/MZ12 takes the form of sequences of bytes, with all commands and responses having the same basic format. The MZ8/MZ12 shall always respond to a received command, but may also send messages at other times. Each transmission by the RC is the following format: <St> <Zn> <Cc> <Dl> <Data> <Et> St (Start transmission): 0x21 ‘!’ Zn (Zone number): see below. Cc (Command code): the code for the command Dl (Data length): the number of data items following this item, excluding the ETR Data: the parameters for the command Et (End transmission): 0x0D Each response by the MZ8/MZ12 is the following format: <St> <Zn> <Cc> <Ac> <Dl> <Data> <Et> St (Start transmission): 0x21 ‘!’ Zn (Zone number): see below. Cc (Command code): the code for the command Ac (Answer code): see below. Dl (Data Length): the number of data items following this item, excluding the ETR Data: the parameters for the response of length n. n is limited to 255. Et (End transmission): 0x0D The MZ8/MZ12 responds to each command from the RC within three seconds. The RC may send further commands before a previous command response has been received. 13 Zone numbers The following zone numbers are defined: 0x01 - Zone number 1. (Zone 1 is the master zone. Commands that are global are addressed to Zone 1) 0x02 - Zone number 2. 0x03 - Zone number 3. 0x04 – Zone number 4. 0x05 – Zone number 5. 0x06 – Zone number 6. Answer codes The following answer codes are defined: 0x00 – Status update. 0x82 – Zone Invalid. 0x83 – Command not recognised. 0x84 – Parameter not recognised. 0x85 – Command invalid at this time. 0x86 – Invalid data length. Example command and response sequence As an example, the command 0x00, change power state – enter standby: STR 0x21 ZONE 0x01 CC 0x08 DL 0x02 Data 1 0x10 Data 2 0x10 ETR 0x0D Assuming that the command was accepted by the amplifier and is being processed, the MZ8/MZ12 responds to this command with the following sequence: STR 0x21 ZONE 0x01 CC 0x08 AC 0x00 DL 0x02 Data 1 0x10 Data 2 0x10 ETR 0x0D AMX Duet™ Support The MZ8 & MZ12 shall be fully compatible with AMX Duet™ Dynamic Device Discovery Protocol (DDDP) The following description of Dynamic Device Discovery comes from the AMX website (www.amx.com). Dynamic Device Discovery is part of AMX’s Duet™ platform, which combines the proven reliability and power of NetLinx with the extensive capabilities of the Java 2 Micro Edition (J2ME) platform. When integrating a serial or IP device from a manufacturer embedding the Dynamic Device Discovery Protocol (DDDP), Duet recognizes the device and loads the appropriate Duet module, which automatically installs the new device. AMX’s NetLinx Master can then find and install the Duet device module either from a library on the master, from AMX’s Web site, or from the manufacturer’s Web site. Duet also allows for device swapping so that programming changes are not required when devices with DDDP are removed or replaced – a huge benefit for end users. The Duet platform is an extension AMX’s InConcert® manufacturer partner program, which was developed to ensure seamless communication between partners’ devices and the AMX control system. Data is specified in the ASCII format. All ASCII characters between the quotes “” should be recognised/transmitted. “\r” is a carriage return (0x0D) Command: “AMX\r” Response: “AMXB<Device-SDKClass=Amplifier><Device-Make=ARCAM><Device-Model=MZ><Device-Revision=x.y>\r” Where x.y = RS232 protocol version number. 14 System Command Specifications Software version (0x04) Request the version number of the main software or the control protocol of the MZ8/MZ12. Example Command/response sequence to request the RS232 protocol version (1.4): Command: 0x21 0x01 0x04 0x01 0xF0 0x0D Response: 0x21 0x01 0x04 0x00 0x03 0xF0 0x01 0x04 0x0D COMMAND: Byte: Description: St 0x21 Zn 0x01 Cc 0x04 Dl 0x01 Data 0xF0 – Request version RS232 protocol 0xF1 - Request version main software Et 0x0D RESPONSE: Power (0x00) Request or change the standby state. Example Command/response sequence to request the power state where the power is on: Command: 0x21 0x01 0x00 0x01 0xF0 0x0D Response: 0x21 0x01 0x00 0x00 0x01 0x01 0x0D Byte: Description: St 0x21 Zn 0x01 Cc 0x04 Ac Answer code Dl 0x03 Data1 Echo data from command Data2 Major version number Data3 Minor version number Et 0x0D COMMAND: Byte: Description: St 0x21 Zn 0x01 (command affects all zones) Cc 0x00 Dl 0x01 Data 0x00 – Enter standby state 0x01 – Power-on 0x02 – Toggle power state 0xF0 – Request power state Et 0x0D RESPONSE: Request Mute status (0x0E) Request the mute status of the audio in a zone. Example Command/response sequence to request the mute status of zone 1 where zone 1 is muted: Command: 0x21 0x01 0x0E 0x01 0xF0 0x0D Response: 0x21 0x01 0x0E 0x00 0x01 0x00 0x0D Byte: Description: St 0x21 Zn 0x01 Cc 0x00 Ac Answer code Dl 0x01 Data 0x00 – System is in standby 0x01 – System is powered on Et 0x0D COMMAND: Byte: Description: St 0x21 Zn Zone number Cc 0x0E Dl 0x01 Data 0xF0 – Request mute status Et 0x0D RESPONSE: Byte: Description: St 0x21 Zn Zone number Cc 0x0E Ac Answer code Dl 0x01 Data 0x00 – Zone is muted 0x01 – Zone is not muted Et 0x0D 15 Activate/deactivate the mute lines (0x1F) Activate/deactivate the mute lines on the designated zone. Example Command/response sequence to activate the mute relays: Command: 0x21 0x01 0x1F 0x01 0x0D Response: 0x21 0x01 0x1F 0x00 0x01 0x0D COMMAND: Byte: Description: St 0x21 Zn Zone number Cc 0x1F Data1 0x00 – Deactivate mute line 0x01 – Activate mute line Dl 0x01 Et 0x0D RESPONSE: Report Amplifer temperature status (0x27) Report the temperature status of the various zones amplifiers. Example Command/response sequence to request the temperature of zone 1 where temperature is too high: Command: 0x21 0x01 0x27 0x01 0xF0 0x0D Response: 0x21 0x01 0x27 0x00 0x01 0x01 0x0D Note: As each amplifier powers a pair of zones (1&2, 3&4 , 5&6) the temperature status of zones 1 and 2 is the same value. 16 Byte: Description: St 0x21 Zn Zone number Cc 0x1F Ac Answer code Dl Data length <n> Data1 Relay state Et 0x0D COMMAND: Byte: Description: St 0x21 Zn Zone number Cc 0x27 Dl 0x01 Data 0xF0 – Request temperature status Et 0x0D RESPONSE: Byte: Description: St 0x21 Zn Zone number Cc 0x27 Ac Answer code Dl 0x01 P2 0x00 – Temperature OK 0x01 – Over temperature Et 0x0D 23425 SH216E Issue 2 A&R Cambridge Ltd, Pembroke Avenue, Waterbeach, CAMBRIDGE CB25 9QR, England