1
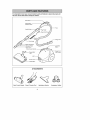
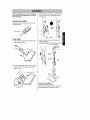
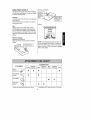
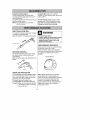
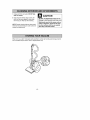
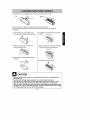
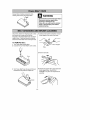
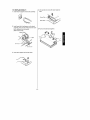
Owner's Manual
Manual del Propietario
®
Canister
Vacuum Cleaner
Aspiradora
Model, Modelo 721.21295
Sears, Roebuck and Co., Hoffman Estates, IL 60179 U.S.A
www.sears.com
PART No. 3828FI3763K
Printed in KOREA
Before Using Your New Vacuum ................... 2
Cleaning Motor Satety Filter ...........................
Cleaning Exterior and Attachments ................
Stonng Your Vacuum ............................
Cleaning Sani-Punch Nozzte ..........................
Power-Mate _ Care ..........................................
Kenmore Vacuum Cleaner Warranty ............ 2
important Safety Instructions
....................... 3
Parts and Features
4
Assembly
Belt Changing and Brush C_eaning .......... 14_ 15
Brush Servicing
16
Brush Assembly .......................................
16
5_6
Use and Care
6
How Your Vacuum Works ................................ 6
How to Start Your Vacuum ............................... 7
Attachments
8o-,9
Attachments Use Chart .................................
9
Vacuuming Tips .............................................. 10
Performance Features .................................... 10
Changing The Dust Bag ............................
11
12
12
13
14
Trouble Shooting ...............................................17
Parts List .................................................
18,421
EspaRol .........................................................
Service ............................................
22
Back Cover
11
Please read this guide, tt will help you assemble and operate your new Kenmore vacuum in the
safest and most effective way.
For more informalion about the care and o_ratJon, call your nearest Sears store.
Your will need the complete model and serial numbers when requiting information,
Your vacuum's model and serial numbers are I_ated on the Model and Serial Number Plate,
Use the space betow to reco_ the model number and serial number ot your new Kenmore vacuum.
Serial No
Date of Purchase
K_p this book and your sales check (receipt) in a safe place for fulure reference.
FULL ONE-YEAR WARRANTY
When used for private household pur_ses, if this vacuum cleaner fails due _o a defect in material
or workmanship within one year from the date of purchase, Sears will repair it free of charge.
For warranty service, return this vacuum cleaner to the nearest Sears Service Center in The
United States,
This warranty gives you s_cific
state to state.
legal rights, and you may atso have other rights which vary from
Sears, Roebuck and Co., D/817 WA, Hoffman Estates, IL 60179
-2-
Your safety is important to us. To reduce the risk of fire, electrical sh_k, injury to
persons or damage when using your vacuum cleaner, follow basic safety precautions
including the following:
Read this manual before assemblingor using your
vacuum deaner.
Use your cleaner onty as described in this manual
Useonly wiUi supplied attachments.
To reducethe risk of e_clrieal shock - Do not use
outdoors or on wet surfaces.
Do not operatethe cleaner with a punctured hose.
R_lace if cut or worn. Avoid vacuuming sharp
objects.
Do not use with any opening blocked; keep free ol
dust,lint, hair and anything that may reduce air
flow.
Disconnect electrical supply before servicing or
cleaning out brush area. Failure to do so couki
result in eJectricaJshock or brush suddenly
starting,
Keep hair, loose clothing, fingers,and all parts of
body away Irom epenings and moving paris.
Do not use cleaner wi_lout dust bag andJorfilters
in plac&
Always turn cleaner off before connecting or
disconnecting the hose.
Always change the dust bag after vacuuming
carpet cleaners or froshener, powders and fine
Always turn cleaner off before ueplugging.
Do not unplug by puliing on cord. To unplug,
gra_ the plug, not the cord.
Hold plug when rewinding onto cord reel.
dust. These products cbg the bag, reduce airflow
and can cause the bag to burst, Failureto change
bog could cause permanent damage to the
cleaner.
Do not aibw plug to whip when rewinding.
Do not use with damagedcord or p_ug.If cteaner
Do not use the cleaner to pick @ sharp hard
objects, small toys, pins, paper, etc. They may
is not wod,,ingas it sbould, h_ been drepped,
damaged, left outdoors,or dropped intowater,
return it to a Sears Sewice Center,
damage the cleaner or dust bag.
Do not pickup ar_ythingthat s burningor smoking,
such asciigaret[es,,matches,or he1ashes.
Do not pall or carry by cord, use cord as a
handle, close door on cord, or pull cord around
sharp edges or come_. Do not run cleaner over
Do not use vacuum cleaner to pick up flammable
or combustibleliquids (gasoline,cfeaning fluids,
perfumes, etc.), or use in areas where they may
cord, Keep cord away from heated surfaces,
Do not leave cleaner whenp_uggedin, Ueplug
from outlet when not in use and before servicing.
be present, The fumes fromthese substances can
create a fire hazardor explosion_
Do not albw to be used as a toy. Close attention
is necesca_ when used by or near children.
Do not handleplug er cleaner w_h wet hands.
Use extra care when cleaning on stairs. Do not
on chairs, tables, etc. Keepon floor.
You are responsible for making sure that your
vacuum cleaner is not used by anyone unable to
put
eperate it proper_y.
SAVE THESE INSTRUCTIONS,
Proper aeaembly and safe use d your vacuum cleaner are your responsibilities. Your cleaner is
intended only for household use. Read this Owner's Manual carefully for impertant use and safety
information, This guide contains safety statements under warning and caution symbols Please
pay special attention to these boxes and follow any instrudions given. WARNING statements
alert you to such dangers as fire, electrical shock, burns and personal injury. CAUTION
statements alert you to such dangers as personal injury and/or property damage
It is important to know your vacuum cleaner's parts and features to assure its proper and
safe use, Review these before using your clea_r,
Sli_
Switch
Power=Mate _
ONJOFF Switch
Holder
Cord
H_k
C_rd Holder
Wand Storage Clip
Telescopic Wand
Wand B_Jtton
3ord Reel
Button
Performance indicator
(Not Shown)
Plug
Suction
ATTACHMENTS
Sani-PunchNozzle Brush/CreviceTool
-4 -
UpholsteryNozzle
Accessory Holder
Before assembling your vacuum cleaner,
_re you have all the parts shown in PARTS
AND FEATURES.
3. Connect Power Cord Plug to top of wand as
shown, DO NOT force. Raised side of plug
must face out
TELESCOPIC WAND
HoEdspring latch and pull out or _sh
to required length,
inw_d
Spnng La_i_
Power-Mate ®
1. insert wand into Power-Mate _ until the wand
button snaps into ptace_
4, Insert handle into wand until handle button
snaps into place,
To remove handle: Press handle button and
pull up on handle,
Button
W_nd
Cord
T_l_optc
2. Connect Power=Mate e plug to Power Cord as
shown. DO NOT force. Raised side of plug
must face out.
g
To Remove Power-Mate _
1. Steady Power-Mate_ with foot.
2, Disconr_ct Power-Mate_'Plug from Power Cord
& Press Wand Button and pult up on war_,
ATTACHMENTS
3. Check to see that the motor safety filter is
propady installed. See CLEANING MOTOR
SAFETY FILTER for instructions,
Clamp Accessory Holder around Telescopic
Wand as shown
°!
Motor Safe_y _
iiio
HOSE
1. Insert hose into canister un_l it snaps into
place, Be sure hose is not twisted,
To remove hose: Pushfitting hook down and
pull out,
Accessories can be stored in the holder.
CANISTER
1, Open the canister hood,
2, Cheek to see that the dust bag is properly
instalte& See CHANGING THE DUST BAG
for instructions.
USE AND CARE
The vacuum cleaner creates suction '[ha_picks up dirt. Rapidly moving _r_
air carries the dirt to the dust bag through the air flow passages_
z-_,
_,-/__
The dust bag lets the air pass through_ while it traps the dirt,
E _'-_,V
For best cleaning r_uEts, keep the airflow
passage open.
_
Check the starred areas occasionally for clogs.
_o_7
Unplug from outlet before checking,
_//_
.._
-6-
4. Push slide switch forward toward MAX for
max suction, backward loward MIN for Iess
suction,
PersonalInjuryandProductDamageHazardl
, DO NOTplugin if switchis in ON position,
Personalinjuryor productdarn_e couldresu_.
• Thecordmovesr_idly whenrewinding,
Keepchi_renawaya_ providea clearpathwhen
rewindingthecordtopreventpersonalinjury,
• DO NOTuse ou_etsabovecounters_Damageto
items in surroundingareacouldoccur,
5 To turnon Power-Mate_ press the Power-Mate*
ON/OFF switch downward.
1. Pull out the power cord to the desired [en£th.
NOTE: To reducethe risk el electric shock, this
vacuum eles_er has e po afized plug; one blade is
wider thanthe other, This piug witi Iit in s polarized
outlet only one way. If the pug does not fit fully in the
outlet, reversethe plug. tf it still _es not fit contact a
quaified etectricisn to instellthe proper outlet, Do not
change the piug in s_y way
2. P_ugthe polarized power cord into a 120 Volt
outlet located near the floor
To r_ind: Unplug the cleaner, Hotd the plug
while rewinding to prevent damage or injury
from the moving cord. Press on the cord ree_
button to rewind the _rd.
: PoweroMate _'ON/OFF switch
Attention: Turn on Power-Mate _ on_y when
vacuuming. Refer to your carpet
manufacturers cleaning recommendations,
Some more delicate carpets may require
that they be vacuumed with the Power°Mate _
agitator tur_d off, to prevent carpet
damage,
3. To lower Telescopic wand,
hold Power-Mate _ down
w_h foot and pull back
on upper part of
Telescopic wand.
_7_
DO NOT attach or remove handle or
wands while cleaner is ON, This could
cause sparking and damage the electrical
contacts,
ATTACHMENTS ON HANDLE
To prevent tip-over, never leave Power-Mate_
ON in the upright position,
2, Remove Power-Mate s plug from holder
Press Wand button, then pull to remove
wand from Power-Mate _.
NOTE: If the Power-Mate _ is attached, turn
cteaner off before removing handle from
Telescopic wand.
1. Press handle button, then pull to remove
handle from Telesco#c wand.
3, Put on attachments as needed
See chart on next page,
2. Push new attachment tool onto handle.
ATTACHMENTS ON TELESCOPIC
WANDS
The Power-Mate _ and Sani-Punch Nozzle have
locking holes. The b_sh/crevice tool and
upholstery nozzle do not have locking holes+
1+Steady Power-Mate _
with foot,
-8-
SANI-PUNCH NOZZLE
Blankets
This Sani_Punch nozzle is for effective cleaning
of mattresses, light blankets, sheets and drapes
to remove mites and dust,
and Sheets
t is easierte
Features
The bottom part of the nozzle can b.e separated
to be cteaned.
Since the bosom does not stick to the surface,
vacuuming is easy.
Drapes
Use
Set the suction power slide switch to MAX
POWER before vacuuming. According to the
type of mattresses, handling may be awkward
or it may cause a lot of noise If this is the case,
adjust the suction power slide switch to a lower
setting.
Effective Cleaning
Ma[tresses and Blankets
AppUySani Punch nozzle directly to mattress
surface.
NOTE: If the vibration plate does not move, lift
the nozzle siightly off the surface, If it does not
move even after doing so check if the suction
power is too low or if the nozzle base is dogged
with a foreign object,
Forblanket lay out )
on bed and vacuum.
J
CLEANING AREA
ATTACHMENT
FurnHure* [ Between Drapes*
Cushions*
CREV,CE
BRUSNi TOOL
X
UPHOLSTERY
NOZZLE
X
X
Ma_'es_s_ Bare
81[ankets* Floors
Carpeted
Fl®rs/Rugs Watls
X
X
X
Power-Mate®
X
SANI-PUNCH
NOZZLE
X
Alwaysc_eanattachmentsbeforeusingon fabrics.
X
** Power-Ma_e
_OF#OFFswitchshould_ inOFF_si5oa
"9"
Suggested sweeping pa_ern
For best cleaning action, tile Power-Mate _
should be pushed straight away from you and
pulled straight back.
This pattern should be continued across the rug
with slow, gliding motions.
NOTE: Fast, jerky strokes do not provide
complete cleaning.
Carpeted stairs need to be vacuumed
regularly. For best cleaning results, put the sflde
switch on MAX
For best cleaning results, keep the airflow
passage open. Check _sionally
for dogs.
See HOW YOUR VACUUM WORKS section,
Unplug from outlet before checki_.
ONE-TOUCH CONTROL
The length of Telescopic wand can be changed
by one touch quickly and easily,
Adiust the length of Telescopic wand as shown.
Personal injury Hazard
Always unplug the vacuum cleaner before
cleaning the brush area as brush may
suddenly restart, Failure to do so can
result in personal injury,
Spr_ng[
PERFORMANCE
INDICATOR
When the unit is running_ the indicator windows
will be green if there are no clogs.
When the indicator window turns completely
red, check if the dust bag is full or if other areas
are clogged, See HOW YOUR VACUUM
WORKS.
SUCTION CONTROL
The handle slide switch aflows you to change
the vacuum suction Ior different fabric and
Indicator Window
carpet weights,
Adiust the suction power with slide switch in the
handle.
Handie
OVERLOAD PROTECTOR
The Power-Mate _ has buiit4n protection against
motor and belt _mage should the brush iam.
If the brush slews down or stops, the overload
protector shuts off _e Power-Mate _.
The canister motor will continue to run
To correct p_oblem:See TROUBLE SlitTING
To reset: Unplug cord from wall outlet and wait
5,qO minutes for motor to cool. Plug
cord into wall cutter,
Note: indicator window may turn rod when
using attachments or when cleaning new
carpet. This is due to reduced airflow caused by
the va_um seal between attachment and
surface, or new carpet fuzz filling the bag
quickly, Restore airflow by raising attachment
slightly from surface you are cleaning, or
replace bag if it is full.
o10_
For bee'[ cleaning results, the dust bag should
changed often,
Bag Mt}u_/t Tab
1_Unplug cord from wall out_et,
2. Pull lid release out and up, then lift canister bo_.
3. Press bad_ the bag mount latch.
6 Close and latch canister hood,
h
NOTE: The vacuum ks fitted with a safety
device which prevents you from dosing the
canister hood if the bag is not fitled correctly.
-../
7, Plug cord into wall outlet.
4. Remove the bag and throw it away,
5. To insert new dust bag:
• Press back the bag mount latch.
• Fit bottom edge of bag mount tab onl_obag
mount _edge,
• Pult bag mour_ tab flush with suction inlet hole,
• Re_easebag mount latch ever top edge of bag
mount tab to secure bag in canister.
(Dust Bag No, 20-51t95)
NEVER REUSE A DUST BAG, Very fine
materials, such as carpet fres_ner, face
powder, fine dust piaster, soot, new carpet
lint, etc,_can clog the bag and cause it to
burst before it is full, Change bag more
often w_n vacuuming these materials,
2, Putl out meter safety filter as shown,
Electrical Shock Hazard
Do not operate the cleaner without the
motor safety filter Be sure the filter is dry
and properly installed to prevent motor
failure arC!or electrical shock,
Check motor safety filter occasionally and
clean when dirty,
1. Un#ug cord from waltoutlet and remove
bag,
3, Wash filter in warm soapy water, rinse, then
dry, Do not clean in dishwasher or install
while damp,
4. Insert filter back into canister,
5. Insert bag.
o11-
1. Unplug cord from wal_outlet. DO NOT drip
water on cleaner.
2, Clean vacuum exterior using a clean, soft
cloth that has been dipped in clean water,
then wrung out. Wipe dry after cleaning.
DO NOT use attachments if they are wet,
Dam_e to dust bag and motor may occur,
Attachments used in dirty areas, such as
under a refrigerator, should not be used
on other surfaces until they are washed
since they could leave marks,
NOTE: Regular cleaning helps to reduce static
electricity and dust buildup on outer surfaces of
c_eaner and attachments.
When not in use, attach Telescopic wand assembty to cani_er by inserting wand storage dip into
hole in canister body as shown Store in updght position only,
\
o12_
Use the brush/crevice toe[ attachment to vacuum clean the Sani°Punch nozzle.
£ottom
Fellow the instructions below for washing the Sani-Punch bottom pla[e.
(Do not soak the entire body of the vacuum nozzle in water; it may cause the vibrator to
malfunction )
1. Press the button on the rear side of the
4, Straighten the vibration plate on the lower
vacuum nozzle to separate the bottom plate,
2, Wipe all the soiled parts of the vacuum
nozzle body with a cloth
section,
v brationplate
5. Insert the attactlment _ojections on bottom
plate into the vacuum nozzle groove&
3. Wash the removed bottom plate with water
and dry iL
6. Push down the tabs to secure,
Bo_omptate_
Since the vibrator inside the Sani-Punchis composedof precision parts,never disassemble the
_ni-Punch body.
careful not to let foreign objectsclog the air inlet on top of the Sani-F_Jnchne_ie.
Since removalof the vibration platemay cause performance problems,do not warp or remove it.
Att_h the bottomplate properly beforeusing.Without this bottom plate, it may not function°
Sincethis v_uum nozzlehas been made exclusively for cleaningmattresses, lightblankets, sheets
and drapes, use it onlyfor these cleaningpurposes.(Using it to clean the fl_r may result in soiting
it or a drop in performance,so do not use it for such purposes.)
o13-
Always
follow
allsafety
precautions
when
cieaning
andservicing
thePower-Mate
_,
Electrical Shock or Personal injury Hazard
Disconnect electrical supply before
servicing or cleaning the unit.
Failure to do so could result in electrical
shock or personal injury from cleaner
suddenly starting.
Disconnect cleaner from electrical outlet Check
and remove heir_ string and lint build_up
frequently in the Power°Mate _ brush and brush
su_,ort areas. If build_up becomes excessive,
disconnect Power=Mate_ from Telescopic wand,
& Carefully insert and lift screwdriver at each
brush support to free brush from base,
TO REMOVE BELT:
1. Turn Power_Mate _ upside down.
2 Unscrew the four Power-Mate s cover screws.
Base
& Remove worn b,eit.
i;
Whee_
3, Turn Power-Mate _ rear side up and titt cover
forward from back untit front snaps free,
& Slide brush supports off to check and dean
brush support areas See BRUSH
ASSEMBLY for picture of complete _ush
assembly.
o14o
TO REPLACE BELT:
1. Install brush supports onto brush assembly.
4. Line up tabs on cover with slots inside the
base.
¢
Cover Tab
Base Slot
2, _nstall new belt in _lt groove on the brush
assemHy, then over #_emotor shaft, Be sure
_lt is between the belt guards.
(Belt No,20-81195)
Motor Shaft
_it
5. Push cover and base together.
Guard
Bell Groove
3. insert each support into its base slots.
o15_
TO REPLACE BRUSHES:
Electrical Shock or Personal injury Hazard
Disconnect electrical supply before
servicing or cleaning the unit. Failure to do
so could result in electrical shock or
personal injury from cleaner suddenly
starting_
1. Remove Power_Mate _ cover, belt and brush
assembly. See "To remove b_olt'in BELT
CHANGING AND BRUSH CLEANING,
2. Remove brush supports from ends of brush
assembly.
3. Replace belt, new brush assembly and
Power-Mate _ cover screws, See "To replace
beW in BELT CHANGING AND BRUSH
CLEANING.
TO CHECK BRUSH:
When brushes are worn to the level of the base
support bar, replace the brush assembly
Brush
Support
o16_
Review
thischart
tofinddo-ibyourself
solutions
forminor
performance
p'obIems,
Anyother
service
needed
should
beperformed
byaSears
oror.her
quaJified
service
representative.
Bectrical Shock Hazard
Disconnect electrical supply before servicing or cleaning the unit.
Failure to do so could result in electrical shock or personal injury.
PROBLEM
POSSIBLE
CAUSE
POSSIBLE
Cleanerwontstart, 1. Unpluggedat wall outiet,
1, Plug in firmly,push t_ ha_d_ slide switch (_ge 7}
2, Reeetck_@tbreaker or rophce fuse.
Z Trod circurabreakedblownfuse at
householdsewice panel
3 Loose h_ ea_tri_t _,medions,
3, R_nned h_ e_ds (_ge 6).
4, Ceaa bush aed brush s@porls (_:agee14 t5) then
_ollowinstruct_ns on page 10aboutovedoad protector,
4 "l°r;_d ovedoad protesterlie
PowePMatd_
Poor job of dirt pick,, I Fullor cloggeddust bag,
2 Cloggedaidlow _eeages
ap.
3. Di_y filter,
,I. Side switch is or_M_N
5 Hob i_ h_e,
6 Wore PowerMa_e_ b_Jshes.
7 Worn _ broken belt.
8. D_ty brush or brush su_ts
9. Cams_arhood opee.
Cleaner star% but
eats off,
1, Cha_gebag (page 11},
2. Clear aidbw passag_ (page6).
3. Changeftter (page 1t}
4, Adjustcontrol (page 7, i0)
6, Chaegebrush_ (Fage 1@
7 & 8, S@ BELTCHANGINGAND BRUSHCLONING (pag_
t4 i5}
9 Close and arch hood,
t. Hoseor hood electrica!connections.
2 l'r_
overloadpmtec_r_r
in
Power t_te£
3 lr_
SOLUTION
over/cadprettier in caniste_
1,Cheek cennectbne recor_ec_hose ends (.page6).
2, Remc_,eanyitemsthat m@"be caught o_-jam_ed then
reseh tf clease_startsand st_x_ agae, dear_beuehand
brush sappo_te(pages 14 15),then follow instrus_oes on
page tOabeut over_d protector
3, C_nge dustbag clear ai#towblockage(pa@6)_ U@I_
@_dLromWal outletasd wait2,_o25m nudesfor m_or b
cootarid automatica!lyr_et
Pewee--Mate
r>'wili not
runwhen attache.
t Pew.-Mate _ conn_ions unplugged
t, Plug in firml_(page 5)
2. Wore _ b_okeebelt,
2 & & See B_LT CHANGINGAND BRUSHCLEANING(pag_
3 Di_lybrush o_brush su_ts
t4,t5}.
4 Tr_d overioad p otector lie
4. Check brusharea for ex_s;ve ti_ build-up or jamm eg
Power-Mate'_
Clea_brush arid brush supports(pages 14 t5) then
_otlewinstruct#he oe _ge t0 aboutoverbad protedor,
Per_orrnanc_
_icato:, some
mode!s, is red
1. Fullor sloggeddust bag,
2 8i_y fil_er,
3 Cbggd airflow passage
t, Changebeg (page 11},
2, Changeftter (page 1t}
3, Clea bl_¢@e #rerrairf_
C eaner picks up
movable _ugs, otPower.Mate _'
t. Suctbn _a stror_g,
1, Adjust_ntrol (pag_ 7 t0}.
I D_ly power cord.
2 Powe_cord jammed
1, Cleanthe power cord.
2. Pull out Powercordand rewind
passage(page 6/_,
pushes t_J hard
Power _rd won't
rewind.
o17_
VACUUM
CLEANER
PARTS
For Model: 721.21295000
14
13
12
1t
10
32
15
37
36
27
35
33
23
21
--19
24
22
-18-
34
Power-Mate _ PARTS
For Model
721.21 295000
5
6
10
13
1t
12
14
15
18
17
19
o19_
VACUUM
CLEANER
PARTS
For Model: 721.21295000
Illust.
No.
Part No.
Illust
No
1
2
3
4
5
3550FI1551K
4036FI4074A
3123019L
3550FI3307G
1TPLD302818
Filter Cover
Indicator Seal
Indicator
indicator Cover
Screw 3'12
6
7
4970FI4260A
4026F_3234A
_tch Spring
batch
8
9
3070FI111 ON
4766FI3251A
Body Cover
Felt
10
11
3940FI3252A
5230FI3558A
Exhaust Sponge
Exhaust Fi_er
12
13
14
4170024A
50_F_3233N
3650FI2132N
Buflon Spring
Cord Ree_ Button
Handle
15
16
39_FI1115A
3123004B
Dust Seal Packing
Filter Sefting Hook
17
18
4123017A
20,51195
Rlter Setting Hook Spring
Dust Bag
DESCRIPTION
19
20
3123009R
1TPL0402818
Terminal Supporter
Screw 4'12
21
22
6801FE3256C
3550FM 113F
Terminal Plate Ass',/
Front Cover
IIIust,
Part No.
No.
1
2
3
4
5
6
7
8
9
10
11
12
5249 FI1400A
6411 FI3_aA
3740FI4259A
3550FI5_lA
4580Ft5_1B
4580H5_3A
4580Ft5_lA
4580FIS_2A
5201FI5_lA
3740F15_1A
3920FI5_lA
4680FI5_lA
DESCRtPTUON
No.
DESCRIPTION
4036FI3036A
4441FI3605J
4122017F
1TPL0403318
Terminal Packing
Caster Ass'y
Roller
Borew 4*20
27
28
4660F11114D
4660FI3238N
Wheel Body
Wl_eel Cover
29
30
31
32
3040F1111D
6871FX2125A
5230FI3248A
6411Ft1071W
Body
PWB
Motor
Cord
33
34
3920FI3600B
4687FI2373G
Motor Mount Packing
Motor
35
36
37
3940H3646A
4980FI3702A
5040FI2449A
Absorbing Spor_je
Motor Supporter
Sound Rubber
Follo_ng
Parts
3828FI3763K
Not
Base
Ass'y
S_3fety Fiffer
Reel
Illustrated
Manual
Owners
20-51195
Dust Bag
Available At Any Sears Retait or Catatog
Store
Power-Mate
For Model
P_
23
24
25
26
PARTS
721 _21295000
[IIust,
No.
Pad No.
DESCRIPTION
Power-Mate _
13
3040FJSOO1A
Base
Cord Ass'y_ Power
Protector, Cord
Cover Nozzle
Pin Rear Roller
Rear Roller, Nozzle
Pin, Front Rotler
Front Roller Nozzie
14
15
16
17
5882Fm_01A
4820FI5001A
5973FJ5001A
20°81195
Sweeper, Agitator
Bumper, Nozzle
Agitator
Beff
18
19
4874F_5001A
4280FI5001A
Supporter
Fixture
Bearing, Head
Pipe Ass*y Suction
Protector, Agitator
Packing
Motor
Power-Mate _'Motor
Follo_ng
Nozzle
Parts Not Illustrated
20-81195
Be_t
Available At Any Sears Retait or Catalog
Store.
-20-
HOSE AND A ACHMENTS
PARTS
For Model: 721.21 295000
13
Illu_.
No_
1
2
3
4
5
6
7
8
9
lO
Part No,
DESCRI
5215FI1316A
3650FI1484A
3550FI2469A
4940FI3727A
3500F_3619A
5020FI3765A
6601 FI3486M
6_t FI3472A
Hose Aos'y
Gdp H_dle-R
3650FI1483A
3550F_2501 A
PTIC¢4
Grip H_dle Cover
Control Knob
Switch Board
Bution
Illust
No,
11
12
13
14
15
16
Slide Switch Ass'y
Swirtch Ass'y
Gdp H_d_e-L
Fitting
Pipe Cover
o2i_
Part No,
3123013P
5201 Fil002A
5248F1225_
3122005N
4930Ft2378B
5249Ft1395J
DESCRIPTION
Fitting Hook
Tele_pic
Wand
Upholstery Nozzle
BrusWCrevice Tool
Accessory
S_i-Punch
Holder
Nozzle