1
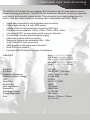
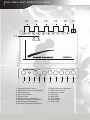
AEQ6J
OWNER’S MANUAL
PLEASE READ THIS MANUAL
BEFORE OPERATING THIS UNIT.
RETAIN FOR FUTURE REFERENCE.
The Audiobahn Way
To bring the product to market that excites the consumer through sound and
vision from an orientation of integrity and customer service. We make you look as
good as you sound. We strive to take car audio to an extreme the world has never
seen, and a world that never stops evolving.
Audiobahn was established in 1997 with one long-term goal in mind, “Build
it Bigger, Badder, & Better, and the people will take notice!” We back this statement
with an engineering team that has brought home several Innovations, Design &
Engineering Showcase Awards, and a marketing team from around the world that
spends countless hours developing our no compromise products to satisfy the most
discriminating enthusiasts.
Our global manufacturing facilities feature ISO9002 ratings (the highest level
of quality control awarded in the electronics manufacturing industry), fully robotic assembly lines and a state of the art, California based R & D laboratory.
Our Technical Department and entire staff look to strive above and beyond
the rest of the pack by going that extra mile to help you out. Whether you happen to
be a veteran competitor, or a beginner car audio enthusiast who does not know a
voice coil from a spider. We are all her to help you get the best system you can with
what you have.
Judge for yourself, and remember what it’s all about, “If it’s not Bigger, Badder & Better, it’s not Audiobahn.” If audio is your life, Audiobahn is the brand for you!
We make you look as good as you sound. People never stop trying to get the best
product, so we will never stop making it.
TABLE OF CONTENTS
Introduction___________________________________________________3
Features and Specifications______________________________________
4-6
Installation and Setup_____________________________________________
6-10
Warning and Disclaimer__________________________________________
11
Warranty______________________________________________________12-13
Notes_________________________________________________________
14
INTRODUCTION
3
Dear Customer,
Congratulations on your purchase of the worlds finest brand of car audio products. Here at
Audiobahn Inc. we are devoted to making our musical reproduction the vert best, and we
are pleased you have chosen our product. Through years of engineering expertise, hand
craftsmanship, and critical testing procedures, we have created a wide range of products
that reproduce music with all the clarity and richness you deserve.
For maximum performance we recommend you have your Audiobahn product installed by
an Authorized Audiobahn Dealer, as we provide specialized training through our Audiobahn
Installer Training Programs. Please read your warranty, keep your receipt, and original
carton for possible future use.
To get a free brochure on Audiobahn products in the US call (714) 452-1476 or e-mail us at
[email protected].
WARNING
Continuous exposure to sound pressure levels over 100dB may cause permanent
hearing loss. High powered autosound systems may produce sound pressure levels
well over 135dB. Need we say more! Use common sense.
If after reading this manual you still have questions regarding your product, we recommend that you see your nearest Audiobahn Dealer. A list of Authorized Audiobahn
Dealers can be found on our web page. If you need further assistance, feel free to call
us at (714) 452-1476 and ask for the Technical Department. Be sure to have the model
number, date of purchase, and invoice number available when you call.
The model number can be located on the outside of the carton. Record this in the space
provided below along with the date of purchase. It is a good idea to keep your receipt
with this as you will need it in the case of needing a warranty, repair service or exchange.
Date of Purchase: _____________________Model Number:___________________
Features and Specifications
4
The AEQ6J is a five-band stereo equalizer. Each frequency band is adjustable to meet individual listening preferences. The AEQ6Q also features a subwoofer crossover, subfoower
level control, and a master system control. The subwoofer level output makes use of a
built-in 18dB per octave electronic crossover that is adjustable from 60Hz - 90Hz.
•
•
•
•
•
•
•
•
•
•
•
•
Active gain preamplifiers with adjustable input sensitivity
Volume gain with up to 8 volts RMS output
Individual left and right sensitivity controls for DVD input
Five band stereo equalizer: (45Hz, 100Hz, 700Hz, 2kHz, 15kHz
Low noise BI-FET op-amp design yields minimum distortion
On-board 30V bi-polar switching power supply
Subwoofer outputs and level controls
Subwoofer frequencies adjustable 60Hz - 90Hz
Gold Plated RCA input connectors
20dB headroom eliminates signal overload
Main/DVD input selector
Universal half-DIN chassis for ease of installation
5-Band EQ
Bass---------------------45Hz
Mid-Bass---------------100Hz
Mid-----------------------700Hz
Mid-High----------------2kHz
High----------------------15kHz
Boost/Cut+/-18dB
S/N Ratio
105dB REF 1 Volt Input
Frequency Response
10Hz - 50kHz +/- 1dB
Maximum Output Voltage
8 Volts RMS
THD
0.005%
Sensitivity
50mV - 3V RMS
Head Room
20dB
Input Impedance10K Ohms
Separation
65dB/1kHz
Operating Voltage
11-15 Volts
Output Impedance
50k Ohms
Size
24mm x 178mm x 110mm
(H x W x D)
Features And Specifications
5
11
L
R
L
DVD
15
L FRONT R
R
L
REAR
17
R
OUTPUT
MAIN
L
16
GND
14
SENS
L
R
SUBWOOFER
OUTPUT
13
BATT+
12
R
DVD GAIN
AEQ6J
IN-DASH EQUALIZER & PRE-AMP LINE DRIVER
8 VOLT PRE-AMP LINE DRIVER
AEQ6J
Sub level
1
Sub freq
2
Volume
3
main DVD
F
4
1. Subwoofer Level Control
2. Subwoofer Frequency Adjustment
3. Volume Control
4. Main / DVD Switch
5. Fader Control
6. Bass Frequency Adjustment
7. Mid-Bass Frequency Adjustment
8. Mid Frequency Adjustment
9. Mid-High Frequency Adjustment
R
Fader
Bass
Mid-Bass
MidMid
5
6
7
8
Mid-High
High
9 10
10. High Frequency Adjustment
11. DVD Gain Controls
12. Subwoofer Output
13. DVD Input
14. Main Input
15. Front Output
16. Rear Output
17. Power Plug
Installation and Setup
6
Mounting Precautions
The in-dash EQ can be mounted next to the source unit or under the dash with the supplied
mounting brackets. For easy set-up, mount the equalizer so the front panel controls will be
easily accessible from the driver’s seat after installation. In addition, observe the following
precautions.
1. Check the clearance on both sides of a planned installation before drilling any holes or installing any screws.
2. When routing RCA cables, keep them away from power cables and output speaker
wires.
3. Do not allow liquids or foreign objects to enter the unit.
4. If the unit should become wet, turn off all the power and call your local authorized Audiobahn dealer so they can check for any possible damage.
Wiring Precautions
Read all of the following wiring precautions. If you are not sure about any of the installation
or wiring processes, please contact your local dealer for help.
1. This unit operates on an automotive 12V negative ground power source and requires additional audio components for proper operation.
2. Disconnect the negative (-) lead of the battery before making any power connections.
3. A good chassis ground connection is critical to the performance of your in-dash EQ.
Use the shortest ground wire possible and securely connect the car chassis along with
the source unit to minimize resistance and avoid noise problems.
4. Extra cable can cause signal loss and act as an antenna for noise. Use only high quality RCA cables that are no longer than needed.
5. If you are using a source unit without a remote turn-on lead, the in-dash EQ can be
turned on with a switched accessory lead.
System Setup
Setting System Volume
After completing the system wiring, follow the steps below to properly adjust the in-dash
EQ.
1. Turn the master volume control on the in-dash EQ and the amplifier gain controls to
their minimum setting.
2. Turn the source unit on and increase the volume until distortion is heard, then reduce
the volume just below this point. This is the maximum usable musical signal for this
source unit.Turning the volume beyond this point will increase distortion without an increase in musical signal Once the source unit volume has been set, it will no longer be
used. Always use the volume control on the in-dash EQ as the master (main) volume
control. It has better electronics, a higher S/N ratio, and is more linear than any source
unit volume available.
Installation and Setup
7
Setting Equalizer Controls
1. 1. Begin by setting all frequencies to the center or level position.
2. 2. Play a favorite music track that you know well and adjust the individual EQ controls
as desired. Avoid extreme settings that can distort musical peaks.
3. 3. Increase or decrease the EQ gain controls as necessary.
4. 4. If your system includes a subwoofer, slowly increase the subwoofer control until you
hear solid bass.
5. 5. If your system includes rear speakers, adjust the fader control to add rear sound. Set
it so most of the music comes from the front and only fills in the rear.
Setting the Low-Pass Frequency
The in-dash EQ processors have a built in low-pass crossover located on the front of the
unit. Set the crossover (60Hz - 90Hz) upon the type and size of your subwoofer system.
1. 1. Plug the additional video source into the DVD input located on the back of the unit.
2. 2. With the Main/DVD switch in the MAIN position, turn the equalizer volume to a normal listening volume.
3. 3. With the video source in play mode, switch to the DVD input source.
4. 4. With the Main/DVD switch in the DVD position, adjust the input gain controls located
on the top of the panel so that the volume of the DVD source matches the volume of
the Main source.
Warning And Disclaimer
8
Investigate the layout of your automobile thoroughly before drilling or cutting any holes. Take care
when you work near gas tanks, gas lines, hydraulic lines, and electrical wiring. Do not use the power amplifier unmounted. Attach the system securely to the automobile to prevent damage, particularly in the event of
an accident. Do not mount the system so that the wire connections are unprotected or are subject to pinching
or damage from nearby objects.
The +12V DC power wire must be fused at the battery positive terminal connection. Before making or breaking power connections at the system power terminals, disconnect the +12V wire at the battery end. Confirm your radio/head unit and/or other equipment is turned off while connecting the input jacks and speaker
terminals. If you need to replace the power fuse, replace it only with a fuse identical to that supplied with the
system. Using a fuse of a different type or rating may result in damage to this system which is not covered by
the warranty.
Disclaimer
Specifications are subject to change without notice.
For the most updated Specifications call Audiobahn,
your local Authorized Audiobahn Dealer,
or check the Audiobahn web site.
www.audiobahn.com
Warranty
9
Audiobahn Consumer
Product Warranty Policy
Audiobahn products are manufactured with the highest quality components and some of the most advanced
technology available. Because of this we recommend that you have your new products installed by an Authorized Audiobahn Dealer. (A list of Authorized Audiobahn Dealers can be found on our web page).
Warranty Period: One year from the original date of purchase.
Warranty Coverage: This warranty covers manufacturer defects only. The warranty is applicable to the
original purchaser, and is non-transferable. You must provide a receipt from an Authorized Audiobahn
Dealer that shows the location of purchase, price paid, and date of purchase.
(Products purchased by consumers from an Authorized Audiobahn Dealer outside the United States are
covered only by the Distributor of that specific country and are not covered by Audiobahn).
NOTES:
Complete subwoofer enclosures (Audiobahn will replace defective subwoofers, plexiglass, or neon only. Do
not send the entire enclosure, unless the enclosure is defective itself. You must receive prior authorization
and an RA# before sending in any complete enclosure).
AUDIOBAHN DOES NOT WARRANTY ANY PRODUCTS NOT PURCHASED THROUGH AN AUTHORIZED DEALER.
(A list of Authorized Audiobahn Dealers can be found on our web page).
AUDIOBAHN WARRANTIES DO NOT COVER THE FOLLOWING:
•
Any product not purchased from an Authorized Audiobahn Dealer (including Internet dealers)
•
Damage caused by abuse, misuse, accident, water / flood, or theft (including any cosmetic damage to
the body of the product)
•
Damage caused by improper installation
•
Any cost or expense related to removal or reinstallation
•
Any unauthorized services
•
Any product that has the serial number removed, altered, or defaced
•
Subsequent damage to any other components
•
Pinched, cut, or stripped wires / terminals
•
Any product that is new, and/or found to be in working condition
•
L.E.D. indicators on electronics (Audiobahn will only replace L.E.D.(s) found to be defective at the time
of purchase)
Warranty Continued
10
How to receive warranty service: Contact your local Authorized Audiobahn Dealer, or call Audiobahn at
(714) 452.1476 between the hours of 9:00AM and 5:00PM PST.
If you are having problems with your system, we recommend you check the product carefully and thoroughly
to confirm that the product truly has a manufacturer defect; as opposed to abuse, or other components in the
system caused the failure. This might include having an Authorized Audiobahn Dealer look at the product
to confirm the source of the problem. Any product found to have a manufacturer defect will be replaced with
a new piece of the same or similar model, or repaired at the discretion of Audiobahn. Any product found to
have no manufacturer defect will be returned to the sender at their cost.
You must acquire a Return Authorization Number (#) prior to returning ANY product to Audiobahn.
That Return Authorization Number (RA#) must be prominently and clearly marked on the outside of the shipping carton, or product delivery will be refused (no exceptions will be made).
Please note: All shipping and handling (to and from) charges will be the sole responsibility of the consumer.
Please record and keep your Return Authorization Number (RA#) in the event that further communication is
required.
Return Authorization Number (RA#):
______________________________________
Date product was sent:
______________________________________
Contact Information
Audiobahn Headquarters
7050 Village Drive Bldg. G
Buena Park, CA 90621
Phone (714) 452.1476 Fax (888) 880.8469
Pacific Coast Time: 9am - 5pm Mon. - Fri.
[email protected]
7050 Village Drive, Bldg G
Buena Park, CA 90621
714-452-1476 office
888-880-8469 fax
[email protected]
PROUD SPONSOR OF
Follow us on Facebook and Twitter