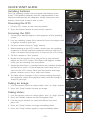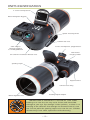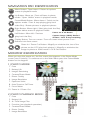
1
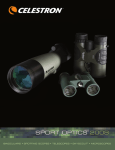
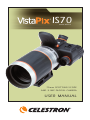
IS70
model #52212
70mm SPOTTING SCOPE
A N D 3.1 M P D I G I TA L C A M E R A
USER MANUAL
INDEX
Introduction . . . . . . . . . . . . . . . . . . . . . . . .2
Quick Start Guide . . . . . . . . . . . . . . . . . . . .3
Parts Identification . . . . . . . . . . . . . . . . . . .4
Navigation Pad Identification . . . . . . . . . . .5
Monitor Identification . . . . . . . . . . . . . . . . .5
Photo Mode . . . . . . . . . . . . . . . . . . . . . .5
Photo Playback Mode . . . . . . . . . . . . . . .5
Movie Mode . . . . . . . . . . . . . . . . . . . . . .6
Movie Playback Mode . . . . . . . . . . . . . .6
Thumbnail . . . . . . . . . . . . . . . . . . . . . . .6
Installing Batteries . . . . . . . . . . . . . . . . . . .6
Taking Photos . . . . . . . . . . . . . . . . . . . . . .6
Taking Movies . . . . . . . . . . . . . . . . . . . .7
Auto Shoot . . . . . . . . . . . . . . . . . . . . . . .7
Self-Timer . . . . . . . . . . . . . . . . . . . . . . . .7
Focus Assist . . . . . . . . . . . . . . . . . . . . . .7
Set-Up Menu Operation . . . . . . . . . . . . . . .8
Video . . . . . . . . . . . . . . . . . . . . . . . . . . .8
LCD . . . . . . . . . . . . . . . . . . . . . . . . . . . .8
Date . . . . . . . . . . . . . . . . . . . . . . . . . . .8
Sound . . . . . . . . . . . . . . . . . . . . . . . . . .8
Format . . . . . . . . . . . . . . . . . . . . . . . . . .8
Reset . . . . . . . . . . . . . . . . . . . . . . . . . . .9
Language . . . . . . . . . . . . . . . . . . . . . . .9
Power Save . . . . . . . . . . . . . . . . . . . . . .9
Photo Menu Operation . . . . . . . . . . . . . . .9
Size . . . . . . . . . . . . . . . . . . . . . . . . . . . .9
Quality . . . . . . . . . . . . . . . . . . . . . . . . . .9
Auto Shoot . . . . . . . . . . . . . . . . . . . . . .10
EV . . . . . . . . . . . . . . . . . . . . . . . . . . . .10
Effect . . . . . . . . . . . . . . . . . . . . . . . . . .10
Movie Menu Operation . . . . . . . . . . . . . .10
Size . . . . . . . . . . . . . . . . . . . . . . . . . . .10
Frame . . . . . . . . . . . . . . . . . . . . . . . . .11
EV . . . . . . . . . . . . . . . . . . . . . . . . . . . .11
Effect . . . . . . . . . . . . . . . . . . . . . . . . . .11
Playback Operation . . . . . . . . . . . . . . . . .11
Playback . . . . . . . . . . . . . . . . . . . . . . . .11
Delete File(s) . . . . . . . . . . . . . . . . . . . .11
Viewing Images on a TV . . . . . . . . . . .12
SD Card Installation . . . . . . . . . . . . . . . . .12
Shutter Release Cable . . . . . . . . . . . . . . . .12
12-volt Adapter . . . . . . . . . . . . . . . . . . . .12
Driver Installation . . . . . . . . . . . . . . . . . . .13
PhotoBase Installation . . . . . . . . . . . . . . .13
Panorama Maker Installation . . . . . . . . . .13
DirectX Installation . . . . . . . . . . . . . . . . . .13
Downloading Photos/Movies . . . . . . . . . .14
Specifications . . . . . . . . . . . . . . . . . . . . . .15
Warranty . . . . . . . . . . . . . . . . . . . . . . . . .16
INTRODUCTION
Congratulations on your purchase of the Celestron VistaPix IS70 – the spotting
scope with a built-in 3.1MP digital camera.
You can use this digital spotting scope like a normal spotting scope for visual
observations. Just look through the eyepiece and focus --- that's all there is to it.
Your IS70 comes with the following:
•
•
•
•
•
•
IS70 Digital Spotting Scope
Aluminum Carrying Case
USB Cable, Video Cable & Shutter Cable
3 Protective Caps
Software - PhotoBase 4.5 / Panorama Maker 3.0 / DirectX
User Guide
To use the digital camera you must install 2 AA alkaline batteries (not supplied).
System Requirements for Downloading Images/Movies
•
•
•
•
•
•
Windows 98SE/2000/ME/XP
Pentium MMX or higher with 128MB SDRAM
CD ROM Drive
600MB Free Hard Drive Space
USB Port
Video (VGA) Card with 2MB RAM (16 bit color)
–2–
QUICK START GUIDE
Installing batteries
Turn the spotting scope over and open the battery cover.
Insert 2 AA Alkaline batteries into the compartment in the
direction indicated by the diagrams inside, then press the
battery cover back in place until it clicks.
Battery Compartment
Powering the IS70
1. Lift the LCD screen to the vertical position.
2. Press the Power Button to turn-on the camera.
Power Button
Focusing the IS70:
1. Center your desired object in the eyepiece of the spotting
scope.
2. Use the spotting scope focus wheel to focus the object until
it appears sharp to your eye.
Focus Knob
3. Set the camera switch to “high” power.
4. While looking at the LCD screen, slowly turn the spotting
scope focus wheel until the maximum value on the focus
scale is reached and sharp focus is seen on the LCD screen.
Hi/Low Power Switch
5. Set the camera to “low” power.
6. Rotate the low power focus ring to focus your desired
object on the LCD screen. The object will appear smaller
since you are viewing it at low power.
7. Again the best focus is reached when the number displayed
on the focus scale is at the maximum and sharp focus is
seen on the LCD screen. Now the low power and high
power cameras are in focus with each other.
Focus Meter
Low Power Focus
8. To make minor changes in focus when looking through
the eyepiece, rotate the eyepiece barrel until the image is
sharp to your eye.
Taking an Image:
1. Use the power switch to select either “low” or “high” power.
2. Press the “Snap” button to take an image.
Snap Button
Taking Video:
1. Use the power switch to select either “low” or “high” power.
2. Press the “Mode” button on the Navigation Pad.
Mode Button
3. Use the arrow buttons to select the Movie Icon and
press OK.
4. Press the “Snap” button to begin recording video.
5. Press the “Snap” button again to stop recording video.
Video Mode Icon
–3–
PARTS IDENTIFICATION
2” Color LCD Flip Screen
Menu Navigation Keypad
Spotter Focusing Knob
USB/TV Out Ports
View Objects
Through Eyepiece
at 14x Magnification
Power and Exposure (Snap) Buttons
Dual Power
Imaging Switch
SD Card/12v DC/Shutter Release Ports
Spotting Scope
Digital Camera
Camera Focus Ring
Rotating Tripod Adapter
70mm Objective Lens
NEVER USE A VISTAPIX TO LOOK AT THE SUN!
Looking at or near the sun may cause instant and irreversible
damage to your eye. Eye damage is often painless, so there is no
warning to the observer that damage has occurred until it is too
late. Do not point the spotting scope at or near the sun. Children
should always have adult supervision while observing.
–4–
NAVIGATION PAD IDENTIFICATION
MENU
Menu Button: Open menu / Return to options
screen in playback mode
Up Button: Move up / Start self-timer in photo
mode / Open “delete” menu in playback mode
Down/Mode Button: Move down / Switch to the
options mode / Start & stop playing (play back
video files) / Rotate pictures in playback photos
Right Button: Move right / Next (play back the files)
/ Open delete menu in playback mode
Power on & off Button
Left Button: Move left / Previous
(play back the files)
S
Capture Image (SNAP) Button /
Shutter / Start & Stop recording
Display Button: Turn on screen / Turn off screen when power is on /
Remove icon from screen
Zoom In / Zoom Out Button: Magnify or minimize the size of the
picture on the LCD (play back photos) / Magnify or minimize the
image in photo or video mode / OK & Exit buttons
MONITOR IDENTIFICATION
When you turn the power on, the first screen that appears is the Photo Mode
screen (see #1 below). To continue on to the Main Menu press the Down/Mode
button on the keypad.
1) PHOTO MODE:
1.
2.
3.
4.
5.
6.
7.
8.
9.
10.
Date
Battery Life
Images Remaining
Camera/Photo Mode
Photo Quality
Image Resolution
Exposure Value
Auto Shoot or Self Timer
Focus Meter
Zoom In / Zoom Out
2) PHOTO PLAYBACK MODE:
1.
2.
3.
4.
5.
6.
7.
Date
Battery Life
# / Total Image Files
Function (see playback operation)
Camera/Photo Mode
Photo Quality
Image Resolution
–5–
3) MOVIE MODE:
1.
2.
3.
4.
5.
6.
7.
8.
9.
Date
Battery Life
Remaining Time Period
Movie Mode
Image Quality
Frames Per Second
Exposure Value
Focus Meter
Zoom In / Zoom Out
4) MOVIE PLAYBACK MODE:
1.
2.
3.
4.
5.
6.
7.
8.
Date
Battery Life
# / Total Files
Total Time
Function (see playback operation)
Movie
Image Quality
Frames Per Second
5) THUMBNAIL:
1. # / Total Files
2. Battery Life
Installing Batteries
Turn the spotting scope over and open the battery cover.
Insert 2 AA Alkaline batteries into the compartment in the
direction indicated by the diagrams inside, then press the
battery cover back in place until it clicks.
Taking Photos
1. Make all the necessary set-up options.
2.
Press the “power button” to turn on the power and you will now be in the
“Photo mode”.
3. Look through the spotting scope to center the object you wish to image.
4. Focus the object looking at the LCD screen.
5.
SNAP
Press the “Snap” button.
–6–
Taking Movies
1. Make all the necessary set-up options.
2.
Press the “power button” to turn on the power and you will be in the
“Photo mode”.
3.
Press the “down/mode button” to enter the screen with various mode
options and choose “Movie”.
4.
Look through the spotting scope to center the object you wish to start the
movie with.
5.
Focus the object looking at the LCD screen.
6.
SNAP
Press the “snap button” to begin the recording and press it again to stop
the recording.
Auto Shoot (Sequential Shooting) in the Photo mode
1. Make sure you have selected “Auto Shoot” from the “Photo menu” and selected
the time interval to use for the auto taking of the images.
2. Look through the spotting scope to center the object you wish to image.
3. Focus the object looking at the LCD screen.
4.
SNAP
Press the “snap button” to begin the Auto Shoot. Images will be taken
automatically at the time interval selected. To stop the Auto Shoot, press
the “menu button”.
Self-Timer in the Photo mode
1.
Press the “up button” once and the icon will be displayed.
2. Look through the spotting scope to center the object you wish to image.
3. Focus the object looking at the LCD screen.
4.
SNAP
Press the “snap button” and the image will be taken in about 10 seconds.
Focus Assist - Sharp Focus Meter
1. Set the camera switch to “low” power.
2. Use the camera focus ring to focus the object. Look at
the focus scale on the left side of the LCD screen.
3. The best focus position is reached when the number
shown on the focus scale is at the highest value possible
and sharp focus is seen on the LCD screen.
4. Set the camera switch to “high” power. Use the spotting scope focusing knob
and focus the object to its sharpest point by using the focus scale.
5. You can take an image now or switch back to “low” power where the image
will be as sharp as possible and will already be in sharp focus since the low and
high powers are now parfocal.
6. Note: You can also focus the eyepiece for your particular eye. Once the image
is sharp on the LCD screen, look through the spotting scope to see if the view
is also sharp. If it is not sharp, you can rotate the eyepiece in either direction
until it is sharp.
–7–
SETUP MENU OPERATION
Follow the arrows in checking each option and when complete push the “exit” or
“ok” button.
For VIDEO playback, select NTSC or PAL. These are the two main television
systems used for playback of movies you take. NTSC is used throughout North
America as well as in Japan, South Korea, and parts of South America. PAL is used
throughout most of Europe, Australia, China, and parts of South America. Using
the wrong format will result in blurred or very poor quality movie images.
You can adjust the brightness
of your LCD screen. The default
“NORMAL” is typically the best
to use but you can change to
“DARK” or “BRIGHT” to suit your
individual choice in different
environments.
To set the DATE, follow the arrows and change the date and time to the current
ones where you are. Please note that entered DATE information will be lost if you
remove the batteries and do not replace them within 4 days.
You may have the SOUND on
or off. The sound refers to the
chime which is played when
the power is turned on or off.
FORMAT is chosen when you
need to format an SD Card
which typically happens when
the SD Card has been previously
used in other devices.
–8–
SETUP MENU OPERATION (CONT.)
Choose RESET when you want
to restore all settings in this menu
operation back to the factory
default settings.
Set the LANGUAGE that you will be using. There are eight languages to choose
from.
If you choose “on” for the PWR
SAVE function, this will allow you
to have the LCD screen turn off
automatically in two minutes if
not used and the main power
will turn off in five minutes if
no functions are used. It is
recommended that you turn this function “on” which will save battery life.
PHOTO MENU OPERATION
Follow the arrows in checking each option and when
complete push the “exit” or “ok” button.
For SIZE you will select the
resolution (megapixels) -MP to
take images with. Your choices
are VGA (0.3MP), 1.3MP, 2.0MP,
3.0MP, 5.0MP (interpolated). The
finer the resolution, the fewer
images you can capture with a given memory device. For example, using the onboard memory of 32MB, you can take 38 images @ 3.0MP or over 600 @ 0.3MP.
The QUALITY setting will
determine how large the file size
will be. If you will be doing no
digital enlarging of the image
on your computer, then the
“economy” setting is ok, if you
will be doing small enlargements then the “normal” setting is ok, but if you want
to do some relatively large enlargements then you should use the “fine” setting.
–9–
PHOTO MENU OPERATION (CONT.)
AUTO SHOOT allows you to
take sequential images if you
select a time interval. The time
options are every 10 seconds, 30
seconds, 60 seconds, 3 minutes,
10 minutes, 30 minutes. If you
make a selection, when you are in the photo mode you push the “snap” button
and the images will continue to be taken at the selected time interval. You can
turn off the “auto shoot” by pushing the “menu” button.
EV means exposure value.
Exposure is the total amount
of light that falls on the image
sensor during the process of
taking an image. Exposure is
measured in exposure value (EV).
You can override the automatic
setting (0.0) to increase or decrease the amount of light to the image sensor.
The EV values are +0.5, +1.0, +1.5, +2.0, -0.5, -1.0, -1.5, -2.0.
EFFECT refers to the color of the
image you desire. The “normal”
setting provides you with natural
color. For specialty type images
you can select “B&W” (black &
white) or SEPIA (shades of
brown).
MOVIE MENU OPERATION
Follow the arrows in checking each option and when
complete push the “exit” or “ok” button.
For SIZE you will select the
resolution for your movie or film
clip. You can choose the VGA
(Video Graphics Array) of 0.3MP
or lower resolution CIF (Common
Intermediate Format) of 0.075MP.
You can shoot video for 30 seconds with the VGA setting or 4 minutes with the
CIF setting with the internal memory.
– 10 –
MOVIE MENU OPERATION (CONT.)
FRAME is the setting of the
frames per second. The more
frames per second, the smoother
motion appears on your movie
or film clip. The higher quality
selection is 30 FPS.
EV means exposure value.
Exposure is the total amount of
light that falls on the image sensor during the process of taking
an image. Exposure is measured
in exposure value (EV). You can
override the automatic setting (0.0) to increase or decrease the amount of light to
the image sensor. The EV values are +0.5, +1.0, +1.5, +2.0, -0.5, -1.0, -1.5, -2.0.
EFFECT refers to the color of the
images in your movie that you
desire. The “normal” setting
provides you with natural color.
For specialty type video you can
select “B&W” (black & white)
or SEPIA (shades of brown).
PLAYBACK MENU OPERATION
Playback
Use the left or right button to display the previous or next image.
Press the zoom in or zoom out button during zoom playback to change
the size of the displayed image on the LCD monitor.
Press the down button to play back or stop video files, or rotate image files.
MENU
Press the menu button to return to the options screen.
Delete File(s)
Press Up button
Choose the option (choose
“Delete All” to delete all files;
choose “Delete One” to delete
current file or “cancel” to
exit menu).
S
After pressing “OK” to delete files, you will see a second screen to make sure you
want to delete files. Then press “OK” or “Exit”.
– 11 –
Viewing Images/Movies on your TV
To view photo images and/or watch your captured movie/video:
1. Attach the supplied video cable to the “TV Out” port on the IS70 and the
“TV IN” port on the TV.
2. Select the “Line” channel on your TV.
3. Turn the power on to the IS70 and it will be in the Photo Mode.
4. Press the down/mode button which will take you to the Optional Menu Screen.
5. Use the arrows to go to the Playback mode and then push “ok”.
6. Now you will have displayed your saved images and video/movie on your
television screen as it would be displayed on the LCD screen.
Inserting and Taking Out SD Card
The camera has 32MB internal memory. To expand the
available storage, you may add an optional Secure Digital
(SD) type memory card, with any capacity up to 2GB.
The card is inserted into the slot on the back of the
spotting scope, as shown in the picture. Insert the SD card
with the label side facing down.
Note: be sure the power is turned off before inserting or
removing cards to prevent possible loss of files or
damage to the card.
A new card will not require formatting, but a card that has
been previously used in other devices should be formatted
by the VistaPix before storing photos on it. Note that this will erase all files
previously stored on the card, so be sure they have been downloaded or copied
first if you wish to keep them.
To remove the SD card push the card, then the card will pop out, and then you
can take it out.
Shutter Release Cable
All cameras produce small vibrations when the shutter button
is pressed to capture an image. To minimize or eliminate
camera vibration you may use the supplied Shutter Release
Cable. It connects to the labeled port on the back of the IS70.
After it is connected and you are ready to take an image, just
press the button on the release cable.
Using an Optional 12 Volt AC Adapter
If you are using your IS70 where electrical current is available, you may want to
procure an AC Adapter that you can use without using batteries.
The requirements for the IS70 are:
Power - 9VDC - 2Amp (Tip positive)
Plug Type: 3.15-6.3 V, plug diameter 4.00mm, interior diameter 1.70mm (EIAJ-02)
– 12 –
Driver Installation
Since VistaPix is a Mass Storage Device, you can access captured images just as if it
is a hard drive, therefore no software driver is needed.
• If you use VistaPix with an older version of Windows 98SE, it is necessary to
install the software driver.
• If you have windows ME/2000/XP operation system installed in your computer,
you should not need to install the VistaPix driver. Simply view and save images
through your My Computer icon.
Before you install the driver, please make sure that your VistaPix is not connected
to the computer.
VistaPix Driver Installer
1. Insert the CD included with your VistaPix.
2. Click the mouse on “Install Driver
(Win98/98SE Only)” to start installation.
3. Follow the “Install Shield Wizard” steps
and click on “Next” when complete.
4. Computer will automatically install
the driver. Please press “Finish” after
installation is complete.
After installing the VistaPix driver please restart your computer.
PhotoBase Installation
1. Insert the CD included with your VistaPix.
2. Click on “Install PhotoBase” to begin
installation.
3. Choose language and press confirm
button.
3. Follow the “Install Shield Wizard” steps
and click on “Next” when complete.
4. Computer will automatically install
PhotoBase. Please press “Finish” after installation is complete.
Panorama Maker
You may install the Panorama Maker software the same way you did for the
PhotoBase software. Panorama Maker is used to create spectacular panoramic
scenes.
DirectX
DirectX is a Microsoft Windows technology that enables high performance
graphics when you’re watching video replay on your computer. DirectX is typically
installed on most computers but if you are having problems viewing your videos,
then install this software.
– 13 –
Downloading Photos Using PhotoBase
1. Connect the camera to your computer
using the USB cable. Select and run
PhotoBase in the “start” menu.
2. Select “Import from Removable Media…”
in the menu of “File->Get Photo”.
3. Select photos in the pop-up window. Choose
the saving path in “Save photos to”, press the
button “OK”.
4. Images download finished.
Select the buttons as indicated. "Help" will
give you detailed information on
PhotoBase's many features.
NOTES
1. You may use other photo/imaging software that you have by selecting it to
download your photos.
2. If you are using a SD card, you can download images as above or with many
newer computers you may insert the SD card directly into your computer.
– 14 –
VistaPix IS 70 Specifications
Spotting Scope Specifications
Optical Design
Size of Objective Lens
Magnification
Focal length
Field of View -- angular
Field of View -- linear
Coatings
Near Focus
Eye Relief
Tripod Adaptable
Refractor
70mm
14x
210mm
4°
210ft @ 1000yds
Fully Coated
15ft (4.5m)
13mm
Rotatable tripod adapter
Digital Camera Specifications
Sensor
CMOS
Resolution -Interpolated Res
5.0MP (2592x1944)
Max Res
3.1MP (2048x1536)
Hi Res
2.0MP (1600x1200)
Med Res
1.3MP (1280x960)
Low Res
0.3MP (640x480)
Zoom
6x digital zoom
LCD Display
2" Color LCD Flip Screen
Memory
32MB Internal Memory, SD card slot
# of Images -- Hi-res
38 images @ 3.0 MP Fine with Internal Memory
# of Images -- Low-res
>600 images @ 0.3MP Economy with Internal Memory
Mag level of camera
7x low power, 24x high power
Field of View
5.6° @ low power – 2° @ high power
Near Focus
5ft (1.5m) @ low power – 10ft (3m) @ high power
TV Out Preview
NTSC/PAL
Ports
USB, TV Out, SD card, 12v DC, Snap (camera control)
Image Type
MPEG
Focus Assist
Sharp Focus Meter
Auto Shoot
10s, 30s, 60s, 3min, 10min, 30min
Continuous Video (approximate)
30 sec VGA @ 30fps
4.5 min CIF @ 15fps with Internal Memory
Self Timer
10 sec
Languages
English, Japanese, German, French, Italian,
Spanish, Chinese (traditional and simplified)
Weight
3.5 lbs (1.6kg)
Power Saving -- option chosen
LCD shut off after 2min. – Power off after 5 min.
Battery Requirements (user supplied)
2-AA (alkaline)
Yes
Mass Storage
Note: Specifications subject to change without notice or obligation.
– 15 –
CELESTRON TWO YEAR WARRANTY
A. Celestron warrants this spotting scope to be free from defects in materials and workmanship for two
years. Celestron will repair or replace such product or part thereof which, upon inspection by
Celestron, is found to be defective in materials or workmanship. As a condition to the obligation of
Celestron to repair or replace such product, the product must be returned to Celestron together with
proof-of-purchase satisfactory to Celestron.
B. The Proper Return Authorization Number must be obtained from Celestron in advance of return. Call
Celestron at (310) 328-9560 to receive the number to be displayed on the outside of your shipping
container.
All returns must be accompanied by a written statement setting forth the name, address, and daytime
telephone number of the owner, together with a brief description of any claimed defects. Parts or product for
which replacement is made shall become the property of Celestron.
The customer shall be responsible for all costs of transportation and insurance, both to and
from the factory of Celestron, and shall be required to prepay such costs.
Celestron shall use reasonable efforts to repair or replace any product covered by this warranty within thirty days of receipt. In the event repair or replacement shall require more than thirty days, Celestron shall
notify the customer accordingly. Celestron reserves the right to replace any product which has been discontinued from its product line with a new product of comparable value and function.
This warranty shall be void and of no force of effect in the event a covered
product has been modified in design or function, or subjected to abuse, misuse, mishandling or unauthorized repair. Further, product malfunction or deterioration due to normal
wear is not covered by this warranty.
CELESTRON DISCLAIMS ANY WARRANTIES, EXPRESS OR IMPLIED, WHETHER OF MERCHANTABILITY OF FITNESS FOR A PARTICULAR USE, EXCEPT AS EXPRESSLY SET FORTH HEREIN.
THE SOLE OBLIGATION OF CELESTRON UNDER THIS LIMITED WARRANTY SHALL BE TO REPAIR OR
REPLACE THE COVERED PRODUCT, IN ACCORDANCE WITH THE TERMS SET FORTH HEREIN. CELESTRON
EXPRESSLY DISCLAIMS ANY LOST PROFITS, GENERAL, SPECIAL, INDIRECT OR CONSEQUENTIAL DAMAGES
WHICH MAY RESULT FROM BREACH OF ANY WARRANTY, OR ARISING OUT OF THE USE OR INABILITY TO
USE ANY CELESTRON PRODUCT. ANY WARRANTIES WHICH ARE IMPLIED AND WHICH CANNOT BE DISCLAIMED SHALL BE LIMITED IN DURATION TO A TERM OF TWO YEARS FROM THE DATE OF ORIGINAL
RETAIL PURCHASE.
Some states do not allow the exclusion or limitation of incidental or consequential damages
or limitation on how long an implied warranty lasts, so the above limitations and exclusions
may not apply to you.
This warranty gives you specific legal rights, and you may also have other rights which vary
from state to state.
Celestron reserves the right to modify or discontinue, without prior notice to you, any model
or style of product.
If warranty problems arise, or if you need assistance in using your product contact:
All authorized returns should be shipped to:
Celestron
Customer Service Department
2835 Columbia Street • Torrance, CA 90503 USA
Tel. (310) 328-9560 • Fax. (310) 212-5835 • Monday-Friday 8AM-4PM PST
This warranty supersedes all other product warranties.
NOTE: This warranty is valid to U.S.A. and Canadian customers who have purchased this
product from an Authorized Celestron Dealer in the U.S.A. or Canada. Warranty
outside the U.S.A. and Canada is valid only to customers who purchased from a
Celestron Distributor or Authorized Celestron Dealer in the specific country and
please contact them for any warranty service.
– 16 –
– 17 –
2835 Columbia Street • Torrance, CA 90503
U.S.A. • 310.328.9560
www.celestron.com
Copyright 2006 Celestron • All rights reserved
Product specifications or instructions may change without prior notice or obligation.
Item #52212-INST
08-06
$10.00