1
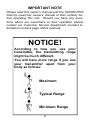
TM
SUPER-PROTM
Remote
Dummy Launcher
RDL Series Owner’s Manual
- RDL 1202 - RDL 1205 - RDL 1209 -
IMPORTANT NOTE
Please read this owner’s manual and the SUPER-PRO
Dummy Launcher owner’s manual in their entirety before operating this unit. Should you have any questions about our Launchers or their operation please
contact our Customer Service department (contact information on back page of this manual).
NOTICE!
According to how you use your
transmitter, the transmitting range
might be much different.
You will have more range if you use
your transmitter apart from your
body as follows:
Maximum
Typical Range
Minimum Range
2
SAFETY WARNING!
KEEP OUT OF REACH OF CHILDREN AT ALL TIMES!
THIS UNIT IS NOT A TOY!
SAFETY TIPS AND PROCEDURES
This product can be extremely hazardous if not used properly. While it is not a firearm, the same caution and safety
procedures should always be followed as if it were.
• Read this Owner’s Manual in it’s entirety.
• Follow all instructions and never modify the unit.
• Always use it for its intended purpose only.
• Always wear safety glasses and hearing protection
when operating the launcher.
• Use only D.T. approved crimped .22 power loads.
• Never stand in front of the launcher or let people/dogs
step in front of the firing path.
• Never point or fire the launcher at people or objects.
• Practice with the unit a few times to familiarize yourself
with the operation.
• Use in an open field with a clear flight path (dummy
may strike overhanging obstructions).
• Always set launcher on stable, level ground.
• If launcher falls over, DO NOT FIRE. Reset the unit
from behind and stabilize.
• Keep dog(s) under control when using the launcher.
• Always make sure you have a safe zone clearly established when firing the launcher.
• Always let bystanders know of the operation and location of the unit.
• Never carry/transport/store loaded launcher.
3
TABLE OF CONTENTS
•
Safety Warning! .......................................... 3
•
Table of Contents ....................................... 4
•
Introduction................................................. 5
•
Quick Tips .................................................. 6
•
Package Contents ...................................... 7
•
Features ..................................................... 7
•
Parts & Functions ....................................... 8
•
Installing/Removing Dummy Launcher ....... 14
•
Installing/Removing Remote Receiver ........ 16
•
Installing Batteries ...................................... 17
•
Turning Remote Receiver On/Off ............... 18
•
Programming Receiver/Transmitter ............ 19
•
Testing Launcher........................................ 20
•
Operating Launcher.................................... 22
•
Maintenance............................................... 24
•
Troubleshooting.......................................... 25
•
Important Safety Notes ............................... 25
•
Warranty/Legal Notice ................................ 26
•
FCC/IC/CE Compliance.............................. 27
•
Contact Information .................................... 28
4
INTRODUCTION
Thank you for purchasing the D.T. Systems SUPERPROTM Remote Dummy Launcher, the most technologically advanced Dummy Launcher on the market today.
Through extensive field research, with feedback from our
top retriever Pro-Trainers and working retriever owners all
around the country, D.T. Systems has created a remote
training aid that will make retriever training easier, more
productive, and result in a more well rounded working dog
in the field, on hunt tests, and in trials.
The new Super-Pro Remote Dummy Launcher incorporates D.T.’s long standing leader in the field (the SuperPro Dummy Launcher) and pairs it with a remote launching system, giving the user the ability to launch dummies
from a remote location from up to 1,200 yards away! One
handheld transmitter will handle up to 16 programmable
launchers to aid in setting up blind retrieves, multiple retrieves, or setting a course for hunt tests or field trials! The
aluminum frame and compact folding design make it lightweight (less than 7 lbs per complete unit) and portable for
ease of use in the field. The remote receiver unit features
a Power-Save Mode as well as a Beeper/Locator to aid in
finding a unit in the field or help as a training aid. It operates off of a .22 caliber blank firing method, utilizing the
same patented features that have made D.T.’s Super-Pro
handheld Dummy Launcher famous (please read the Super-Pro Dummy Launcher owner’s manual for a full list of
features). If you have been looking for a compact, lightweight, and portable REMOTE retriever training aid—look
no further than the D.T. Systems Super-Pro Remote
Dummy Launcher!
D.T. Systems: Dog Tested, Dog Tough1 Since 1983.
5
QUICK TIPS
Before You Go Out:
• Purchase and use only D.T. recommended GREEN and
•
•
•
YELLOW power loads. RED power loads are not recommended as they will cause faster wear and tear on
your unit and dummy.
Be familiar with the operation of your RDL and test your
unit (see p.20-21).
Make a checklist of needed items for your training session (RDL, dummy, transmitter, protective eyewear,
hearing protection, power loads, batteries, etc.).
Make sure your dog is in proper condition for these training exercises.
At the Training Site:
• Find a large open area where the operation of your RDL
will not be a disturbance to the public.
• Always wear protective hearing/eye gear during use.
• Make sure your dog is always under control when setting
•
•
and loading the RDL. Keep your dog away from the
RDL, especially when loaded.
Make sure your Remote Receiver unit is OFF and
unloaded when training is complete.
Take everything from your checklist with you when leaving the training site (including empty shells).
After Your Training Session:
• Again, make sure the Remote Receiver is OFF (or re•
move the batteries if storing for an extended period).
Follow all maintenance and storage instructions (see
p.24).
6
PACKAGE CONTENTS
All RDL units include:
• Remote Launcher Base with Remote Receiver Unit
• Owner’s Manual for Super-Pro RDL
RDL 1205 also includes:
• Super-Pro Dummy Launcher (pre-attached to Base)
• White Super-Pro Launcher Dummy
• Owner’s Manual for Super-Pro Dummy Launcher
RDL 1209 also includes:
• Remote Handheld Transmitter
FEATURES
•
•
•
•
•
•
•
•
•
•
•
1200 yard range
Launch angle easily adjustable from 0° to 75°
Compact, lightweight, portable design
1 Transmitter controls up to 16 Remote Launchers
Weather resistant Transmitter and Receiver unit
Transmitter & Receiver use 9V batteries (not included)
Power-Save Mode on Remote Receiver (see p.18)
Safe-T-Ratchet Cocking Mechanism to prevent misfires
while cocking
Used with fully detachable Super-Pro Dummy Launcher
(not included with RDL 1202)
Beeper/Locator on Launcher makes it easy to find
(audible from up to 450 yards)
Transmitter and Receiver are cross compatible with BL
series bird launchers
7
PARTS & FUNCTIONS
Transmitter
Antenna
Launcher
Selector
Knob
LED
Indicator
Light
Bird
Button
“T” Switch*
Beeper
Button
Battery Cover/
Compartment
(back side)
*Most Transmitters
have a “T” Switch
that is permanently
in the ‘up’ position.
Lanyard
Connection
8
PARTS & FUNCTIONS
‘BIRD’ Button - Activates Motor Arm to raise Ratcheting
Safety Arm and release Ratcheting Cocking Lever to fire
Dummy Launcher.
‘BEEPER’ Button - Activates Beeper/Locator to help audibly locate the launcher in the field from up to 450 yards
away.
Launcher Selector Knob - Chooses which launcher is being controlled. The RDL Transmitter can control up to 16
different launchers.
Transmitter LED Indicator Light - The red LED light will
turn on any time a Transmitter button is pushed to indicate
that the Transmitter is being operated. If the red LED light
blinks rapidly after pushing any Transmitter button, the 9volt battery will need to be replaced soon.
Transmitter Antenna - Be sure to check that the Antenna
is securely fastened to the Transmitter before each use.
Hand-tighten only. Be careful when screwing the Antenna
into the Transmitter. Over-tightening the Antenna can
cause damage to the Antenna and/or the Antenna mount.
‘T’ Switch - The “T” Switch should always be in the up position when operating the Launcher.
Battery Cover - Slides open to access Battery Compartment.
Battery Compartment - Houses 9V Alkaline battery.
Lanyard Connection - Lanyard can be connected to the
top of the Transmitter (Lanyard included).
9
PARTS & FUNCTIONS
Launcher
Remote
Receiver
Unit
Ratcheting
Cocking
Lever
Locking
Lever
Ratcheting
Safety Arm
Super-Pro
Dummy
Launcher
Launch Angle
Elevator Arm
Folding
Base Legs
Launcher Base
Dummy Launcher
Mounting Bracket
Launch Angle
Knob
Dummy Launcher
Mounting Screws
Locking
Lever
Shell
Chamber
Shell
Extractor
(RDL 1202 will NOT include Super-Pro Dummy Launcher)
10
PARTS & FUNCTIONS
Launcher Base - Solid aluminum frame construction makes
it lightweight yet durable.
Super-Pro Dummy Launcher (not included with RDL
1202) - Please refer to the Super-Pro Dummy Launcher
owner’s manual for detailed information on parts and proper
use/maintenance of this unit.
Locking Lever - Lever allows opening and lockdown of the
dummy launcher for access to the power load.
Shell Chamber - Chamber to insert blank power load.
Shell Extractor - Easily extracts a used power load from
the chamber without the use of any other tools.
Ratcheting Cocking Lever - Attached to the Firing Pin Pull
Knob on the Super-Pro Dummy Launcher. Ratchets and
locks in place when pulled back.
Ratcheting Safety Arm - Ratchets and holds Ratcheting
Cocking Lever in place. Releases Cocking Lever to fire
launcher when Remote Receiver is triggered.
Launch Angle Elevator Arm - Elevates and lowers dummy
launcher angle from 0° to 75°.
Launch Angle Knob - Locks and releases Elevator Arm to
change launch angle.
Folding Base Legs - Folds in for compact transport and
folds out for stability during launch.
Dummy Launcher Mounting Bracket and Screws - Securely attaches Dummy Launcher to Launcher Base.
Remote Receiver Unit - Remote unit that receives signals
from the transmitter for launch and beep (see p.12-13 for
more details).
11
PARTS & FUNCTIONS
Remote Receiver
Beeper/Locator
Horn
LED Indicator
Light
Power
Button
Receiver
Antenna
Motor
Arm
Mounting
Bracket
Mounting
Wing Nuts
Battery
Compartment
9V Battery
Connector
Battery
Cover
12
PARTS & FUNCTIONS
Power Button - Turns Remote Receiver ON/OFF, resets
unit after each launch, and is used in programming procedure.
Receiver LED Indicator Light - Flashes once a second to
indicate the Remote Receiver is ON. Lights when signal for
launch or beep is received from Transmitter. Flashes rapidly when battery is low and needs replacing. Flashes once
every 3 seconds when in Power Save Mode (see p.18 for
more details).
Beeper/Locator Horn - Emits loud beeps to help locate
Launcher in the field. Remote-activated and audible from
up to 450 yards.
Motor Arm - Swivels to release Ratcheting Safety Arm and
fire dummy launcher.
Receiver Antenna - Receives signal from Transmitter from
up to 1200 yards away.
Remote Receiver Mounting Bracket - Bracket that holds
and secures the Remote Receiver to the Launcher Base.
Remote Receiver Mounting Wing Nuts - Secures Remote
Receiver in mounted position. Remove Mounting Wing
Nuts to remove the Remote Receiver.
Battery Cover - Slides open to access Battery Compartment. Remote Receiver must be removed from RDL to access (see p.16-17 for more details).
Battery Compartment - Houses 9V Alkaline battery.
9V Battery Connector - Found in Battery Compartment
and connects 9V battery as power supply.
13
INSTALLING/REMOVING DUMMY LAUNCHER
WARNING - Do not remove/install Dummy Launcher
while loaded with a Power Load.
These directions are for adding a Super-Pro Dummy
Launcher unit to a RDL 1202 Launcher Base and for removing the Dummy Launcher for periodic maintenance.
1. If you are installing your existing Super-Pro Dummy
Launcher, remove the foam padding from the handle.
2. Remove the 4 screws found under the foam padding.
3. Attach the Dummy Launcher Mounting Bracket using
the 4 exposed screw holes (fig.1).
4. Unscrew the hex screws in the Ratcheting Cocking
Lever so that it no longer protrudes out the other side.
5. Slightly pull the Dummy Launcher Pull Knob and slide
the Ratcheting Cocking Lever over it (fig.2).
6. Screw in the hex screws to lock the Ratcheting Cocking Lever in place (fig.3).
7. Make sure the Self-Contained Firing Pin is securely
tightened into the Dummy Launcher.
8. Detach the spring from the Ratcheting Safety Arm and
swing the arm to the other side (fig.4).
9. Pull the Pull Knob completely out and fit the Firing Pin
rod though the groove in the Launcher Base with the
Ratcheting Cocking Lever and the Dummy Launcher
Locking Lever facing up (fig.5).
10. Insert Dummy Launcher into Launcher base with the
Locking Lever facing up (fig.6).
11. Slide Ratcheting Cocking Lever into its track (fig.7).
12. Completely insert Dummy Launcher and secure with
four Dummy Launcher Mounting Screws (fig.8).
13. Swing the Ratcheting Safety Arm back in place and
reattach the spring (fig.9).
14
INSTALLING/REMOVING DUMMY LAUNCHER
fig.1
fig.2
fig.3
fig.4
fig.5
fig.6
fig.7
fig.8
fig.9
Removing for Maintenance
1. Detach the spring from the Ratcheting Safety Arm and
swing the arm to the other side (fig.4).
2. Unscrew and remove all four Dummy Launcher Mounting Screws (fig.6).
3. Hold the Ratcheting Cocking Lever and pull out the
Dummy Launcher to lift it out of Launcher base (fig.5).
4. Follow maintenance directions in your Super-Pro
Dummy Launcher instruction manual.
15
INSTALLING/REMOVING REMOTE RECEIVER
WARNING - Do not remove/install Remote Receiver
while Launcher is loaded with a Power Load.
These directions are for removing the Remote Receiver
unit to replace battery or for replacing a Remote Receiver
unit on a Remote Launcher.
Installing Remote Receiver
1. Slide the Remote Receiver into Mounting Bracket on
the Launcher Base.
2. Line up screw holes on the Remote Receiver with the
Mounting Bracket.
3. Screw in Mounting Wing Nuts until Remote Receiver is
properly secured to the Mounting Bracket.
Removing Remote Receiver
1. Loosen Remote Receiver Mounting Wing Nuts.
2. Lift the Remote Receiver out from the Mounting Bracket
on the Launcher Base.
16
INSTALLING BATTERIES
WARNING - Do not remove/install battery while
Launcher is loaded with a Power Load.
You must install a 9V battery in Transmitter and Remote
Receiver before using the Remote Launcher. Use only
Alkaline batteries from major brand name manufacturers.
Generic brands may not work with these units.
Installing Transmitter Battery
1. Push in the “PUSH” at the top of the
Battery Cover and slide down to
open.
2. Insert a 9V Alkaline battery with the
negative terminal on the left and the
positive terminal on the right as indicated on the diagram in the battery
compartment.
3. Slide Battery Cover back into place
until it is securely closed.
Installing Remote Receiver Battery
NOTE - Instructions on removing and installing Remote
Receiver unit can be found on p. 16.
1.
2.
3.
4.
5.
Remove Remote Receiver from Launcher Base.
Slide the Battery Cover off the Remote Receiver.
Connect 9V Alkaline battery to the Battery Connector.
Place 9V battery into Battery Compartment.
Slide Battery Cover back into place until it is securely
closed.
6. Replace Remote Receiver in Launcher Base.
17
TURNING REMOTE RECEIVER ON/OFF
WARNING - Do not turn unit ON/OFF while Launcher
is loaded with a Power Load.
NOTE - The Transmitter is in a permanent “sleep” state
and is only active when a button is pressed.
Turning Remote Receiver ON
1. Push and hold the Power Button on the Remote Receiver. The Red LED will light solidly
for about 2 seconds while holding button.
2. Release the Power Button when the Red LED light
goes off. The unit is now ON and the Red LED light will
now flash approximately once every second.
Turning Remote Receiver OFF
1. Push and hold the Power Button on the Remote Receiver. The Red LED will light solidly for about 2 seconds followed by one short flash while holding button.
2. Release the Power Button after the one short flash.
The unit is now OFF.
Power-Save Mode on Remote Receiver
After 1 hour of inactivity, the Remote Receiver will go into
Power-Save Mode (the LED light will flash approximately
once every 3 seconds).
This mode reduces battery use and will make responses to
the Transmitter less immediate. You may have to press
and hold the ‘BIRD’/‘BEEPER’ buttons for a few seconds to
get the desired launch/beep.
Once the remote Receiver responds or is reset/restarted,
the Power-Save Mode will be canceled.
18
PROGRAMMING RECEIVER/TRANSMITTER
WARNING - Do not Program unit while Launcher is
loaded with a Power Load.
These directions are for initial Programming of a new
Launcher, Programming after battery replacement, and
Programming additional Launchers to the Transmitter.
Programming
1. Verify that the Remote Receiver is off.
2. Choose a number (1-16) on the Launcher Selector Knob
of the Transmitter (optional: label the Launcher with the
number for easy recognition).
3. Push and hold the red Power Button on the Remote Receiver on the RDL Launcher unit. Do not release the
Power Button.
4. After approximately 6 seconds of holding the Power Button down, the Red LED light will flash 4 times.
5. While continuing to hold the red Power Button down,
push either the “BIRD/NICK” button or the
“BEEPER/CONT” button on the Transmitter for approximately one second.
6. To indicate the unit has been programmed, the LED light
on the Remote Receiver will flash 5 times and the
Beeper/Locator horn will beep 5 times.
7. After programming confirmation, release the Power Button on the Remote Receiver.
NOTE - Do not release the red Power Button until instructed
to do so or the entire process will have to be repeated. Repeat the process from the beginning if the light does not
blink 5 times and beep 5 times at the end of the programming.
19
TESTING LAUNCHER
These are instructions on testing the unit indoors without
actually firing with a power load. This will still let you test
the functions of the unit and will allow you to get familiar
with the process in a safe, controlled environment.
CAUTION: Do not launch indoors with Launcher loaded.
Always check that the Launcher is not loaded before testing. Keep out of reach of children at all times.
Testing the Launcher
1. Make sure the Launcher is not cocked
2. Place on firm level ground with Folding Legs out.
3. Loosen Launch Angle Knob, slide to adjust launch angle to desired position, and tighten Knob.
4. Lift the Locking Lever and open the Dummy Launcher.
5. Make sure there is no power load in the chamber.
(From this point on, practice STAYING CLEAR OF THE
DUMMY FLIGHT PATH.)
6. Close the Dummy Launcher and lock into place with the
Locking Lever.
7. Slide a DT Launcher Dummy completely onto the
Launcher barrel.
8. Turn the Remote Receiver ON (see p. 18). Make sure
the Motor Arm is not touching the Ratcheting Safety
Arm.
9. Pull the Ratcheting Cocking Lever all the way back.
The Ratcheting Safety Arm should keep it in place.
10. Step away from the launcher.
11. Be sure the correct Launcher is selected on the Selector Knob and press the “BIRD” button on your transmitter. The Remote Receiver should lift the Ratcheting
Safety Arm to release the Ratcheting Cocking Lever.
20
TESTING LAUNCHER
Testing the Remote Receiver Only
1. Make sure the Launcher is not cocked
2. Turn Remote Receiver ON, or quickly push the Power
Button to reset the Remote Receiver if already ON.
3. Select the correct Launcher on the Selector Knob and
push the ‘BIRD’ button on the Transmitter. The Motor
Arm should rotate to lift the Ratcheting Safety Arm.
Testing the Beeper/Locator
1. Turn Remote Receiver ON.
2. Select the correct Launcher on the Selector Knob and
push the ‘BEEPER’ button on Transmitter.
3. The Beeper should beep any time the button is pushed.
NOTE - The Beeper Horn is very loud and should be covered if tested in close proximity.
Testing the Power-Save Mode
1. Turn Remote Receiver ON and wait more than 1 hour.
2. Select the correct Launcher is on the Selector Knob and
push and hold either button on Transmitter (Remote Receiver may not respond for several seconds).
3. Once the Remote Receiver responds, it is no longer in
the Power-Save Mode.
NOTE - The Power-Save Mode can also be canceled by
resetting or restarting the Remote Receiver.
Testing the Launcher With Power Loads
1. Find an open, safe unpopulated area for testing.
2. Wear all proper hearing and eye safety equipment.
3. Follow the “Launching the RDL” instructions on p. 22.
NOTE - You do not have to actually launch a dummy to test
fire the unit.
21
OPERATING LAUNCHER
CAUTION: The RDL series Launcher is designed to
launch a dummy at a very high velocity and thus fires with
great force. Make sure all persons and dogs are completely clear of the flight path of the dummy at all times
when loaded. Always wear hearing and eye protection
when operating this unit. Do not launch indoors. Keep
out of reach of children at all times.
Launching the RDL
1. Make sure the Launcher is not cocked.
2. Place on firm level ground with Folding Legs out.
3. Loosen Launch Angle Knob, slide to adjust launch angle to desired position, and tighten Knob.
4. Lift the Locking Lever and open the Dummy Launcher.
5. Place a D.T. approved .22 caliber power load into the
chamber. From this point on, STAY CLEAR OF THE
DUMMY FLIGHT PATH.
6. Close the Dummy Launcher and lock into place with the
Locking Lever.
7. Slide a DT Launcher Dummy completely onto the
Launcher barrel.
8. Turn the Remote Receiver ON. Make sure the Motor
Arm is not touching the Ratcheting Safety Arm.
9. Pull the Ratcheting Cocking Lever all the way back.
The Ratcheting Safety Arm should keep it in place.
10. Step away from the launcher.
11. Be sure the correct Launcher is selected on the Selector Knob and press the “BIRD” button on your transmitter. The Remote Receiver should lift the Ratcheting
Safety Arm to release the Ratcheting Cocking Lever.
CAUTION - If the Power Load misfires, do not reuse
Power Load. Always properly dispose of misfires.
22
OPERATING LAUNCHER
Ejecting Used/Misfired Power Load
1. After launch (or misfire), lift Locking Lever and open
Dummy Launcher.
2. Continue opening past normal stopping point.
3. Release and allow Launcher to go back normal stopping
point, and remove Power Load.
Resetting Remote Launcher After Launch
Follow the “Launching the RDL” procedure on p. 22 with
these modifications:
1. For Step 4, follow “Ejecting Power Load” above.
2. For Step 8, quickly push the Power Button on the Remote Receiver to reset for re-release. Remote Receiver
will not trigger RDL after a launch unless reset.
Locating Remote Launcher
1. Select appropriate Launcher on Selector Knob.
2. Push the ‘BEEPER’ button on the Transmitter to activate
the Beeper/Locator (Remote Receiver must be ON).
Unloading Unfired Power Load
1. From behind the launcher, securely hold down Ratcheting Safety Bar to prevent accidental fire.
2. Follow “Ejecting Power Load” instructions above.
3. Carefully release Ratcheting Safety Bar and step away.
4. Press “BIRD” button on transmitter to uncock launcher.
WARNING - Use extreme caution when unloading unfired power loads to prevent accidental firing of RDL.
23
MAINTENANCE
•
•
•
•
Regular Maintenance*
Wipe and clean RDL and Transmitter with a clean,
soft cloth and warm, soapy water after each use.
Take care not to use too much water when cleaning the Remote Receiver and Transmitter.
Dry off any moisture to prevent corrosion/rusting as
this may cause malfunction of the unit.
Regularly clean and oil the Ratcheting Cocking
Lever track and the Dummy Launcher firing shaft.
Follow Dummy Launcher maintenance directions in
the Dummy Launcher instruction manual.
During Use
• Avoid placing the Launcher in extremely wet or
marshy conditions.
• Never immerse Remote Receiver and Transmitter
in water or keep them out in rain.
• If shooting dummy into water, dry the inside of the
dummy tube between launches.
•
•
•
•
Storing Your Launcher*
Keep Folding Legs in ‘closed’ position to keep the
springs from stretching.
Remove dummy and batteries from unit.
Do not stack anything on top RDL.
Do not store in extreme temperatures or humidity.
*WARNING - Make sure Launcher is not loaded with a
Power Load during maintenance and storage.
24
TROUBLESHOOTING
If your Launcher is not operating properly:
• Make sure the correct channel is selected on the
Launcher Selector Knob.
• Reset Remote Receiver after each launch.
• Replace batteries. Use only Alkaline batteries from
major brand name manufacturers. Generic brands
may not work with these units.
• Reprogram Remote Launcher (see p.19).
Please contact Customer Service (see p.28) for further troubleshooting or repair options.
IMPORTANT SAFETY NOTES
• Always wear eye and hearing protection.
• Your dog should be examined by a veterinarian to
•
•
•
•
•
•
assure that there are no physical reasons to hinder
training with the RDL series Launcher.
It is extremely important that you completely understand all functions of the launcher and how to properly train with it before training.
Do not use the Remote Dummy Launcher for anything other than its intended purpose.
Make sure people/dog(s) are clear of the launch
area when launcher is loaded.
Never launch the RDL towards people/dog(s).
Keep all body parts away from launch area during
launch.
Keep away from children unless supervised by an
adult.
25
WARRANTY
All RDL series units have a one year parts and labor
warranty effective from the original date of purchase. A
copy of the original sales receipt is required to validate the
date of purchase for any warranty repairs.
This warranty covers all repair costs for any manufacturer’s
defects or defects that occur during normal use and
maintenance. It also covers regular return shipping back to
the customer.
This warranty DOES NOT cover any damage caused by
misuse/abuse/negligence, shipping costs to our facilities,
expedited shipping costs, lost parts, or any repairs after the
first year of ownership.
RDL series units have been made with State of the Art
equipment. Any repairs or fine adjustment should be
performed only by D.T. Systems technicians.
NOTE
Warranty covers manufacturer’s defects only. It does not
cover damage from misuse, abuse or negligence.
LEGAL NOTICE
Proper Use and Maintenance of the Super-Pro™ Remote
Dummy Launcher is the responsibility of the Buyer. D.T.
Systems, Inc. and its representatives are in NO WAY liable for injuries/damages resulting from improper use.
Buyer/User of said devices agrees to hold D.T. Systems
and its representatives harmless from and indemnify them
from any and all claims, damages, demands, penalties,
suits or causes of actions whatsoever brought by any person or entity as a result of the use or ownership of the Super-Pro™ Remote Dummy Launcher.
26
FCC/IC/CE COMPLIANCE
Your RDL Series TM Launcher has been manufactured under complete
compliance with Part 15 of the Federal Communication Commission (FCC)
rules, Industry Canada (IC) Standard RSS-310, and Article 3 of the
Directive 1999/5/EC. The complex internal structure of each product has
been designed to operate within specific regulations of FCC specifications.
Any changes or modifications not expressly approved by the manufacturer
is a violation of these specifications and could void the user's authority to
operate the equipment.
This device complies with Part 15 of the FCC rules subject to the following
two conditions:
1. This device may not cause harmful interference
2. This device must accept all interference received, including interference
that may cause undesired operation.
Note: This equipment has been tested and found to comply with the limits for a Class
B digital device, pursuant to part 15 of the FCC Rules. These limits are designed to
provide reasonable protection against harmful interference in a residential installation.
This equipment generates, uses and can radiate radio frequency energy and, if not
installed and used in accordance with the instructions, may cause harmful
interference to radio communications. However, there is no guarantee that
interference will not occur in a particular installation. If this equipment does cause
harmful interference to radio or television reception, which can be determined by
turning the equipment off and on, the user is encouraged to try to correct the
interference by one or more of the following measures:
- Reorient or relocate the receiving antenna.
- Increase the separation between the equipment and receiver.
- Connect the equipment into an outlet on a circuit different from that to which the
receiver is connected.
- Consult the dealer or an experienced radio/TV technician for help.
This Category II radiocommunication device complies with Industry
Canada Standard RSS-310. 26.96-27.28.10mv.
Ce dispositif de radiocommunication de catégorie II respecte la norme
CNR-310 d'Industrie Canada.
Declaration of Conformity (Directive 1999/5/EC)
D.T. Systems, Inc. declares that the RDL Series TM products are in
compliance with the essential requirements under Article 3 of the R&TTE
Directive 1999/5/EC by application of the following standards:
Article 3.1(a) - EN 60950-1
Article 3.1(b) - EN 301 489-1 V1.8.1, EN 301 489-3 V1.4.1
Article 3.2 - EN 300 220-1 V2.1.1, EN 300 220-2 V2.1.2
27
D.T. Systems, Inc.
2872 Walnut Hill Lane
Dallas, Texas 75229
(214) 350-9446
(888) 588-8364
Fax: (214) 350-7847
www.dtsystems.com
[email protected]
RDL Series
2013.04
Printed in Korea
28