1
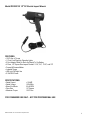
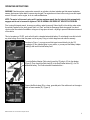
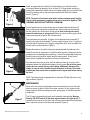
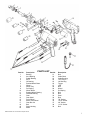
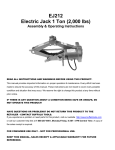
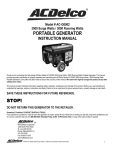
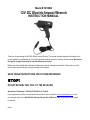
Model # IW12BX
12V DC Electric Impact Wrench
INSTRUCTION MANUAL
Thank you for purchasing this IW12BX Electric Impact Wrench. This manual provides important information on its
proper operation and maintenance. Every effort has been made to ensure the accuracy of this manual. We reserve
the right to change this product at any time without prior notice.
Before use, read carefully and understand all warnings, cautions, instructions and labels. Failure to do so could
result in serious personal injury, property damage or even death.
SAVE THESE INSTRUCTIONS FOR FUTURE REFERENCE.
STOP!
DO NOT RETURN THIS TOOL TO THE RETAILER.
Questions? Problems? CONTACT BUFFALO TOOLS.
If you experience a problem or need parts for this product, visit our website http://www.buffalotools.com or call
our customer help line at 1-888-287-6981, Monday-Friday, 8 AM - 4 PM Central Time. A copy of the sales receipt
is required.
080310
Model IW12BX 12V 1/2" DC Electric Impact Wrench
1
Model IW12BX 12V 1/2" DC Electric Impact Wrench
FEATURES:
• 150 Ft. lbs. of Torque
• 11 Foot Cord Plugs Into Cigarette Lighter
• 2 Foot Adapter Cable For Hook-Up Directly To Car Battery
• 4 Piece, 1/2" Square Drive Impact Sockets: 11/16", 3/4", 13/16", and 7/8"
• Forward & Reverse Modes
• Lockable Trigger
• LED Light For Night Use
• 2 12A-250V Fuses
SPECIFICATIONS:
• Rated Current
• Rated Voltage
• Blows Per Minute
• Drive Size
• Maximum Torque
<15 AMP
120V/60Hz
30-40 BPM
1/2" Square
150 Ft. lbs.
FOR CONSUMER USE ONLY – NOT FOR PROFESSIONAL USE
Model IW12BX 12V 1/2" DC Electric Impact Wrench
2
GENERAL SAFETY RULES FOR ALL ELECTRIC POWER TOOLS
WARNING: When using this tool, basic safety precautions should always be followed to reduce the risk of
personal injury and damage to equipment and vehicles. The warnings, cautions and instructions in this manual
cannot cover all situations and conditions. The user must exercise common sense.
READ ALL INSTRUCTIONS BEFORE USING THIS TOOL!
1) Keep work area clean. Cluttered areas invite injuries. If emergency dictates use of this tool on the road, keep
work area as clear of clutter as possible. Park vehicle on firm, level ground away from traffic.
2) Observe work area conditions. If forced to use this tool in wet or damp conditions, extreme care must be
observed as serious personal injury may result if tool is exposed to moisture.
3) Keep children away. Children must be kept at a safe distance when using this and other tools. Failure to do so
may result in serious injury or death.
4) Store idle equipment. When not in use, store the impact wrench in its carrying case. Store case in a dry location
to reduce chance of rust. Lock up tools and keep out of reach of children.
5) Use the right tool for the job. Use this tool only as intended. Do not modify this tool and do not use for a
purpose for which it was not intended.
6) Dress properly. Secure loose clothing, jewelry or long hair to prevent them from getting caught in moving parts
of the tool or vehicle, especially if using the battery adapter cable.
7) Use hearing and eye protection. Always use ANSI approved hearing and eye protection.
8) Maintain tools with care. Clean, properly functioning tools ensure better and safer performance. Inspect the
cord periodically and if damaged, have it repaired by an authorized technician. Failure to do so may result in
serious personal injury and possible damage to equipment or vehicle.
9) Disconnect power. Unplug tool when not in use.
10) Avoid unintentional starting. Be sure the trigger is locked when not in use and before plugging in. Do not carry
any tool with your finger on the trigger, whether it is plugged in or not.
11) Stay alert. Use common sense when using this and other tools. Do not use any tool when you are tired or under
the influence of drugs or alcohol. Failure to do so may result in damage to equipment, vehicle, personal injury or
death.
12) Replacement parts and accessories. When servicing, use only identical replacement parts. Use of any other
parts will void the warranty. Only use accessories intended for use with this tool. Contact Buffalo Tools at
888-287-6981 if you need a replacement part.
13) People with pacemakers should consult their physician(s) before using this product. Electromagnetic fields
in close proximity to a heart pacemaker could cause interference to or failure of the pacemaker.
14) Use this tool with both hands. This tool requires the use of both hands when operating. This helps maintain tool
stability and keeps hands away from the working area of the tool.
15) This unit should only be powered by 12 Volt DC systems. Do not alter the power cord for use in AC sockets.
Doing so is both dangerous and voids the warranty.
Model IW12BX 12V 1/2" DC Electric Impact Wrench
3
PACKAGE CONTENTS
• 12V DC Electric Impact Wrench
• 4 Impact Sockets, Sizes 3/4", 11/16", 7/8", and 13/16"
• 2-Foot Adapter Cable For Automobile Battery Hook-Up
• 2 Spare 12A-250V Fuses
• High Impact Plastic Carrying Case (Not Shown)
2
COMPONENTS
3
4
5
1
11
10
6
9
7
8
1.
2.
3.
4.
5.
6.
7.
Anvil
LED Light
Trigger Locking Switch
Forward and Reverse Trigger
Pistol Grip
Sockets: 11/16", 3/4", 13/16", 7/8"
2 Spare 12A-250V Fuses
Model IW12BX 12V 1/2" DC Electric Impact Wrench
8.
9.
10.
11.
12V Plug-In
Negative Terminal Clamp (Black Handle)
Positive Terminal Clamp (Red Handle)
Automobile Battery Adapter
4
OPERATING INSTRUCTIONS
WARNING! Gasoline engines create carbon monoxide, an odorless, colorless, tasteless gas that causes headaches,
nausea, dizziness and even death if exposure is prolonged. The engine does not have to be running to use this impact
wrench. If forced to run the engine, do so in a well-ventilated area.
NOTE: The motor in this wrench spins until it reaches maximum speed, then the internal clutch automatically
engages and the nut is loosened or tightened. THIS IS NORMAL AND DOES NOT INDICATE A PROBLEM.
Prior to using this impact wrench, be sure your vehicle or wheel is secured. If wheel is still on the vehicle, make certain
the vehicle is parked on firm, level ground, that it is in “Park” and that the Emergency Brake is engaged. Use wheel
chocks on the other wheels if available or a large rock, large piece of wood – anything to prevent inadvertent movement
of the vehicle.
This tool operates on 12V DC, such as that found in a standard automobile battery. Do not attempt to use this tool with
any other voltage. Do not alter the power cord in any way. Doing so is both dangerous and voids the warranty.
As shown in Figure 1, you may connect this impact wrench directly into the 12V
receptacle (A), the cigarette lighter in your vehicle, or you may use the Battery Adapter
Cable (B) and use the vehicle battery itself.
A
Figure 1
To use the Battery Adapter Cable, simply insert the 12V plug-in (C) into the adapter.
(Figure 2) Then connect the Red clamp (D) to the Red Positive terminal (F) of a 12V
automobile battery. The Positive terminal is marked with a +.
E
Figure 2
C
D
B
F
Connect the Black clamp (E) to a clean, grounded part of the vehicle such as the engine
block or frame member (G). (Figure 3)
G
Figure 3
Model IW12BX 12V 1/2" DC Electric Impact Wrench
5
Select the appropriate size socket (H) to fit the wheel lug nut. Attach the socket
to the impact wrench by pressing it on to the Anvil (I). For best results, use only the
sockets that came with this wrench. Be sure the spring-loaded pin (J) on the Anvil lines
up with the matching hole on the socket securing the socket firmly to the impact
wrench. (Figure 4)
NOTE: The motor in this wrench spins until it reaches maximum speed, then the
internal clutch automatically engages and the nut is loosened or tightened. THIS
IS NORMAL AND DOES NOT INDICATE A PROBLEM.
H I J
Figure 4
K
L
Use the impact wrench to loosen the lug nuts on the wheel while the vehicle is still
firmly on the ground, otherwise the wheel will spin. Once the lug nuts are loosened,
use the vehicle jack to lift the vehicle off the ground. Refer to the vehicle owner’s
manual for instructions on using the jack. When the vehicle is off the ground, finish
removing the lug nuts by hand or with a socket wrench.
This impact wrench is reversible. To tighten, set the directional lever toward the “R”
symbol on the right side of the handle. To loosen, switch the lever to the “L” symbol (L)
on the left side of the handle. If the Trigger Locking Switch (K) is set in the middle, the
unit will not turn in either direction. (Figure 5)
Figure 5
Replace the wheel on the vehicle, aligning the wheel studs with the boltholes in the
wheel. Be sure the air valve faces out. Install the wheel lug nuts, following the vehicle
manufacturer’s recommendations on tightening. To avoid cross-threading the lug nuts,
thread the nuts on by hand first, before using the impact wrench. Do not use the
impact wrench to tighten the lug nuts as you may over-tighten them.
Once the wheel is securely in place, check to make sure there are no tools or other
equipment beneath the vehicle before lowering it to the ground. Do not let the power
cords come into contact with any vehicle wiring. Additionally, disconnect the
clamps as soon as work is finished and put the wrench in its case. Then check
to make sure there are not tools or equipment on the engine deck before closing
the hood.
M
Figure 6
NOTE: This impact wrench is equipped with an automatic LED light (M) for use in low
light conditions. (Figure 6)
MAINTENANCE
N
When not in use, store your impact wrench and its accessories in its case. Store the
case in a secure, dry place. Protect it from water, moisture, oil, fuel, grease or other
foreign materials, which may damage the case, moving parts, or its internal electrical
components.
Figure 7
The 12V plug-in assembly has a fuse that will eventually need replacing. Warning:
Use only 12A-250V fuses (N) of the same style as shown in the figure at left. To
replace the fuse, remove the cap at the end of the plug-in and replace the fuse making
sure to replace the pieces in the same order as shown. (Figure 7)
Model IW12BX 12V 1/2" DC Electric Impact Wrench
6
PARTS LIST
Part No.
1
2
3
4
5
6
7
8
9
10
11
12
13
14
15
16
17
18
19
20
Description
Bearing
Anvil Bearing
Radial Bearing
Anvil
Oil Bearing
Ratchet Wheel Base
Wheel
Wheel Tray
Pull Spring
Wheel Brace
Ratchet Wheel Bearing
Pedestal Bearing
Gear
Gear Shaft
Drive Wheel
Motor Gear Wheel
Gear Box Lid
Bolt
Right Housing
Motor
Part No.
21
22
23
24
25
26
27
28
29
30
31
32
33
34
35
36
37
38
39
Description
Bolt
Cable Block
Cable Bushing
12-V Plug-In
Left Housing
Trigger
LED
Bolt
Wheel
Pull Spring
Bolt
Bolt
Pawl
Rod
7/8” Socket
13/16” Socket
3/4” Socket
11/16” Socket
Bolt
Model IW12BX 12V 1/2" DC Electric Impact Wrench
7
NOTES:
Model IW12BX 12V 1/2" DC Electric Impact Wrench
8