1
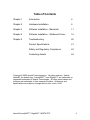
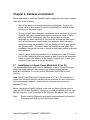
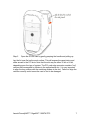
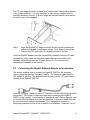
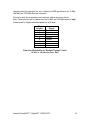
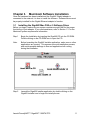
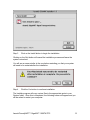
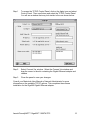
FriendlyNET™ GigaNIX™
1000TA/TPC
10/100/1000T Ethernet Adapter
User’s Manual
Table of Contents
Chapter 1
Introduction
4
Chapter 2
Hardware Installation
6
Chapter 3
Software Installation - Macintosh
11
Chapter 4
Software Installation - Windows & Linux
16
Chapter 5
Troubleshooting
40
Product Specifications
41
Safety and Regulatory Compliance
43
Contacting Asanté
44
Copyright © 2000 Asanté Technologies Inc. All rights reserved. Asanté,
AsantéQ, the Asanté logo, FriendlyNET™ and GigaNIX™ are trademarks or
registered trademarks of Asanté Technologies. All other brand names and
products are trademarks of their respective holders. All features and
specifications are subject to change without prior notice. 12/00
Asanté FriendlyNET™ GigaNIX™ 1000TA/TPC
2
Asanté FriendlyNET™ GigaNIX™ 1000TA/TPC
3
Chapter 1. Introduction
Thank you for purchasing the Asanté FriendlyNET™ GigaNIX™ Gigabit Ethernet
adapter. The GigaNIX™ family of adapters is the most affordable, powerful
Ethernet solution for connecting desktops, high-performance servers and
workstations to 10BaseT, 100BaseTx and 1000BaseT networks.
The GigaNIX family supports Mac OS, Windows and Linux. GigaNIX is fully
compliant with IEEE 802.3z, the Unshielded Twisted Pair (UTP). The GigaNIX
solution is fully compliant with IEEE 802.3ab and IEEE 802.3u. Drivers for
Windows NT, Windows 2000 and Red Hat Linux are included with all GigaNIX
adapters. Drivers for PC and Linux as well as Mac OS 8 and OS 9 are included
with the GigaNIX 1000TA adapter only.
1.1
Features
The GigaNIX™ adapter offers the following key features:
•
•
•
•
•
•
•
•
•
•
•
•
One adapter for all common platforms with driver support for Mac OS
(GigaNIX 1000TA), Windows and Linux (GigaNIX 1000TA/TPC)
Supports 33/66 MHz, 32/64 bit PCI interfaces
Installs in any PCI-capable Power Macintosh, G3, G4 or PC with a vacant PCI
slot
Full duplex Gigabit Ethernet Interface
Complies with all PCI mechanical and electrical requirements
Simplified network monitoring with Asanté’s LAN Inspector utility
Compatible with all 10/100/1000BaseT hubs, switches and routers
Sustained throughput of 1 Gbps over PCI bus (depending upon hardware and
memory)
AsantéQ™ link quality monitor evaluates and adjusts to actual line conditions
by managing echo and crosstalk cancellation, equalization, timing and skew
compensation
Automatic gain control maximizes signal strength
Burst rate of up to 256 dwords (1024 bytes) over PCI bus
Optional jumbo packets, 802.3x full duplex flow control with automatic pause,
802.1D and 802.1Q priority with multiple priority queues. (Switch must also
support jumbo packets)
1.2
Package Contents
The package contains the following items:
• (1) FriendlyNET™ GigaNIX™ adapter
• (1) GigaNIX ™ Quick Start Guide
• (1) GigaNIX CD-ROM with LAN Inspector
• GigaNIX release note
Asanté FriendlyNET™ GigaNIX™ 1000TA/TPC
4
1.3
System Requirements
•
•
Macintosh Platforms (1000TA Only): PCI-based PowerPC with 32MB
RAM running Mac OS 9 or better. Minimum configuration for Gigabit
Ethernet Networks: G3 with 64MB RAM running Mac OS 9 or better.
PC Requirements: (1000TA/TPC): Pentium 133 with 32MB RAM;
Recommended minimum requirements for running Gigabit Ethernet:
Pentium III with 64MB RAM or better. Windows 98 or later or Linux (Kernel
2.2.16 or greater recommended) required.
1.4
Bracket/LED Information
The faceplate of the GigaNIX has an RJ-45 connector that supports the
connection of Category 5 or 5E copper cabling and three LEDs, as shown in the
diagram below. There are 3 LEDs on the faceplate. Each LED is for a port speed
option: 10 Mbps (Ethernet), 100 Mbps (Fast Ethernet), and 1000 Mbps (Gigabit
Ethernet). All ports function in the same manner as shown in the Table below:
1.4.1 GigaNIX LED Activity
Speed
Link
A.
10 Mbps
LED glows solid green
when link is detected
B.
100 Mbps
LED glows solid green
when link is detected
C.
1000 Mbps
LED glows solid green
when link is detected
Asanté FriendlyNET™ GigaNIX™ 1000TA/TPC
Activity
LED blinks slowly during
activity (transmit or receive)
LED blinks slowly during
activity (transmit or receive)
LED blinks slowly during
activity (transmit or receive)
5
Chapter 2. Hardware Installation
Before attempting to install the GigaNIX Gigabit adapter into your system, please
make sure of the following:
•
Shut off the power to the computer and any peripherals. Remove the
power cable to the computer to reduce the possibility of residual power
remaining in the power supply.
•
Ground yourself. Many electronic components inside computer and on the
GigaNIX card can be severely damaged by receiving a shock of static
electricity. Before touching any electronic components or boards,
discharge any static electricity on your body by touching the bare metal
case around the power supply inside your computer. Avoid excessive
movement during the installation, such as walking across carpets, as this
can generate static. If you must leave the installation area before the
installation is complete, be sure to ground yourself again before continuing
the installation.
•
Assess system power requirements. If you already have other PCI cards
in your Mac, make sure that your system is able to provide the necessary
power to support the addition of the GigaNIX adapter card. Check your
computer's user manual for power limitations.
2.1
Installation in a Apple Power Macintosh G3 or G4
This manual describes a procedure for installation in Apple G3 and G4 model
computers. Older platform case designs may require a slightly different
installation procedure. If in doubt, consult Macintosh User Guide for each
machine.
Note: Not all Power Macintosh Computers have a PCI slot. The user should
consult the Reference Manual, included with the machine, for more information
before attempting installation, ensure that the computer has at least one
available PCI slot.
Before installing the GigaNIX adapter, make sure you have sufficient room to
open the G3/G4 case completely. Attempting to install the adapter with the case
partially open may result in damage to the computer, the adapter card, or both.
Step 1
Power down the Macintosh workstation and peripherals, and remove
the power cable and any other peripheral cables.
Asanté FriendlyNET™ GigaNIX™ 1000TA/TPC
6
Step 2
Open the G3/G4 case by gently grasping the handle and pulling up.
Lay the lid open flat on the work surface. This will expose the case interior and
allow access to the PCI slots. Note that the slot may be either 32 bit or 64 bit,
depending upon the type of system. The PCI card edge connector contains “key”
notches that correspond to dividers in the motherboard slot. It is very important
to align the key notches with the matching dividers in the slot. Failure to align the
notches correctly could cause the card or slot to be damaged.
Asanté FriendlyNET™ GigaNIX™ 1000TA/TPC
7
Step 3
Align the GigaNIX PCI edge connector and the Macintosh motherboard
socket as indicated in the diagram above. Once aligned, push down
firmly on the PCI card until it is completely sealed in the slot.
Once the GigaNIX adapter has been successfully installed, close the G3/G4
system, re-attach the power cable and any other cables that were removed for
the hardware installation procedure. Consult Section 2.3 for information on
connecting the adapter to the network.
2.2
Installation in a PC Computer
There are many different styles and types of PC platforms that utilize PCI slots.
This section contains a generic installation procedure. Please refer to your
User's manual for more detailed instructions on installing the adapter in a PC.
Step 1
Shut down the power to the computer system and remove the power
cord and any peripheral cables.
Step 2
Open the computer case. This will expose the interior of the case and
allow the adapter card to be installed. Consult your User's Manual for
assistance in opening your computer.
Asanté FriendlyNET™ GigaNIX™ 1000TA/TPC
8
The PCI card edge connector contains “key” notches that correspond to dividers
in the motherboard slot. It is very important to align the key notches with the
matching dividers in the slot. Failure to align the notches correctly could cause
the card or slot to be damaged.
Step 3
Align the GigaNIX PCI edge connector and the system motherboard
socket as indicated in the diagram above. Once aligned, push down
firmly on the PCI card until it is completely seated in the slot.
Once the GigaNIX adapter has been successfully installed, close the PC case,
re-attach the power cable and any other cables that were removed for the
hardware installation procedure. Consult Section 2.3 for information on
connecting the adapter to the network.
2.3
Connecting the Gigabit Ethernet Adapter to the network.
This section explains how to connect the GigaNIX 1000TA to the external
network using the standard Category 5 cables. The maximum cable length is
100 meters or 328 feet. (The diagram below shows a typical UTP cable used to
connect to the GigaNIX 1000TA.)
Insert the Category 5 cable into the UTP connector until the self-locking tab clicks
into position. Two types of cables are used when connecting the GigaNIX
1000TA to the network. A workstation or "straight through" cable is typically used
to connect Ethernet adapters to hubs and switches. A crossover cable may also
be used to connect adapters to adapters. This configuration is useful for
diagnostic purposes or when a hub or switch is not available. However, it is not
Asanté FriendlyNET™ GigaNIX™ 1000TA/TPC
9
recommended for extended use, as it violates the IEEE specification for 10 Mbit,
100 Mbit and 1000 Mbit Ethernet networks.
Pinouts for both the workstation and crossover cables are shown below.
Note: These pinouts are for cables used on 10 Mbit and 100 Mbit networks only.
Cables used for Gigabit networks must use all 8 wires.
Pin
Number
1
2
3
4
5
6
7
8
Signal
Transmit+
TransmitReceive+
Unused
Unused
ReceiveUnused
Unused
Pinout for Workstation or "Straight Through" Cable
10 Mbit or 100 Mbit Networks Only
Asanté FriendlyNET™ GigaNIX™ 1000TA/TPC
10
Chapter 3.
Macintosh Software Installation
Once the hardware has been installed and the GigaNIX Gigabit adapter is
connected to the network, it is time to install the software. Software drivers must
be properly installed for the Gigabit Ethernet adapter to function.
3.1
Installing the GigaNIX Mac OS8 or 9 Software Driver
Before you begin, make sure your system contains enough RAM for the proper
functioning of your adapter. If you need assistance, refer to Section 1.3 for the
Macintosh system requirements information.
Step 1
Begin the Installation by inserting the GigaNIX CD into the CD ROM.
Double clicking on the CD-ROM icon to open the CD.
Note:
Before launching the GigaNIX installer application, make sure no other
applications are running. This ensures a smooth installation process,
and avoids possible damage to files and applications left running
during the installation.
Step 2
Launch the GigaNIX Installer application by double clicking on the
GigaNIX installer icon to begin the install process.
Asanté FriendlyNET™ GigaNIX™ 1000TA/TPC
11
Step 3
Click on the Install button to begin the installation.
Clicking on the Quit button will cancel the installation process and leave the
system untouched.
You will see a screen similar to the one below reminding you that your system
will need to be restarted after the installation.
Step 4
Click the Yes button to continue installation.
The Installer program will copy various files to the appropriate spots in your
System folder. Once this is completed, the following screen will appear and you
will be asked to restart your computer:
Asanté FriendlyNET™ GigaNIX™ 1000TA/TPC
12
Step 5
The installation process is complete. Click on the Restart button to
restart your computer.
After installing the software and restarting your computer, you will need to
configure AppleTalk and TCP/IP for use with the GigaNIX Gigabit Ethernet
adapter. Unless you change your machine’s setup, this procedure will only have
to be performed once. After that, your Macintosh will be able to locate and load
the adapter driver automatically whenever you reset or power-up your Mac. Refer
to the following sections for information on configuring your adapter to utilize
AppleTalk and TCP/IP.
3.2
Configuring GigaNIX for AppleTalk
Your Macintosh utilizes the AppleTalk protocol to communicate with other
Macintoshes running Personal Filesharing. In order for your Gigabit Ethernet
adapter to utilize AppleTalk, you must select your adapter in the AppleTalk
Control Panel. Additional options may be selected based on the needs of the
system, using options documented in the Apple network system administration
guides and manuals. Follow the steps below to configure your Gigabit Ethernet
adapter for AppleTalk:
Step 1
Pull-down the Apple (apple icon) menu and select the AppleTalk
Control Panel item to open a window that should look similar to the one
shown below
Asanté FriendlyNET™ GigaNIX™ 1000TA/TPC
13
To configure the GigaNIX adapter for use with the AppleTalk protocol, you will
need to tell your system which slot contains the Gigabit adapter.
Step 2
Select the Connect Via: window and drag the cursor to the slot that
contains the Gigabit adapter and release. Close the panel to save
your changes.
Your GigaNIX Gigabit Ethernet adapter is now ready to connect to the network.
Refer to the next section for instructions on how to configure your adapter
for use with TCP/IP.
3.3
Configuring the GigaNIX 1000TA for TCP/IP
The TCP/IP protocol is to access many servers, including AppleShare IP Servers
and servers found on the Internet. Configuring your G3/G4 the GigaNIX Gigabit
Ethernet adapter for use with the TCP/IP protocol is accomplished using the
TCP/IP Control Panel. The default setting is for the system to be configured
Using DHCP Server. Before attempting to configure your adapter for TCP/IP, you
will need to know whether your system will be using a static IP address (one that
is configured manually by the user) or obtained from an outside source such as a
DHCP server. You may obtain this information from your Systems Administrator
or MIS department.
Asanté FriendlyNET™ GigaNIX™ 1000TA/TPC
14
Step 1
To access the TCP/IP Control Panel, click on the Apple icon and select
Control Panel. Then scroll down and select the TCP/IP Control Panel.
You will see a window that may look similar to the one shown below:
Step 2
Select Connect Via: window. Select the Connect Via: window and
drag the cursor to the slot containing the Gigabit Ethernet adapter and
release.
Step 3
Close the panel to save your changes.
Consult your Macintosh User Manual or Network Administrator for more
information on the available TCP/IP options. This completes the software
installation for the GigaNIX Gigabit Ethernet adapter.
Asanté FriendlyNET™ GigaNIX™ 1000TA/TPC
15
Chapter 4. Windows Software Installation
This chapter describes the installation of the GigaNIX in Windows NT
environment. Before attempting to install the software, make sure your system
settings match the system requirements listed in Chapter 1. Bear in mind that
your system's performance will vary depending upon processor speed and
amount of available RAM.
4.1
Installing the GigaNIX on Windows 98/2000/Me
Thanks to the Hardware Wizard in Windows 98, and the Found New Hardware
Wizards of Windows 2000 and Windows Me, the installation processes of these
programs is very similar. Before installing the GigaNIX driver, make sure the
hardware has been installed properly, and the adapter is connected to the
network with the appropriate network cables. For information on connecting
network cables to the GigaNIX Ethernet adapter, please see the "Connecting to
the GigaNIX" section presented earlier in this manual.
•Step 1
Once the hardware is installed, reconnect the power and network
cables and turn on the power to the computer.
The Hardware Wizard will detect the card. Click the Next> button to continue
installation. Refer to the Troubleshooting section if the Hardware Wizard does
not detect the card.
Asanté FriendlyNET™ GigaNIX™ 1000TA/TPC
16
•Step 2
The Hardware Wizard will search for new software for the hardware it
has detected. Click Next> to continue installation.
Step 3
The Hardware Wizard will ask you what you wish to do. Click Next> to
accept the Recommended option and continue installation.
Asanté FriendlyNET™ GigaNIX™ 1000TA/TPC
17
•Step 4
The Hardware Wizard will ask where you wish to search for drivers.
Click the "Specify a location" option. Insert the Asanté GigaNIX
Gigabit Ethernet Adapter CD. Click Browse and select the CD. Select
the appropriate Windows directory and Click Next to continue.
•Step 5
The Hardware Wizard will find the driver and list the path to the INF
file. Click Next to continue installation.
Asanté FriendlyNET™ GigaNIX™ 1000TA/TPC
18
•Step 6
The Hardware Wizard will ask you to configure Advanced Features for
your adapter. For most users, the default settings are sufficient. Click
OK to accept the default settings.
Asanté FriendlyNET™ GigaNIX™ 1000TA/TPC
19
•Step 7
•Step 8
Step 9
The Hardware Wizard will ask you to insert your Windows 98,
Windows 2000 or Windows Me CD and then click OK.
The Hardware Wizard will copy files from the Windows CD.
The Hardware Wizard will finish installing the adapter software. Click
Finish to continue the installation.
Asanté FriendlyNET™ GigaNIX™ 1000TA/TPC
20
Step 10
The Hardware Wizard will ask you to restart your computer. Click Yes
to reboot your computer and complete your installation.
The installation of your Asanté GigaNIX Gigabit Ethernet Adapter is now
complete. Refer to Chapter 5 for information on configuring your adapter.
4.2
Software Installation on Windows NT
This section describes the steps necessary to install the software for the GigaNIX
Gigabit Ethernet adapter. Before attempting to install the software, please make
sure of the following:
The Gigabit Ethernet adapter has been properly installed and the power restored
to the computer.
1. The adapter has been connected to the network using the appropriate
network cables for your type of network.
2. You have the Windows NT installation CD available. Windows will need to
copy files from the installation CD as part of the installation process.
3. The Windows NT system is upgraded with Service Pack 4 (or the latest
available).
4. You are able to start your Windows NT system and log on.
5. You know the complete path to where the Windows NT files are located,
including the Drive letter of your GigaNIX installation CD.
Note: You must have Network Administrator privileges to install the driver
software! Also, if you are upgrading from an existing adapter to the Gigabit
1000TPC, Networking will already be installed on your computer. If this is the
case, the Network Control Panel will open and you can choose to add an
adapter. Proceed to step 7 below to continue the installation.
Follow the steps below to install the GigaNIX Gigabit Ethernet adapter:
Step 1.
From the Windows NT Desktop, select Setting. Then select Control
Panel.
Asanté FriendlyNET™ GigaNIX™ 1000TA/TPC
21
Step 2
Locate the Network Icon from the Control Panel Window and double
click to launch the Network Control Panel.
Step 3
Windows NT will detect that your Networking is not installed. This is a
normal part of the installation process. Click Yes to continue
installation.
Asanté FriendlyNET™ GigaNIX™ 1000TA/TPC
22
Step 4
The Network Setup Wizard will launch. Click the "Wired to the network"
box and click Next to continue the installation.
Step 5
The Network Setup Wizard will check the available network adapters.
Click the Start Search button to continue the installation.
Asanté FriendlyNET™ GigaNIX™ 1000TA/TPC
23
The Network Setup Wizard will search the hardware installed in your system for
new hardware. It will then search for drivers to match the new
hardware. This may take several minutes.
The Network Setup Wizard will not be able to find the appropriate software for
the card it has detected. The following screen will appear:
Step 6
Manually install the adapter by clicking Select from list.
The Network Setup Wizard will display a list of adapters for which it has drivers.
Asanté FriendlyNET™ GigaNIX™ 1000TA/TPC
24
Step 7
Click the Have Disk button to install the GigaNIX Gigabit Ethernet
Adapter and continue installation.
The Network Setup Wizard will prompt you to insert the diskette containing the
drivers you wish to install.
Asanté FriendlyNET™ GigaNIX™ 1000TA/TPC
25
Step 8
Type the drive letter of your CD ROM where the Asanté Gigabit
Ethernet Adapter is located and the directory name where the
Windows NT drivers are located. Be sure to type the directory name
exactly as it appears above, including the backslashes. Click OK to
continue installation.
Note:
Windows NT does not have the option to browse the CD for the correct
directory where the files are located. You will need to have this
information available to type in when requested.
The Network Setup Wizard will find the driver and display it in the window.
Step 9
Click OK to accept the driver and continue the installation.
Asanté FriendlyNET™ GigaNIX™ 1000TA/TPC
26
Step 10
The Windows Network Setup Wizard will indicate that an adapter was
not found. Click the Gigabit Ethernet PCI Adapter (83820/21) from the
list and click Next to continue the installation.
Asanté FriendlyNET™ GigaNIX™ 1000TA/TPC
27
Step 11
To configure the adapter for use with TCP/IP, check the "TCP/IP
Protocol" from the Network Protocols list provided by the Network
Setup Wizard. Click Next to continue the installation.
Next, the Network Setup Wizard will display a list of Network Services. Unless
you are familiar with how to add and delete these service, do not attempt to alter
this list.
Step 12
Click the Next button to accept the list and continue the installation.
At this point, Windows will have all of the information it requires from you to
complete the installation. It will need to access information from the Windows
NT installation CD to continue.
Asanté FriendlyNET™ GigaNIX™ 1000TA/TPC
28
Step 13
The Network Setup Wizard will now install the drivers. Click the Next
button to continue the installation.
The Network Setup Wizard now requires files from the Windows NT setup CD.
Asanté FriendlyNET™ GigaNIX™ 1000TA/TPC
29
Step 14
Insert the Windows NT setup CD into the CD ROM drive and click
Continue to continue the installation.
Next, the Network Setup Wizard will display a list of current bindings. Unless
you are familiar with the Windows NT configuration settings, do not attempt to
alter the binding list.
Step 15
Click Next to accept the current list and continue the installation.
The Network Setup Wizard will indicate that networking has been installed on the
computer. The system must be restarted before the adapter will connect to the
network.
Asanté FriendlyNET™ GigaNIX™ 1000TA/TPC
30
Step 16
Click the Finish button to restart the computer and complete the
installation.
When the system returns to proper operation, verify that the adapter port LEDs
operate as described in the GigaNIX LED activity table in this manual. The
GigaNIX installation on your Windows NT platform is now complete.
4.4
Software Installation on Linux
These instructions presume that you are running Red Hat Linux 6.x or a similar
OS. You should be using at least a kernel version 2.2.12 Installation for any
other Red Hat-based system will be similar. For Debian-based systems, the
location of some files will be different.
Installing the driver
To install the driver, copy the driver files to an appropriate directory:
$ mkdir giganix
$ cd giganix
$ cp /mnt/floppy/linux/*
.
To create a new driver object module:
$ make
Asanté FriendlyNET™ GigaNIX™ 1000TA/TPC
31
Note: If you are installing the GigaNIX in an SMP machine, you should comment
out the standard CFLAGS line in the “Makefile” and uncomment the SMP version
of CFLAGS before compiling the driver.
To install the driver object module in the file system, become root and run:
# make install
#depmod -a
Configure the card using your preferred configuration tool, or edit the initialization
script for the interface directly. On Red Hat, the file /etc/sysconfig/networkscripts/ifcfg-eth0 might look something like this:
DEVICE=eth0
BOOTPROTO=static
IPADDR=192.168.1.10
NETMASK=255.255.255.0
You should also add a line to /etc/conf.modules similar to this:
alias eth0 dpm
to ensure that the kernel loads the appropriate module.
Tuning the Installation
The tunable parameters of the driver, like “Receive” and “Transmit” buffers are
put in the file nsm.h under the heading “Tunable parameters.” The default value
of RX_QUEUE_SZ is 100. On a high-end system, putting a value of 200 for
RX_QUEUE_SZ may give better performance.
To try jumbo frames, the mtu size can be increased using the ifconfig utility, as
follows:
# ifconfig <interface-name> mtu <mtu-size>
eg: ifconfig eth0 mtu 3000
The BUF_SIZE_MAX value in nsm.h (Tunable parameter) should be changed to:
4096 if you enable jumbo frames.
<mtu-size> can be increased up to 4000 bytes for sane operation.
Please see the installation notes for information on functionality testing and
known driver problems.
Asanté FriendlyNET™ GigaNIX™ 1000TA/TPC
32
Asanté FriendlyNET™ GigaNIX™ 1000TA/TPC
33
Chapter 5.
Troubleshooting
Your Asanté GigaNIX adapter is designed to provide years of trouble-free
operation. In the unlikely event your network is not operating properly following
installation, follow the troubleshooting tips below.
1. Does your system meet the System Requirements for hardware and
software? Refer to Section 1.3 in this manual for specific hardware and
software requirements. Make sure your system meets these requirements
before troubleshooting further.
2. Did your adapter software install properly? If not, check to make sure the
hardware is seated properly, and that the "Key" on the motherboard is
pressed firmly into the notch on the adapter.
3. Is there a green network Link LED on the 10, 100 or 1000 LED? If not, try
connecting a "known good" network cable between your hub or switch and
the adapter. You should see a Link LED on both your switch and your
network adapter. Although the GigaNIX Ethernet adapter utilizes the
Extended Distance feature and is rated up to 613 feet (187 meters) over
Category 5 cable or 492 feet (150 meters) over Category 3 cable, your
network conditions may restrict the maximum length of your network cable
to 100 meters.
4. Be sure your cable is not coiled, twisted or damaged. When connecting
the switch to a computer, be sure your Category 5 UTP cable is wired for
straight-through. Note that pins 3 and 6 must use the same twisted pair;
these are typically orange/white orange or green/white green.
5. Check your cable type. 10BaseT may use Category 3 (or better) cables.
100BaseTX may use Category 5 (or better). 1000BaseT may use
Category 5 (or better), although Asanté Certified Gigabit cables (Category
5E) are recommended.
6. When employing multiple hubs or switches, check the uplink connection
on your hub or switch. If the hub or switch utilizes an uplink port, set the
port to uplink on only one hub/switch and use a standard, straight-through
network cable to connect to a port on the other hub or switch. If there is no
uplink port on the hub or switch, create the uplink using a crossover cable
as described in section 2.3 in this manual.
7. Check your computer’s software. Consult your operating system manual
for instructions on configuring your network for file and print sharing.
Need more help?
Consult the Asanté website (www.asante.com) for additional troubleshooting tips
and frequently asked questions (FAQ).You may also contact Asanté Technical
Support during standard business hours (7am to 6pm MST, Monday-Friday).
Email: [email protected]
Phone: 801-566-8991
FAX: 801-566-3787
Asanté FriendlyNET™ GigaNIX™ 1000TA/TPC
34
Product Specifications
Connector:
Drivers:
Status Indicators:
Bus Interface:
Dimensions:
Performance
Throughput:
Burst Rate:
Host Offloading:
Optional:
Link Quality Monitor:
Environmental Range
Operating Temperature:
Relative Humidity:
Power:
Standards Compliance
Network:
Gigabit Ethernet (1000BaseT, 100BaseTX, 10BaseT):
RJ-45
Apple Mac OS 9 and OS X1
Microsoft Windows 98, 98 Second Edition and Me
Microsoft Windows NT and 2000 Professional
Linux
See the Asanté website for the latest drivers
1000 Mbps Link/Activity, 100 Mbps Link/Activity and
10 Mbps Link/Activity
PCI v2.2 bus master, 32/64-bit, 33/66 MHz
2.5 x 6.4 inches (63 x 163 mm)
Sustained 1 Gbps over PCI bus
Up to 256 dwords (1024 bytes) over PCI bus
IPv.4 checksum and optional statistics gathering for
RFC 1213 (MIB II), RFC 1398 (Ether-like MIB), IEEE
802.3 LME
Jumbo packets, 802.3x full duplex flow control with
automatic pause,
802.1D and 802.1Q priority with multiple priority
queues
AsantéQ continuously adapts to actual line conditions
by managing echo and crosstalk cancellation,
equalization, timing and skew compensation.
Automatic Gain Control maximizes signal strength
32º to 131ºF (0º to 55ºC)
10% to 90%, non-condensing
Maximum 7W
IEEE 802.3u Auto Negotiation and parallel detection
IEEE 802.3ab Gigabit Ethernet over 4 pairs of UTP
Category 5 (1000BaseT); Asanté Certified Gigabit
Ethernet Cable or EIA/TIA-568A Category 5E
recommended.
IEEE 802.3u Fast Ethernet over 2 pairs of UTP
Category 5 (100BaseTX).
IEEE 802.3 Ethernet over 2 pairs of UTP Category 3
(10BaseT).
Asanté FriendlyNET™ GigaNIX™ 1000TA/TPC
35
Distance:
Full Duplex:
Virtual Network:
Regulatory
Recommended maximum distance is 328 feet (100
meters). Exclusive 10BaseT Extended Distance rated
up to 613 feet (187 meters) over Category 5 cable or
492 feet (150 meters) over Category 3 cable
Support for 10/100/1000 Mbps data rates
Virtual LAN (VLAN) tag support
FCC Class B, CE Mark
Support
Free Technical Support and Warranty:
Five years of free telephone technical support (7AM
to 6PM, MST), 24-hour support via web and ftp; five
year product warranty
AsantéCare:
Optional extended technical support and product
warranty for additional years
Asanté FriendlyNET™ GigaNIX™ 1000TA/TPC
36
Safety and Regulatory Compliance
FCC Class B Notice. This hardware device complies with Part 15 of the FCC
Rules. Operation is subject to the following two conditions: 1) This device may
not cause harmful interference, and 2) This device must accept any interference
received, including interference that may cause undesired operation. This
equipment has been tested and found to comply with the limits for a Class B
digital device, pursuant to Part 15 of the FCC rules, which are designed to
provide reasonable protection against such interference in a residential
installation. However, there is no guarantee that interference will not occur in a
particular installation. The equipment generates, uses and can radiate radiofrequency energy and, if not installed and used in accordance with the
instructions, may cause harmful interference to radio communications. If you
suspect this equipment is causing interference, turn your unit on and off while
your radio or television is showing interference. If the interference disappears
when you turn the unit off and reappears when you turn the unit on, something in
the unit is causing interference. The user is encouraged to attempt to correct the
interference by one or more of the following measures: Reorient or relocate the
receiving antenna, increase the separation between the equipment and the
receiver, or connect the equipment to an outlet on a circuit other than the one to
which the receiver is connected. Consult the place of purchase or an
experienced radio/television technician for additional suggestions. Any changes
or modifications not expressly approved by the party responsible for compliance
could void the user’s authority to operate the equipment.
Do not make electrical or mechanical modifications to the equipment.
VCCI Class B Notice. The equipment is a Class B product based on the
standard of the Voluntary Control Council for Interference from Information
Technology Equipment (VCCI)
CE Notice. The CE mark on this equipment indicates that this equipment meets
or exceeds the following technical standards: EN50082-1, EN55022, EN605552, EN61000-4-1, EN61000-4-2, EN61000-4-3, EN61000-4-4 and EN61000-4-5.
Safety Advisory
1. This product should be operated from the type of power source indicated
on the marking label. If you are not sure of the type of power available,
consult your dealer or local power company.
2. Do not allow anything to rest on the power cord. Do not locate this product
where persons will walk on the cord.
3. Never push objects of any kind into this product through cabinet slots, as
they may touch dangerous voltage points or short out parts that could
result in a risk of fire or electric shock. Never spill liquid of any kind on the
product.
4. Do not attempt to service this product yourself, as opening or removing
covers may expose you to dangerous voltage points or other risks. Refer
all servicing to service personnel.
Asanté FriendlyNET™ GigaNIX™ 1000TA/TPC
37
Contacting Asanté
You may contact Asanté in one of several ways: via the Web, e-mail, fax or
telephone.
Technical Support:
Send all technical support queries to [email protected] or visit the Asanté
Website at www.asante.com. The Asanté Website contains technical as well as
sales literature for all Asanté products. You may also register your products
online.
Technical Support-Worldwide
801/566-8991
Technical Support-Fax
801/566-3787
Main Corporate Telephone Numbers
800/662-9686 Home/Office Solutions
800/303-9121 Enterprise Solutions
408/435-8388
Asanté FriendlyNET™ GigaNIX™ 1000TA/TPC
38
Legal Notice
This document is protected by copyright and distributed under licenses restricting
its use, copying, distribution and decompilation. No part of this document may be
reproduced in any form by any means without prior written authorization of
Asanté Technologies, Inc. Documentation is provided “as is,” without warranty of
any kind, either express or implied, including any kind of express or implied
warranty of non-infringement or the implied warranties of merchantability or
fitness for a particular purpose.
U.S. Government End Users: This document is provided with a “commercial
item,” as defined by FAR 2.101 (October 1995), and contains “commercial
technical data” and “commercial software documentation” as those terms are
used in FAR 12.211-12.212 (October 1995). Government end users are
authorized to use this documentation only in accordance with those rights and
restrictions, as set forth herein, consistent with FAR 12.211-12.212 (October
1995), DFARS 227.7202 (June 1995) and DFARS 252.227-015 (November
1995).
Asanté Technologies, Inc. reserves the right to change any products described
herein at any time and without notice. Asanté´ Technologies, Inc. assumes no
responsibility or liability arising from the use of products described herein, except
as expressly agreed to in writing by Asanté Technologies, Inc. The use and
purchase of this product does not convey a license under any patent rights,
trademark rights, or any other intellectual property rights of Asanté Technologies,
Inc. Asanté, AsantéQ, the Asanté logo, FriendlyNET and GigaNIX are
trademarks or registered trademarks of Asanté Technologies Inc. All other brand
names and products are trademarks or registered trademarks of their respective
holders. All features and specifications are subject to change without notice.
Asanté FriendlyNET™ GigaNIX™ 1000TA/TPC
39