1
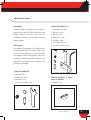
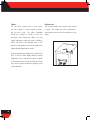
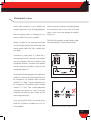
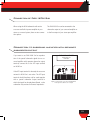
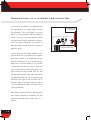
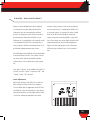
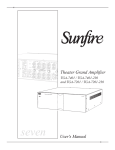
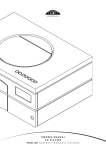
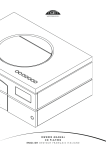
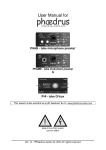
IKON
®
manual
951006-0-0 C
CAUTION
RISK OF ELECTRIC SHOCK
DO NOT OPEN
CAUTION: RISK OF ELECTRIC SHOCK DO NOT OPEN
CAUTION: TO REDUCE THE RISK OF ELECTRIC SHOCK, DO NOT REMOVE THE BACK PANEL. NO
USER-SERVICEABLE PARTS INSIDE. REFER SERVICING TO QUALIFIED PERSONNEL.
The lightning flash within an equilateral
triangle is intended to alert you to the presence of uninsulated „dangerous voltage“
within the product’s enclosure that may be of
sufficient magnitude to constitute an electric
shock to persons.
1.
Read Instructions - All the safety and operating instructions should be read before the appliance is operated.
2.
Retain Instructions - The safety and operating instructions should be retained for future reference.
3.
Heed Warnings - All warnings on the appliance and in the operating instructions should be adhered to.
4.
Follow Instructions - All operating and use instructions should be followed.
5.
Water and Moisture - The appliance should not be used near water - for example, near a bathtub, washbowl, kitchen sink,
laundry tub, in a wet basement, or near a swimming pool and the like.
6.
Carts and Stands - The appliance should be used only with a cart or stand if recommended by the manufacturer.
7.
Wall or Ceiling Mounting - The appliance should be mounted to a Wall or ceiling only as recommended
by the manufacturer.
8.
Ventilation - The appliance should be situated so that its location or position does not interfere with proper ventilation.
For example, the appliance should not be situated on a bed, sofa, rug, or similar surface that may block the ventilation
openings; or placed in a built-in installation, such as a bookcase or cabinet, that may impede the flow of air through the
ventilation openings.
9.
Heat - The appliance should be situated away from heat sources such as radiators, heat registers, stoves, or other appliances
that produce heat.
10.
Power Sources - The appliance should be connected to a power supply only of the type described in the operating instructions or as marked on the appliance.
11.
Power Cord Protection - Power-supply cords should be routed so that they are not likely to be walked on or pinched by items
placed on or against them, paying particular attention to cords at plugs, convenience receptacles and the point where they
exit from appliance.
12.
Cleaning - Do not use any liquid cleaners. Use only a dry cloth to wipe off dust and grease.
13.
Non-use Periods - The power cord of the appliance should be unplugged from the outlet when left unused for a long period
of time.
14.
Object and Liquid Entry - Care should be taken so that objects do not fall and liquids are not spilled into the enclosure
through openings.
15.
Damage Requiring Service - The appliance should be serviced by qualified personnel when:
a)
b)
c)
d)
e)
16.
2
The exclamation point within an equilateral
triangle is intended to alert you to the
presence of important operating and maintenance (servicing) instructions in the literature
accompanying the appliance.
The power-supply cord or the plug has been damaged; or
Objects have fallen, or liquid has been spilled into the appliance; or
The appliance has been exposed to rain; or
The appliance does not appear to operate normally, or exhibits a marked change in performance; or
The appliance has been dropped, or the enclosure damaged.
Servicing - The user should not attempt to service the appliance beyond that described in the operating instructions. All other
servicing should be referred to qualified service personnel.
Contents
Page
Danish Audiophile Loudspeaker Industries .................................................................. 4
Unpacking .................................................................................................................... 5
Break-in ........................................................................................................................ 7
Setup - wide dispersion ............................................................................................... 7
Placement .................................................................................................................... 8
Placement of IKON VOKAL ............................................................................................. 9
Wall-mounting the IKON 1 & ON WALL........................................................................... 10
Connection ................................................................................................................... 11
Single wiring - IKON 1, ON WALL , VOKAL 1 ..................................................................... 12
Bi-wiring - IKON 2, 5, 6, 7, VOKAL 2 ............................................................................... 12
Connection of DALI IKON SUB ...................................................................................... 13
Connection to surround amplifier with separate subwoofer output ................... 13
Connection to a stereo pre-amplifier .................................................................. 14
Level adjustment ................................................................................................. 15
The listening room ....................................................................................................... 17
Power and acoustic pressure ....................................................................................... 18
DALI - more than meets the eye .................................................................................. 19
Tips and advice from DALI ........................................................................................... 20
Cleaning and maintenance ........................................................................................... 20
Technical specifications ............................................................................................... 21
3
Danish Audiophile Loudspeaker Industries
Thank you for selecting DALI IKON loudspeakers.
DALI is acclaimed around the world for unique
It is important to us that your new DALI loud-
loudspeakers built to our uncompromising stand-
speakers are set up and connected optimally. For
ards for design and performance.
this reason, we recommend that you read this
manual and follow its instructions.
The goal for every single DALI loudspeaker is
always our foremost commitment: To create a
This manual contains instructions for setup and
listening experience in your home that will make
connection, as well as tips and advice on how
you forget time and place.
to get the most out of your new loudspeakers.
Remember to sign up for our e-mail newsletter
at www.dali.dk.
4
Enjoy.
Unpacking
Unpacking:
Tool kit for IKON 5, 6, 7
Carefully unpack the loudspeakers of the box.
1. Aluminium foot, 4 pcs.
Dependant on which DALI IKON model you have
2. M8 screw, 4 pcs.
bought, different accessories comes with the
3. M8 nut, 4 pcs.
loudspeaker, which you can read about in the fol-
4. Rubber foot, 4 pcs.
lowing chapters.
5. M8 spike, 4 pcs.
6. 5 mm Allen key, 1 pc.
Grille fronts:
7. 13 mm fork wrench, 1 pc.
The speakers are delivered with the grille fronts
already mounted when you unpack them. If you
7
2
wish to remove the grille front, loosen it by gradually tugging at the 6 metal plungers that hold it
in place. It is important that all 6 are equally loosened before removing the front. Otherwise, the
3
6
4
grille may be damaged.
5
1
Tool kit for IKON SUB
Figure 2. Tool kit for IKON 5, 6, 7
1. M8 nut, 4 pcs.
2. Rubber foot, 4 pcs.
Tool kit for IKON 1, 2, VOKAL 1,
3. M8 spike, 4 pcs.
VOKAL 2, ON WALL
4. 13 mm fork wrench, 1 pc.
1: Bumper, 4 pcs.
2
4
1
1
3
Figure 1. Tool kit for IKON S UB
Figure 3. Tool kit for IKON 1, 2, VOKAL 1,
VOKAL 2, O N WALL
5
Spikes:
Rubber feet:
On some floor surfaces and in some rooms,
The enclosed rubber feet may be used instead
the use of spikes is a crucial aspect of obtain-
of spikes. The rubber feet can be mounted on
ing the best result. The spikes (included)
the aluminium feet over the thread holes for the
should be screwed in loosely in the four
spikes.
aluminium feet, leaving the spike’s nut only
slightly tightened. Using the screws (included),
mount the feet in the threaded holes in the
bottom of the speaker. Push the feet against the
cabinet before tightening the screw.
Place the loudspeaker upright on its spikes on the
floor, so that it stands steadily without rocking.
Tighten the nuts, so that the four spikes sit tightly
in the aluminium feet. These assembly and setup
steps ensure stable mechanical coupling to the
surface beneath.
6
Figure 4. Mounting spikes
Break-in
Like any mechanical system, a loudspeaker
requires a “break-in” period. You will experience
a gradual increase in sound quality during an initial period. Unlike other mechanical systems, the
lifespan of a loudspeaker is increased by regular
use.
Figure 5. DALI IKON bass driver
Setup - wide dispersion
DALI IKON is a prime exponent of one of the many
virtues that have made DALI famous worldwide
– Wide Dispersion.
Wide Dispersion means that the area in front of the
loudspeakers where a full stereo image is achieved
is a great deal wider than with other loudspeakers. This ensures substantially better sound across
a larger area within your listening room.
To take full advantage of DALI IKON’s Wide Dis-
Figure 6. DALI IKON High frequency module:
Soft dome tweeter and ribbon tweeter
persion, the loudspeakers should face straight
ahead and not be angled in towards the listening
position unless the two loudspeakers are placed
very far apart.
The IKON tweeter module is especially developed
for this loudspeaker. Its unique design ensures that
Wide Dispersion is more than just a name – you
can tell the difference.
7
Placement
Before setting up and connecting your new DALI
IKON loudspeakers, you should find the best possible placement relative to your listening position.
It is a good idea to follow these simple guidelines:
Avoid as far as possible any objects between the
loudspeakers and the listening position. Obstacles can have a detrimental effect on tonal balance.
Figure 7. Stereo setup
Ideally, the distance from the listening position
to each loudspeaker should be the same as the
distance between the left and right loudspeakers
(Figure 7). In a surround installation, the speakers should be placed in a symmetrical configuration (Figure 8).
Figure 8. Surround setup
8
Placement of IKON Vokal
The IKON VOKAL center speakers have been specially designed to be positioned close to the large
surface of the TV screen - and can be placed
either above or below the screen, as required.
Whether you position the center speaker above
or below your TV, we recommend having the
front of the speaker in line with the front of the
TV. We recommend fitting the enclosed rubber
feet to ensure a stable, vibration-free setup.
Figure 9. Placement above TV-screen
Figure 10. Placement below TV-screen
9
Wall-mounting the IKON 1 & IKON On Wall
DALI IKON 1
There are several placement options for DALI
On the rear panel of DALI IKON ON WALL, there
IKON 1: on a stand, on a shelf, on a table-top or
are four indentations to make room for loudspea-
wall-mounting.
ker cable between the speaker and the wall. This
allows you to run cable along either side up or
For the best possible sound, we recommend pla-
down depending on what works best for you.
cement with the tweeter module at roughly the
same height as your ears when you are seated in
your favourite listening position.
For wall-mounting of DALI IKON 1, use the builtin bracket on the speaker’s rear panel. Mount the
included rubber feet on the rear of the speaker
to avoid scuffing the wall and to ensure secure
mounting. Hang the loudspeaker on a screw that
sits firmly in the wall. You must make certain that
the screw can bear the weight of the speaker as
stated in the technical specifications. The diameter of the screw head should be 8 - 10 mm and
the diameter of the screw should be max. 4 mm.
Figure 11. Wall-mounting IKON 1
DALI IKON ON WALL
DALI IKON ON WALL is designed for wall-mounting.
Because the loudspeaker can be positioned four
different ways, there are four brackets on the rear
panel. The speaker can be used as front, rear,
side or center loudspeaker. If used as center loudspeaker, it can be placed above or below the TVscreen. For wall-mounting, follow the instructions
above for DALI IKON 1.
Figure 12. Wall-mounting IKON O N WALL
10
Connection
Correct, tight connections to your amplifier are
Make sure that the conductors are tightly gripped
extremely important for your listening experience.
by the terminals with no loose wires that could
cause a short circuit and damage the amplifier
Before connecting cables or changing any con-
(Figure 14).
nections, ALWAYS turn off your amplifier.
The DALI IKON terminals are well-suited to plugs.
Always use cables of the same type and length
We recommend DALI Connect Banana Plugs.
for left and right channels. We recommend using
special speaker cables from DALI, available from
your dealer.
Connection in correct phase is a detail that is
often ignored. The red (+) terminal of the amplifier
must be connected to the red (+) terminal of the
loudspeaker. The black (-) terminal of the amplifier
must be connected to the black (-) terminal of the
loudspeaker (Figure 13).
For the optimal listening experience, the right loudspeaker (as seen from the listening position) must
Figure 13. Amplifier connections
be connected to the amplifier output terminals
marked “R” or “Right.” The left loudspeaker must
be connected to the amplifier output terminals
marked “L” or “Left.” Even a single loudspeaker
connected out-of-phase in a stereo or surround
installation will make the bass weaker and the
stereo image unfocused.
If you are using DALI IKON in a surround system,
follow the instructions included with your surround amplifier.
Figure 14. Connecting bare loudspeaker wire
11
Single wiring - IKON 1, On Wall, Vokal 1
For normal single wiring, connect loudspeaker
cable as shown (Figure 15.).
Figure 15. Single wiring
Bi-wiring - IKON 2, 5, 6, 7, Vokal 2
The top terminal pair is internally connected to the
crossover network’s high frequency section. The
bottom terminal pair is internally connected to the
crossover network’s bass section. When bi-wiring
or bi-amping, ALWAYS remove the metal jumpers
between the terminals before connecting cables.
For bi-wiring, connect two sets of loudspeaker
cable, one to the top terminals and one to the
bottom terminals. At the amplifier end, connect
both sets of loudspeaker cables to the same pair
of terminals on the amplifier (Figure 16).
12
Figure 16. Bi-wiring
Connection of DALI IKON Sub
When using the IKON subwoofer with active
The DALI IKON SUB can be connected to the
crossover and built-in power amplifier in your
subwoofer output of your surround amplifier or
stereo or surround system, there are two connec-
to the line output of your stereo pre-amplifier.
tion options.
Connection to surround amplifier with separate
subwoofer output
If you want to use DALI IKON SUB for reproduc-
SURROUND AMPLIFIER
tion of the special subwoofer signal from a sur-
LFE/Subwoofer
LINE OUT
round amplifier with separate subwoofer output
terminal, connect this to the LFE input terminal
on IKON SUB.
If the LFE input terminal is selected, the crossover
network in IKON SUB is not active. The LFE input
terminal should therefore only be used together
with a special subwoofer output terminal in
which the signal has already been filtered, so the
Figure 17. Connection to surround amplifier
with separate subwoofer output
subwoofer only receives the lowest frequencies.
13
Connection to a stereo pre-amplifier
If you want to use IKON SUB to supplement the
bass reproduction of a stereo system, connect
PRE-AMPLIFIER
LINE OUTPUT
the subwoofer "Line in, Left/Right" to a stereo
signal on the pre-amplifier with full frequency
content. The built-in crossover network in IKON
SUB then ensures that the subwoofer only reproduces the lowest frequencies (see section on
level adjustment and adjusting the crossover on
page 15 and 16).
In most cases you will achieve excellent results
with one IKON SUB. It is possible as a no-compromise stereo solution, or for reproduction of very
powerful sound pressure in a surround setup in
large rooms, to use two IKON SUBs. This solution
is connected in the same way, but for stereo you
should only connect the left-hand channel to one
input terminal on the left-hand IKON SUB and
the right-hand channel to one input terminal on
the right-hand IKON SUB. For a surround setup,
parallel the LFE inputs of the two IKON SUB. In
all other respects, follow the instructions above
- but use separate channels. You may wish to
consult your dealer.
Note: When using two IKON SUB, the best results
are normally achieved by positioning the two
subwoofers relatively close to each other (1 - 2
metres).
14
LINE IN
POWER AMPLIFIER
Figure 18. Connection to stereo preamplifier
Level adjustment
When you have decided upon which method
amount of bass present in the music/soundtrack,
of connection you want and positioned the
no more and no less. If installing the IKON SUB in
subwoofer, you can commence the exciting
a surround system, it is practical to select a fixed
process of tuning the system. Please note that
level on the IKON SUB and adjust subwoofer
positioning the subwoofer will have a lot of
output using the surround amplifier's setup func-
influence on its contribution to the overall sound.
tion. If bass levels are set too high, distortion will
If for example, the IKON SUB is positioned in a
reduce the quality of your listening experience.
corner, the bass will be much heavier than if it is
Please note that the position of the subwoofer
positioned midway between two corners.
will have major influence on its sonic contribution.
The following tuning methods are recommended
to achieve the best results. Use a piece of music
you know well, and that preferably includes
rhythmic bass such as kettle drums, bass guitar
etc.
Start with "Volume" in the middle of the dial (12
o’clock). Turn the "Phase" to position 180°, and
"Power" to the "ON" position.
Level adjustment
Adjust the volume of the IKON SUB so that the
bass matches the level of the front speakers.
You should be able to appreciate the IKON SUB's
contribution to the sound, without it ever being
over-powering. Bass must be tight and accurate,
so that the subwoofer reproduces the exact
Figure 19. Adjusting IKON S UB
15
Adjusting the crossover frequency (only
Selecting Auto function
when using ”LINE IN, Left/Right” inputs)
The "Auto" function puts the IKON SUB into
Once the volume level is finalised, you can start
stand-by after approx. 10 minutes with no signal
on the equally important adjustment of the over-
received at the input. When IKON SUB receives a
lap between the front loudspeakers and the IKON
signal once more, the subwoofer’s amplifier starts
SUB. To do so, adjust up and down using "Cros-
up automatically.
sover" until you can hear that the bass is even
and with no drop-out. You may have to adjust the
The "Power" button is the main on/off switch. We
volume again.
recommend switching off the system when it is
not to be used for long periods. When connecting
Setting phase
or changing connections, always disconnect the
Try different settings – if necessary combined
main electricity.
with new adjustment of volume and crossover
frequency. Select the position that provides the
Overloading
smoothest transition between the main speakers
If the IKON SUB is seriously overloaded, the built-
and the subwoofer. The choice may be difficult,
in safety circuit will cut the power off. If this oc-
but it often pays to experiment extensively in your
curs, turn the system down and the IKON SUB will
search for the best sound. In any event, it is a
automatically come on-line again after a short
good idea to listen to the system for a few days
period.
before making any final adjustments. Using the
same setting for surround and 2-channel stereo
The built-in safety circuit is not a guarantee
does not always achieve the best results. It is the-
against damage as a result of overloading, which
refore a good idea to note the setup you prefer for
is why the recommendations regarding sound
surround and stereo.
pressure etc., to be found on page 18 should be
followed.
16
The listening room
Every room has its own distinctive acoustics, which
As a basic rule, try to avoid large, hard and reflec-
influence the way we experience the sound from
tive areas in the immediate vicinity of your loud-
a speaker. In actual fact, it's a matter of how the
speakers. In the same way that a mirror reflects
room accommodates the sound and then damps
light, they will reflect sound from the speakers at
it. You can influence the acoustics of your listening
almost full strength but with a slight delay due to
room in various ways.
the relatively low speed of sound. This will disturb
the precision and spacial effect of sound reprodu-
Some of the sound you hear comes not from the
ction. Try hanging a soft textile surface behind the
actual speakers but from reflections from floor,
speaker, place a rug in front of it, or place a large
ceiling and walls. These reflections are damped by
plant to the side and experience the surprisingly
objects such as furniture, plants and carpets. If the
large effect doing so will have on the quality and
sound is bright, soft items such as curtains and
precision of the sound.
carpets can help. If the room has large window
panes, drawing the curtains will prevent reflec-
Once you are happy with the positioning of your
tions from the glass surfaces.
speakers, it is important to ensure that they are
completely stable. For floor models it is essential
Both the amount and quality of the deep bass
that you use the accompanying spikes.
depend on the size and shape of the room, and
the position of the speakers. If positioned near a
side or back wall, this will accentuate the bass. A
corner location will accentuate it even more, but
will also increase the reflections. The decision is
yours, so experiment with different positions to
find which provides the ideal sound for you.
17
Power and acoustic pressure
How loud a speaker is able to play and still sound
in the system. So, DALI recommends that the
good is completely dependent on the signal it has
tone controls generally be set to the neutral posi-
to reproduce. So, in practice, you cannot define an
tion, and you achieve your desired sound image
unequivocal level for use in comparing different
through correct positioning of the speakers.
speakers.
Ensuring that you keep the volume low enough so
Obviously, lots of pure, undistorted output from
the sound remains clear and undistorted will mini-
a large amplifier is better than a distorted signal
mise the strain on both speakers and amplifier.
from a small amplifier stretched beyond its capacity. The signal from a distorting (clipping) amplifier
All DALI loudspeakers are designed with linear
contains much more high-frequency information
impedance to be an optimal amplifier load. The
than an undistorted signal, and therefore puts a
result is significantly more open and detailed
heavy strain on the tweeter. Consequently, speak-
sonic image.
ers are most often damaged by small amplifiers
having to work too hard - and very rarely by large
amplifiers, which are practically running idle.
It is worth noting that when the tone controls are
turned above the neutral setting this significantly
burdens both speakers and amplifier. On a good
sound system tone controls should only be used
to compensate for poor recordings and not to permanently compensate for weaknesses elsewhere
18
DALI - more than meets the eye
Your DALI loudspeakers incorporate a wide range of technical solutions based on many years of intensive
research and experience. Most of it can’t be seen, but can be heard and enjoyed. These design principles
include:
Wide Dispersion
DALI designs drivers and crossovers to produce wide, even sound dispersion,
resulting in outstanding room integration, a larger sweet spot and a wider
listening area.
Time Coherence
The unique DALI drivers, optimised cabinets and carefully tuned cross-overs
ensure optimal time coherence in the reproduced sound.
3D Audio
DALI’s time coherence and low-loss technologies create a transparent, holographic, three-dimensional sounds.
Low-Resonance Cabinets
Specially designed cabinets reduce resonances and coloration of the sound,
achieving a natural, realistic sound.
Amplifier Friendly
DALI’s linear impedance design ensures an audible reduction of amplifier
instability and coloration.
Hand Crafted
Hand assembled from the fitting of the cabinet to final electro-acoustic
testing, each and every speaker is personally approved and signed by the
person who assembled it.
19
Tips and advice from DALI
DALI loudspeakers should never be angled in
As a general rule, your amplifier’s tone controls
towards the listening position, unless the speak-
(bass and treble) should remain in a neutral posi-
ers are very far apart.
tion.
Always turn off the amplifier, before connecting
Use the spikes or rubber feet included with the
or disconnecting any cables.
loudspeakers – they make a significant contribution to sound quality and ensure that your loudspeakers stand firmly.
Cleaning and maintenance
Clean the cabinets with a soft, dry cloth. If the
cabinets are dirty, wipe with a soft cloth dipped
in all-purpose cleaner and then well wrung out.
Be very careful when wiping the speaker cones,
as they are very fragile. Fabric frameworks can be
vacuumed and wiped with a well-wrung, lint-free
cloth and mild all-purpose cleaner.
20
Technical specifications
There are countless methods for measuring
DALI IKON loudspeakers are designed to repro-
speakers. However, none of them tell you any-
duce music as honestly as possible.
thing useful about how a speaker really sounds.
Only your ears can decide whether one speaker
Enjoy your new speakers!
sounds better than another.
IKON 1
IKON 2
IKON 5
43-30,000
42-30,000
39-30,000
87.0
88
88
8
8
8
106
108
109
2,900/14,000
3,000/14,000
600/2,700/14,000
47
41
37
Enclosure type
Bass reflex
Bass reflex
Bass reflex
Recommended placement
Wall / Shelf
Stand
Floor
Rec. amplifier power [Watt]
25-100
30-120
30-125
Frequency range +/- 3 dB [Hz]
Sensitivity (2.83 V/1m) [dB]
Nominal impedance [ ]
Maximum SPL [dB]
Crossover frequencies [Hz]
Bass reflex tuning frequency [Hz]
Amplifier power [Watt]
-
-
-
High frequency driver(s)
1 x 28 mm soft dome
1 x 28 mm soft dome
1 x 28 mm soft dome
1 x 17 x 45 mm ribbon
1 x 17 x 45 mm ribbon
1 x 17 x 45 mm ribbon
1 x 5”
1 x 6½”
2 x 5”
Single wire
Bi-wire
Bi-wire
Low frequency driver(s)
Connection input(s)
Dimensions (HxWxD) [cm]
Dimensions (HxWxD) [inches]
Function(s)
Weight [kg/lb]
Finish
35 x 15 x 26
44 x 19 x 30
81 x 15 x 26
13.8 x 5.9 x 10.1
17.3 x 7.4 x 11.7
31.9 x 5.9 x 10.2
-
-
-
5.2/11.46
9.0/19.84
11.8/26.01
Light Oak / Light Walnut
Light Oak / Light Walnut
Light Oak / Light Walnut
21
Frequency range +/- 3 dB [Hz]
Sensitivity (2.83 V/1m) [dB]
Nominal impedance [ ]
Maximum SPL [dB]
Crossover frequencies [Hz]
Bass reflex tuning frequency [Hz]
Enclosure type
IKON 7
IKON VOKAL 1
37-30,000
36-30,000
78-26,000
91.5
92
87.5
6
6
8
111
112
107
800/3,200/14,000
600/2,900/14,000
3,000
36
35
70
Bass reflex
Bass reflex
Bass reflex
Recommended placement
Floor
Floor
Below / above TV screen
Rec. amplifier power [Watt]
25-150
25-200
25-100
Amplifier power [Watt]
-
-
-
High frequency driver(s)
1 x 28 mm soft dome
1 x 28 mm soft dome
1 x 28 mm soft dome
1 x 17 x 45 mm ribbon
1 x 17 x 45 mm ribbon
-
2 x 6½”
3 x 6½”
2 x 4”
Low frequency driver(s)
Connection input(s)
Dimensions (HxWxD) [cm]
Dimensions (HxWxD) [inches]
Function(s)
Weight [kg/lb]
Finish
Frequency range +/- 3 dB [Hz]
Bi-wire
Bi-wire
Single wire
100 x 19 x 33
114 x 20 x 34
12 x 42 x 21
39.4 x 7.4 x 13.1
44.9 x 7.9 x 13.5
4.5 x 16.5 x 8.4
-
-
-
18.6/41.01
22.9/50.49
5.6/12.35
Light Oak / Light Walnut
Light Oak / Light Walnut
Light Oak / Light Walnut
IKON VOKAL 2
IKON ON WALL
IKON SUB
26-200
55-30,000
57-30,000
Sensitivity (2.83 V/1m) [dB]
89
89.5
-
Nominal impedance [ ]
8
8
30K(L/R) 20K LFE
113
Maximum SPL [dB]
Crossover frequencies [Hz]
Bass reflex tuning frequency [Hz]
Enclosure type
110
108
2,500/14,000
2,500/14,000
-
44.5
-
29
Bass reflex
Closed
Bass reflex
Recommended placement
Below / above TV screen
Wall
Floor
Rec. amplifier power [Watt]
25-150
25-100
-
-
-
250
-
Amplifier power [Watt]
High frequency driver(s)
Low frequency driver(s)
Connection input(s)
Dimensions (HxWxD) [cm]
Dimensions (HxWxD) [inches]
Function(s)
Weight [kg/lb]
Finish
22
IKON 6
1 x 28 mm soft dome
1 x 28 mm soft dome
1 x 17 x 45 mm ribbon
1 x 17 x 45 mm ribbon
-
2 x 5”
1 x 6½”
1 x 12” long stroke
RCA. Stereo (low-pass filtered), LFE (mono)
Bi-wire
Single wire
15 x 51 x 26
38 x 28 x 19
45 x 41 x 45
5.9 x 20.1 x 10.1
14.8 x 10.9 x 7.4
17.8 x 16.1 x 17.7
Volume, Crossover frequency, Phase
-
-
7.7/16.98
7.1/15.65
29.0/63.93
Light Oak / Light Walnut
Light Oak / Light Walnut
Light Oak / Light Walnut