1
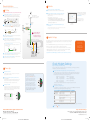
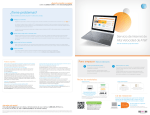
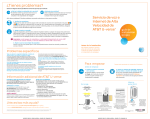
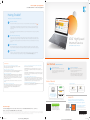
Need to update your equipment?
Call 1.888.573.4147 or visit att.com/equipment
Having Trouble?
Many issues can be resolved in four simple steps:
1
Check your connections.
Make sure that the filters and cables on each device are connected and installed properly as described in Step 1 A-F.
Cables usually make an audible click when securely attached. If all connections are secure and you are still unable to
connect to the Internet, try another phone jack. If you have voice service on your DSL line, verify that the phone jack
has a dial tone.
Filters are not required for customers without AT&T phone service. A filter installed where it is not needed may eliminate
your DSL signal.
2
Power down, then power back up.
AT&T High Speed
Internet Service
hut down your computer, and unplug the black Power Adapter (and any other devices) from the back of the Modem/
S
Gateway. Wait 15 seconds, and then plug Power Adapter back in. Make sure the Modem/Gateway Power light comes on
(if not, try another outlet.) If your equipment has a Power button, turn it on. Turn your computer (and any other devices)
back on.
3
Wait for indicator lights.
Self-Installation Guide for Modem
Wait for indicator lights to turn green (may take up to 15 minutes), and then attempt to access the Internet. Modems
vary by manufacturer. For details about the correct light display for your equipment, see the manufacturer’s user guide.
4
Reset your modem.
Using a pen or pencil, press and hold your modem’s Reset button again for at least 10 seconds to clear the settings.
You will need to manually enter your settings into your modem. See the Check Modem Settings section.
Specific Issues
What if I have a monitored security system or health alarm?
When you have completed the installation, please contact your alarm
monitoring provider to test your alarm.
What if I have a cable or dial-up modem?
Cable and dial-up modems are not compatible with AT&T High Speed Internet
service. DSL equipment can be purchased at att.com/equipment
Why do I need to install filters?
Filters are only required for customers with voice service on their DSL line
due to both the regular phone line and DSL signals carried over the same line.
Without filters you may experience disruptions or hear static on phone line.
Installing a filter on every phone device shared with DSL will help eliminate
pitched tone or static noise.
Note: Filters are not necessary for customers without voice service on their
DSL line.
What if I hear static on the DSL phone line?
Make sure filters are properly installed on all phone jacks with a connected
devices (including wall-mounted phones). You can purchase additional
filters (including wall-mount filters) at att.com/equipment or most
electronics stores.
How can I get rid of the Detecting Proxy Settings Internet browser notice?
Run the Internet Connection Wizard.
In Internet Explorer® 7, you can find this wizard under Tools > Internet
Options > Connection Setup. When prompted to enter proxy settings, do not
select anything.
In earlier versions of Internet Explorer, you can find this wizard under Tools >
Internet Options > Connection Setup. When prompted to enter proxy settings,
do not select anything.
How do I upgrade from AT&T Dial Internet Service?
During registration, simply enter your existing AT&T email address (Member
ID) and your account will be updated automatically. If you do not register with
your existing AT&T email address (Member ID), you must call AT&T to cancel
your AT&T Dial Internet service or you will have duplicate accounts.
What if my previous AT&T service is suspended?
Call Customer Service at 1.877.722.3755 or (1.888.321.2375 in AL, FL, GA, KY,
LA, MS, NC, SC, and TN) to reactivate your account.
Get Started
1
Gather information:
Service Activation Date
(located on your confirmation letter or packing slip)
You can only connect to the Internet after your service
has been activated. This may take until 8pm on your
Service Activation Date.
2
Your Account Information
(located on your confirmation letter or packing slip)
• All customers: Your AT&T High Speed Internet
telephone/account number
•E
xisting members: Your primary AT&T e-mail address
(Member ID) and password. (Your password is not
located on your confirmation letter/packing slip.)
Gather Materials
Required equipment
Supplied equipment
Your equipment may differ in appearance from these illustrations.
*F ilters are not necessary if you do not have voice service on your DSL line.
Data Cable
(Color may vary)
DSL Modem
Dual-Port Filter*
(Necessary only if you have a
phone device using the same wall
jack as your DSL modem)
Single-Port Filters*
(You need as many filters as you
have phone devices in your home)
Ethernet Cable
(Color may vary)
If you have AT&T equipment that is
more than three years old, you may
experience problems. To purchase new
equipment, contact AT&T at 1.888.573.4147
or go to att.com/equipment
Power Adapter
(Color may vary)
NOTE: Cable and dial-up modems are not compatible with AT&T High Speed
Internet service. Correct equipment can be purchased at att.com/equipment
Install CD
Turn on the computer you will be using with your
AT&T High Speed Internet Service and insert CD. The
CD will install the correct settings for your equipment.
Watch the video to learn
how to install your service!
Need more help?
Visit att.com/support for videos and online tutorials or call 1.888.321.2375 (in AL, FL, GA, KY, LA,
MS, NC, SC, TN) or 1.877.722.3755 (in all other states).
Windows and Internet Explorer are trademarks of Microsoft Corporation. Motorola is a registered trademark of Motorola Trademark Holding LLC. 2Wire is a registered trademark of 2Wire, Inc. Westell is a registered trademark of Westell Technologies, Inc. Linksys is a registered trademark
of Cisco-Linksys LLC. Belkin is a registered trademark of Belkin International, Inc. NETGEAR is a registered trademark of NETGEAR, Inc. Actiontec is a registered trademark of Actiontec, Inc. D-LINK is a registered trademark of D-Link Corporation or its subsidiaries in the United States and
other countries. AT&T, the AT&T logo, and all other AT&T marks contained herein are trademarks of AT&T Intellectual Property and/or AT&T affiliated companies. ©2012 AT&T Intellectual Property. All rights reserved.
239715ATT_8pgs.indd 1-2
Page4_ATT166_BYO_Modem_Release
Download the free AT&T Code
Scanner on your mobile phone at
http://scan.mobi or your app store
and click on the link to start the video.
Installation
CD
The CD will take you through
the installation process.
If you need further assistance, refer to
the instructions on Manual Installation.
ATT120410824-A
ATT120410824-A
9/14/12 5:50 AM
Manual Installation:
3 Activate
NOTE: Your device and cables may look different and contain different labels.
1 Set Up
A
or give permission to allow the network connection when prompted.
If you don’t have AT&T phone service, skip steps A–C and start with step D.
A
B
Install Single-Port Filters on any wall jacks with telephones,
Single-Port Filter
Phone
B
Existing
Phone Cable
Install a Dual-Port Filter on the wall jack that will be used by
Wall Jack
Dual-Port Filter
Phone
B
Phone
Existing
Phone Cable
Wall
Jack
DSL/HPNA
Connect the Phone Cable of any device sharing this jack to the
Existing
C Phone
Cable
Connect the green Data Cable from DSL/HPNA Port on the
Dual-Port Filter to the DSL/Broadband Port on the Modem/Gateway.
Make sure your computer is OFF during the step.
Don’t have AT&T Phone
Service? Do not use a
filter. Simply connect the
Data Cable to a wall jack.
Data
Cable D
DSL Port
Ethernet Port
Power Port
Don’t have AT&T voice service?
Do not use a filter. Simply connect the Data Cable into a wall
jack as shown below.
DSL
ETHERNET
RESET
POWER
Wall Jack
Data Cable
E
Modem
Ethernet
Cable
E
Connect the yellow Ethernet Cable from the Ethernet Port
on your Modem/Gateway to the Ethernet Port on your PC.
F
NOTE: For the best experience,
we recommend using Microsoft®
Internet Explorer 7.0 or higher or
Safari 4 or higher.
Turn your security or firewall software back on, if you
turned it off.
Note: Your AT&T email address (Member ID) and account password are used for accessing
the homepage, email, and account management features.
DSL
Phone Port on the Dual-Port Filter.
D
C
Phone
att.net/activate
During registration, you will need to enter:
• Your AT&T High Speed Internet telephone/account number.
• Create an AT&T email address (Member ID) and a password. Or enter
your existing primary AT&T email address (Member ID) and account
password, if you already have one.
Phone
the Modem/Gateway. Skip to D if this jack will only be used by
the Modem/Gateway (and not shared with a phone, fax, etc.).
C
Voice service is not required
for an Internet connection.
Dual-Port
Filter
Your Internet browser should display
this activation screen. If registration
does not start automatically, go to
Open your Internet browser and complete registration.
The online registration process will start automatically to help you
activate your service.
Phone (optional)
fax machines, satellite receivers, or other connected devices
except for the jack that will be used by the Modem/Gateway.
Wall Jack
Turn off any security or firewall software,
F
4 Update Settings
After registration, you will need to update your Modem settings to the AT&T email address (Member ID) and
DSL network password you created/used during registration. The online registration process will guide
you through the steps.
Note: Your DSL network password is used by your Modem/Gateway to connect to the DSL network. This is
different from your AT&T account password, which you established during registration.
Power
Adapter
• For non-AT&T equipment, please check your device manufacturer’s instructions or refer to the Check
Modem Settings page of this guide. Be sure to enter your AT&T email address (Member ID) and DSL
network password in place of the temporary PPPoE Username and Password.
Electrical
Outlet
Congratulations! Your AT&T High Speed Internet service should now be working.
If you are having
issues or are unable
to connect to the
Internet, please check
the Having Trouble?
section of this guide.
Connect the black Power Adapter from the Power Port on
your Modem/Gateway to an electrical outlet.
Check Modem Settings
Steps to configure your Modem settings:
2 Power Up
A
Wait for your modem to power up and connect.
(about 15 minutes).
During this time, do not unplug the black Power Adapter or green
Data Cable. This can damage the Modem/Gateway. The lights
should turn green to indicate a successful connection.
C
Find
your Modem’s IP (Internet Protocol) address and enter it into your Internet browser.
A
Turn your modem on.
If your modem does not turn on after you connect it to a power
source, push the Power button.
B
Devices vary considerably, so terms and steps for your device may differ. Please consult the user guide that came
with your device, or contact the manufacturer directly.
Reset your modem.
Using a pen or pencil, press and hold your Modem’s Reset button
(usually located on the back or bottom of the Modem/Gateway)
for at least 10 seconds. This restores the manufacturer’s original
settings, if they were previously changed.
If the lights on the Modem/Gateway
do not turn green, or are red, after 15
minutes, see the Having Trouble? section.
Depending on your Modem, the first time
you use the Modem with your new AT&T
service, an instructional wizard may appear
on your computer to assist you through
the process. The wizard may ask for a
default password or access code (found in
the Modem’s user guide or on the bottom
of the Modem), or ask you to set a security
password. This password is different from
your AT&T Member ID or password.
This address provides access to your Modem’s settings. Your IP address should be listed in the Modem’s user
guide or labeled on the bottom of the Modem. If you cannot locate this address, contact the manufacturer
directly. Listed below are the IP addresses for several popular Modems:
Motorola®http://192.168.1.254
2Wire®http://192.168.1.254
Westell®http://192.168.1.254
Linksys®http://192.168.1.1
Belkin®http://192.168.2.1
You may need to enter the Modem’s default username and password, located on the bottom
of the Modem or in its user guide.
B• Enter settings in the configuration screen.
The configuration screen may appear automatically, or you may need to select Advanced. Enter the following
information in the appropriate fields (order and terminology may vary):
IN THIS FIELD:
IF YOU…
ENTER:
PPPoE Username
(Applies to everyone)
[email protected]
PPPoE Password
(Applies to everyone)
attreg
Reside in AL, FL, GA, KY, LA, MS, NC, SC, TN
8
Reside in any other state
0
VCI
(Applies to everyone)
35
NAT
Are using a router
On
DHCP
Are using a router
On
VPI
NOTE: Modems vary by manufacturer. For
details about the correct light display for your
equipment, see the manufacturer’s user guide.
Netgear®http://192.168.1.1
http://192.168.0.1
Actiontec®http://192.168.100.254
D-Link®http://192.168.0.1
If your Modem/Router does not support onboard PPPoE, you will need to configure your computer for PPPoE instead.
C• Refer to Step 3 Activate.
Need affordable in-home computer connection service?
We can be there—the next day!1
Call AT&T ConnecTech® at 1.866.445.7334.
1
Next-day service not available in all areas and requires order before 3pm local time.
239715ATT_8pgs.indd 3-4
Stay connected on the go!
Your Internet service from AT&T includes access to the
thousands of AT&T Wi-Fi Hot Spots nationwide.
Visit attwifi.com to learn more.
9/14/12 5:50 AM