1
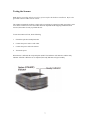
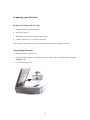
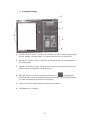
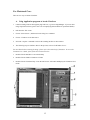
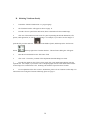
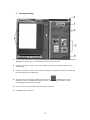
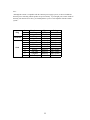
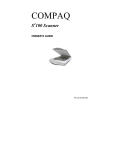
Astra 2400S
Operation Manual
This operation manual contains information not found in the Quick Start Guide. For quick
installation instructions, see the Quick Start Guide accompanying your scanner.
Important: Unlock scanner before operating. Lock the scanner before moving it.
Trademarks
Presto! PageManager is a trademark of NewSoft Technology Corporation. IBM PC/AT is a
trademark of International Business Machines Corporation. MS-Windows, Windows, and MSDOS are trademarks of Microsoft Corporation. Macintosh and Mac Series are trademarks of
Apple Computer, Inc. Photoshop is a trademark of Adobe Systems, Inc. Other names and
trademarks appearing herein are trademarks of their respective holders.
Important Safeguards
Read all of the instructions.
Save these instructions for later use.
Follow all warnings and instructions marked on the product.
When replacement parts are required, be sure that service technicians have used
replacement parts that conform to at least the same safety standards with regard to fire,
electric shock, or other hazards.
Do not use this product near water or in rainy/moist environment.
Do not place the scanner on an uneven surface. This may cause serious damage to the
scanner.
The scanner should be operated only from the type of power source indicated on the
marketing label.
Do not attempt to service this product yourself as opening or removing the enclosure may
expose you to dangerous voltages or other hazards.
This unit has input circuitry suitable for a 100 ~ 240VAC supply.
The sound level at the operators position according to IEC 7041 : 1982 should be less
than or equal to 70dB(A).
1
Table of Contents
A Glance At Your Scanner …………………………………………………………….. 3
Unlocking The Carriage ……………………………………………………………….. 4
Installing Application Software and VistaScan ……………………………………… 5
Testing The Scanner …………………………………………………………………… 7
Completing Your First Scan …………………………………………………………... 8
Start Your Scan By Using VistaScan …………………………………………………. 9
Troubleshooting ………………………………………………………………………. 16
Maintenance …………………………………………………………………………... 18
Specifications ………………………………………………………………………….. 19
Glossary ……………………………………………………………………………….. 20
2
A Glance At Your Scanner
The Front View
The Rear View
3
Unlocking the Carriage
Before operating the scanner, please unlock the restraint. To unlock the restraint, move the restraint toward
the unlocked position.
!! Warning: You must lock the scanner before transporting it. Failure to do so can
cause extensive damage to your scanner. Be sure the scanner lamp is in the return
position before locking the scanner. To lock the restraint, move the restraint
toward the locked position.
4
Installing Application Software and VistaScan
For Windows 95/98 users:
Installing Adobe PhotoShop LE (Install first prior to installing VistaScan)
a.
Insert the Adobe PhotoShop CE into your CD-ROM drive.
b.
The installation program will launch automatically.
Note: If the installation program does not launch, please follow these steps:
1.
Click the Start button on the taskbar and select the Run command.
2.
On the command line of the Run dialog box, type D:\INSTALL (where D: indicates the CDROM drive). Select OK.
The installation program will guide you through the remainder of the process. Follow the instructions to
complete the installation.
Installing VistaScan (Install PhotoShop LE prior to installing VistaScan)
a.
Insert the Astra scanner (SCSI) CD into your CD-ROM drive.
b.
The installation program will launch automatically.
Note: If the installation program does not launch, please follow these steps:
c.
1.
Click the Start button on the taskbar and select the Run command.
2.
On the command line of the Run dialog box, type D:\SETUP (where D: indicates the CDROM drive). Select OK.
Follow the on-screen instructions to install VistaScan and other bundled software.
5
For Macintosh Users:
Installing Adobe Photoshop LE (Install first prior to installing VistaScan)
a.
Insert the CD labeled Adobe PhotoShop into your CD-ROM drive.
b.
Double click on the PhotoShop CD icon located on the desktop.
c.
Double click on the PhotoShop installer icon.
d.
Follow the onscreen instructions to install the software.
Installing UMAX Astra 2400S VistaScan CD (Install PhotoShop LE first prior to installing VistaScan)
a.
Insert the CD labeled Astra scanner (SCSI) into your CD-ROM drive.
b.
Double click on the UMAX VistaScan CD icon located on the desktop.
c.
Double click on the VistaScan CD installer icon.
d.
Follow the on-screen instructions to install VistaScan and other bundled software.
Note: For detailed instructions on the use of the bundled software, please refer to the online manual
included in each program.
6
Testing the Scanner
Note: Before proceeding with the steps below, please complete the hardware installation. Refer to the
Quick Start Guide included with the scanner.
The scanner automatically performs a simple self-test each time it is turned on to help spot major system
errors in the scanner itself. Once the scanner has been unpacked and the shipping restraint has been
removed, the scanner is ready to perform this test.
To start the scanners self-test, do the following:
1.
Unlock the Optical Assembly Restraint
2.
Connect the power cord to a wall outlet.
3.
Connect the power cord to the scanner.
4.
Turn on the power.
When the test is initiated, the ready and option (ADF/UTA) indicators will flash once and the ready
indicator will blink. When the test is completed, the ready indicators will glow steadily.
7
Completing your First Scan
Testing Your Scanner (for PC only)
1.
Unlock the Optical Assembly Restraint.
2.
Turn on your scanner.
3.
Run Windows and open the VistaScan program group.
4.
Click the “Scanner Test” icon to begin self-testing.
If the scanner test fails, please refer to the Troubleshooting section of this manual for a solution.
Original Image Placement
1.
Raise the scanner’s document cover.
2.
Place the document (graphic, text, or photo) face down on the scanner. Center the document along the
triangular mark.
3.
Lower the document cover.
8
Start Your Scan by Using VistaScan
Note:
It is important to realize that different applications may use different methods of acquiring an
image and only the most general case is given here. Please refer to your application’s user
documentation for details on its usage.
For Windows Users
There are two ways to initiate VistaScan.
A. Using Application programs to invoke VistaScan
1.
From Microsoft Windows, launch the application that will be used to call VistaScan. (e.g. Presto!
PageManager or Adobe PhotoShop LE).
2.
Pull down the “File” menu.
3.
Choose “Select Source”. Remember the specific wording of parameters may vary among different
applications.
4.
Select “VistaScan” as the data source. (You only need to do this once).
5.
Pull down the “File” Menu again.
6.
Select “Acquire” to activate the scanning dialog box as shown on page 10.
7.
Place the image you will scan on top of the scanner’s object glass.
8.
From the four modes on the “Click to Scan” panel, click a scan mode button that suits the required
scan. For example, if you wish to scan a color photograph, click the Color Photo button in order for
the image to be scanned in true color. Scanning will commence upon selection of a button.
9.
Click “Exit” to close VistaScan when scanning is complete. The scanned image will be placed on the
application’s desktop ready to be edited.
10. Edit the scanned image using the application. (e.g. Presto! PageManager or Adobe PhotoShop).
For more details about scanning the image, please refer to the online help in VistaScan. To access the
VistaScan User’s Guide, please follow the instructions below:
1.
Select “Start”
2.
Select “Programs”
3.
Select “VistaScan”
4.
Select “VistaScan User’s Guide”. Your internal browser will launch and display the VistaScan User’s
Guide.
9
10
B. Initiating VistaScan directly
1.
Launch the VistaScan program group.
2.
The VistaScan interface will appear as shown on page 12.
3.
From the “Scan to” panel in the main menu, choose a destination for the scanned image.
4.
Click one of the small icons in the “Scan To” panel representing the desired destination (a file, printer,
e-mail application, etc.) for the scanned image. For example, if you want to save the image in a
particular file, click the small icon
“Preferences” button
box will appear.
on the middle of the panel, and then click the
on the top right of the VistaScan interface. The Preferences dialog
5.
In the Preferences dialog box, enter the relevant details into the “File Name”, “File Format”, and “File
Folder” fields respectively. You may use the “Browse” button to help you locate the desired folder for
your image.
6.
Click “OK”. The entries you made will be implemented and the dialog box exited.
7.
From the four modes on the “Click to Scan” panel, click a scan mode button that best suits the required
scan. For example, if you wish to scan a color photograph, click the Color Photo button in order for
the image to be scanned in true color. Scanning will commence upon selection of a button.
8.
For an explanation of the other “Scan to” destinations, please refer to VistaScan’s online help. For
information on accessing the VistaScan online help, please see page 9.
11
C. Scanning the Image
1
Click the “Preview” button. A quick, low resolution scan will be made and appear in the
Preview Window. From this image, you can determine the area you want to scan.
2
From the five “Scan to” choices, click the icon that represents the desired destination for
the scanned image.
3 Click the “Preferences” button. The Preferences dialog box will appear from which you
should enter the relevant details into the dialog box.
4 Select the area to be scanned by clicking on the Frame tool
, and dragging the
curser diagonally to form a rectangle that best defines the area. As you drag, the borders
of a frame encompassing the desired area will appear.
5 Click one of the scan mode buttons and scanning will commence.
6
Click Exit to close VistaScan.
12
For Macintosh Users
There are two ways to initiate VistaScan.
A. Using Application programs to invoke VistaScan
1.
Launch scanning software that supports plug-in drivers (e.g. Presto! PageManager. If you use other
image acquisition software, please refer to its accompanying documentation for operational details).
2.
Pull down the “File” menu.
3.
Choose “Select Source”, and then select the “Plug-ins” command.
4.
Choose “VistaScan” as the data source.
5.
Select the “Acquire” command to activate the scanning interface as shown below.
6.
The following steps are similar to those in the previous section “For Windows Users”.
For more details about scanning the image, please refer to the online help of VistaScan. To access the
VistaScan User’s Guide, please follow the instructions below:
1.
Double-click the hard drive icon on the desktop.
2.
Double-click the UMAX VistaScan 3.5 folder.
3.
Double-click the VistaScan Help. Your Internet browser will launch and display the VistaScan User’s
Guide.
13
B. Initiating VistaScan directly
1.
Launch the “UMAX VistaScan DA 3.x” program group.
2.
The VistaScan interface will appear as shown on page 15.
3.
From the “Scan to” panel in the main menu, choose a destination for the scanned image.
4.
Click one of the small icons in the “Scan To” panel representing the desired destination (a file,
printer, email application, etc.) for the scanned image. For example, if you want to save the image in a
particular file, press the small icon
button
on the middle of panel, and then press the “Preferences”
on the top right of the VistaScan interface. The Preferences dialog box will appear.
5.
Enter the relevant details into the “File Name” field.
6.
Click “OK”. The entries you made will be implemented and the dialog box exited.
7.
From the four modes on the “Click to Scan” panel, click a scan mode button that best suits the
required scan. For example, if you wish to scan a color photograph, click the Color Photo button in order
for the image to be scanned in true color. Scanning will commence upon selection of a button.
8.
For an explanation of the other “Scan to” destinations, please refer to VistaScan’s online help. For
instructions on accessing the VistaScan online help, please see page 13.
14
C. Scanning the Image
1
Click the PREVIEW button. A quick, low-resolution scan will be made and appear in the PREVIEW
WINDOW. From this image, you can determine the area you want to scan.
2
From the five “Scan to” choices, click on the icon that represents the desired destination for the
scanned image.
3
Click the “Preferences” button. The Preferences dialog box will appear from which you should enter
the relevant details into the dialog box.
4
Select the area to be scanned by clicking on the Frame tool
, and dragging the cursor
diagonally to form a rectangle that best defines the area. As you drag, the borders of a frame
encompassing the desired area will appear.
5
Click one of the scan mode buttons and scanning will commence.
6
Click Exit to close VistaScan.
15
Troubleshooting
UMAX scanners are designed to be reliable and easy to install. If, however, you have a problem with your
scanner, these troubleshooting steps should indicate where the problem lies.
Scanner Troubleshooting
This section will cover problems you may encounter when installing or using your scanner and suggest
possible solutions.
If the scanner lamp flickers, is dim, or fails to come on:
The scanning lamp is failing or has failed and needs to be changed. Please contact your dealer or UMAX
technical support.
If the Ready indicator comes on, but software returns “scanner link failed” or a similar
message:
1.
Make sure the cable is connected properly.
2.
Check the Installation procedure to make sure you followed all the instructions. Macintosh users
should pay special attention to the setting of the SCSI ID number. PC users should pay special
attention to the I/O address setting.
3.
The SCSI card provided is dedicated for use with a UMAX scanner, therefore please do not
connect additional SCSI devices.
4.
Check the terminators and the cables. If the cable and terminators are all properly installed, please
contact your dealer.
Apple-Compatible Driver Troubleshooting
If you have trouble installing the driver, check the following:
1.
Conflict between SCSI ID’s. Be sure that each SCSI device has a unique ID. The SCSI ID on
your scanner is preset at the factory to 5. Refer to “Changing the SCSI ID Numbers” if you need to
change the SCSI ID.
2.
Conflict between Init files or too many Init files. If there is a conflict because another Init file
exists in the System folder, try removing the Init file and then installing the driver.
3.
Conflict with an Apple-compatible driver. Remove all Apple-compatible drivers before
installing the Scanner file.
4.
Scanner file doesn’t exist. Be sure the Scanner driver is in the System extension folder.
5.
6.
7.
Scanner is not on or not ready. Refer to the section Scanner Troubleshooting in this chapter for
solving problems.
Cable is not properly connected. Connect the cable.
Scanner model doesn’t support an older version of the scanner driver. Contact your dealer
for newer version of the scanner driver.
16
Changing the SCSI ID Number
If you have other devices connected to your SCSI port, you need to check and see what SCSI ID’s are
already used. The scanner is preset at the factory to SCSI ID 5.
If, after checking other devices in the SCSI chain, you find that SCSI ID 5 is unused, you do not need to
change the ID on the scanner and you can go ahead with the installation.
If, however, after checking other devices in the SCSI chain, you find that another device uses SCSI ID 5,
you must reset the SCSI ID on your scanner.
To change the SCSI ID, do the following:
1.
Make sure the scanner is turned off.
2.
Gently turn the switch until an unused number appears in the switch’s notch.
Note: Do not use SCSI 8 and 9 on your scanner. They are for factory use only.
If All Else Fails
If the above solutions do not resolve the problem, contact your dealer or check the UMAX support Web
site at www.umax.com/support. In addition, UMAX has Support Technicians that can be reached at 214739-1915 Monday through Friday from 9am-5pm CST. When contacting a UMAX Support Technician,
please have the following information ready:
1.
The scanner model you are using.
2.
The version number of the scanner driver.
3.
The computer model you are using.
4.
All SCSI devices that you are using.
5.
The application software packages that you are using.
6.
Error codes or messages seen.
7.
A description of what you were doing at the time the malfunction or failure occurred.
8.
Other observations that may aid the technician in identifying the problem and solution.
Note: If returning the scanner for repair, the scanner must first be locked. Failure to lock scanner prior
to shipping may damage the scanner and void the warranty.
17
Maintenance
With the exception of periodic cleaning or lamp replacement, the scanner is virtually maintenance free.
The following sections give the procedures for basic maintenance of the scanner.
Static Electricity Precautions
Static electricity is a constant danger to computer systems. The charge that can build up in your body may
be strong enough to damage electronic components on the scanner’s printed circuit board or the computers
interface card. Therefore, it is important to observe basic precautions whenever handling electronic
components for your computer. Although areas with high humidity are much less prone to static
electricity, it is best to always take precautions against accidental damage that can result in expensive
repairs.
The following measures should generally be enough to protect your equipment from static discharge.
•
•
Discharge any static electricity that may be built up in your body by touching a grounded or antistatic surface. For example, touch some large metal object or the silver-toned expansion slot
covers at the rear of your computer’s case. Be sure to do this immediately before removing any
components from their anti-static bag.
When handling any electronic components, be sure to carefully avoid touching any metal part of
the component. Avoid touching any of the gold “fingers” that plug into the expansion slot. It is
best to handle system components either by their edges or by the mounting bracket which attaches
to the slot opening in the rear of the case.
Follow the above to the best of your ability. Excessive caution is not necessary, simply take reasonable
care.
Cleaning
Regularly cleaning the object glass will ensure that dirt or smudges will not reduce the quality of your
scanned image. Before you clean the glass, make sure the scanner is turned off and the power cord is
unplugged. Clean the object glass and document cover with a soft damp cloth and a mild detergent or
alcohol.
Warning:
Do not spray the cleaning fluid directly on the object glass. Spraying the liquid directly
on the glass may cause the liquid to penetrate the seams around the glass and
contaminate the mirrors and lenses inside the scanner. Please be sure you spray the
liquid on the cleaning cloth and then wipe the glass clean.
18
Specifications
Scanner Type ………………………………………………………………………………………… Flatbed
Scan Speed ………………………………………………………... 42.2 Seconds/A4 (600 dpi, Color Mode)
Preview Speed ……………………... 5.3 Seconds/A4 (Color Mode); 3.5 Seconds/A4 (Gray/Line art Mode)
Maximum Scannable Area ……………………………………………….. 216 x 356.6 mm (8.5 c 14 inches)
Optical Resolution …………………………………………………………………………… 600 x 2400 dpi
Maximum Resolution ………………………………………………………………………. 9600 x 9600 dpi
Scanning Density ……………………………………………. 1 dpi to 9600 dpi, via Ultra View Technology
Color Scanning Method …………………………………………………………... One pass with color CCD
Sample Depth
Color Mode …………………………………………………………………… 36 Bit/Pixel Internal
Grayscale Mode ………………………………………………………………. 12 Bit/Pixel Internal
Line-Art Mode ………………………………………………………………………….. 1 Bit/Pixel
Scanner Settings
Scaling ……………………………………… 1% to 200% in 1% increments at 600 dpi Resolution
Highlight/Shadow ………………………………………………………………………... 255 Steps
Contrast/Brightness ……………………………………………………………….. +100% ~ -100%
Gamma Curve ………………………………………………………………. Downloadable Curves
Data Output
Color Mode …………………………………………………………………………... 42 Bit (BET)
Grayscale Mode ……………………………………………………………………… 14 Bit (BET)
Interface ………………………………. Built-in SCSI II; One 25-pin Connector and One 50-pin Connector
Power Requirements
Voltage ……………………………………………………………………………… 100-240 VAC
Frequency ………………………………………………………………………………… 50/60 Hz
Power Consumption …………………………………………………………………….. Maximum 42 Watts
Environmental Ranges
Operating Temperature ……………………………………………………………….. 10°C ~ 35°C
Relative Humidity ……………………………………………………………………... 10% ~ 85%
Dimensions ……………………………………………………………………... 336mm x 591mm x 151mm
Net Weight ……………………………………………………………………………………………. 6.6 Kg
Systems Supported ……………………………………………………………………….. PC and Macintosh
Options ……………………………………………………………………………….. Transparency Adapter
Automatic Document Feeder
19
Glossary
ADF: Automatic Document Feeder; a scanner option which automatically feeds and scans multiple page
documents.
Apple-Compatible Driver: An interface software module for applications other than Photoshop that
support Apple scanners.
Application Software: Software that is used to perform a specific function, e.g., image processing, OCR
(Optical Character Recognition), or DTP (Desktop Publishing).
ASPI: SCSI communication standard developed by Adaptec.
BET: Bit Enhancement Technology. This is a digital image processing technique which increases the
number of bits used per pixel in order to acquire a more vivid and clearer image.
Black and White: A 1-bit image file capable of only displaying black and white image data with no
intermediate gray levels.
CCD: Charged-Coupled Device. An electronic light sensing device used to convert light waves into
electronic signals.
DIP Switches: Small switches mounted in or on computer equipment that set certain parameters.
Document Cover: The plastic cover that is lowered over a document on the scanner’s object glass.
Driver: The driver is a software program that tells the computer how to communicate with and operate
scanner. The driver can be a stand alone application or can be accessed from within another application.
DPI (Dots-per-inch): A measurement of resolution. The higher the dpi, the higher the resolution of the
image.
Expansion Slot Cover: A metal or plastic plate dust cover that covers the exterior “hole” in an expansion
slot.
Folder: An electronic storage area used to store and organize files and other folders and is often
represented on a computer screen by a folder-like icon
Grayscale: An 8-bit image file capable of displaying up to 256 gray levels.
I/O Base Address: An address that is used for communication between a host computer and an expansion
or interface card. All cards in a computer system must be set to different I/O addresses.
Icon: The graphical representation of a computer file or piece of computer software.
Image-Editing Software: A software program used to edit or alter image files.
Indicator Panel: The area of the scanner that contains the LED indicators to show scanner status.
Interface Card: A card that is inserted into an expansion slot to allow the connection of a peripheral
device to a PC.
Object Glass: The tempered glass of the scanner where documents or objects to be scanned are placed.
20
Optical Assembly: The component system of the scanner that contains all of the optical components.
Sometimes referred to as a carriage or carriage assembly.
Option (ADF/UTA) Indicator: Glows when an automatic document feeder or transparency adapter is
installed and ready for use.
Peripheral Device: A device attached to a computer that adds functionality to a computer system.
Pixel: The smallest unit within an image file. The actual pixel displays a value based on the bit-depth of
the image.
Power Indicator: The indicator that glows when the scanner’s power cable is connected to the scanner
and a “live” outlet and the power switch is turned on.
Ready Indicator: The indicator that glows when the scanner is ready to be used.
Resolution: A measure of how many dots-per-inch are scanned.
SCSI Chain: One or more SCSI devices connected to the same SCSI controller.
SCSI Device: A device which connects to a computer using the SCSI interface.
SCSI ID Switch: The switch on most external SCSI devices which is used to set the SCSI ID.
SCSI ID: A unique number between 0 and 7 that identifies each device on a SCSI chain. The SCSI ID is
set using a SCSI ID switch (present on most external SCSI devices).
Terminator: An electronic component that absorbs stray signals in a SCSI chain of computer equipment
to ensure reliable operation.
TWAIN Compliant: Any software or image input device that conforms to the TWAIN standard.
TWAIN: A standardized interfacing system that allows many different software applications to access
many different imaging input devices.
UTA: UMAX Transparency Adapter; a scanner option that consists of additional hardware allowing the
scanning of transparent originals, such as slides or x-rays.
21
Note:
“Although the scanner is compatible with the German power supply systems, we do not include the
German power cord along with the product except in Germany. If you bought your scanner outside of
Germany, but intend to use it there, you should purchase a power cord compatible with the German
system.”
Plug
Connector
Cord
No.
1.
2.
1.
2.
1.
2.
3.
4.
5.
6.
7.
8.
Manufacture
I Sheng
King Cord
I Sheng
King Cord
I Sheng
King Cord
Ta Hsing
Walsin Lihwa
One Six
Yeh Yang
Longwell
Da Tung
Type
SP-023
KC-015A
IS-14
KC-003
H05VV-F
H05VV-F
H05VV-F
H05VV-F
H05VV-F
H05VV-F
H05VV-F
H05VV-F
22
Rating
16A/250V
16A/250V
10A,250V
10A,250V
3G,0.75mm²
3G,0.75mm²
3G,0.75mm²
3G,0.75mm²
3G,0.75mm²
3G,0.75mm²
3G,0.75mm²
3G,0.75mm²