1
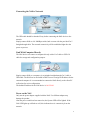
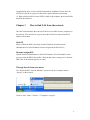
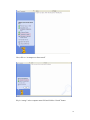
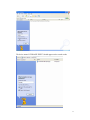
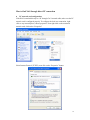
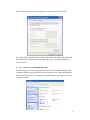
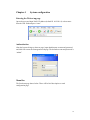
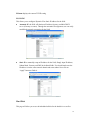
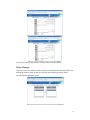
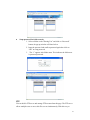
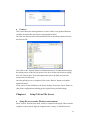
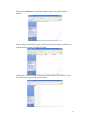
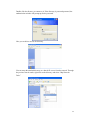
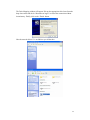
User Manual Network Attached Storage NAS User Manual 1 Table of Contents 1. Introduction Overview Features System Requirements Power Requirements Package List Hardware Components Ports and Buttons Status Indicators 2. Getting Started Hard disk installation IDE cable connection Connecting the 4 pin Power Plug Connecting the NAS to network Link with computer directly Connect NAS to a computer Power on the NAS 3. How to find NAS from the network Static IP Dynamic IP Host Name Through Search from START menu 4. How to find NAS through direct PC connection PC network card configuration PC connects to NAS through USB cable 2 5. System Configuration Entering the Web Interface Authentication Menu Bar Network TCP/IP Settings Host name and group name Auto DHCP server IP status IP CONFIG Hard Disk Disk Utility File System Language Hard Disk sleep time Status Log Disk Information Folder Manager Folder List Sharing List FTP FTP Server Anonymous Accounts management Time Date Time SNTP Time Server Time Zone System Administrator Firmware 3 6. Setup NAS as File Server Setup file server under Windows environment 7. Troubleshooting 8. Appendix Specifications 4 Chapter 1 Introduction Overview Coolmax Technology introduces an affordable SOHO NAS (Network Attached Storage) for home or small business users. This user friendly network disk is ready to plug and play; no prior networking experience is required. It supports Windows, Mac, and Linux operation systems. It is easy to share data files through the Internet and easy to setup and operate. By using NAS, it adds great flexibility for the network. It extends the personal computing to a new powerful level. Features Data sharing over a network Complied with TCP/IP, SMB, FTP, SNTP protocol Sharing data via a local area network through SMB protocol High speed USB2.0 interface Share-level security through web-based network management tool Thermal fan controller for hard disk protection File sharing between Windows, Mac, and Linux clients No drivers needed, no server required System Requirements File server for local network Windows 98, ME, 2000, XP Mac OS 10.2 or above FTP server for internet Windows 98, ME, 2000, XP Mac OS 9 or above USB Enclosure Windows 98, ME, 2000, XP Mac OS 9.X, 10.3 or above Packing List Please make sure the package includes the following items: NAS x1 Network cable x1: RJ-45, Cat 5, 1.5M USB 2.0 cable x1: Type A female to type B female, 1M Power Adapter x1: Input AC100V-240V, Output DC12V 2A, peak 2.5A 5 One User Manual CD One NAS Quick Installation Guide Hardware Components Ports and Buttons Status Indicators Blue Light: NAS system ready Green Light: Connect to a network, Blinks when there is data transfer Red Light: Blinks when data read and write from hard disk Chapter 2 Getting Started Hard disk installation This NAS is a standard IDE hard drive supported device. It supports up to 1 Terabyte capacity. Before the Hard Drive is placed into the enclosure, adjust the jumper to the master position. Please refer to the documentation from hard drive manufacture. 6 Jumper Setting IDE cable connection Match The IDE ribbon cable RED strip to the Hard Drive connector pin 1 and attach firmly. IDE cable connector Connecting the 4 pin power plug Carefully connect the power plug to the Hard Drive power connector and press firmly. Power connector ※ Once you have finished all the steps above, secure the Hard Drive with provided screws and carefully close the enclosure. 7 Connecting the NAS to Network The USB cable should be detached if any before connecting the NAS device to the network. Simply connect NAS to a 10/100Mbps switch, hub or router with the provided Cat 5 Straight through cable. The network connectivity will be established right after the power on process. Link With Computer Directly The NAS device can connect to computer directly with a Cat 5 cable or USB 2.0 cable for storage and configuration purpose. Simply connect NAS to a computer via an included straight through Cat 5 cable or USB cable. The NAS has its own build in DHCP server to assign an IP address for the connected computer. It is recommended to connect the NAS directly to the client PC at first time for easier configuration. The default IP address for the NAS device is 169.254.0.1 Power on the NAS Only use the power adapter supplied with the NAS. Use different adapter may damage the product. After the power switch has been turned on, the System LED will be lighted. If the Link LED lights up or blinks as well, this indicates there is connectivity from the network. 8 Congratulation! Now you have finished the hardware installation. Please have the NAS device placed on a proper location with a good ventilation environment. ※ When connect the NAS via the USB 2.0 cable to the computer, the network cable should be disconnected Chapter 3 How to find NAS from the network Once the NAS attached to the network, the NAS is accessible from any computer on the network. There will be few ways to locate the NAS device either from the IP address or host name. Static IP Please confirm the NAS’s host name and the IP address from the Network Administrator if a static IP address has been assigned to the NAS device. Dynamic assigned IP Consult Network Administrator for the NAS IP address. If NAS is behind a router, you can search the DHCP client table. Check the host name “storage-xxxx” from the DHCP list on the network gateway or router Through Search from start menu Use “Search Results” from the Windows system to look for a computer named “storage” on the network. Click on “start” menu→”Search”→”Computers or people” 9 Next, click on “A computer on the network” Key in “storage” at the computer name field and click the “Search” button 10 The device named “STORAGE-XXXX” should appear on the search results 11 How to find NAS through direct PC connection PC network card configuration If the NAS is attached directly to a PC through Cat 5 network cable, make sure the PC network card is configured properly. To configure the local area connection, right click on my network places, choose properties. Next right click on the connected network card, click on the “Properties” Select Internet Protocol (TCP/IP), next click on the “Properties” button. 12 Select “Obtain an IP address automatically”, next click on the “OK” button. The connected PC should be able to obtain an IP address 169.254.0.X through NAS. Since both the PC and NAS are on the same subnet, you can follow Chapter 3 to locate the NAS. PC connects to NAS through USB cable The NAS becomes an extra storage enclosure drive for the computer through USB connection. Windows will automatically detect the hard drive without installing any driver. Once the hard drive is recognized, an additional drive will appear on the My Computer window. 13 Chapter 4 System configuration Entering the Web set up page Open a browser and input NAS’s IP address (default IP: 169.254.0.1) or host name from the URL field and press “enter”. Authentication After the browser brings up the next page, input administrator account and password, and click OK to enter the management web page. The default account and password is “admin”. Manu Bar The first home page shows below. There will be brief description on each configuration page. 14 Network TCP/IP setting This page enables you to configure your network environment. It also displays the network information. Host name and group name Click on “Edit” button to change workgroup and host name if necessary. Input workgroup and host name, next click on “OK” to finish it. Auto DHCP server shows the current DHCP server status. 15 IP Status displays the current TCP/IP setting IP CONFIG This allows you to configure Dynamic IP or Static IP address for the NAS. Automatic IP: the NAS will obtain an IP address from any available DHCP server (Gateway or router). Through the automatic IP assignment, user can easily establish the network connection for the NAS. Static IP: to manually setup an IP address for the NAS, Simply input IP address, Subnet Mask, Gateway and DNS in the blank fields. User should make sure the IP address is on the same network domain and same subnet. Next click on “Apply” button to finish it. Hard Disk This page will allow you to use the imbedded utilities for the hard drive as well as 16 display the hard drive status. The NAS supports FAT32 file system for various operation systems. Disk Utility: You should format the hard disk from this page before you use it. Click on “Format disk” button and the warning page will prompt on the screen. Click “OK” to format the hard disk. The formatting process will take a while depends on the hard drive capacity. Once the formatting process is done, the successfully information will pop up and indicate the initial disk successfully. Next, click on “OK” to finish it. Scan disk: Click on “Scan disk” button to start scanning the hard disk. The dialogue box will 17 show below, click on “OK” to scan disk. It is particular useful to check if there is any error on the hard drive. The next dialogue box will show below. The scanning process will take some time to complete. It depends on the capacity of the hard disk. Once the hard drive is ready, the PUBLIC fold will be created by default. File System Language: The system language will define file name in different languages that you can use it on NAS. Currently it supports 14 languages for localized operation systems. Click on the drop down menu to select the desired language. Hard Disk Sleep Time The disk will idle if hard disk is inactive after “xx” minutes. To setup the hard disk sleeping time, input the value in the field. The value should be “5” to “60”. The value “0” can disable this function. The hard drive will standby all the time without idling. Status Log Click “Refresh” to refresh the updated system log information. During the scan disk process, the status log will show the current scanning status and contains. 18 User can clear the log any time by clicking on the Clear Msg button. Folder Manager User can create a new folder, rename or delete an existing folder from the Folder List, making the folder to share on the local network and setup password for folder accessibility through Sharing List. 19 Create a new folder 1. Click on the “Create” button and the pop up window will show below. 2. Input folder name and click on “OK” to create a folder. 3. Highlight the folder name to rename or delete the folder Share a folder Select a folder name on Folder List table and click on , the folder will appear on the Sharing List table. Now the folder is available to every one on the entire network. If the sharing folder needs to be removed, simply highlight the folder name and click on to disable it. 20 Setup password for folder security 1. Select a folder on the “Sharing List” and click on “Password” button, the pop up window will show below. 2. Input the password and confirm password again then click on “OK” to setup password. 3. The “*” appears after folder name. This indicates the folder now is password protected. FTP You can build a FTP server and manage FTP account from this page. The FTP server allows multiple users to access this files server simultaneously. With this easy to 21 configure NAS device, user can bring the FTP to home or office for cost less and secure file access. It is easy to maintain. No extra loading for PC. No more pear to pear file sharing. It is always available form the network without specifically turn on a PC to access the shared files. FTP Server First select from the drop down menu and choose “Enable” to activate the FTP (File Transfer Protocol) Server. Next assign a port for FTP access. The default is on port 21. Click on “Apply” to make changes. Anonymous The FTP server allows anonymous account access for various needs. When Anonymous account has been enabled, any one can connect to the FTP server from the network. NAS administrator will be able to restrict read/write access to this account. The default login in home directory is the PUBLIC folder. There will be more selections from the directory drop down menu according to the created folder form prior Folder Manager. Account management The account management allows you to add more users as well as grant different rights for various privileges. To add new user, click on the Add button. The pop up page will show below. 22 1. Building an account Input the desired user name and click on Add button. The user name will appear on the account table with current account status. 2. Modifying Account By default, newly created user has right for read only. You can modify it by highlighting the user name and clicking on the “Modify” button. Next page should show below. Input the user login password for better security and select the appropriate ready only or read/write access type. Next select the desired directory from the Folder List and move it to the Sharing List. Click on the “Modify” button first to make 23 changes following by the “Return” button to get back to the previous page. You can temporarily enable or disable the user account through the “En/Disable” button. The change will immediately take effect right after the button is pressed. To delete a user, simply highlight the user and click on “Delete” button. The following warning page will pop up. Click on OK button to confirm. Time You can setup system time for the NAS and synchronize with the network time server. 24 Setup the Date Input the current date into the date field. The system date is on yyyy/mm/dd format. Setup the Time Input the current time into the time field. The system time is on hh:mm:ss with 24hr format. SNTP You can enable/disable the SNTP (simple network time protocol) from this section and set it up automatically synchronize with the network time server. Time Server Setup Internet time server form this section. Either check on one of the five pre-defined time servers from the internet or input the desired time server form the network. Time Zone Select the local time zone for your location from this section. Finally click on “OK” button to make changes. SYSTEM Administrator You can change the system password for NAS’s administrator from this page. Click on the Password button to change the password. Input the desired password twice in the fields. Click on the “OK” button to confirm the change. 25 Firmware This section shows the running firmware version. If there is any updated firmware available, download the new firmware and upgrade the NAS. Once the new firmware has been downloaded, click on the Browse button to locate the firmware file. Next, click on the “Upload” button to flash the firmware. It is important that during the upload process, make sure the power has to be on all the time and never unplug the Cat 5 network cable. If any interruption takes place, the NAS may turn into serious unrecoverable state. Once the upload process is completed, click on the “Reboot” button to reload the updated firmware. If you need to set the NAS back to the factory default, click on the “Reset” button to clear all the configurations and bring up the original factory default settings. Chapter 6 Setup NAS as File Server Setup file server under Windows environment Select “Search” from the start menu, search for computers and people. When search a computer on the network, input the computer name “storage” to find NAS device. 26 Please consult Chapter 3 for detail description on how to find NAS from the network. After you have found NAS from the search results, the result window will show up with the NAS host name. STORAGE-XXXX Double click on the host name to discover the shared folder. There will be a list of shared directories appear in the result window. 27 Double click the directory to connect to it. If the directory is password protected, the authentication window will prompt up for the password. Now you are able to access the directory. You can setup the attached directory as a shared file server form the network. Through the previous search results, right click on the directory and select “Map Network Drive” 28 The Drive Mapping window will appear. Pick up the appropriate drive letter form the drop down menu and check “Reconnect at logon” to ensure the connection without inconsistency. Finally click on the “Finish: button. Now the network driver Z: is available to you all the time. 29 Chapter 7 Troubleshooting Refer to the following tips for solutions on problems during the installation and NAS operation. Please check with this section when encounter issues before contacting the tech support service. The NAS does not power up Check if the power adapter is connected properly and is plug into the power source. Use only the AC adapter that comes with NAS package. There is no Link light after the Cat 5 cable is connected Verify the Cat 5 network cable is securely plugged in on both ends. Make sure the cable is a straight through working cable. Alternatively try second cable. NAS is not accessible Please make sure you have followed the instruction on Chapter 3 for how to find the NAS. The default IP address for NAS is 169.254.0.1. The client PC should have TCP/IP network protocol installed and should be on the same network segment. NAS is still not accessible and could be frozen If you believe the NAS device is frozen, reset the NAS from the back of the device. Use a paper clip or needle pin to press the reset button for at least 5 seconds. This will allow the NAS to restore back the factory default. 30 Chapter 8 Appendix Specifications Thermal Control System fan on when the temperature is up to 50°C (122°F) System fan off when the temperature is down to 40°C (104°F) System Fan 5V DC or 12V DC (optional) File system FAT32 Hard Disc self-initial Yes Power request DC 12V/2A, peak 2.5A System Web base management interface Network protocol supported TCP/IP, SMB, FTP, HTTP Network IP configuration Auto sensing: Dynamic IP server (DHCP server)/ Dynamic IP client/ Static IP Storage media 3.5” Hard Disc, up to 1 Terabyte Firmware Maintain Updateable by management website System time Simple Network Time Protocol (SNTP) supported Interface RJ-45 x1: 10/100 BASE-TX, Auto MDI/MDI-X Half-duplex and full-duplex operation USB type B x 1: Support high speed mode USB2.0 Up to 480 Mb/s Power Switch x1: Rock switch Reset button x1 Power Jack x1 : 12V DC Storage interface x1 :40 pin ATA LED indicator Blue Light: NAS system ready Green Light: Connect to a network, Blank-data transfer Red Light: Blank-data read and write from hard disc 31