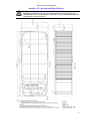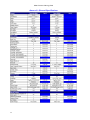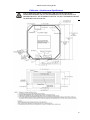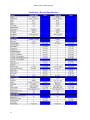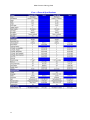
1
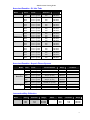
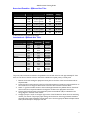
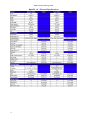
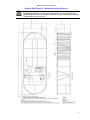
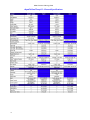
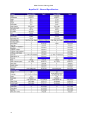
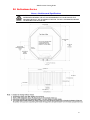
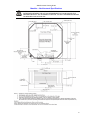
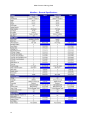
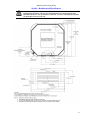
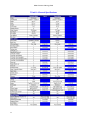
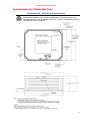
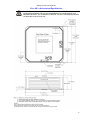
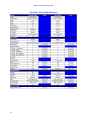
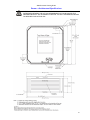
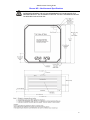
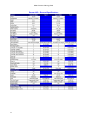
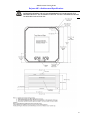
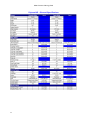
2004 Consumer Planning Guide
IV
2004 Consumer Planning Guide
Table of Contents
PRE-PURCHASE DECISIONS...................................................................................................................... 1
BEFORE DELIVERY .................................................................................................................................. 1
Typical Installation Site..................................................................................................................................................................................1
SITE ACCESS............................................................................................................................................. 2
COVER ........................................................................................................................................................ 2
AFS SITE SELECTION AND PREPARATION........................................................................................... 3
CONSIDERATIONS.................................................................................................................................. 3
Installation Types ............................................................................................................................................................................................3
Access to Site ...................................................................................................................................................................................................7
ELECTRICAL HOOK UP .............................................................................................................................. 8
LOAD SHARING ....................................................................................................................................... 8
ELECTRICAL REQUIREMENTS ............................................................................................................. 8
American/Canadian - Bay Collection .........................................................................................................................................................8
American/Canadian - D1 Hot Tubs...........................................................................................................................................................9
American/Canadian - Aquatic Fitness Systems .......................................................................................................................................9
International Bay Collection .........................................................................................................................................................................9
International D1 Hot Tubs........................................................................................................................................................................ 10
International - Aquatic Fitness Systems ................................................................................................................................................. 10
American/Canadian - @Home Hot Tubs............................................................................................................................................. 11
International - @Home Hot Tubs .......................................................................................................................................................... 11
INSTALLATION CHECK LIST ............................................................................................................. 12
HOT TUB SPECIFICATIONS .................................................................................................................... 12
SPECIFICATIONS FOR DIMENSION ONE SPAS ............................................................................. 12
AQUATIC FITNESS SYSTEMS ............................................................................................................. 13
AquaFit 16’ - Architectural Specifications.............................................................................................................................................. 13
AquaFit 16’ – General Specifications ..................................................................................................................................................... 14
AquaFit DualTemp19’ - Architectural Specifications.......................................................................................................................... 15
AquaFit DualTemp19’– General Specifications................................................................................................................................... 16
AquaPro 19’ - Architectural Specifications ............................................................................................................................................ 17
AquaPro19’– General Specifications....................................................................................................................................................... 18
BAY COLLECTION SPECIFICATIONS............................................................................................... 19
Lotus Bay – Architectural Specifications ................................................................................................................................................ 19
Lotus Bay – General Specifications ......................................................................................................................................................... 20
Sarena Bay – Architectural Specifications............................................................................................................................................. 21
Sarena Bay – General Specifications...................................................................................................................................................... 22
D1 REFLECTIONS SERIES..................................................................................................................... 23
Arena – Architectural Specifications ....................................................................................................................................................... 23
Arena – General Specifications ................................................................................................................................................................ 24
Aurora II – Architectural Specifications.................................................................................................................................................. 25
Aurora II – General Specifications........................................................................................................................................................... 26
Aurora HP – Architectural Specifications .............................................................................................................................................. 27
Aurora HP – General Specifications ....................................................................................................................................................... 28
Californian – Architectural Specifications.............................................................................................................................................. 29
Californian – General Specifications....................................................................................................................................................... 30
Chairman – Architectural Specifications................................................................................................................................................ 31
Chairman – General Specifications......................................................................................................................................................... 32
Chairman II – Architectural Specifications............................................................................................................................................ 33
Chairman II – General Specifications..................................................................................................................................................... 34
Diplomat – Architectural Specifications................................................................................................................................................. 35
Diplomat – General Specifications.......................................................................................................................................................... 36
Nautilus – Architectural Specifications................................................................................................................................................... 37
iii
2004 Consumer Planning Guide
Nautilus – General Specifications............................................................................................................................................................38
Seville – Architectural Specification.........................................................................................................................................................39
Seville – General Specifications................................................................................................................................................................40
Triad II – Architectural Specifications.....................................................................................................................................................41
Triad II – General Specifications..............................................................................................................................................................42
SPECIFICATIONS FOR @HOME HOT TUBS ................................................................................... 43
Companion HP – Architectural Specifications......................................................................................................................................43
Companion HP – General Specifications...............................................................................................................................................44
Cove – Architectural Specifications .........................................................................................................................................................45
Cove – General Specifications ..................................................................................................................................................................46
Cove HP – Architectural Specifications ..................................................................................................................................................47
Cove HP – General Specifications ...........................................................................................................................................................48
Dream – Architectural Specifications .....................................................................................................................................................49
Dream – General Specifications ..............................................................................................................................................................50
Dream HP – Architectural Specifications..............................................................................................................................................51
Dream HP – General Specifications.......................................................................................................................................................52
Sojourn HP – Architectural Specifications .............................................................................................................................................53
Sojourn HP – General Specifications ......................................................................................................................................................54
iv
2004 Consumer Planning Guide
Spa Pre-Purchase Decisions
Before Delivery
Before attempting to install or use your
hot tub, please read these instructions
thoroughly, and carefully review the
owner’s manual for your
Dimension One hot tub!
Because your hot tub is
completely self-contained, you
can install it just about
anywhere you wish . . . on a
deck, patio or even indoors.
Just be sure to position it
above ground, in an area with
good drainage and on a level
surface that fully contacts the
bottom of the hot tub. More
information on different
installation types and their unique
requirements can be found in the
section on AFS Site Selection and
Preparation.
Typical Installation Site
A concrete slab is best, but is not be required for your spa. You may choose to install it on a wood deck or
bricks. If you choose to install your hot tub on a raised deck or indoors, we suggest you contact a structural
engineer to confirm the surface will hold a hot tub filled with water. Settlement of your deck or slab may
result in damage to the hot tub, which is not covered by warranty. (See specifications in this booklet.)
Wherever you plan to install your hot tub, be sure the surface is flat and solid. Locate your hot tub so that the
equipment is above grade and not subject to flooding. Water should always drain away from the hot tub. If
you are placing your hot tub next to an obstacle, such as a fence or wall, be sure that you place the hot tub
with the topside primary control panel facing forward for easy equipment access. Locate the vents on the
drawing of your particular Dimension One hot tub. This is where cool air will enter and warm air will escape
during hot tub operation. Please ensure that these areas are always free of obstructions. Also, allow additional
space around the hot tub for any accessories you may have purchased - for example an E-Z Lifter® spa cover
lift, steps, or a gazebo. Check with your dealer on these additional space requirements.
Note
Note
In most cities and counties, permits are required for the installation of electrical circuits or
the construction of exterior structures such as decks and gazebos. Some communities have
also adopted residential barrier codes that may require fencing and/or self-closing gates on
the property to prevent unsupervised access to a hot tub by young children.
If you install the spa or hot tub indoors, the surrounding area should be waterproof or
water resistant. Water may be splashed out during normal usage and when entering or
exiting the spa. Dimension One Spas is not responsible for any water damage to any indoor
location for any reason.
Dimension One Spas and @Home Hot Tubs are equipped with a locking cover that meets or exceeds the
“Standard for Safety Covers,” but is not an adequate safety measure to prevent unsupervised entry. Please
check with your local Building Permit Office that can inform you on any special requirements needed for
installation of your electrical, decking or required barriers. Your local dealer may also provide you with
information on local building and electrical codes.
1
2004 Consumer Planning Guide
Site Access
Please refer to the drawings on pages 7 - 45 for the specifications and appropriate measurements for your hot
tub model. You will need the measurements of your hot tub in order to determine the clearance needed for
delivery.
Caution
DUE TO MANUFACTURING TOLERANCES THERE COULD BE SOME MINOR
DIFFERENCES BETWEEN THE ACTUAL MEASUREMENTS OF YOUR SPA AND THE
DRAWING BELOW. IF SITE PLANNING IS CRITICAL TO SUCH TOLERANCES, BE
SURE TO MEASURE YOUR ACTUAL SPA.
Your hot tub will probably be delivered on a dolly or cart. The additional distance from the ground to the
dolly or cart must also be included in your measurements for vertical clearance. Also, take into consideration
that if your hot tub must be transported up-hill or taken upstairs, you may need additional clearance or
assistance. Be sure to remove obstacles such as gates, planters, or items attached to the house. The point of
entry must be clear of air conditioning units, heating units, meters, electrical boxes, etc. It is best that your
dealer pre-inspect the installation site and determine the best way to deliver your hot tub. In rare cases, a
crane must be brought in to assist in an installation. Your Dimension One dealer will supervise this for you.
Here is a list of some of the most common installation hazards in planning your route:
Gates
Fences
Eaves
Gutters
Air Conditioners
Heaters
Cover
The cover supplied with your hot tub is
constructed of the highest quality
materials and is equipped with quickrelease keyed buckle locks that meet
standards set by American Standards
for Testing and Measurement (ASTM).
When the hot tub is not in use, it is
recommended that the cover locks
always be utilized to discourage
unsupervised use and to minimize heat
loss. When installing the cover on your
hot tub, be sure it is facing the correct
direction. When standing in front of
the topside primary control panel, the
center seam or hinge should run
horizontally. You should be able to lift
the handle of the cover and see the hot
tub control panel. Allow 18 inches of
extra space on the backside of the hot
tub where the optional E-Z Lifter will
rest in its upright, open position.
®
2
Hose Bibs
Bushes
Overhanging Branches
Steps
90° Turns
2004 Consumer Planning Guide
AFS Site Selection and Preparation
You have many options for installing your Aquatic Fitness System. By design, your Aquatic Fitness
System is self-supporting when placed on an adequate foundation, and can be installed above grade, in deck,
or in ground, allowing you to locate it almost anywhere you wish – outdoors or indoors. However, think
carefully about your site location, taking into consideration climate, usage, water spillage, splashing, and
drainage.
When your Aquatic Fitness System is in place and filled with water, it can weigh over 10 tons (20,000 lbs).
It is important that a proper foundation is built that can fully support that weight. The Aquatic
Fitness System must sit on a flat, level, continuous surface foundation that fully contacts the bottom of the
Aquatic Fitness System. An uneven or cracked concrete pad, or the use of shims of any kind, may cause
the Aquatic Fitness System to buckle, distort and/or crack, which will void the Warranty. We
recommend you closely follow the minimum foundation specifications which are provided in Appendix A.
A correctly installed pad that “meets” or “exceeds” all specifications is very important to a
successful Aquatic Fitness System installation. An uneven or cracked concrete pad, or the use of
shims of any kind, may cause the Aquatic Fitness System to buckle, distort and/or crack, which
will void the Warranty.
Considerations
Important consideration must be given to the type of installation desired, the type of site access available, type
of power available, and a wide range of additional items that are directly dependent on each of these major
choices. First, let’s consideration the type of installation you want.
Installation Types
Your Aquatic Fitness System can be installed outdoors or indoors. It can be installed above ground, below
ground (like a swimming pool), or partially inground. You can plan to have your equipment package (pumps,
filters, etc.) installed under the skirt and hidden from view, or installed remotely. You should carefully
consider the following items before making your final decision on the type of installation you want.
Appendix A contains a list of architectural requirements, including concrete specifications for the
pad, equipment diagrams, size and shape specifications for all Aquatic Fitness Systems, and a
blank site plan for you to sketch in your proposed installation.
If installed indoors, you must provide proper ventilation. Contact an HVAC professional to
ensure proper humidity control.
Warning
3
2004 Consumer Planning Guide
Outdoor – Self-Contained
This type of installation provides for
“everything in one place.” You build a
new pad (or use an existing one if it
meets or exceeds the specifications
required for a safe Aquatic Fitness
System installation); bring the
Aquatic Fitness System and the
power and water to the site; hook
up the equipment that is installed
within Aquatic Fitness System
under the skirt; and test it.
Everything is in one place.
Be sure to keep the following things in
mind when planning the installation of
your Aquatic Fitness System outdoors:
• Local codes pertaining to fencing.
• Local building, electrical, and plumbing codes.
• View from your house.
• Wind direction.
• Exposure to sunlight
• Privacy from neighbors and roadways.
• Proximity to trees (falling leaves, branches, debris and shade).
• Proximity to overhead utility lines.
Do not locate Aquatic Fitness System under power lines!
•
•
•
•
•
•
•
•
Dressing and bathroom location.
Location to facilitate adult supervision.
Landscaping and nighttime lighting.
Ease of access to Aquatic Fitness System equipment access panel.
Method of entry and exit from the Aquatic Fitness System; handrails and steps.
Seating direction and view from Aquatic Fitness System seats.
Storage area for maintenance equipment and chemicals
Location of electrical power source.
Warning
4
This unit requires a GFCI (Ground Fault Circuit Interrupter). A “line of sight” service
disconnect must be located where visible from the hot tub, not less than 5 feet (≅1.5 meters)
from the Aquatic Fitness System and not to exceed 50 feet (≅15.24 meters) from the
Aquatic Fitness System. This requirement may be filled with the GFCI sub-panel. All supply
wire to be rated minimum 90°C.
2004 Consumer Planning Guide
Outdoor – Remote Equipment
This type of installation provides for “everything in more than one place.” You must first build a new pad (or
use an existing one if it meets or exceeds the specifications required for a safe Aquatic Fitness System
installation). Next you may build a shed (or use an existing building located near the pad) to house the
Aquatic Fitness System equipment package. You will need to have electrical power and water brought to
the site (and gas also if you have chosen the gas heating option). Hook up and test the equipment that is
installed in your remote location. This installation type allows you to locate the Aquatic Fitness System
equipment package where it is convenient for you to access.
Above Ground
This installation type is typically the easiest because it
normally requires little excavation. The Aquatic
Fitness System is simply placed on a qualifying
pad and hooked up.
Below Ground
In ground Aquatic Fitness Systems require a
little more planning, but can be very rewarding.
Since your Aquatic Fitness System is
completely self-supporting when placed on a
proper foundation pad, backfilling with sand, gravel
or earth is not recommended and will void the
warranty.
If you back fill the Aquatic Fitness System, it voids any warranty.
•
•
•
•
After excavating the ground, install a
concrete foundation pad as described
above.
If you are planning to locate the
equipment in a remote location, you
will have to excavate a trench for the
plumbing from the Aquatic Fitness
System to the equipment. The depth
of the trench will be dependant upon
your local soil conditions and frost
levels. We recommend installing the
lines well bellow the frost line.
If you choose to leave the equipment
attached to the Aquatic Fitness
System, and are installing it below
grade, you must plan for complete
drainage so standing water never reaches the electrical components of the spa. You must also ensure
that nothing obstructs the equipment access panel, and that proper ventilation is made available to
cool the equipment. Keep in mind that you must allow access around the Aquatic Fitness
System, should it ever need to be serviced or replaced.
If you choose to heat your Aquatic Fitness System with an optional gas pool heater, the heater
must be installed above ground and a minimum of five feet away from the Aquatic Fitness System.
Check all local codes regarding the installation of gas heaters.
5
2004 Consumer Planning Guide
•
•
If the equipment is left under the unit, drainage must be provided to drain off water. The equipment
is not capable of being submerged in water. Also insure that whatever you surround the pool with
does not create additional hazards; splashed water may create walking hazards and/or cause water
damage.
Check all local building, electrical, and plumbing codes to ensure that your installation is in
compliance.
It is your responsibility to comply with all local codes pertaining to the installation of this product.
Partial In-Ground
This type of installation can allow you to take advantage of any special geographical features unique to your
site. For example, you may choose to excavate part of a terraced lot and put one end of the Aquatic Fitness
System into the excavation and wrap a “ground-level” deck around it.
Indoor
This type of installation provides for “everything in one place – inside.” You
will have some special challenges and/or
considerations with an indoor installation, but
the result can be very rewarding. Some
important things to consider are:
•
When installed indoors, your
Aquatic Fitness System has
the potential to create an
increased humidity condition
whenever the cover is off for
extended periods of time. If you
install the Aquatic Fitness
System in a closed room, a
means of decreasing unwanted
humidity should be provided;
ventilation fans, high-capacity
dehumidifier or multiple window openings
for cross ventilation are some examples.
Consult with your Authorized Aquatic Fitness System dealer for more examples or cost
estimates.
If installed indoors, you must provide proper ventilation. Contact an HVAC professional to
ensure proper humidity control.
Warning
6
2004 Consumer Planning Guide
•
•
•
•
•
•
•
•
Although your Aquatic Fitness System is designed to give years of trouble-free operation, you
must plan for the possibility that your Aquatic Fitness System will need service or replacement.
Locate your Aquatic Fitness System so that nothing obstructs the equipment access panel. Be
sure to allow access to the Aquatic Fitness System, for repair or removal, when designing your
indoor installation. Failure to do so may significantly increase service charges in future years.
Building materials for all Aquatic Fitness System indoor installations, including but not limited to
floors, walls, ceilings, doors, windows, trim, must be of materials capable of withstanding humidity and
direct long-term contact with water. All furnishings must meet these same requirements.
By the very nature of their use, Aquatic Fitness Systems have the potential to create a very wet
environment. Dependant upon the installation and the skill level of the users, varying amounts of
water may be splashed out of the Aquatic Fitness System at any given time. Splashed water lying
on the floor may create slip hazards and/or cause water damage. You must provide for proper
drainage of any water created through use of your Aquatic Fitness System.
Be certain that floor load bearing capacities are adequate to support the filled weight of the Aquatic
Fitness System, room occupants and furnishings.
Inspect your Aquatic Fitness System carefully for leaks after filling and from time to time during
the first 48 hours of operation. Although every Aquatic Fitness System is pressure tested and
water tested to the most rigid industry standards before leaving the factory, in very rare instances,
rough handling during transportation from the factory or at time of installation may cause a leak.
Indoor sunrooms may create unusually high ambient temperature conditions. Always keep your
Aquatic Fitness System covered with a solid thermal cover when it is not in use. Carefully
monitor your Aquatic Fitness System’s water temperature to ensure it does not exceed 104 F.
Check all local building, electrical, and plumbing codes to ensure that your installation is in
compliance.
A licensed and bonded tradesman should perform all electrical, structural and plumbing work.
Access to Site
Part of your location planning must include a review of accessability to your proposed site.
Truck
You will need to determine if a truck can access your site, or at least get close enough for a crane or large
forklift to transfer your Aquatic Fitness System to your pad.
Crane or 3-Ton “All Terrain” Forklift
Because of the size and weight of the Aquatic Fitness System, it will be necessary to use a crane or 3-ton
forklift to place your system on its pad. Make sure that you consider all access requirements including, but not
limited to, overhead restrictions such as power lines and trees, surface weight limits, space between buildings,
etc.
7
2004 Consumer Planning Guide
Electrical Hook Up
Do not turn on electrical power to your hot tub until told to do so later in this manual.
Warning
Have a licensed electrician run the required 120/240 volt power line to the hot tub installation site. The
power inlet connection is located in the pedestal on the left side of the hot tub, approximately 25” from the
front. This connection is designed to mate with a Carlon 1” conduit body Type LB, Access Fitting E986F or
any 1” female PVC conduit fitting. The manufacturer’s label lists the power requirements for your hot tub.
We recommend that only a licensed and bonded electrician do the initial hot tub hook-up.
Warning
This unit requires a GFCI (Ground Fault Circuit Interrupter). A “line of sight”
service disconnect must be located where visible from the hot tub, not less than 5 feet from
the hot tub and not to exceed 50 feet from the hot tub. This requirement may be filled with
the GFCI sub-panel. All supply wire to be rated minimum 90°C.
Load Sharing
Computerized load sharing (available only on Dimension One Spas hot tubs) is used to allow the system to
automatically recognize the temperature differential and the number of jet pumps in use, compare it with the
available power, and adjust the heater to maximize heater output. If you want to be able to run the pumps at
full power and still be able to generate heat at the same time, consider installing the maximum electrical
service available for your spa. If you do not have enough electrical service, your pumps may shut off when heat
is required. Otherwise, heat may be discontinued if you start up the pumps.
Electrical Requirements
The following charts provide a listing of electrical requirement options available for Dimension One Spas Inc.
and @Home Hot Tub spas.
American/Canadian - Bay Collection
Model
Lotus Bay
Sarena Bay
8
Power
240V
240V
240V
240V
Branch
Circuit
3 wire + ground
3 wire + ground
3 wire + ground
3 wire + ground
Circuit
Protection
50A
40A
50A
40A
Wire Gauge
#6 AWG
#6 AWG
#6 AWG
#6 AWG
2004 Consumer Planning Guide
American/Canadian - D1 Hot Tubs
Model
Arena
Aurora II
Aurora HP
Californian
Chairman
Chairman II
Diplomat
Nautilus
Seville
Triad II
Power
240V
240V
240V
240V
240V
240V
240V
240V
240V
240V
240V
240V
240V
240V
240V
240V
240V
240V
240V
240V
240V
240V
240V
240V
240V
240V
240V
240V
Branch
Circuit
3 wire + ground
3 wire + ground
3 wire + ground
3 wire + ground
3 wire + ground
3 wire + ground
3 wire + ground
3 wire + ground
3 wire + ground
3 wire + ground
3 wire + ground
3 wire + ground
3 wire + ground
3 wire + ground
3 wire + ground
3 wire + ground
3 wire + ground
3 wire + ground
3 wire + ground
3 wire + ground
3 wire + ground
3 wire + ground
3 wire + ground
3 wire + ground
3 wire + ground
3 wire + ground
3 wire + ground
3 wire + ground
Circuit
Protection
40A
30A
50A
40A
30A
50A
40A
30A
50A
40A
30A
50A
40A
30A
50A
40A
30A
50A
40A
30A
50A
40A
30A
50A
40A
30A
40A
30A
Wire Gauge
#6 AWG
#8 AWG
#6 AWG
#6 AWG
#8 AWG
#6 AWG
#6 AWG
#8 AWG
#6 AWG
#6 AWG
#8 AWG
#6 AWG
#6 AWG
#8 AWG
#6 AWG
#6 AWG
#8 AWG
#6 AWG
#6 AWG
#8 AWG
#6 AWG
#6 AWG
#8 AWG
#6 AWG
#6 AWG
#8 AWG
#6 AWG
#8 AWG
American/Canadian - Aquatic Fitness Systems
Model
AquaFit™ 16
AquaFit™ 19
Dual Temp
AquaPro™ 19
Power
240V
240V
240V
240V
240V
240V
240V
240V
240V
240V
240V
240V
Branch
Circuit
2 wire + ground
2 wire + ground
2 wire + ground
2 wire + ground
3 wire + ground
2 wire + ground
3 wire + ground
2 wire + ground
3 wire + ground
2 wire + ground
2 wire + ground
2 wire + ground
Circuit Protection
60A
60A and 50A
50A w/Gas Heater
60A plus
30A (for spa side)
60A and 50A, plus
40A (for spa side)
50A w/Gas Heater
30A/40A (for spa side)
60A
60A and 50A
50A w/Gas Heater
Wire
Gauge
#6 AWG
#6 AWG
#6 AWG
#6 AWG
#8 AWG
#6 AWG
#6 AWG
#6 AWG
#6 AWG
#6 AWG
#6 AWG
#6 AWG
Comment
Minimum
Recommended
Gas Heater Minimum
Minimum
Recommended
Gas Heater Minimum
Minimum
Recommended
Gas Heater Minimum
International Bay Collection
Model
Lotus Bay
Power
Circuit
Protection
Wire
Gauge
240V
240V
240V
2x16
3x16
1x32
#8 AWG
#8 AWG
#8 AWG
Model
Power
Circuit
Protection
Wire
Gauge
Sarena Bay
240V
240V
240V
2x16
3x16
1x32
#8 AWG
#8 AWG
#8 AWG
9
2004 Consumer Planning Guide
International D1 Hot Tubs
Model
Arena
Aurora II
Aurora HP
Californian
Chairman
Power
240V
240V
240V
240V
240V
240V
240V
240V
240V
240V
240V
240V
240V
240V
240V
Circuit
Protection
1x16
2x16
1x32
1x16
2x16
1x32
1x16
2x16
1x32
1x16
2x16
1x32
1x16
2x16
1x32
Wire
Gauge
#8 AWG
#8 AWG
#8 AWG
#8 AWG
#8 AWG
#8 AWG
#8 AWG
#8 AWG
#8 AWG
#8 AWG
#8 AWG
#8 AWG
#8 AWG
#8 AWG
#8 AWG
Model
Chairman II
Diplomat
Nautilus
Seville
Triad II
Power
240V
240V
240V
240V
240V
240V
240V
240V
240V
240V
240V
240V
240V
240V
240V
Circuit
Protection
1x16
2x16
1x32
1x16
2x16
1x32
1x16
2x16
1x32
1x16
2x16
1x32
2x16
3x16
1x32
Wire
Gauge
#8 AWG
#8 AWG
#8 AWG
#8 AWG
#8 AWG
#8 AWG
#8 AWG
#8 AWG
#8 AWG
#8 AWG
#8 AWG
#8 AWG
#8 AWG
#8 AWG
#8 AWG
International - Aquatic Fitness Systems
Model
AquaFit™ 16
AquaFit™ 19
Dual Temp
AquaPro™ 19
Power
240V
240V
240V
240V
240V
240V
240V
240V
240V
240V
240V
240V
Circuit Protection
60A
60A and 50A
50A w/Gas Heater
60A plus
30A (for spa side)
60A and 50A, plus
40A (for spa side)
50A w/Gas Heater plus
30A/40A (for spa side)
60A
60A and 50A
50A w/Gas Heater
Wire
Gauge
#6 AWG
#6 AWG
#6 AWG
#6 AWG
#8 AWG
#6 AWG
#6 AWG
#6 AWG
#6 AWG
#6 AWG
#6 AWG
#6 AWG
Comment
Minimum
Recommended
Gas Heater Minimum
Minimum
Recommended
Gas Heater Minimum
Minimum
Recommended
Gas Heater Minimum
The power inlet connection is located in the pedestal on the left side of the hot tub, approximately 25" from
the front. The front of the hot tub is the section that includes the topside, primary control panel.
To hook-up your hot tub, follow these instructions:
1.
2.
3.
4.
5.
10
Remove the screws holding the equipment access panel to the front of the hot tub cabinet and set
the panel aside.
Loosen the four screws located on the front of the black equipment control box and remove the
door from the control box to allow access to the four-wire connection terminal block.
Attach 1” rigid non-metallic conduit to the conduit nipple located in the pedestal base on the side of
the hot tub and run required conductors through the conduit to the equipment control box.
Connect the wires to the equipment system terminal block (TB1) as indicated on the wiring diagram
in the back of this manual.
Configure jumpers 1 and 2 on the upper right corner of the PC Board to match the circuit size being
used for your hot tub. The proper jumper settings can be found on the wiring schematic located on
the inside of the Lower Equipment Compartment cover. Use the appropriate Electrical Requirements
Chart (shown above) for the proper wire size.
2004 Consumer Planning Guide
American/Canadian - @Home Hot Tubs
Model
Companion HP
Cove
Cove HP
Dream
Dream HP
Sojourn HP
Power
Branch Circuit
240V
240V
240V
120V
240V
240V
240V
240V
240V
240V
240V
3 wire + ground
3 wire + ground
3 wire + ground
3 wire + ground*
3 wire + ground
3 wire + ground
3 wire + ground
3 wire + ground
3 wire + ground
3 wire + ground
3 wire + ground
Circuit
Protection
30A
40A
30A
15A
40A
30A
30A
40A
30A
40A
30A
Wire
Gauge
#8 AWG
#6 AWG
#8 AWG
#12AWG
#6 AWG
#8 AWG
#8 AWG
#6 AWG
#8 AWG
#6 AWG
#8 AWG
*A GFCI protected cord is required (P/N 1560-09)
International - @Home Hot Tubs
Model
Power
Companion HP
240V
240V
240V
240V
240V
240V
240V
240V
240V
240V
240V
240V
240V
240V
240V
240V
240V
Cove
Cove HP
Dream
Dream HP
Sojourn HP
Circuit
Protection
1x16
2x16
1x32
1x16
2x16
1x16
2x16
1x32
1x16
2x16
1x32
1x16
2x16
1x32
1x16
2x16
1x32
Wire
Gauge
#8 AWG
#8 AWG
#8 AWG
#8 AWG
#8 AWG
#8 AWG
#8 AWG
#8 AWG
#8 AWG
#8 AWG
#8 AWG
#8 AWG
#8 AWG
#8 AWG
#8 AWG
#8 AWG
#8 AWG
The power inlet connection is located in the pedestal on the left side of the hot tub, approximately 25" from
the front. The front of the hot tub is the section that includes the topside, primary control panel.
1.
2.
3.
4.
5.
Remove the screws holding the equipment access panel to the front of the hot tub cabinet and set
the panel aside.
Loosen the two screws located on the front of the blue equipment control box and raise the door on
the control box on its hinges to allow access to the four wire connection terminal block.
Attach 1” rigid non-metallic conduit to the conduit nipple located in the pedestal base on the side of
the hot tub and run required conductors through the conduit to the equipment control box.
Connect the four/three wires to the equipment system terminal block (TB1) as indicated on the
wiring diagram in the back of this manual.
Configure jumpers 1 and 2 on the upper right corner of the PC Board to match the circuit size being
used for your hot tub. The proper jumper settings can be found on the wiring schematic located on
the inside of the Lower Equipment Compartment cover. Use the appropriate Electrical Requirements
Chart (shown above) for the proper wire size.
11
2004 Consumer Planning Guide
Installation Check List
Owner’s Manual
Hot Tub Cover
Locks on Hot Tub and Cover
Cabinet Care
Filter Use, Removal and Cleaning
GFCI Location
Electrical Disconnect Location
How to Fill and Drain Hot tub
How to Use the Topside Primary
Control
Instructions for your Ultra Pure
Water Management System,
CrystalZone®, or CD
ClearZone™ Ozone Generators &
Water Management Systems
Drain Valve and Hose Bib
Changing Light Lens Cap
Selector Valve Control
Adjusting/Interchanging Jets
Adjusting the NeckFlex™ Jet Pillow and
Interchangeable Jets
Water Care Guide
Automatic Bromine Feeder (Optional)
The Use of the Optional PureVision™
Cartridges
Please check these items before you fill your hot tub with water:
Hot Tub Specifications
The following section of this manual gives you detailed information on the sizes of both Dimension One and
@Home hot tubs. Dimension One hot tubs are listed first, alphabetically by model, followed by @Home hot
tubs in the same order.
Specifications for Dimension One Spas
These specifications include:
•
•
•
•
•
spa shape
dimensions
electrical requirements
water capacity
type and number of Hydrotherapy Jets
•
•
•
•
•
weight
type of Water Management System
number and type of pumps
type of skirt
type and number of controls
Spa features and specifications are subject to change without notice. To be sure you have the
latest specifications for your favorite spa, you can download the most current specifications from
the Customer Service/Downloads Section at http://www.d1spas.com.
12
2004 Consumer Planning Guide
Aquatic Fitness Systems
AquaFit 16’ - Architectural Specifications
Caution
DUE TO MANUFACTURING TOLERANCES THERE COULD BE SOME MINOR
DIFFERENCES BETWEEN THE ACTUAL MEASUREMENTS OF YOUR SPA AND THE
DRAWING BELOW. IF SITE PLANNING IS CRITICAL TO SUCH TOLERANCES, BE SURE
TO MEASURE YOUR ACTUAL SPA.
13
2004 Consumer Planning Guide
AquaFit 16’ – General Specifications
14
2004 Consumer Planning Guide
AquaFit DualTemp19’ - Architectural Specifications
Caution
DUE TO MANUFACTURING TOLERANCES THERE COULD BE SOME MINOR
DIFFERENCES BETWEEN THE ACTUAL MEASUREMENTS OF YOUR SPA AND THE
DRAWING BELOW. IF SITE PLANNING IS CRITICAL TO SUCH TOLERANCES, BE SURE
TO MEASURE YOUR ACTUAL SPA.
15
2004 Consumer Planning Guide
AquaFit DualTemp19’– General Specifications
16
2004 Consumer Planning Guide
AquaPro 19’ - Architectural Specifications
Caution
DUE TO MANUFACTURING TOLERANCES THERE COULD BE SOME MINOR
DIFFERENCES BETWEEN THE ACTUAL MEASUREMENTS OF YOUR SPA AND THE
DRAWING BELOW. IF SITE PLANNING IS CRITICAL TO SUCH TOLERANCES, BE SURE
TO MEASURE YOUR ACTUAL SPA.
17
2004 Consumer Planning Guide
AquaPro19’– General Specifications
18
2004 Consumer Planning Guide
Bay Collection Specifications
Lotus Bay – Architectural Specifications
Caution
DUE TO MANUFACTURING TOLERANCES THERE COULD BE SOME MINOR
DIFFERENCES BETWEEN THE ACTUAL MEASUREMENTS OF YOUR SPA AND THE
DRAWING BELOW. IF SITE PLANNING IS CRITICAL TO SUCH TOLERANCES, BE SURE
TO MEASURE YOUR ACTUAL SPA.
19
2004 Consumer Planning Guide
Lotus Bay – General Specifications
20
2004 Consumer Planning Guide
Sarena Bay – Architectural Specifications
Caution
DUE TO MANUFACTURING TOLERANCES THERE COULD BE SOME MINOR
DIFFERENCES BETWEEN THE ACTUAL MEASUREMENTS OF YOUR SPA AND THE
DRAWING BELOW. IF SITE PLANNING IS CRITICAL TO SUCH TOLERANCES, BE SURE
TO MEASURE YOUR ACTUAL SPA.
21
2004 Consumer Planning Guide
Sarena Bay – General Specifications
22
2004 Consumer Planning Guide
D1 Reflections Series
Arena – Architectural Specifications
Caution
DUE TO MANUFACTURING TOLERANCES THERE COULD BE SOME MINOR
DIFFERENCES BETWEEN THE ACTUAL MEASUREMENTS OF YOUR SPA AND THE
DRAWING BELOW. IF SITE PLANNING IS CRITICAL TO SUCH TOLERANCES, BE SURE
TO MEASURE YOUR ACTUAL SPA.
23
2004 Consumer Planning Guide
Arena – General Specifications
General
Shape
Shell Material
Domestic (60Hz)
Part #
Export (50Hz)
Round
Round
Ultralife™ / Granitex™
Ultralife™ / Granitex™
Height
36 in.
91 cm
Width
87 in.
221 cm
Length
87 in.
221 cm
Corner Radii
N/A
N/A
Seating Capacity
7+
7+
340 Gallons
1287 Liters
Water Capacity
Dry Weight
510 lbs
231 kg
Full Weight
3342 lbs
1516 kg
Wood or Synthetic
Wood or Synthetic
Yes
Yes
HydraMax by Sta-Rite
Aqua-flo
Skirt Material
Poly Floor
Part #
Water System
Pump Brand
Motor Size
# Pumps/Speed
4.0 HP
One / Dual
2.0 HP
01562-23A
One / single
01562-34A
Plumbing Systems
2
2
Pump Returns
2
01510-559
2
01510-559G
Typhoon Jets
VCR Jet® - Air
Adjustable/Directional
VCR Jet® - Rotator
2
01510-436
2
01510-436G
2
01510-418
2
01510-418G
6
01510-415
6
01510-415G
VCR Jet® - Mini Rotator
2
01510-445
2
01510-445G
VCR Jet® - Mini Directional
2
01510-444
2
01510-444G
VCR Jet® - Mini Directional in NFJ
0
0
VCR Jet® - Euro Directional
0
Ozone Jet
1
01510-201
1
01510-201G
Heater Return Jet
1
01510-275
1
01510-275G
Total Jets
16
Filters/Coverage
Water Treatment System
1 / 75 sq. ft.
0
16
01561-00
1 / 6.97 sq. meters
01561-00
03200-06E
Crystal Zone™
03200-06
Crystal Zone™
Gate Valves
2
01522-30
2
01522-30
Diverter Valves
1
01522-50
1
01522-50
Floor Drains
1
01510-231
1
01510-231G
8” Weir
01510-137
20 cm Weir
01510-137G
Skimmer
Electrical System
Voltage
Amperage
Heater
Thermostat
Light
Control System
Upper Control
240
240
40/30
1X16 / 2X16 / 1X32
FastFlo 2.7,4.0,5.5 kW
01781-20
FastFlo 2.9 kW
1 with optional LED
01512-003 (O)
1 with optional LED
01512-003 (O)
MSPA-MP-D12
01710-1008
MSPA-MP-D11-CE
01710-1008E
Programable Digital
01560-320
Programable Digital
01560-320
Electronic
Electronic
Auxiliary Upper Control
No
No
Programmable
Yes
Yes
Special Features
Dynamic Massage Sequencer w/
control panel
NeckFlex® Jet Pillows
No
No
0
0
Headrest Pillows
0
0
Cup Holders
2
2
Floor pedestal
Floor pedestal
Tactile Therapy
24
01781-20
2004 Consumer Planning Guide
Aurora II – Architectural Specifications
Caution
DUE TO MANUFACTURING TOLERANCES THERE COULD BE SOME MINOR
DIFFERENCES BETWEEN THE ACTUAL MEASUREMENTS OF YOUR SPA AND THE
DRAWING BELOW. IF SITE PLANNING IS CRITICAL TO SUCH TOLERANCES, BE SURE
TO MEASURE YOUR ACTUAL SPA.
25
2004 Consumer Planning Guide
Aurora II – General Specifications
26
2004 Consumer Planning Guide
Aurora HP – Architectural Specifications
Caution
DUE TO MANUFACTURING TOLERANCES THERE COULD BE SOME MINOR
DIFFERENCES BETWEEN THE ACTUAL MEASUREMENTS OF YOUR SPA AND THE
DRAWING BELOW. IF SITE PLANNING IS CRITICAL TO SUCH TOLERANCES, BE SURE
TO MEASURE YOUR ACTUAL SPA.
27
2004 Consumer Planning Guide
Aurora HP – General Specifications
28
2004 Consumer Planning Guide
Californian – Architectural Specifications
Caution
DUE TO MANUFACTURING TOLERANCES THERE COULD BE SOME MINOR
DIFFERENCES BETWEEN THE ACTUAL MEASUREMENTS OF YOUR SPA AND THE
DRAWING BELOW. IF SITE PLANNING IS CRITICAL TO SUCH TOLERANCES, BE SURE
TO MEASURE YOUR ACTUAL SPA.
29
2004 Consumer Planning Guide
Californian – General Specifications
30
2004 Consumer Planning Guide
Chairman – Architectural Specifications
Caution
DUE TO MANUFACTURING TOLERANCES THERE COULD BE SOME MINOR
DIFFERENCES BETWEEN THE ACTUAL MEASUREMENTS OF YOUR SPA AND THE
DRAWING BELOW. IF SITE PLANNING IS CRITICAL TO SUCH TOLERANCES, BE SURE
TO MEASURE YOUR ACTUAL SPA.
31
2004 Consumer Planning Guide
Chairman – General Specifications
32
2004 Consumer Planning Guide
Chairman II – Architectural Specifications
Caution
DUE TO MANUFACTURING TOLERANCES THERE COULD BE SOME MINOR
DIFFERENCES BETWEEN THE ACTUAL MEASUREMENTS OF YOUR SPA AND THE
DRAWING BELOW. IF SITE PLANNING IS CRITICAL TO SUCH TOLERANCES, BE SURE
TO MEASURE YOUR ACTUAL SPA.
33
2004 Consumer Planning Guide
Chairman II – General Specifications
34
2004 Consumer Planning Guide
Diplomat – Architectural Specifications
Caution
DUE TO MANUFACTURING TOLERANCES THERE COULD BE SOME MINOR
DIFFERENCES BETWEEN THE ACTUAL MEASUREMENTS OF YOUR SPA AND THE
DRAWING BELOW. IF SITE PLANNING IS CRITICAL TO SUCH TOLERANCES, BE SURE
TO MEASURE YOUR ACTUAL SPA.
35
2004 Consumer Planning Guide
Diplomat – General Specifications
36
2004 Consumer Planning Guide
Nautilus – Architectural Specifications
Caution
DUE TO MANUFACTURING TOLERANCES THERE COULD BE SOME MINOR
DIFFERENCES BETWEEN THE ACTUAL MEASUREMENTS OF YOUR SPA AND THE
DRAWING BELOW. IF SITE PLANNING IS CRITICAL TO SUCH TOLERANCES, BE SURE
TO MEASURE YOUR ACTUAL SPA.
37
2004 Consumer Planning Guide
Nautilus – General Specifications
38
2004 Consumer Planning Guide
Seville – Architectural Specification
Caution
DUE TO MANUFACTURING TOLERANCES THERE COULD BE SOME MINOR
DIFFERENCES BETWEEN THE ACTUAL MEASUREMENTS OF YOUR SPA AND THE
DRAWING BELOW. IF SITE PLANNING IS CRITICAL TO SUCH TOLERANCES, BE SURE
TO MEASURE YOUR ACTUAL SPA.
39
2004 Consumer Planning Guide
Seville – General Specifications
40
2004 Consumer Planning Guide
Triad II – Architectural Specifications
Caution
DUE TO MANUFACTURING TOLERANCES THERE COULD BE SOME MINOR
DIFFERENCES BETWEEN THE ACTUAL MEASUREMENTS OF YOUR SPA AND THE
DRAWING BELOW. IF SITE PLANNING IS CRITICAL TO SUCH TOLERANCES, BE SURE
TO MEASURE YOUR ACTUAL SPA.
41
2004 Consumer Planning Guide
Triad II – General Specifications
42
2004 Consumer Planning Guide
Specifications for @Home Hot Tubs
Companion HP – Architectural Specifications
Caution
DUE TO MANUFACTURING TOLERANCES THERE COULD BE SOME MINOR
DIFFERENCES BETWEEN THE ACTUAL MEASUREMENTS OF YOUR SPA AND THE
DRAWING BELOW. IF SITE PLANNING IS CRITICAL TO SUCH TOLERANCES, BE SURE
TO MEASURE YOUR ACTUAL SPA.
43
2004 Consumer Planning Guide
Companion HP – General Specifications
44
2004 Consumer Planning Guide
Cove – Architectural Specifications
Caution
DUE TO MANUFACTURING TOLERANCES THERE COULD BE SOME MINOR
DIFFERENCES BETWEEN THE ACTUAL MEASUREMENTS OF YOUR SPA AND THE
DRAWING BELOW. IF SITE PLANNING IS CRITICAL TO SUCH TOLERANCES, BE SURE
TO MEASURE YOUR ACTUAL SPA.
45
2004 Consumer Planning Guide
Cove – General Specifications
46
2004 Consumer Planning Guide
Cove HP – Architectural Specifications
Caution
DUE TO MANUFACTURING TOLERANCES THERE COULD BE SOME MINOR
DIFFERENCES BETWEEN THE ACTUAL MEASUREMENTS OF YOUR SPA AND THE
DRAWING BELOW. IF SITE PLANNING IS CRITICAL TO SUCH TOLERANCES, BE SURE
TO MEASURE YOUR ACTUAL SPA.
47
2004 Consumer Planning Guide
Cove HP – General Specifications
48
2004 Consumer Planning Guide
Dream – Architectural Specifications
Caution
DUE TO MANUFACTURING TOLERANCES THERE COULD BE SOME MINOR
DIFFERENCES BETWEEN THE ACTUAL MEASUREMENTS OF YOUR SPA AND THE
DRAWING BELOW. IF SITE PLANNING IS CRITICAL TO SUCH TOLERANCES, BE SURE
TO MEASURE YOUR ACTUAL SPA.
49
2004 Consumer Planning Guide
Dream – General Specifications
50
2004 Consumer Planning Guide
Dream HP – Architectural Specifications
Caution
DUE TO MANUFACTURING TOLERANCES THERE COULD BE SOME MINOR
DIFFERENCES BETWEEN THE ACTUAL MEASUREMENTS OF YOUR SPA AND THE
DRAWING BELOW. IF SITE PLANNING IS CRITICAL TO SUCH TOLERANCES, BE SURE
TO MEASURE YOUR ACTUAL SPA.
51
2004 Consumer Planning Guide
Dream HP – General Specifications
52
2004 Consumer Planning Guide
Sojourn HP – Architectural Specifications
Caution
DUE TO MANUFACTURING TOLERANCES THERE COULD BE SOME MINOR
DIFFERENCES BETWEEN THE ACTUAL MEASUREMENTS OF YOUR SPA AND THE
DRAWING BELOW. IF SITE PLANNING IS CRITICAL TO SUCH TOLERANCES, BE SURE
TO MEASURE YOUR ACTUAL SPA.
53
2004 Consumer Planning Guide
Sojourn HP – General Specifications
54
2004 Consumer Planning Guide
55