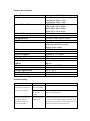
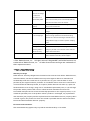
1
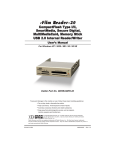
Waterproof 3oz. Action Camera.
Be your own actor, stuntman, videographer, director, editor, producer and
creative agency. The WingmanHD captures all of your triumphs in high
definition 1080p clarity right out of the box, and includes everything you
need to record still pictures and video from every perspective imaginable. No
more ties, no more hold ups – get out there and play.
View Real Time Video & Review Playback
The built in 1.5 inch TFT LCD enables you to set up your shot with accuracy
and ensures that you won’t miss that critical moment when shooting in first
person perspective, while real time video output promises perfectly framed
video and images from the third person perspective. Optimized brightness
levels let you see what’s going on easily during daytime or nighttime
activities with minimal power drain.
Professional 1080p High Definition Video
The 8 megapixel CMOS image sensor captures rich high definition video and
impressive still image photography with the press of a button. Automatic
focus, white balance and exposure let you concentrate on your activity
without swapping between camera settings. Optional HDMI or component
video output lets you plug directly into your high definition TV so you can
share your feats with friends and envious bystanders on the fly.
Universal Mounting System
The standard photography ¼-20” tripod attachment gives you hundreds of
mounting options and the ability to use any mount, bracket or device built for
standard cameras and camcorders. In addition to the included helmet
mount, vented helmet mount and bar mount, the WingmanHD is compatible
with the full line of Fat Gecko Camera Mounts and accessories. Whether you
plan to ski down the face of Whistler, kayak through the slot caves of Zion,
surf the waves of Uluwatu, race the Talladega track, or splice some
point-of-view shots into your feature film, there’s a WingmanHD mount for
the occasion.
Zoom, Fast Forward, Rewind, Delete and Skip
Digital 3x zoom lets you get footage from the sidelines or capture closer shots
of impending jumps, rapids, free falls and more. In review mode, easily skip
among files, fast forward or rewind video, and delete unnecessary footage to
free up more storage space without waiting to get back to a computer.
Gondola editing? No problem.
Getting Acquainted with Your WingmanHD
1. Video
2. Power
3. Start-up Indicator (red)
4. Record Indicator (green)
5. Photo
6. Still Picture
7. USB
8. HDMI
9. Wrist Strap Loop
10. Right Button
11. Speaker
12. Playback
13. Down Button
14. Ok Button
15. Up Button
16. Left Button
17. Menu
18. TFT LCD Monitor
19. Lens
20. Self-timer / Auto-record
21. MicroSD Memory Card Slot
22. AV Out
23. Microphone
24. ¼-20” Standard Tripod Thread
LCD Screen Symbols & Functions
1080P
Record Video
Battery Status
Take a Picture
Memory Remaining
Record Audio
No Memory Card
Recording Time
Memory Card Inserted
1080P Video Resolution
Playback & Review
Operating Your WingmanHD.
Charging Your Battery
We recommend that you fully charge the lithium-ion WingmanHD battery
before using it in your WingmanHD Action Camera. Please use the included
wall, auto or USB power adapter and follow instructions carefully.
Powering on WingmanHD
Slide the power switch to the “On” position, the start-up screen will appear.
Powering off WingmanHD
Slide the power switch to the “OFF” position, the LCD screen will go dark and
you will hear a “beep” indicating that the power has been turned off.
Recording Video
Press the REC button to begin video recording. The recording time will be
displayed on the LCD screen and the LEDs for the start-up indicator and auto
record indicator will flash to indicate that recording is in progress.
Press the REC button again to stop video recording.
Taking Photos
Press the PHOTO button to take a photo. The LEDs for the start-up indicator
and auto record indicator will flash once to indicate that you can begin taking
photos.
Video Resolution & Recording Modes
The WingmanHD Action Camera’s default resolution is 1080p (1920x1080).
Press the “Menu” button enter the default interface.
Four video resolution modes are available:
1080P(1920*1080)/30fps
720P(1280*720)/60fps
WVGA(848*480)/60fps
QVGA(320*240)/30fps
Video Resolution
1. Press “OK” to change the video resolution
2. Enter the image resolution interface, then press the “<” or “>” buttons
to select 1080p, 720Pp, WVGA or QVGA
3. Press “OK” to confirm your chosen resolution and exit
Shooting Modes
1. Press “OK” to change the shooting mode
2. Enter the shooting mode interface, then press the “<” or “>” buttons
to select “Record” or “Capture”
3. Press “OK” to confirm and exit
4. Select “Audio Recording Symbols”
5. Press “OK” to confirm
6. Press “Menu” to exit
Recording may now begin. Press the “REC” button, you see a green light
flash slowly and the recording time displayed on the LCD screen.
Mirror Mode
1. Press “OK”
2. Press the “<” or “>” buttons to select “X” or “√”
3. Press “OK” to confirm and exit
Flip Mode
1. Press “OK”
2. Press the “<” or “>” buttons to select “X” or “√”
3. Press “OK” to confirm and exit
Still Picture Resolution & Shooting Modes
Press the “Menu” button to enter the default interface.
Three still picture resolution modes are available:
3M: 2048×1536
5M: 2560×1920
8M: 3200×2400
Image Resolution
1. Enter the default interface, then press the “<” or “>” buttons to select
“shooting icons”
2. Press “OK” to enter the shooting interface
3. Use the “<” or “>” buttons to select 3M, 5M or 8M
4. Press “OK” to confirm and exit
Self-timer Mode
1. Enter the default interface, then press the “<” or “>” buttons to go to
the “Photo” Sub-menu
2. Select “Self-timer”
3. Press “OK” to set the time interval: 0 seconds, 5 seconds or 10 seconds
4. Press the “Photo” button to begin taking still images at the intervals
you have selected
Continuous Mode
1. Enter the default interface, then press the “<” or “>” buttons to go to
the “Photo” Sub-menu
2. Select “Sequence Mode”
3. Press “OK” to set the time interval: 0 seconds, 2 seconds, 3 seconds, 5
seconds, 10 seconds, 20 seconds, 30 seconds or 60 seconds
4. Press the “Menu” button to exit the setting
5. Press the “Photo” button to begin taking still images at the interval
you have set. Continuous mode will continue taking photos at the set
interval until you press the “Photo” button again to stop picture
taking.
Single Shot Mode
1. Press the “OK” button to enter the interface, then use the “<” and “>”
buttons to select “X” or “√”
2. Press the “Photo” button to take a picture, the self-timer LED will
flash once to indicate that one photo was taken
Triple Shot Mode
1. Enter the default interface, then press the “<” or “>” buttons to go to
the “Photo” Sub-menu
2. Select “Sequence Mode”
3. Press the “Photo” button to take 3 pictures consecutively, the
self-timer LED will flash three times to indicate that three pictures
were taken
System Parameters
1. In the preview mode, press the “Playback” button to enter the
playback interface
2. Press the “Menu” button to enter the setting interface, then use the
“<” and “>” buttons to select “Set-up”
3. Press “OK” to enter the interface
Setting Date & Time
1. Use the “<” and “>” buttons to select 00/00/00
2. Press “OK” to enter the sub interface
3. Use the “+” and (-) buttons to specify the correct date and time, then
confirm and exit
Time Display
1. Use the “<” and “>” buttons to select “X” or “√”
Beep On/Off
1. Use the “<” and “>” buttons to select “X” or “√”
Loop Record
1. Use the “<” and “>” buttons to select “X” or “√”
LCD Standby
1. Use the “<” and “>” buttons to select LCD power saving mode, then
select: 0 seconds, 10 seconds, 30 seconds, 2 minutes
2. Press the “Record” or “Photo” button to restart the LCD once it has
entered power saving mode
Camera Standby
1. Use the “<” and “>” buttons to select LCD power saving mode, then
select: 0 minutes, 2 minutes, 5 minutes or 10 minutes
2. Press the “Record” or “Photo” button to start up the camera. ALL
OTHER BUTTONS WILL HIBERNATE ONCE AUTO STANDBY IS ACTIVATED.
TV Standard
1. Use the “<” and “>” buttons to select “NTSC” or “PAL” TV Out Mode
2. Remove and re-insert AV cables whenever making changes to the TV
Out Mode
Frequency
1. Use the “<” and “>” buttons to select “50Hz” or “60Hz” to compliment
your local Hz settings
Formatting Your Memory Card
1. Use the “<” and “>” buttons to select ““X” or “√”
2. WARNING: Formatting your memory card is recommended whenever
you insert a new MicroSD memory card. FORMATTING YOUR MEMORY
CARD WILL ERASE ALL CONTENTS. Please back-up any data before
formatting your memory card to avoid loss.
Restoring WingmanHD Default Settings
1. Use the “<” and “>” buttons to select ““X” or “√”
Notes About Video Recording
When loop coverage is set, the camera segments and saves your video files
automatically every 15 minutes to create separate files. When loop
coverage is not set, the camera will segment and save your video files every
30 minutes.
Playback and Review
In the preview mode, press the “Playback” button to enter the playback
interface.
Video Files
1. Select the menu “Video File” and press “OK” to preview the recorded
video or audio files
2. Press the “-“ button to go to the thumbnail preview of all files
3. Press the “Menu” button to delete or protect specific files: <Delete
Single File>, <Delete All> or <Protect>
4. During Playback, button functions are as follows:
a. “+” Increase volume
b. “-” Reduce volume
c. “<” Rewind
d. “>” Fast Forward
e. “Playback” Pause or Resume
f.“OK” Start or Stop
Note: The speed that the fast forward and rewind function operates can
be set at: x2, x4 (two times or four times faster than normal speed)
Audio Files
1. Press the “<” or “>” buttons to select the audio file that you want to
play and press “OK” to start or stop playing the file
2. Use the “+” and “-“ buttons to increase or reduce the volume
3. Press the “Playback” button to pause or stop playing the file
Note: During audio playback, the fast forward and rewind functions
cannot be used.
Photo Files
1. Select “Photo Files” menu and press “OK”
2. Press the “-“ button to go to the thumbnail preview of all files
3. Press the “Menu” button to delete or protect specific files or play files
automatically
4. To protect a file, press “OK” to display the lock icon on the photo
5. To unprotect a file, press “OK” to remove the lock icon from the photo
6. To delete a single file, press the “OK” button twice and choose “YES”
7. To delete all photos, press “YES”
8. During Playback, button functions are as follows:
a. “+” Zoom In
b. “-“ Zoom out, Thumbnail View
c. “<” Select Previous Photo
d. “<” Move Picture Up (during zoom mode)
e. “>” Select Next Photo
f.
g.
“>” Move Picture Down (during zoom mode)
“Playback” Exit
h. “OK”: Zoom In Mode, press the “up”, “down” “left” and “right”
buttons to move the pictures vertically and horizontally
Auto Playback
The interval time during auto playback is 5 seconds.
DPOF Mode
DPOF records the printing instructions for printers that are compatible with
DPOF printing from SD and microSD memory cards.
1. Select “DPOF” to turn DPOF mode on, the DPOF symbol will be
displayed.
TV Playback
1. Select “Playback” on the camera menu and plug the AV cable into the
camera’s AV Out
2. Plug the opposite end of the AV cable into your television’s AV input
3. Photo and video files will be displayed on your TV screen
HDTV Playback
1. Select “Playback” on the camera menu and plug the HDMI cable into
the camera’s HDMI Out
2. Plug the opposite end of the HDMI cable into your television’s HDMI
input
3. Photo and video files will be displayed on your HDTV screen in high
definition
Computer Playback & Backup
1. Turn the camera off
2. Plug the mini USB cable into the camera’s mini USB Out
Note: Leaving the camera off while plugged into your computer’s USB
port will charge your camera’s battery.
3. Plug the opposite end of the USB cable into your computer’s USB port.
Note: If plugging into a desktop computer, be sure to utilize a USB
port that is directly wired into your computer’s motherboard; USB
ports in the front of the computer sometimes do not provide enough
power for full functionality, choose a USB port located in the back of
your desktop computer tower.
4. Turn the camera on to drag and drop files from the camera’s memory
card to your computer
Transferring of files can also be completed by removing the memory
card and inserting it into a memory card reader. Delkin recommends
the Universal Memory Card Reader (DDREADER-41 or DDREADER-42) for
transferring files from microSD to PC or MAC.
Camera Specifications
Image Sensor
Photo
Video & Frame Rate
Video File Format
Photo File Format
Storage Medium
Digital Zoom
AV Out
PC Port
Microphone
Power Dissipation
Rechargeable Battery
Recording Time
Operating Platform
(1080p)
CPU
RAM
Storage Temperature
Operating Temperature
Working Humidity
8 Megapixel CMOS (2592 x 1944)
3 Megapixel 2048 x 1536
5 Megapixel 2560 x 1920
8 Megapixel 3200 x 2400
1080p 1920 x 1080 @ 30fps
720p 1280 x 720 @ 60fps
WVGA 848 x 480 @ 60fps
QVGA 320 x 240 @ 30fps
MOV H.264
JPEG
microSD / SDHC (up to 32GB)
3x
NTSC/PAL analog video output
HDMI high definition output
Analog audio output
USB 2.0
Built in microphone & speaker
400mAh @ 3.7V (max)
1100mAh
2.5 hours (per charge)
Windows XP SP2, Vista or Above
Mac OS
≥ Pentium 4 1.5GHZ
≥ 1GB
-20°C - 50°C
-10°C - 50°C
15 - 85% relative humidity
Troubleshooting
Problem
Cause
Resolution
The camera will not power on
Power button is not
Slide the power button to the “ON” position
LCD monitor will not light up
in the “ON” position
Indicator will not light up
Battery is drained or
Make sure the battery contacts line up correctly and the
not installed
battery has sufficient power
properly
The camera is turned on and
Check the microSD
Check the functionality of the memory card by inserting
the indicator lights are
memory card
the card into a card reader. Reformat the memory card
illuminated, but the LCD
and reinsert into the camera. If functionality is still not
screen will not display
restored, replace the microSD memory card.
Camera Switches Off by Itself
Battery has no
Recharge or replace the battery
power or the voltage
is insufficient
The camera is on
Press the “RECORD” or “PHOTO” button to take the
auto-standby mode
camera out of standby. To turn Auto Standby Mode off,
follow the instructions in the user manual.
Unable to Shoot or Record
Memory card is at
Delete files, move files to another storage device or
capacity
insert a new microSD card.
System error
Restart the camera and restore to factory default
settings
Images are blurred
Too much vibration
During low light settings, the camera shutter must stay
or not enough light
open for a longer period of time. Movement during
exposure will create blurred images. Hold the camera
steady, add more light, or utilize a tripod or steadying
device.
Camera Freezes
Lens is dirty
Clean the lens with a microfiber lens cloth.
Shooting or
Test different video and picture settings to find the ideal
recording mode is
setting for your shot or environment. Faster video will
not set correctly
require faster frame rates.
System error
Remove the battery and reinsert, then power on the
camera. Normal functionality should reappear.
© 2011 Delkin Devices, Inc. All rights reserved. WingmanHD™ and Delkin Devices® are
trademarks of Delkin Devices, Inc. All other brand names and logos are trademarks of
their respective owners.
1 Year Limited Warranty
Warranty Coverage
Delkin Devices’ warranty obligations are limited to the terms set forth below: Delkin Devices,
as defined below, warrants this Delkin Devices product against defects in materials and
workmanship under the normal use for a period of one (1) year from the date of retail
purchase by the original end-user purchaser. If a hardware defect arises and a valid claim is
received within the Warranty Period, at its option, Delkin Devices will either (1) repair the
hardware defect at no charge, using new or refurbished replacement parts, or (2) exchange
the product with a product that is new or which has been manufactured from new
serviceable used parts and is at least functionally equivalent to the original product, or (3)
refund the purchase price of the product. When a product is exchanged, any replacement
item becomes your property and the replaced item becomes Delkin Devices’ property. When
a refund is given, the product for which the refund is provided must be returned to Delkin
Devices and becomes Delkin Devices’ property.
Exclusions and Limitations
This Limited Warranty applies only to products manufactured by or for Delkin
Devices that can be identified by the Delkin Devices’ trademark, trade name, or logo affixed
to them. The Limited Warranty does not apply to any non-Delkin Devices’ products, even if
packaged and sold with Delkin Devices products. Manufacturers, suppliers, or publishers,
other than Delkin Devices, may provide their own warranties to the end user purchaser, but
Delkin Devices, in so far as permitted by law, provides their products “as is.” Delkin Devices
does not warrant that the operation of this product will be uninterrupted or error-free.
Delkin Devices is not responsible for damage arising from failure to follow instructions
relating to the product’s use.
This warranty does not apply: (1) to damage caused by use with non-Delkin Devices’ products;
(2) to damage caused by accident, abuse, misuse, flood, fire, earthquake, or other external
cause; (3) to damage caused by operating the product outside the permitted or intended uses
described by Delkin Devices; (4) to damage caused by service (including upgrades and
expansions) performed by anyone who is not a representative of Delkin Devices; (5) to a
product or part that has been modified to significantly alter functionality or capability
without the written permission of Delkin Devices; (6) to consumable parts, such as batteries,
unless damage has occurred due to a defect in materials or workmanship; or (7) if any Delkin
Devices serial number has been removed or defaced.
To the extent permitted by law, this warranty and remedies set forth above are exclusive and
in lieu of all other warranties, remedies and conditions, whether oral or written, statutory,
express or implied. As permitted by applicable law, Delkin Devices specifically disclaims any
and all statutory or implied warranties, including without limitation, warranties of
merchantability, fitness for a particular purpose and warranties against hidden or latent
defects. If Delkin Devices cannot lawfully disclaim statutory or implied warranties then to
the extent permitted by law, all such warranties shall be limited in duration to the duration
of this express warranty and to repair or replacement services as determined by Delkin
Devices in its sole discretion. No Delkin Devices’ reseller, agent, or employee is authorized to
make any modification, extension, or addition to this warranty. Except as provided in this
warranty and to the extent permitted by law, Delkin Devices is not responsible for direct,
special, incidental or consequential damages resulting from any breach of warranty or
condition, or under any other legal theory, including but not limited to loss of use; loss of
revenue; loss of actual or anticipated profits (including loss of profits on contracts); loss of
the use of money; loss of anticipated savings; loss of business; loss of opportunity; loss of
goodwill; loss of reputation; loss of, damage to or corruption of data; or any indirect or
consequential loss or damage howsoever caused including the replacement of equipment and
property, any costs of recovering, programming, or reproducing any data stored or used with
Delkin Devices products and any failure to maintain the confidentiality of data stored on
and/or with the product. The foregoing limitation shall not apply to death or personal injury
claims.Delkin Devices disclaims any representation that it will be able to repair any product
under this warranty or make a product exchange without risk to or loss of data.
Consumer Protection Laws
For consumers who are covered by consumer protection laws or regulations in their country
of purchase or, if different, their country of residence, the benefits conferred by this
warranty are in addition to all rights and remedies conveyed by such consumer protection
laws and regulations. Some countries, states and provinces do not allow the exclusion or
limitation of incidental or consequential damages or exclusions or limitations on the duration
of implied warranties or conditions, so the above limitations or exclusions may not apply to
you. This warranty gives you specific legal rights, and you may also have other rights that
vary by country, state or province. This Limited Warranty is governed by and construed under
the laws of the country in which the product purchase took place. Delkin Devices, the
warrantor under this Limited Warranty, is identified at the end of this document according to
the country or region in which the product purchase took place.
Obtaining Warranty Service
Please access and review the online help resources referred to in the documentation
accompanying this hardware product before requesting warranty service. If the product is
still not functioning properly after making use of these resources, please contact Delkin
Devices. A Delkin Devices representative will help determine whether your product requires
service and, if it does, will inform you how Delkin Devices will provide it. Delkin Devices will
provide warranty service on products that are tendered or presented for service during the
Warranty Period, as permitted by law. You may be responsible for shipping and handling
charges if the product cannot be serviced in the country it is in. In accordance with
applicable law, Delkin Devices may require that you furnish proof of purchase details and/or
comply with registration requirements before receiving warranty service. If your product is
capable of storing data or software programs, you should make periodic backup copies of the
data and programs contained on the product’s hard drive or other storage media to protect
your data and as a precaution against possible operational failures.
Delkin Devices
13350 Kirkham Way
Poway, CA 92064
800.637.8087
858.391.1234
www.delkin.com