1
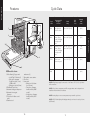
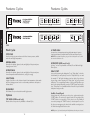
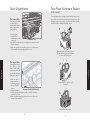
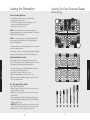
Viking Use & Care Manual
®
Viking Range Corporation
111 Front Street
Greenwood, Mississippi 38930 USA
(662) 455-1200
For product information,
call 1-888-VIKING1 (845-4641)
or visit the Viking Web site at
vikingrange.com
Professional & Designer 325E & 450E
Series Built-In Dishwashers
F20761 EN
(092710)
Congratulations
With your purchase of the world’s most powerful and
intelligent dishwasher, you have joined the elite world of
Viking ownership.
Your Viking dishwasher is designed to offer years of reliable
service. This Use & Care Guide will provide you with the
information you need to become familiar with your
dishwasher’s operation and care.
Your complete satisfaction is our ultimate goal. If you have any
questions or comments about this product, please contact the
dealer from whom you purchased it, or contact our Consumer
Support Center at 1-888-VIKING1.
For more information about the complete and growing
selection of Viking products, contact your dealer or visit us
online at vikingrange.com.
This symbol alerts you to hazards such as fire, electrical
shock or other injuries.
WARNING
Electrical Shock Hazard
Electrically ground dishwasher.
Connect ground wire to green ground connector
in terminal box.
Do not use an extension cord.
Failure to follow these instructions, can result in
death, fire or electrical shock.
WARNING
Tip Over Hazard
Do not use dishwasher until completely installed.
Do not push down on open door.
Doing so can result in serious injury or cuts.
WARNING
Excessive Weight Hazard
Use two or more people to move and install
dishwasher.
Failure to do so can result in back or other injury.
2
3
Important Safety Instructions
Getting Started
Important Safety Instructions ______________________ 5
Read all instructions before using the dishwasher.
Features ___________________________________________ 8
• It is your responsibility to be sure your dishwasher
Product Controls
Cycle Data ________________________________________ 11
General Features: Cycles __________________________ 12
Using the Delay Start Option ______________________ 13
Operation
Preparing Dishes __________________________________ 14
Washing Recommendations _____________________ 16
Rack Adjustments _________________________________ 18
° Has been installed by a qualified installer.
° Has been properly grounded.
° Has been properly connected to an appropriate
electrical supply, water supply and drain.
° Has been securely mounted to the cabinet.
° Is properly maintained.
Silverware Basket __________________________________ 19
Loading Dishwasher _______________________________ 20
Loading Silverware Basket _________________________ 21
Loading Racks _____________________________________ 23
Dishwasher Detergent _____________________________ 25
° Has had all shipping materials, packaging and
temporary labels removed.
• Install dishwasher so that it is protected from the elements.
Protect dishwasher from freezing to avoid possible fill valve
damage.
Rinse Agent _______________________________________ 26
Wash Temperature _________________________________ 27
• DO NOT use an extension cord to connect the dishwasher
to electricity.
Energy Saving Tips ________________________________ 27
Water Hardness ___________________________________ 28
Product Care
Maintenance ______________________________________ 29
• Use the dishwasher only for its intended function.
• To avoid the risk of personal injury due to steam burns,
open door slowly to allow steam to escape before opening
completely.
Troubleshooting ___________________________________ 31
Troubleshooting Fault Codes ______________________ 36
Service Information ________________________________ 38
• Use only detergents and rinse agents recommended for use
in household dishwashers, and store them in a safe and dry
environment away from the access of children.
Warranty __________________________________________ 39
4
5
Getting Started
Table of Contents
Getting Started
Important Safety Instructions
• When loading items to be washed, place sharp items so that
they are not likely to damage the door seal and load sharp
knives with the handles up to avoid the risk of personal
injury.
• Depending on cycles/options selected, the dishwasher
operates at very high water temperatures 155°F (68°C) on
some models. Use extreme caution when opening unit or
handling dishes.
• DO NOT wash plastic items unless marked “dishwasher
safe” or the equivalent.
• DO NOT use door to push racks in. Close the dishwasher
door when not in use.
• DO NOT operate the dishwasher without the filters in place.
• DO NOT repair or replace any part of the appliance unless
specifically recommended in the manual. All other servicing
should be referred to a qualified authorized technician.
• DO NOT operate your dishwasher unless all enclosure panels
are properly in place.
• DO NOT abuse, sit on or stand on the door or dish rack of
the dishwasher.
• When discarding an old dishwasher, always remove the door
to prevent accidental entrapment.
SAVE THESE INSTRUCTIONS!
• DO NOT tamper with controls.
• To reduce the risk of injury, do not allow children to play in or
on a dishwasher.
• If hot water has not been used recently (usually two weeks or
longer), hydrogen gases may buildup in the water heater and
the hot water pipes. HYDROGEN GAS IS EXPLOSIVE. To
prevent injury or damage, before using your dishwasher, turn
on all hot water faucets and allow water to run for several
minutes before using your dishwasher. This will allow gases to
escape. Do not smoke or use any open flames near the faucet
while it is open.
6
7
Getting Started
Important Safety Instructions
Getting Started
• Five-Stage Filtration and Waste Removal System
Prevents redepositing of food particles by assuring 100%
filtered water is delivered to dishes in all cycles resulting in
clean spot-free dishes. The system includes a removable
coarse strainer, exclusive Triple-Clean™ filtration with
self-cleaning jets, and an exclusive ultra hard food waste
disposer.
• Sure-Temp™ Water Heating
HydroFlo™ water heater automatically heats water to
appropriate/selected temperature, assuring excellent
washing performance.
• AirFlo™ Gentle Drying (450E model)
Gentle, effective and safe fan-driven system delivers warm,
gentle air over, under and around dishes.
450E model shown
• Vari-Pressure Intelli-Wash™ System
Customizes water volumes and water pressure to
selected cycles and options. The wash system
includes multi-level washing with two high quality
stainless steel wash arms and an exclusive
blockproof Flexible-Fluid™ coupling direct water
feed. The exclusive DishGuard™ Protector
prevents spray arm blockage from lower rack load
while protecting dishes.
• Central Intelligence™ System
Constant communications optimize performance
by measuring water temperature and water volume.
8
• Condensate Quick Dry (325E model)
Moisture at the end of the cycle condenses on the stainless
interior and drains into the sump area providing quick and
efficient drying.
• Quiet Clean™ Performance Packages
Engineered top to bottom for the quietest operation
possible. The combination of a quiet three phase motor,
separate motor and pump for washing and draining, multistage sound absorbing insulation and cushion mounted key
operating components provides a unique Quiet Clean™
sound package.
• “Load-As-You-Like” Sturdi-Bilt™ Racks
Fully extendable and adjustable nylon coated steel racks
accommodate 15 international place settings of china in a
single load.
• Diamond-Brite™ Stainless Steel Tank and Inner Door
Brightly polished surgical stainless steel to maintain
optimum long-term appearance.
9
Getting Started
Features
Features
Cycle Data
Getting Started
Features
Cycle
name
1
Main- 145° F (63° C)
Rinse- 150° F (66° C)
8.4
126
(min.)
Normal
Wash
Normally soiled
plates, glasses,
bowls, and lightly
soiled pots and
pans
Main- 120° F (49° C)
Rinse- 140° F (60° C)
4.7
88
(min.)
Econo
Wash
Normally soiled
plates, glasses,
bowls, and lightly
soiled pots and
pans
Main- 125° F (51.7° C)
Rinse- 130° F (54° C)
5.4
101
(min.)
9
Light/
China
Lightly soiled
dishes or fine
china and crystal
Main- 130° F (54° C)
Rinse- 135° F (57° C)
5.8
81
(min.)
Rinse/
Hold
All dishware
Rinse
1.4
10
(min.)
5
450E model shown
1. Roller Bearing™ upper rack
• Hold-Tight™ dividers (3)
• One-piece stemware
Cradle/cup shelf (1 row)
(450E model)
• One-piece cup shelf (1 row)
2. DishGuard™ protector
3. Automatic detergent dispenser
4. Automatic rinse agent
dispenser
5. Top-of-door hidden control
panel
6. Stainless steel
wash arms (2)
7. Removable coarse strainer
8. Fine filter
9. Lower rack
• One-piece fold down
tines (4 rows)
• Two-piece silverware
basket and lids (450E
model)
• Single-piece silverware
basket and lids (325E
model)
10
NOTE: Will perform properly if connected to “cold” water - 50° F (10° C). Cycle times
will be extended.
NOTE: All cycle times, temperatures and fills are approximate and are dependent on
installation and environmental conditions.
NOTE: Heating delays to meet set temperatures may extend the cycle times.
NOTE: AirFlo™ Gentle Drying will add approximately one hour to the total cycle time.
(450E model)
11
Product Controls
8
Total wash time
(minutes)
120°F
(49°C)
Heavily soiled
pots, pans and
casserole dishes
7
3/4
Wash
temp.
Total
water
gal. (L)
Pots/
Pans
6
2
Recommended
dish types/
soil level
Features: Cycles
Features: Cycles
325E
Wash Cycles
HI TEMP WASH
POTS/PANS
Increases time, temperatures and may add extra water to improve
cleaning performance. Available with Pots/Pans and Normal cycles.
Heavily soiled pots, pans and casserole dishes. Intense pressure, added
wash time and high temperatures.
NOTE: When used with Pots/Pans cycle, periods of soaking will occur to aid in
the removal of baked on soils.
NORMAL WASH
ECONO DRY (450E model only)
Normally soiled plates, glasses, bowls, and lightly soiled pots and pans.
Varying pressure levels.
ECONO WASH
Normally soiled plates, glasses, bowls, and lightly soiled pots and pans.
Lower temperature main wash and rinse, using less energy.
LIGHT/CHINA
Lightly soiled dishes or fine china and crystal. Low temperature, shorter wash
and rinse. Varying pressure levels to ensure wash performance and protect
delicate dishes.
RINSE/HOLD
All dishware. Short, non-heated rinse with high pressure.
Options
TOP WASH (450E model only)
Washes dishes on top rack only. Available on Normal Cycle.
Selects a “no heat” dry. Available on Normal, Econo Wash and Light
China Cycles.
DELAY START
Lets you delay running the dishwasher. To set “Delay Start”, select the
desired wash cycle and option(s). Press the “Delay Start” key once and
the number “2” will light, indicating a two hour delay. If you desire a
longer delay, continue pressing the “Delay Start” key to the desired
delay time. The corresponding number on the key will light. Once you
have set the desired delay time, press the “START” button and close the
door. “Delay Start” is not available with the Rinse/Hold cycle. Available
delay times vary by models.
Audible Sound Signal
A single beep will occur when you select cycles, options and press the
“START” button. The end-of-cycle signal consists of 2 long beeps. If the
“START” button is not pressed or if the door is not closed within 4
seconds of pressing the “START” button, 3 short beeps will occur. For
all other error messages and to deselect the audible sound signal, see
the Troubleshooting/Fault Codes section.
NOTE: Option, Cycle and Start keys will only illuminate after they are selected.
12
13
Product Controls
Product Controls
450E
Preparing Dishes
Changing a Program
It is not necessary to rinse normal food soils off the dishes
before putting them in the dishwasher, although larger solid
particles, such as bones, seeds, skins, pits, and toothpicks
should be removed.
Changing a Program After the Unit has Started
If you are not going to run the dishwasher immediately after
loading, it is best to rinse salty and highly acidic foods off
stainless steel, silver, and silverplate flatware. Prolonged
contact of foods—including lemon juice, salt, vinegar, mustard,
mayonnaise, and salad dressings—with stainless steel can
cause corrosion (pitting).
1. Load the dishes per recommended loading. See section
on Loading Dishwasher.
2. Make sure there is rinse agent in the dispenser. Add rinse
agent if needed. See section on Rinse Agent.
3. Add proper amount of detergent and pre-wash. See
section on Dishwasher Detergent.
4. Push both top and bottom racks in.
5. Select the desired cycle and option(s). Cycle and Option
keys will illuminate to indicate selection.
6. Press “START”. The “START” symbol will illuminate to
indicate the unit is ready.
7. Close the door tightly until you hear a click. Otherwise, the
dishwasher will not start.
Press “START” again and close the door. The drain pump will
run to remove any dirty water from the dishwasher before
starting the newly selected cycle. Check to make sure there is
still detergent in the detergent dispenser.
Opening the Door after Cycle has Started
If the door is opened after the cycle has started, the ”START”
button will flash to indicate that the dishwasher is in Standby
Mode. Press the “START” button and close the door securely
within 4 seconds to restart the cycle.
Operation
Operation
Before Operation
The dishwasher is programmed to stop operating if the door is
opened during a cycle. To change a program or option after
starting the machine, open the door slightly to let the spray
arms stop rotating and avoid getting sprayed with water. Press
and hold “START” for four seconds to cancel the current
selection, then press the touchpad(s) for your desired selection.
Option Restrictions
All options are not available for all cycles. Please note the
following:
• The option “HI TEMP WASH” is not available in the
“LIGHT/CHINA” or “ECONO WASH” cycles.
• No options are available in the “RINSE/HOLD” cycle.
• The option “TOP WASH” is available only with the
“NORMAL WASH” cycle.
After selecting the wash cycle and options, depress “START”
button. The start light will turn on. This merely means the
machine is ready. Close the door securely within 4 seconds of
pressing the “START” button.
14
15
Washing Recommendations
Most household dishes such as plates, saucepans, and flatware are
dishwasher safe. If you are unsure, check the manufacturer’s
recommendations before washing. You are responsible for what is
washed in the dishwasher.
Diswasher safe?
Comments
Yes
exceptions:
anodized and
disposable
aluminum
Anodized aluminum may fade or
darken. Disposable aluminum may
contact other dishes and cause dark
spots.
Cast iron
Not
recommended
Seasoning will be removed and the
cast iron will rust.
China/
stoneware
Yes
exceptions:
antique, handpainted, or
gold leaf
China without decoration or with
glaze covered patterns is usually
dishwasher safe. Antique, handpainted and gold-leaf China may
discolor or fade.
Yes
exceptions:
antique, some
lead crystal
Position crystal so that it will not fall
over or knock against other dishes.
Some types of lead crystal may etch
in dishwasher.
Flatware
with
glued
handles
Not
recommended
Certain adhesives may loosen and
cause the handles to come off.
Glass
Yes
exceptions:
milk glass
(not
recommended)
Milk glass may discolor with
repeated washing.
Not
recommended
Gold-plated flatware may discolor.
Operation
Crystal
Goldplated
flatware
16
Materials
Knives
Diswasher safe?
Comments
Yes
Position knives in large items tray
so that blades are not touching.
Knives may become dull if the
blades contact other items.
Non-stick
coatings
Not
recommended
Coating may wear off with repeated
washing.
Pewter/
brass/
bronze
Not
recommended
Pewter, brass, and bronze may
tarnish or pit.
Plastic
Yes
Stainless
steel
Yes
Silver/
silverplate
Yes
Disposable plastic cannot withstand
high water temperature or
dishwasher detergent.
Rinse stainless steel items if they
will not be washed immediately.
Prolonged contact with salty or
acidic foods will stain. Position
stainless steel pieces so they do not
contact dissimilar metals.
Rinse silver/silverplate items if they
will not be washed immediately.
Prolonged contact with salty or
acidic foods and foods containing
sulfur will stain. Position stainless
steel pieces so they do not contact
dissimilar metals.
Tin
Not
recommended
Tin may rust.
Wood
Not
recommended
Wash wood items by hand. Wood
may warp, crack, or lose its shape
or finish in the dishwasher.
17
Operation
Materials
Aluminum
Washing Recommendations
Rack Adjustments
Two-Piece Silverware Basket
(450E models)
The silverware basket is designed with flexibility in mind. It can
be positioned on the lower rack and also in the upper rack. The
design also allows the basket to be divided into two separate,
smaller baskets for additional loading options.
The Lower Rack
The lower rack is best
for dinner plates,
smaller plates, serving
plates, larger bowls,
pots, and pans.
1
• Securely place
heavily soiled
cookware face down
Fold-Down Tines
in the rack.
• Use the fold-down tines to provide space for large items such
as pots and pans.
• Make sure pot handles and other items do not stop rotation
of lower wash arm by hanging below the rack.
Grasp the basket as shown and push
the two halves in opposite directions
to release the locking tabs.
2
The upper rack is best
for glasses, cups,
bowls, small plates,
and saucers and can
accomodate full sized
plates up to 10-1/4”.
Operation
Operation
The Upper Rack
• Make sure small
plastic items are
held firmly in place
with Hold Tight™
dividers.
Stemware Cradle (450E models)
• Arrange stemware
between prongs of stemware cradle so that the stemware
cannot move easily.
• Make sure items hanging below the rack do not block the
rotation of the wash arm.
Repeat step 1 on opposite end
of basket.
3
Pull the two halves apart.
18
19
Loading the Dishwasher
Loading Two-Piece Silverware Basket
(10 Place Setting)
General Loading Guidelines
• Load all items so that the force of the water and the
detergent reach soiled surfaces.
• Do not let china, crystal, and other delicate items touch
each other during dishwasher operation.
• Do not use door to push racks in.
NOTE: Do not load dishes in a manner that would block the
detergent dispenser lid from completely opening. The detergent
dispenser lid could be damaged.
NOTE: Do not put sterling silver or silver-plated flatware in the
same compartment with stainless steel. Contact between the
metals can damage silver.
Do not put stainless steel of different qualities close to each other.
Contact can damage metals.
Rinse stainless steel items if they will not be washed immediately.
Prolonged contact with salty or acidic foods will cause stains.
Extra Quiet Operation Hints
• Keep sink drain plugs inserted during dishwasher operation to
prevent noise transfer through drains.
• Load dishes so they do not touch each other.
• Make sure lightweight items are secured in the rack.
• Make sure pot lids and handles, pizza pans, cookie sheets, etc.,
do not touch interior walls.
E
B
A
B
A
B
B
A
B
A
A
B
B
B
B
C
C
C
E
E
E
E
E
C
E
C
C
B
G
E
B
C
A
B
B
A
A
B
B
B
B
B
C
E
B
A
C
B
E
A
C
F
The Silverware/Cutlery Basket
Tips for Best Cleaning Results:
• Distribute items evenly and mix knives, forks, and spoons so
that items will avoid nesting.
• Always place forks and spoons with eating portions up and
handles down.
• Each compartment has a lid which will separate the silverware
for the best cleaning and drying results. The lids also hold small,
lightweight items in place.
• IMPORTANT: Sharp or pointed items, such as knives, should
always be put in with the point down to protect your hands.
• Basket can also be moved to upper rack or lower rack.
20
A
B
C
D
21
E
F
G
Operation
Operation
Your dishwasher has been designed and engineered to give
superior cleaning results and to operate very quietly. To avoid any
extra clattering or thumping noises during operation:
F
Loading Single-Piece Silverware
Basket
Loading Racks
(10 Place Setting)
Upper Rack
The Silverware/Cutlery Basket
Tips for Best Cleaning Results:
• Distribute items evenly and mix knives, forks, and spoons so
that items will avoid nesting.
• Always place forks and spoons with eating portions up and
handles down.
• Compartments with lids help separate the silverware for the
best cleaning and drying results. The lids also hold small,
lightweight items in place.
• IMPORTANT: Sharp or pointed items, such as knives, should
always be put in with the point down to protect your hands.
• 10 glasses
• 10 coffee cups
• 10 saucers
• 10 bowls
• 10 dinner
plates
• 1 serving
platter
• 2 serving
bowls
• 10 bread and
butter plates
(AHAM DW-1 10 place setting)
22
23
Operation
Operation
Lower Rack
Loading Racks (15 International Place Setting)
Upper Rack
• 12 coffee
cups
• 15 glasses
• 11 bowls
• 11 saucers
Use only a detergent designed for an automatic dishwasher.
Never use oven cleaners or other caustic cleaners not designed
for dishwashers. These will damage the stainless steel interior,
filters and pump components of your dishwasher. Never use
soap, laundry detergent or handwashing detergent in your
dishwasher, as they are too mild and will cause severe oversudsing. The foam product prevents the dishwasher from
working properly and may cause damage to the dishwasher.
WARNING: Dishwasher detergent is corrosive. Keep out of
reach of children. If swallowed, drink plenty of water or
milk. Do not induce vomiting. Seek medical advice without
delay. If dishwasher detergent gets into eyes, rinse
immediately with plenty of water.
Release lever
Rinse agent
compartment
Lower Rack
Prewash
detergent
• 4 saucers
• 15 dinner
plates
• 12 bread
and butter
plates
• 4 bowls
• 3 coffee
cups
24
(used for Pots/Pans)
Main wash detergent
(in cup)
Storing the Detergent
For best results, keep your detergent container tightly closed
after each use, out of reach of children and stored in a cool, dry
place. Storage under the sink is not advisable for powdered
detergent, because this area is generally too warm and
moist to keep detergent fresh.
25
Operation
Operation
• 3 bread and
butter plates
Dishwasher Detergent
Rinse Agent
Wash Temperature
A rinse agent causes water to flow off the dishes more quickly,
preventing droplets that dry as spots and improving drying
performance. Rinse agent come in solid and liquid forms. Your
dishwasher’s rinse agent dispenser uses the liquid form.
Hot water dissolves and activates dishwashing detergents,
dissolves grease on dishes, and helps glasses dry spot free. If
the incoming water is extremely cold due to unusually cold
temperatures outside, if you have recently done laundry or
run hot water for showers, or if your water travels a long
distance from the hot water heater to the dishwasher, the
running time of the dishwasher may be longer to heat the
water to the required temperature.
Fill level indicator
(refill when empty)
Checking the Wash Temperature
5 4 3 2 1
6
Rinse agent
dispenser
Filling the Rinse Agent Dispenser
Operation
Adjusting the Dosage of Rinse Agent
The rinse agent dosage is set by the manufacturer and is
dispensed automatically into the final rinse. If necessary, the
rinse agent dosage can be adjusted by inserting a screwdriver
inside the filler hole where the adjustment device is set on “4.”
It is recommended that the dial be adjusted only one number
at a time.
Energy Saving Tips
•
•
•
•
•
Only start a wash when the machine is completely full.
Select “ECONO WASH.”
Do not prewash dishes. Simply scrape, load, and wash.
Use the POTS/PANS program only for heavily soiled dishes.
Connect the dishwasher to a cold water supply (cycle times
will be longer).
Power On Light
• A blue light will illuminate from the bottom right corner of
the dishwasher kickplate when a cycle is running.
NOTE: For soft water conditions, it may be necessary to reduce
the rinse agent dosage setting.
NOTE: Too much rinse agent is not advisable as this might
result in the formation of foam, especially if the dishwasher is
connected to a cold water supply.
26
27
Operation
Drying will usually be better if you use a rinse agent. To fill the
dispenser, open the cap and pour the rinse agent into the
dispenser up to the knob for dosage setting. The dispenser will
hold approximately four ounces of liquid rinse agent.
An incoming water temperature of 120°F (49°C) is
recommended. However, the Sure Temp Water Heating
System will ensure the water temperatures are correct for the
cycle/options selected.
Water Hardness
Maintenance
Hardness of Water
Your new dishwasher is designed to give you years of
dependable service. In order to maintain a high level of
performance, you need to make sure your dishwasher is
properly cared for and cleaned. Here are a few things you can
do to make sure your dishwasher performs at its highest level.
Water has a different “hardness,” or mineral content, in
different locations. The hardness is measured in grains per
gallon (gpg). Find out your water’s hardness by asking your
local water department, county extension agent, or water
softening company. Ask how many “grains” of hardness are in
your water.
Coarse strainer
The harder the water is, the more detergent you need. For the
detergent amounts recommended for use in your location with
your water, follow the guidelines in the chart. With hard water,
you need more detergent to get dishes clean. With soft water,
you need less.
Fine
filter
Too much detergent with soft water can cause “etching,” a
permanent cloudiness of glassware. If you have hard water, the
dishes as well as the dishwasher itself may accumulate a gray
deposit after some time. This deposit can be remedied by
using a mild citric acid solution instead of detergent in the
heavy wash program.
Primary Filter
How Much Detergent to Use?
(Do not remove primary filter)
Operation
The amount of detergent you use depends on the hardness of
the water and on the cycle you select. Generally, only one
tablespoon (per cup) of detergent is needed for a normal load.
Water hardness
(grains per gallon)
Amount of detergent
(powder or liquid)
Soft water
0-3 gpg
1 tablespoon
(15ml)
Medium hard water
4-8 gpg
2 tablespoons
(30ml)
Hard water
9-above gpg
3 tablespoons
(45ml)
NOTE: Line level on detergent dispenser represents 2
tablespoons.
The filters are important, because they continuously filter wash
water. Under normal operation, the filters are self cleaning and
require no maintenance. If there is a heavy amount of food soil,
sediment or hard water conditions, it may be necessary to clean
the filters after each use. To clean, remove the filters as shown
in the above illustration and soak overnight in a 50/50 solution
of water and vinegar. Citric cleaner and water are also
acceptable. Filters should appear bright when clean.
The Coarse Strainer
Large food particles that can’t pass through the drainage pump
are collected in the coarse strainer. Lift out and empty the
coarse strainer when necessary. Don’t forget to put it back
again. It is normal for a small amount of water to remain in the
coarse strainer area.
WARNING
Never operate the dishwasher without the filters in place.
28
29
Product Care
NOTE: In areas with hard water above 12 grains, a water
softener is recommended.
Filters
Maintenance
Troubleshooting
Coarse strainer
(lift to remove)
Poor wash results may not always be caused by the dishwasher. Please
review the following Troubleshooting Charts for possible remedies. You
may find the proper solution without having to call a service provider.
If the cycle buttons are flashing, please refer to the Fault Codes Chart in
the following pages of this manual for possible remedies.
1
2
1
Poor Dishwashing Results
(Squeeze tabs to remove coarse strainer)
PROBLEM
POSSIBLE CAUSE AND/OR REMEDY
The dishwasher does
not start
Door is ajar:
Make sure the door is closed securely.
“DELAY START” Option is On:
Make sure the “DELAY START” option is not
turned on.
Water Supply is Disconnected:
Check that the water supply is connected
properly and the water is turned on.
Fine filter
(lift to remove)
Power Cord is Disconnected:
Make sure the power cord is properly
plugged into the wall socket.
3
4
3
Fuse is Blown:
Check your fuse box for a blown fuse or
tripped circuit breaker.
Spotting and filming
(Rotate to remove fine filter)
To Clean Filters
Remove the coarse strainer and empty. If necessary, remove the
fine filter and clean all surfaces. DO NOT remove primary filter.
Replace the filters and secure in place.
Hard water:
Use the maximum recommended amount
(3 tablespoons) of dishwasher detergent. To
remove hard water spots, try a vinegar rinse:
• Wash and rinse load as usual.
• Remove all metal items from dishwasher.
• Do not add detergent.
• Pour two cups of vinegar into a bowl and
set it on the bottom rack of the dishwasher.
• Run the dishes through an entire wash program.
If the vinegar rinse doesn’t work, repeat the
above process substituting 1/4 cup citric acid
crystals (available at most drug stores) for the
vinegar.
Product Care
Filter system:
Check filter system to be sure it is clean and
properly installed.
30
31
Product Care
Wiping with a damp cloth should remove
spots from metal items. For sterling silver
and silver plated flatware, rub with a towel,
or use a good cream silver polish.
Troubleshooting
Troubleshooting
POSSIBLE CAUSE AND/OR REMEDY
PROBLEM
POSSIBLE CAUSE AND/OR REMEDY
Spotting and filming
No rinse agent:
Does the rinse agent dispenser need to be filled?
Small particles deposited
on items (cont.)
Improper loading of dishes:
Load dishes to prevent water and detergent from
being trapped in or between items. Water should
circulate freely.
Flatware incorrectly loaded:
Pay particular attention to spoons so that they do
not nest in each other and prevent water
penetration.
Make sure filters are installed properly.
Filter may have clogged due to heavy sediment,
food soil or hard water conditions.
Yellow or brown marks
Iron or manganese in water:
Temporary solution: Pour in one teaspoon to one
tablespoon of citric acid crystals instead of the
prewash detergent. Follow this prewash with a full
detergent wash. Use the pots/pans or normal
wash cycle.
Permanent solution: Install an iron removal system
in the water supply.
Copper with sterling silver:
Yellow film on sterling silver results when washing
copper items in the same load. Silver polish
usually removes the stain.
Tea or coffee (tannic acid):
Tea or coffee can stain cups. Remove stains by
hand, using a solution of 1/2 cup bleach and 3
cups warm water. (Do not use on sterling silver or
silverplate.)
Discoloration of stainless
steel, silverplate or
sterling silver
Allowing salty foods to remain on flatware.
Rinse flatware that is to stand several hours before
washing.
Stainless steel contacting silver:
Do not put stainless steel and silver flatware in the
same silverware basket compartment. Direct
contact between these metals can cause
permanent damage to silver. Clean stained items
with silver polish. Do not use abrasives on
stainless steel or silver.
Distortion of plastics
Plastic items have a low heat tolerance:
Plastics vary in their ability to tolerate heat.
Check washing instructions for all plastic items to
be sure they are dishwasher safe.
Marks on melamine and
plastics
Porous material:
Use a special cleaner for plastic. DO NOT use
bleach or scouring powder on these materials.
Dishwasher detergent:
Use only the correct amount of dishwasher
detergent according to the hardness of the water
and the wash program you have selected. Do not
use old or caked detergent. Store the dishwasher
detergent in a dry place and in a closed container.
Change the dishwasher detergent if the result is
still unsatisfactory.
Items not loaded properly:
Check that you loaded the items according to the
instructions on pages in this manual. Do not
overload. Make sure water can reach all soiled
surfaces.
Check that both wash arms can rotate freely and
that items do not obstruct the movement of the
wash arms. Lift the arms and make sure that no
grains of dirt retard the rotation of the wash arms.
If necessary, clear the obstruction, refit the arms,
and check that they rotate freely. Be sure a utensil
or handle has not prevented their turning.
Strainer blocked
Check the strainer. Clean if necessary. Refer to
maintenance section in this manual.
Excessive foam
in the machine
Use only dishwasher detergent.
Marks and discoloration
Aluminum utensils rubbing against items during
washing:
Be sure aluminum utensils, especially light weight
foil-type pans, do not touch dishes.To remove
spots, use a non-abrasive cleaner.
Small particles deposited
on items
Detergent:
Use only fresh detergent. Store in a tightly closed
container in a cool dry place. Fill dispenser only
when ready to start the dishwasher. Use the
recommended amount of detergent, especially
with hard water.
Product Care
Dishes are not clean
32
33
Product Care
PROBLEM
Troubleshooting
Troubleshooting
PROBLEM
POSSIBLE CAUSE AND/OR REMEDY
PROBLEM
POSSIBLE CAUSE AND/OR REMEDY
Detergent left in
detergent compartment
Compartment cover blocked:
The cover may not be opening because of
improperly loaded items. Move dishes that may
be blocking it.
Dishwasher will not fill
Door open:
Check that door is firmly closed.
Controls:
Check that dishwasher is on.
Water feed line:
Check to see that the water feed line is not crimped.
Water supply:
Be sure water is available and turned on.
Water backs up in sink
when dishwasher drains
Food waste disposer and trap:
Check disposer and trap at sink for blockage or
food particles.
Water left in bottom near
filters
Dishwashing cycle not complete:
Allow dishwasher to complete cycle.
Old detergent:
If detergent is hard or caked in the box,
throw away. Use only fresh detergent. Add
detergent just before starting the dishwasher.
Cloudy film on glassware- Too much detergent: especially in soft water.
etching of glass
If vinegar or citric acid rinse doesn’t remove film, the
cloudiness is “etching.” This is permanent. If you
have soft water, use the least amount (one
teaspoon) of recommended dishwasher detergent
to prevent etching. Use high quality dishwashing
detergent and rinse aid. Do not overload the
machine. Water should circulate freely to assure
adequate rinsing and draining. Dry without heat.
Dishes not dry
No rinse agent:
Fill rinse agent dispenser. Rinse agent helps dishes
to dry faster.
The drain hose is clogged/blocked:
Check to make sure there are no obstacles in the
hose where it connects to the water. Foreign
particles can get stuck in the entrance of the
connection line. Also, check to make sure that the
cone-shaped connection line has been cut to an
inner diameter of at least 3/4” (1.9 cm).
Plastic items:
Certain plastic materials are difficult to dry.
Plastics may need towel drying.
The drain hose is kinked:
Check to make sure that there are no folds or sharp
bends in the drain hose.
Dishwasher will not drain
Non-heat drying:
Allow more drying time when using non-heat drying.
Improper loading or unloading:
Do not overload or nest items. Be sure all surfaces
drain well. Load items with concave bases so as
much water as possible can run off. Unload the
lower rack first. Water from dishes in the upper rack
may be spilling onto the lower rack.
Odor in your dishwasher
If you are only running your dishwasher every 2 to 3
days, bacteria in the food soil left on your dishes will
create an unpleasant odor. Use the Rinse/Hold
option in between cycles. To help eliminate the
odor, use a detergent with chlorine bleach and an
extra heat option with your cycle.
Chipping or breaking
of glassware
Improper loading:
Do not overload. Load between prongs, not over
them. Glasses loaded over prongs are not
supported and may break. Make sure glassware is
secure. Always use upper rack for delicate items.
Use the light/china cycle.
If large chunks of food soil are left on plates and
dishes, it may take several washes for them to
pass through the filtration system of the dishwasher,
thus causing food odor. Make sure the dishwasher is
cool; remove chunks of food soil from filter area.
Then run your dishwasher as normal.
Unusual noise
Improper loading:
Utensils may not be secure or may have dropped
from the rack. Water may cause utensils to rattle.
Make sure everything is securely placed in
dishwasher.
There are products that you can use to clean your
dishwasher such as Glisten, Dishwasher Magic® and
Lemi Shine. These products will leave your
dishwasher free of odor, spots, deposits and hard
water build-up.
Control panel does not
illuminate
Cycle and Option buttons will only illuminate after
selection. To activate unit, press “START”. The
“START” button will illuminate and unit is ready.
Close door and cycle will start.
34
Dishwasher has a plastic
smell
Your dishwasher may have parts that have a plastic
odor to them. Place 2 cups white vinegar in a
dishwasher safe measuring cup and place in the
lower rack. Do not use detergent. Run the
dishwasher through the longest cycle with an extra
heat option. Do not use heated dry.
35
Product Care
Product Care
Some water is normal. Water left in removable
coarse strainer is normal.
Troubleshooting/Fault Codes
FLASH
ACTION
Normal Wash
1
1
1
1
1
1
2
3
4
5
Pan Flood Sensor Disconnect
Motor Control Status Error
Motor Control Comms Error
Diverter Timeout
Drain Error
2
2
1
2
Huba Disconnect Error
Fill Timeout
2
3
Low Level Sensor Error
1. Verify that no dishes have turned over and are holding a significant amount of water.
2. Verify that drain hose has high loop, per installation guide.
Reset Unit and try again. If problem persists, contact service.
2
4
High Level Error
1. Verify items in rack are properly retained so that they can not turn over.
Reset Unit and try again. If problem persists, contact service.
2
5
Level Sensor Error
1. Verify that dishwasher is level front to back and side to side.
2. Verify that drain hose has high loop, per installation guide.
Reset Unit and try again. If problem persists, contact service.
3
3
1
3
UI-MC Comm Error
Drain Pump Error
Reset Unit and try again. If problem persists, contact service.
Motor Status
Motor Under Voltage
Temperature Sensor Error
Internal Error
Pan Flood
Reset Unit and try again. If problem persists, contact service.
3
3
4
5
See Note
4
5
1
5
A
Note A - Both lights flash continuously.
Note B - To reset unit, press and hold the START button 4 seconds.
Note C - Numbers listed indicate the times the lights will flash when a specific error is
detected (example: For a drain error, the POTS/PANS light will flash once and the NORMAL
WASH light will flash 5 times).
Note D - Cycle and Option keys will only illuminate after they are selected. To activate
dishwasher, press START, the light will illuminate, close the door within 4 seconds and cycle will
start.
36
Reset Unit and try again. If problem persists, contact service.
Reset Unit and try again. If problem persists, contact service.
Reset Unit and try again. If problem persists, contact service.
Reset Unit and try again. If problem persists, contact service.
1. Turn water on at sink and run garbage disposal to verify that sink is not clogged.
2. Verify that dishwasher drain hose is not clogged or kinked.
3. If draining into disposal, verify that plug has been removed from disposal.
4. Verify that drain hose has high loop, per installation guide.
5. Verify that dishwasher is level front to back and side to side.
6. Verify filters are not clogged.
Reset Unit and try again. If problem persists, contact service.
Reset Unit and try again. If problem persists, contact service.
1. Verify water supply to dishwasher is turned on.
2. Verify that fill line is not kinked.
3. Verify that dishwasher is level front to back and side to side.
4. Turn water on at sink and verify there has not been a decrease in water pressure.
Reset Unit and try again. If problem persists, contact service.
Reset Unit and try again. If problem persists, contact service.
Reset Unit and try again. If problem persists, contact service.
Reset Unit and try again. If problem persists, contact service.
Reset Unit and try again. If problem persists, contact service.
Reset Unit and try again. If problem persists, contact service.
Turning Audible Sound On and Off:
To turn off, press Rinse/Hold button for 10 seconds. The beep stops and the Rinse/Hold LED
will flash 2 times. To turn on, repeat above instructions. The audible sound beeps 2 times
and the Rinse/Hold LED flashes 2 times to identify that it is on.
Note: The audible sound cannot be disabled for error messages.
Note: The LED will flash in sync with the audible sound.
37
Product Care
Product Care
FAULT
Pots/Pans
Service Information
It is assumed that your dishwasher has been properly installed
in accordance with all specifications and local codes and that
the appliance has been properly grounded. If your dishwasher
should fail to operate, check the troubleshooting section of this
manual.
If Service is Required
Call your dealer or authorized service agency. The name of the
authorized service agency can be obtained from the dealer or
distributor in your area.
Have the following information readily available:
a. Model number
b. Serial number
c. Date of purchase
d. Name of dealer from whom purchased
Clearly describe the problem that you are having. If you are
unable to obtain the name of an authorized service agency, or
if you continue to have service problems, contact Viking
Range Corporation at 1-888-VIKING1 (845-4641), or write to:
VIKING RANGE CORPORATION
PREFERRED SERVICE
1803 Hwy 82W
Greenwood, Mississippi 38930 USA
Record the following information indicated below. You will
need it if service is ever required. The model and serial
numbers are located on an identification label attached to the
left side of the tank. For access, simply open the door of the
dishwasher.
Model no. ____________________ Serial no. ________________
Date of purchase __________ Date installed ________________
Dealer’s name __________________________________________
One Year Full Warranty
Built-In Dishwashers and all of their component parts, except as
detailed below*, are warranted to be free from defective
materials or workmanship in normal household use for a period
of twelve (12) months from the date of original retail purchase.
Viking Range Corporation, warrantor, agrees to repair or
replace, at its option, any part which fails or is found to be
defective during the warranty period.
*Painted and decorative items are warranted to be free from
defective materials or workmanship for a period of ninety (90)
days from the date of original retail purchase. ANY DEFECTS
MUST BE REPORTED TO THE SELLING DEALER WITHIN
NINETY (90) DAYS FROM DATE OF ORIGINAL RETAIL
PURCHASE.
Five Year Limited Warranty
Any upper and/or lower nylon rack which rusts through due to
defective materials or workmanship and any electronic controls
which fail due to defective materials or workmanship in normal
household use during the second through fifth year from the
date of original retail purchase will be repaired or replaced, free
of charge for the part itself, with the owner paying all other
costs, including labor.
Any motor/pump assembly or water distribution system
component as listed below which fails due to defective
materials or workmanship in normal household use during the
second through fifth year from the date of original retail
purchase will be repaired or replaced, free of charge for the
part itself, with the owner paying all other costs, including
labor.
Motor/Pump and Water Distribution
System Components
Circulation motor/pump
Lower wash arm
Drain motor/pump
Tube to upper wash arm
Fill valve
Upper wash arm
_______________________________________________________
Product Care
Product Care
Address ________________________________________________
Warranty
If service requires installation of parts, use only authorized parts
to insure protection under the warranty.
Keep this manual for future reference.
38
39
Warranty
Warranty
Lifetime Limited Warranty
Any stainless steel tank or inner door liner which develops a water
leak due to defective materials or workmanship in normal household
use during the lifetime of the product will be repaired or replaced,
free of charge for the part itself, with the owner paying all other
costs, including labor.
NINETY (90) DAY RESIDENTIAL PLUS WARRANTY
This warranty applies to applications where use of the product extends
beyond normal residential use. Examples are, but not limited to, bed and
breakfasts, fire stations, private clubs, churches, etc. This warranty
excludes all commercial locations such as restaurants, food service
locations and institutional food service locations.
This warranty extends to the original purchaser of the product
warranted hereunder and to each transferee owner of the product
during the term of the warranty.
The return of the Owner Registration Card is not a condition of
warranty coverage. You should, however, return the Owner
Registration Card so that Viking Range Corporation can contact
you should any question of safety arise which could affect you.
Any implied warranties of merchantability and fitness
applicable to the above described nylon racks, motor/pump
assembly, water distribution system, stainless steel tank, or
stainless steel inner door liner are limited in duration to the
period of coverage of the applicable express written limited
warranties set forth above. Some jurisdictions do not allow
limitations on how long an implied warranty lasts, so the above
limitation may not apply to you. This warranty gives you specific
legal rights, and you may also have other rights which may vary
from jurisdiction to jurisdiction.
Specifications subject to change without notice.
Owner shall be responsible for proper installation, providing normal
care and maintenance, providing proof of purchase upon request,
and making the appliance reasonably accessible for service. If the
product or one of its component parts contains a defect or
malfunction during the warranty period, after a reasonable number
of attempts by the warrantor to remedy the defects or malfunctions,
the owner is entitled to either a refund or replacement of the product
or its component part or parts. Warrantor’s liability on any claim of
any kind, with respect to the goods or services covered hereunder,
shall in no case exceed the price of the goods or service or part
thereof which gives rise to the claim.
40
Product Care
Product Care
This warranty shall apply to products purchased and located in the
United States and Canada. Products must be purchased in the
country where service is requested. Warranty labor shall be
performed by an authorized Viking Range Corporation service
agency or representative. Warranty shall not apply to damage
resulting from abuse, accident, natural disaster, loss of electrical
power to the product for any reason, alteration, outdoor use,
improper installation, improper operation, or repair or service of the
product by anyone other than an authorized Viking Range
Corporation service agency or representative. This warranty does not
apply to commercial usage. Warrantor is not responsible for
consequential or incidental damage whether arising out of breach of
warranty, breach of contract, or otherwise. Some jurisdictions do not
allow the exclusion or limitation of incidental of consequential
damages, so the above limitation or exclusion may not apply to you.
WARRANTY SERVICE:
Under the terms of this warranty, service must be performed by
a factory authorized Viking Range Corporation service agent or
representative. Service will be provided during normal business
hours, and labor performed at overtime or premium rates shall
not be covered by this warranty. To obtain warranty service,
contact the dealer from whom the serial number and date were
originally purchased. For the name of your nearest authorized
Viking Range Corporation service agency, call the dealer from
whom the product was purchased or Viking Range
Corporation. IMPORTANT: Retain proof of original purchase to
establish warranty period.
41
42
43