1
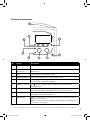
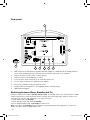
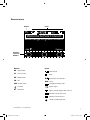
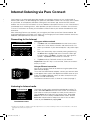
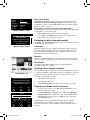
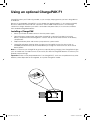
Evoke
F4 with Bluetooth
EvokeF4-V6-Aus.indb 1
4/22/2014 10:45:32 AM
Pure Warranty Statement for Australia
This statement replaces any reference to warranty which may be contained elsewhere within
this manual.
What do you need to do now?
Option 1: You can register your purchase on-line at https://www.pure.com/au/register/register.asp.
Option 2: Or you can do nothing other than keep your proof of purchase as evidence of your
purchase date. This proof of purchase would need to be presented if warranty service was
ever required.
If you have any questions about your warranty you can call us toll free 1800 988 268.
What’s covered by this warranty?
•Pure agrees to refund, repair or replace, at your election, without charge to you, any part found
to be defective during the warranty period.
•If equipment has been used according to its accompanying instruction manual and is used in
a domestic situation, a two year warranty period applies (excludes rechargeable ChargePAK
where fitted. A one year warranty period applies to all ChargePAKs).
How do you make your claim?
Call 1800 988 268 for instructions on how to return your Pure product for warranty service or go to http://support.pure.com/au/ and complete the contact us form.
What’s NOT covered by this warranty?
Under this express warranty Pure will not be liable for loss or damage of any kind whatsoever,
whether direct, indirect, incidental, consequential or otherwise.
•Replacement of parts due to normal wear and tear.
•Products with serial number defacement, modification or removal.
•Water damage or corrosion caused by dampness.
•Any damage or deterioration due to shipment.
•Any product which has been subjected to misuse, abuse or accident.
Australian consumers — The benefits to the consumer given by this express warranty are
in addition to other rights and remedies of the consumer under a law in relation to the goods
or services to which this warranty relates. Our goods come with guarantees that cannot be
excluded under the Australian Consumer Law, You are entitled to a replacement or refund for a
major failure and for compensation for any other reasonably foreseeable loss or damage. You are
also entitled to have the goods repaired or replaced if the goods fail to be of acceptable quality and
the failure does not amount to a major failure.
Pure is distributed and supported in Australia by PIONEER ELECTRONICS AUSTRALIA PTY LTD,
5 ARCO LANE, HEATHERTON, VICTORIA, 3202.
EvokeF4-V6-Aus.indb 2
4/22/2014 10:45:32 AM
Evoke
F4 with Bluetooth
Thank you for choosing Evoke F4 with Bluetooth. This music streaming
and radio system brings a world of listening simply and easily within your
reach. You can use it to enjoy music streamed wirelessly from your iOS or
Android device or from your PC or Mac; to listen to a wide-range of internet,
digital or FM radio stations; and to play thousands of podcasts, on-demand
radio programmes and evocative ambient sounds. You can also access the
Pure Connect cloud‑based on‑demand subscription service to gain instant
access to millions of music tracks. This manual will get you up and running
in no time, and explains how to make the most of your Evoke F4. We’re
constantly improving and adding new features to our products. To take
advantage of any enhancements made since your product was shipped,
please visit support.pure.com where you can download the latest version of
this user guide in PDF format.
Volume
Select
1
EvokeF4-V6-Aus.indb 1
4/22/2014 10:45:33 AM
Important Safety Instructions
1. Read these instructions – All the safety and operating instructions should be read before this product is
operated.
2. Keep these instructions – The safety and operating instructions should be retained for future reference.
uce heat.
3. Heed all warnings – All warnings on the appliance and in the operating instructions should be adhered to.
4. Follow all instructions – All operating and use instructions should be followed.
5. Do not use this apparatus near water.
rate
6. Clean only with dry cloth.
servicing to 7. Do not block any ventilation openings. Install in accordance with the manufacturer’s instructions.
8. Do not install near any heat sources such as radiators, stoves, or other apparatus that produce heat.
oths, alling or
be exposed
9. Only use attachments and accessories specified by the manufacturer.
10. Unplug the apparatus during lightning storms or when unused for long periods of time.
11. Do not use the mains adapter outdoors.
12. Be aware of volume levels when using headphones, excessive volume can damage your hearing.
13. Cease use immediately if apparatus exhibits any signs of mechanical damage, excessive temperature,
swelling or splitting.
equire a
d periods.
sion, or
ore near
to a
abnormal.
atteries
14. Refer all servicing to qualified service personnel. Servicing is required when the apparatus has been
damaged in any way, such as power-supply cord or plug is damaged, liquid has been spilled or objects
have fallen into the apparatus, the apparatus has been exposed to rain or moisture, does not operate
normally, or has been dropped.
15. To reduce the risk of electric shock, do not remove cover (or back) as there are no user-serviceable parts
inside. Refer servicing to qualified personnel.
16. Use only power supplies listed in the user instructions (with model no. DSA-24CA-05 055357,
manufactured Pure).
17. Servicing is required when the apparatus has been damaged in any way, such as power supply cord or
plug is damaged, or the apparatus does not operate normally, or has been dropped.
18. WARNING To reduce the risk of fire or electric shock, do not expose this apparatus to rain or moisture.
The apparatus shall not be exposed to dripping or splashing and that objects filled with liquids, such as
vases, shall not be placed on apparatus.
19. CAUTION: Danger of explosion if battery is incorrectly replaced. Replace only with the same or equivalent
type.
20. WARNING: The direct plug-in adapter is used as disconnect device, the disconnect device shall remain
readily operable.
21.
This equipment is a Class II or double insulated electrical appliance. It has been designed in such a
way that it does not require a safety connection to electrical earth.
Damage to hearing can occur with consistent exposure to high volume when using headphones.
Always check the volume level before inserting headphones into your ears.
Use of headphones while operating a vehicle is not recommended and is illegal in some areas. Stop
listening to your radio if you find it distracting while operating any type of vehicle or performing any
other activity that requires your full attention.
2
EvokeF4-V6-Aus.indb 2
4/22/2014 10:45:33 AM
Contents
4
Getting started
4
5
6
6
Quick start
Controls and sensors
Rear panel
Switching between Sleep, Standby and
On
Screen icons
7
8
Internet listening via Pure
Connect
8
8
9
10
10
Connecting to the Internet
Listening to Internet radio
Listening to other Internet content
Music streaming
Pure Connect tagging service
11 Streaming from the Pure
Connect app
11
11
Download the Pure Connect app
Selecting Evoke or other Caskeid
compatible device in the
Pure Connect app
12 Streaming music from a PC
or Mac
12
Listening to streamed tracks on Evoke
13 Listening to digital or FM
radio
13
13
13
13
13
Changing digital stations
Searching for digital stations
Changing FM stations
Storing a preset
Listening to a preset
14 Listening to audio from a
USB memory stick
14 Using Bluetooth
15 Recording radio programmes
15
15
Instant recordings
Timed recordings
16 Setting alarms and timers
16
16
16
16
16
16
16
Setting an alarm
Setting the sleep timer
Setting the kitchen timer
Cancelling a sounding alarm or timer
Snoozing a sounding alarm
Changing the alarm snooze time
Cancelling a snoozing alarm
17 Options and settings
17 Pure Connect settings
17Autotune
17 FM settings
17 Network/USB media
18 Audio settings
19 Setting the clock
19 Changing the language shown on the
display
19 Upgrading Evoke
19 Changing Evoke’s name
19 Bluetooth settings
20 Network settings
21 Using an optional ChargePAK
F1
21
Installing a ChargePAK
22 Help and advice
23Specifications
3
EvokeF4-V6-Aus.indb 3
4/22/2014 10:45:33 AM
Getting started
Quick start
Note: If you have a ChargePAK F1 rechargeable battery (sold separately) fit it now before plugging in
Evoke. See page 21 for more information.
1
Extend the aerial and insert the connector of the supplied power adapter into the 5.5V DC
input on the rear of Evoke. Plug the adapter into the power supply. Pure is displayed briefly
on‑screen.
Aerial
5.5V DC
2
3
Aux Speaker
Aux Speaker
Stereo
Out Out
Stereo
Choose your display language (English, French, German or Italian) by turning the Select dial
to highlight the language you want. Push the Select dial in to confirm your choice. Repeat this
process to select the time zone and region closest to you.
The Home screen is displayed:
Digital radio
Pure Connect
Network/USB media
FM radio
Auxiliary input
OK
Settings
Turn the Select dial to highlight and press to select one of the following options:
Digital radio
See page 13
Pure Connect
See page 8
Network/USB media
See page 12
FM radioSee page 13
Auxiliary input
See page 6
To change any of Evoke’s settings, tap the Settings button (see page 17).
4
EvokeF4-V6-Aus.indb 4
4/22/2014 10:45:33 AM
Controls and sensors
9
1
3
2
Volume
Select
8
6
7
4
5
No.
Control
Description
1
Home
Tap to return to the Home screen.
2
Context-sensitive
touch buttons
Tap the button that corresponds to the function shown on screen that you
want to use.
3
Back
Tap to go back to the previous screen.
4
Volume/mute dial
Turn to adjust volume. Push to mute and un-mute.
5
Select dial
Turn to navigate menus, stations or options and push to select an item.
Push to pause a media track or podcast.*
6
Standby touch key
Tap to switch between Sleep, Standby and On. See page 6 for
more information.
7
Light sensor
Do not cover. Adjusts the display brightness according to the light levels in
your room (only works when brightness level is set to ‘Automatic’).
8
Record button
Tap to instantly record the internet or digital radio station that is playing.
See page 15 for more information.
9
SnoozeHandle
Tap to snooze the alarm. Grip and hold to brighten the display to maximum
brightness for 3 seconds.
Note: The alarm will not sound if Evoke is powered down and if Evoke is not
connected to mains power.
* The > symbol indicates that you will need to use the same control to navigate through the various menu options.
5
EvokeF4-V6-Aus.indb 5
4/22/2014 10:45:34 AM
Rear panel
7
Aerial
6
Stereo speaker
Aux in
5.5V DC
4
5
8
1
2
3
1.
USB connector for USB Ethernet adapter, Bluetooth adapter or a USB drive for recording/playback.
Also used for upgrading Evoke’s software when an internet connection is not available.
2.
Output connector for the Evoke F4 stereo speaker.
3.
Output connection for headphones (3.5mm).
4.
3.5mm auxiliary input connection for an iPod, MP3 player, etc.
5.
5.5V DC input connection for supplied mains adapter.
6.
Acoustically tuned bass reflex port (do not cover).
7.
Compartment for ChargePAK F1 rechargeable battery (sold separately).
8.
USB Bluetooth adapter.
Switching between Sleep, Standby and On
Evoke has three power modes, Standby, Sleep and On. In Standby, Evoke uses minimal power. In Sleep
mode, Evoke remains connected to the wireless network (once attached) and is ready to stream music
using the Pure Connect app. See page 11 for more information.
To enter Sleep mode, tap Standby.
To enter Standby mode, tap and hold Standby.
Once in Sleep/Standby mode, tap Standby to switch to On.
Note: If you press the Standby button and Evoke is being powered by the ChargePAK F1, Evoke will
power off and not enter the Sleep power state.
6
EvokeF4-V6-Aus.indb 6
4/22/2014 10:45:34 AM
Screen icons
Source
Icons
PC
Welcome to Pure Connect
Wide range of great content
Add ♥
Options
Contextsensitive
buttons
Source
Icons
DR Digital radio
Volume level
PC Pure Connect
Mute
MP Media player
Alarm/timer set indicators
FM FM
Clock
AUX Auxiliary input
ChargePAK battery level*
BT
Caskeid
Stereo signal
Bluetooth
Signal strength (Digital, FM or Wi-Fi)
Ethernet connection active
Ethernet connection lost
R
Timed recording indicator
*ChargePAK F1 sold separately.
7
EvokeF4-V6-Aus.indb 7
4/22/2014 10:45:36 AM
he
ription
music
Internet listening via Pure Connect
Pure Connect is an online media portal that provides you with quick and easy access to thousands of
internet radio stations, on-demand programs, podcasts and ambient sounds. You can enjoy all this content
on your Evoke, on smartphones and tablets running the Pure Connect app, and on the Pure Connect
website. You can also use Pure Connect to access additional subscription services such as Pure Connect’s
cloud-based music streaming service*, which provides you with instant access to millions of music tracks.
To access Pure Connect on Evoke, you will need to connect Evoke to your network. See below for more
information.
After connecting Evoke to your network, you can register your Evoke on the Pure Connect website. We
recommend registering your Evoke as this allows you to manage your Pure Connect favourites and access
additional subscription services like music streaming.
Connecting to the Internet
6578616D706C
Enter key or password
ABCDEFGHIJKLM
NOPQRSTUVWXYZ
sp 0 1 2 3 4 5 6 7 8 9
Delete
Save
More...
Using your wireless network
1.Tap Home and select Pure Connect from the Home screen.
Evoke will scan for wireless networks and show them in a list.
2.
Select your network. If your network requires a key, follow steps
3-4.
3.
Enter your network key or password by turning and pressing
the Select dial to highlight and select characters. Select sp
to insert a space. Tap More... for lower-case; tap it again for
symbols. Tap Delete to remove the last character.
4.Tap Save to finish. Evoke will connect to your network.
Helpful hint: Your Wi-Fi key is case sensitive, make sure to enter it
exactly as shown.
Using an Ethernet connection
100Mbps
LAN
USB
You can also connect Evoke to the Internet using the optional Pure
USB Ethernet adapter.
To use the Pure USB Ethernet adapter, connect your network cable
to the adapter, then connect the adapter to the USB socket on your
Evoke. The adapter USB light comes on and a connection to your
network is made automatically.
The Ethernet connection status is shown on screen (see page 7).
Listening to Internet radio
My favourites♥
Pure Music
Live Radio
Listen again
Podcasts
Pure Sounds
Pure Connect menu
Thousands of radio stations around the world broadcast online. To
listen, select Pure Connect from the Home screen. Your Evoke will
tune to the last station you listened to or show you the stations list.
Turn the Select dial to enter the Pure Connect menu. Select Live
Radio to see a list of currently available Internet stations. Use the
Select dial to browse the list and push to tune in. You can add a
station to your Favourites by tapping Add.
*You will need to subscribe to our Blue or Violet subscription level to access music streaming on Evoke. For more information on the various subscription levels visit connect.pure.com.
8
EvokeF4-V6-Aus.indb 8
4/22/2014 10:45:36 AM
Name
Genre
Country
Language
Quality
Clear all
[All]
[Classical]
[Netherlands]
[Dutch]
[All]
Go
Clear
Lounge
Station search screen
Wind chimes in suburbs
Wooden lock
Accoustic guitar (E,A,D...
Active daytime birds
Arctic Blizzard
Browsing Pure Sounds
Search for a station
Tap Search when browsing the station list to search for stations by
Name, Genre, Country, Language, Quality (sound quality), or any
combination of these. Use the Select dial to set your options and tap
Go to see the list of results.
Searching for an internet radio station using Quick Jump
The Quick Jump function lets you to search for stations that begin with
a certain letter. To use Quick Jump:
1. Tap the A-Z button to open the Quick Jump box.
2. Turn and press the Select dial to select the first letter of the
radio station that you want to search for.
Listening to other Internet content
Tap Home and select Pure Connect from the Home screen, then one
of the following content types:
Listen again
Select this option to access the BBC Listen Again service, which lets
you catch up with any BBC radio shows that you might of missed.
These archived radio programmes are available to listen to for a set
period of time after the live broadcast.
Podcasts
Podcasts are prerecorded audio shows on a wide variety of subjects
such as comedy, arts, business, and culture, for you to enjoy anytime.
Pure Sounds
Our library of evocative ambient sounds, including birdsong,
cityscapes, and waves on shore.
Creating a Pure Connect account
connect.pure.com
All you need to create a Pure Connect account and register your Evoke
is a valid e-mail address. We’ll need to send you a couple of e-mails and
you won’t be able to complete the process without access to them.
To create a Pure Connect account:
Optional registration at
connect.pure.com adds
advanced features to your
radio. Register now?
Yes
Later
Never
QPZKE
Enter registration code
ABCD E FGHIJKLM
NOPQRSTUVWXYZ
sp 0 1 2 3 4 5 6 7 8 9
Del
Save
More...
1.
Open your Internet browser.
2.
G
o to connect.pure.com.
3.
Click Create account and follow the instructions on-screen.
Register your Evoke on Pure Connect
1.
L
og in to Pure Connect, click Me and select Devices. You’ll
see your registration code.
2.
From Pure Connect settings on your radio, select Register
with Pure Connect to enter your code. Use the Select dial to
highlight and select characters; tap Del to erase characters;
and tap Save to finish.
Congratulations! You’ve registered your Evoke on Pure Connect.
The favourites you’ve created on Pure Connect will be visible on
your Evoke, and those you’ve created on Evoke will appear on Pure
Connect.
9
EvokeF4-V6-Aus.indb 9
4/22/2014 10:45:37 AM
Music streaming
Pure Connect’s music streaming is a cloud-based on-demand subscription service that gives you instant
access to millions of music tracks from one of the world’s largest music catalogues covering almost
every conceivable artist and genre. You can listen on our music streaming and radio systems, on an
Apple or Android device running the Pure Connect app or on the Pure Connect website.
Pure Connect’s music streaming service is only available in certain countries. Please see http://www.pure.com/availability/ for details.
Accessing Pure Connect’s music streaming on Evoke
1.Tap Home and select Pure Connect from the Home screen.
2.
Turn and press the Select dial to select Pure Music.
3.
Turn and press the Select dial to select one of the following options:
My Tracks: Select this option to access the tracks that you have purchased from Pure Connect.
Catalogue: Select this option to browse or search the complete music catalogue on your Evoke.
By playlist: Select this option to listen to playlists created by you at connect.pure.com or via the Pure
Connect App (see “Streaming from the Pure Connect app” on page 11).
Pure Connect tagging service
The Pure Connect tagging service can be used to identify, bookmark and purchase tracks that are
playing on a digital, FM or Internet radio station. In addition to accessing your favourite music tracks,
the Pure Connect tagging service also automatically back catalogues any music by similar artists that
you might be interested in, allowing you to explore something completely new or rediscover forgotten
favourites.
Note: To use the Pure Connect tagging service, your Evoke will need to be connected to the internet
and you will need a Pure Connect account. See page 9 for more information on setting up a Pure
Connect account.
1.
Tap the Tag button.
2.
Evoke will identify the name of the song that is being played and allow you to buy it (or stream it if
you have a music streaming subscription).
Note: To access your tagged tracks list, you will need to log in to your Pure Connect account at connect.pure.com.
Note: The Pure Connect tagging service will attempt to identify and match any playing track using our
extensive catalogue. Purchasing and streaming tracks is subject to availability.
10
EvokeF4-V6-Aus.indb 10
4/22/2014 10:45:37 AM
Streaming from the Pure Connect app
You can use the Pure Connect app to stream any music stored on your smartphone or tablet as well as all
the content available on Pure Connect to Evoke and other Caskeid compatible devices (such as Jongo).
Note: Any devices that you want to use with the Pure Connect app will need to be on the same network.
Download the Pure Connect app
You can download the Pure Connect app on your smartphone or tablet from the Apple App Store or
Google Play.
from the Apple App Store
from Google Play
Selecting Evoke or other Caskeid compatible device in the
Pure Connect app
With the Pure Connect app you can stream to a single Caskeid device or multiple Caskeid devices
simultaneously.
To start streaming content:
1. Select the content that you want to stream in the Pure Connect app.
2.
Tap the
icon in the app player bar on your iOS or Android device to view a list of available
devices on your network.
3.
Tap the
icon next to the Caskeid compatible devices that you want to stream to.
Your selected content will start playing on the Caskeid devices that you selected.
See the help supplied with the app for more information on streaming to a Caskeid device.
A
Pure Connect app
11
EvokeF4-V6-Aus.indb 11
4/22/2014 10:45:41 AM
Streaming music from a PC or Mac
You can stream music stored on your computer or on a UPnP-compatible Network Attached Storage
(NAS) device to Evoke. To stream music from your computer you will need to install media server
software on it.
Listening to streamed tracks on Evoke
1. Tap Home and turn and press the Select dial to choose Network/USB media player from Home
screen.
2. Turn and press the Select dial to choose the media player that you want to stream music from.
3. Turn and press the Select dial to navigate and select the track or playlist.
Playing/pausing audio playback
Press the Select dial to pause/play a track that is playing on Evoke.
Seeking within a track
While paused, you can hold down the
and
buttons to seek within the track.
Skipping backwards and forwards between tracks
If you are streaming audio on Evoke from a media server, you can tap the
forward between tracks.
buttons to skip back/
12
EvokeF4-V6-Aus.indb 12
4/22/2014 10:45:42 AM
Listening to digital or FM radio
Extend the aerial, then tap Home and select Digital radio or FM radio from the Home screen. The first
time you select digital radio, Evoke will perform an autotune to find all available stations and will tune into
one when finished.
DR
BBC Radio 6Music
Now playing: Juicy Fruit
by Mtume
Presets
Tag
Options
Changing digital stations
1. T
urn the Select dial left or right to browse through the list of
available digital stations.
2. P
ush the Select dial to change the station.
Searching for digital stations
Digital radio screen
Absolute Radio
Absolute Rad 00s
Absolute Rad 60s
Absolute Rad 70s
Absolute Rad 90s
OK
A-Z
1. T
urn the Select dial left or right.
2. Tap A-Z to open the search option.
3. T
urn and press the Select dial to select the first letter of the radio
station that you want to listen to.
4. P
ush the Select dial to change the station.
Changing FM stations
Changing digital radio station
Select starting character
A B C D E F G H I J K L M
N O P Q R ST UVW XY Z
sp 0 1 2 3 4 5 6 7 8 9
Searching for digital radio
station
Seek tune
103.30
Options
Seek tuning
1. Turn the Select dial.
2. Tap the
buttons to seek to the next or previous FM radio
station that has a strong signal.
Manual tuning
Turn the Select dial right or left to step up or down 0.05MHz.
Storing a preset
Tune to the station you want to store as a preset and tap Presets.
Turn the Select dial to highlight a preset number. Tap Add to store
the preset. (You can replace existing presets.)
Listening to a preset
Tap Presets, select the station that you want to recall and tap
Listen, or push the Select dial.
Using seek tuning to change
FM stations
Empty 1
Empty 2
BBC Radio 6Music
Empty 4
Empty 5
Add ♥
OK
Selecting a preset
13
EvokeF4-V6-Aus.indb 13
4/22/2014 10:45:43 AM
Listening to audio from a USB memory
stick
Evoke can play music from a USB memory stick connected to the USB port on the back. Evoke supports
WMA (Standard V9), AAC, MP3 and MP2 audio files. By default, Evoke looks for audio on your network if
you have not connected a USB memory stick to the back of Evoke.
To listen to tracks from a USB memory stick:
1. Tap Home and turn and press the Select dial to choose Network/USB media from the Home
screen.
2. Turn and press the Select dial to select the USB device.
3. Turn and press the Select dial to specify the type of audio (Playlists, Artists, Genres or Pure
recordings) that you want to listen to.
4.Turn and press the Select dial to select the audio that you want to listen to,
Playing/pausing audio playback
Press the Select dial to pause/play a track that is playing on Evoke.
Seeking within a track
While paused, you can hold down the
and
buttons to seek within the track.
Skipping backwards and forwards between tracks
Tap the
buttons to skip back/forward between tracks.
Using Bluetooth
If your phone or tablet is capable of storing audio files, you can use Bluetooth to stream any music stored
on your phone or tablet to Evoke.
Note: Adding a Bluetooth device varies on different mobile devices. See your Bluetooth mobile device
manual for specific information.
Preparing Evoke to stream audio using Bluetooth
1. Ensure that the Bluetooth adapter is inserted into Evoke’s USB connector.
2.Enable Bluetooth on your mobile device.
3.On your mobile device, select the option to add a new Bluetooth device. On some mobile devices you may need
to select the search or scan option.
4. Start the pairing process on your mobile device. Do this by selecting Evoke from the list of available devices
that appear on the mobile device’s screen. This will connect automatically once paired.
You will now be able to start streaming audio to Evoke from your Bluetooth device.
Note: You will need to disconnect any connected mobile Bluetooth devices from Evoke to stream using
Wi-Fi or to stream from a different Bluetooth device. Bluetooth will automatically disconnect if you go out of
range of Evoke. To manually disconnect you will usually need to use the Bluetooth settings on your mobile
device.
Note: For more help with Bluetooth, see our “Help and advice” on page 22.
14
EvokeF4-V6-Aus.indb 14
4/22/2014 10:45:43 AM
Recording radio programmes
Evoke allows you to record live radio from an internet (via Pure Connect) or digital radio station. You can
either schedule recordings or record instantly. To record, you need to connect a USB memory stick to the
USB port on the back of Evoke. The length of time that you can record depends on the amount of space
available on your USB memory stick and the station that you are recording. A 2GB USB memory stick can
record around 15 to 30 hours of digital or internet radio (based on the most common station data rates of
128kbps and 64kbps, respectively). If your USB memory stick runs out of space during a recording, Evoke
will stop recording and display a message.
Note: You can only record live radio if you have selected Pure Connect as the audio source.
Instant recordings
To record instantly you will need to:
1.Tap Home to display the home menu.
2. Turn and press the Select dial to select either Pure Connect or Digital radio.
3. Tune into the radio station that you want to record and tap the Record button on the front of Evoke to
begin recording.
To stop instant recording, tap the Record button on the front of Evoke.
Timed recordings
You can use the timed recordings function to schedule a recording from an internet or digital radio station
that has been added to your favourites.
1.Tap Home to display the Home menu.
2.Tap Settings and turn and press the Select dial to select Timed recordings.
3. Turn and press the Select dial to choose a recording slot.
4. Tap the Edit button.
5.Turn and press the Select dial to turn the recording On or Off.
6.Turn the Select dial to adjust the hour the recording should start and press to confirm. Repeat to set
the minutes.
7.Turn the Select dial to adjust the hour the recording should end and press to confirm. Repeat to set the
minutes.
8.Turn the Select dial to set the days the timed recording should occur . Choose between Once only,
Daily, Weekdays, Weekends, Every Monday, Every Tuesday, Every Wednesday, Every Thursday,
Every Friday, Every Saturday and Every Sunday then press the Select dial to confirm.
9.Turn the Select dial to set the radio station source. Choose between Pure Connect or Digital radio then press the Select dial to confirm.
10.Turn and press the Select dial to choose the radio station that you want to record from your favourites
list.
11. A timed recording is indicated by R in the icon bar.
15
EvokeF4-V6-Aus.indb 15
4/22/2014 10:45:43 AM
Setting alarms and timers
Evoke has two alarms and two types of timers (kitchen and sleep). To set an alarm or a timer up, tap Home
to display the Home screen. Tap Settings. Turn and press the Select dial to select Alarms and timers.
Setting an alarm
1. From the Alarms and timers menu, turn and press the Select dial to select either Alarm 1 settings or
Alarm 2 settings and tap Edit.
2. Turn and press the Select dial to turn the alarm On or Off.
3. Turn the Select dial to adjust the hours and press to confirm. Repeat to set the minutes.
4. Turn the Select dial to set the days the alarm sounds. Choose between Once only, Daily, Weekdays,
Weekends, Every Saturday and Every Sunday then press the Select dial to confirm.
5. Turn the Select dial to set the alarm type. Choose between Pure Connect station, Digital radio, FM
radio or Tone then press the Select dial to confirm.
6. If you’ve set the alarm type as Pure Connect station, Digital radio or FM radio, turn the Select dial
to choose between Last tuned (last station tuned to) or select a favourite Pure Connect station or
digital and FM preset if you have any saved.
7. Turn the Select dial to change the alarm volume and press to confirm.
8. A set alarm is indicated by
in the icon bar.
Note: If you are powering Evoke using a ChargePAK, any alarms that are set will not go off unless Evoke
is powered on.
Setting the sleep timer
The sleep timer switches your radio into standby/sleep after a specified amount of time. From the Alarms
and timers menu, select Sleep timer. Use the Select dial to adjust the length of the sleep timer in 15
minute steps from 15 mins to 1 hour 30 mins. Tap Save to store.
A set sleep timer is indicated by
in the icon bar.
Setting the kitchen timer
The kitchen timer sounds a beeping tone after a set period of time.
From the Alarms and timers menu select Kitchen timer and use the Select dial to adjust the length of
time. Tap Mins to toggle between minutes and hours. Tap Save to confirm.
A set kitchen timer is indicated by
in the icon bar.
Cancelling a sounding alarm or timer
To cancel a sounding alarm or timer, push either the Select or Volume dial. A sounding alarm will
automatically cancel after 1 hour.
Note: Pushing the Volume dial will not cancel a tone alarm.
Warning: When powered by ChargePAK F1, tapping Standby switches the radio off and any set alarms or
timers will not sound.
Snoozing a sounding alarm
Tap the Snooze button or the SnoozeHandle to snooze a sounding alarm for the specified time (default 9
minutes).
Changing the alarm snooze time
From the Alarms and timers menu, select Snooze time. Use the Select dial to adjust the duration of the
snooze from 5 to 15, then either 20/25/30/40 minutes, or 1 hour.
Cancelling a snoozing alarm
To cancel a snoozing alarm push either the Select or Volume dial.
16
EvokeF4-V6-Aus.indb 16
4/22/2014 10:45:44 AM
Options and settings
Pure Connect settings
These settings are only available when listening to Pure Connect. Tap Home to display the home menu
and then tap Settings. Turn and press the Select dial to select Pure Connect.
Pure Music repeat
Turn and press the Select dial to select a repeat option for the specified content on Pure Connect’s
cloud-based on-demand streaming service. Select All to specify that all tracks should be repeated.
Select Track to specify that the track currently playing on Evoke should be repeated. Select Off to
disable the repeat option.
Pure Music Shuffle
Turn and press the Select dial to select a shuffle option for the specified content on Pure Connect’s cloudbased on-demand streaming service. Select On to shuffle all tracks. Select Off to disable shuffling.
Clear favourites
Select Clear favourites to remove all stations/podcasts/Pure Sounds from your favourites list, as well as
from Pure Connect if your radio is connected.
Register with Pure Connect
Enter your Pure Connect registration code if you haven’t already done so. See page 9 for more
information.
Autotune
The Autotune option scans all digital frequencies for stations and automatically adds any new digital radio
stations and removes any inactive ones. This option is only available if listening to digital radio. Tap Home
to display the home menu and then tap Settings. Turn and press the Select dial to select Autotune.
FM settings
These settings are only available when listening to FM radio. Tap Home to display the home menu and
then tap Settings. Turn and press the Select dial to select FM.
FM stereo
Switch between receiving FM stations in Mono (default) or Stereo. If listening with headphones or have
connected an auxiliary speaker, you may want to change this setting to stereo.
Network/USB media
These settings are only available when listening to the Network/USB media source. Tap Home to display
the home menu and then tap Settings. Turn and press the Select dial to select Network/USB media.
Repeat
Select the repeat type.
Off (default): Tracks are played until the end of the current album, folder, playlist or search results.
All: Continuously repeats the current album, folder, playlist, or your search results.
Track: Repeats the current track.
Shuffle
Select the order that tracks in the current album, folder, playlist or search results are played:
Off (default): Tracks play in the order that they are displayed on-screen.
On: Tracks play in random order.
Media details
View technical details about your current media server or re-scan for alternative servers:
Current details: Turn the Select dial to view information about the media server, including the media
server name, the software version, the IP address and the port number.
17
EvokeF4-V6-Aus.indb 17
4/22/2014 10:45:44 AM
4 5 6 7 8 9
Display options
Adjust display settings, such as screen duration and the information displayed while you are listening to
each source. Tap Home to display the home menu and then tap Settings. Turn and press the Select dial
to select Display.
Information
Different information displays are available for each audio source:
Digital/FM radio
Scrolling text: Text information broadcast by the current station. May include song titles, program
details, news, etc.
Reception info: Displays the current frequency and signal strength.
Time and date: Displays the current time and date.
Pure Connect
Description: Broadcast by the current station. May include song titles and programme details. If
streaming a track from Pure Connect’s cloud-based on-demand streaming service this displays the artist
and album of the track.
Location and Genre: Information about the current station, e.g., US Rock.
Time offset: Most stations will be live streams, but otherwise displays how far into a broadcast the
station is. If streaming a track from Pure Connect’s cloud-based on-demand streaming service this
displays how far into the track’s duration you are.
Wi-Fi signal strength: Displays a bar indicating the current Wi-Fi signal strength.
Station URL: Displays the URL address of the current station. If listening to a track from Pure Connect’s
cloud-based on-demand streaming service this displays the URL of the track.
Time and date: Displays the date with a full-screen clock (as in standby mode).
Media player
Track info: Displays artist and album information (id3 tags).
Time offset/duration: Displays a progress bar and timers indicating the current track position.
Wi-Fi signal strength: Displays a bar indicating the current Wi-Fi signal strength.
Time and date: Displays the date with a full-screen clock (as in standby mode).
Active and Standby backlight
You can adjust the duration that the screen is illuminated when switched on or in standby. Select Active
backlight to adjust the display settings that apply when the radio is switched on or Standby backlight
to adjust the display settings that apply when your radio is in standby. Choose from Always on or Off
after 7 seconds.
Active and Standby brightness
You can adjust the brightness of the screen when Evoke is switched on or in standby. Select Active
brightness to adjust the display brightness when Evoke is switched on or Standby brightness to adjust
the display brightness when Evoke is in standby.
Audio settings
- Bass Audio
Bass
Treble
0
0
OK
Treble
You can use this menu to adjust the bass and treble.
1. Tap Home to display the home menu and then tap Settings. Turn
and press the Select dial to select Audio.
2. Turn the Select dial to adjust the bass level.
3. T
ap Treble and turn the Select dial to adjust the treble level.
4. Tap OK when you have finished adjusting the audio settings.
18
EvokeF4-V6-Aus.indb 18
4/22/2014 10:45:44 AM
Setting the clock
The clock will automatically set itself using your digital radio signal, FM radio signal or your network.
However, if you cannot receive an updated time signal, or see the message ‘Time not available’, you
can manually set the time and date. To set up the time and date manually:
1. T
ap Home to display the Home menu and then tap Settings.
2. T
urn and press the Select dial to select Alarms and timers > Set clock.
3. T
urn and press the Select dial to adjust the time and date.
4. Tap
or
to move to the previous or next setting.
5. Tap Save when you have finished setting up the time and date.
Changing the language shown on the display
To switch the display language between English, French, German and Italian:
1.Tap Home to display the Home menu and then tap Settings.
2. Turn and press the Select dial to select Miscellaneous > Language.
3. T
urn and press the Select dial to set the display language.
Upgrading Evoke
Software updates may be issued in the future to provide new features and functions We recommend using
automatic software updates for your Evoke, which are delivered via the Wi-Fi connection. If a software
update is available, Evoke will display a message asking if you would like to install the software update.
To upgrade over your network manually
1. T
ap Home to display the Home menu and then tap Settings.
2. Turn and press the Select dial to select Miscellaneous > Upgrade.
3. E
voke will search for any available updates. If an update is available the message New version
available: vX.X will appear on screen (X.X is the version number, i.e. v2.1).
4. Tap OK to download and install the new software. This can take up to 5 minutes.
To upgrade using a USB drive (when a network is not available)
Contact Pure technical support (http://support.pure.com) for information on how to upgrade Evoke to the
latest version of software.
Warning: Do not switch off Evoke while it is updating.
Changing Evoke’s name
Your Evoke is assigned a name. This name is used so that you can find your radio easily when using the
Pure Connect website to manage your listening. This name is also used to identify Evoke as an available
speaker in the Pure Connect app and Bluetooth. By default this name is Evoke F4 ******, but here you can
change this to anything you like to make it more memorable.
Note: ****** represents a six digit code that will be unique to each Evoke, which is based on the last six
digits of Evoke’s MAC address.
To assign a custom name to Evoke:
1. T
ap Home to display the Home menu and then tap Settings.
2. Turn and press the Select dial to select Miscellaneous > View/change device name. The name that
has currently been assigned to Evoke will display at the top of the screen.
3. T
urn and press the Select dial to enter a new name.
4. Tap Save when you have finished setting up the radio name.
Bluetooth settings
You can use the Bluetooth menu to make Evoke visible or invisible to other Bluetooth devices.
1.Tap Home to display the Home menu and then tap Settings.
2. Turn and press the Select dial to select Miscellaneous > Bluetooth
3. Turn and press the Select dial to select one of the following options:
On (Discoverable)
On (Hidden)
Off
EvokeF4-V6-Aus.indb 19
19
4/22/2014 10:45:45 AM
Network settings
Evoke can be connected to your network using a Wi-Fi or Ethernet connection. The settings that you can
change are different depending on the type of connection you are using. Tap Home to display the Home
menu and then tap Settings. Turn and press the Select dial to select Network.
Wireless network settings
Connection wizard
Scan for wireless networks to connect to.
View details
Displays your network configuration details.
Network name (SSID)
Encryption method (WEP, WPA or WPA2)
IP address
Network mask
DNS IP address
Router IP address
Device Wi-Fi MAC address
Access point MAC address
Manual setup
Manually configure your wireless network (for advanced users only).
Retry connection: Attempts to reconnect to the selected network.
Network name: Scan for networks or Enter SSID manually to specify a new SSID for your wireless
network.
Encryption mode: Change the encryption mode between WEP, WPA (PSK), WPA2 (PSK) or None.
Evoke automatically detects the mode for your network. Only change this setting if you think the
encryption mode is incorrect.
Key or password: Enter a new encryption key or password.
IP address: Choose between DHCP (dynamic) or Static. If you select Static, another menu will appear
where you will need to specify the IP address settings for Evoke.
Ethernet network settings
View details
Displays your network configuration details.
IP address
Network mask
DNS IP address
Router IP address
Device Wi-Fi MAC address
Ethernet MAC address
Manual setup
Manually configure your wireless network (for advanced users only).
IP address: Choose between DHCP (dynamic) or Static. If you select Static, another menu will appear
where you will need to specify the IP address settings for Evoke.
General network settings
Clear network settings
Evoke will delete all previous Wi-Fi connections, passwords and other network settings. If using the
wireless connection method, this will also perform a fresh scan for available networks.
20
EvokeF4-V6-Aus.indb 20
4/22/2014 10:45:45 AM
Using an optional ChargePAK F1
ChargePAK makes your Evoke truly portable, so you can enjoy the programmes you love in the garden or
at the beach.
Because it’s rechargeable, ChargePAK is much cheaper than regular batteries. It’s also more eco-friendly
because it reduces the amount of toxic substances sent to landfill. And, because it’s a fit-and-forget
solution that charges whenever your radio is connected to the power outlet, it’s much more convenient
than standard rechargeable batteries.
Installing a ChargePAK
1.Switch your Evoke off and disconnect it from the power supply.
2.Open the battery compartment and position ChargePAK so that the Pure label is facing the
battery compartment lid and ChargePAK’s contacts line up with the three terminals in the battery
compartment.
3.Replace the battery door and connect your product to a power outlet.
4.ChargePAK will begin charging. When charging your ChargePAK for the first time or after an
extended period of inactivity we recommend that you charge it for around 24 hours to ensure full
battery power.
Note: It is normal for your ChargePAK to get warm, especially during charging. Your ChargePAK will give
years of trouble-free use under normal circumstances, but like all rechargeable batteries its efficiency will
gradually reduce with age.
Important: Evoke can only be powered with a Pure ChargePAK F1 and is not compatible with any other
batteries, either disposable or rechargeable, or any other ChargePAK model.
21
EvokeF4-V6-Aus.indb 21
4/22/2014 10:45:45 AM
Help and advice
I am having trouble connecting to my network
• Your radio can’t connect to wireless networks that are access controlled, such as office networks,
without a WEP, WPA or WPA2 key or password.
• Your radio needs to be positioned within the range of your wireless network, which will be reduced
if there are walls between your router and radio. Although Evoke is very good at picking up wireless
networks, the strength of the Wi-Fi signal will vary depending on your router and the surrounding
environment. If Evoke fails to find your wireless network, or the signal drops off, move the radio closer
to the router.
• Unless your wireless network is ‘open’ (this is generally not recommended due to the risk of
unauthorised access), make sure you have your WEP, WPA or WPA2 key to hand.
• Make sure that you have entered the correct WEP, WPA or WPA2 key or password for your network.
• If you also experience trouble connecting to your network with the Ethernet adapter, check your
Internet connection using a computer. If this is OK, try restarting your router or modem.
Screen displays ‘Station not available’
• If a station will not play visit http://support.pure.com for assistance.
I can’t see Evoke in the list of available Bluetooth devices on my mobile device
• This may be because your Evoke Bluetooth visibility setting is set to ‘On (Hidden)’ or ‘Off’ (see page
19). Your Evoke setting will need to be set to ‘On (Visible)’ to pair wih your mobile device.
My mobile device is prompting me for a passcode when I try to pair with Evoke
• Some legacy Bluetooth devices may prompt you to enter a passcode when trying to pair with Evoke. If
this occurs, enter the code ‘0000’.
22
EvokeF4-V6-Aus.indb 22
4/22/2014 10:45:45 AM
Ethernet (requires optional adapter): 10/100 Mbps.
Bluetooth: A2DP supported via supplied USB dongle.
Specifications
Radio Frequencies
Digital (DAB/DAB+/DMB-R), FM and internet radio (via Wi-Fi or Ethernet connection).
Digital Band III 174–240 MHz, Parametric stereo decode up to 256 kbps. FM 87.5-108 MHz.
Network Wi-Fi: 802.11b and 802.11g supported with WEP and WPA/WPA2 encryption.
2.412GHz ~ 2.472GHz (channels 1 to 13).
Ethernet (requires optional adapter): 10/100 Mbps.
0.5 MB broadband speed recommended.
Bluetooth: A2DP supported via supplied USB dongle.
Media streaming
Audio codecs supported include WMA (Standard V9), AAC, MP3, MP2. Media streaming requires UPnP server or PC/MAC running UPnP server software (supplied upon registration to connect.pure.com).
Speaker 3.5" full range driver.
Input connectors
5.5V DC power adapter socket (adapter supplied). 3.5mm Line-in for auxiliary devices. USB (Full-size A type) for USB recording/playback, product updates (also available over Wi-Fi), Bluetooth dongle or optional USB Ethernet adapter.
Output connectors
3.5mm stereo headphone socket. 3.5mm stereo socket for Evoke F4 stereo auxiliary speaker.
Presets 30 digital radio, 10 FM radio and unlimited internet radio favourites (requires registration at connect.pure.com).
Display Large high contrast white on black graphical 128 x 64 OLED display.
Mains power adapter
Input: 100-240C AC, 50/60Hz, 0.8A
Output: 5,5V DC, 3.57A
ChargePAK
Pure ChargePAK F1 rechargeable battery pack (available separately).
Standby: <1W, Active: 3.4W.
Power consumption Approvals
CE marked. Hereby, Pure, declares that this Band II LPD device is in
compliance with the essential requirements and other relevant provisions
of Directive 1999/5/EC. The Declaration of Conformity may be consulted at
http://www.pure.com/R&TTE-DoC.
ETSI EN 300 401 compliant.
Australian C-Tick N1600 and Electrical Safety.
Dimensions 209 mm wide x 110 mm deep x 175 mm high
Weight1.5kg
Warranty
Comprehensive three year warranty.
23
EvokeF4-V6-Aus.indb 23
4/22/2014 10:45:45 AM
Disposal of Waste Electrical & Electronic Equipment
This symbol on the product or on its packaging indicates that this product should not be treated as
household waste. Instead it should be handed over to a suitable collection point for the recycling
of electrical and electronic equipment. By ensuring this product is disposed of correctly, you will
help prevent potential negative consequences for the environment and human health, which could
otherwise be caused by inappropriate waste handling of this product. The recycling of materials will
help to conserve natural resources. For more detailed information about recycling of this product,
please contact your local council office, your household waste disposal service or the shop where
you purchased the product.
Copyright
Copyright 2014 by Imagination Technologies Limited. All rights reserved. No part of this publication may be copied
or distributed, transmitted, transcribed, stored in a retrieval system, or translated into any human or computer
language, in any form or by any means, electronic, mechanical, magnetic, manual or otherwise, or disclosed to
third parties without the express written permission of Imagination Technologies Limited. Version 5 April 2014.
Trademarks
Evoke F4, ChargePAK, Pure, the Pure logo, Imagination Technologies, and the Imagination Technologies logo are
trademarks or registered trademarks of Imagination Technologies Limited.
Caskeid is a superior synchronization technology, providing clear multi-speaker wireless audio.
Caskeid and the Caskeid logo are trademarks or registered trademarks of Imagination Technologies.
All other product names are trademarks of their respective companies.
Warranty Information
Imagination Technologies Limited warrants to the end user that this product will be free from defects in materials
and workmanship in the course of normal use for a period of three years from the date of purchase. This
guarantee covers breakdowns due to manufacturing or design faults; it does not apply in cases such as accidental
damage, however caused, wear and tear, negligence, adjustment, modification or repair not authorized by us.
Please visit www.pure.com/register to register your product with us. Should you have a problem with your unit
please contact your supplier or contact Pure Support at the address shown at the rear of this manual.
Disclaimer
Imagination Technologies Limited makes no representation or warranties with respect to the content of this
document and specifically disclaims any implied warranties of merchantability or fitness for any particular purpose.
Further, Imagination Technologies Limited reserves the right to revise this publication and to make changes in it
from time to time without obligation of Imagination Technologies Limited to notify any person or organization of
such revisions or changes.
Acknowledgement of License Agreements
Portions of the code used in Evoke F4 are subject to the GPL, LPGL, BSD, and other open source licenses. For
more details please refer to: http://www.pure.com/licensing
24
EvokeF4-V6-Aus.indb 24
4/22/2014 10:45:45 AM
Pure UK Headquarters
Imagination Technologies Limited
Home Park Estate
Kings Langley
Herts, WD4 8LZ
United Kingdom
www.pure.com
http://support.pure.com
EvokeF4-V6-Aus.indb 25
Pure Australasia Pty Ltd
PO Box 5049
Wonga Park
Victoria 3115
Australia
[email protected]
http://support.pure.com/au
4/22/2014 10:45:45 AM
www.pure.com
connect.pure.com
www.facebook.com/pure
105QQ
EvokeF4-V6-Aus.indb 26
4/22/2014 10:45:45 AM