1
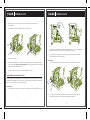
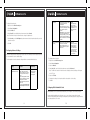
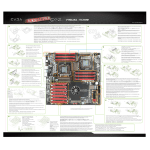
Gaming
Imaging
3D
Video
Entertainment
Photos
Graphics
KILLER XENO PRO
TM
EVGA Corp.
128-P2-KN01
●
2900 Saturn Street, Suite B
●
Brea, CA 92821
●
www.evga.com
Installation Guide
Table of contents
Installation Guide
1.
Remove the current network driver installed on your computer. In Windows Vista, go to Start >
Control Panel > Programs > Uninstall a Program. NOTE: if using an onboard network controller, it is
recommended to first disable the onboard network controller from within your system BIOS.
Configuring the Killer Xeno ................................................................... 5
2.
Turn off your computer and disconnect the power cord.
Setting the Lag and Latency Reduction (LLR) mode .......................... 6
3.
Remove any existing network cards (if applicable).
Setting Link Speed ................................................................................ 7
4.
Install the EVGA Killer Xeno Pro Gaming network card into a 1x PCI-E slot. NOTE: If you do not have
an empty 1x PCI-E slot, you can install the card into any open PCI-E slot, the below images show
both methods of installation.
Installation Guide .................................................................................. 2
Using Hardware Accelerated Voice Chat ............................................. 3
Setting Duplex Mode ............................................................................. 8
Configuring Advanced Setting .............................................................. 9
Configuring Killer Bandwidth Control ................................................. 10
Configuring Killer Firewall ................................................................... 14
Changing Alert Settings ...................................................................... 15
Adding Killer Firewall Exceptions ....................................................... 16
Deleting Killer Firewall Exceptions ..................................................... 16
Technical Support ............................................................................... 17
Warranty Information ........................................................................... 17
EVGA Advanced RMA (EAR) Program ................................................ 17
EVGA Online Community ..................................................................... 17
EVGA FAQ ............................................................................................ 17
EVGA Gaming ...................................................................................... 17
FOLDING@EVGA ................................................................................. 17
MODS RIGS ......................................................................................... 18
Compliance Information ...................................................................... 18
Trademark Information ........................................................................ 18
1
2
5.
Reinstall the cover on your computer and reconnect any cables that you removed earlier
in the installation.
6.
Plug an Ethernet Cable into the EVGA Killer Xeno Pro. (RJ-45 port)
7.
Power up your computer.
8.
Insert the driver installation CD or double click on the EVGA Killer Xeno Pro driver executable file that
can be downloaded at www.evga.com/support/drivers. The setup program takes over and will walk
you through the driver installation process.
9.
You may need to reboot your PC once the driver installation is complete.
2.
Connect the other end of the audio cable to the input labeled “AUX” or “CD” on your motherboard
(if using onboard audio) or your soundcard (if using a dedicated sound card).
3.
If you do not have a four-pin audio connector available on your motherboard or sound card,
follow the directions below for External Cable.
External Cable:
1.
Connect the external audio cable to the LINE OUT jack on the EVGA Killer Xeno Pro bracket.
2.
Connect the other end of the external audio cable to the MIC IN jack on your motherboard
(if using onboard audio) or your soundcard (if using a dedicated sound card).
Using Hardware Accelerated Voice Chat
If you are going to use the EVGA Killer Xeno Pro’s built in hardware voice chat, you will need to connect the
included audio input/outputs correctly. There are two options for doing this, and internal, or external cable.
NOTE: You only need to use one of the below two options.
Internal Cable:
1.
Connect the four-pin audio cable to the four-pin socket near the top of the EVGA Killer Xeno Pro card.
3
4
Optimized Default Settings
Headset / MIC connection:
1.
2.
Connect your microphone or headset microphone to the MIC IN jack on the EVGA Killer Xeno Pro.
Connect your headphones or speakers to the LINE OUT or AUDIO OUT jack on your motherboard
(if using onboard audio) or your soundcard (if using a dedicated sound card).
Headset Only Option:
A third option is to use your headset exclusively for Xeno voice chat, and leave your speakers for game
audio without mixing the two in your sound card’s control panel. To do this, connect the microphone plug
on your headset to the microphone jack on your Killer Xeno, and the headphone plug on your headset to
the audio-out jack on the Killer Xeno. Remember – this option will leave the voice chat audio exclusively on
the Killer Xeno.
Feature
Optimized Default Setting
LLR Mode
Game
(bypasses Windows Network Stack)
Link Speed
Auto
Link Duplex (Duplex mode)
None
Nagle Algorithm Control
Enabled TCP No Delay
Ack Frequency
Enabled TCP Ack Frequency
Maximum Transmission Unit
1500 bytes
Killer Bandwidth Control
On
Killer Firewall
Off
Setting the Lag and Latency Reduction (LLR) mode
Two Lag and Latency Reduction (LLR) modes are available on the Killer Xeno:
• Game Mode — optimizes the Killer Xeno for online gaming by allowing the Killer Xeno to bypass the
Windows Network Stack, prioritize game data, and free up system resources.
Configuring the Killer Xeno
The Killer Xeno ships with the best configuration for all online games. Unless you encounter a technical
problem and are advised by a support specialist to change any of these settings, it is recommended to
keep the default settings.
Note: The default settings are optimized to fight lag on your computer, resulting in smoother game play in
many online games. These effects are best noticed after repeated play in intense multiplayer gaming
sessions, such as big raids or combat in MMO or FPS games.
Note: Other installed network cards may not function properly with LLR Game Mode selected. It is
recommended that you disable all other network cards if you want to use LLR Game Mode.
• Application Mode — operates the Killer Xeno as an optimized, “normal” network card. Use this mode
to run programs that require access to the Windows Network Stack (such as VPN clients), or for
troubleshooting applications that are not functioning in LLR Game Mode.
To set the LLR mode:
1. Right-click on the Killer Xeno tray icon.
2. Select the LLR mode.
5
6
To set the link speed:
1. Right-click on the Killer Xeno tray icon.
2. Select Xeno Configuration.
3. Select the Main tab.
4. Under Xeno NIC, open the Mode
drop-down menu and select Normal.
Note: The Killer Xeno must be in Normal mode to set the link speed.
5. Under General, open the Link Speed drop-down menu and select the speed for your network connection.
6. Click OK.
Setting Link Speed
Link speed determines how fast the Killer Xeno connects to the local network or Internet. In most cases,
your local network will be much faster than your Internet connection.
The following table shows the available speeds and requirements for each.
Speed
Description
Requirement
Auto
Auto-negotiates the fastest
available speed based upon
the configuration of your
local network
None
Configures the Killer Xeno
for 10 Mb connections only
Your local network
connection must support 10
Mb Ethernet networking
connections
10 Mb
100 Mb
Configures the Killer Xeno
for 100 Mb connections
Note that speeds up to
100 Mb are also supported
1000 Mb
Configures the Killer Xeno
for 1000 Mb (1 Gigabit)
connections
Note that speeds up to
1000 Mb (are also
supported
7
Setting Duplex Mode
The following table shows the available duplex modes.
The duplex mode should be changed from the default setting only if the Killer Xeno is connected to an
older switch or router (for example, a switch or router manufactured in 1998 or earlier).
(recommended setting)
Your local network
connection must support 100
Mb Ethernet networking
connections
Your local network
connection must support 1
Gigabit (1000 Mb) Ethernet
networking connections
Mode
Description
Full Duplex
Default setting
This is the recommended setting for connecting all recent
consumer home switches, routers, or gateways.
Half Duplex
Restricts the connection to half duplex mode, and limits
overall performance for your Killer Xeno.
This setting should be used only if you are connecting to
legacy networking equipment (manufactured in 1998 or
earlier).
8
Ack Frequency
To change the duplex mode:
1. Right-click on the Killer Xeno tray icon.
Determines the frequency at which
received data packets are
acknowledged.
Change Ack Frequency only if you
are selectively attempting to change
latency behavior in specific
programs.
2. Select Xeno Configuration.
3. Select the Main tab.
Note: The Killer Xeno must be in Normal mode to change the duplex mode.
5. Under General, open the Link Duplex drop-down menu and select the preferred speed for your local
network connection.
Maximum Transmission
Unit (MTU)
Maximum size of a data packet that
the Killer Xeno broadcasts.
Finding an optimal size for your
Internet conditions may improve
performance.
Configuring Advanced Settings
Advanced settings should be changed only in special cases or if advised by a technical support specialist.
It is recommended to use the default settings.
The following table shows the advanced settings and their recommended default settings.
Change this setting
only if you notice
problems with games
or applications, or if
advised by technical
support.
IMPORTANT: Be aware of potential
harm in other applications when
changing this setting; you may need
to change to the default setting to
achieve normal behavior in standard
programs.
4. Under Xeno NIC, open the Mode drop-down menu and select Normal.
6. Click OK.
Enabled
1500 bytes
Consult your internet
service provider for
recommended MTU
size, or test the MTU
for the maximum size
that you can send
without fragmentation
in your location.
To configure advanced settings:
1. Right-click on the Killer Xeno tray icon.
2. Select Xeno Configuration.
Setting
Description
Default Setting
Nagle Algorithm Control
Nagle Algorithm Control delays
sending a data packet until the
packet is full. This prevents poorly
written programs from flooding a
network.
Enabled
Change this setting
only if advised by
technical support.
3. Select the Main tab.
4. Under Xeno NIC, open the Mode drop-down menu and select Advanced.
Enable TCP No Delay
Turning off Nagle Algorithm Control
may improve TCP latency at the risk
of flooding the local network.
Enabling TCP No Delay creates this
registry entry:
HKEY_LOCAL_MACHINE\SOFTWARE\
Microsoft\MSMQ\Parameters\TCPNo
Delay
Note: The Killer Xeno must be in Advanced mode to display the advanced settings, which appear
on the TCP tab.
5. Select the TCP tab.
6. Configure the settings. See the previous table for a description of each setting.
7. Click OK.
Configuring Killer Bandwidth Control
Killer Bandwidth Control is a powerful feature that allows your computer to do more while you game.
By managing the bandwidth each online game uses, you can continue to game with less lag and
smoother online gameplay while listening to streaming music, downloading large files, using your favorite
voice chat application, or all of these.
9
10
To use Killer Bandwidth Control, set the following for your games and applications:
• Priority
• Bandwidth
• Connection Settings
a. Locate the game or application whose priority you want to change.
Note: Games and applications appear with the file name used by the Windows operating system.
These file names may be abbreviated. For example, World of Warcraft may be listed as WoW.exe;
Call of Duty 4 may be listed as CoD4.exe.
To configure Killer Bandwidth Control:
b. Select the priority for the game or application:
• 1 Game — use for most games
• 2 Realtime — use for applications such as voice chat or streaming music
• 3 Standard — use for lower-priority applications or applications you do not want to interfere with
your game.
1. Right-click the Killer Xeno tray icon.
2. Select Bandwidth Control.
3. Select the Priority tab and set the
priority settings for your games and
applications.
c. Set the Offload configuration for the game or application:
• Yes— the Killer Xeno offloads the network processing for the specific application. (For most games,
the default is Yes). This setting is recommended for game traffic only.
• No — the Killer Xeno does not offload network processing for the application.
Note: The Game Detect feature automatically identifies online game applications and sets these
as high priority (1 - Game). You can change these priority settings for your games and other
applications as desired.
11
4. Select the Bandwidth tab and set the Bandwidth settings for the games and applications you
want to modify.
12
a. Locate the game or application and set Download and Upload settings:
• Unlimited — use for most games
a. Click the Test button to launch your default web browser and start a bandwidth speed test.
b. After the test completes, write down the Download and Upload values, as shown in this example.
Other programs should be set to lower bandwidths than your game, depending on the total bandwidth
available. Try different settings for each program while you game, and make sure to monitor your lag.
Note: Do not assign more bandwidth to a program than you have available. This will impede the
performance of your online gaming experience.
5. Select the Settings tab and modify the connection settings for the games and applications you
want to modify.
c. Enter the Download and Upload values in the Download/Upload kb/s fields next to My Internet
Connection Speed.
Important: Be sure to enter the actual tested values for your broadband connection. Setting these
values too high causes Killer Bandwidth Control to assign too much bandwidth to programs, which
can impede your online gaming experience.
6. Click OK.
Configuring Killer Firewall
Killer Firewall protects your online gaming computer from intruders and unauthorized Internet access by
programs on your computer.
When enabled, Killer Firewall runs entirely on the Killer Xeno’s Network Processing Unit (NPU), allowing you
to disable any software firewalls that run in the Windows operating system on your computer. This keeps
your computer protected with less performance impact than traditional, software-based firewalls running on
your computer.
Killer Firewall protects your computer by notifying you each time traffic wants to come into your computer.
It does this by identifying programs that open ports to your Internet connection that are listening for data.
Any time a program on your computer wants to open a port to the Internet, and you have not asked it
to do so, Killer Firewall notifies you and asks your permission to open the port.
Note: You may not want to enable Killer Firewall if your computer is already protected by a firewall in your
home router or gateway.
13
14
To enable or disable Killer Firewall:
To change alert settings:
1. Right-click on the Xeno Killer Tray icon.
1. On the General tab, locate the Alerts section.
2. Select Xeno Firewall.
2. Select Exception alerts will be made:
• Per Application — use this setting to receive alerts when a program tries to access the network.
This is the simplest option; Killer Firewall notifies you only once when a program is requesting access.
• Per Individual Port — use this setting to receive alerts for every port that programs are trying to access.
This is a complex option; Killer Firewall notifies you multiple times if a program needs access to
multiple ports.
3. On the General tab, under Firewall, select the On button to enable Killer Firewall;
select the Off button to disable Killer Firewall.
Note: When Killer Firewall is enabled, alerts are also enabled automatically.
Adding Killer Firewall Exceptions
Each time Killer Firewall notifies you about a program that is requesting access to the Internet, it will ask you
if you would like to add this program as an exception to the firewall rules. If you select Yes, Killer Firewall
automatically adds that exception.
You may need to edit an exception occasionally, especially if you patch or reinstall a program and it then
requires a different port or protocol. If this occurs, edit Killer Firewall exceptions.
To edit Killer Firewall Exceptions:
1. On the General tab, under Exceptions, select the program name for which you want to edit
firewall settings.
2. Click Edit.
3. Edit the settings.
4. Click OK to save the settings and return to the Firewall screen.
Deleting Killer Firewall Exceptions
You typically need to delete a Killer Firewall exception after a program has changed, been patched,
or uninstalled from your computer.
To delete Killer Firewall exceptions:
Changing Alert Settings
1. On the General tab, under Exceptions, select the program name for which you want to delete
After Killer Firewall is enabled, alerts are enabled automatically.
exception settings.
2. Click Delete.
3. Click Yes when prompted to confirm the deletion and return to the Firewall screen
15
16
Technical Support:
MODS RIGS:
EVGA is dedicated to supporting our products. If you need to contact Customer Service, please have your
system configuration ready, as well as your model number and serial number ready. You will need to register
your product before a support technician can assist you. You may register your product online at:
http://evga.com/register, or when you call for support, a staff member will register you.
$1k Sponsorships for every 200 posts. Come show off your rig and join in on one of the biggest things
happening at EVGA, visit http://modsrigs.com
Compliance Information
•
Hours of Operation: 24/7 Technical Phone Support
FCC Compliance Information
•
Phone Support: (888) 880-EVGA (3842)
•
Fax Support: (714) 528-4501
•
Tech Support Web Site: http://evga.com/support
This device complies with FCC Riles Part 15. Operation is subject to the following two conditions:
This device may not cause harmful interference, and this device must accept any interference received, including interference that may
cause undesired operation. This equipment has been tested and found to comply with the limits for a Class B digital device, pursuant to
Part 15 of the FCC Rules. These limits are deigned to provide reasonable protection against harmful interference in a residential
installation. This equipment generates, uses and can radiate radio frequency energy and, if not installed and used in accordance with
the manufacturer’s instructions, may cause harmful interference to radio communications. However, there is no guarantee that
interference will not occur in a particular installation.
If this equipment does cause harmful interference to radio or television reception, which can be determined by turning the equipment
off and on, the user is encouraged to try to correct the interference by one or more of the following measures:
Increase the separation between the equipment and signal source. Connect the equipment to an outlet on a circuit different from that
to which the signal source is connected.
Consult the dealer or an experienced computer technician for help. The use of shielded cables for connection of the monitor to the
graphics card is required to ensure compliance with FCC regulations. Changes or modifications to this unit not expressly approved by
the party responsible for compliance could void the user’s authority to operate the equipment.
Warranty Information:
For warranty information on this product, please visit: http://evga.com/warranty/. As a valued EVGA
customer; you will be sure to receive a warranty that will fit your needs.
EVGA Advanced RMA (EAR) Program:
CE Compliance Information
The EVGA Advanced RMA (EAR) Program is a program to protect yourself and your product in the case
of product failure. For more details please visit: http://evga.com/EAR
EMC Directive 89/336/EEC and Amendment 92/31/EEC, Class B Digital Device EN 50081-14, Generic Emissions Standard for
Residential, Commercial and Light Industrial Products (EN 55022/CISPR 22, Limits and Methods of measurement of Radio).
(EN 55022/CISPR 22, Limits and Method of Measurement of Radio Interference Characteristics Information Technology
EVGA Online Community:
Equipment) Warning: This is a Class B product. In a domestic environment this product may cause radio interference in
which case the user may be required to take adequate measure. EN 50082-1, Generic Immunity Standard for Residential,
Commercial and Light Industrial Products (IEC 801-2, IEC 801-3, IEC 801-4)
To visit the EVGA community message boards, please visit: http://forums.evga.com
Trademark Information
EVGA FAQ:
To search our knowledge base and product FAQ please visit http://evga.com/FAQ
2000-2009 EVGA Corp. EVGA, the EVGA logo and combinations thereof are trademarks of EVGA Corp. Bigfoot Networks, the Bigfoot Networks
Logo, Killer and the Killer logo are trademarks of Bigfoot Networks, Inc. All brands, products and companies are trademarks or registered
trademarks of their respective companies. EVGA Corp. reserves the right to change product specifications without prior notice.
EVGA Gaming:
If you live to game, this is the place for you! We have the best tournaments, prizes and game servers,
visit http://evga.com/gaming
FOLDING@EVGA:
Distributed computing for the greater good. Did you know you could turn your graphics card into a shared
super computer? Visit http://evga.com/folding
17
18