1
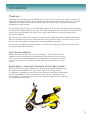
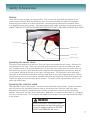
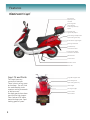
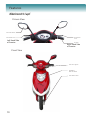
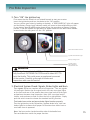
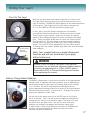
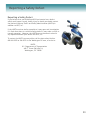
RideGreenUS Owners Manual Capri All Electric - Zero Emissions Motor Scooter www.RideGreenUS.com www.InnovativeScooters.com Table of Contents Introduction........................................................ Specifications & Vehicle Identification Number (VIN)....... Warnings............................................................ Safety & Awareness .............................................. Features............................................................. Instrument Panel Throttle Hand Brakes Storage Areas Battery System..................................................... Battery Pack Installation and Removal......................... Pre-Ride Inspection............................................... Brake Check............................................. Brake Adjustment.................................... . . Ignition Key.............................................. Electrical System (Brakes, turn signals, horn)..... Mirrors.................................................... Tires..................................................... . Riding Your Capri...................................... ......... Turning On the Capri Ignition......................... Battery Meter Behavior............................. . .. Driving Conditions & Mileage Ranges............... . What Happens When the Battery is in the RED Zone?.. Capri Locking Steering Column Security Feature....... Waxing, Washing Maintenance.................... ............. . Professional Maintenance Schedule............................ Troubleshooting Guide............................................ Limited Warranty Information................................... Reporting Safety Defects......................................... Contact US.......................................................... 2 3 4 5 6-7 8 - 11 12 13 14 - 16 14 14 15 15 16 16 17 - 18 17 17 18 18 18 19 20 21 22 23 24 Introduction Thank you... Thank you for purchasing your new RideGreenUS, Capri electric Scooter. We simply manufacture and produce the best scooters on the market. Your decision to buy initially reflects our own good opinion and we hope that the use and riding experience of the Capri will prove to be easy & rewarding for years to come. Our manufacturing facilities are ISO 9001:2000 registered. This means consistent quality standards and continuous improvements is our goal. Each part that goes into a Capri scooter is inspected and tested. Upon total assembly the Capri is once again tested and then securely packed with all recyclable materials. We want you to use your Capri scooter for years to come. Remember that individual replacement parts are available for the Capri should you ever need to make a repair. Just call or visit our web site for more information on replacement parts or available accessories. If you have any suggestions, please contact us. We do like to share your experiences with other InnovativeScooter.com customers. Capri Scooter Manual Please keep this manual with your Capri s2cooter. This manual contains important safety information and operational instructions which are to be read carefully and understood before one attempts to operate the scooter. In the event you sell your scooter, please transfer this manual to it’s new owner. Registration, Licensing & Insurance of the Capri Scooter Your Capri has been engineered to meet and exceed national Department of Transportation standards to be fully street legal in the United States. It is however, advisable to consult your local state or municipality ordinances concerning operator license requirements, age of driver, registration and license plates. You should also consult your insurance agent for any required or recommended coverage. 3 Specifications & Vehicle Identification Number (VIN) Capri Specifications Engine: Electric (Rear Wheel) 500 Watt Engine Capacity: Battery - 48V/20Ah lead acid battery ^-8 hours to charge Dry Weight: 187 lbs (85kg) Exterior Size: 71”x26”x41” (1800x650x1050mm) Seat Height: 26” (670mm) Chassis: Steel Maximum Passenger Load: 245lbs./111Kg Ignition: Electric Transmission: Hi-Efficiency DC Drive Controller Tire Size: 3.00-10, 36PSI Front/Back tires Front Suspension: Hydraulic Rear Suspension: Hydraulic Front Brakes: Drum Rear Brakes: Drum Starting System: Electric Interior Trunk: Yes Colors Available: Red/White, Blue/White, Yellow/White Vehicle Identification Numbers (VIN) Your Capri scooter is issued a VIN at the factory. The VIN will also appear on a Certificate of Origin (CO) that is sent to you shortly after your initial purchase. VIN and CO are required by some states that to register your scooter. The CO is in essence the title to your scooter. The VIN number is easy to find. It’s located below the front glove box. There is a snap in plastic panel. Remove the panel, the VIN is stamped in to the Capri’s metal frame. It’s always a good idea to check the VIN to make sure it matches the CO designated VIN. The VIN is also located on a label under the drivers seat. Your scooter’s VIN can be found in two locations, stamped on the frame and under the driver’s seat. Frame Stamped VIN Location 4 Safety ! Warning SEVERE INJURY OR DEATH CAN RESULT IF INSTRUCTIONS AND PRECAUTIONS IN THIS OWNERS MANUAL ARE NOT FOLLOWED. DO NOT attempt to operate the scooter unless you have thoroughly read and understood the operation and purpose of all features and controls described in the Owners Manual. ALWAYS wear DOT (Department of Transportation) approved motorcycle helmets and eye protection when operating the scooter. NEVER operate the scooter while using headphones attached personal radios or audio systems. In addition: never use cell phones or text while operating the scooter. Pull safely off of the road in a designated parking area to make your call. NEVER operate the scooter under the influence of alcohol or drugs. In addition: use of prescription drugs that state warnings about safe operation of motor vehicles. NEVER EXCEED the maximum operating load capacity as specified in this manual. ALWAYS keep both hands on the handle bars and both feet on the foot rest while the scooter is in motion. Always wear shoes, open toe shoes are not recommended. ALWAYS observe your local state laws for licensing, riders age limits, registration and operation of 600 Watt electric motor scooters on public highways. Follow all local laws pertaining to: speed limits, headlight and turn signal use requirements. ALWAYS do a visual and functional check of your scooter, as described in the manual, prior to riding. ALWAYS maintain a safe operating distance from other vehicle on the road. A defensive driver is a safe driver. Two wheel vehicles are sometimes not recognized by cars or trucks. It is recommended to wear bright clothing to highlight your visibility to traffic. NEVER modify the scooter. Modifications of this scooter could lead to an accident resulting in SERIOUS INJURY OR DEATH. Any modification of the scooter, including the use of non-standard battery packs or other performance parts voids all warranties. NEVER leave the key in the ignition. Keep your keys in a safe place to avoid unauthorized use of your scooter. NEVER stunt ride your vehicle. ALWAYS safely operate your vehicle based on road surface conditions (wet, oily, gravel, sand) and weather. Use caution on hills and turns. Note: The order of WARNING items on this list (top to bottom) is not a ranking of their importance. All WARNING recommendation are to be followed. 5 Safety & Awareness HELMETS Always wear a Department of Transportation Approved (DOT) motorcycle helmet. National highway safety statistics confirm that the most serious motorcycle injuries and fatalities stem from the rider not wearing a helmet. ALWAYS wear a DOT approved helmet when riding a scooter. Helmets must fit the rider appropriately and not be too loose or too tight. Helmets should be in good condition and not be cracked or have frayed or broken retaining straps. EYE and FACE PROTECTION You are traveling at speeds near or over 30 mph. Rocks, insects and debris can easily cause serious damage to your eyes and skin. These objects hitting you can cause accidents. Your concentration is taken off of driving. Always wear eye approved protection while operating your scooter. PROPER PROTECTIVE CLOTHING ALWAYS wear shoes while operating your scooter. Closed toe shoes are highly recommended. Wear shirts or shirts with long sleeves. Long pants are preferable over shorts. Loose fitting clothing should be avoided as it can get caught in the moving parts of the scooter. VISIBILITY Drive defensively. ALWAYS be aware of other vehicles and traffic on the road. Motorcycles and especially scooters are not highly visible to most motorists. Do your best to wear bright or reflective clothing to up your visibility factor. Braking: Bright sunlight or glare can make your turn signals less visible. An excellent braking and turn signal procedure is to gently squeeze both brakes several times prior to stopping or turning. Your brake lights are more visible than the turn signal lights. The flashing of your brake light will assist motorist visibility of your intentions of your stopping or turning intentions. Head lights: Turning on your headlights even during daylight operation substantially increases your visibility to motorists. Watch out fo motorist blind spots. Even though you are traveling at speeds around 30 mph, motorist will have trouble seeing a scooter. Again driving your scooter defensively is always good practice. 6 Safety & Awareness Parking There are two ways to park your Capri scooter. One, is your side kick stand and second, is the center stand kick stand. Both are located on your left hand side under the white running board. Always park your scooter on a hard road surface, sand and grass areas should be avoided. When ever possible use the center stand. Your Capri is much more stable and secure on the center stand. ALWAYS TURN OFF THE IGNITION KEY BEFORE ATTEMPTING TO PUT YOUR CAPRI ON EITHER KICK STAND. Foot Pivot Point Foot Pivot Point Center Stand Side Kick Stand Operating the center stand The center stand takes a bit of practice. Once you learn the method the rest is easy. Stand on the left hand side of the Capri. With your right foot, push downward on the center stand pivot point until it makes contact with a hard road surface. At the same time, place your left hand on the left side handle bar and your right hand under the cargo box rack and grasp the rack securely, palm up. In an upward, pulling to the rear of the Capri, rocking motion, lift the back of the scooter with your right at the same time push down with your right foot on the center stand pivot point. To fold up the center stand, sit on the scooter with both feet touching the ground. Place both hands on the handle bar grips and rock the Capri gently forward. The center stand, spring loaded, will tuck up under the rocker panel. Operating the side kick stand This operation is much more simple. Stand on the left hand side of the scooter. Steady the scooter your left hand on the handle bar and your right on the drivers seat. With your right foot, push downward on the side kick stand pivot point. Follow through until it locks in it’s full downward position. Gently lean the Capri on the kick stand. Make sure it is stable and that there is 3-4 degrees of lean on the kick stand. To lift the kick stand push the pivot point with your foot towards the back of the scooter ! WARNING NEVER OPERATE the scooter unless the center stand and side kick stands are in their full upright position or SEVERE INJURY and DAMAGE will occur. 7 Features RideGreenUS Capri Drivers Seat Opens up from the back Rear Cargo Box with reflector Small Cargo Box Key Opens Seat Key Lock Ignition Key Opens Rear Storage Compartment Opens with Ignition Key pri S Ca enU e r G Ride issions Zero Em Brake & Turn Signal Lights Passenger Foot Rest Rear Mud Flap License Plate Area Capri Electric Motor Located in the Wheel Wheel Guard Center Stand Side Kick Stand Floor Mat Capri Fit and Finish The Capri has many convenient features. There’s plenty of leg room and storage. You will find the workmanship rivals scooters costing thousands of dollars more. Our body panels have been specified for high impact. Color fade and UV stable materials keep your Capri looking good for years. 8 Cargo Box Support Rack Rear Storage Area Open with ignition key Brake Lights Turn Signal Lights License Plate Not Included Features RideGreenUS Capri Dash Instruments Head Light ON Light Indicator Ignition Switch ON Light Indicator Left Hand Turn Signal Indicator Right Hand Turn Signal Indicator Speedometer Battery Charge Level Indicator Left Side Handle Bars Hi Beam Low Beam Turn Signal Light Switch Horn Push Button Right Side Handle Bars Main Dash and Head Light Switch Off Position Dash Light Only On Position Headlights & Dash Lights On Position Additional Horn Push Button 9 Features RideGreenUS Capri Drivers View Rear View Mirror Front Brake Lever Rear Brake Lever Left Hand Side of Scooter Throttle Right Hand Side of Scooter Front View Front Turn Signals Headlights Hi & Low Beam Front Brake Cable Rid eG r een 10 US Features Main Power Breaker Storage Areas Rear Storage Compartment Opens with ignition key Under the Seat Storage Area Capri Storage Areas Front Storage Compartment Opens with Ignition Key Ample storage areas make the Capri very versatile. You can just enjoy riding the Capri or use it to accomplish everyday tasks like going to the bank, post office picking up a movie or getting some groceries. You’ll save thousands of dollars on gas and you’ll have fun doing it while riding your Capri. Cargo Box, opens with it’s key ! WARNING DO NOT EXCEED the maximum load carrying capacity of the Cargo Box. The support rack and box are rated for 11 lbs./5Kg Cargo Box Installation You will need to install your Cargo Box on the Capri’s metal Cargo Box bracket. The Cargo Box arrives with mounting hardware. There are: a. Two rubber vibration insulator pads. These are installed between the metal bracket and the Cargo Box. b. (2) Metal topside brackets. c. (4) Nuts, washers and bolts. Note: Examine the mounting holes on your Cargo Box and Rear Scooter mounting bracket so four points line up. Cargo Box comes complete d. Gray Cargo Box mat. with all the required mounting hardware e. Cargo box locking keys. Note: All mounting holes are positioned for proper fit. There is no need to stretch or force fit any components. 11 Battery System Battery System Overview Your Capri Scooter arrives with an installed battery pack of (4) 12Vdc sealed lead acid batteries that are combined together to create a 48 Vdc/20Ah power source. A 48Vdc system offers better performance and lower overall electric system resistance. A 48Vdc power source allows for lighter wiring. The battery pack should last for over 290 to 330 cycles, in essence thousands of miles. Replacement battery packs are available. See our section in this manual on how to change the battery pack. Battery life is dependant on how often you charge the unit. It is best to operate your scooter near to the point that the battery system is fully discharged. This would mean the Battery Charge Level reading is in the lower part of the red segment of the meter. Initial Charging Cycle Your Capri arrives from the factory fully charged. Once the initial charge is used a typical charging cycle lasts between 6 - 8 hours. Battery System Charging Procedure 1. The charging system simply plugs in to the receptacle below the front seat. Then plug the remaining end of the charger in to any 120VAC receptacle. The RED LED to the right of the word”POWER” indicated the unit is plugged it to 120VAC properly. 3. The charger has a RED LED POWER ON Light and a two state RED/GREEN LED CHARGE light. A RED light to the right of the word “CHARGE” means the unit is charging. An additional indication of a charging mode is the sound of the chargers cooling fan running. 4. The charging cycle is completed when a GREEN LED appears to the right of the word CHARGE. Unplug the charger and store it in a clean, dry place. Do not store the charger under the seat of your scooter. Riding and road vibrations will damage the power supply. 5. DO NOT leave charger plugged in to a 120VAC outlet when it’s not charging. Damage to the charger could occur. Fully Charged Charging ON Charging System Indicators ‘RED” Charging “GREEN” Fully Charged ! Battery Charger easily plugs in under the driver’s seat of the Capri 12 WARNING ALWAYS charge your scooter in a dry location. Water will damage the charging unit . Also, wet areas can cause electrical shock. Clean and dry all receptacle prior to charging. DO NOT TRAVEL with the charger. Prolonged vibration will cause it to fail. OFF Master Power Breaker Switch located under drivers seat Battery Pack Installation and Removal Battery Pack Location The Capri’s battery pack enclosure is conveniently located on the floor boards. It is theft protected via a locking deadbolt. Your ignition key opens this lock. The enclosure makes changing the battery pack safe and easy. Battery packs last for thousands of miles. this procedure is only needed for replacing worn out batteries not for charging the batteries. Locate the anti battery theft deadbolt lock located on the scooter’s floor board. Use your ignition key to unlock the battery enclosure. Turn the key counter clockwise to unlock the battery pack enclosure. Once this task is accomplished there are two handles to lift out the battery pack. The pack weighs 65lbs. The two handles may require a blade screw driver to pry them upward. As the battery pack is lifted you will notice an attached battery power cord. Lift the battery out and let it rest on the floor board before removing the plug. The battery power cord is pressure fit and secured. To remove, wiggle and pull the plug at the top closest to the battery pack. Never pull on the cord. Now you can easily remove the battery enclosure pack. To install simply reverse the process. ! WARNING SHOCK HAZARD : Prior to removing the battery pack, disconnect the battery charger if connected. Perform this task in a clean, dry work space. Switch the under drivers seat Main Breaker to the OFF position. DO NOT allow metal or liquid to come in contact with any of the batteries wiring. This procedure is only for battery replacement not battery charging. Recycling There are no serviceable parts in the battery pack enclosure. Safely dispose of the battery pack the same as you would an automotive battery. Recycling Centers are listed in all major phone directories. Most major retail chains that sell automotive batteries will also accept batteries for recycling. NEVER DISCARD the battery pack in your regular trash pick up. This is illegal and not very environmentally conscious. The Capri’s battery pack enclosure is theft protected via a locking dead bolt. It removes easily. Lift out by using the enclosure’s handles, unplug, then plug in a new battery pack enclosure. Your ignition key is used to unlock the battery pack enclosure Please recycle your battery pack 13 Pre-Ride Inspection Pre-Ride Inspection Safety is always first. Make sure your scooter is always is good working order. Simple visual and mechanical checks will be outlined and should ALWAYS be performed prior to riding your scooter. If you do find damaged or worm parts DO NOT ride the scooter. Contact a local powersports dealer for repairs or contact us at www.RideGreenUS for technical repair guides and available replacement parts. 1. Brake Check There is nothing more important than having brakes to stop. If any parts of the braking system are worn or broken DO NOT RIDE THE SCOOTER. Frayed, damaged or loose brake cables, excessive play in the brake levers and worn drum brake pads are all reasons NOT TO RIDE. a. Test brake levers for proper adjustment. b. Visually inspect the brake cables & proper adjustment. a. Test Brake Levers for Proper Adjustment A very simple test can be done by squeezing the brake levers. Too tight will cause excessive wear on brake pads and cause early replacement. Too loose is highly dangerous. A properly adjusted brake lever will move approximately two inches until a firm resistance is felt from the brakes. If the brake lever action is too loose or too tight you can easily adjust the brakes. b. Brake Adjustments & Cable Inspection Front Brake Rear Brake To adjust the brakes simple use a 9/16” or 15mm open end wrench. As you face of the brake cable clockwise reduces brake lever travel and tightens the brakes, the reverse increases brake lever travel and loosens the brakes. In Addition, visually inspect the brake cable for wear or damage. Brake Adjustment Nut ! 14 WARNING ALWAYS make sure the ignition switch is the OFF POSITION while performing a brake cable inspection or adjustment.. Pre Ride Inspection 2. Turn “ON” the ignition key First assure that the throttle is not rotated forward to start your scooter. Insert the ignition key and turn clockwise to the “ON” position. You can confirm your action by looking at the dash. A “RED POWER ON” light will appear and the Battery Charge Level Indicator needle will move to the available battery level. If your battery level is in RED region please follow the procedure on Battery Charging Process. If the RED POWER ON light does not appear make sure the Main Power Breaker located under the riding seat is in the “ON” position. ON OFF Main Power Breaker Switch Ignition ON Indicator Light Battery Charge Level ! WARNING Ignition Switch Three Positions OFF, ON and Lock With the ignition switch in the “ON” position your scooter is now fully functional. EXTREME CAUTION must be taken NOT TO twist the throttle. This could cause an unplanned movement of the scooter. Carefully go through all checks and inspections with care and caution. 3. Electrical System Check: Signals, Brake Lights and Horn Turn signals: Perform a complete electrical inspection. Test turn signals left and right. Position the turn signal switch left view turn signal lights on the front and rear of the scooter. Move turn signal switch to the right and perform the same visual inspection. Note: Your turn signal switch latches, and continues to flash in either the left or right position. Simply push the switch inward to release the standard latching function. Test brake lever action and assure brake lights function properly. Turn the ignition key to the ON position. Squeeze brake lever, view rear brakes lights for to assure their proper ON function when either front or rear brake lever is squeezed. Horn: You horn can be checked on either side of the handle bars. Test each sides horn switch for proper function. 15 Pre-Ride Inspection 4. Check for Proper Rear View Mirror Installation & Adjustment Your scooter has two mirrors right and left. Make sure that the mirrors are tightened properly as not to easily sway or move. Mirrors assist the driver, it is always advisable, and a safe driving practice, to confirm a lane change or turn by looking over your shoulder for traffic Install or Adjust Rear View Mirrors The mirrors require a 5/8” or 12mm wrench to tighten and properly install and or adjust each mirror. Installing a mirror or adjusting 5. Proper Tire Inflation Your Capri Scooter comes equipped with a 3-10 sized tire. Tire pressure gauges are readily available at most automotive stores. Purchase one that easy to view and read. Front pressure is 36 PSI, rear tire pressure should be set at 36 PSI. ALWAYS DO a visual inspection for nicks, cuts or excessively worn treads prior to riding. Check tire pressure weekly. If your tire becomes completely flat you will need to compress the center of the tire to reseat the seal. The process is fully explained in Inflating an Undamaged Tire. Inflating an Undamaged Flat Tire On rare occasion your tires may arrive flat or go flat from temperature extremes. The 3-10 tires that your Capri uses do not utilize an inner tube for inflation. The tires are tubeless and self sealing. The trick is however, to get the tires to seat firmly on their rim If they are not seated they will not inflate. There is a simple trick to follow. Grab a belt or a cinch strap. Wrap it tightly around the center of the wheel as shown. Pull tightly so it squeezes the center of tire. This forces the tire side walls to bulge out and seat firmly, simultaneously fill with air to 36 PSI. 16 Riding Your Capri Turn On The Capri Now that you have done your scooter inspection it’s time to ride. The Capri easily starts by turning the ignition key one click to the right (Clockwise). The RED LED should appear on the dash as described in the manual. Take a quick check of your battery charge level. If it’s in the GREEN or YELLOW zone you are good to go! Ignition Switch Three Positions OFF, ON and Lock Accelerate by twisting toward you At first, gently twist the throttle towards you. Acceleration increases the further back you twist. Slower as you twist forward. There is also a cruise feature. As you run the Capri at a steady speed of about 28mph the Capri will remain cruising at that speed level. Simply tap either brake lever to cancel the cruise function. The Capri uses it’s DC drive system to accelerate and to assist in braking. When you apply the brakes you’ll hear a slight humming sound. This is the DC drives regeneration function which assists in slowing down the scooter. ALWAYS apply both front and rear brakes when stopping. Note: Your scooter features a motor disconnect function and will not accelerate if you apply either brake lever. ! Just twist and ride WARNING SEVERE INJURY OR DEATH can result if this manuals instructions are not followed. Maximum loading capacity, including stowed materials is 245lbs. ALWAYS wear a Department (DOT) of Transportation Approved helmet when operating the scooter. Battery Charge Meter Behavior The Battery Charge Meter is your direct indication of the approximate mileage range. In optimum flat road conditions with no stopping and starting and no light on your Capri will average distance on a charge is 34 - 38 miles. See our Driving Conditions & Mileage Chart for typical approximate mileage results for a variety of driving conditions. Some hills may be too steep. A continuous 18 - 25 degree hill may be beyond the capability of your Capri. Battery Charge Meter You will notice the meter moves in to the RED zone as you climb a hill or accelerate. This is normal as you are loading the batteries to compensate for the hill or acceleration loads. The meter will read accurately once the load is met. You will find that the meters readings are consistent throughout the batteries charge level. In other words, it does not go along for 25 miles in the GREEN zone and than the remaining miles are quickly moving the needle indicator towards the RED zone. 17 Riding Your Capri Driving Conditions & Mileage Ranges Flat Road Surface Few Stops Start & Stop Traffic Combination Hill & Flat Hills 5 -17 Degree Grade Headlights On Approximate Mileage Performance 31-34 26-30 22-26 22-26 24-28 20-24 18-22 Note Mileage results were conducted with a 180 lb. rider. Conservative driving habits were applied and local traffic speed limits of 25 mph were maintained to reflect realistic mileage performance results. Your results may very based on weight and driving habits What Happens When the Battery is in the RED Zone? Your Capri is operated by a microprocessor based DC drive controller. It’s job is to optimize performance and battery life. It also controls acceleration and interlock safety features that won’t allow you to accelerate or start if the hand brake lever is engaged. It also provides an obvious low battery charge acceleration behavior. If your battery is in the bottom portion of the RED Zone your scooter will function with the following behavior. As you twist the grip to accelerate the scooter will speed up an then cut off, speed up and cut off until the battery system is totally discharged. The great part about this feature is that it typically provides low charge state range of about 1 - 2 miles. In other words the scooter just doesn’t stop and leave you stranded. Capri Locking Steering Column Security Feature After you have safely placed your scooter on the center kick stand, and on a firm road surface, you now can lock the steering column. Insert the ignition key, with your right hand and do not turn it in either direction. Simultaneously, with your left hand, grasp the left side handle bar grip. Now, turn the ignition key counter clockwise while turning the Capri’s handle bars to a full left position. Now, remove the ignition key. You will notice that the handle bars are now locked in a left hand turn. This makes pushing or rolling your scooter very difficult. To fully secure your scooter it is advisable to purchase additional locking cables and after market locking systems to avoid theft or an unintentional riding of your scooter. 18 Turn the wheel and the key to lock the steering column 18 Washing, Waxing and Maintenance Basic care of your Capri scooter Your Capri scooter is meant to operate in all kinds of weather conditions. Riding your Capri in extreme snow, ice and rain are typically not advisable. Proper dress and weather protection gear are available from many quality after market suppliers. Avoid prolonged exposure to sunlight. Even though your scooter is designed with UV plastic materials, sunlight will break down plastic (turn it brittle) during long periods of exposure. Storing your Capri The Capri should be stored in a clean dry space. Extreme moisture and dampness should be avoided. If you live close to an ocean avoid prolonged exposure to ocean spray or salt water. If either comes in contact with your scooter clean it immediately. Washing A quality automotive soap works best in getting off road dirt and grime. Avoid brushes and abusive scrub pads. All of these will scratch your beautiful scooters finish. Use a soft sponge or hand towel to wash the body panels. ! WARNING DO NOT allow water to come in contact with the ignition key area or under carriage drive system. AVOID the use of high pressure washer systems on body panel parts. Hand washing is best. DO NOT use acetone based solvents to clean any area of the scooter. Waxing A good quality wax will go along way in keeping your scooter looking like new. A spray wax is easiest to apply and is very effective in coating the metal screws that hold the body panels together. Spray all of the body panel with the wax and buff off the excess. Tires and Vinyl Surfaces Clean your tires and vinyl seats, parts and rims with the same solution used to wash the body panels. Use a quality rubber and vinyl dressing on these surfaces. Maintenance Your Capri Scooter is virtually maintenance free. We have however prepared a Professional Maintenance Schedule to follow. Lumination points, brakes and electrical systems should be checked by a qualified professional powersports dealer. 19 Professionaal Maintenance Schedule Item Initial Inspection after 5 charging cycles 2,500 miles/4,000 km or six month intervals 5,000 miles/8,000 km or six month intervals Body Panel Fasteners Brake Cables Brake System Wheels & Rims Steering Bearings Front/Rear Shock Absorbers Throttle Grip and Electrical Brake Lights Head Light Turn Signals Drive System Connectors Kick Stands Center & Side Wheel Bearings Charging Receptacle Main Breaker Connectors Power Supply Cables Please follow all routine maintenance inspections, repair, lubrication and replacement intervals. Failure to do so voids all warranties. 20 Troubleshooting Guide Troubleshooting: The Capri is designed to function with relatively few mechanical or electrical issues. Often times it’s some very simple things to investigate. Because you choose an electric scooter over a combustion engine scooter your maintenance and number of possible problems has been reduced by hundreds of parts. Electric scooters are truly easy to use, service and maintain. 1.Charger is not charging a. Not plugged in to 120Vac source (red power light should be in the on state on your charger) b. Power cord plugged from charger is not fully plugged in to the Capri scooters receptacle. (firmly insert the plug to assure contact) c. Loose or damaged Main Breaker Wire (With power supply unplugged, check breaker wiring, assure tightness of the screws on the breaker) d. Defective Power Supply (If no lights appear on the power supply it has been damaged) 2. Battery DOES NOT seem to hold a charge. a. Possible bad connection between your charger and the battery. Check all connectors on the battery pack and the under seat plug b. Charger may be damaged. Review the Charger light indicators for proper function. c. Measure voltage of battery pack. Battery pack should read 42 volts DC or higher. This is a task for a qualified powersports technician. d. If battery reads under 42 Volts DC there may be a damaged battery cell. Your battery pack contains four 12VDC batteries. A qualified powersports technician can service the pack or a new pack can be ordered. Always recycle old batteries in a proper manner. 3. When I turn on the ignition key scooter lights and electrical systems function but scooter will not accelerate or move. a. Check brake lever adjustment. Extreme over adjustment will act like you are applying the brakes and not allow the scooter to operate.) b. In addition and on rare occasions the brake lever limit switch wiring or switch have become damaged. This is a task for a qualified powersports technician. 4. While riding the Capri it will not accelerate from a stop. a. Remember, the Capri will not accelerate if the hand brake is applied. 5. When I turn on the ignition key no lights appear on the dash. a. Check to assure the Main Breaker under the driver’s seat is in the on position. b. Check the two wires going in to the Main Breaker are not damaged or loose. c. Check to assure the power plug at the battery is fully inserted. 6. The Capri is surging in an on and off action. a. Check Battery Charge Level. If it’s in the RED ZONE recharge your scooter. 7. Brakes are not working properly. a. Follow the brake adjustment section of this manual. b. locate a qualified person or powersports dealer repair facility and inspect or replace worn or contaminated break pads 8. Can not inflate my scooters flat tire. a. Check to see if the tire is damaged in any way. Look for tears cuts or objects that may have punctured the tire. If all is fine move on to (b). If not replace the tire. b. Follow the procedure on inflating a flat as described in this manual. 9. The Throttle does not work or move the scooter. a. If the throttle does not return to a stop position the throttle spring may be damaged. b. Check throttle grip for damage. The rubber grip may need to be adjusted with a flat head screw driver c. Throttle spring, contact are damaged or out of adjustment. This requires a review by a qualified powersports technician for adjustment or replacement. 21 90 Day Limited Scooter Warranty USYI, hereby warrants to the original purchaser that the frame and components of the new vehicle will be free from defects in materials and workmanship. The period of the warranty is 6 months or 3,000 miles from the date of purchase for the engine gas powered or electrical; 3 months from the date of purchase for the frame and component parts (except as noted below in “4”). Manufacturer, if notified of a defect in material or workmanship during the period of the warranty, will repair or replace, at its option, the defective part at no charge, other than the reasonable charges for labor and shipping, if necessary to perform a warranty repair. 2. The original purchaser must operate the vehicle and maintain the vehicle in accordance with the instructions provided in the user manual, the supplements thereto and the labels affixed to the vehicle. Additionally within ten (10) days of the discovery of the alleged defect, the original purchaser must provide written notification to our Customer Service dept. 1220 US Hwy 1, Suite F, North Palm Beach, FL 33408. 3. This warranty shall be void if the Customer modifies the "product" in any respect including but not limited to the use of parts other than genuine manufacturer direct parts. 4. This limited warranty is applicable only to the customer as an original purchaser of the "product" and shall not apply to any subsequent purchaser, assignee or other recipient of the scooter from customer. 5. This limited warranty does not cover components that are subject to normal wear and tear. These items include but are not limited to the tires, clutch, brakes, brake shoes, throttle cable, drive belts, torque converter, chains, seat, lights, fasteners, padding, decals, cosmetic body panels, spark plugs, wires. Additionally, this warranty does not apply to components, which are warranted by the component manufacturer. 6. All transportation costs and shipping damage incurred while submitting parts for repair or replacement are the responsibility of the original purchaser. Any damage during shipping of scooter to customer on initial purchase must be claimed through the freight delivery company and is not the responsibility of USYI, Inc. 7. This limited warranty does not apply to any injury, loss, defect or malfunction of the "product" or failure to function resulting from any failure to operate or maintain "product" in accordance with the directions contained in the owners manual provided by manufacturer; or any injury, loss, damage, defect or malfunction, or failure to function resulting from any accident, acts of God, alterations in the "product" by anyone other than the distributor, or misuse, unreasonable use, tampering, abuse, acts, omissions, failure or negligence by anyone other than manufacturer. 8. These warranties set forth herein are in lieu of any other warranties, expressed or implied, including the warranties of merchantability or fitness. Any such implied warranty imposed by state consumer law is limited in duration to three (3) months from date of purchase. 9. USYI, Inc, will make every effort to get scooter up and running as quickly as possible. , as always, we appreciate your efforts in helping to make this process a more pleasant riding and ownership experience. 10. This warranty does not include labor, wearable parts or damaged parts from accidents, abuse, or shipping. you have a part that needs replacing, please contact us. products are very straight orward and are easily serviceable by almost anyone who is trained to work scooters or motorcycles. all cases, Purchaser needs to return the defective part(s) to USYI, Inc prior to replacement of new part(s). 22 Reporting a Safety Defect Reporting a Safety Defect If you believe that your RideGreenUS/Capri scooter has a defect which could cause a wreck, bodily injury or death you should contact the National Highway Traffic and Safety Administration (NHSTA) in addition to USYI, Inc. If the NHSTA receives similar complaints it may open and investigation If it finds that there is a vehichle safety defect it may order a recall or remedy campaign. However, the NHSTA can not become involved in any disputes between your dealer and USYI, Inc. To contact the NHSTA you may either call the Auto safety Hotline 800-424-9393 or 366-0123 in the Washington DC area, or write to: NHSTA U.S. Department of Transportation th 400 7 Street SW (NSA-11) Washington, DC 20590 23 RideGreenUS Capri Owners Manual USYI Inc. Corporate Headquarters 1220 US Hwy. 1, Suite F North Palm Beach, FL 33408 561.656.0720 [email protected] USYI Inc. Technical Support 217B Seneca Way Havre de Grace, MD 21078 717.395.3250 [email protected] Visit our general products site at: www.InnovativeScooters.com In addition, visit our Amazing Folding Flexi Scooter site: www.USAFlexi.com About the Manual: This manual was written with the most current knowledge information available. It is meant to be a reference only. Some specification may change from model to model. This manual reflects our specifications at the time of this manuals printing. For the most up to date and detailed information about our products please visit our www.RideGreenUS site. Environmental Awareness: Please print this document only if necessary. Please visit our RideGreenUS.com website for the most up-to-date .pdf version of this manual. Copyright USYI, Inc., 2008 All Rights Reserved Document Number: USYI-RGCM-2008-08