1
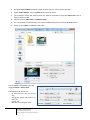
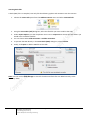
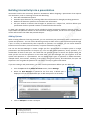
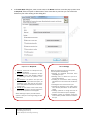
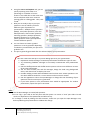
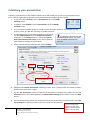
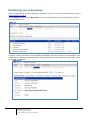
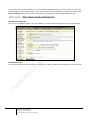
Engaging learners through interactive presentations: Using Adobe Presenter (Breeze) Centre for Development of Teaching and Learning (CDTL) National University of Singapore email: [email protected] TABLE OF CONTENTS DELIVERING ONLINE INSTRUCTION............................................................................................ 4 INTRODUCTION TO ADOBE PRESENTER ..................................................................................... 6 How it benefits the instructors and students ..................................................................................6 Recommendations before starting ..................................................................................................6 SETTING UP AN ADOBE PRESENTER ACCOUNT........................................................................... 7 Getting started with Adobe Presenter ............................................................................................7 CREATING YOUR POWERPOINT PRESENTATION ........................................................................ 8 PowerPoint Slide Design ..................................................................................................................8 Instructional Design .........................................................................................................................8 SETTING UP ADOBE PRESENTER WORKSPACE ............................................................................ 9 The Workspace ................................................................................................................................9 Presentation Settings.....................................................................................................................10 Application Settings .......................................................................................................................11 NARRATING YOUR PRESENTATION ...........................................................................................13 Adding narrations to the PowerPoint presentation ......................................................................14 IMPORTING VIDEO AND FLASH FILES ........................................................................................15 BUILDING INTERACTIVITY INTO A PRESENTATION ....................................................................18 Adding Quizzes...............................................................................................................................18 DESIGNING YOUR PRESENTATIONS ..........................................................................................21 Working with themes ....................................................................................................................21 Managing your slides .....................................................................................................................22 PUBLISHING YOUR PRESENTATION...........................................................................................23 DISTRIBUTING YOUR PRESENTATION .......................................................................................24 BEST PRACTICES WHEN USING ADOBE PRESENTER ...................................................................27 REFERENCES ............................................................................................................................28 2 Engaging learners through interactive presentations: Using Adobe Presenter (Breeze) Educational Technology Team email: [email protected] Centre for Development of Teaching and Learning Synopsis Online teaching is becoming increasingly common at most higher education institutions. Online instruction methods range from hybrid courses that offer a combination of face-to-face and online instruction, to fully online experiences and distance learning. However, many educators still resist offering such courses due to the fear that developing rich e-learning content requires a lot of time and specialized skills—not just to produce but also to modify and maintain. Adobe Presenter, an e-learning authoring tool, enables you to quickly create professional, high-quality presentations from within Microsoft PowerPoint. In this workshop, you'll learn how, with just a few clicks, you can transform your PowerPoint presentations into engaging, compact Flash presentations. Narration, animations, quizzes, and software simulations can be easily added to your e-learning courses. The presentations can then be easily shared over the University network, IVLE or web pages. Note: Adobe Presenter was formerly known as Macromedia Breeze Presenter. Objectives This introductory workshop will show you how to: • Set up an Adobe Presenter user account • Create your presentation in PowerPoint • Understand how to use the Adobe Presenter tool • Add audio and edit audio files • Publish your presentation to the Adobe Connect server • Distribute your presentations At the end of the session, you will be able to understand how to use the Adobe Presenter tool and will be able to plan and create learning resources using Adobe Presenter. Prerequisites It is recommended that you have prior PowerPoint experience. You can achieve powerful results quickly because Presenter just adds an extra menu item to the familiar PowerPoint application. 3 Engaging learners through interactive presentations: Using Adobe Presenter (Breeze) Educational Technology Team email: [email protected] Centre for Development of Teaching and Learning Delivering online instruction The Internet and multimedia technologies are reshaping the way knowledge is delivered, and e-learning is becoming a real alternative to traditional classroom learning. Online teaching is increasingly common at many types of higher education institutions, ranging from hybrid courses that offer a combination of inperson and online instruction, to fully online experiences and distance learning. In the past few years, elearning has emerged as a promising solution to lifelong learning and on-the-job training. E-learning can be defined as technology-based learning in which learning materials are delivered electronically to remote learners via a computer network. The table below illustrates the advantages and disadvantages of online learning in comparison with traditional classroom learning. Traditional Classroom Learning Advantages • • • • Disadvantages • Teacher-centered • Time and location constraints • More expensive to deliver Provides immediate feedback Familiar to both faculty and students Motivates students Cultivates a social community Online Learning • • • • • Learner-centered & self-paced Flexible time and location Unlimited access to knowledge Greater access to expertise Allows for archiving, thus enabling knowledge reuse and sharing • Updated content at less cost • Lack of immediate feedback • Increased preparation time for faculty • Potentially more frustration, anxiety and confusion It is important to understand that using technology to supplement classroom teaching does not radically change teaching methods but merely enhances what would be done in the classroom in any case. If elearning courses are not designed and delivered well, they will result in frustration, confusion, and reduced learner interest. If only text-based learning materials are used to develop such courses, then they may lead to boredom and disengagement in students and prevent them from gaining a good understanding of a topic. Good e-learning courses should integrate and present learning materials in diverse media such as text, image, sound, and video with sufficient learner-content interactivity and flexibility. Ask yourself why you have set out to create an online course. Listed below are some questions that you might need to ask yourself when developing an online course: 1. 2. 3. 4. 5. What instructional methods does your course typically employ? What combinations of media would you use? How do you currently provide practice and assessment? Do learners complain that the courses are too long? Too boring? What methods have you used to improve the quality of your e-Learning? 4 Engaging learners through interactive presentations: Using Adobe Presenter (Breeze) Educational Technology Team email: [email protected] Centre for Development of Teaching and Learning Here are some guidelines when you have decided to deliver an e-learning course: • Know your audience It is important to identify your audience and to be sensitive to the needs and interests of your audience. Define prerequisites for your course, and if you have the tools and time, verify that those tasks have been completed by your students. • Deliver organised content Make sure the content you plan to deliver is relevant, organised, clear, and to the point. If you confuse your learners with too much topic-jumping, recovery from confusion in an online environment will be exponentially more challenging. • Make it relevant Focus on scenarios, ill-defined problems, real-world examples, and outcomes that students can recognize and relate to • Make it engaging Use stories, interactions and questions to challenge attitudes, demonstrate consequences and make learners think – and think differently • Deliver meaningful fun Use multimedia and games that are specifically designed to augment the learning experience and help meet the goals of your class. • Rehearse your presentation Run through a rehearsal of your presentation – with an audience of more than one. You don’t need to ask your colleagues to join you for the entire two hour session, but just run through each topic and presentation element to ‘mark’ each move you plan to make. • Be more of yourself Develop your own online teaching style, and making yourself and your learners comfortable in the online environment. Become comfortable using your web camera and use it briefly to introduce yourself, and to bring a personal feel to the room. Provide your audience with some suggestions and ground rules for how to interact in your classroom. 5 Engaging learners through interactive presentations: Using Adobe Presenter (Breeze) Educational Technology Team email: [email protected] Centre for Development of Teaching and Learning Introduction to Adobe Presenter When you start developing an online lesson, one of the main factors that you should consider is the media you would use to deliver the instruction. Two common e-Learning delivery media are: asynchronous webbased courses and synchronous virtual sessions. Adobe Presenter is a plug-in that integrates with Microsoft PowerPoint and simplifies the creation and sharing of narrated, self-paced, media-rich presentations. With Adobe Presenter, you can create dynamic presentations and courses, complete with a narrated voice-over, directly from within PowerPoint. Are you faced with the following problems? • You want your presentations to be viewed by others without being edited or downloaded, • You have had problems with numerous versions of the same presentation after making changes, • Your mailbox has been filled by a presentation attached to an e-mail, or • Your students complain that it takes a long time for them to download your presentations. Adobe Presenter allows instructors to create compelling Flash presentations, e-learning courses and develop tutorials, including narration and assessments, using PowerPoint. With just a few clicks in PowerPoint, you can transform your presentations into engaging e-learning courses by easily adding narration, animations, interactivity, quizzes, videos and software simulations. It also reduces the file size will to a quarter enabling students to easily access even with slow connections. It is an easy first step to incorporate additional technology into the classroom. How it benefits the instructors and students • Converts PowerPoint to Flash. • Reduces the file size, and thereby reduces time taken to upload and download these resources even while they are off-campus. • Publish content as a PDF file, preserving all of the animations. • Students are not required to have the PowerPoint program or viewer to watch -- the latest flash player (a free download) is sufficient. • Adobe presenter makes it easy to add audio. • Adding narration to a PowerPoint gives online students more of a face-to-face class experience. • Allows instructors to design quick quizzes for student assessment and enables question pooling and randomization. • Helps ensure consistency with branding and customization. Recommendations before starting It is recommended that you have prior experience with using Microsoft PowerPoint. Bear in mind that visually your presentation will only be as good as your skills in Microsoft PowerPoint and Adobe Presenter acts as an audio supplement to your PowerPoint presentations. It is also recommended that you use a headset to record audio for your presentation. A headset will allow a more consistent distance from your mouth and the microphone and avoids recording as much background noise as desktop/boom microphones. Note: Desktop/Boom microphone is NOT recommended 6 Engaging learners through interactive presentations: Using Adobe Presenter (Breeze) Educational Technology Team email: [email protected] Centre for Development of Teaching and Learning Setting up an Adobe Presenter Account In order to begin using Adobe Presenter, you will need to contact the current Adobe Presenter (Breeze) account administrator at NUS and register your name and userID: http://www.cit.nus.edu.sg/breeze-diy-courseware/ The Adobe Presenter (Breeze) account administrator will activate your account and an email notification will be sent to you. Note: You can also use this website to get resources like the User Guide, Tutorial, and the serial number information required during installation. Getting started with Adobe Presenter 1. Download Breeze plugin (Adobe Presenter) after receiving confirmation email at http://www.cit.nus.edu.sg/breeze-diy-courseware/#DLAndInstall Install the Breeze plugin, choose the Run option to continue. 3. During installation, you will now be prompted for the Serial Number which can be obtained at: http://www.cit.nus.edu.sg/breeze-diy-courseware/secure/presenter10.html or you can refer to the email instructions. Choose Install with a serial number. 2. 4. Copy the serial number and paste it in the installation serial number text field. 5. Once the installation is successful, Adobe Presenter plug-in is installed within Microsoft PowerPoint. 7 Engaging learners through interactive presentations: Using Adobe Presenter (Breeze) Educational Technology Team email: [email protected] Centre for Development of Teaching and Learning Creating your PowerPoint Presentation Presentations are a common way for faculty to share information with students. By combining PowerPoint with Adobe Presenter, faculty and students can now extend their classroom presentations beyond the physical classroom. Before moving on to use Adobe Presenter to create your e-learning lessons, the first step will be to create a PowerPoint presentation. PowerPoint Slide Design Use the following tips and suggestions when designing your PowerPoint slides. Text Screen Layout • Use point form or phrases • One idea per slide • Use sans-serif font • Ensure consistency • Use large font size (40pt +) • Limit the use of colours, fonts, and text • Use contrasting background & text • Check for spelling, grammar • Avoid gradients Media • Use media elements that support your message • Use readable graphs/tables • Avoid using pictures/ sounds that distract • Beware of copyrighted materials Instructional Design Delivering presentations online presents a new set of challenges. There are several common factors that you need to consider when planning, both in terms of how you organise and sequence your presentation and how you personally deliver it. When planning, consider adding the following elements to your presentation: • Create a plan for the presentation before building your slides. o Always remember your central message. o Have a title slide to state the subject of the content. o Use a logical sequence. Create a distinctive start and finish by having an introduction slide/agenda slide at the beginning and a summary slide at the end to recap your message. o Use Section divider slides to delineate sections within a presentation when using long presentations. o Make sure all slide titles, including those for graphics-only slides, are visible in the PowerPoint outline as these titles will be used to quickly access any slide. • Include speaker notes on each slide in PowerPoint. • Add presenter information (name, title, photo, contact info, short biography) • Use Quizzes to let users interact while you track their progress. • Include documents, and links to web pages as attachments to support your content. • Avoid distractions that could undermine your instructional purpose. • Do not use transitions between slides. They don’t work when published to Adobe Presenter. • Do not record audio from within PowerPoint. 8 Engaging learners through interactive presentations: Using Adobe Presenter (Breeze) Educational Technology Team email: [email protected] Centre for Development of Teaching and Learning Setting up Adobe Presenter Workspace The Workspace When you open up your presentation, you should see the Adobe Presenter menu in the PowerPoint toolbar. This workspace gives you an overview of all the features available in Adobe Presenter. It is always a good practice to set your preferences before you work on your presentations. To start setting your preference, from the Tools tab of Adobe Presenter menu, select Settings. There are two parts to the settings – the Presentation settings and Application settings. This section lets you set the appearance, the playback, quality, attachments, presenters, server information and audio input source. 9 Engaging learners through interactive presentations: Using Adobe Presenter (Breeze) Educational Technology Team email: [email protected] Centre for Development of Teaching and Learning Presentation Settings The presentation setting consists of 4 parts: 1. Appearance – allows you to assign a Title and key in a summary of your presentation 2. Playback – allows you to set up on how you would like the presentation to be played back. 3. Quality – This allows you to set the publishing quality of the presentation on the server. Choose the Adobe Connect Pro option under Publish For. Please select your audio quality and image quality as shown below: 10 Engaging learners through interactive presentations: Using Adobe Presenter (Breeze) Educational Technology Team email: [email protected] Centre for Development of Teaching and Learning 4. Attachments – This allows you to upload any include documents and links to web pages as attachments to support your content. This is a handy tool if you would like your students to refer to reading as they are going through the presentation. Click on Add to include new documents Key in a name for the attachment, from the Type, choose either File or Link depending on what you would like to include. Application Settings Adding Presenter Details Presenter details will include the information of the instructor who delivers the e-learning lesson. You can include information like the name, job title, short biographical notes, a logo, and contact details to make your presentation more credible, personal, and interesting. 1. To add new presenters, choose Presenters tab from the Application settings, and click on Add. 2. Enter the name of the new presenter and other information like the email address, photo, biography, etc. To set your name as the default presenter, make sure the Default option is checked. For the photos and the logos, Adobe Presenter accepts only JPG or PNG images. You can edit or delete a presenter at any time using the Edit and Delete buttons respectively. 11 Engaging learners through interactive presentations: Using Adobe Presenter (Breeze) Educational Technology Team email: [email protected] Centre for Development of Teaching and Learning Setting the Server Details 1. From the Servers tab in the Application settings, click on Add. 2. In the Add server dialog box, add the Server information (as shown below) and click ok to confirm. Server information Name: Breeze URL: https://breeze.nus.edu.sg Setting the Audio Source While setting up the audio source, you can either use a microphone or the line-in option that is usually included with an external audio device, such as a tape deck or stereo amplifier. For our purposes, you can leave that at the default setting. Preview This allows you to set the number of slides that you would like to preview before publishing the presentation. 12 Engaging learners through interactive presentations: Using Adobe Presenter (Breeze) Educational Technology Team email: [email protected] Centre for Development of Teaching and Learning Narrating your presentation It is recommended that you create a script for audio. Before beginning, practice reading the script aloud. A guideline might be one minute or less per slide. Use the following tips and suggestions when adding narrations to your Adobe Presentation: • Prepare a written audio script before recording your narration. o Use the Script Import feature when recording your narration to import speaker notes into the Record Audio dialog box. Speaker notes appear as notes in the final Adobe Presenter presentation, and you can see them in the Record dialog box while you’re recording your narration. o You can also prerecord your narration audio and then import the audio by using the Audio Import feature. Divide your recorded audio into separate audio files for each slide as this simplifies importing the recorded presentation audio. o Check your sound quality by just recording your introduction slide to check before proceeding with the entire presentation. o Use the Adobe Presenter Audio Editor to synchronize slide animations to your audio track. o You can fine-tune your recorded narration using the Audio Editor. You can add pauses where needed to allow time for text to be read or animations to complete. o You can stop your narration and return to it later. Do not assume that you have to record narration for the entire presentation at once; you can do it slide by slide if you want to and come back and finish later. • Use a good microphone and headphones. Turn off ringers on phones, pagers, and watch alarms. Try to minimize distracting background noise while recording. • Keep the microphones a few inches from your mouth to avoid hearing your own breathing. • Eliminate extraneous noise. Turn off your phone, alarms, and ringers. • Avoid verbal pauses and eliminate verbal tags. • When speaking into a microphone, you may find it difficult to speak with the conviction or passion necessary to convey your message. Imagine you are speaking to a live audience, and speak with confidence. • You can use two narrators to add variety to the presentation and keep viewers’ attention. Alternating between a male and female voice is often very effective. 13 Engaging learners through interactive presentations: Using Adobe Presenter (Breeze) Educational Technology Team email: [email protected] Centre for Development of Teaching and Learning Adding narrations to the PowerPoint presentation 1. Put your Headsets on and adjust for a comfortable fit. 2. Positioning your microphone correctly is important. The microphone should be 1-2 inches from the corner of your mouth. With your presentation open in PowerPoint, select Record from the Audio tab of the Adobe Presenter menu. 3. Before beginning audio recording, Adobe Presenter will automatically check that the input level for the microphone is set. Read the statement, “I am setting my microphone recording level….” 4. Once the icon turns green, click OK. 5. The Record Audio dialog box appears. Before beginning the audio recording, be sure that the correct slide in PowerPoint is open. Slide 1 should be visible. Record narration Show script Save narration Move to the next slide Display bigger text 6. To show the script for each slide in the window. Click Show Script. The notes dialog box appears. All lecture notes are imported for each slide. This makes it easier to record. Adjust the script size, so that it is convenient for you to read. 7. Click on the Record (Red) button to begin recording. Record the first slide. 8. When finished reading the script for this slide click the Stop Recording button. 9. Using the forward (<) and backward (>) buttons to proceed to the next slide or move back to the previous slide. 14 Engaging learners through interactive presentations: Using Adobe Presenter (Breeze) Educational Technology Team email: [email protected] Centre for Development of Teaching and Learning 10. Repeat steps 8-9 for the other slides of your presentation. Once you have completed the recording for all your slides, press the OK button. You can review your audio recordings by clicking on the Play button. 11. You can review or do simple edits of the audio recording by selecting Edit Audio from the Audio tab of the Adobe Presenter menu. 12. Set the cursor to the beginning and click the Play button. 13. This option displays the audio content for each slide and allows for simple edits throughout the presentation. It allows you to record over audio, delete sections, and even change the audio timing from slide to slide. 14. Once you have listened and have finalised your narration, click Save and then close the Edit Audio dialog box. Although you can add audio to slides in PowerPoint, the best way is to use the audio recording and importing features on the Adobe Presenter menu to add narration to your presentations. Editing sound is like editing text. Listen carefully to your recording, delete any extraneous sounds, and then use the options available in your software to polish the sound. Add any music or sound effects you require, but make sure to save your audio track in the correct format (.mp3 or .wav). Importing Video and Flash files Movies or videos can be used to teach concepts. The visual context in movies aids in understanding and boosts listening, and students just simply love them. Flash movies potentially give the instructor a means of presenting graphical information that still images cannot duplicate. These movies then help students develop understandings of ideas through the dynamic display. Importing Video files Video files added to a presentation can appear directly on a slide or in the viewer sidebar. Slide video is easily integrated into existing slides or you can create a slide containing only the video file. Adding a video file as sidebar video is especially useful if you have video of a speaker. Video added to the sidebar appears in the location used for presenter photographs. Only one video can be added to one slide area. 1. Select the slide to which you want to add the video file. 2. Select Video 15 from the Insert tab of the Adobe Presenter menu Engaging learners through interactive presentations: Using Adobe Presenter (Breeze) Educational Technology Team email: [email protected] Centre for Development of Teaching and Learning 3. Using the Import Video dialog box, select the video file you want to add to the slide. 4. Under Import Options, select a Quality option from the menu. 5. You could also change the slide on which the video is imported by using the Import On menu to select a different slide. 6. Choose between Slide Video and Sidebar Video. 7. You can preview the video directly in the Import Video dialog box by selecting Preview option. 8. Finally click on Open to embed the video file. You can edit the embedded video clip using the Insert > Video > Edit. This Editing mode allows you: - to trim the start and end of the clip; - change the effects like Fade-in or Fade-out, - Speed, and - the time of starting the video 16 Engaging learners through interactive presentations: Using Adobe Presenter (Breeze) Educational Technology Team email: [email protected] Centre for Development of Teaching and Learning Inserting Flash files A Flash (SWF) file is a compiled, view-only file that delivers graphics and animation over the Internet. 1. Choose the Insert Swf option from the Adobe Presenter menu and select Insert Swf File. 2. Using the Insert Flash (swf) dialog box, select the flash file you want to add to the slide. 3. Under Import Options, use the drop-down menu next to Import On to choose the slide where you would want to add the flash file. 4. You can choose either Slide animation or Sidebar animation. 5. To preview the SWF directly in the Insert Flash (SWF) dialog box, select Preview. 6. Finally, click Open to add the SWF file to the slide. Note: You can use the Slide Manager to check if the video and flash files are added correctly to the necessary slides. 17 Engaging learners through interactive presentations: Using Adobe Presenter (Breeze) Educational Technology Team email: [email protected] Centre for Development of Teaching and Learning Building interactivity into a presentation Interactions need to be consciously planed in PowerPoint. When designing a presentation that requires user interaction, such as a learning scenario with branching: • Start with a detailed storyboard. • Stimulate open discussion by inserting slides that ask rhetorical or thought-provoking questions. • Make use of discussion questions to introduce new information. • Ask your students to discuss their thoughts or opinions on a subject first, and then deliver your presentation slides to provide answers or stimulate further discussion. To keep users engaged, pop quizzes can be included at logical transitions between concepts, lesson, or topics. Make the questions relevant to the information being presented, and be sure the correct answers can be referenced in the slides that precede the quiz. Adding Quizzes When creating effective e-learning materials, you can customise your presentation with a combination of quizzes and questions. You can use the branching concept to allow users to take a particular path through a quiz or survey as determined by their responses to questions. For example, you can create branches based on correct answers, incorrect answers, or options selected by the user. You can use the Quiz Manager to create a single quiz for a presentation or multiple quizzes in a single presentation and add questions to the quiz (es). You can add graded questions, survey questions, or a combination of both to each quiz. You could also use question groups to ensure two people taking the same quiz do not see the questions in the same order. The Quiz Manager lets you organize all of the quizzes and questions in a presentation. You can design eight types of questions in Adobe Presenter: multiple-choice, short-answer, matching, true-or-false, rating scale (Likert), fill-in-the-blank, hot spot and sequences. You can grade the questions or use them in surveys to gather information. If you are creating a new presentation, you must save the presentation before you can add a quiz. 1. From the Quiz tab of the Adobe Presenter menu, choose Manage. 2. When the Quiz Manager is opened for the first time, a default quiz is displayed. You can use the default quiz or add more quizzes as necessary. 3. Click on Add Quiz to create a new quiz. 18 Engaging learners through interactive presentations: Using Adobe Presenter (Breeze) Educational Technology Team email: [email protected] Centre for Development of Teaching and Learning 4. In the New Quiz dialog box, enter a new name in the Name text box. From the pop-up menu next to Required, select an option to determine if users must take or pass the quiz. You could also finalise on your other setting at this dialog box. Options for Required Other Settings 1. Optional. The learner can attempt the quiz, but is not mandatory. 2. Required. The learner is required to at least attempt the quiz. A quiz attempt is defined as answering at least one question in the quiz. 3. Pass Required. The learner must pass this quiz to continue. If you select this option, all navigation to any slide past the end of the quiz is prohibited until the learner achieves a passing score. 4. Answer All. The learner must answer every question. The questions must be answered in order and no questions can be skipped. Select the options you want to incorporate into the quiz like the following: • Allowing for backward movement when attempting the quiz. • Allowing users to review the quiz and is purely informational. • Including an “Instructions” Slide containing information for users about how to take the quiz. • Showing the score at the end of a quiz. • Showing the questions in the outline when users see the presentation in the Presenter viewer. • Shuffling questions to change the order of questions each time the quiz is displayed. • Shuffling answers to randomly change the order in which possible answers are listed in the quiz. When selecting an option, consider how the quiz fits in with your e-learning strategy for the presentation. 19 Engaging learners through interactive presentations: Using Adobe Presenter (Breeze) Educational Technology Team email: [email protected] Centre for Development of Teaching and Learning 6. Using the Pass or Fail Options tab, you can specify a passing score either as a percentage or a number of correct answers. You could also set the action that has to take place when users receive a passing grade or a failing grade. Then, click on OK. 7. Now you are ready to key in your quiz questions. You can add any of the six different types of questions to presentations – Multiple choice questions (MCQs), True/False questions, Fill-in-theblank questions, short answer questions, matching questions, Hotspot questions, Sequence questions, or a rating scale (likert) questions. Each type of question contains different options. 8. You can choose to create a graded question or a survey question depending on whether you would like your quiz to be graded or not. 9. The quiz is generally generated after the selected slide in your presentation. Here are a few tricks and tips to try when adding quizzes to your presentation: 1. Experiment with branching to customize presentations for different types of users. 2. Try customizing feedback messages to accurately communicate with presentation users. 3. Use the shuffle question and shuffle answer options to show users different versions of the same information. 4. You can write custom pass and fail messages, design the slide using background colors, and choose how to display the score. 5. Consider adding custom audio feedback based on how users answer questions. You can select different audio for a correct answer and an incorrect answer. 6. Use the Appearance tab in the Quiz Manager to change the text formatting of quiz questions after the entire quiz is generated. 7. If you have quizzes in one presentation that would be appropriate for another presentation, import the quiz to save time. Note: Always use the Quiz Manager to create/edit questions • Do not copy a quiz slide in the left pane and then paste it to create a “new” quiz slide. This will result in a duplication of the QuestionID and will mess up. • If a change is made by editing the slide contents, make sure you open the Quiz Manager once, before publishing the presentation to validate the change. 20 Engaging learners through interactive presentations: Using Adobe Presenter (Breeze) Educational Technology Team email: [email protected] Centre for Development of Teaching and Learning Designing your presentations An easy way to design how your presentations appear is by the use of themes that is bundled with Adobe Presenter. Themes allow you to add static images, colors, and sound to create dynamic and interactive presentations. The same theme can be re-used for all the presentations that you create or you can design your own customised new themes for each new presentation. Working with themes Adobe Presenter gives you many options for customizing colours, tabs, functionality, graphics, font style, and other design elements of a theme. 1. From the Adobe Presenter menu, choose Theme from the Theme tab. 2. The default theme assigned to presentations is Sage under the My Current Theme. 3. From the Themes section, you can choose your preferred Theme from the drop-down menu. The preview window displays the new theme. 4. The Theme Editor dialog box outlines a multitude of settings that you can change. The useful thing about this window is that your changes appear in the representation in the middle of the screen, so you can start to see how your presentation is going to look. 21 Engaging learners through interactive presentations: Using Adobe Presenter (Breeze) Educational Technology Team email: [email protected] Centre for Development of Teaching and Learning 5. One of the first things you might like to do is save one of the themes as your own theme template using the Save as… option, which you can then customise and re-use. 6. On the right hand side of the theme editor window, there are various options that you can switch on or off using the three sections available: • Customize: To set the type of display(e.g., full-screen) • Presenter Info: Helps you decide on whether to display a photo, contact, Bio, etc. • Panes: This would enable you to display the Outline, Thumbnails or Notes as the default setting and on how you want the default layout setting to be like. 7. At the bottom of this window are options related to colours, text labels, background images and fonts for the surrounding area of the presentation. 8. Change the theme options as desired and click OK to close the Theme Editor. Managing your slides A single presenter can be assigned to all slides in a presentation, or different presenters can be assigned to individual slides. By default, a single presenter is assigned to all slides. To change to a different presenter: 1. From the Tools Tab of the Adobe Presenter menu, choose Slide Manager. 2. From the Presented By: drop-down menu, choose the name of another presenter for that particular slide. 22 Engaging learners through interactive presentations: Using Adobe Presenter (Breeze) Educational Technology Team email: [email protected] Centre for Development of Teaching and Learning Publishing your presentation Publishing a presentation to the Adobe Presenter server will enable you to view your presentation online. But it is always a good idea to preview your presentation before publishing to the server. 1. To preview, select Preview from the Presentation tab of the Adobe Presenter menu. 2. To publish, select Publish from the Presentation tab of the Adobe Presenter menu. 3. You can choose to publish locally to a folder on your computer (either as a CD package or a .zip archive), locally as a PDF file or directly to the Breeze server. 4. To upload and save the presentation directly to the Server, use the Adobe Connect tab in the Publish Presentation Dialog box. In the Output options, uncheck the Upload Source presentation with assets (as this will increase the time needed to upload the presentation) To publish presentations to the Adobe Presenter server, you must have an Adobe Presenter user account. 5. Select a format that you want and then click on Publish. Browser Tablet Both Do not select this option 6. Complete the Content Information including a Proper Title, a preferred URL and a brief summary of what the presentation is about. 7. Use the Set Permissions screen to make the presentation be available to the public by using the Customize button and choosing Yes for the Allow Public Viewing option and then select the Next button. 8. This will automatically upload the presentation file and a window with the information on the URL for viewing will be displayed. Click on the link to view your presentation. 23 Engaging learners through interactive presentations: Using Adobe Presenter (Breeze) Educational Technology Team email: [email protected] Centre for Development of Teaching and Learning You can use Chrome browser or download Adobe Presenter Viewer app to view it on iPad Distributing your presentation Once your presentation has been uploaded to the Breeze server, you can view your presentation using the https://breeze.nus.edu.sg. Choose Content and then select My Content. The content list will have the list of presentations that has been uploaded by you. To get the content information for the uploaded presentation, click on the name of the presentation. This will display the information related to the presentation. This will have the information on the URL needed to view the presentation. 24 Engaging learners through interactive presentations: Using Adobe Presenter (Breeze) Educational Technology Team email: [email protected] Centre for Development of Teaching and Learning You can choose the Reports section to view the average scores achieved by your students on the quizzes included in the presentations. Adobe Presenter presentation can be distributed in several ways through: • Email • IVLE • Course website • Module Blogs • CD-ROM Distribution through Email An easy way to distribute a presentation to an audience is by sending the web address (URL) of the presentation in an email message. This method is probably best used for occasional use of presentations and when having more permanent access is not important. This can be easily achieved by using the Email Link found on the content information for each presentation. You can also send it your class distribution list. Usually your class distribution list would have an address like dl.class.coursecode. Distribution using the Web 25 Engaging learners through interactive presentations: Using Adobe Presenter (Breeze) Educational Technology Team email: [email protected] Centre for Development of Teaching and Learning This can be done either through your course website (popularly known as the K drive) or using your module blogs. On your module page, you can create a link to each presentation. The URL can be got from URL for Viewing section of the content Information. For example, an URL would like the following: Distribution through IVLE You can use the Weblink option in the IVLE module to create a new weblink to each of your presentations. Distribution on CDs You can also distribute the presentations in CDs after you have compiled and completed your entire course. 26 Engaging learners through interactive presentations: Using Adobe Presenter (Breeze) Educational Technology Team email: [email protected] Centre for Development of Teaching and Learning Best practices when using Adobe Presenter Some recommendations to follow when creating e-learning presentations using Adobe Presenter: • Plan your content. When you start preparing your e-learning presentation, keep in mind your topic, goals, objectives, flow of material and your audience. Organise your ideas and key points, decide on the structure and content first, before adding colour, text, audio, video or other visual materials. Speaking into a microphone can be more difficult than giving a presentation to a live audience. To ensure a smooth delivery that covers all of your important points, prepare a written script for the entire presentation before recording audio. If you have slide notes written in PowerPoint, you can easily import them into Presenter to use as a script or as the basis of a script. • Limit the text to a few phrases and not sentences. If you have too many words on the slide, your students would spend too much time reading and will not pay attention to your narration. Remember that they are meant to be cues for your lessons. Reading off entire slides of text will not make you an effective presenter. Visuals when used appropriately usually provide more lively representations of content. • Start with an introduction. Use your first slide to introduce yourself. Provide an overview of the topic, structure and scope of your presentation. Have a photograph or a video of yourself on the first slide to establish the teacher-student connection. Always create slide titles to give users easy access to any slide. • Don’t read, talk! Reading off entire slides of text will not make you an effective presenter. Always say more than you show. It is extremely boring to listen to someone reading text on the slide, when they could actually read it at a much faster pace. Once your students recognise that you are just reading your slides, they will tune you out. Use images or short phrases as a starting point and expand on the visual message with what you are saying. Add animations to create powerful, animated, multimedia presentation. Animations add impact to your message and enhance your presentations. Pretend you are actually delivering a lecture to a class by not just reading your script. • Engage the learner. Ask questions and pause for the learner to think about the answer. Give reallife / practical examples, show appropriate videos or tell a relevant story. When you would like to emphasis on an important point make a pause for a few seconds. Make use of the quizzes to build interactivity and engagement to your learners. Using such assessment tasks will also help you in identifying when students have difficulty with concepts or topics. • Keep your presentation short. Create presentations that are of a manageable size. A single online presentation typically corresponds to a single topic in a module or course. Only take 1-2 minutes per slide. If you have more to say, break the slide up into more than one slide. Usually an elearning lesson can contain 20 slides that will result in a 15–20 minute session for users. Always design your online presentation based on the bandwidth capabilities of your audience. 27 Engaging learners through interactive presentations: Using Adobe Presenter (Breeze) Educational Technology Team email: [email protected] Centre for Development of Teaching and Learning References Technical Guides CIT Breeze DIY Courseware gives you a brief introduction to the Adobe presenter available at NUS. o http://www.cit.nus.edu.sg/breeze-diy-courseware/ Adobe Presenter User Guide https://helpx.adobe.com/pdf/presenter_reference.pdf Adobe Presenter Resources: A quick start guide o http://www.adobe.com/resources/acrobatconnect/presenter/ Adobe Presenter Self-learning Tutorial o https://admin.adobe.acrobat.com/_a227210/getstartedpresenter/ Readings 1. Allan M Jones. (2003). The use and abuse of PowerPoint in Teaching and Learning in the Life Sciences: A Personal Overview. Life Sciences Teaching Unit, University of Dundee, UK. Retrieved July 10, 2012, from http://bio.ltsn.ac.uk/journal/vol2/beej-2-3.pdf. 2. Atkinson, Cliff. (2008). Beyond Bullet Points: Using Microsoft Office PowerPoint 2007 to create presentations that inform, motivate, and inspire. Redmond, Washington: Microsoft Press. 3. Atkinson, Cliff. (2008). Beyond Bullet Points: Part I, II and III. Retrieved July 10, 2012, http://office.microsoft.com/en-us/powerpoint/HA011872851033.aspx. 4. Craig, Russell & Amernic, Joel. (2006). PowerPoint Presentation Technology and the Dynamics of Teaching. Innovative Higher Education, 31(3), 147-160(14), Springer. 5. Matt Bower & Debbie Richards (2005). Self-Paced Lectures. Macquarie University 6. Michelle Grabowski. (2010) Evaluation of Adobe® Presenter as a Teaching Tool. Journal of Extension [On-line], 48(2) Article 2TOT5. Available at: http://www.joe.org/joe/2010april/tt5.php 7. Quinn, A. (2007). Teaching a University Research Methods Course in the On-line Synchronous Classroom: An example using Macromedia's Breeze. TCEA Educational Technology Research Symposium, 1, 114-121. 8. Randah McKinnie (2008). Best Practices for Delivering Virtual Classroom Training. http://www.elearning.uq.edu.au/sites/wsa.www.elearning.uq.edu.au/files/uploads/files/tools/virt ual_classrooms/virtual-classroom-best-practices.pdf . 9. Shauna Schullo, Amy Hilbelink, Melissa Venable, and Ann E. Barron. (2007). Selecting a Virtual Classroom System: Elluminate Live vs. Macromedia Breeze (Adobe Acrobat Connect Professional), MERLOT Journal of Online Learning and Teaching, 3( 4). 10. Tutty, J. & Schroeder, B. (2007). New Opportunities for Learning: Using Macromedia Breeze in Online Teaching. In C. Crawford et al. (Eds.), Proceedings of Society for Information Technology and Teacher Education International Conference 2007, 523-525, Chesapeake, VA: AACE. 28 Engaging learners through interactive presentations: Using Adobe Presenter (Breeze) Educational Technology Team email: [email protected] Centre for Development of Teaching and Learning