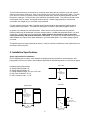
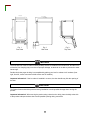
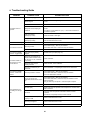
1
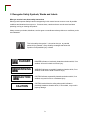
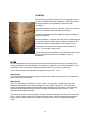
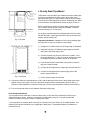
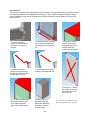
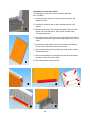
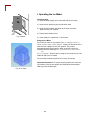
Aficionado /
Commercial Chef
Icemaker
User Manual
Read this manual carefully before using
your new Aficionado / Commercial Chef
ice maker. It is suggested that you keep
the manual in a safe place after reading
it for future reference.
C883/C887
C813/C814
• This product is designed for indoor use only.
• Appearance, design, color, and product parts
are subject to some changes without notice.
09.09 / V1.0
Table of Contents
1.
O ve r v i ew … … … … … … … … … … . . … … . . … … … … . … … … . … … … … … … … … 2
2.
Recognize Safety Symbols, Words and Labels ….……..…….….……...... 3
3.
Safety Precautions ……..………….….……….…………….…………… 4-5
4.
S e t - U p … … . … … … … … … . … … … … … . … . . . . . . . . ..……… …… ……… …… … 6-7
5.
Installation Specifications ………...…….…………………………… 7-9
6.
Gra vity Drain Pipe Model ………..…….……..……………………………… 10
7.
D r a i n P u m p M o d e l … … … … … … . . … … … … … . . … … … … … … … … … … … 11
8.
P r o d u c t I n s t a llatio n …............................................................ 12-15
9.
Operating the Ice Maker ……………………………………………… 16-17
10.
C leaning the Ice Maker … ……… …… ..…… .… ………… ……… …… .. 18-19
11.
M a i n t a i n i n g t h e I c e M a k e r … … … … . … . . … ……… …… ……… …… …… . 19
12.
Specifications ……..……….………………..…………………………….. 20
13.
T r o u b l e s h o o t i n g G uide …… …..…… ..…….… ……… …… ……… …… ….. 21
14.
Warranty ….………………….……..………….………………………………. 22
1
1. Overview
Thank you for purchasing the Aficionado C88 and Commercial Chef C81 Series Ice Maker. This product
is a built-in type of ice maker that may also be used for “free-standing” applications. Your ice maker is
designed for indoor usage, within your home, and should not be used for commercial purposes. The
Aficionado C88 AND Commercial Chef C81series ice maker produces transparent, clear ice of the
highest quality, at a rate of 70 lbs per day.
Proper installation of the ice maker is of the utmost importance. The unit should be installed by a qualified
technician or installer. A high quality water filter is mandatory (you need to purchase this separately), to
insure impurities are removed from the water, and to insure proper mechanical operation. Warranty is
honored only if a water filter is installed and properly maintained, because impurities in your drinking
water may also clog the ice maker system. This could result in unnecessary service calls not covered by
the warranty.
Before installing the ice maker, read your installation manual in full. It contains detailed instructions to be
observed during installation. If you read this manual carefully, you will be able to have the ice maker
installed safely and without any problems. Should you have any questions about its installation, please
contact your dealer.
Review the warranty information included in this manual. If service is needed, please call: (866) 327-5817.
This unit has a one year parts and labor guarantee, which includes in-home service.
Important Information! When designing and manufacturing the ice maker, safety matters. The
Aficionado C88 and Commercial Chef C81 is designed according to UL standards. The company bears
no responsibility or liability for products that are subsequently modified or installed with parts not supplied
or approved, or used incorrectly. The company may modify or improve the design at anytime.
Specifications, functions and design in this manual and on the website may be changed at any time
without prior notice.
2
2. Recognize Safety Symbols, Words and Labels
What you need to know about safety instructions
Warnings and Important Safety Instructions appearing in this manual are not meant to cover all possible
conditions and situations that may occur. Common sense, caution and care must be exercised when
operating, moving or cleaning this product.
Always contact your dealer, distributor, service agent or manufacturer about problems or conditions you do
not understand.
This is the safety alert symbol. It is used to alert you to potential
personal injury hazards. Obey all safety messages that follow this
symbol to avoid possible injury or death.
DANGER
DANGER indicates an imminently hazardous situation which, if not
avoided, will result in death or serious injury.
WARNING
WARNING indicates a potentially hazardous situation which, if not
avoided, could result in death or serious injury.
CAUTION
CAUTION indicates a potentially hazardous situation which, if not
avoided, may result in minor or moderate injury.
CAUTION
CAUTION used without the safety alert symbol indicates a
potentially hazardous situation which, if not avoided, may result in
property damage.
3
3. SAFETY
PRECAUTIONS
Read all of the instructions before using this appliance. When using this appliance, always
exercise basic safety precautions, including the following:
1) Use this appliance only for its intended purpose as described in this use and care guide.
2) This ice maker must be properly installed in accordance with the installation instructions before it is
used. See grounding instructions in the installation section.
3) Never unplug your ice maker by pulling on the power cord. Always grasp the plug firmly and pull
straight out from the outlet.
4) Repair or replace immediately, all electric service cords that have become frayed or otherwise
damaged. Do not use a cord that shows cracks or abrasion damage along its length, the plug, or the
connector end.
5) Before cleaning or before making any repairs, turn switch to off position. Refer to “Cleaning the Ice
Production System” on page 19 for more information.
Note: If for any reason this product requires service, we strongly recommend that a certified
technician performs the service.
6) If your old ice maker is not being used, we recommend that you remove the door. This will reduce
the possibility of danger to children.
7) Do not operate your ice maker in the presence of explosive fumes.
SAVE THESE INSTRUCTIONS
4
DANGER
Risk of child entrapment. Before you throw away your old ice maker,
take off the door. This will reduce the risk of danger to children.
Thank you for choosing our Aficionado /
Commercial chef product.
This easy-to-use manual will
guide you in getting the best use of your
ice maker.
Model number
Remember to record the model and serial
number. They are on a label in back of
the ice maker.
Date of purchase
Serial number
Staple your receipt to your manual. You will need it to obtain warranty service.
5
4. Set Up
After removing the packing materials, check the appearance of the
ice maker for possible defects or irregularities. Should the product
show any irregularity in its appearance, contact the dealer
immediately.
All packing materials (strings, box, Styrofoam, wood, etc.) should be
placed out of children’s reach and disposed of properly.
For safety, the product should be installed and used in accordance
with the User Manual.
Incorrect installation, or careless use of the product, may damage the
environment, humans, animals, and/or materials and property. The
manufacturer bears no responsibility for such damage or injury.
The automatic ice maker performs best at room temperature of
60°~75℉ and a supply of water at 50℉.
The ice maker should be installed in a controlled indoor environment,
but NOT near heat generators such as radiators, stoves, or
dishwashers.
Air Flow
The ice maker draws indoor air through the left part of the kick plate/grill using a fan, and expels hot air
through the right part of the kick plate/grill. Do not place any material in front of the kick plate/grill, as this
disrupts the air flow. This results in reduced performance and, in the worst case, malfunction.
The ice maker should be operated within a temperature range of 50℉ to 75℉.
Water Supply
The ice maker requires a continuous supply of drinking water at 20psi or higher pressure. The hydrostatic
pressure should not exceed 80psi.
Water Quality
There is no such thing as “perfectly pure” water. Water - even tap water - contains some impurities.
Rainwater absorbs impurities from the atmosphere or when it passes through soil. Some impurities
consist of solid particles called suspended solids and are filtered through micro filters. Some remaining
impurities cannot be filtered because they are chemically combined with water molecules. These
impurities are called dissolved solids.
The mineral content of ice produced by the ice maker is reduced compared to the water before conversion
into ice. Water containing a low level of impurities freezes rapidly. Impurities elevate the temperature of
water. Most impurities condensed in the water-tank of the ice maker form a hard precipitation called
“scale”.
6
This ice maker reduces the mineral level by circulating water during the ice production cycle (with excess
water removed via the outlet tube). Each cycle requires just over 20 ounces (0.64 quart) of water. For each
cycle, about 16 ounces (0.5 quart) is used in rinsing the water tank, with the remaining quantity removed
through the outlet pipe. In this process, some impurities unavoidably remain. They may accumulate on the
internal parts of the ice maker, forming abnormal ice pieces. Should a large quantity of mineral scale
accumulate, the lifespan of your ice maker may be reduced.
For best operation of the ice maker, impurities and minerals should be decomposed by washing with a
cleaning solution periodically. The method of cleaning the ice maker is described on pages 18 and 19.
In general, it is mandatory to use filtered water. Filters remove not only bad odors but also particles.
Dissolved solids may be treated with a reverse osmosis system, a condensed phosphate feeder, or a good
carbon filter. Neutral water is not recommended. Water softeners should not be used for the water
supply because they add minerals and soft ice may result. If you have any questions about the purity of
water, address your inquiry about water treatment to your Aficionado dealer, or to a water quality expert in
your area.
This product was thoroughly washed at the factory. However, check the cleanliness of the inside before use
and keep it clean during use.
5. Installation Specifications
Space requirements for installation
Prior to installing the ice maker, check whether the prepared opening dimensions, electrical power, and
piping position are correct. Refer to the installation specifications and drawings shown on the next few pages.
TOP VIEW
Prepared Opening Dimensions:
A) Rough Opening Depth: 24”
B) Rough Opening Width: 15”
C) Rough Opening Height: 34” min. to 35” max.
D) Min. Door Clearance: 15-1/2”
E) Min. Clearance at 90°: 17-1/8”
(A)
Rough Opening
Depth: 24”
TOP VIEW
FRONT VIEW
(C)
Rough Opening
Height: 34” min.
to 35” max.
90°
(B)
Rough Opening
Width: 15”
(E)
Min. Clearance
at 90°: 17-1/8”
7
(D)
Min. Door
Clearance: 15-1/2”
14.9"(378)
24.97"(634.2)
1.1"(27.8)
21.1"(538)
22.6"(575)
34.0"(863.3)
29.1"(740)
33.5"(850)
21.1"(538)
376
3.9"(100)
4.1"(105)
Fig. 1
Front View
1.0"(25.4)
10
Fig. 2
Side View
5°
Fig. 3
Top View
CAUTION
The front and rear of the ice maker must be perfectly leveled. If installed on an uneven floor, and the unit is
not leveled, ice clumping may occur due to improper drainage, as the drain is not able to process the water
fast enough.
Double check that proper leveling is accomplished by placing your level in at least 4 to 6 locations (front
right, front left, center front center middle center rear for instance).
Important Information! If the ice maker is installed in a corner, the door handle may limit the opening of
the door.
CAUTION
The finished bottom should be protected during installation to avoid possible damage when moving the
product.
Important Information! When moving the product using a hand truck or dolly, place the dolly at the side
of the product and tape the door shut to avoid possible opening during movement.
8
WARNING
Requirements for Power Supply
120 volt, 60Hz, dedicated 15-amp circuit breaker and electric power are required. A separate circuit is
required for grounding. The power cord of the product should be inserted into a suitable 3-prong groundingtype outlet.
Important Information! A Ground Fault Circuit Interrupter (GFCI) is not recommended because the
operation of the product may be stopped.
Important Information! The provisions of the National Electric Code as well as any local laws and
instructions should be observed when installing the product.
Do not use extension cords or 2-prong adapters. The product must be fully grounded, according to
local/state/national electrical codes .
Requirements for Plumbing
Plan the arrangement of water supply pipes. Connect a 1/4" diameter copper pipe as the source of cold water.
Install a shutoff valve between the tap water pipe and the ice maker so that the user can control the water flow.
Do not install the shutoff valve at the back of the product where it cannot be reached. Do not use a selfpiercing valve. An inline water filter (not supplied) is required to keep the warranty in effect.
The tap water pressure should be maintained at levels between 20psi and 80psi. If an electrical outlet is
available at the back of the ice maker, installation may be easier. A clock-type inverted receptacle is
recommended for the overlay model, so that after 3/4” wood is applied, the unit fits flush in the front. Electric
power, inlet water pipe, and drain pipeline installation should satisfy all provisions for local laws and
regulations. For tap water position, refer to the installation specifications and drawings on pages 10 and 11.
Important Information! The product is designed for built-in or free-standing use. However, it may be
necessary to slide the icemaker forward for service. For this reason, do not install any material at the front,
upper or lower end of the product which could obstruct the ice makers forward movement.
After installing the ice maker, place shims under the product as needed to keep it level.
Installation on a Slab
Draw water to the drain position using the optional built-in drain pump. The pump can raise water up to 8
feet in height. Capability to raise water may be affected by piping.
Important Information! Piping/plumbing lines should be carried out in accordance with all local laws and
regulations.
9
6. Gravity
Drain Pipe Model
S hut- O ff V alve
D rain Tub e
W ater Filter
24"(610)
Lo cate d rain
w ithin 2" D IA .
A rea 23" b ack fro m
fro nt o f unit
W ater Inlet Tub e
This product is a gravity drain pipe model that requires a drain pipe
to run from the exhaust hole at the back of the product to the
appropriate drain pipe. An optional drain pump kit can be installed
to raise water to a drainage point such as a neighboring sink. Refer
to the information and specifications shown on pages 10 and 11.
Before connecting the drain tube and the water supply pipe with
the ice maker, the house piping should be installed. The drain
tube should slope 1/4“ for every foot.
0.16(4)
0.16(4)
M IN . 15"(381)
Fig. 4 Top View
An air gap is required between the drainage tube of the ice maker
and the drain pipe. A stand pipe fitted with a trap at the lower part
may be used as a drain pipe.
Important Information! Installation of an incorrect drainage pipe
will cause the ice in the ice container to melt rapidly.
1) Arrange the ice maker at the front of the opening of installation.
2) Install the inlet pipe (1/4" diameter copper pipe) on the wall
and connect the water supply valve.
M IN . 34"(863.6)
3) Connect the drain pipe from the wall to the ice maker. If the
horizontal distance is 5' (1.5m) or longer, the drain pipe should
be arranged by drilling the wall to the rear of the product.
4) If the electrical outlet is at the back of the product, insert the
plug in the electrical outlet.
5) Connect the inlet pipe with the copper pipe using the flare nut.
6) Connect the inlet pipe with the water-supply valve of the
product using the flare nut.
Fig. 5 Front View
7) Cut the required length of drain tube.
8) Connect the drain tube (with a diameter of 5/8“) with the drain pipe at the back of the product and fix them
together using a hose clamp. The drain tube should be placed at the upside passing the drain fitting. If
required for easy installation, immerse the drain hose in warm water just before connection with the fitting.
9) Turn on the tap and check for any leakage. Adjust the leveling legs.
Drain Pump Kit (Optional)
You may order the ice maker with or without a drain pump. In the case of the model with no drain pump,
water is drained by gravity. However, it is possible to install a drain pump kit on the gravity drain pipe
model if you wish to convert the model to a drain pump model.
You may obtain the necessary drain accessory for conversion from your dealer, for an additional $399. Your
dealer will provide all information to you regarding the drain pump. A detailed description of installation is
included in the kit.
10
7. Drain
Pump Model
S hut- O ff Valve
W ater Inlet Tub e
1) Arrange the ice maker at the front of the opening of
installation.
2) Install the inlet pipe (copper pipe with a diameter of
1/4”) on the wall and connect the water supply valve.
3) Connect the drain pipe from the wall to the ice maker.
24"(610)
W ater Filter
D rain Tub e
A ir G ap D evice
Important Information! An air gap may be required
between the drain tube of the ice maker and the container
of the drain pipe under the provision of local laws and
regulations. Refer to Fig. 6.
0.16(4)
5) If the electrical outlet is at the back of the product, insert
the plug into the electrical outlet.
0.16(4)
M IN . 15"(381)
Fig. 6 Top View
6) Install the product so that the front of the product is
facing forwards.
7) Use the inlet pipe after cutting the required length.
M IN . 34"(863.6)
8) Connect the inlet pipe with the water-supply valve of the
product using the flare nut.
9) Cut the required length of drain tube.
10) Connect the drain tube (with a diameter of 5/8“) with the
drain pipe at the back of the product and fix them
together using a hose clamp. If required for easy
installation, immerse the drain hose in warm water just
before connection with the fitting.
11) Turn on the tap and check where there is any leakage.
12) Pour 3 quarters of the water into the ice container. The
drain pump should work and pump the water upwards.
Check whether the drain pump works or not. Check for
any leakage.
Fig. 7 Front View
13) Turn the switch to the “ICE" position. The compressor will start working in 3-5 minutes.
14) Pour 3 quarters of water into the ice container and block the drain tube while the drain pump is operating. At
this time, check whether the operation has stopped and that the drain pump works continuously.
15) Adjust the leveling legs.
Important Information! Plumbing should be carried out in accordance with all the provisions laid out under
the local laws and regulations.
11
8. Product Installation
Important Information! Turn on the tap and check for
any leakage at the connection.
The user does not need to fill the container with water. The first
batch of ice should be discarded. Ice production requires 1-2
hours.
Leveling Legs
Turn the legs counterclockwise to raise the product, or
clockwise to lower it.
CAUTION
Do not cover the kick plate/grill parts.
Fig. 8 Air Hose Joint
The ice maker is ventilated through the front ventilation panel.
A decorative door panel may be installed but the ventilation
holes of the kick plate/grill must not be blocked.
The kick plate/grill may be painted in another color. Follow the
simplified steps outlined below.
1) Smooth the painted surface using fine sandpaper.
2) Scrub the surface until it is clean and dry using rubbing
alcohol.
3) Use a machinery or industrial oil base or gloss enamel paint.
12
Door Reversal
The direction in which the door swings opens may be changed. Hinges are attached to the right-hand side
of the door when the product is shipped from the factory. The ice maker is designed so that the hinges
may be installed on either side. If the hinges are moved to the holes on the left-hand side, the door will
open to the left.
① Loosen the anchor
screws on the lower hinge
of the door and remove
the door.
② Remove the anchor screws
on the lower hinge and insert
the hinge into the hole on the
left.
④ Remove the anchor
screws on the upper hinge
bracket and place the hinge
into the hole on the left.
⑤ Put the upper cover hinge
bracket in the right-hand hole.
③ Loosen the anchor
screws on the upper
hinge and upper cover
hinge bracket and
remove the upper panel.
⑥ Move the “L” shaped
door hinges of the upper
and lower parts of the
door to the left.
⑦ Turn the separated upper
panel inside out and put it
on the upper hinge and
upper cover hinge bracket.
⑧ Place the door on
the upper hinge and
lower hinge and fasten
the anchor screws of
the lower hinge.
13
⑨ Check the movement of the
door by opening and closing it.
Installation of Custom Door Panels
This description concerns the model on which a decorative
door is installed.
① Loosen the anchor screws on the lower hinge of the door and
separate the door.
② Arrange the decorative door so that it matches the door of the
product.
①
③ Mark the center point of the top hinge and lower hinge holes that
extend over the overlay panel. Then drill 3/8” diameter holes
1/4” deep at that point.
④ Remove the overlay panel from the door and tighten the two M4×8
truss head screws, securing the sheet metal bracket to the overlay
panel.
⑤ Separate the inside gasket of the door and fasten it by inserting
the four screws into the four holes at the corners.
⑥ Fix the supplied door anchor bracket at the lower ends of the door
and decorative door.
⑦ Affix the completed door on the upper and lower hinge and fasten
the anchor screws of the lower hinge.
⑧ Check the operation and door swing.
②
③
④
⑦
⑥
14
⑤
Installation Checklist
Important Information! The installer should check whether any installation part has been omitted and follow
the check list below to ensure safe and proper installation.
If you have any questions or problems regarding installation, address your queries to the distributor or dealer.
■
Does the ice maker work properly?
If the ice maker does not work, check whether the plug has been inserted properly.
■
Did you remove all the packing materials and tapes from the inside of the ice maker?
■
Did you follow all instructions during installation?
■
Did you level the unit? Proper leveling is key to prevent ice from clumping, because if improperly leveled,
the water will not drain and it will cause ice cubes in the bin to adhere to each other.
■
Is the front of the kick plate/grill adequately ventilated? The grill must have zero blockage for the icemaker
to function properly. No pet hair, no dust. Vacuum the grill periodically.
■
Does the owner sufficiently understand the operation of the ice maker?
WARNING
Used ice makers should be safely stored or disposed of properly. Ensure that the product’s door has been
removed or permanently closed. If children can enter the icemaker, a serious accident may occur.
15
9. Operating
the Ice Maker
Initial Operation
1) Open the water supply valve connected with the ice maker.
2) Insert the ice maker plug into the electrical outlet.
3) Open the door and turn the switch at the lower end of the
product to the “ICE” position.”
4) Discard the first batch of ice.
Fig. 9 Switch
5) Good-quality ice is produced 1-2 hours later.
Using the Ice Maker
Use of the ice maker is very simple. Water is supplied to the ice
maker and the water is also drained. Simply turn the switch at the
lower end of the product to the “ICE” position. The product
automatically starts ice production, which continues until the ice
container has been filled with ice. The produced ice drops down
into
the ice container. Remove the ice using the ice scoop found on the
inside left wall of the ice maker.
The ice maker produces 24 pieces of ice every 30 minutes.
Important Information! Do not put anything other than ice into the
ice container. Wine or beer bottles are unsanitary and a detached
label may block the drain pipe.
Fig. 10 Ice Cube
16
Ice
The ice has a “top hat” shape (refer to Figure 10). Newly produced ice is clear and transparent. The inside
of the ice is sometimes cracked; however, such cracks commonly occur in the production process and
disappear with time. Ice stored in the container for a long time may gather frost on the outside and look
cloudy. This is normal. Once water is poured on the ice, the frost will disappear.
Ice Container
The product continues making ice until the level of ice reaches the temperature sensing tube (right side). It
then ceases production. The model with a drain pump drains away melted ice when the ice maker is turned
off. The pump works for only several seconds.
Operation Time
It takes about 20-35 minutes to produce a set of 24 ice cubes. The length of one cycle of the ice maker (ice
production and ice removal) differs depending upon the cleanliness of the ice maker, the surrounding
temperature, and the temperature of the water supplied to the ice maker. It takes about 10-12 hours to fill
the empty ice container with ice.
Ice Production
The ice production process largely consists of two cycles – ice production and ice removal. 24 ice cubes are
produced with each cycle of ice production and ice removal. When water is sprayed onto the surface of the
frozen ice-forming mold, the ice production cycle starts. When ice is removed and water is supplied to the
ice maker, the ice removal cycle begins again.
Ice Removal Cycle
The compressor works during the progression of the ice removal cycle, but the pump motor and fan motor
will stop. The hot gas valve and water supply valve turn on. When the two valves are opened and the frozen
surfaces are heated, ice drops down into the container. Then the ice removal cycle is stopped and the ice
production cycle starts again automatically.
How Ice is Produced
The ice maker draws water from the fixed water source that feeds into the water container. When water is
sprayed onto the surface of the ice-forming mold, the water not containing mineral impurities freezes and
attaches to the ice-forming mold. The water containing impurities drops down into the water container. As
the ice production cycle progresses, the mineral impurity level in the water container rises. During the ice
removal cycle, water is fed into the ice maker, thus diluting the water in the container and washing a portion
of the concentrated minerals out through the drain pipe.
17
10. Cleaning
the Ice Maker
All the exterior parts, door, ice container, condenser, water circulation parts, and ice scoop of the product
should be kept clean. The ice maker should be cleaned periodically. Keeping the ice maker clean extends
the lifespan of the product. Regular cleaning of the entire ice maker should be performed at least once a year.
The frequency of cleaning the ice-production system should be increased depending upon the water quality;
and increased further still if the user has carpets or keeps a pet in the vicinity of the product (due to pet hair).
Good water filtration, which is required to qualify for warranty coverage, helps keep the icemaker clean.
Cleaning the Exterior
If the surface of the door and handle becomes stained, clean at once. If the door and/or gasket have spots on
their surface, remove the spots using soap and warm water. Use non-abrasive cloths or pads. In the case of
a stainless steel exterior, use a soft and non-abrasive stainless steel washing agent and a soft lint-free cloth.
WARNING
When performing maintenance work or cleaning, turn off the power switch or circuit breaker on the ice maker.
Cleaning the Ice Container
The ice container should also be cleaned regularly. Mix 1 ounce of household bleaching agent with 2 gallons
of warm water at 95℉-115℉ (35-45℃) for use as a cleansing fluid. Moisten a clean cloth with the cleansing
fluid, scrub the inside of the ice container, and pour a small quantity of the fluid into the drain pipe. Then dry
the interior.
Cleaning the Condenser
If the condenser is not cleaned regularly, the temperature may drop or the machine may experience
technical problems or sustain damage.
The condenser should be cleaned 2-3 times a year to remove any lint that has accumulated on the condenser.
When cleaning the condenser, remove the front lower panel and the kick plate/grill using a screw driver. Then,
remove any dust and lint from the condenser using a soft bristle brush. Using a vacuum cleaner to remove
the dust is recommended for easier cleaning.
CAUTION
Important Information! To avoid possible bending of the condenser fins, clean the condenser in the
direction of the fins (up and down).
18
Cleaning the Ice-Production System
1) Open the door and turn off the switch at the lower right front.
2) Remove all the ice and dispose of it or store it in a freezer.
3) Pour 4 ounces of a washing agent (liquid dishwashing detergent) into the water container of the ice maker.
4) Turn the switch to the “WASH” position. The process of automatic wash (2 minutes) and water circulation
(4 minutes) will be repeated three times.
5) It may be necessary to repeat the above process 2-3 times (without adding additional detergent) to
thoroughly rinse the system.
6) Clean the ice container, ice curtain, slide grill, spray nozzle, nozzle frame, connective hose, ice scoop, and
the inside of the water container using a mixture of washing agent and water. Wipe dry. Regularly wash the
ice scoop. It may be washed together with other food containers. Just place it into the dishwasher
and use the sanitizing cycle.
7) Replace the ice removed in Step 2.
WARNING
The use of a washing agent may cause burns. In the event that a person drinks the washing agent, do not
allow that person to vomit. Have the person drink a large quantity of water or milk. Visit a physician at once. If
the skin is stained with a washing agent, wash it out thoroughly. Keep the washing agent out of the reach of
children.
11. Maintaining the Ice Maker
Shut Down Procedure for Storage in an Unheated Home.
1) Clean the ice-production system following the instructions detailed above.
2) Turn off the power.
3) Empty the water container. Remove the pump hose. The pump hose may be removed after removing the
back panel of the ice maker.
4) Separate the inlet pipe connected with the water supply valve.
5) Turn on the power and turn the switch to the “WASH” position to open the water supply valve and to
remove the water from the inlet pipe inside the ice maker.
6) In the case of the drain pump model, pour 1/2 gallon of RV anti-freeze mixture (propylene glycol) into the
ice container.
Important Information! Do not use an anti-freeze product intended for automobiles.
7) Turn off the ice maker and remove the plug from the electrical outlet.
When using the ice maker after an extended absence, re-connect the pump hose and other hoses. Repeat the
initial starting steps described on page 16.
19
12. Specifications
UNIT
C883, C887 / C883P,C887P/C813/C817.C813P/C817P
Rated Power
V
120
Frequency
Hz
60
Power Consumption
W
500
WxDxH (mm)
378 x 634.2 x 863.3 (including legs)
WxDxH (inch)
14.9” x 24.97” x 34.0” (including legs)
kg
45.5 / 47.5
lb
100.3 / 104.7
kg
53.1 / 55.1
lb
117.1 / 121.5
Exterior
-
Top, Side Coating Panel and Front Durable Stainless Steel /
Coating Panel
Quantity of Ice
EA
24
kg/day
27.21
lb/day
60
kg
12
lb
26.5
Kcal/hr (at 7.2° C)
1080
Kcal/hr (at -23.3° C)
-
Refrigerant
-
R134a
Evaporator Design
-
Spray Type (Cube)
Condenser
-
Air-Cooled
Refrigerant Controlled By
-
MICOM Control
Water Supply Condition
°F
50° ~ 75°
Remark
-
Self-Container Type
Dimensions
Net Weight
Gross Weight
Maximum Production
Ice Storage Capacity
Compressor
20
13. Troubleshooting
PROBLEM
Ice maker does not
operate
Ice cubes are too large
Guide
POSSIBLE CAUSE
Ice maker is unplugged
Plug ice maker in.
Breaker tripped
Reset breaker - if it happens again, call an authorized service
center.
Switch turned to “OFF”
Turn switch to “ICE”.
Storage bin is full, keeping ice
maker off
Level of ice has reached sensor tube – it is normal for ice maker to
be off.
Ice maker in a room below 50℉(10℃) – room must be warmer for
ice maker to operate.
Drain pipe blocked
(Drain pump model)
Clean the interior of drain pipe.
Drain pump not operative
(Drain pump model)
Check the drain pump.
Call an authorized service center.
Cube size control is set too cold
Call an authorized service center.
Not enough water
Check water supply – filter may be restricted.
Check inlet water valve – inlet screen may be restricted.
Cube size control set too warm
Call an authorized service center.
Spray jets may be partially
clogged
Activate wash cycle (See page 19).
Storage bin should fill with ice
and ice maker should shut off in
12~16 hours – if not, condenser
may be dirty
Clean condenser.
Storage bin drain may be
partially restricted
Clean out drain, check installation.
Air flow to ice maker may be
obstructed
Check installation – kick plate/grill must be free of obstructions.
Not enough water in reservoir
Check water supply – filter may be restricted.
Check inlet water valve – inlet screen may be restricted.
Check for water leak in reservoir.
Ice may be stuck in the
evaporator and the unit is “frozen
up”
Check water supply – filter may be restricted.
Check inlet water valve – inlet screen may be restricted or valve
does not operate.
Hot gas valve may not operate – check and repair or replace.
Too much heat load
Inlet water valve leaks through, must be replaced.
No water spray
Water pump does not operate, must be replaced or check for water
leak in reservoir.
No airflow
Fan motor does not operate or fan blade is broken, must be
replaced.
Condenser is completely blocked, must be cleaned.
Compressor does not operate
properly or at all
Call an authorized service center.
Not enough refrigerant
Call an authorized service center.
Hot gas valve leaks through
Call an authorized service center.
Ice cubes are too small
Ice cubes are partially
formed – ragged sides
Ice maker makes ice,
but storage bin does
not fill with ice
Ice cubes are partially
formed – white at the
bottom
Unit operates but no
ice falling into storage
bin
POSSIBLE SOLUTION
21
14.
Limited Warranty
What is covered and for how long?
This warranty covers all defects in workmanship or
materials for a period of:
3. Customer service is provided by Aficionado.
To have your product serviced, please
contact customer service at 1-866-327-5817.
12 months labor (in-home service)
12 months parts
5 years sealed system
10 Years Parts Only Compressor
THIS WARRANTY COVERS APPLIANCES
WITHIN THE CONTINENTAL UNITED STATES,
PUERTO RICO AND CANADA. IT DOES NOT
COVER THE FOLLOWING:
Damages from improper installation.
Damages in shipping.
Defects other than manufacturing.
Damage from misuse, abuse, accident,
alteration, lack of proper care and
maintenance or incorrect current or
voltage.
Damage from other than household use.
Damage from service by other than an
authorized dealer or service center.
Decorative trims or replaceable light bulb.
Transportation and shipping.
Labor (after the initial 12 months).
The warranty commences on the date the item was
purchased. The original purchase receipt must be
presented to the authorized service center before
warranty repairs are rendered.
EXCEPTIONS: Commercial or Rental Use
Warranty
90 days labor (In Home Service)
90 days parts
No other warranty applies
What is covered.
1. The mechanical and electrical parts, which serve
as a functional, purpose of this appliance are
covered for a period of 12 months. This includes
all parts except finish, and trim.
2. The components of the sealed system
(e.g. hermetic compressor, condenser and
evaporator) are covered from manufacturing
defects for a period of 5 years from the date of
purchase. Any damages to such components
caused by mechanical abuse or improper handling
or shipping will not be covered.
THIS LIMITED WARRANTY IS GIVEN IN LIEU
OF ALL OTHER WARRANTIES, EXPRESSED
OR, INCLUDING THE WARRANTIES OF
MERCHANTABILITY AND FITNESS FOR A
PARTICULAR PURPOSE.
The remedy provided in this warranty is exclusive
and is granted in lieu of all other remedies.
This warranty does not cover incidental or
consequential damages, so the above limitations
may not apply to you. Some states do not allow
limitations on how long an implied warranty lasts,
so the above limitations may not apply to you.
What will be done?
1. We will repair or replace, at our discretion, any
mechanical or electrical part which proves to be
defective in normal usage during the warranty
period so specified.
2. There will be no charge to the purchaser for parts
and labor on any covered items during the initial
12 month period. Beyond this period, only parts
are covered in the remaining warranty. Labor is
not provided and must be paid by the customer.
This warranty gives you specific legal rights, and
you may have other rights, which vary, from state
to state.
Aficionado / Commercial Chef
New York, NY 10018
22