1
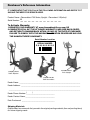
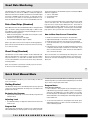
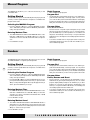
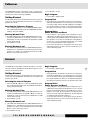
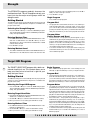
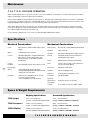
700U I 700R I 700EL
700 S E R I E S
Owner’s Manual & Assembly
Purchaser’s Reference Information
IT IS IMPERATIVE THAT YOU FILL IN THE FOLLOWING INFORMATION AND REFER TO IT
SHOULD THE NEED FOR SERVICE ARISE.
Product Name: Diamondback 700 Series (Upright / Recumbent / Elliptical)
Serial Number: R
___________
To Activate Warranty:
1.REGISTER YOUR WARRANTY AT www.diamondbackfitness.com OR
2.COMPLETELY FILL OUT THE ATTACHED WARRANTY CARD (SEE BACK COVER)
AND RETURN TO DIAMONDBACK WITHIN 15 DAYS OF THE DATE OF PURCHASE.
FAILURE TO COMPLY WITH THE WARRANTY ACTIVATION PROCEDURE MAY VOID
THE MANUFACTURER’S WARRANTY.
Serial Number Location
SERIAL NUMBER
R9900000000
Serial No. Sticker
Serial No. Sticker
700U Upright
700EL Elliptical
Serial No. Sticker
700R Recumbent
Dealer Name: _____________________________________________________________________
Dealer Address: ___________________________________________________________________
_________________________________________________________________________________
)
Dealer Phone Number: (________________________________
Dealer Contact Name:_________________________________
Date Purchased: _____________________________________
Shipping Materials
Diamondback recommends that you retain the original packing materials (box and packing items)
for future shipping needs.
IMPORTANT!
IMPORTANT!
IMPORTANT!
IMPORTANT!
Warranty Card must be completed and returned to Diamondback within 15
days of purchase. Failure to comply may void manufacturer’s warranty. Or,
you may register your product at www.diamondbackfitness.com.
✃
Your Name: ____________________________________________________________________________________________________
Address: ______________________________________________________________________________________________________
City: __________________________________________________
State: _____________________
Zip ___________________
Daytime Phone No.: ____________________________________
Evening Phone No.: ___________________________________
Dealer Store Name: _____________________________________________________________________________________________
Address: ______________________________________________________________________________________________________
City: __________________________________________________
State: _____________________
Model: ________________________________________________
Serial No.: __________________________________________
✁
Environment Unit Placed:
■ Home ■ Light Institutional, i.e. Hotel, Business
Purchase Date: ________________
✁
Zip ___________________
Mail Completed form to:
Diamondback Fitness - Warranty Card
300 Camarillo Ranch Road
Camarillo, California 93012
Diamondback Fitness
300 Camarillo Ranch Road
Camarillo, CA 93012
T 800-776-7642
F 805-388-5890
Diamondback Fitness is a division of Raleigh America, Inc.
Part Number:
22-07-910
7/31/2003
Table of Contents
•
•
•
•
•
•
•
•
•
•
•
•
•
Purchaser’s Reference Information .................. Inside Cover
Introduction ........................................................................ 2
Glossary of Terms .............................................................. 2
Safety Instructions and Warnings ...................................... 3
700U Assembly Drawing .................................................... 4
700U Assembly Instructions .............................................. 5
700R Assembly Drawing .................................................... 6
700R Assembly Instructions .............................................. 7
700EL Assembly Drawing .................................................. 8
700EL Assembly Instructions ............................................. 9
Operation & Comfort Tips ................................................ 10
Console Layout ................................................................ 11
Exercise Guidelines .......................................................... 12
Maximum Heart Rate & Training Zone ......................... 12
Quantity & Quality ........................................................ 12
• Heart Rate Monitoring ...................................................... 13
• 700 Series Programs
Quick Start ................................................................... 13
Manual .......................................................................... 14
Random ........................................................................ 14
Fatburner ...................................................................... 15
Interval .......................................................................... 15
Strength ........................................................................ 16
Target Heart Rate ......................................................... 16
• Domestic Warranty Information ....................................... 17
• Maintenance ..................................................................... 18
• Specifications ................................................................... 18
• Warranty Card ................................................... Back Cover
1
7 0 0 S E R I E S O W N E R’ S M A N U A L
I ntroduction
Good health is an exercise in common sense.
The basics of good health are really common sense.
Get a smart start on exercising.
1. Always stretch before your workout to loosen
Eat right, drink lots of water, get enough sleep, and
exercise at least 3-4 times a week. It may sound
muscles, and afterwards to cool down.
2. The first few minutes of your workout should be
simple, but to achieve the look and vitality most
health-conscious men and women want, takes more
devoted to warming up muscles before a vigorous
workout, and building your heart rate slowly.
discipline than most people are willing to endure.
Having fitness equipment in your home makes it
3. After your aerobic workout of about 24-32 minutes,
spend 10 minutes gradually reducing your heart
easier to achieve your goals. And having
Diamondback equipment gives you even more of an
rate with a lower resistance level.
edge. Because when your equipment is comfortable,
simple and effective, you exercise more. And that
Remember, start slow, with intensity low, until
you build endurance and strength. And always
means better results.
consult your physician before beginning any
exercise program.
A workout that works for you. To maintain
cardiovascular fitness, the American Heart
Association recommends that you exercise 3 to 4
days a week at 60%-75% of your maximum heart
rate. By monitoring your heart rate while you exercise,
you can get the most effective workout in the least
amount of time. It’s the easiest way of determining if
you’re exercising at a safe and effective level. Of
2
course, if you want to lose weight or reach a higher
level of athletic conditioning, working out 5 to 6 times
a week will help you achieve that goal faster.
Glossary of Terms
LED’s =
The lights on the face of the console.
Programs = Quick Start, Manual, Random, Fatburner, Interval, Strength, Target HR
Stage =
Represented by a vertical column of lights on the dot matrix screen.
Watts =
The amount of energy currently being expended.
Work =
The amount of energy expended during exercise.
7 0 0 S E R I E S O W N E R’ S M A N U A L
Safety Instructions & Warnings
The 700 series is built for optimum safety and is designed to meet
or exceed all domestic and international standards. However, certain precautions need to be followed when operating any exercise
equipment. BE SURE TO READ THE ENTIRE OWNER’S MANUAL
BEFORE OPERATING YOUR 700 SERIES UNIT.
THE NEXT STEP
The fitness experts at Diamondback believe that
C A U T I O N - FOR SAFE OPERATION
1. Keep your hands and feet away from all moving parts.
2. Before beginning any exercise program on the 700 series equipment, it is important to consult with your physician if you have any
of the following: History of heart disease, high blood pressure,
diabetes, chronic respiratory diseases, elevated cholesterol, or if
you smoke cigarettes or experience any other chronic diseases or
physical complaints.
3. If over the age of 35 or overweight, consult with your physician
before beginning an exercise program.
4. Pregnant women should consult with their physician before beginning an exercise program.
5. If you experience dizziness, nausea, chest pains or other abnormal symptoms during exercise, stop the exercise session immediately. Consult a physician before continuing.
6. Drink fluids if you exercise for twenty or more minutes on any 700
series unit.
IN WORKOUT
working out is not just for athletes but for all people.
TECHNOLOGY.
W A R N I N G - TO REDUCE RISK OF INJURY TO YOURSELF
OR OTHERS
1. To ensure proper functioning of your 700 series equipment, do
not install attachments or accessories not provided or recommended by Diamondback.
2. Keep your hands and feet away from all moving parts.
3. Before beginning any exercise program, consult your physician.
4. Always wear proper clothing and shoes when exercising on any
700 series unit.
5. User weight is not to exceed 250 pounds / 113 kilograms.
6. Keep children away from 700 series equipment. Hands and feet
may get caught in the pedals or other moving parts which could
result in serious injury. Keep your hands and feet away from all
moving parts.
7. Place the 700 series unit in an area that will meet minimum clearance requirements:
• Front, Back & Sides: 4 feet / 30cm
8. Keep 700 series equipment away from walls to allow proper ventilation. Air should be able to circulate freely around the units.
Keep all air openings free of dirt and dust. Never insert anything
into openings.
9. The 700 series is intended for indoor use in the home environment. It is not intended for outdoor use.
10. Drink fluids if you exercise for twenty or more minutes on your
700 unit.
11. Place your 700 series unit on a solid, level surface when in use.
12. Use the handlebars or handrails when getting on and off your
700 series unit.
13. Never operate the unit if it is damaged or broken. Contact your
local authorized Diamondback fitness dealer for service.
14. Make sure all components are fastened securely (i.e. seat post,
saddle, handlebars, pedals) at all times.
15. SAVE THIS OPERATING INSTRUCTIONS MANUAL.
7 0 0 S E R I E S O W N E R’ S M A N U A L
3
700U Assembly Drawing
4
7 0 0 S E R I E S O W N E R’ S M A N U A L
700U Assembly Instructions
Frame Assembly
1. Unscrew two M8 x 20mm bolts from the rear stabilizer bar.
2. Place rear stabilizer bar under rear main frame body and align
screw holes.
3. Insert and tighten these two M8 x 20mm screws using a 5mm
Allen wrench.
4. Install seatpost by sliding it into seatpost receptor.
Console Mast Assembly
1. Install console mast adapter/cover onto console mast.
2. Insert the main wire harness into the bottom opening of the console mast tube. Push the harness up the tube until the connector
of the harness appears in the opening at the top of the tube.
WIRING HARNESS INSTALLATION TIP: Straighten the loops
of the wiring harness so that it can slide smoothly into the
console mast. Hold the bottom of the console mast next to
the console mast receptor and point the top of the console
mast downward.
3. Install the console mast by sliding it into the console mast receptor while pulling the wiring harness. This will keep the slack
out of the harness so the wires will not get pinched and short
out. Insert and tighten two M8 x 40mm screws and washers using a 5mm Allen wrench. Be sure not to pinch wire harness while
tightening these two screws.
4. Snap console mast adapter/cover into top of sidecase.
Handlebar Assembly
1. Insert the hand pulse harness through the opening of the console mast and out the top of the console mounting plate.
2. Assemble the handlebar onto the mount and insert and tighten
the three M8 x 12mm screws using a 5mm Allen wrench. Be sure
not to pinch the hand pulse harness during this procedure as
this will damage the electronic console.
3. Insert and install handlebar cover onto handlebar and tighten
one M8 x 12mm screw on the bottom of the handlebar cover.
Saddle Assembly
1. Assemble saddle onto seatpost.
2. Tighten the affixing nut and washer using a 17mm open-end
wrench.
SADDLE ANGLE ADJUSTMENT HINT: Hold the rear of saddle
in the optimum comfort position and tighten the nut at the
same time.
Pedal Assembly
1. Use a 15mm open-end wrench to firmly affix the pedals to the
cranks.
2. The left and right pedals are different and are denoted as right or
left on the bottom of each pedal. NOTE: Left pedal threads counterclockwise.
3. Retighten cranks after approximately 10 hours of use.
Console Assembly
Waterbottle Assembly
1. Connect both plugs, from the main wiring harness and hand pulse
wiring harness, to the plug receptors on the backside of the console taking care to install correctly (see plug alignment marks).
WIRING HARNESS INSTALLATION HINT: Any excess wiring
must be carefully inserted (“stored”) back into the console
mast before installing the console onto the console mounting
plate.
2. Fasten the console to the console mounting plate with the four
M5 x 12mm screws and washers using a Phillips screwdriver.
1. Place the bottle holder on the console mast. Insert and tighten
the two M5 x 12mm screws using a screwdriver.
2. Snap the waterbottle into the bottle holder.
Transformer Assembly
1. Plug transformer into plug receptor located on the rear/bottom
side of main frame.
2. Plug the transformer into power outlet. NOTE: Be sure to use
right transformer for your power outlet, 110V or 220V.
7 0 0 S E R I E S O W N E R’ S M A N U A L
5
700R Assembly Drawing
Diagram 2
6
7 0 0 S E R I E S O W N E R’ S M A N U A L
700R Assembly Instructions
Rear Frame & Seat Assemblies
1. Unscrew two M8 x 20mm bolts from the rear stabilizer bar.
2. Remove the hand pulse harness which is stored in the seat track
receiving tube. Assemble seat frame to seat track. Cut off tywrap
and remove the seat lock retainer that holds the seat lock in the
locked position (see diagram 2). Make sure to adjust the seat
tightening mechanism so it will not blind with the seat track upon
installation.
3. Install seat track assembly by sliding seat track onto seat track
receptor. Be careful not to pinch the coiled hand pulse harness
during seat track installation. Securely fasten the seat track using two M8 x 15mm screws and the seat track stops using two
M8 x 20mm screws and washers with a 5mm Allen wrench. Take
note that the seat track stops must be installed on the screws
closest to the seat track cover (see diagram). Do not over tighten
the seat track stop screws.
4. Place rear stabilizer bar under the seat track and align the screw
holes.
5. Insert and tighten two M8 x 20mm screws using a 5mm Allen
wrench.
6. Install seat frame handlebar onto the seat frame using four M8 x
15mm screws and washers using a 5mm Allen wrench.
7. Connect the plug from the hand pulse wiring harness of the seat
handlebar to the plug receptor of the retracting cable hanging
out of the sidecase. Secure the hand pulse harness on the back
and bottom of the seat frame by tightening the harness on the
cord clamps with the two tywraps included in the hardware box.
8. Install seat back and seat pad onto the seat frame using four M6
x 15mm screws and split washers (for each pad).
Console Mast Assembly
1. Install console mast adapter/cover onto console mast.
2. Run both wiring harnesses through the bottom of console mast
to the top of console mast opening. Pull the harnesses until just
tight, DO NOT PULL HARD.
WIRING HARNESS INSTALLATION HINT: Straighten the loops
of the wiring harnesses and twist both harnesses so that it
can slide smoothly into the console mast.
3. Install the console mast by sliding it into the console mast receptor while pulling the wiring harness. This will keep the slack
out of the harness so the wires will not get pinched and short
out. Insert and tighten four M8 x 12mm screws using a 5mm
Allen wrench. Be sure not to pinch wiring harnesses while tighten
screws.
4. Snap console mast adapter/cover into top of sidecase.
Console Assembly
1. Connect the plugs from the main wiring harness and hand pulse
to the plug receptors on the backside of the console taking care
to install correctly (see plug alignment marks).
WIRING HARNESS INSTALLATION HINT: Any excess wiring
must be carefully inserted (“stored”) back into the console
mast before installing the console onto the console mast.
2. Fasten the console to the console mast with the four M5 x 12mm
screws and washers using a Phillips screwdriver.
Pedals Assembly
1. Use a 15mm open-end wrench to firmly affix the pedals to the
cranks.
2. The left and right pedals are different and are denoted as right or
left on the bottom of each pedal. NOTE: Left pedal threads counterclockwise.
3. Retighten cranks after approximately 10 hours of use.
Waterbottle Assembly
1. Place the bottle holder on the console mast. Insert and tighten
the two spacers and two M5 x 12mm screws using a screwdriver.
2. Snap the waterbottle into the bottle holder.
Transformer Assembly
1. Plug transformer into plug receptor located on the rear/bottom
side of main frame.
2. Plug the transformer into power outlet. NOTE: Be sure to use
right transformer for your power outlet, 110V or 220V.
7 0 0 S E R I E S O W N E R’ S M A N U A L
7
700EL Assembly Drawing
8
7 0 0 S E R I E S O W N E R’ S M A N U A L
700EL Assembly Instructions
Transportation Wheel Assembly
1. Slide the Wheel Sleeve onto the bar at the base of the left rear of
the unit. Attach the sleeve to the bar using the supplied Phillips
head screw.
2. Press the Transportation Wheel onto the Wheel Sleeve until it
snaps into place.
3. Repeat this process on the other end of the rear bar.
Console Mast Assembly
1. Connect main wire harness at the bottom of console mast to
wire harness at the front of frame.
2. Slide console mast into console mast receptor at front end of
frame. IMPORTANT: Gently pull up on the wire harness at the
top of the console mast while doing so to avoid pinching the
wire harness.
3. First, attach console mast to frame at upper holes location on
both sides using the 5mm Allen wrench and two M8x20mm
screws with one flat washer and one lock washer each. Thread
these screws in, but do not tighten them all the way yet.
4. Next, attach console mast at lower holes location on both sides
of console mast receptor. NOTE: There are three holes on either
side to choose from. The middle hole is for average-sized users.
The hole closest to the footpads is for taller users, and the hole
farthest from the footpads is for shorter users. Choose the desired hole and fully tighten the bolts using two M8x20mm screws
with one flat washer and one lock washer each. Then fully tighten
the two screws in the upper holes.
5. Attach the Console Mast Base Cover to the front of the Console
Mast Receptor using 4 Phillips head screws, with the arrow on
the cover facing upward.
Handrail Assembly
1. Attach right handrail to the console mast at the right handrail
axle using the set-screw collar. Tighten the set-screw of the reght
handrail set-screw collar by using the 3mm Allen wrench.
2. Next, attach the right handrail to the bottom of the right steparm.
Insert the handrail/steparm axle through the holes in the steparm
and through the tube at the bottom of handrail, and attach handrail by using & tighten the M8 x 20mm screw with washer and a
5mm Allen wrench.
3. Assemble left handrail the same way.
4. Attach both steparm/handrail connecting covers using M5x25mm
screws each and a Phillips screwdriver.
5. On either side of water-bottle cover, attach the handrail covers
to each other around the handrails. Use the two M4x 40mm
screws and nuts on each side and tighten them with a Phillips
screwdriver and an open wrench
Handlebar Assembly
1. Insert the hand pulse harness through the opening of the console mast and out of the top of the console mounting plate.
2. Assemble the handlebar onto the mount and insert and tighten
the four M8x12mm screws using a 5mm Allen wrench. Be sure
not to pinch the hand pulse harness during this procedure, as
this will damage the electronic console.
Console Assembly
1. Connect both plugs from main wiring harness and hand pulse
wiring harness to the plug receptors on the backside of the console taking care to install correctly (see plug alignment marks).
WIRING HARNESS INSTALLATION HINT: Any excess wiring
must be carefully inserted (stored) back into the console
mast before installing the console onto the console mounting
plate.
2. Fasten the console to the console mounting plate with the four
M5 x 12mm screws and washers using 1 Phillips screwdriver.
Waterbottle
1. Insert the water bottle into the water bottle holder.
Transformer Assembly
1. Plug transformer into plug receptor located on the rear/bottom
side of main frame.
2. Plug the transformer output into power outlet. NOTE: Be sure to
use right transformer for your power outlet, 110V or 220V.
7 0 0 S E R I E S O W N E R’ S M A N U A L
9
700 Series Operation & Comfort Tips
General 700 Series Tips
Cadence: There is a strong relationship between cadence (revolutions <RPM>/steps <SPM>) and the efficiency of your workouts.
Research indicates that you will be more comfortable and get a lot
more work done if you maintain a cadence of at least 60 RPM or
SPM. The 700 series console will give you a continuous readout of
your cadence.
700U/R
Proper adjustment of seat position and knowledge of pedaling cadence will allow effective use of your leg muscles without producing
undue muscular fatigue. Applying these proper techniques will allow you to ride comfortably and efficiently. These biomechanically
designed stationary cycles are fully adjustable to optimize comfort.
1. Leg Extension: The seat should be positioned such that the leg
is almost fully extended when the ball of the foot is on the pedal
and the pedal is in the position furthest from the body. This will
allow for greater use of more leg muscles, thereby maximizing
cardiovascular benefit while minimizing fatigue.
2. Foot Position: The ball of the foot should be on the pedal, directly over the pedal axle. This position allows you to maximize
the action of your calf muscles. Avoid pedaling with the arch of
your foot on the pedal. If toe clips and straps are attached to the
pedals, use them to stabilize your foot on the pedals but do not
use them if they place your foot in an unnatural position.
700 EL
The 700EL has the longest stride length (21 inches) in its class. This
ensures full leg muscle involvement and a very smooth motion. The
700EL also incorporates forward and reverse motion to work all major
leg muscle groups. These features along with the upper body component of the 700EL give you a total body workout.
10
7 0 0 S E R I E S O W N E R’ S M A N U A L
700 Series Console Layout
Reading Rack with
Operating Instructions
Dot Matrix Display
Data Window
Programs
Pulse Indicator
11
Start/Stop
Key
Data Keys
Scroll Key
7 0 0 S E R I E S O W N E R’ S M A N U A L
Exercise Guidelines
Anyone over the age of 35, as well as younger persons whom are overweight, should check with his/her physician before beginning any type
of exercise program. People who have diabetes or high blood pressure, a family history of heart disease, high cholesterol or have lead a
sedentary lifestyle should protect themselves with a medical checkup and a stress test, preferably administered during exercise by a
healthcare professional.
In 1996, the office of the Surgeon General of the United Sates released a report on physical activity and health. This report definitively stated
that exercise and fitness are beneficial for a person’s health and redefined that exercise is a key component of disease prevention and
healthier living.
Medical research has shown us that there is an amount of exercise which is enough to condition the cardiorespiratory system and the
muscles of the body. This amount of exercise is between 60% and 85% of your maximum heart rate measured during a training session. This
range allows enough exercise to achieve fitness, but not an excessive amount to cause injury. Your heart rate is an excellent indicator of the
amount of stress placed on the cardiovascular system.
If exercise intensity is too low or too high, no gains will be made in fitness. If the intensity is too low, the stress levels are ineffective. If the
intensity is too high, injury or fatigue may set your exercise program back as you try to recover.
The best way to monitor exercise intensity is to accurately count your pulse during exercise. Your heart rate can easily be determined by
counting your pulse at the chest, wrist, or at the carotid artery on your neck. However, it can be difficult to count your own pulse while
exercising. The 700 series models are equipped with both a hand contact pulse sensor system and a built-in Polar compatible receiver for
pulse sensors that can be worn independently. These sensors automatically count your heart rate while you are exercising and display it as
a digital readout on the console. Your target heart rate, the intensity needed to improve cardiovascular fitness, depends primarily on your age
and not your state of fitness. It is calculated as a percentage of your maximum heart rate, which is estimated as 220 minus your age. It is
most effective to train at a target heart rate of between 60% and 85% of your maximum heart rate.
Maximum Heart Rate & Training Zone
Quantity & Quality
To calculate your maximum heart rate and find your training zone
use the following formula. An example has been provided below
based on a 35-year-old person
The American College of Sports Medicine makes the following
recommendations for the quantity and quality of training for developing and maintaining cardiorespiratory fitness in healthy
adults:
220 - Age = Maximum Heart Rate
(220 - 35 = 185)
12
•
60% of Maximum Heart Rate
(60% x 185 = 111 bpm)
•
85% of Maximum Heart Rate
(85% x 185 = 157 bpm)
•
•
•
Training Zone: 111 bpm - 157 bpm
An activity that uses large muscle groups, maintained continuously, and is rhythmical and aerobic in nature.
Duration: 20 to 60 minutes of continuous aerobic activity, including a warm-up and cool-down period for each exercise session.
Frequency: 3 to 5 times per week
Intensity: 60% to 85% of maximum heart rate
In addition to aerobic exercise, it is recommended that you add
strength training of moderate intensity twice a week to your program.
■ = 85%
● = 60%
7 0 0 S E R I E S O W N E R’ S M A N U A L
Heart Rate Monitoring
The 700 Series units offer a number of options for monitoring your
heart rate while you exercise. In addition to hand pulse grips, the
700 Series units also have a built in receiver that can read the signal
from Polar compatible heart rate monitors. To make this function
even easier for you to utilize, a chest strap that will monitor your
heart rate and transmit it to the console is included with each unit.
Pulse Hand Grips (Standard)
Each 700 Series unit comes standard with stainless steel pulse hand
grips. To activate, gently grasp both hand grips to obtain a heart
rate reading. For best results when using the hand grips we recommend the following suggestions:
• Make sure that the palms of the hands are touching the contact
area of each hand pulse grip.
• Maintain an even pressure on the grips.
• Do not hold the hand pulse grips too tightly.
(Note: If you choose to wear a chest strap for monitoring purposes,
please note the console will take the measurement of the chest strap,
as it is more accurate.)
Chest Strap (Standard)
The 700 Series console includes a built-in receiver which will work
with most manufacturers’ chest straps. To get an accurate reading
using these devices, you will need to be within three feet of the
console, and a minimum of four feet from others using a heart rate
monitoring device.
There are three parts to the Heart Rate System on the Diamondback
700 Series equipment:
1. Sensor / Transmitter
2. Chest Band / Strap
3. The Receiver
The sensor component needs to be in contact with a smooth, steady
section of the user’s skin. The chest band or strap is necessary to
keep the sensor contact in place during exercise. The receiver of
the wireless ECG system is built into the console unit of the Diamondback 700 Series equipment. Scroll through to the PULSE display option to have your heart rate shown in the display window.
How to Wear Your Sensor/ Transmitter
1.
2.
3.
4.
Buckle one end of the chest strap onto the transmitter.
Adjust the band length so that the fit is snug, but not too tight.
Buckle the other end of the chest strap onto the transmitter.
Center the transmitter on your chest below the pectoral muscle
(breasts).
5. Pull unit away from chest by stretching the belt and moisten the
conductive electrode strips located next to the buckles. If you
wish to wear the band over a shirt, moisten the shirt under the
area of the electrode strip.
Note: The transmitter is on automatically when being worn. It is off
when it is not connected to your body. However, as moisture may
activate the transmitter, thoroughly dry the transmitter to prolong
battery life.
(Note: The transmitter may fluctuate erratically if you are too close
to other heart rate monitoring equipment.)
13
Quick Start Manual Mode
The QUICK START mode allows you to start working out with the
touch of one button.
Getting Started
The 700 Series units power on automatically when any key is pressed
or when you start to pedal. When the unit powers on it will be in the
program select mode.
Beginning the Program
•
Just press the START key. You are automatically set up with a 30
minute workout.
Adjusting Load
•
Use data ▲ or ▼ keys to adjust the load level shown in the dot
matrix screen.
out data (Calories burned and distance traveled) by pressing the
SCROLL key. When you are finished reviewing data, press the STOP
key to return to the program select mode.
Program Notes
Pause, Resume and Reset
• Pause & Resume - The program may be interrupted, for up to
5:00 minutes, by pressing the STOP key once. To resume program, press the START key. If you don’t pedal for 25 seconds,
the unit will pause automatically. If the start key is not pressed
within 5:00 minutes, the unit will power off and all program information will be lost.
•
To reset the unit and return to the program select mode, press
and hold the STOP key for three seconds. This will allow you to
select a different program.
Program End
The program time selected will count down to zero and the program
will end indicated by a four beep signal. You may review your work-
7 0 0 S E R I E S O W N E R’ S M A N U A L
Manual Program
The MANUAL mode allows you to select the work level you feel
comfortable with.
Begin Program
•
Press START to begin program.
Program End
Getting Started
•
The 700 Series units power on automatically when any key is pressed
or when you start to pedal. When the unit powers on it will be in the
program select mode.
The program time selected will count down to zero and the program will end indicated by a four beep signal. You may review
your workout data (Calories burned and distance traveled) by
pressing the SCROLL key. When you are finished reviewing the
data, press the STOP key to return to the program select mode.
Selecting the MANUAL Program
•
Press the data ▲ or ▼ keys to select the MANUAL program.
This is indicated by the light under the MANUAL profile illuminating. Then press ENTER.
Entering Workout Time
1. The TIME LED illuminate and the DATA WINDOW flashes a default time of 0:00 minutes. Use data ▲ or ▼ keys to select desired time. If no time is selected, then the time will count up from
zero.
2. Press ENTER to accept.
Program Notes
Pause, Resume and Reset
• Pause & Resume - Program may be interrupted, for up to 5:00
minutes, by pressing the STOP key once. To resume program,
press the START key. If you don’t pedal for 25 seconds the unit
will pause automatically. If the start key is not pressed within
5:00 minutes, the unit will power off and all program information
will be lost.
• To reset the unit and return to the program select mode, press
and hold the STOP key for three seconds. This will allow you to
select a different program.
Random
14
The RANDOM program is designed to allow the user to choose from
an unlimited number of computer generated profiles.
Begin Program
Getting Started
Program End
The 700 Series units power on automatically when any key is pressed
or when you start to pedal. When the unit powers on it will be in the
program select mode.
•
•
Selecting the Random Program
•
•
Press the data ▲ or ▼ keys to select the RANDOM program.
This is indicated by the light under the RANDOM profile illuminating. Then press ENTER.
Press the data ▲ or ▼ keys to view an unlimited amount of computer generated random profiles. Each time you press the ▲ or
▼ keys a new profile will appear. When a profile appears that you
desire, press the ENTER key to accept.
Entering Workout Time
The program time selected will count down to zero and the program will end indicated by a four beep signal. You may review
your workout data (Calories burned and distance traveled) by
pressing the SCROLL key. When you are finished reviewing the
data, press the STOP key to return to the program select mode.
Program Notes
Pause, Resume and Reset
•
•
1. The TIME LED illuminates and the DATA WINDOW flashes a default time of 30:00 minutes. Use data ▲ or ▼ keys to select desired time. If no time is selected then the default time of 30:00
minutes will be entered.
2. Press ENTER to accept.
Press START to begin program.
Pause & Resume - The program may be interrupted, for up to
5:00 minutes, by pressing the STOP/pause key once. To resume
program, begin pedaling and press the START key. If you don’t
pedal for 25 seconds, the unit will pause automatically. If the
start key is not pressed within 5:00 minutes, the unit will power
off and all program information will be lost.
To reset the unit and return to the program select mode, press
and hold the STOP key for three seconds. This will allow you to
select a different program.
Entering Workout Level
1. The LEVEL LED illuminated and the DATA WINDOW flashes a
default level of 1. This indicates the easiest workout level for this
program. If you desire a more challenging workout use the ▲ or
▼ keys to select a level up to level 9.
2. Press ENTER to accept.
7 0 0 S E R I E S O W N E R’ S M A N U A L
Fatburner
The FATBURNER program is designed to keep you working at a
constant level of resistance. Some studies have indicated that this
is the best way to burn fat in many individuals.
2. Press ENTER to accept.
Begin Program
•
Press START to begin program.
Getting Started
The 700 Series units power on automatically when any key is pressed
or when you start to pedal. When the unit powers on it will be in the
program select mode.
Program End
•
Selecting the Fatburner Program
•
Press the data ▲ or ▼ keys to select the FATBURNER program.
This is indicated by the light under the FATBURNER profile illuminating. Then press ENTER.
Entering Workout Time
The program time selected will count down to zero and the program will end indicated by a four beep signal. You may review
your workout data (Calories burned and distance traveled) by
pressing the SCROLL key. When you are finished reviewing the
data, press the STOP key to return to the program select mode.
Program Notes
Pause, Resume and Reset
•
1. The TIME LED illuminates and the DATA WINDOW flashes a default time of 30:00 minutes. Use data ▲ or ▼ keys to select
desired time. If no time is selected then the default time of 30:00
minutes will be entered.
2. Press ENTER to accept.
•
Entering Workout Level
1. The LEVEL LED illuminated and the DATA WINDOW flashes a
default level of 1. This indicates the easiest workout level for this
program. If you desire a more challenging workout use the ▲ or
▼ keys to select a level up to level 9.
Pause & Resume - The program may be interrupted, for up to
5:00 minutes, by depressing the STOP/pause key once. To resume program, begin pedaling and press the START key. If you
don’t pedal for 25 seconds, the unit will pause automatically. If
the start key is not pressed within 5:00 minutes, the unit will
power off and all program information will be lost.
To reset the unit and return to the program select mode, press
and hold the STOP key for three seconds. This will allow you to
select a different program.
Interval
The INTERVAL program helps to build the strength of your cardiovascular system. By alternating the workload from high to low, your
heart gets an effective workout.
Getting Started
Begin Program
•
Press START to begin program.
Program End
•
The 700 Series units power on automatically when any key is pressed
or when you start to pedal. When the unit powers on it will be in the
program select mode.
The program time selected will count down to zero and the program will end indicated by a four beep signal. You may review
your workout data (Calories burned and distance traveled) by
pressing the SCROLL key. When you are finished reviewing the
data, press the STOP key to return to the program select mode.
Selecting the Interval Program
•
Press the data ▲ or ▼ keys to select the INTERVAL program.
This is indicated by the light under the INTERVAL profile illuminating. Then press ENTER.
Program Notes
Pause, Resume and Reset
•
Entering Workout Time
1. The TIME LED illuminates and the DATA WINDOW flashes a default time of 30:00 minutes. Use data ▲ or ▼ keys to select desired time. If no time is selected then the default time of 30:00
minutes will be entered.
2. Press ENTER to accept.
•
Pause & Resume - The program may be interrupted, for up to
5:00 minutes, by pressing the STOP/pause key once. To resume
program, begin pedaling and press the START key. If you don’t
pedal for 25 seconds, the unit will pause automatically. If the
start key is not pressed within 5:00 minutes, the unit will power
off and all program information will be lost.
To reset the unit and return to the program select mode, press
and hold the STOP key for three seconds. This will allow you to
select a different program.
Entering Workout Level
1. The LEVEL LED illuminated and the DATA WINDOW flashes a
default level of 1. This indicates the easiest workout level for this
program. If you desire a more challenging workout use the ▲ or
▼ keys to select a level up to level 9.
2. Press ENTER to accept.
7 0 0 S E R I E S O W N E R’ S M A N U A L
15
Strength
The STRENGTH program gradually increases the
workload over time. This will strengthen not only your
heart, but also the major muscle groups which are
doing the work.
program. If you desire a more challenging workout use the ▲ or
▼ keys to select a level up to level 9.
2. Press ENTER to accept.
Begin Program
•
Getting Started
The 700 Series units power on automatically when any key is pressed
or when you start to pedal. When the unit powers on it will be in the
program select mode.
Program End
•
Selecting the Strength Program
•
Press the data ▲ or ▼ keys to select the STRENGTH program.
This is indicated by the light under the STRENGTH profile illuminating. Then press ENTER.
Entering Workout Time
The program time selected will count down to zero and the program will end indicated by a four beep signal. You may review
your workout data (Calories burned and distance traveled) by
pressing the SCROLL key. When you are finished reviewing the
data, press the STOP key to return to the program select mode.
Program Notes
Pause, Resume and Reset
•
1. The TIME LED illuminates and the DATA WINDOW flashes a default time of 30:00 minutes. Use data ▲ or ▼ keys to select
desired time. If no time is selected then the default time of 30:00
minutes will be entered.
2. Press ENTER to accept.
•
Entering Workout Level
Press START to begin program.
1. The LEVEL LED illuminated and the DATA WINDOW flashes a
default level of 1. This indicates the easiest workout level for this
Pause & Resume - The program may be interrupted, for up to
5:00 minutes, by pressing the STOP/pause key once. To resume
program, begin pedaling and press the START key. If you don’t
pedal for 25 seconds, the unit will pause automatically. If the
start key is not pressed within 5:00 minutes, the unit will power
off and all program information will be lost.
To reset the unit and return to the program select mode, press
and hold the STOP key for three seconds. This will allow you to
select a different program.
Target HR Program
16
The TARGET HEART RATE program offers both control and simplicity of use. This workout allows you to
keep your heart rate at a level that is right for your
body and your fitness.
Begin Program
•
Program End
•
Getting Started
The 700 Series units power on automatically when any key is pressed
or when you start to pedal. When the unit powers on it will be in the
program select mode.
Selecting the Target HR Program
•
Press the data ▲ or ▼ keys to select the TARGET HR program.
This is indicated by the light under the TARGET HR profile illuminating. Then press ENTER.
•
•
Entering Workout Time
1. The TIME LED illuminates and the DATA WINDOW flashes a default time of 30:00 minutes.
2. Use the data ▲ or ▼ keys to select the desired time setting.
3. When you have the correct setting, press ENTER to accept.
The program time selected will count down to zero and the program will end indicated by a four beep signal. You may review
your workout data (Calories burned and distance traveled) by
pressing the SCROLL key. When you are finished reviewing the
data, press the STOP key to return to the program select mode.
Program Notes
Entering Target Heart Rate
1. The PULSE LED illuminates and the DATA WINDOW flashes the
default rate of 120 Beats Per Minutes.
2. Use data ▲ or ▼ keys to select the desired heart rate setting.
2. When you have the correct setting, press ENTER to accept.
Press START to begin program. After a short warmup, the unit
will begin to adjust the difficulty to reach your target heart rate.
•
The Target HR setting and Intensity Level can be manually adjusted during the program. Press the ENTER key to enter the
adjustment mode. The current heart rate setting will be displayed
in the data window. Adjust the setting as desired. Press the ENTER key again. The current Intensity Level setting will be displayed in the data window. Adjust the setting as desired. Press
the ENTER key again to exit the adjustment mode.
Pause & Resume — The program may be interrupted, for up to
5:00 minutes, by pressing the STOP key once. To resume program, begin pedaling and press the START key. If you stop pedaling for 25 seconds, the unit will pause automatically. If the START
key is not pressed within 5:00 minutes, the unit will power off
and all program information will be lost.
To reset the unit and return to the program select mode, press and
hold the STOP key for 3 seconds. This will allow you to select a
different program.
7 0 0 S E R I E S O W N E R’ S M A N U A L
Domestic Warranty Information
(Applies to all product sold and placed within the continental US,
Alaska, Hawaii, and Puerto Rico only)
Effective: August 2003
Diamondback warrants its 700 series (700 Upright, Recumbent, and
Elliptical) to be free from defects in material and workmanship under normal use in the home environment. Diamondback’s obligation
under this Warranty is limited to repair or replacement of any defective part without charge through an authorized service agent to the
original purchaser with the following parameters:
Warranty voided if:
The Warranty does not apply to any failure of the product, or any
parts of the product, due to: assembly errors, alterations, modifications, misuse, abuse, accident, improper maintenance, or if the serial number on the product has been removed, altered or defaced.
Assembly errors include but are not limited to:
• Severed wire harness.
• Stripped crank arms and/or pedals.
• Bolts used in the wrong location.
Parts & Service
Who is covered:
The Warranty is extended to the individual or legal entity whose name
appears on the Warranty registration card filed with Diamondback
and may not be transferred to any other individual or legal entity.
Contact the authorized Diamondback dealer where unit was originally purchased. If you have moved, or that retailer is unavailable,
use our dealer locator at “http://www.diamondbackfitness.com”
www.diamondbackfitness.com to help find another authorized dealer.
To obtain service:
Diamondback is not responsible for arranging Warranty service and/
or honoring extended warranties provided by dealers.
To obtain service you must contact your authorized Diamondback
Fitness dealer. Your dealer is also your authorized service agent. An
authorized service agent must diagnose your unit in order to determine Warranty claims/issues.
Exclusions:
Sales where the unit is delivered unassembled (in a carton) to the
end user (e.g. mail order or Internet sales) without a service contract
purchased through the dealer voids the Warranty.
Warranty is void if the 700 series unit is placed in a commercial or
light commercial environment. (i.e. hotel, motel, apartment/condo
complex or business center, rehab facility, health club, school, or
correctional facility.)
Warranty Registration:
Additional Rights:
Warranty commitments are valid only with a completed Warranty
card that is returned within 15 days from the date of purchase and
includes the product serial number. Registration is available at
www.diamondbackfitness.com.
This Warranty is expressly in lieu of all other warranties, and any
implied warranties of merchantability or fitness for a particular purpose created hereby, are limited to the same duration as the express Warranty herein. Raleigh America, Inc. shall not be liable for
any incidental or consequential damages. Some states do not allow
the exclusion or limitations of implied warranties, incidental or consequential, so the above limitations and exclusions may not apply
to you.
Retailers and wholesale outlets for Raleigh America, Inc. products
are not authorized to modify this Warranty in any way.
This Warranty gives the original owner specific legal rights. Other
additional rights may vary from state to state.
Proof of purchase from Diamondback’s authorized dealer will be
required if the Warranty card is not registered prior to any consideration of Warranty claim.
What is covered:
HOME:
Maximum usage: 10 hours per week.
Frame:
Parts &
Electronics:
Normal
Wear Items:
Labor:
Lifetime limited Warranty, covers defects
in welds, materials, and workmanship.
Raleigh America Inc.
6004 S. 190th St., Suite 101,
Kent, WA 98032
Phone number: 253-395-1100
2 Years
90-day limited on foam grips, pedals,
pedal straps, seats, seat backs, etc.
1 Year
LIGHT INSTITUTIONAL:
ANY USAGE OF THIS PRODUCT IN AN INSTITUTIONAL SETTING
WILL VOID ALL WARRANTY COVERAGE.
7 0 0 S E R I E S O W N E R’ S M A N U A L
17
Maintenance
C A U T I O N - FOR SAFE OPERATION
Always inspect hardware prior to any exercise session. Look for loose hardware, loose pedals, loose cranks, and frayed wires. Repair or
replace any damaged or worn parts, tighten all loose hardware.
As part of Diamondback’s normal installation and set-up process, all pedals/cranks must be tightened after 8 to 10 hours of initial riding
to ensure parts are properly seated. This is standard initial “break in” service which must be performed after the first 8 to 10 hours of use.
Untightened pedals/cranks may become loose, causing damage which may void warranty.
After training, always wipe down your 700 series unit. Perspiration that continuously settles on frame, pads or casing may eventually
cause rust or damage to the unit. Damage resulting from lack of proper maintenance will not be covered under warranty. To clean pads,
use a mild soap and warm water. Dry with clean towel.
If noises develop or malfunctions occur, contact your authorized Diamondback fitness dealer.
Specifications
Electrical Construction:
Mechanical Construction:
Power:
External power; 110VAC/220VAC wall mounted
adapter
Brake System:
Electronically Controlled Magnetic Brake (ECB)
Flywheel:
24lbs. Balanced.
Wiring:
22 AWG Copper, PVC jacketed
Drivetrain:
Fiber reinforced Wingprene Poly-V Belt, 6 groove.
Console:
High Impact ABS plastic, Circuit Board: FR4 Fiberglass, LED 3-Color Dot matrix Display, One
Numeric Window, 14 LED Indicators, Built-in
Reading Rack
Bearing:
High quality bearings in Bottom Bracket &
Sealed ball bearings in brake
Frame:
Welded Fourteen (14) Gauge Steel Tubing.
Paint:
Polyester epoxy powder coating. Wrinkle finish, electrostatically applied.
Side Cases:
High Impact, ABS Plastic
Hardware:
SAE 1020 with BED Finish
Upholstery:
Polyurethane Emerald Surface Foam
Foam Grip:
PVC Nitrile Rubber
Operating
Specifications:
Resistance range 25 to 750 watts.
User Weight
Capacity:
U, R: 250 lbs./113 kgs; EL: 300lbs./136kgs
Console
Feedback:
18
Programming
Options
Heart Rate:
Time, RPM/SPM, Calories, Pulse, Distance, Level
• Manual Mode with Quick Start Option
• 4 Pre-Programmed Hill Profiles with 16 intensity levels
• Heart Rate Control Program
• Built-in Polar compatible heart rate receiver
• Contact heart rate standard
• Polar compatible chest strap included
Space & Weight Requirements
Shipping Specifications
Assembled Specifications
700U Upright
85 lbs. / 38”Lx16”Wx29”H
(38.5 kgs. / 952mmLx401mmWx726mmH)
71 lbs. / 35”Lx22”Wx55”H
(32 kgs. / 889mmL x 560mmW x 1397mmH)
700U Recumbent
104 lbs. / 45”Lx17.5”Wx29”H
(47 kgs. / 1127mmLx438mmWx726mmH)
95 lbs. / 57”Lx27”Wx47”H
(43 kgs. / 1450mmL x 700mmW x 1194mmH)
700EL Elliptical
168 lbs. / 63”Lx27”Wx31”H
(76.3 kgs./1600mmLx690mmWx780mmH)
152 lbs. / 59”Lx26”Wx58”H
(69 kgs. / 1500mmL x 650mmW x 1480mmH)
7 0 0 S E R I E S O W N E R’ S M A N U A L