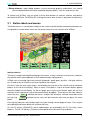
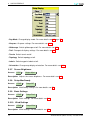
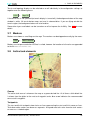
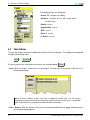
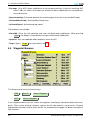
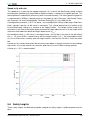
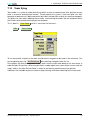
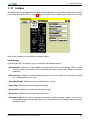
1
Manual (Altair version)
Document name:
Document version:
Release date:
XCSoar-A-EN
1.8
03/07/2008
triadis engineering GmbH – Eichholzstrasse 7 – Postfach – CH-3254 Messen
Phone: +41 (0)31 768 15 15 – Fax: +41 (0)31 768 15 16 – Internet: www.triadis.ch – E-Mail: [email protected]
Notes
i
XCSoar Manual (Altair version) • XCSoar-A-EN
Preface
Revision history
Revision
1.6 EN
1.7 EN
1.7 GR
1.8
Date
15/09/2007
08/01/2008
02/02/2008
03/07/2008
Status
released
draft
draft
released
Author
J.Wharington
D.Wettstein
D.Wettstein
D.Wettstein
Changes, comments
Standard XCSoar manual
Altair version, layout rework
German translation
New features, XCSoar Altair version 5.2
This manual applies to XCSoar version 5.2. The authors reserve the right to update this manual as
enhancements are made throughout the life of this product.
Warnings and precautions
IT IS THE USER’S RESPONSIBILITY TO USE THIS SOFTWARE PRUDENTLY. THIS SOFTWARE IS INTENDED TO BE USED ONLY AS A NavIGATION AID AND MUST NOT BE
USED FOR ANY PURPOSE REQUIRING PRECISE MEASUREMENT OF DIRECTION, DISTANCE, LOCATION, OR TOPOGRAPHY. THIS SOFTWARE SHOULD NOT BE USED AS
AN AID TO DETERMINE GROUND PROXIMITY FOR AIRCRAFT NavIGATION. THIS SOFTWARE SHOULD NOT BE USED AS A TRAFFIC COLLISION AVOIDANCE SYSTEM.
Legal notices
Software license agreement
This software is released according to the GNU General Public License Version 2. See Appendix A
for the full text of the agreement and warranty notice.
Limited liability
In no event shall XCSoar, or its principals, shareholders, officers, employees, affiliates, contractors, subsidiaries, or parent organizations, be liable for any incidental, consequential, or punitive
damages whatsoever relating to the use of the Product.
Disclaimer
This product, and all accompanying files, data and materials, are distributed ”as is” and with no
warranties of any kind, whether express or implied. This product is used entirely at the risk of
the user. Although great care has been taken to eliminate defects during its development it is not
claimed to be fault-free. No claims are made regarding its correctness, reliability or fitness for any
particular purpose. The XCSoar project developers and contributors shall not be liable for errors
contained herein or for incidental or consequential damages, loss of data or personal injury in
connection with furnishing, performance, or use of this material.
XCSoar Manual (Altair version) • XCSoar-A-EN
ii
CONTENTS
Contents
1
2
iii
Introduction
1.1
Organisation of this manual . . . . .
1.2
System requirements . . . . . . . .
1.3
Running XCSoar . . . . . . . . . . .
1.4
Through-life support . . . . . . . . .
1.5
Using XCSoar safely . . . . . . . . .
1.6
Graphical elements in this document
.
.
.
.
.
.
.
.
.
.
.
.
.
.
.
.
.
.
.
.
.
.
.
.
.
.
.
.
.
.
.
.
.
.
.
.
.
.
.
.
.
.
.
.
.
.
.
.
.
.
.
.
.
.
.
.
.
.
.
.
.
.
.
.
.
.
.
.
.
.
.
.
.
.
.
.
.
.
.
.
.
.
.
.
.
.
.
.
.
.
.
.
.
.
.
.
.
.
.
.
.
.
.
.
.
.
.
.
.
.
.
.
.
.
.
.
.
.
.
.
.
.
.
.
.
.
.
.
.
.
.
.
1
1
1
1
3
4
4
User Interface
2.1
Button labels and menus . . . .
2.1.1 NAV menu . . . . . . . . .
2.1.2 DISP menu . . . . . . . . .
2.1.3 Pan mode . . . . . . . . . .
2.1.4 CONF menu . . . . . . . .
2.1.5 INFO Menu . . . . . . . . .
2.2
InfoBoxes . . . . . . . . . . . .
2.3
Dialog windows . . . . . . . .
2.3.1 Waypoint Select . . . . . . .
2.3.2 Change Task Point . . . . .
2.3.3 Change Landing Point . . .
2.3.4 Task Editor . . . . . . . . .
2.3.5 Team Code . . . . . . . . .
2.3.6 Setup Display . . . . . . . .
2.3.7 Screen Brightness . . . . .
2.3.8 Setup MacCready . . . . . .
2.3.9 Basic Settings . . . . . . . .
2.3.10 Wind Settings . . . . . . . .
2.3.11 Airspace Browser . . . . . .
2.3.12 Setup Vega . . . . . . . . .
2.3.13 Configuration . . . . . . . .
2.3.14 Altair Flight Recorder Setup
2.3.15 Waypoint Info . . . . . . . .
2.3.16 Waypoint Browser . . . . .
2.3.17 Airspace Info . . . . . . . .
2.3.18 Status . . . . . . . . . . . .
2.3.19 Analysis . . . . . . . . . . .
2.3.20 Checklist . . . . . . . . . .
2.4
Status messages . . . . . . . .
2.5
Status dialog . . . . . . . . . .
2.6
Text entry . . . . . . . . . . . .
2.7
Sounds . . . . . . . . . . . . .
2.8
Screen . . . . . . . . . . . . .
2.9
Help system . . . . . . . . . .
.
.
.
.
.
.
.
.
.
.
.
.
.
.
.
.
.
.
.
.
.
.
.
.
.
.
.
.
.
.
.
.
.
.
.
.
.
.
.
.
.
.
.
.
.
.
.
.
.
.
.
.
.
.
.
.
.
.
.
.
.
.
.
.
.
.
.
.
.
.
.
.
.
.
.
.
.
.
.
.
.
.
.
.
.
.
.
.
.
.
.
.
.
.
.
.
.
.
.
.
.
.
.
.
.
.
.
.
.
.
.
.
.
.
.
.
.
.
.
.
.
.
.
.
.
.
.
.
.
.
.
.
.
.
.
.
.
.
.
.
.
.
.
.
.
.
.
.
.
.
.
.
.
.
.
.
.
.
.
.
.
.
.
.
.
.
.
.
.
.
.
.
.
.
.
.
.
.
.
.
.
.
.
.
.
.
.
.
.
.
.
.
.
.
.
.
.
.
.
.
.
.
.
.
.
.
.
.
.
.
.
.
.
.
.
.
.
.
.
.
.
.
.
.
.
.
.
.
.
.
.
.
.
.
.
.
.
.
.
.
.
.
.
.
.
.
.
.
.
.
.
.
.
.
.
.
.
.
.
.
.
.
.
.
.
.
.
.
.
.
.
.
.
.
.
.
.
.
.
.
.
.
.
.
.
.
.
.
.
.
.
.
.
.
.
.
.
.
.
.
.
.
.
.
.
.
.
.
.
.
.
.
.
.
.
.
.
.
.
.
.
.
.
.
.
.
.
.
.
.
.
.
.
.
.
.
.
.
.
.
.
.
.
.
.
.
.
.
.
.
.
.
.
.
.
.
.
.
.
.
.
.
.
.
.
.
.
.
.
.
.
.
.
.
.
.
.
.
.
.
.
.
.
.
.
.
.
.
.
.
.
.
.
.
.
.
.
.
.
.
.
.
.
.
.
.
.
.
.
.
.
.
.
.
.
.
.
.
.
.
.
.
.
.
.
.
.
.
.
.
.
.
.
.
.
.
.
.
.
.
.
.
.
.
.
.
.
.
.
.
.
.
.
.
.
.
.
.
.
.
.
.
.
.
.
.
.
.
.
.
.
.
.
.
.
.
.
.
.
.
.
.
.
.
.
.
.
.
.
.
.
.
.
.
.
.
.
.
.
.
.
.
.
.
.
.
.
.
.
.
.
.
.
.
.
.
.
.
.
.
.
.
.
.
.
.
.
.
.
.
.
.
.
.
.
.
.
.
.
.
.
.
.
.
.
.
.
.
.
.
.
.
.
.
.
.
.
.
.
.
.
.
.
.
.
.
.
.
.
.
.
.
.
.
.
.
.
.
.
.
.
.
.
.
.
.
.
.
.
.
.
.
.
.
.
.
.
.
.
.
.
.
.
.
.
.
.
.
.
.
.
.
.
.
.
.
.
.
.
.
.
.
.
.
.
.
.
.
.
.
.
.
.
.
.
.
.
.
.
.
.
.
.
.
.
.
.
.
.
.
.
.
.
.
.
.
.
.
.
.
.
.
.
.
.
.
.
.
.
.
.
.
.
.
.
.
.
.
.
.
.
.
.
.
.
.
.
.
.
.
.
.
.
.
.
.
.
.
.
.
.
.
.
.
.
.
.
.
.
.
.
.
.
.
.
.
.
.
.
.
.
.
.
.
.
.
.
.
.
.
.
.
.
.
.
.
.
.
.
.
.
.
.
.
.
.
.
.
5
6
7
8
8
9
9
11
11
12
12
12
12
12
12
13
13
13
13
14
14
14
14
14
14
14
14
14
15
15
15
19
20
20
20
.
.
.
.
.
.
.
.
.
.
.
.
.
.
.
.
.
.
.
.
.
.
.
.
.
.
.
.
.
.
.
.
.
.
.
.
.
.
.
.
.
.
.
.
.
.
.
.
.
.
.
.
.
.
.
.
.
.
.
.
.
.
.
.
.
.
.
.
.
.
.
.
.
.
.
.
.
.
.
.
.
.
.
.
.
.
.
.
.
.
.
.
.
.
.
.
.
.
.
.
.
.
XCSoar Manual (Altair version) • XCSoar-A-EN
CONTENTS
3
4
5
6
Display Elements
3.1
Zoom and map scale
3.2
Panning the map . .
3.3
Glider symbol . . .
3.4
Trail . . . . . . . . .
3.5
Glide range . . . . .
3.6
Map elements . . .
3.7
Markers . . . . . .
3.8
Active task elements
3.9
Thermal profile . . .
3.10 Other . . . . . . . .
.
.
.
.
.
.
.
.
.
.
.
.
.
.
.
.
.
.
.
.
.
.
.
.
.
.
.
.
.
.
.
.
.
.
.
.
.
.
.
.
.
.
.
.
.
.
.
.
.
.
.
.
.
.
.
.
.
.
.
.
.
.
.
.
.
.
.
.
.
.
.
.
.
.
.
.
.
.
.
.
.
.
.
.
.
.
.
.
.
.
.
.
.
.
.
.
.
.
.
.
.
.
.
.
.
.
.
.
.
.
.
.
.
.
.
.
.
.
.
.
.
.
.
.
.
.
.
.
.
.
.
.
.
.
.
.
.
.
.
.
.
.
.
.
.
.
.
.
.
.
.
.
.
.
.
.
.
.
.
.
.
.
.
.
.
.
.
.
.
.
.
.
.
.
.
.
.
.
.
.
.
.
.
.
.
.
.
.
.
.
.
.
.
.
.
.
.
.
.
.
.
.
.
.
.
.
.
.
.
.
.
.
.
.
.
.
.
.
.
.
.
.
.
.
.
.
.
.
.
.
.
.
.
.
.
.
.
.
.
.
.
.
.
.
.
.
.
.
.
.
.
.
.
.
.
.
.
.
.
.
.
.
.
.
.
.
.
.
.
.
.
.
.
.
.
.
.
.
.
.
.
.
.
.
.
.
.
.
.
.
.
.
.
.
.
.
.
.
.
.
.
.
.
.
.
.
.
.
.
.
21
21
21
22
23
24
24
26
26
27
27
Cross Country Tasks
4.1
NAV Menu . . . .
4.2
Task Editor . . . .
4.3
Task calculator . .
4.4
Waypoint Browser
4.5
Waypoint Info . . .
4.6
AAT . . . . . . . .
4.7
OnLine Contest .
4.8
Logger . . . . . .
.
.
.
.
.
.
.
.
.
.
.
.
.
.
.
.
.
.
.
.
.
.
.
.
.
.
.
.
.
.
.
.
.
.
.
.
.
.
.
.
.
.
.
.
.
.
.
.
.
.
.
.
.
.
.
.
.
.
.
.
.
.
.
.
.
.
.
.
.
.
.
.
.
.
.
.
.
.
.
.
.
.
.
.
.
.
.
.
.
.
.
.
.
.
.
.
.
.
.
.
.
.
.
.
.
.
.
.
.
.
.
.
.
.
.
.
.
.
.
.
.
.
.
.
.
.
.
.
.
.
.
.
.
.
.
.
.
.
.
.
.
.
.
.
.
.
.
.
.
.
.
.
.
.
.
.
.
.
.
.
.
.
.
.
.
.
.
.
.
.
.
.
.
.
.
.
.
.
.
.
.
.
.
.
.
.
.
.
.
.
.
.
.
.
.
.
.
.
.
.
.
.
.
.
.
.
.
.
.
.
.
.
.
.
.
.
.
.
.
.
.
.
.
.
.
.
.
.
.
.
.
.
.
.
.
.
.
.
.
.
.
.
.
.
.
.
.
.
29
29
31
38
39
40
41
42
43
Glide Computer
5.1
Flight modes . . . . . . . .
5.2
MacCready settings . . . .
5.3
Glide polar . . . . . . . . .
5.4
Basic settings . . . . . . .
5.5
Speed to fly . . . . . . . .
5.6
Safety heights . . . . . . .
5.7
Final glide calculator . . . .
5.8
Display of altitude required .
5.9
Task speed estimation . . .
5.10 Optimal cruise track . . . .
5.11 Analysis dialog: Glide polar
5.12 Flight notifications . . . . .
5.13 Sunlight and time . . . . . .
.
.
.
.
.
.
.
.
.
.
.
.
.
.
.
.
.
.
.
.
.
.
.
.
.
.
.
.
.
.
.
.
.
.
.
.
.
.
.
.
.
.
.
.
.
.
.
.
.
.
.
.
.
.
.
.
.
.
.
.
.
.
.
.
.
.
.
.
.
.
.
.
.
.
.
.
.
.
.
.
.
.
.
.
.
.
.
.
.
.
.
.
.
.
.
.
.
.
.
.
.
.
.
.
.
.
.
.
.
.
.
.
.
.
.
.
.
.
.
.
.
.
.
.
.
.
.
.
.
.
.
.
.
.
.
.
.
.
.
.
.
.
.
.
.
.
.
.
.
.
.
.
.
.
.
.
.
.
.
.
.
.
.
.
.
.
.
.
.
.
.
.
.
.
.
.
.
.
.
.
.
.
.
.
.
.
.
.
.
.
.
.
.
.
.
.
.
.
.
.
.
.
.
.
.
.
.
.
.
.
.
.
.
.
.
.
.
.
.
.
.
.
.
.
.
.
.
.
.
.
.
.
.
.
.
.
.
.
.
.
.
.
.
.
.
.
.
.
.
.
.
.
.
.
.
.
.
.
.
.
.
.
.
.
.
.
.
.
.
.
.
.
.
.
.
.
.
.
.
.
.
.
.
.
.
.
.
.
.
.
.
.
.
.
.
.
.
.
.
.
.
.
.
.
.
.
.
.
.
.
.
.
.
.
.
.
.
.
.
.
.
.
.
.
.
.
.
.
.
.
.
.
.
.
.
.
.
.
.
.
.
.
.
.
.
.
.
.
.
.
.
45
45
46
47
48
49
50
52
53
54
55
56
57
57
Atmosphere and Instruments
6.1
Variometer . . . . . . .
6.2
Air data inputs . . . . .
6.3
Wind display . . . . . .
6.4
Wind estimation . . . .
6.5
Wind settings dialog . .
6.6
Thermal locator . . . .
6.7
Convection forecast . .
.
.
.
.
.
.
.
.
.
.
.
.
.
.
.
.
.
.
.
.
.
.
.
.
.
.
.
.
.
.
.
.
.
.
.
.
.
.
.
.
.
.
.
.
.
.
.
.
.
.
.
.
.
.
.
.
.
.
.
.
.
.
.
.
.
.
.
.
.
.
.
.
.
.
.
.
.
.
.
.
.
.
.
.
.
.
.
.
.
.
.
.
.
.
.
.
.
.
.
.
.
.
.
.
.
.
.
.
.
.
.
.
.
.
.
.
.
.
.
.
.
.
.
.
.
.
.
.
.
.
.
.
.
.
.
.
.
.
.
.
.
.
.
.
.
.
.
.
.
.
.
.
.
.
.
.
.
.
.
.
.
.
.
.
.
.
.
.
.
.
.
.
.
.
.
.
.
.
.
.
.
.
.
.
.
.
.
.
.
58
58
59
59
59
60
61
62
.
.
.
.
.
.
.
.
.
.
.
.
.
.
.
.
.
.
.
.
.
.
XCSoar Manual (Altair version) • XCSoar-A-EN
iv
CONTENTS
6.8
7
8
Analysis dialog: Wind, Temperature, Barograph and Climb history . . . . . . .
62
Airspace, Traffic and Team Flying
7.1
Airspace display . . . . . . . . . .
7.2
Incursion events . . . . . . . . . .
7.3
Airspace warning levels . . . . . .
7.4
Airspace warning dialog . . . . . .
7.5
Airspace warning acknowlegement
7.6
Airspace Info dialog . . . . . . . .
7.7
Airspace Browser dialog . . . . . .
7.8
Analysis dialog: Airspace . . . . .
7.9
FLARM traffic display . . . . . . .
7.10 Team flying . . . . . . . . . . . . .
.
.
.
.
.
.
.
.
.
.
.
.
.
.
.
.
.
.
.
.
.
.
.
.
.
.
.
.
.
.
.
.
.
.
.
.
.
.
.
.
.
.
.
.
.
.
.
.
.
.
.
.
.
.
.
.
.
.
.
.
.
.
.
.
.
.
.
.
.
.
.
.
.
.
.
.
.
.
.
.
.
.
.
.
.
.
.
.
.
.
.
.
.
.
.
.
.
.
.
.
.
.
.
.
.
.
.
.
.
.
.
.
.
.
.
.
.
.
.
.
.
.
.
.
.
.
.
.
.
.
.
.
.
.
.
.
.
.
.
.
.
.
.
.
.
.
.
.
.
.
.
.
.
.
.
.
.
.
.
.
.
.
.
.
.
.
.
.
.
.
.
.
.
.
.
.
.
.
.
.
.
.
.
.
.
.
.
.
.
.
.
.
.
.
.
.
.
.
.
.
.
.
.
.
.
.
.
.
.
.
.
.
.
.
.
.
.
.
.
.
.
.
.
.
.
.
.
.
.
.
65
65
66
66
67
68
68
69
71
72
74
Avionics and Airframe
8.1
GPS connection . . . . . .
8.2
Switch inputs . . . . . . . .
8.3
Switch Status . . . . . . . .
8.4
Aircraft radio transceiver . .
8.5
Supported variometers . . .
8.6
Other avionics devices . . .
8.7
Slave mode . . . . . . . . .
8.8
Interface to external loggers
.
.
.
.
.
.
.
.
.
.
.
.
.
.
.
.
.
.
.
.
.
.
.
.
.
.
.
.
.
.
.
.
.
.
.
.
.
.
.
.
.
.
.
.
.
.
.
.
.
.
.
.
.
.
.
.
.
.
.
.
.
.
.
.
.
.
.
.
.
.
.
.
.
.
.
.
.
.
.
.
.
.
.
.
.
.
.
.
.
.
.
.
.
.
.
.
.
.
.
.
.
.
.
.
.
.
.
.
.
.
.
.
.
.
.
.
.
.
.
.
.
.
.
.
.
.
.
.
.
.
.
.
.
.
.
.
.
.
.
.
.
.
.
.
.
.
.
.
.
.
.
.
.
.
.
.
.
.
.
.
.
.
.
.
.
.
.
.
.
.
.
.
.
.
.
.
.
.
.
.
.
.
.
.
.
.
.
.
.
.
.
.
.
.
.
.
.
.
.
.
.
.
.
.
.
.
.
.
75
75
75
76
76
76
77
77
77
Quickstart
9.1
Local flight . . . . . . . . . . .
9.2
FAI Task . . . . . . . . . . . .
9.3
FAI Task, Manual Start . . . . .
9.4
AAT Task, Manual Arm . . . . .
9.5
Task with alternate start sectors
.
.
.
.
.
.
.
.
.
.
.
.
.
.
.
.
.
.
.
.
.
.
.
.
.
.
.
.
.
.
.
.
.
.
.
.
.
.
.
.
.
.
.
.
.
.
.
.
.
.
.
.
.
.
.
.
.
.
.
.
.
.
.
.
.
.
.
.
.
.
.
.
.
.
.
.
.
.
.
.
.
.
.
.
.
.
.
.
.
.
.
.
.
.
.
.
.
.
.
.
.
.
.
.
.
.
.
.
.
.
.
.
.
.
.
.
.
.
.
.
.
.
.
.
.
78
78
79
80
80
83
.
.
.
.
.
.
.
.
.
.
.
.
.
.
.
.
.
.
.
.
.
.
.
.
.
.
.
.
.
.
.
.
.
.
.
.
.
.
.
.
.
.
.
.
.
.
.
.
.
.
.
.
.
.
.
.
.
.
.
.
.
.
.
.
.
.
.
.
.
.
.
.
.
.
.
.
.
.
.
.
.
.
.
.
.
.
.
.
.
.
.
.
.
.
.
.
.
.
.
.
.
.
.
.
.
.
.
.
.
.
.
.
.
.
.
.
.
.
.
.
.
.
.
.
.
.
.
.
.
.
.
.
.
.
.
.
.
.
.
.
.
.
.
.
.
.
.
.
.
.
.
.
.
.
.
.
.
.
.
.
.
.
.
.
.
.
.
.
.
.
.
.
.
.
.
.
.
.
.
.
.
.
.
.
.
.
.
.
.
.
.
.
.
.
.
.
.
.
.
.
.
.
.
.
.
.
.
.
.
.
.
.
.
.
.
.
.
.
.
.
.
.
.
.
.
84
84
84
85
86
87
87
88
90
91
11 Configuration
11.1 Site . . . . . . . . . . . . . . . . . . . . . . . . . . . . . . . . . . . . . . . .
11.2 Airspace . . . . . . . . . . . . . . . . . . . . . . . . . . . . . . . . . . . . .
92
94
95
9
10 InfoBox Reference
10.1 Altitude . . .
10.2 Aircraft state
10.3 Glide ratio .
10.4 Variometer .
10.5 Atmosphere
10.6 MacCready .
10.7 Navigation .
10.8 Waypoint . .
10.9 Team code .
v
.
.
.
.
.
.
.
.
.
.
.
.
.
.
.
.
.
.
.
.
.
.
.
.
.
.
.
.
.
.
.
.
.
.
.
.
.
.
.
.
.
.
.
.
.
.
.
.
.
.
.
.
.
.
.
.
.
.
.
.
.
.
.
.
.
.
.
.
.
.
.
.
.
.
.
.
.
.
.
.
.
.
.
.
.
.
.
.
.
.
.
.
.
.
.
.
.
.
XCSoar Manual (Altair version) • XCSoar-A-EN
CONTENTS
11.3
11.4
11.5
11.6
11.7
11.8
11.9
11.10
11.11
11.12
.
.
.
.
.
.
.
.
.
.
.
.
.
.
.
.
.
.
.
.
.
.
.
.
.
.
.
.
.
.
.
.
.
.
.
.
.
.
.
.
.
.
.
.
.
.
.
.
.
.
.
.
.
.
.
.
.
.
.
.
.
.
.
.
.
.
.
.
.
.
.
.
.
.
.
.
.
.
.
.
.
.
.
.
.
.
.
.
.
.
.
.
.
.
.
.
.
.
.
.
.
.
.
.
.
.
.
.
.
.
.
.
.
.
.
.
.
.
.
.
.
.
.
.
.
.
.
.
.
.
.
.
.
.
.
.
.
.
.
.
.
.
.
.
.
.
.
.
.
.
.
.
.
.
.
.
.
.
.
.
.
.
.
.
.
.
.
.
.
.
.
.
.
.
.
.
.
.
.
.
.
.
.
.
.
.
.
.
.
.
.
.
.
.
.
.
.
.
.
.
.
.
.
.
.
.
.
.
.
.
.
.
.
.
.
.
.
.
.
.
.
.
.
.
.
.
.
.
.
.
.
.
.
.
.
.
.
.
.
.
.
.
.
.
.
.
.
.
.
.
.
.
.
.
.
.
.
.
.
.
.
.
.
.
.
.
.
.
.
.
.
.
.
.
.
.
.
.
.
.
.
.
.
.
.
.
.
.
.
.
.
.
.
.
.
.
.
.
.
.
97
99
101
103
104
105
106
107
108
110
12 Data Files
12.1 File management . . . .
12.2 Terrain . . . . . . . . .
12.3 Topology . . . . . . . .
12.4 Waypoints . . . . . . .
12.5 Airspace . . . . . . . .
12.6 Map . . . . . . . . . .
12.7 Airfield details . . . . .
12.8 Glide polar . . . . . . .
12.9 Profiles . . . . . . . . .
12.10 Checklist . . . . . . . .
12.11 Tasks . . . . . . . . . .
12.12 Flight logs . . . . . . .
12.13 Input events . . . . . .
12.14 Language . . . . . . .
12.15 Status . . . . . . . . .
12.16 FLARM Identification file
12.17 Dialog files . . . . . . .
.
.
.
.
.
.
.
.
.
.
.
.
.
.
.
.
.
.
.
.
.
.
.
.
.
.
.
.
.
.
.
.
.
.
.
.
.
.
.
.
.
.
.
.
.
.
.
.
.
.
.
.
.
.
.
.
.
.
.
.
.
.
.
.
.
.
.
.
.
.
.
.
.
.
.
.
.
.
.
.
.
.
.
.
.
.
.
.
.
.
.
.
.
.
.
.
.
.
.
.
.
.
.
.
.
.
.
.
.
.
.
.
.
.
.
.
.
.
.
.
.
.
.
.
.
.
.
.
.
.
.
.
.
.
.
.
.
.
.
.
.
.
.
.
.
.
.
.
.
.
.
.
.
.
.
.
.
.
.
.
.
.
.
.
.
.
.
.
.
.
.
.
.
.
.
.
.
.
.
.
.
.
.
.
.
.
.
.
.
.
.
.
.
.
.
.
.
.
.
.
.
.
.
.
.
.
.
.
.
.
.
.
.
.
.
.
.
.
.
.
.
.
.
.
.
.
.
.
.
.
.
.
.
.
.
.
.
.
.
.
.
.
.
.
.
.
.
.
.
.
.
.
.
.
.
.
.
.
.
.
.
.
.
.
.
.
.
.
.
.
.
.
.
.
.
.
.
.
.
.
.
.
.
.
.
.
.
.
.
.
.
.
.
.
.
.
.
.
.
.
.
.
.
.
.
.
.
.
.
.
.
.
.
.
.
.
.
.
.
.
.
.
.
.
.
.
.
.
.
.
.
.
.
.
.
.
.
.
.
.
.
.
.
.
.
.
.
.
.
.
.
.
.
.
.
.
.
.
.
.
.
.
.
.
.
.
.
.
.
.
.
.
.
.
.
.
.
.
.
.
.
.
.
.
.
.
.
.
.
.
.
.
.
.
.
.
.
.
.
.
.
.
.
.
.
.
.
.
.
.
.
.
.
.
.
.
.
.
.
.
.
.
.
.
.
.
.
.
.
.
.
.
.
.
.
.
.
.
.
.
.
.
.
.
.
.
.
.
.
.
.
.
.
.
.
.
.
.
.
.
.
.
.
.
.
.
.
.
.
.
.
.
.
.
.
.
.
.
.
.
.
.
.
.
.
.
.
.
.
.
.
.
.
111
111
111
111
111
112
112
112
113
118
118
118
119
119
119
120
120
120
13 About XCSoar
13.1 Product history . . . . .
13.2 Get involved . . . . . .
13.3 Open source philosophy
13.4 Development process .
13.5 User base . . . . . . .
13.6 Credits . . . . . . . . .
.
.
.
.
.
.
.
.
.
.
.
.
.
.
.
.
.
.
.
.
.
.
.
.
.
.
.
.
.
.
.
.
.
.
.
.
.
.
.
.
.
.
.
.
.
.
.
.
.
.
.
.
.
.
.
.
.
.
.
.
.
.
.
.
.
.
.
.
.
.
.
.
.
.
.
.
.
.
.
.
.
.
.
.
.
.
.
.
.
.
.
.
.
.
.
.
.
.
.
.
.
.
.
.
.
.
.
.
.
.
.
.
.
.
.
.
.
.
.
.
.
.
.
.
.
.
.
.
.
.
.
.
.
.
.
.
.
.
.
.
.
.
.
.
.
.
.
.
.
.
.
.
.
.
.
.
.
.
.
.
.
.
.
.
.
.
.
.
.
.
.
.
.
.
121
121
121
122
122
123
123
A
Map Display .
Terrain display
Glide computer
Safety factors .
Polar . . . . .
Devices . . . .
Units . . . . .
Interface . . .
Appearance .
InfoBox . . . .
.
.
.
.
.
.
.
.
.
.
.
.
.
.
.
.
.
.
.
.
.
.
.
.
.
.
.
.
.
.
.
.
.
.
.
.
.
.
.
.
GNU General Public License
XCSoar Manual (Altair version) • XCSoar-A-EN
125
vi
1
INTRODUCTION
1
Introduction
This document is a pilot’s manual that describes the functionality of XCSoar when used with Altair.
XCSoar is an open source glide navigation system for portable devices. The audience is assumed
to have a sound knowledge of the fundamental theory of flight for gliders, and at least a basic
working knowledge of cross-country soaring.
Updates to the XCSoar software may result in some of this manual being out of date. You should
read the release notes distributed with the software to keep track of changes. Updates to the
manual and software are available from http://www.triadis.ch .
1.1
Organisation of this manual
This manual is broadly organised into the major functions of the software from a pilot’s perspective.
The remainder of this section deals with how to download, install and run the software on various
platforms. Section 2 introduces the user interface concepts and gives an overview of the display.
Section 3 describes the moving map part of the display in greater detail and describes how the
software can assist in general navigation. Section 4 describes how cross-country tasks are specified and flown, and presents some of the analysis tools available to pilots to help improve their
performance. Section 5 goes into further detail on the glide computer functions as it is important
for pilots to be aware of how the computer performs its calculations.
Section 6 describes how the computer can interface to variometers and other air data sensors,
and how it uses these measurements to provide various models of the atmosphere, in particular
on winds and thermal convection. Section 7 describes how XCSoar can assist in managing flight
in special use airspace and the FLARM collision awareness system. Section 8 deals with systems
integration and systems diagnostics, the integration of XCSoar with communications devices and
with airframe switches.
The remainder of the manual contains mainly reference material. Section 10 lists the types of
information that can be displayed in the grid of InfoBoxes next to the map display. The configuration
of the software is described in detail in section 11. The formats of the various data files that program
uses, as well as where to obtain them from and how to edit them, is described in section 12.
Finally, a short history and discussion of XCSoar’s development process is presented in section 13.
1.2
System requirements
• Altair The triadis engineering GmbH Altair glide computer is a glide computer factory installed
with XCSoar.
• GPS data source The Altair Pro version contains an internal GPS. The standard version additionally needs an external GPS data input. This must be a NMEA-0183 data source that
outputs GPRMC and GPGGA sentences. Suitable devices include handheld serial GPS
devices, glider flight loggers, GPS-integrated variometers, and FLARM. Up to two GPS devices may be used simultaneously, giving XCSoar a degree of redundancy of the GPS fixes.
1.3
Running XCSoar
XCSoar starts up automatically when Altair is powered on. The PWR/ESC button (top left) on Altair
has multiple functions:
1
XCSoar Manual (Altair version) • XCSoar-A-EN
1
INTRODUCTION
• Powering on Press and hold the PWR/ESC button for one second. The LED in the button will
light up, and XCSoar will start after Altair has booted.
• Powering off Press and hold the PWR/ESC button for approx. two seconds. Altair will switch
off.
• Escape Pressing the PWR/ESC button quickly acts as an Escape key, typically used to close
dialog pages or as a cancel function.
Start-up and user profiles
When XCSoar starts up, it displays a start-up screen with a safety reminder and a profile selector.
XCSoar allows multiple independent configurations to coexist for different purposes, such as:
• Different pilots
• Competition versus casual flying
• Flying in different locations
These configurations can be saved in profiles. To proceed, select your profile and press Enter.
The customization of profiles is described briefly in section 12. When multiple profiles are available, changes to configuration settings will only affect the profile selected at start-up; others are
unaffected.
Splash screen
When XCSoar starts up, shuts down, or loads large files, such as airspace, waypoints etc, a
progress bar with a description of the current process is shown below the safety reminder. The
current software version is displayed in the header.
XCSoar Manual (Altair version) • XCSoar-A-EN
2
1
INTRODUCTION
Last flight statistics
The previous flight’s statistics are automatically saved when XCSoar is shut down, and loaded
again at startup. This allows the flight to be reviewed even after shutting down Altair. Note that
these persistent flight statistics use approximately 85 kilobytes of storage.
Previous flight statistics are automatically reset on a new takeoff in order not to affect the current
flight.
Persistent settings
The basic settings (MacCready setting, Bugs, Ballast, QNH, maximum forecast temperature) are
preserved when XCSoar shuts down and restored when XCSoar initialises.
Exiting the program
To shut down Altair (XCSoar), press the PWR/ESC button for approx. two seconds and confirm the
shutdown process by pressing YES on the dialog that comes up.
1.4
Through-life support
Troubleshooting
A small team of dedicated developers produces XCSoar. Although we are happy to help with the
use of our software, we cannot teach you about basics of modern information technology. There
are ample existing resources dealing with these. If you have a question about XCSoar please email
us at [email protected].
You may find some solutions to standard problems in the Frequently Asked Questions (FAQ) section
of the XCSoar website.
Furthermore, we recommend to subscribe to the XCSoar users mailing list so you will be kept up
to date with latest developments.
A log file of the startup functions of XCSoar is generated to the file xcsoar-startup.log. This
is transferred to the ‘FromAltair’ directory by AltairSync if a USB drive is plugged in when Altair is
first switched on. It can then be sent to the XCSoar developers to help determine the cause if the
program crashes at startup.
XCSoarPC
XCSoarPC may be used to become familiar with XCSoar’s interface and functionality in the comfort
of one’s home. All files and configuration used by XCSoarPC are identical to the Altair versions, so
it can be helpful to try out customizations on the PC version before using them in flight.
XCSoarPC can also be connected to external devices and operates just as Altair does. Suggested
uses include:
• Connect the PC to a FLARM device to use XCSoarPC as a ground station display of
FLARM-equipped traffic.
• Connect the PC to an intelligent variometer such as Vega to test configuration settings of
the variometer.
3
XCSoar Manual (Altair version) • XCSoar-A-EN
1
1.5
INTRODUCTION
Using XCSoar safely
The use of an interactive system like XCSoar in flight carries with it certain risks due to the potential
distraction of the pilot from maintaining situational awareness and eyes outside the cockpit.
The philosophy guiding the design and development of the software is to try to reduce this distraction by minimising the need for user interactions as much as possible, and by presenting information
in a clear fashion able to be interpreted in a glance.
Pilots using XCSoar must take responsibility for using the system safely. Good practice in the use
of XCSoar includes:
• Becoming familiar with the system thoroughly through training on the ground.
• Performing clearing turns before interacting with XCSoar in flight in order to ensure there is
no collision risk with other traffic.
• Setting up the system to take advantage of automatic functions and input events so that
user interactions can be minimised. If you find yourself mechanically performing certain
interactions frequently, ask yourself (or other XCSoar users) if the software can be made to
do these interactions for you.
1.6
Graphical elements in this document
The following elements are used in this document to simplify understanding:
• Onscreen menus
• Dialogs
• Buttons
•
Warnings
•
Remarks
XCSoar Manual (Altair version) • XCSoar-A-EN
4
2
2
USER INTERFACE
User Interface
This section describes the fundamental user interface concepts used by XCSoar, and is intended
as an overview. More detailed descriptions are given in following sections.
The XCSoar display is composed of several parts:
• Map area The bulk of the screen is dedicated to the GPS moving map display. Various symbols
relating to glide computer information are overlaid on the map area. Icons and text may
appear along the lower edge of the screen to indicate status of connected devices, operating
modes etc.
• InfoBoxes A grid of data values is displayed to the right of the screen. These so-called InfoBoxes
display data from the GPS and other input devices as well as data generated by the glide
computer.
• Gauges Gauges (upper right corner) provide instrumentation displays. All gauges are optional
and some may only have meaningful information displayed when XCSoar is connected to a
supported instrument.
• Button labels and menus These buttons are drawn in black (resp. grey) text on a green background.
• Status messages Text is displayed over the map area in status message boxes. This text is
used to present detailed information to the pilot when certain events occur.
5
XCSoar Manual (Altair version) • XCSoar-A-EN
2
USER INTERFACE
• Dialog windows Larger dialog windows, usually containing graphics and buttons, are used to
present detailed data to the pilot regarding waypoint details, statistics and analysis etc.
To interact with XCSoar, you can either use the Altair buttons or external switches and devices
connected to XCSoar. For XCSoarPC, clicking the mouse over an item is equivalent to touching it.
2.1
Button labels and menus
The button menu is a set of buttons drawn on the screen and activated by hardware button presses.
Using buttons and the button menu are the primary ways the user interacts with XCSoar.
Interface basics
The menu is organised into different groups of functions, usually in the form of a hierarchy. However,
the specific menu layout depends on the hardware button configurations.
XCSoar can also accept input from external keyboards, game-pads, joysticks, stick grip switches
etc. A wide variety of functions can be assigned to these inputs.
For Altair, there are four major menus, activated by pressing one of the vertical strip of hardware
buttons on the left of the display. When a menu is activated, a strip of onscreen buttons appear
along the bottom of the display. At the last page, pressing the menu button again will turn that
menu off and the horizontal strip of onscreen buttons disappear. Three dots on the right side of a
menu title (e.g. NAV... ) indicate that there is another row of buttons, whereas three dots on the
left side (e.g.
button.
...NAV ) indicate that the menu will be closed the next time you press this menu
Pressing the particular menu button again will cycle through several pages of items. Pressing the
corresponding horizontal button will activate that item.
On the PC version (XCSoarPC), these mode buttons are activated by the F1,2,3,4 keys (menu
buttons). The F6,7,8,9,0 keys (F buttons) correspond to the horizontal strip of buttons.
XCSoar Manual (Altair version) • XCSoar-A-EN
6
2
USER INTERFACE
If the user doesn’t interact with the computer for a certain time, the menu will close automatically.
This menu timeout is configurable. The escape key on PC, or the PWR/ESC button on Altair, can
also be used to close the current menu.
Menu button labels appear as grey text instead of black if the corresponding function is not available. For example, the AAT Target button will appear grey if the task is not an AAT task.
Several menu button labels have dynamic text based on context, in order to make it clearer as
to what happens when the button is pressed. The convention is used that a button’s label describes what will happen when the button is pressed. For example, if the button says Map Off ,
then pressing the button will turn off terrain and topology, and the button label will then change to
Map On . In the menu list described below, generic labels are used.
Menu overview
This section describes the default layout of the menu system. The functions performed by each
button are explained more in detail in the following sections.
The primary menu buttons are activated by each of the vertical strip of buttons on Altair, from top
to bottom:
NAV
Navigation and task settings
DISP
Display and map settings
CONF
Configuration of XCSoar, connected devices, and in-flight settings
INFO
Display of various information dialogs
2.1.1
NAV menu
• Change ..Pt Change the current task, landing or waypoint. See 4.1 for more details.
• NavTo ..Pt Change navigation mode. See 4.1 for more details.
• Task Edit Opens Task Editor . See 4.2 for more details.
• Advance .. Manually advance to or arm next task point. See 4.2 for more details.
• Final Force Switches between automatic and forced final glide mode. See 5.1 for more details.
7
XCSoar Manual (Altair version) • XCSoar-A-EN
2
USER INTERFACE
• Team Code Opens Team Code . See 7.10 for more details.
• AAT Target Configuration of the AAT target settings. See 4.1 for more details.
2.1.2
DISP menu
• Pan On Activates pan map mode. See 3.2 for more details.
• Mark Location Drops a marker at the current glider location. See 3.7 for more details.
• Setup Display Opens Setup Display . See 2.3.6 for more details.
• Map Off Switches terrain and topology on/off.
• Default Restores default display settings.
• Zoom Auto Switches between automatic and manual zooming. See 3.1 for more details.
• Full Scrn On Switches between full screen (without InfoBoxes) and normal display.
• Bright Adjust Opens Screen Brightness . See 2.8 for more details.
2.1.3
Pan mode
• Pan Off Turns pan mode off.
• Zoom In Zooms in the map display.
• Zoom Out Zooms out the map display.
• Nearest Waypoint Opens Waypoint Browser . See 4.4 for more details.
XCSoar Manual (Altair version) • XCSoar-A-EN
8
2
USER INTERFACE
2.1.4
CONF menu
• Setup MC Opens Setup MacCready . See 5.2 for more details.
• Setup Basic Opens Basic Settings . See 5.4 for more details.
• Setup Wind Opens Wind Settings . See 6.5 for more details.
• Settings Airspace Opens Airspace Browser . See 7.7 for more details.
• Setup Vega Opens Setup Vega if Vega is connected. See 6.1 for more details.
• Setup System Opens the XCSoar configuration dialog. See 11 for more details.
• Setup Logger Opens Altair Flight Recorder Setup . See 4.8 for more details.
2.1.5
INFO Menu
• Waypoint Details Opens Waypoint Info for the active task waypoint. See 4.2 for more details.
• Nearest Waypoint Opens
Waypoint Browser
with the nearest task waypoints. See 4.4 for
more details.
• Nearest Airspace Opens Airspace Info with the nearest airspaces. See 7.6 for more details.
• Status Show Opens Status . See 2.5 for more details.
• Aux Info On Toggles the InfoBox display between normal (flight-mode specific) or auxiliary InfoBox display. See 2.2 for more details.
9
XCSoar Manual (Altair version) • XCSoar-A-EN
2
USER INTERFACE
• Analysis Show Opens Analysis . See the different ‘Analysis dialog: ...’ parts of this document
for more details.
• Checklist Opens Checklist . See 12.10 for more details.
• Message Last Repeats the last status message.
Default buttons
When no menu is active, (so-called default mode), the horizontal row of buttons in Altair perform
the following functions (from left to right):
F6
F7
F8
F9
F0
Setup
Final
Display
FR
FLARM Dsp
Basic
Force
Mode
Event
On
Pressing PWR/ESC on Altair displays labels for these default menu buttons.
Rotary knob
In default mode, the rotary knob performs the following functions:
• Outer knob counterclockwise Zoom in
• Outer knob clockwise Zoom out
• Inner knob counterclockwise (No function assigned)
• Outer knob clockwise (No function assigned)
• Knob button press Clear status message or acknowledge airspace warning
In dialog forms, the rotary knob in Altair performs the role of the cursor and enter keys:
• Outer knob counterclockwise Up cursor
• Outer knob clockwise Down cursor
• Inner knob counterclockwise Left cursor
• Inner knob clockwise Right cursor
• Knob button press Enter key
Dynamic menu labels
Certain menu items now have dynamic labels to make it clearer what happens when the menu item
is selected. The convention used is for the labels to display the action that will be performed once
the menu item is selected. Items that are not available are greyed out to indicate that selecting the
menu item will not do anything.
XCSoar Manual (Altair version) • XCSoar-A-EN
10
2
USER INTERFACE
2.2
InfoBoxes
The customizable InfoBoxes are used to display informations regarding atmosphere, flight, task, etc. The available fields are
listed in section 11.12.
Screen display modes
The screen can be toggled between the following main display modes:
• Map with standard InfoBoxes (flight mode specific; see 5.1 for more details).
• Map with auxiliary InfoBoxes
INFO .
Aux Info On
• Full-screen map, InfoBoxes hidden
DISP .
Full Scrn On
When auxiliary InfoBoxes are displayed, the word ‘AUX’ appears at the lower left corner of the map
area.
2.3
Dialog windows
XCSoar contains two categories of dialog windows: interactive ones that can be used to set up
tasks, configure and modify settings, and informational ones that simply display information.
Controls
A cursor shows the active button, tab or data field. This cursor appears as a highlighted area with
black borders around the corners. When rotating the outer knob (up/down) on Altair, the cursor
cycles through the next or previous elements (buttons, menus, fields, etc). When rotating the inner
knob (left/right), the value of the element under the cursor can be modified.
Pressing the enter key selects or activates the element under the cursor (button, data field).
Many of the dialog windows have multiple pages of information and are controlled in a consistent
fashion. Press the
or
buttons to select the next or previous page of the dialog, and the
Close button to make the dialog disappear. The PWR/ESC button can also be used to close
dialogs.
The user must close the dialog to return to the normal map mode. When a dialog has been opened,
the Altair buttons change their functions or are disabled until the dialog is closed.
11
XCSoar Manual (Altair version) • XCSoar-A-EN
2
USER INTERFACE
In some dialogs, items that are not relevant or valid are not displayed (e.g. AAT details in a non-AAT
task).
We will now list all dialogs of the current XCSoar version like they appear in the onscreen menus.
Most of them are described in detail in other sections; in these cases there is only a basic description in this part.
2.3.1
Waypoint Select
Access: In navigation mode WayPoint:
NAV .
Change WayPoint
Description: Search and change waypoints. For more details see 4.2.
2.3.2
Change Task Point
Access: In navigation mode TaskPoint:
NAV .
Change Task Pt
Description: Change the current task point. For more details see 4.1.
2.3.3
Change Landing Point
Access: In navigation mode LandingPoint:
NAV .
Change Landing Pt
Description: Change the current landing point. For more details see 4.1.
2.3.4
Task Editor
Access:
NAV .
Task Edit
Description: Set up and modify tasks. For more details see 4.2.
2.3.5
Team Code
Access:
NAV .
Team Code
Description: Setting team codes and showing team mates’ positions. For more details see 7.10.
2.3.6
Setup Display
Access:
DISP .
Setup Display
Description: Settings of the map display.
XCSoar Manual (Altair version) • XCSoar-A-EN
12
2
USER INTERFACE
• Dsp Mode Change display mode. For more details see 2.2 resp. 5.1.
• Airspace Airspace settings. For more details see 11.2.
• Gliderange Switch gliderange on/off. For more details see 3.5.
• Trail Change trail display settings. For more details see 3.4.
• Terrain Switch terrain on/off.
• Topology Switch topology on/off.
• Labels Switch waypoint labels on/off.
• Orientation Change map display orientation. For more details see 11.3.
2.3.7
Screen Brightness
Access:
DISP .
Bright Adjust
Description: Adjusts the screen brightness. For more details see 2.8.
2.3.8
Setup MacCready
Access:
CONF .
Setup MC
Description: MacCready settings. For more details see 5.2.
2.3.9
Basic Settings
Access:
CONF .
Setup Basic
Description: Basic settings. For more details see 5.4.
2.3.10
Access:
Wind Settings
CONF .
Setup Wind
Description: Wind settings. For more details see 6.5.
13
XCSoar Manual (Altair version) • XCSoar-A-EN
2
2.3.11
Access:
USER INTERFACE
Airspace Browser
CONF .
Settings Airspace
Description: Search and modify display settings of airspaces. For more details see 7.7.
2.3.12
Access:
Setup Vega
CONF .
Setup Vega
Description: Vega settings. For more details see 6.1.
2.3.13
Access:
Configuration
CONF .
Setup System
Description: XCSoar configuration settings. For more details see 11.
2.3.14
Access:
Altair Flight Recorder Setup
CONF .
Setup Logger
Description: Altair Flight Recorder Setup. For more details see 4.8.
2.3.15
Access:
Waypoint Info
INFO .
Waypoint Details
Description: Shows informations about the selected waypoint. For more details see 4.5.
2.3.16
Access:
Waypoint Browser
INFO .
Nearest Waypoint
Description: Searching of waypoints. For more details see 4.4.
2.3.17
Access:
Airspace Info
INFO .
Airspace Nearest
Description: Searching of airspaces. For more details see 7.6.
2.3.18
Access:
Status
INFO .
Status Show
Description: Overview information on the aircraft, system, and task. For more details see 2.5.
2.3.19
Access:
Analysis
INFO .
Analysis Show
Description: Shows information about air data, aircraft or tasks. For more details see the related
parts in the different sections of this document.
XCSoar Manual (Altair version) • XCSoar-A-EN
14
2
USER INTERFACE
2.3.20
Checklist
Access:
INFO .
Check list
Description: Checklist can display several pages of user-defined free text, typically this is used
for checklists.
These checklists may include: daily inspection, preflight, outlanding, pre-landing, radio procedures, and aircraft rigging and de-rigging instructions. For more details see 12.10.
2.4
Status messages
Status messages appear over the map area to present text for a short period of time. The message disappears after the time period has elapsed, and different types of message have different
periods. If necessary, status messages can be made to disappear by acknowledging the message
by pressing Enter.
Typical status messages include:
• Airspace queries
• Airspace warnings
• User interface events (e.g. changing display modes)
• Glide computer events (e.g. takeoff, turning waypoints)
Status messages do not appear while a dialog is on screen, the messages are buffered and
displayed as soon as the dialog is exited.
The duration each type of status message appears can be defined in the configuration settings.
The default duration for important messages is 30 seconds, for other messages the default duration
is 1.5 seconds.
Additional user buttons may be assigned to a status message repeat function.
2.5
Status dialog
Status shows general information about different topics and can be opened at any time. It
contains several pages with specific content and serves as general status overview.
15
XCSoar Manual (Altair version) • XCSoar-A-EN
2
USER INTERFACE
Aircraft
• Longitude Aircraft’s longitude
• Latitude Aircraft’s latitude
• Altitude Aircraft’s altitude
• Max height gain xxxxxxx
• Near Nearest waypoint
• Bearing Bearing to nearest waypoint
• Distance Distance to nearest waypoint
System
XCSoar Manual (Altair version) • XCSoar-A-EN
16
2
USER INTERFACE
• GPS lock Whether a GPS source is connected.
• Satellites in use Satellites used for GPS reception.
• Vario Whether a variometer is connected.
• FLARM Whether a FLARM device is connected.
• Flight Recorder Type of flight recorder.
• Declaration xxxxxxxx
• Supply voltage Supply voltage.
Task
• Assigned task time Minimum AAT task time.
• Estimated task time Estimated task time with current MacCready settings.
• Remaining time Remaining time to final task point.
• Task distance Task distance.
• Remaining distance Distance to final task point.
• Speed estimated xxxxxxxx
• Speed average Average speed so far.
17
XCSoar Manual (Altair version) • XCSoar-A-EN
2
USER INTERFACE
Rules
• Valid start Whether a valid Start was recognized
• Start time Start time
• Start alt Start altitude
• Start point Start task point
• Start speed Start speed
• Finish alt min Minimum finish altitude
• Valid finish Whether a valid Finish was recognized
Times
XCSoar Manual (Altair version) • XCSoar-A-EN
18
2
USER INTERFACE
• Local time Local time
• Flight time Flight time
• Takeoff time Takeoff time
• Landing time Estimated landing time
• Sunset Sunset at finish waypoint
Flight Recorder
• Type Flight Recorder Type
• Identification Flight Recorder Identification
• Version Flight Recorder Version
• Time Flight Recorder Time
• Last Declaration Time and date of last declaration
2.6
Text entry
When needed, text can be entered over a virtual keyboard. This keyboard can be opened by
pressing the
19
button on the appropriated fields.
XCSoar Manual (Altair version) • XCSoar-A-EN
2
USER INTERFACE
To enter text, rotate the knobs to choose a character with the cursor and press Enter. When the
keyboard is open, the buttons on Altair have the following functions:
ESC
Esc
2.7
NAV
Cap
DISP
Shift
CONF
a´ u¨
INFO
Enter
F5
Back
F6
Down
F7
Up
F8
Left
F9
Right
Sounds
XCSoar generates sounds for different events, and can be configured to have custom sounds for
any event. see 12.15 for details on customization.
When XCSoar is connected to the Vega intelligent variometer, it sends commands to Vega’s speech
system, to give verbal cues and warnings such as:
• Final glide through terrain
• Approaching/passing a task waypoint
• Airspace warnings
2.8
Screen
Certain aspects of the look of items on the screen can be adjusted. See 11 for more details.
The control of the screen hardware brightness can be controlled from Screen Brightness accessible from DISP .
Bright Adjust .
Refer to the Altair User’s Manual for details on Screen Brightness .
2.9
Help system
A help system now provides descriptive text for properties in most dialogs. When a property is
selected, press and hold the enter button for two seconds, then release. A window will open with
help text describing the property.
XCSoar Manual (Altair version) • XCSoar-A-EN
20
3
DISPLAY ELEMENTS
3
Display Elements
This section describes the different elements of the display.
3.1
Zoom and map scale
The map is generated in a projected coordinate system (not longitude and latitude). The map scale
may be modified (zooming) at any time and the map can be panned. All navigation functions take
account of the earth curve.
To zoom in and out in manual zoom mode, use the rotary knob.
The map scale is displayed in the lower left corner of the moving map display.
There is a facility to have two zoom settings; one when the glider is in circling flight mode, and
one in the cruise or final glide flight mode. This is the ‘Circling zoom’ option in the configuration
settings. When the user zooms in or out, it affects the current mode’s zoom setting only, so when
leaving the mode the previous mode’s zoom setting is used. If ‘Circling Zoom’ is not enabled, there
is only a single zoom level.
Auto-zoom automatically zooms in when approaching a waypoint to keep the waypoint at a reasonable screen distance. The user can still zoom out if desired. When auto-zoom is active, ’AUTO’
appears next to the map scale.
To turn auto zoom on or off, select from the menu
DISP .
Zoom Auto
When a waypoint changes (automatically, via the task selector, or by manually switching waypoints), auto-zoom returns the zoom level to what it was immediately prior to its alteration. This
has the effect of allowing users to zoom in and out manually in cruise, and when approaching a
waypoint, the system automatically zooms in.
3.2
Panning the map
A pan mode allows the user to explore areas beyond the glider. This is particularly useful when
task planning. Here is how the pan mode can be used:
1. Enable pan mode by pressing
DISP .
Pan On
2. The map can then be panned with the inner/outer rotary knob. To zoom in/out, you can use
the F6/F7 buttons in Pan mode.
21
XCSoar Manual (Altair version) • XCSoar-A-EN
3
DISPLAY ELEMENTS
3. When done, pan mode should be disabled, by activating the menu again:
DISP .
Pan Off
or by pressing ESC.
When pan is active, the text ’PAN’ appears next to the map scale and a special row of buttons is
displayed (see 2.1.3). The location of focus moves and rotates with the glider when panning.
3.3
Glider symbol
The glider symbol shows the position of the glider on the map. The orientation of the glider indicates
the estimated heading of the glider.
Course
The map is oriented in one of two ways, depending on the flight mode and the configuration settings:
• North-up Here the map is always oriented with true north up. The glider symbol is rotated
according to its track corrected for wind.
• Track-up Here the map is oriented so that the glider’s track made good is up. The north arrow
symbol points to true north. The glider symbol may be shown rotated according to the
computed heading of the glider taking wind into account.
Configuration settings can be used to further specify north or target-up when in circling mode.
These are useful to prevent disorientation when looking at the map while circling. Target-up when
circling makes it easy to determine which direction to exit the thermal.
When in North or target-up in circling modes, the glider symbol is centered on the screen. Otherwise the glider symbol is positioned 20% from the bottom of the screen, giving a good view of the
map ahead of the glider. This position is adjustable in the configuration settings.
For more details about these modes and combinations, see 11.3.
Position
If you need to know further details about your exact position, there are mainly two information
sources:
Nearest Waypoint
Access:
Waypoint Browser shows the nearest waypoints to your position.
INFO .
Nearest Waypoint
Status Aircraft The ‘Aircraft’ page of Status shows the exact position of the glider.
Access:
INFO .
Status Show
XCSoar Manual (Altair version) • XCSoar-A-EN
22
3
DISPLAY ELEMENTS
3.4
Trail
An optional trail is drawn on the map showing the glider’s path history. The colour and thickness of
the trail depends on the variometer value; with lift areas being presented in green and thicker lines,
sink areas being presented in red with thin lines. Zero lift is presented as a grey line.
If Vega or an intelligent variometer is connected with Netto output, the Netto vario value is used;
hence the colours and thickness of the trail indicates the air-mass vertical movement rather than
the glider’s vertical movement.
The trail display can be toggled between off, short (about ten minutes), long (about one hour) or
full (entire flight). This can be performed through the configuration settings or by the menu:
DISP .
Setup Display
The trail width can be adjusted in the configuration settings (see 11.3).
Note that for each of these modes, the trail is short in circling mode in order to reduce screen
clutter.
In order to assist centering thermals in the presence of wind, the trail can be artificially drifted with
the wind as it is displayed (drift compensation). In this way, the trail is referenced to the prevailing
wind rather than referenced to the ground. Since thermals drift with the wind also, the drifted trails
give a better indication of where the glider has been relative to the thermals.
An example of this is illustrated below. Note that when trail drift compensation is active (right
picture), the glider appears to be circling in a column rather than an elongated spiral (left picture).
Enabling trail drift compensation is performed through the configuration settings. The compensation is only performed whilst in circling mode; the display of the trail in cruise mode is unaffected.
This can also be performed from the wind settings dialog:
23
XCSoar Manual (Altair version) • XCSoar-A-EN
3
CONF .
DISPLAY ELEMENTS
Setup Wind
The trail drift display is useful also to show more clearly when thermals are cranked due to wind
shear.
3.5
Glide range
A reachable glide ‘footprint’ is displayed on the map display as a dashed line, indicating where the
glider would descend through the terrain clearance height. This glide range line is calculated for
tracks extending in all directions. This feature is useful in assessing range with respect to topology
when searching low for lift, and when flying in mountainous areas.
The final glide path is checked for whether the glider clears terrain by the terrain clearance height.
If clearance is not attained, a red cross appears on the map at the point where the violation occurs.
No icon is drawn if there is no task defined.
3.6
Map elements
XCSoar Manual (Altair version) • XCSoar-A-EN
24
3
DISPLAY ELEMENTS
The moving map shows:
• Waypoints
• Terrain and topology
• Markers
The map is drawn in a projected coordinate system (not latitude and longitude), and the scale can
be changed (zooming in and out), as well as panned. All navigation functions take the curvature of
the Earth into account.
Waypoints
Waypoints are displayed with different symbols depending on the waypoint type; the major distinction being landable and non-landable waypoints.
triadis engineering GmbH recommends the option ‘Alternative’ for waypoint display (see 11.11).
With this option, the waypoint symbols are drawn as shown below:
Non-landable waypoints: small black hollow circles.
Unreachable airfields: white with a grey diagonal band.
Reachable airfields: green with a grey diagonal band.
At large zoom scales, all waypoints are drawn as small black crosses.
Waypoints are optionally labelled according to one of several abbreviation schemes.
XCSoar continually calculates which landing points are within gliding range using the current wind
estimate. The estimated arrival altitude above the arrival safety height of reachable landable points
is optionally displayed next to the waypoint (see 11.3 for these configuration options). This arrival
altitude is calculated at the MacCready setting of zero.
Terrain and topology
The following topological features are drawn on the map:
• Major roads, shown as red lines
• Railway lines, shown as black lines
• Rivers, shown as blue lines
• Large water bodies (lakes), shown as blue areas
• Large cities, shown as yellow areas
Terrain is coloured according to height, and optionally shaded by sun direction or lift-generating
slope. Invalid terrain, or terrain below sea level is coloured blue.
Terrain is phong-shaded to improve visibility. Currently the shading is set up so that the virtual
lighting position is the wind bearing, thus brighter areas are on the upwind side of hills and dark
areas in the lee of the hill. The amount of phong shading and the overall terrain brightness are
configurable (see 11.4). Support for a sun ephemeris is underway.
25
XCSoar Manual (Altair version) • XCSoar-A-EN
3
DISPLAY ELEMENTS
Terrain and topology display can be switched on or off individually in the configuration settings, or
together over the following menu:
DISP .
Map Off
If the terrain file is not specified (or terrain display is turned off), the background colour of the map
window is white. All terrain below mean sea level is coloured blue. If you are flying outside the
terrain region, the background colour will also be blue.
Some other layers and labels can be turned on or off to improve the visibility. See 11.3 for more
details.
3.7
Markers
Markers are shown as small flags on the map. The markers can be dropped manually by the menu:
DISP .
Mark Location
Markers are not preserved after XCSoar is exited, however the location of all marks are appended
to the file xcsoar-marks.txt.
3.8
Active task elements
Course
The active task course is drawn on the map as a green dashed line. At all times a thick black line
is drawn from the glider to the next task waypoint and a blue arrow indicates the recommended
course to this waypoint.
Taskpoints
The start and finish taskpoint show circles or lines representing the start and finish zones or lines.
Task observation sectors are drawn as segments. Assigned area tasks also show the task sectors
or areas as a shaded region.
XCSoar Manual (Altair version) • XCSoar-A-EN
26
3
DISPLAY ELEMENTS
Start/finish
Line
Start/finish
Cylinder
Taskpoint
Sector
Taskpoint
AAT
Final glide bar
An arrow on the left side displays the calculated height difference required for the glider to complete
the task. For more details, see 5.8.
On this arrow, a letter is displayed, which indicates the current task navigation mode:
• T NavTo Task Point
• L NavTo Landing Point
• W NavTo Way Point
For more information about the navigation modes see 4.1.
3.9
Thermal profile
Statistics on climb rates in thermals are collected and displayed in a thermal band meter. It is
not shown when the glider is above final glide. It is also not shown when the glider is below the
break-off height, as you should then be focused on just staying airborne or finding an outlanding
field.
The thermal band meter shows a graph, where the vertical axis is height above the
break-off height, and is scaled according to the maximum height achieved. The horizontal axis is the average climb rate achieved at a particular height band. The horizontal axis is scaled according to the MacCready setting, and an arrow indicating this
setting, and the glider’s current height is overlaid on the shaded area. This scaling
and arrow makes it easy to see how the pilot’s MacCready setting compares with
achieved thermals and to plan the desired working height band.
When cruising between thermals, the vertical position of the arrow, indicating the glider’s height
relative to the thermal band, can be used as a reference to suggest how urgent it is to find the next
thermal. As the arrow approaches the bottom of the band, then the glider is nearing the break-off
height and the pilot should consider taking even a weak thermal.
3.10
Other
The following symbols display different informations concerning flight mode and GPS:
27
XCSoar Manual (Altair version) • XCSoar-A-EN
3
DISPLAY ELEMENTS
GPS not connected
GPS waiting for fix
Cruise
Climb
Final glide
XCSoar Manual (Altair version) • XCSoar-A-EN
28
4
CROSS COUNTRY TASKS
4
Cross Country Tasks
This section describes the handling of tasks in XCSoar.
Please note that there is always an active task in XCSoar, which contains at least a start and
a landing point (standard: homebase). This active task and its modifications are automatically
saved and restored when you switch the device off and on.
For more details about setting up and modifying tasks, see 4.2.
4.1
NAV Menu
You can modify a task before and during flight through the NAV menu.
The first three buttons of the menu have the following functions:
• NavTo .. With these buttons the navigation mode can be changed at any time:
• .. TaskPt Navigation mode ‘TaskPoint’. The course to the next task point is shown on the
map. This is standard during tasks. With
be chosen instead of the current one.
Change TaskPt
another task point can
• .. LandingPt Navigation mode ‘LandingPoint’. The course to the current landing point
is shown on the map. This is used for flying back when no specific task is flown or
when a task is aborted. All potential landing points are shown on the map. With
Change LandingPt
landing points.
another landing point can be chosen from a list of possible
• .. WayPt Navigation mode ‘WayPoint’. The course to the current waypoint is shown on
the map. With Change WayPt another waypoint can be chosen.
→ The active mode is shown as a single letter on the final glide bar (on the left of the
display).
• Change .. With these buttons, the current task, landing or waypoint can be changed at any time.
These buttons are only available for the current mode. This means that for example a
landing point can only be changed in ‘LandingPoint’ mode.
• .. TaskPt Opens the following dialog:
29
XCSoar Manual (Altair version) • XCSoar-A-EN
4
CROSS COUNTRY TASKS
Here you can chose a taskpoint from the list of the waypoints available in the task.
• .. LandingPt Opens the following dialog:
This dialog contains a list of maximum ten landing points. For each landing point,
type (A: Airfield, L: Landable field), distance, course and altitude difference to safety
altitude are displayed as well as the required glide rate to reach this point. The list is
sorted by glide rate and landing point type (airfields are at the top). Red highlighted
list elements are landing points which are near but not reachable according to the
computers calculations.
• .. WayPt Opens the Waypoint Browser in which you can select a new waypoint. For
more details about this dialog, see ‘Page: Waypoint’ in 4.2.
In addition to the first three, the following buttons can be found in the NAV menu:
• Advance (..) Advance to the next task point. This button is not available in ‘auto advance’ mode.
• Final Force Forces final glide. For more details, see 5.1.
• Team Code Opens Team Code . For more details, see 7.10.
• AAT Target Allows the setting of individual target options for AAT task points. The following
dialog is opened:
XCSoar Manual (Altair version) • XCSoar-A-EN
30
4
CROSS COUNTRY TASKS
The following fields are displayed:
• Select TP Taskpoint to modify.
• Distance Distance of the AAT target within
the AAT area.
• Radial xxxxxx
• Optimizable xxxxxx
• ETE xxxxxx
• Delta T xxxxxx
• V Achiev xxxxxx
4.2
Task Editor
This part describes setup and modification of tasks with the task editor. This dialog can be opened
through the following menu:
NAV .
Task Edit
On every page of the task editor four buttons are available below Close :
• Load With this button, saved tasks can be loaded. The task file can be chosen from the list in
the following dialog:
When a task is loaded, a copy of this file is opened as active task. For this reason,
changing the active task does not affect the original task file as long as it is not deliberately saved with the same filename and therefore overwritten.
• Save / Declare With this button, tasks can be saved and/or declared to a logger. When pressed,
the following dialog appears:
31
XCSoar Manual (Altair version) • XCSoar-A-EN
4
CROSS COUNTRY TASKS
• Save and Download Save and declare task.
• Save only Only save task.
• Download only Only declare task.
If you want to declare a task, you have to confirm this in the following dialog:
A task may be modified at any time, but it can only be declared to a logger before
flight.
• Calc Opens the task calculator. For more details, see 4.3.
• New Cleans out the current waypoint list and sets the homebase as start and finish waypoint. If
a task is already loaded, the following message appears:
Make sure the current task was saved (if necessary) before pressing New .
XCSoar Manual (Altair version) • XCSoar-A-EN
32
4
CROSS COUNTRY TASKS
Page: Overview
On this page, a brief summary of the task is displayed:
• Task type Standard or AAT
• Distance Task distance
• Enroute Time Estimated task time
Below these fields, the task points are listed (S: Start, F: Finish).
On the bottom of the page, comments about this task may be displayed.
Page: Options
33
XCSoar Manual (Altair version) • XCSoar-A-EN
4
CROSS COUNTRY TASKS
On this page, you can set the task options:
• Name Task file name.
• Type Standard or AAT
• Advance Type of advance to the next taskpoint when flying through a taskpoint area:
• Manual Manual advance throuth NAV .
Advance (manual) .
• Auto Automatic advance when the glider flies through the taskpoint area (or, for start,
finish or AAT taskpoints, when the specific requirements are met). The next taskpoint
is automatically chosen from the task point list.
• Arm The pilot has to arm advance manually in order for the computer to advance when
the waypoint requirements are met. This can be done through NAV . Advance ..
.
• Arm Start The start taskpoint has to be armed manually. All other taskpoints are advanced automatically.
When the glider reaches the taskpoint area in “arm start” or “arm” mode, status messages
are issued to remind the pilot of advancing the waypoints. At start, XCSoar announces
that the glider is in the start area or behind the start line.
• OLC Support Switch on/off OLC computation. See 4.7 for more details about OLCs.
• TkOff and Ldg WP Define start and landing point. xxxxxxxx
• Alternate Start Points Switch on/off the use of alternate start points. If turned on, alternate start
points can be defined over the
point.
Altern. Starts
in the ‘Taskpoint Detail’ dialog of the start
• Enroute Zone Type Task point zone type:
• Cylinder Cylinder with specified radius.
• FAI Sector 90 degree arc centered about the bisector of inbound and outbound legs, with
specific distance from circle center.
• DAe German sector type. Equivalent to a 0.5km cylinder plus a 10km FAI sector.
Start and finish type may be set separately (see next page of the task editor).
• Enroute Zone Radius Zone radius of the task points.
• AAT Min time (Only AAT) Sets the minimum AAT time. If during the flight the computer notes
that the estimated task time is shorter than the minimum AAT time, a status message is
issued.
XCSoar Manual (Altair version) • XCSoar-A-EN
34
4
CROSS COUNTRY TASKS
Page: Waypoints
On this page, all task points are listed. The following buttons are available:
• Insert With this button, new task points can be added through the following dialog:
In this dialog you can search and select waypoints. Filters (name, distance, direction, type)
on the left side make this search easier. Distance and direction are always relative to the
aircraft. On the bottom of the page, five buttons have preset filter functions:
• Near Sets the field ‘Distanz’ to 25km. When pressed again, the value changes to 50, 75
and 100km. All waypoints within this distance are displayed in the list.
• Ahead Sets the field ‘Direction’ to HDG(360◦ ). All waypoints within a certain angle (30◦ )
on both sides of the aircrafts heading direction are displayed.
35
XCSoar Manual (Altair version) • XCSoar-A-EN
4
CROSS COUNTRY TASKS
• Landable Sets the field ‘Type’ to ‘Landable’. All landable waypoints are displayed.
• Airport Sets the field ‘Type’ to ‘Airport’. All airports are displayed.
• Home xxxxxxxx
These filters may be used in combination.
• Remove Removes the selected waypoint from the list.
A task always has at least a start and a finish task point (standard: homebase). These
can not be deleted.
• Up Moves the selected task point up (earlier in the task).
• Down Moves the selected task point down (later in the task).
To modify a task point, select it and press Enter. The following dialog appears:
In this dialog, name, position and altitude of the taskpoint are displayed. For start- and finish, as
well as for AAT task points, type and radius can be defined additionally.
On the left side, below Close , two more buttons are available:
• Select Waypoint Opens Waypoint Select to replace the current taskpoint with a new one.
• Edit Waypoint Allows editing of the taskpoint’s properties.
These modifications of a task point only affect the task point for the current task; the
original waypoint in the database is not modified.
XCSoar Manual (Altair version) • XCSoar-A-EN
36
4
CROSS COUNTRY TASKS
Page: Rules
On this page you can set the rules for the current task:
• Start max Speed Maximum allowed velocity in start area. 0 = no maximum velocity.
• Start max Height Maximum allowed height over ground at task start. 0 = no maximum height.
• Finish min Height Minimum height over ground at task finish. 0 = no minimum height.
• FAI Finish Height FAI Finish height (1000m rule).
• Online Contest Rules for OLC path optimization:
• Sprint Conforms to FAI IGC League rules. Up to 5 points including start and finish, maximum duration 2.5 hours, finish height must not be below start height.
• Triangle Conforms to FAI OLC triangle rules. Four points with common start and finish.
For tasks longer than 500km, no leg less than 25% or larger than 45%; otherwise no
leg less than 28% of total. Finish height must not be lower than start height less 1000
meters.
• Classic Conforms to OLC classic rules. Up to seven points including start and finish,
finish height must not be lower than start height less 1000 meters. Points awarded
80% on second last leg and 60% on last leg.
37
XCSoar Manual (Altair version) • XCSoar-A-EN
4
CROSS COUNTRY TASKS
Page: IGC Settings
On this page you can specify the IGC specific task parameters used for declaration.
4.3
Task calculator
The task calculator is essetially used for AATs. It shows informations about the current task:
• Assigned task time (Only AAT) Minimum AAT task time.
• Estimated task time Estimated task time at current MacCready.
• Task distance Remaining distance to finish task point.
• Set MacCready Allows modification of MacCready and shows the influence of these modifications on the estimated task time.
XCSoar Manual (Altair version) • XCSoar-A-EN
38
4
CROSS COUNTRY TASKS
• Set range (Only AAT) Allows modification of turning point positions inside the remaining AAT
areas (-100% to +100%) and shows the influence of these modifications on estimated task
time and distance.
• Speed remaining Estimated speed for the remaining part of the task at current MacCready.
• Achieved MacCready Achieved MacCready value.
• Achieved Speed Achieved average speed.
These buttons are available:
• Close MC Closes the task calculator and saves the MacCready modification. When pressing
Close , the dialog is closed without saving the MacCready modification.
• Optimise Sets the modifiable fields to optimal values for AAT.
• Target Opens Target . For more details see 4.1.
4.4
Waypoint Browser
This dialog may be accessed several ways:
• DISP .
Pan On .
• INFO .
Nearest Waypoint
Nearest Waypoint
In the waypoint browser you can search for waypoints and display information about these waypoints. Filters (name, distance, direction, type) on the left side make this search easier. Distance
and direction are always relative to the aircraft. On the bottom of the page, five buttons have preset
filter functions:
39
XCSoar Manual (Altair version) • XCSoar-A-EN
4
CROSS COUNTRY TASKS
• Near Sets the field ‘Distanz’ to 25km. When pressed again, the value changes to 50, 75 and
100km. All waypoints within this distance are displayed in the list.
• Ahead Sets the field ‘Direction’ to HDG(360◦ ). All waypoints within a certain angle (30◦ ) on both
sides of the aircrafts heading direction are displayed.
• Landable Sets the field ‘Type’ to ‘Landable’. All landable waypoints are displayed.
• Airport Sets the field ‘Type’ to ‘Airport’. All airports are displayed.
• Home xxxxxxxx
These filters may be used in combination.
If you need detailed information about a waypoint, select it and click Enter.
opened.
4.5
Waypoint Info
is
Waypoint Info
This dialog can either be opened through the waypoint browser or the following menu:
INFO .
played.)
Wegpunkt Details
(Informations about the nearest Waypoint are dis-
In Wegpunkt Info , additionally to position and general waypoint information, two ‘Alt diff’ values
are displayed. These show the additional altitudes which are needed to reach the waypoint above
the required safety height from the current gliders position. The first value is referred to MacCready
= 0, the second to the current MacCready.
XCSoar Manual (Altair version) • XCSoar-A-EN
40
4
CROSS COUNTRY TASKS
4.6
AAT
AAT Targets
A target is a point within an AAT area that the pilot intends to fly to. These targets can be moved
within the AAT areas so the pilot can adjust the effective distance of the task. Targets may be set
on the ground, during task planning, and modified during flight.
When flying an AAT task, the navigation system directs the glider to the target, and statistics like
distance to waypoint are also relative to the target rather than the waypoint of the AAT area itself.
Automatic task waypoint advancement normally triggers when entering an AAT area, so if the pilot
wishes to fly to the targets, either the ‘arm start’, ‘arm’ or ‘manual’ advancement modes should be
used when flying AAT tasks.
Manually moving targets
In order to make the specification of targets more straightforward, their location is defined by a
range parameter that determines how far from the minimum to maximum possible distance the
target is. This is expressed as a percentage. For example, with range set to 100%, the target is
located to give the maximum overall task distance. With range set to −100%, the target is located
to give the minimum overall task distance.
Zero range yields a nominal task distance: for sectors the target is half way along the bisector
radial; for cylinders the target is in the center of the cylinder.
The targets can be modified in two ways:
• In
Task calculator (see 4.3), the ‘Set Range’ field adjusts the targets of all remaining
waypoints in the task.
• In Target (see 4.1), the range of each waypoint may be individually adjusted.
AAT targets and task calculator
Task calculator can be helpful to check the influence of changes (atmosphere, polar, MacCready,
etc) on the estimated task time. It is recommended to keep an eye on the task calculator during
an AAT task in order to be able to modify settings (e.g. MacCready, AAT target position, etc) if
necessary.
Target projection
XCSoar continually analyses the path of the glider through AAT sectors to find the points in previous
AAT sectors through which the achieved scoreable distance will be greatest. Internally, the program
moves the targets for previous AAT sectors, which are then the optimal targets.
In certain conditions, targets for the current AAT sector may be moved automatically:
• When inside an AAT sector, the target in that sector is moved to a line projecting from the
previous sector’s target through the aircraft, at the same distance from the previous sector’s
target to the target prior to entering the sector. The effect of this is to allow pilots to choose
to enter an AAT sector in a different direction or offset from the direct line from the previous
target to the current target.
41
XCSoar Manual (Altair version) • XCSoar-A-EN
4
CROSS COUNTRY TASKS
• While the aircraft is in the AAT sector and the distance from the previous target to the
aircraft is greater than the distance from the previous target to the current target, the target
is moved further along the projected line from the previous target to the aircraft, just beyond
the aircraft. Hence, the black track line will not be visible but the blue optimal track arrow will
point along this projected direction.
4.7
OnLine Contest
Analysis contains a page ‘OnLine Contest’ which can be used to show the optimal path and
estimated score. The rules for OLC optimizing can be set on the page ‘Rules’, field ‘Online Contest’
of the Task Editor :
• Sprint Conforms to FAI IGC League rules. Up to 5 points including start and finish, maximum
duration 2.5 hours, finish height must not be below start height.
• Triangle Conforms to FAI OLC triangle rules. Four points with common start and finish. For
tasks longer than 500km, no leg less than 25% or larger than 45%; otherwise no leg less
than 28% of total. Finish height must not be lower than start height less 1000 meters.
• Classic Conforms to OLC classic rules. Up to seven points including start and finish, finish height
must not be lower than start height less 1000 meters. Points awarded 80% on second last
leg and 60% on last leg.
The Sprint rules require the start altitude to be the lowest altitude in the flight after release from
tow. The detection of this start point can be enabled in Task Editor by turning the ‘OLC Support’
field to ON.
When flying OLC, either AAT or non-AAT tasks may still be used to manage the flight navigation.
During flight, if the ‘Optimise’ button in the OLC page of the analysis dialog is pressed, the computer
will optimise the current flight with respect to the selected OLC rules.
XCSoar Manual (Altair version) • XCSoar-A-EN
42
4
CROSS COUNTRY TASKS
In the OLC analysis page, the aircraft track is shown as a thin green line, and after optimisation,
the optimal path is shown as a thick red dashed line.
If continued flight in final glide will result in higher score, the displayed results are shown as ‘In
progress’ and a blue line shows the projected path to improve the score. For Sprint and Classic
OLC types, this path is extended in the direction to the current waypoint. For Triangle OLC type,
this path is extended in the direction to produce the largest triangle.
The score and computed optimal distance is approximate.
If continued flight in final glide will not achieve a higher score, or if the aircraft has landed, the
displayed results are shown as ‘Finished’.
Depending on the duration of the flight, the time required to calculate the optimum path may take
up to 10 seconds.
4.8
Logger
A flight logger conforming to the IGC file specification can be used to record flights.
Several flight loggers are accessible via XCSoar:
• A software-based logger. All versions of XCSoar have this functionality. The logger conforms to the IGC standard but is not certified.
• The PRO version of Altair has an internal IGC certified logger device. XCSoar communicates with the logger as if it were an external serial device.
• XCSoar can also send declarations to some external logger devices, such as the EW logger. For this to work, the device name must be specified in the “Devices” section of the
configuration settings.
When the internal software logger is active, a small diamond in the lower right corner of the map
area flashes once per second.
By default, XCSoar is set up to automatically start and stop the internal software flight logger when it
detects the aircraft is flying and when it has landed, respectively. Only when the logger is manually
started it does ask if the flight is to be declared; when automatically starting it automatically declares
the current task.
If a task has been declared, then subsequent attempts at modifying the task result in a warning
message asking to confirm whether the action is to be taken and invalidate the declaration. This is
intended to make it harder to accidentally modify the task resulting in a failed declared task.
The XCSoar software logger, when started, checks for 500kB of free space on the file storage.
If there is insufficient space, it will automatically delete IGC files, oldest first, in order to free up
500kB. It does not ask the user for confirmation before performing this operation.
The internal software logger buffers data so that when it starts (automatically or manually) up to 60
seconds of data prior to starting is recorded. This means that the software logger now adequately
captures the full takeoff.
Configuration
The connected Logger can be configured through the following menu:
43
XCSoar Manual (Altair version) • XCSoar-A-EN
4
CONF .
CROSS COUNTRY TASKS
Setup Logger
XXXXXXXX –¿ 1zu1 bernehmen aus Altair maintenance?!
XCSoar Manual (Altair version) • XCSoar-A-EN
44
5
GLIDE COMPUTER
5
Glide Computer
This section focuses on how XCSoar’s glide computer works and is recommended reading so you
understand the specific details of calculations being performed and how to use the software properly. It assumes a basic knowledge of cross-country soaring, but is suitable reading for competition
pilots as well as pilots engaging in casual cross-country touring.
5.1
Flight modes
XCSoar automatically detects the difference between thermal (circling) flight and cruising flight.
After about 30 seconds of circling flight the software will switch from cruise to climb mode. After
about 30 seconds of straight line flight the software will switch from climb to cruise mode.
The cruise modes are further divided into final glide and normal cruise. Final glide is active when
the last waypoint in the task is active, or when the task is in abort mode.
• Cruise The glider is not circling and active waypoint is not the finish point.
• Circling The glider is circling (though it may not be climbing).
• Final glide The glider is not circling and the active waypoint is the final one in the task.
The specific computations performed by XCSoar are of course dependent on this flight mode. The
display changes in each mode, principally, the InfoBoxes may be set up differently for each mode
(see paragraph InfoBoxes); secondly there is a facility to automatically change zoom between
circling and other flight modes (this is called ‘circling zoom’).
Switching between the different flight modes is automatic. Circling is enabled when the glider
turns (typically three quarters of a turn). It is possible to have circling mode switched based on an
external input (e.g. from a pilot-operated switch).
A small symbol is drawn on the lower right corner of the map area to indicate which flight mode the
computer is in.
Final glide mode can be forced even if the active waypoint is not the final waypoint. There are two
ways to do it:
• NAV .
Final Force
• F6 (A status message confirms that final glide mode is enabled)
This toggles between forced final glide, and normal (automatic) operation.
Final glide mode can also be forced automatically if at any stage in the flight the aircraft is above
the final glide slope. This is a configuration option called ‘Auto Force Final Glide’, disabled by
default. This option is useful when flying short tasks in which the aircraft may well be above final
glide turning the penultimate waypoint.
InfoBoxes
In addition to the three standard display modes, an auxiliary set of InfoBoxes may be displayed in
any flight mode. This is useful if the pilot has information he wants to be able to view no matter
what mode the computer is in.
There are two ways to choose the display mode:
45
XCSoar Manual (Altair version) • XCSoar-A-EN
5
• DISP .
GLIDE COMPUTER
Setup Display
• F7
For informations about individual customization of the InfoBoxes see 11.12.
5.2
MacCready settings
When connected to a supported intelligent variometer, adjusting the MacCready setting on the
variometer will change the setting in XCSoar. If no variometer is connected, the MacCready value
can be adjusted through the following menu:
CONF .
Setup MC
Auto MacCready
XCSoar can adjust the MacCready ring setting automatically to relieve the workload on the pilot.
Two methods of updating the MacCready ring setting are available:
• Final glide During final glide, MacCready is adjusted in order to arrive at the finishing point
in minimum time. For OLC sprint tasks, the MacCready is adjusted in order to cover the
greatest distance in the remaining time and reach the finish height.
• Average climb When not in final glide, MacCready is adjusted to the average climb rate achieved
in all thermals.
Additionally, both methods may be used, so that before reaching final glide, the MacCready setting
is adjusted to the average climb rate, and during final glide it adjusts the setting to give minimum
time to arrival.
The method that is used is defined in the configuration settings (page ‘Glide Computer’, field ‘Auto
Mc Mode’). The default setting is ‘Final Glide’.
You can enable/disable Auto MacCready in Setup MacCready .
When Auto MacCready is enabled, the MacCready InfoBox displays ‘AUTO’ instead of ‘MANUAL’;
and the MacCready indicator in the variometer gauge displays ‘AutoMc’ instead of ‘Mc’.
The Auto MacCready methods are described in further detail below.
Final glide
When above final glide altitude, the MacCready ring setting may be increased, resulting in a higher
speed to be commanded. Because the ring setting has increased, this also increases the minimum
strength of the thermal that would be efficient to stop and circle in.
XCSoar Manual (Altair version) • XCSoar-A-EN
46
5
GLIDE COMPUTER
Similarly, when below final glide altitude, the MacCready ring setting my be decreased, resulting
in a lower speed to be commanded. Because the ring setting has decreased, the pilot may be
prepared to stop and circle in weaker thermals.
Auto MacCready performs this adjustment automatically and continuously. Typically it is meaningless to enable this mode before reaching final glide altitude, or nearly so, because early in the flight
the glider will be very much below the final glide altitude and the Auto MacCready function would
then drive the MacCready ring setting to zero.
Average climb
This method sets the MacCready to the average climb rate achieved across all thermals in the
current flight. As such, it takes into account the time spent centering the thermal. The value is
updated after leaving a thermal.
Since MacCready theory is optimal if the MacCready setting is the average climb rate of the next
expected climb, this method may give suboptimal performance (commanding speed too slow) if the
conditions are improving; and similarly may be non-conservative if the conditions are deteriorating
(commanding speed too high). Similarly, if the pilot continues to climb in weak thermals, this will
reduce the average and may therefore encourage the pilot to continue to select weak thermals.
As a result of these limitations, the pilot should be aware of how the system operates and adjust
his decision-making accordingly.
5.3
Glide polar
The glide polar can be defined in the configuration settings (see 11.7). The glide polar specifications of a small selection of glider types, representing major classes of gliders, are built into
XCSoar, and these may be used as an approximation for other gliders if no better glide polar can
be found. However, for most accurate results, it is advisable to use the correct glide polar for your
particular aircraft type.
The glide polar is adjusted in flight by XCSoar to account for degraded performance due to bugs
and ballast.
47
XCSoar Manual (Altair version) • XCSoar-A-EN
5
GLIDE COMPUTER
The build-up of bugs on the wing’s leading edge, as well as rain droplets on the wing, affect the
aerodynamic performance. It is the pilot’s responsibility to judge and update the bugs value during
flight. The bugs value is expressed as a percentage of the clean glider’s performance. For example,
at 100% bugs value, the glider performs as a clean glider, and at 50% bugs value, the glider’s sink
rate is doubled when compared to a clean glider.
The ballast value is expressed as a percentage of the glider’s total ballast capacity. Depending
on the specific construction of the glide polar file, this may optionally include a weight margin to
provide for different pilot weights. When flying with no ballast, a heavy pilot may set a ballast value
of perhaps 10% so that the polar is appropriately adjusted for the increased cockpit weight.
The current glide polar and all up weight can be reviewed in Analysis .
5.4
Basic settings
Use Basic Settings to modify ballast, bugs (Clean), QNH or temperature settings before or
during flight. It is accessed via the menu under
CONF .
Setup Basic
• Ballast The ballast setting is used to modify the polar to account for any water ballast carried
during the flight. A ballast setting of 100% modifies the polar to account for a full load of
water ballast.
• Clean The bugs setting (’clean’) determines the amount the polar is degraded due to contamination during a long flight. A ’clean’ setting of 100% will cause the software to use the clean
polar. A ’clean’ setting of 50% will degrade the polar by 50%, effectively doubling the sink
rate for a given airspeed.
• QNH Use this dialog both before and during the flight to record the mean sea level atmospheric
pressure, also known as QNH pressure. The software uses the values entered to convert
airspace flight levels into altitudes. If connected to a supported intelligent variometer with
an altimeter, the altitude is updated on this dialog as the QNH pressure is adjusted. This
makes it easy to set the QNH pressure if the airfield elevation is known.
On system startup, after the GPS has acquired lock, and if a barometric altitude source is
connected (e.g. Vega, Altair Pro, FLARM), the QNH is automatically adjusted. This adjustment sets the QNH such that the barometric altitude equals the terrain altitude.
XCSoar Manual (Altair version) • XCSoar-A-EN
48
5
GLIDE COMPUTER
The QNH is only updated if the aircraft is on the ground for more than 10 seconds, so that if
XCSoar is restarted during flight, QNH will not be adjusted. The update only occurs also if
the terrain database is valid at the current aircraft location.
• Max Temp The maximum forecast ground temperature is used by the convection forecast algorithm (see 6.7) in its determination of estimated convection height and cloud base.
5.5
Speed to fly
When used in conjunction with an intelligent variometer that produces indicated airspeed measurements, a speed command chevron is drawn on the variometer gauge.
XCSoar continuously calculates two types of speed to fly:
• Dolphin speed This is the instantaneous, best speed to fly in rising or descending air, adjusted
for wind if in final glide mode.
• MacCready speed This is the best speed to fly during cruise in still air, adjusted for wind if in
final glide mode.
The user can specify a maximum manoeuvring speed in the configuration settings, which limits the
speed-to-fly in MacCready calculations to realistic values.
Different pilots have personal preferences as to whether they prefer to fly in so-called ‘block MacCready’ style, in which they fly constant speed between thermals according to the MacCready
speed; or to fly in ‘dolphin’ style, in which they fly at varying speeds according to the continuously
changing Dolphin speed value.
A configuration option ‘Block speed to fly’ (see 11.5) can be used to specify whether dolphin or
block speed to fly is used. The InfoBox ‘V Opt’ shows the optimum speed according to whichever
mode is selected. When connected to the Vega intelligent variometer, the speed command sounds
are based on this optimum speed value.
49
XCSoar Manual (Altair version) • XCSoar-A-EN
5
GLIDE COMPUTER
Speed to fly with risk
The speed to fly system can be compensated for risk, in which the MacCready setting used for
calculating the speed to fly (in both Block or Dolphin modes) is reduced as the glider gets low. This
feature performs automatically what many pilots use to do manually. The theory governing how this
is implemented in XCSoar is based loosely on the paper by John Cochrane, “MacCready Theory
with Uncertain Lift and Limited Altitude” Technical Soaring 23 (3) (July 1999) 88-96.
A configuration parameter γ (‘STF risk factor’, in the configuration settings under page ‘Glide Computer’) controls how the risk Mc value is calculated. The γ factor determines the fraction of the
current MacCready setting as a function of the height fraction. The height fraction used in this
calculation is the ratio of the height above the break-off height above terrain (h) to the height of the
maximum climb above the break-off height above terrain (htop ).
For the default value, γ = 0.0, there is no compensation – the risk Mc is the same as the Mc setting.
For γ = 1.0, the risk Mc is scaled linearly with the height fraction h/htop . For intermediate values
of γ, the risk Mc varies smoothly with the height fraction, such that the risk Mc is small only when
low.
Low values of γ are best when pilots do not want to slow down as they get low (but risk out-landing);
high values of γ can be used for very cautious pilots but will result in lower average speeds.
A value of γ = 0.3 is recommended.
5.6
Safety heights
Three safety heights are defined to provide a degree of safety margin in glide computer calculations.
XCSoar Manual (Altair version) • XCSoar-A-EN
50
5
GLIDE COMPUTER
The safety heights are:
• Arrival height This is the elevation above ground at which the glider is required to arrive at for
a safe landing circuit, plus some safety margin. This value is used in final glide calculations
as well as the determination and display of reachable landable fields.
• Terrain clearance This is the elevation above ground, below which any computed glide path
is considered to provide inadequate clearance to the terrain. The terrain clearance value
affects the glide range display, and if the final glide at any point dips below the terrain clearance elevation above ground, a warning marker (large red cross) is drawn on the screen.
If the terrain elevation model is invalid or out of range, then the glide range display and the
terrain warning marker is disabled.
• Break-off height This is the elevation above ground, below which it is recommended for pilots to
consider the cross-country task failed and to concentrate on finding a suitable field to land
in. Currently this break-off height does not affect XCSoar in any way but it is reserved for
future use to provide warnings etc.
These may be set to zero but this is highly discouraged since all glide computers,
instruments and data sources (such as terrain elevation models) are subject to some
degree of error and the atmosphere through which the glider flies is also unpredictable.
XCSoar determines the height above sea level of any turn point or landing point either from the
waypoint file, of if no height is specified in the waypoint file, from the terrain file.
Landable fields are only marked as reachable if the estimated arrival elevation above ground is
above the arrival altitude safety height, and the glide path does not intersect the terrain clearance
safety elevation. The estimated arrival altitude (above safety height) displayed next to landable
waypoints is calculated for best glide angle at zero MacCready ring setting (Mc= 0), adjusted for
wind.
At all times, if the final glide through terrain marker (a red cross) is displayed on the screen, then
the glider must climb in order to safely reach the destination.
51
XCSoar Manual (Altair version) • XCSoar-A-EN
5
GLIDE COMPUTER
When calculating the arrival heights of landable fields (for map display purposes and in abort
mode), a safety MacCready value can be specified in the configuration settings. This safety value
is set to zero by default. Larger values make the arrival height calculation more conservative.
All these safety heights can be defined in the configuration settings on the page ‘Safety factors’.
5.7
Final glide calculator
The final glide calculator uses many sources of information when determining the altitude required
to reach your goal or the next waypoint. These are:
• The glider’s polar data;
• The wind speed and direction;
• The distance and bearing of the goal or waypoint;
• The MacCready setting;
• The altitude of the waypoint or goal;
• A user specified safety margin (arrival height).
• The glider’s total energy if XCSoar is connected to an instrument with an air speed indicator.
From the parameters shown above, two altitudes are derived.
• Altitude required This calculation is the total altitude required for the glider to reach the goal
plus any user safety margin.
• Altitude difference This calculation is the altitude required to glide to the goal plus any safety
arrival altitude plus the altitude of the goal, minus the altitude above mean sea level of the
glider. The result represents either your height above glide slope, or your arrival height at
goal. If no goal altitude is provided in the turn-point file, XCSoar will use the terrain file
altitude at the goal.
The final glide calculation is extended to calculate the altitudes required and difference to complete
the entire task. This capability is sometimes referred to as final glide around multiple turn points.
The altitude difference to complete the task is displayed continuously as an arrow and in numeric
form on the left hand side of the map area of the screen.
The height required is adjusted for energy height, compensating for the fact that the kinetic energy
of the glider can be converted to height (potential energy). The kinetic energy that is convertable
to height is calculated from the difference in the true airspeed to the true airspeed for best glide.
This compensation is most accurate when airspeed data is available to XCSoar, otherwise the true
airspeed is estimated from the wind speed and ground speed.
XCSoar Manual (Altair version) • XCSoar-A-EN
52
5
GLIDE COMPUTER
5.8
Display of altitude required
On the left side of the map display, a box displays the calculated height difference required for the
glider to complete the task, or reach the final waypoint. If the glider is above the minimum height
required, a green arrow bar is drawn above the box indicating the amount of excess height. If the
glider is below the minimum height required, a red arrow bar is drawn below the box indicating the
amount of height deficit.
Above
Below
The scale of the final glide bar is +/− 500 meters.
Dual height required bars
The final glide bar has been modified to show the effect of MacCready setting on the altitude
difference to complete the task. The display shows in an arrow outline the altitude difference
calculated at zero MacCready, as well as the usual filled arrow that displays the altitude difference
calculated at the current MacCready setting. The number shown in the box next to the final glide
bar still shows the altitude difference at the current MacCready setting.
Examples of the appearance in various configurations is shown below:
• Above final glide at Mc= M and Mc= 0 Here the display shows that at the current MacCready
setting, the aircraft is above final glide (filled arrow). The hollow arrow shows the additional
excess height.
• Below final glide at Mc= M , and above at Mc= 0 Here the display shows that at the current
MacCready setting, the aircraft is below final glide (filled red arrow). The hollow green arrow
shows that at Mc= 0, the aircraft is above final glide.
53
XCSoar Manual (Altair version) • XCSoar-A-EN
5
GLIDE COMPUTER
In this situation, if the glider is climbing, the pilot can assess whether to leave the thermal
early and commence a final glide descent at a reduced MacCready setting; or continue to
climb. It is useful to switch on the auto MacCready setting as this will automatically adjust
the MacCready value to the optimal value – and then it is simple for the pilot to compare
the achieved lift rate with the MacCready value. When the achieved lift rate drops below the
MacCready value, the thermal should be left.
• Below final glide at Mc= M , and just below at Mc= 0 Here the display shows that at the current MacCready setting, the aircraft is below final glide (filled red arrow). The hollow red
arrow shows that by reducing the MacCready setting to zero, the aircraft is nearly at final
glide.
• Below final glide at Mc= M , and at Mc= 0 Here the display shows that at the current MacCready setting, the aircraft is below final glide (filled red arrow). No hollow red arrow shows
that even at Mc= 0 the aircraft is well below final glide.
5.9
Task speed estimation
Some of XCSoar’s internal calculations make use of estimates of the time required to reach each
waypoint in the task. This information is used in some InfoBox displays, Assigned Area Task
calculations, and sunset warnings.
The glide computer assumes the glider’s average cross-country speed is equal to that achievable
under classic MacCready theory taking wind into account, with the current MacCready setting. This
method is used for estimating arrival times and task finish time.
The following task speed measures are defined:
• Task speed remaining This is the estimated speed for the rest of the task according to MacCready theory.
• Task speed average This is the task speed to date compensated for altitude required to complete the task.
• Task speed achieved This is the task speed to date, compensated for altitude differences from
the task start altitude.
XCSoar Manual (Altair version) • XCSoar-A-EN
54
5
GLIDE COMPUTER
• Task speed instantaneous This is the instantaneous estimated speed along the task. When
climbing at the MacCready setting, this number will be similar to the estimated task speed.
When climbing slowly or flying off-course, this number will be lower than the estimated task
speed. In cruise at the optimum speed in zero lift, this number will be similar to the estimated
task speed. This measure, available as an InfoBox is useful as a continuous indicator of the
cross-country performance. It is not used in any internal calculations.
In addition, a measure called achieved MacCready is calculated. This is computed by finding the
MacCready setting that under classical MacCready flight would produce the same task speed as
has been achieved. This value is higher than the actual MacCready setting when the glider has
climbed faster than the MacCready setting or when the glider has flown in cloud streets etc. The
achieved MacCready is used in the task calculator dialog.
Task speed estimates for achieved speed, are compensated for altitude variations, such that the
effects of climbs are taken into account in calculating the average task speed. Considering two
gliders A and B flying the same task. Glider A has cruised faster, trading off height for speed.
Glider B is behind A but higher and will save time later since it has less climbing to do to complete
the task.
While flying AAT tasks, the task speed measures may change when the glider is inside an AAT
area or when the AAT range or targets are adjusted by the pilot. This is due to the task distance
achieved and remaining when such events occur.
5.10
Optimal cruise track
In order to help reduce the cross-track error when flying between non-final waypoints, XCSoar
calculates an adjustment to the cruise track, called the ’optimal cruise track’. This track is adjusted
so that it compensates for the wind drift incurred when circling, and as such it needs to estimate
the proportion of time spent circling according to classical MacCready theory.
The optimal cruise track is displayed on the map area as a large blue arrow, and it recommends
the glider steers so that the glider’s track is lined up with the blue arrow during cruise such that
55
XCSoar Manual (Altair version) • XCSoar-A-EN
5
GLIDE COMPUTER
it will arrive at the waypoint in minimum time. When the wind is negligible, or when the computer
is in final glide mode, this arrow will point along the black line that indicates the track to the next
waypoint.
The calculation and display of optimal cruise track is a unique feature of XCSoar. Commonly, when
cruising between thermals, glide navigation systems direct the glider to steer so that the glider’s
track points directly at the target. Ideally, the glider’s track is collinear with the line from the previous
to next waypoint, such that the cross-track error is small and hence the glider travels the minimum
distance between waypoints.
However, because the glider usually has to stop cruising in order to climb in lift, whilst circling the
glider drifts downwind and therefore the cross track error can increase. After several cycles of
cruise-climb, the overall track becomes curved.
For the case where the final waypoint is active and one is above final glide, circling is not necessary
so this simple scheme is optimal.
5.11
Analysis dialog: Glide polar
The analysis dialog can be used to check the glide polar, which can be accessed via:
INFO .
Analysis Show
The polar page shows a graph of the glide polar at the current bugs and ballast setting. It also
shows the calculated best LD and the speed at which it occurs, and the minimum sink and the
speed at which it occurs. The current aircraft all up weight is displayed in the title.
In this dialog page, Settings opens Basic Settings (e.g. to adjust the bugs/ballast).
The glide polar page of the analysis dialog shows the average total energy sink rate at each speed
achieved in flight, when connected to a supported intelligent variometer (e.g. Vega). This facility
allows pilots to perform test flights in stable atmospheric conditions, such as on calm days with no
wind, and inspect the measured glide polar. By comparing the measured glide polar with the model
XCSoar Manual (Altair version) • XCSoar-A-EN
56
5
GLIDE COMPUTER
glide polar, this enables investigation of whether the glider is being flown optimally with respect to
flap settings and also to investigate the benefits of performance optimisation such as sealing control
surfaces etc.
Data is collected only when in cruise mode and at G loading between 0.9 and 1.1; so pilots performing test flights should attempt to fly smoothly with wings level.
5.12
Flight notifications
Notifications, appearing as status messages, appear when the following conditions are detected:
• Estimated task time too early for AAT
• Estimated arrival at finish past sunset
• Significant wind change
5.13
Sunlight and time
A sun ephemeris computes the time of sunset, which is displayed in the Aircraft Status dialog
(see 12.15). Note that local terrain and atmospheric conditions may result in poor visibility before
the displayed sunset time.
If the expected arrival time at the final waypoint in the task is past sunset, a status message warning
is issued.
57
XCSoar Manual (Altair version) • XCSoar-A-EN
6
6
ATMOSPHERE AND INSTRUMENTS
Atmosphere and Instruments
XCSoar maintains an internal model of the atmosphere based on statistics gathered from the
flight path and other instruments connected to the device. These statistics and measurements are
approximate and the weather can on some days change rapidly. The pilot should at all times keep
observing the weather. In particular, when out-landing in fields, the pilot should look for indicators
on the ground to confirm wind strength and direction.
6.1
Variometer
A needle-dial style display shows the variometer measurements. The gross variometer reading drives the main arrow on the dial, and in the center of the dial the instantaneous measurement is shown as text. Additionally, speed command arrows
(chevrons) appear above or below the gross variometer measurement. Chevrons
pointing up indicate slowing down is recommended. Chevrons pointing down indicates that speeding up is recommended.
When the averager value is displayed, the value shown is the average gross climb rate over the previous 30 seconds when in circling mode, and the netto (airmass) vertical speed over the previous
30 seconds when in cruise mode.
The average value can also be displayed as an optional additional needle. See 11.12 for details on
customising the variometer gauge.
When no variometer is connected to XCSoar, the computer produces variometer estimates based
on GPS vertical speed, which is slow and uncompensated for aircraft total energy.
The MacCready value, bugs and ballast, optimum speed to fly and wind data are transferred between XCSoar and supported external intelligent variometers. In the ideal setup, both XCSoar and
the variometer have a consistent perspective on the flight at all times; and that by adjusting the
MacCready setting on one device should be kept in sync with the other, by the software and to not
require additional input from the pilot.
Currently XCSoar supports the triadis Engineering Vega intelligent variometer, the Cambridge 302
DDV, Borgelt B50/B500, LX Navigation LX1600 variometers, Zander, and Tasman Instruments
variometer. Note that the level of support for each device varies, and not all manufacturers release
their protocols to allow the XCSoar developers to provide full support. Barometric altitude is also
read from certain GPS units and loggers, including the Volkslogger and Posigraph.
For Vega, a small icon displaying a circling glider is displayed when the variometer is in climb audio
mode.
Vega configuration
A connected Vega can be configured via
menu:
CONF .
Settings Vega . This is accessed via the following
Setup Vega
XXXXXXXX
XCSoar Manual (Altair version) • XCSoar-A-EN
58
6
ATMOSPHERE AND INSTRUMENTS
6.2
Air data inputs
Where additional aircraft dynamics or air mass data are provided by an intelligent variometer, XCSoar can often make use of it or display it in a separate InfoBox. Key sensor measurements that
XCSoar uses include:
• Gross total energy variometer (rate of change of the total energy of the aircraft) Used for display, and for calculation of netto variometer.
• Netto variometer (estimated vertical velocity of the air mass at the aircraft) Used to display, and
to colour the trail so that it may effectively show areas of lift and sink.
• Aircraft acceleration (load factor) Used for netto variometer calculations where an external
netto variometer is not provided.
• Barometric altitude Used for display
• Indicated airspeed Used for display, in compensating final glide calculations for aircraft kinetic
energy, and in netto variometer calculation where an external netto variometer is not provided.
• Air density Used for calculating true airspeed from indicated airspeed.
6.3
Wind display
A continuous display of wind strength and direction is provided on the map. The wind information
is derived from the gliders wind drift during thermal flight (climb mode).
The wind direction and speed are displayed as a wind vector on the moving map display and
optionally in numeric form in the data display fields. The length of the vector indicates the wind
magnitude, and this magnitude is also displayed near the wind vector.
The wind data is one of many data sources used to calculate final glide information. It is possible
to manually adjust the wind used in all calculations. For more details, see 6.5.
6.4
Wind estimation
XCSoar offers two ways of estimating wind during flight.
• Circling This method uses GPS position fixes to estimate the wind based on drift, typically while
thermalling; and is available on all XCSoar installations.
• ZigZag This method uses GPS position fixes and true airspeed measurements to estimate the
wind, typically during cruise. It is only available where XCSoar is connected to an intelligent
variometer that outputs true airspeed.
The wind magnitude and direction can also be adjusted manually from
below).
Wind Settings
(see
Statistics are gathered so that winds are recorded at different heights and times. When the glider’s
altitude changes significantly, the statistics are consulted to determine the best estimate of the wind
based on previous measurements.
59
XCSoar Manual (Altair version) • XCSoar-A-EN
6
ATMOSPHERE AND INSTRUMENTS
One of the following estimation methods can be set either in the configuration settings (page ‘Glide
Computer’, field ‘Auto Wind’) or in Wind Settings :
• Manual
• Circling
• ZigZag
• Both (ZigZag and Circling)
When wind estimates change significantly, a status message notification of this is issued.
Circling wind algorithm
XCSoar estimates the wind magnitude and direction when circling. It does this using a sophisticated algorithm that incrementally improves the wind estimate from completed turns. Poor quality
turns, where the bank angle changes significantly, are rejected or have minimal impact on the
overall wind estimate. The best turns are those with constant bank angle.
Estimates are only obtained if the average GPS fix rate is better than one every two seconds. This
results in improved fidelity of estimates in the presence of GPS dropouts.
Zig-Zag algorithm
For aircraft fitted with intelligent variometers connected to XCSoar, a so-called ‘zig-zag’ wind estimation algorithm is available. With this algorithm, the wind estimate can be updated continuously
during long glides without circling.
This allows the wind estimate to be updated during cruise while the aircraft performs a zigzag
manoeuver. No specific manoeuver is required, in many cases the estimate will be updated as the
aircraft’s heading changes naturally as the pilot hunts for lift. In general, however, the technique
requires the aircraft heading to change over 40 degrees.
If the wind changes significantly while in straight flight, the zig-zag algorithm is used to update the
wind estimate even if the aircraft’s heading does not change much. This provides greater accuracy
in long final glides.
Wind estimates are updated when a large difference between the estimated ground speed and the
true ground speed are detected even without much zig-zag manoeuvering.
Compass algorithm
For aircraft fitted with intelligent variometers and digital compasses connected to XCSoar, a wind
estimation algorithm making use of magnetic heading and airspeed is being developed. This provides another method of updating the wind estimate during cruise and does not require zig-zag
manoeuvres.
6.5
Wind settings dialog
Wind Settings allows the initial estimate of the wind speed and direction to be entered, usually
prior to flight. It is accessed via the menu under:
CONF .
Setup Wind
XCSoar Manual (Altair version) • XCSoar-A-EN
60
6
ATMOSPHERE AND INSTRUMENTS
The wind value can be saved so that the estimate is restored next time XCSoar starts.
At any time during flight, the pilot can make corrections to the wind estimate by entering the correction in the wind settings dialog and pressing the Save Wind button. Once Save Wind is
pressed, the internal estimate is ignored until a new internal estimate is obtained from the circling
or zigzag algorithm.
The automatic wind algorithm and the compensation of wind drift of the trail may also be set in this
dialog.
6.6
Thermal locator
An algorithm estimates the center of the lift when circling. The thermal marker symbol is a green
circle with a ‘T’ in the center. The option ‘Lift center’ on the ‘Glide Computer’ page of the configuration settings determines how this is used:
• OFF Lift center locator disabled.
• Circle at center A thermal marker is displayed at the center of lift.
• Pan to center A marker is displayed at the center of lift, and when circling, the display is panned
to this lift center.
When the thermal locator is enabled, the location of the last 20 thermals is marked on the map with
the thermal marker during cruise.
This location is calculated to compensate for the thermal drift at the glider’s height. This means that
internally XCSoar remembers the location of the thermal source on the ground. In other words, if
you leave a thermal at the top and later return at low altitude, the position on the map shows the
predicted location of the thermal at that low altitude (which is further upwind than the top).
If the wind changes and the thermal source is still active, its position on the map reflects the wind
change; that is, the thermal at altitude will be projected downwind at the new wind estimate.
61
XCSoar Manual (Altair version) • XCSoar-A-EN
6
6.7
ATMOSPHERE AND INSTRUMENTS
Convection forecast
If the glider is equipped with an outside temperature and humidity probe, a simple convection
forecast system estimates the convection ceiling and the cloud base. The humidity probe is optional
and is mainly required for estimating cloud base.
Prior to takeoff or during flight the pilot can modify the maximum forecast temperature on the ground
by adjusting the value in Basic Settings described in subsection 5.4.
The forecast convection ceiling is determined by the altitude at which the atmospheric temperature
equals the maximum forecast temperature on the ground, cooled adiabatically as it rises according
to the dry adiabatic lapse rate. Typically the glider will not climb as far as the convection ceiling
and so the measured values are extrapolated to find the ceiling. If the atmosphere is stable, the
convection ceiling is reported as zero altitude.
The forecast cloud base is determined by the altitude at which the dew point intersects the maximum forecast temperature on the ground, cooled adiabatically as it rises according to the dry
adiabatic lapse rate. If no clouds are forecast, the cloud base is reported as zero.
6.8
Analysis dialog: Wind, Temperature, Barograph and Climb history
Analysis is used to see several aspects of the atmosphere. It is accessed via the menu under:
INFO .
Analysis Show
Several pages are of interest:
• Wind at altitude This shows a graph of the wind speed versus height, and shows the wind vector
at several heights.
Set wind opens Wind Settings (e.g. to manually set the wind).
XCSoar Manual (Altair version) • XCSoar-A-EN
62
6
ATMOSPHERE AND INSTRUMENTS
• Temp trace This page is only available if a supported instrument is connected to XCSoar that
produces outside air temperature and humidity. The chart shows the variation of dry air
temperature, dew point temperature and outside air temperature with height. The convection
forecast is summarised as the estimated thermal convection height and estimated cloud
base.
Settings opens Basic Settings .
• Barograph Shows a graph of the history of the altitude of the glider. Statistics are used to
estimate the thermal working band (average base and ceiling of climbs) and to estimate how
the ceiling is changing over time. The base and ceiling lines are drawn on the barograph.
Settings opens Basic Settings .
XXXXXX GRAPHIC
• Climb history Shows a bar chart of the average climb rate achieved during each climb. Statistics
are used to estimate the overall average climb rate, and to estimate how this average is
changing over time. The current MacCready setting is drawn on the bar chart as a thick red
dashed line, and the climb rate trend is drawn on the chart as a blue line.
Task calc opens the Task calculator .
63
XCSoar Manual (Altair version) • XCSoar-A-EN
6
XCSoar Manual (Altair version) • XCSoar-A-EN
ATMOSPHERE AND INSTRUMENTS
64
7
AIRSPACE, TRAFFIC AND TEAM FLYING
7
Airspace, Traffic and Team Flying
A database of Special Use Airspace (SUA) can be loaded into XCSoar and used for both display
of the airspace regions as well as detecting when the glider enters and leaves the regions.
Two airspace files can be set in the configuration settings (page ‘Site’). The first of these is intended
for use as the primary SUA database, the second is intended for use with short-term or changing
airspace such as the airspace defined in NOTAMs.
It is the user’s responsibility to ensure that the SUA database (airspace file) is up-todate.
Through a connected FLARM device, the glide computer can also display information relating to
FLARM-equipped nearby traffic and obstacle threats.
A team code function allows teams of pilots to exchange their positions via radio in a short code,
encoded and decoded by the computer.
7.1
Airspace display
Local special use airspace regions are drawn on the map as shaded areas with thick borders. The
colour and pattern of the areas are specific to different airspace categories and may be configured
by the user. Depending on the settings, the user may choose to display no airspace, only airspace
above, only airspace within a particular height separation, or automatic display where XCSoar
decides when it is important to display the regions.
The patterns used to display airspace areas include opaque, transparent (hollow) and several
hatched and stippled patterns. The non-opaque patterns are partially transparent with respect to
terrain and topology but are not transparent with respect to overlapping airspace. However, where
overlapping airspace occurs, all borders are visible. That is, even though airspace patterns are not
mutually transparent, all airspace borders are drawn on top of the airspace areas.
Both the display and warning of airspace classes can be individually enabled or disabled by the
user as described in subsection 7.7.
65
XCSoar Manual (Altair version) • XCSoar-A-EN
7
AIRSPACE, TRAFFIC AND TEAM FLYING
The default colouring of Class C, D, E and F airspace is consistent with ICAO charts.
7.2
Incursion events
Three types of events are detected by XCSoar in relation to SUA:
• Predicted incursion This event is detected when the glider is estimated to be on a track that will
result in entering the airspace at a set time in the future. The time is the ’airspace warning
time’ configuration setting.
The use of a long term average track in these calculations means that the system can still
predict incursion even when drifting in the wind when circling.
• Entering This event occurs when the glider enters an airspace region.
• Leaving This event occurs when the glider leaves an airspace region.
In all cases, the boundary of the region is defined by maximum and minimum altitudes or flight
levels, as specified in the airspace file.
Airspace warnings are still issued even if the incursion region is off-screen.
Where a barometric altitude source is available, it is used preferentially to GPS altitude in detecting
airspace incursions. This makes the system conform to normal conventions of having airspace
violations based on QNH-adjusted altitude.
7.3
Airspace warning levels
The concept of airspace warning levels is introduced:
• 0 Aircraft is outside and distant from airspace.
• 1 Aircraft is predicted to penetrate the airspace but is not close.
• 2 Aircraft is predicted to penetrate the airspace and is close to doing so.
• 3 Aircraft is inside airspace.
At all times XCSoar monitors the aircraft relative to all airspace and maintains warning levels for
each. The airspace warnings are still filtered according to the airspace filter preferences; such that
certain categories of airspace may be effectively disabled.
The sequence of events when entering an airspace results typically in three warnings: when near
(level 1), when close (level 2), and when inside (level 3).
Whenever the warning level increases (above level 0) for any airspace, the airspace warning dialog
appears, accompanied by a system beep. When there are no more airspace regions at warning
levels above 0, the dialog disappears automatically.
XCSoar Manual (Altair version) • XCSoar-A-EN
66
7
AIRSPACE, TRAFFIC AND TEAM FLYING
7.4
Airspace warning dialog
This dialog shows the most recent airspace warnings. The following details are shown:
<NAME> ...
<TOP,in user units> <TOP,in alt units> <Base info>
<Position> <Class> <distance if outside> ...
<BASE,in user units> <BASE,in alt units> <Base info>
The glider’s position in relation to the airspace is shown with symbols:
The glider is inside the airspace.
The glider is horizontally beside the airspace.
The glider is below the airspace.
The glider is above the airspace.
The glider is diagonally below the airspace.
The glider is diagonally above the airspace.
The color of the airspace indicates it’s class. As the glider approaches the airspace, more color is
shown in the symbol and the background of the airspace information gets darker.
Two examples of airspace warnings:
Example 1 The glider is inside the airspace Grenchen CTR (class D) with base of terrain surface
and ceiling at 1350 meters above sea level.
Example 2 The glider is below and diagonally 1.87km away from the airspace Bale TMA 2b (class
C) with a base of FL 100 (3047m ASL) and a ceiling at FL 195 (5943m ASL).
All airspace warnings as well as a list of all airspaces can be found in Airspace Info (see below).
67
XCSoar Manual (Altair version) • XCSoar-A-EN
7
7.5
AIRSPACE, TRAFFIC AND TEAM FLYING
Airspace warning acknowlegement
When Airspace Warnings is visible and an airspace warning is active, the dialog can be closed
by pressing Close resp. ESC. This has the effect of closing the warning without actually acknowledging the warning.
The warning can be acknowledged by one of the buttons (F buttons) on the bottom of the dialog:
• Avoid xxxxxxxx
• Enter xxxxxxxx
• Disable xxxxxxxx
Near shows the nearest (distance 25km) airspaces in Airspace Info
The general guidelines for using the dialog are:
• Don’t acknowledge a warning if you are not sure which airspace the warning is about.
• Note that the warning system beep only occurs when the warning level increases.
• The warning system is designed to allow circling near an airspace without over-stressing
the pilot with extraneous warnings.
When an airspace region is acknowledged, the region is drawn on the screen without a pattern.
When the aircraft is predicted to enter a SUA region, or it actually enters an SUA region, a warning is raised, presented as an audio alert and a status message describing the type of airspace
warning, the SUA details (including class of airspace, base and ceiling altitude or flight level, radio
frequencies).xxxxxxxx stimmt?
Acknowledged warnings will repeat after a certain time specified as the ‘Acknowledge time’ on the
‘Airspace’ page of the configuration settings.
Airspace warning acknowledgements apply to individual SUA regions. If, for example, a glider
enters airspace A and the pilot acknowledges the warning, and shortly thereafter is predicted to
enter airspace B, an airspace warning for SUA region B will be raised.
If you want acknowledged airspace warnings to not be repeated, set a very large value for the
configuration setting ‘Acknowledge time’.
7.6
Airspace Info dialog
Airspace Info shows Informations about all airspaces. It can be accessed over:
INFO .
Nearest Airspace
XCSoar Manual (Altair version) • XCSoar-A-EN
68
7
AIRSPACE, TRAFFIC AND TEAM FLYING
The airspaces can be filtered by Name, Distance, Heading and Type (class or status). Four buttons
have specific filter functions:
• Near Sets the distance on 25km. Pressing the button another time sets it on 50, 75 and 100km.
All airspaces within this distance are shown.
• Ahead Sets the field ‘Direction’ to HDG(360◦ ). All airspaces within a certain angle (30◦ ) on both
sides of the aircrafts heading direction are displayed.
• Disabled Sets the type to ‘Disabled’. All disabled airspaces are shown.
• Acked Sets the type to ‘Acknowledged’. All acknowledged airspaces are shown.
→ Filter combinations are possible
7.7
Airspace Browser dialog
Display and warning settings of airspaces or airspace classes can be set in
It can be accessed over the following menu:
CONF .
69
Airspace Browser .
Settings Airspace
XCSoar Manual (Altair version) • XCSoar-A-EN
7
AIRSPACE, TRAFFIC AND TEAM FLYING
To search airspaces, you can use the same filtering methods as in Airspace INFO (see previous
subsection).
Modify settings
To modify warning and display settings of a single airspace, select the airspace from the list and
press Enter. The following dialog shows up:
You can now modify the settings (warnings, visibility) for the selected airspace.
To modify the settings for a whole class, press Classes (F9). The following dialog shows up:
XCSoar Manual (Altair version) • XCSoar-A-EN
70
7
AIRSPACE, TRAFFIC AND TEAM FLYING
Choose a class and press Enter. You can now modify the warnings and visibility settings.
Changes of airspace display colors can be done on the ‘Airspace’ page of the configuration settings.
See 11.2 for more details.
7.8
Analysis dialog: Airspace
The analysis dialog contains a page showing a cross-section of the airspace. This is accessed via
the menu under
INFO .
Analysis Show
The display shows along the horizontal direction, the distance from the glider out to 50 km in the
direction of the glider’s track; along the vertical direction is height. The height of the glider is
indicated by a white arrow. This page is useful to help visualise complex layering of airspace.
71
XCSoar Manual (Altair version) • XCSoar-A-EN
7
AIRSPACE, TRAFFIC AND TEAM FLYING
Browse opens Airspace Browser .
7.9
FLARM traffic display
If connected to a FLARM device, FLARM traffic is displayed on the map area. Each FLARM aircraft
received is drawn as a dashed red disk.
Do not use XCSoar for collision avoidance, as FLARM audio devices are much more
suitable in assisting the pilot to be aware of traffic.
Note that unless one is circling, the usual zoom level is such that FLARM traffic will not be easily
distinguished. When one is circling, or if the user has North-Up screen orientation, this makes the
map display a poor aid at helping to locate the traffic.
FLARM map display
The FLARM targets on the map are drawn as red discs and also have black/blue arrow heads
to indicate the direction the FLARM target is heading. Note that these arrow heads are oriented
according to the display orientation. For example, if the orientation is track-up, then the arrows
show the relative track bearing of the target to the aircraft. If the orientation is north-up, then the
arrows show the absolute track bearing of the target.
Display on the map FLARM of aircraft registration or pilot name is made possible via a look-up of
the ICAO aircraft ID of FLARM traffic in a file. See 12.16 for details on this file format. Aircraft with
the FLARM privacy flag set will not have any identification displayed.
FLARM radar
To remedy this situation, when FLARM traffic is received, the lower right corner of the screen shows
a small radar-style view of the FLARM traffic from the perspective of the aircraft. The FLARM radar
can be opened with F9 even when there is no traffic. FLARM traffic is displayed as coloured
squares on the radar.
This FLARM radar is oriented track-up and a small glider icon clearly shows that the display is
oriented as such. The scale of the display is nonlinear (expanded close to the aircraft). On the
background there are three rings; the first is 500 meters, the second is 1000 meters and the third
is 2000 meters. Traffic further away than 2000 meters is drawn at the 2000 meter ring.
XCSoar Manual (Altair version) • XCSoar-A-EN
72
7
AIRSPACE, TRAFFIC AND TEAM FLYING
The FLARM gauge display shows FLARM traffic in colours according to the threat level:
• Green for level 0
• Yellow for level 1
• Red for level 2 and 3
The style of the FLARM radar can be customised with the ‘FLARM symbols’ configuration option
on page ‘Appearance’ of the configuration settings.
This controls the symbols used to display FLARM targets on the radar display.
• Relative altitude The relative altitude of the target is represented as a shape that becomes
triangular for extreme above/below heights, square at the same altitude. Square shapes
indicate similar altitude; a triangle pointing up indicate the traffic is very high; a triangle
pointing down indicates the traffic is very low. Similarly, intermediate trapezoids indicate
relative height in a similar way proportionally: thinner at the top indicates the traffic is higher,
thinner at the base indicates the traffic is lower.
• Bearing The track bearing of the target relative to the track bearing of the aircraft is displayed as
an arrow head. In all modes, the color of the target indicates the threat level.
The FLARM radar-like display, when enabled, can be suppressed when visible by pressing the
enter button. If the FLARM radar is suppressed, pressing the enter button again cancels the
suppression and the radar is shown again. When new traffic appears in the radar, or if the FLARM
issues a collision warning, the suppression is cancelled.
When the alert level of the FLARM target indicates a collision warning (level 3), a black line is
drawn from the target to the edge of the radar. This is done to make it easier to see at a glance
which direction the target is relative to the glider, since when a collision warning is active, typically
the target will be close to the glider.
73
XCSoar Manual (Altair version) • XCSoar-A-EN
7
7.10
AIRSPACE, TRAFFIC AND TEAM FLYING
Team flying
Team code is a system to allow pilots flying within a team to communicate their position to each
other in a concise and accurate manner. The principle of the system is that each pilot uses their
computer to determine a 5 digit code which describes their position relative to a common waypoint.
The pilots call each other reporting these codes, and entering the codes into the computer allows
their mates to be located accurately by the computer.
This is done in Team Code , which is accessed via the menu:
NAV .
Team Code
To use team code, all pilots in the team should select a waypoint to be used as the reference. This
can be done by pressing Set Reference and selecting a waypoint from the list.
During flight, the pilot can read out his ‘Own code’ from the team code dialog to his team mate, in
order to report his position. When the pilot hears a code report from a team mate, he can enter the
mate’s code in the field ‘Partner Code’ in order to see bearing and distance of the partner.
InfoBoxes are available to give the relative range, bearing and relative bearing to the team mate.
XCSoar Manual (Altair version) • XCSoar-A-EN
74
8
AVIONICS AND AIRFRAME
8
Avionics and Airframe
This section discusses XCSoar as a subsystem of the aircraft. It covers the integration of XCSoar
with external devices, including GPS, switches and sensors, and aircraft radio transceivers and
other devices. Integration with FLARM is covered in section 7.9, and integration with variometers
is covered in section 6.1.
8.1
GPS connection
XCSoar requires a 3D GPS fix for its navigation functions.
GPS status
GPS status icons and text may appear on the bottom edge of the map display to indicate:
• Waiting for GPS fix The GPS may have a 2D fix, better reception or additional time to search
for satellites is required. The aircraft symbol disappears while there is no 3D fix.
• GPS not connected No communication with the GPS is received. This indicates an error in the
Comm port settings or the GPS device may be disconnected or switched off.
When the GPS is not connected for more than one minute, XCSoar automatically attempts to
restart communication with the device and will then resume waiting. This method has shown to
provide the most reliable way of recovering from communication errors.
XCSoar can handle up to two GPS sources and it uses them to provide redundancy. This means
that if the primary GPS source drops out, XCSoar will use the GPS data from the second source.
If both sources have valid fixes, the second source is ignored. For this reason, it is recommended
to have the GPS source with the best antenna or reliability as the primary device.
GPS altitude
Some older GPS units (and some new ones) do not output altitude relative to mean sea level, rather
they output elevation with respect to the WGS84 ellipsoid. XCSoar detects when this occurs and
applies the ellipsoid to geoid offset according to an internal tabulated data at two degree spacing.
This is not required for FLARM units or Altair Pro, which correctly output MSL altitude.
8.2
Switch inputs
XCSoar supports monitoring of switches and sensors connected to the host computer, for the
purpose of providing situational awareness feedback, alerts, or as general-purpose user-interface
input devices. Several mechanisms are available for interfacing to switches and sensors:
• Serial device Certain intelligent variometers such as triadis engineering’s Vega have multiple
airframe switches and pass this information to Altair/XCSoar as special NMEA sentences.
• OneWire device triadis engineering’s Altair glide computer and Vega variometer provide a OneWire
peripheral bus to which various digital and analog sensors can be attached.
A custom ‘input events’ file determines how switch and sensor inputs are processed.
A standard set of airframe inputs are defined as:
75
XCSoar Manual (Altair version) • XCSoar-A-EN
8
AVIONICS AND AIRFRAME
• Airbrake
• Flap position (positive, neutral, negative)
• Landing gear
Other logical inputs from Vega include computed quantities relating to specific airframe alerts and
aircraft operating envelope warnings, for example “airbrake extended and gear retracted”.
Refer to the Vega documentation for more details on switch inputs and how they may be used.
8.3
Switch Status
When a Vega is connected, the switch status is shown on the last page of
available from the menu:
CONF .
Status , which is
Status Show
This page is updated in real-time, allowing the pilot to check the correct functioning of switches
during daily inspection tests or before takeoff.
8.4
Aircraft radio transceiver
Monitoring and setting the active and standby frequencies of aircraft transceivers with serial connections are currently in development. The goal is to provide the functionality whereby the radio
frequency can be set with one button press (requiring confirmation by the pilot) when the aircraft
flies into controlled airspace or enters an airfield’s advisory/mandatory broadcast traffic zone.
8.5
Supported variometers
XCSoar supports inputs from triadis Engineering’s Vega variometer and TR-DVS digital voice
system, Cambridge Aero Instruments 302 DDV and GPSNav, Borgelt B50/B500, LX Navigation
LX1600 variometers, Zander variometers, and Tasman Instruments variometer.
XCSoar Manual (Altair version) • XCSoar-A-EN
76
8
AVIONICS AND AIRFRAME
8.6
Other avionics devices
Support for the Honeywell Digital Compass HMR3000 is under development.
8.7
Slave mode
A device type in the configuration settings, “NMEA Out” is defined for use in joining two Altair
systems in a master-slave mode.
In the master, the second COM device can be set to NMEA Out, and all data received in the first
com device (as well as outgoing data) will be sent to the slave.
In the slave, the first COM device can then be set to “Vega” or “Altair Pro” and this system receives
all data as if it came from the Master’s GPS and connected instruments (Vega, FLARM etc).
8.8
Interface to external loggers
XCSoar has support for declaration and handling special sentences used by commercial flight
loggers. Devices that are supported but do not include declaration support include Posigraph and
Colibri.
Volkslogger
Uploading of the current task to the Volkslogger is supported. The device type in the system
settings must be set to ‘Volkslogger’.
When a task is declared in Task Editor , the pilot name, aircraft type and competition ID will be
uploaded to the Volkslogger.
Note that uploading the task erases the Volkslogger’s database of waypoints!
EW logger
Uploading of the current task to EW loggers is supported. The device type in the system settings
must be set to ‘EW’.
When a task is declared in Task Editor , the pilot name, aircraft type and competition ID will be
uploaded to the EW Logger.
CAI 302
Uploading of the current task to the CAI 302 is supported. The device type in the system settings
must be set to ‘CAI 302.
When a task is declared in
uploaded to the CAI 302.
77
Task Editor , the pilot name, aircraft type and competition ID will be
XCSoar Manual (Altair version) • XCSoar-A-EN
9
9
QUICKSTART
Quickstart
This section provides instructions for using XCSoar in typical cross-country tasks. It is separated
into simple scenarios to demonstrate how to use key features. It assumes the configuration options
have already been set up to the user’s preferences.
These instructions are intended to provide a simple step-by-step guide to flying tasks of varying
levels of complexity but are not intended to demonstrate all the features of XCSoar. Furthermore,
the system can be used productively in ways other than as described here.
9.1
Local flight
In this scenario, the pilot intends to fly locally or a casual cross-country task where navigation to
pre-determined waypoints is not required.
Prior to takeoff
• Turn on the device.
• Open
Basic settings
and adjust the bugs and ballast as required. Set the maximum
forecast temperature. Close the dialog.
• Open Task editor and press New .
• The task now contains the home waypoint as start and finish waypoint.
In-flight
• At the appropriate times, set the MacCready automatically, manually in Setup MacCready
, or from the variometer.
• Change the bugs/ballast settings as required.
• In flight, refer to Analysis as required.
• At any time, the glider can reach home when the altitude difference bar is a green arrow
pointing upwards.
• Optionally, set MacCready to ‘AUTO’ when ready to return home. If the MacCready mode
was set to ‘Final Glide’ or ‘Both’, then the system will command the optimal speed to return
home.
After landing
• Status , page ‘Task’, shows the elapsed flight time.
• Analysis can be used to analyse or review the flight.
These actions may be performed after turning the device off and on again.
XCSoar Manual (Altair version) • XCSoar-A-EN
78
9
QUICKSTART
9.2
FAI Task
In this scenario, the pilot intends to fly a triangle FAI task with a single start sector and automatic
waypoint advance.
Prior to takeoff
• Turn on the device.
• Open
Basic settings
and adjust the bugs and ballast as required. Set the maximum
forecast temperature. Close the dialog.
• Open Task editor and press New .
• The task now contains the home waypoint as start and finish waypoint.
• Add new waypoints with Insert on the ‘Waypoints’ page.
• Set the start and sector types, and ensure AAT is OFF. In this example, we set alternate
start points to ‘OFF’ and Auto Advance mode to ‘Auto’. Once finished, press close.
• The task is now entered. Open Analysis and select the ‘Task’ page to preview the task
on a map.
In-flight
• The current waypoint will advance automatically as the pilot flies through the observation
zones.
• After the task is started,
Status can be opened to verify a valid start was detected. If
the ‘start time’ is given, the start was detected and legal according to the task start rules
specified in the configuration.
• At all times the black track arrow will point at the next waypoint. The blue arrow will point at
the direction the glider should track when in cruise.
• If Auto Zoom is activated, the map will automatically zoom in as task waypoints are approached.
• At the appropriate times, set the MacCready automatically, manually in Setup MacCready
, or from the variometer.
• Change the bugs/ballast settings as required.
• Refer to Analysis as required.
• Refer to Status as required. This shows the start time, elapsed time on task, estimated
arrival time, average task speed etc.
• At any time, the glider can reach home when the altitude difference bar is a green arrow
pointing upwards.
• Optionally set MacCready to ‘AUTO’. If the MacCready mode was set to ‘Final Glide’ or
‘Both’, then the system will command the optimal speed to return home; and the MacCready
value will be set to the minimum climb rate at which it is beneficial to continue to climb.
79
XCSoar Manual (Altair version) • XCSoar-A-EN
9
QUICKSTART
After landing
As described in subsection 9.1.
9.3
FAI Task, Manual Start
In this scenario, the pilot intends to fly a triangle FAI task with a single start sector and manual task
start.
Prior to takeoff
As described in subsection 9.2, except where noted below.
• Set ‘Auto Advance’ to ‘Arm start’ in Task editor .
In-flight
As described in subsection 9.2, except where noted below.
• Prior to entering the start sector, when you are ready to start the task, press the ‘NavTo
TaskPt’ button.
After landing
As described in subsection 9.1.
9.4
AAT Task, Manual Arm
In this scenario, the pilot intends to fly a triangle AAT task, and will manually arm the waypoint
advance system.
Prior to takeoff
• Turn on the device.
• Open
Basic settings
and adjust the bugs and ballast as required. Set the maximum
forecast temperature. Close the dialog.
• Open Task editor and press New .
• The task now contains the home waypoint as start and finish waypoint.
• Add new waypoints with Insert on the ‘Waypoints’ page.
• Set the start and sector types, and set AAT to ON, and set the assigned minimum task time.
In this example, we assume there are not alternate start points and Auto Advance mode is
set to ‘Arm’.
• Adjust AAT sector parameters for the waypoints by clicking Enter on the selected waypoint.
• The AAT task is now entered.
XCSoar Manual (Altair version) • XCSoar-A-EN
80
9
QUICKSTART
• The estimated elapsed time to complete the task with different MacCready settings can be
explored by pressing Calc . Adjusting the ’range’ setting shifts the targets within the AAT
sectors to increase or decrease the task distance.
• Open Analysis and select the ‘Task’ page to preview the task on a map.
In-flight
• When the pilot is ready to start the task, press Arm Advance . The current waypoint will
then advance automatically once, as the pilot flies through the start sector. After this occurs,
the advance trigger is disarmed.
• In order to re-start, the pilot needs to press Arm Advance again prior to flying through
the start sector again.
• After the task is started,
Status can be opened to verify a valid start was detected. If
the ‘start time’ is given, the start was detected and legal according to the task start rules
specified in the configuration.
• During flight, the estimated elapsed time to complete the task with different MacCready
settings can be explored in Task calculator . Adjusting the ’range’ setting shifts the targets
within the AAT sectors to increase or decrease the task distance. Typically, the pilot should
set the range such that the estimated elapsed time is greater than the assigned task time.
If conditions are improving, such that the pilot wishes to fly deeper within an AAT sector,
the range can be increased. Likewise, if conditions are deteriorating, the range can be
decreased to a value at which the estimated elapsed task time is above the assigned task
time. This allows the pilot to effectively increase or decrease the task distance.
The figure below shows the course around the targets at range set to −100%.
The figure below shows the course around the targets at range set to 100%.
81
XCSoar Manual (Altair version) • XCSoar-A-EN
9
QUICKSTART
• At all times the black track arrow will point at the next target. The target is the location within
the AAT sector at the range specified in Task calculator . The blue arrow will point at the
direction the glider should track when in cruise.
• When the pilot is within or approaching an AAT sector and is ready to advance to the next
waypoint, press Arm Advance . The current waypoint will then advance automatically
once, if the pilot is inside the observation zone. After this occurs, the advance trigger is
disarmed.
• If Auto Zoom is activated, the map will automatically zoom in as task waypoints are approached.
• At the appropriate times, set the MacCready automatically, manually in Setup MacCready
, or from the variometer.
• Change the bugs/ballast settings as required.
• Refer to Analysis as required.
• Refer to Status as required. This shows the start time, elapsed time on task, estimated
arrival time, average task speed etc.
• Optionally set MacCready to ‘AUTO’. If the MacCready mode was set to ‘Final Glide’ or
‘Both’, then the system will command the optimal speed to return home; and the MacCready
value will be set to the minimum climb rate at which it is beneficial to continue to climb.
After landing
As described in subsection 9.1.
XCSoar Manual (Altair version) • XCSoar-A-EN
82
9
QUICKSTART
9.5
Task with alternate start sectors
In this scenario, the pilot intends to fly a task with alternate start sectors and manually arm the
waypoint advance system.
Prior to takeoff
As described in subsection 9.2, except where noted below.
• Open Task editor , and set ‘Auto Advance’ to ‘Arm start’. Set ‘Alternate Start Points’ to
‘ON’ on the ‘Options’ page. Press Enter on the start waypoint in ‘Waypoints’ and then press
Altern. Starts
. Press ‘Clear list’ to clear the list of existing start points if required. Add
alternate start points with Insert .
In-flight
As described in subsection 9.2, except where noted below.
• Prior to entering the start sector, when the pilot is ready to start the task, press Arm Advance
.
• In order to re-start from any start sector, the pilot needs to press
Arm Advance
again
prior to flying through any of the start sectors again.
83
XCSoar Manual (Altair version) • XCSoar-A-EN
10
10
INFOBOX REFERENCE
InfoBox Reference
InfoBox data types are grouped into logical categories.
All InfoBoxes display their data in user-specified units. Where data is invalid, the displayed value
will be ’–’ and the contents are greyed out. This happens, for example, when no terrain data is
found or it is not in range for the Terrain Elevation InfoBox type.
In the following description of the InfoBox data types, the first title is as it appears in the InfoBox
configuration dialog box, the second title is the label used in the InfoBox title.
10.1
Altitude
Height GPS
This is the height above mean sea level reported by the GPS. Touchscreen/PC
only: in simulation mode, this value is adjustable with the up/down arrow keys,
and the right/left arrow keys also cause the glider to turn.
Height AGL
This is the navigation altitude minus the terrain height obtained from the terrain
file. The value is coloured red when the glider is below the terrain safety
clearance height.
Terrain Elevation
This is the elevation of the terrain above mean sea level obtained from the
terrain file, at the current GPS location.
Pressure Altitude
This is the barometric altitude obtained from a GPS equipped with pressure
sensor, or a supported external intelligent vario.
10.2
Aircraft state
Bearing
True bearing of the next waypoint. For AAT tasks, this is the true bearing to
the target within the AAT sector.
Speed ground
Ground speed measured by the GPS. If this InfoBox is active in simulation
mode, pressing the up and down arrows adjusts the speed.
XCSoar Manual (Altair version) • XCSoar-A-EN
84
10
INFOBOX REFERENCE
Track
Magnetic track reported by the GPS.
Airspeed IAS
Indicated Airspeed reported by a supported external intelligent vario.
G load
Magnitude of G loading reported by a supported external intelligent vario. This
value is negative for pitch-down manoeuvres.
Bearing Difference
The difference between the glider’s track bearing, to the bearing of the next
waypoint, or for AAT tasks, to the bearing to the target within the AAT sector.
GPS navigation is based on the track bearing across the ground, and this
track bearing may differ from the glider’s heading when there is wind present.
Chevrons point to the direction the glider needs to alter course to correct the
bearing difference, that is, so that the glider’s course made good is pointing
directly at the next waypoint. This bearing takes into account the curvature of
the Earth.
Airspeed TAS
True Airspeed reported by a supported external intelligent vario.
10.3
Glide ratio
L/D instantaneous
Instantaneous glide ratio, given by the ground speed divided by the vertical
speed (GPS speed) over the last 20 seconds. Negative values indicate climbing cruise. If the vertical speed is close to zero, the displayed value is ’–’.
L/D cruise
The distance from the top of the last thermal, divided by the altitude lost since
the top of the last thermal. Negative values indicate climbing cruise (height
gain since leaving the last thermal). If the vertical speed is close to zero, the
displayed value is ’–’.
Final L/D
The required glide ratio to finish the task, given by the distance to go divided
by the height required to arrive at the safety arrival altitude. Negative values
indicate a climb is necessary to finish. If the height required is close to zero,
the displayed value is ’–’.
85
XCSoar Manual (Altair version) • XCSoar-A-EN
10
INFOBOX REFERENCE
Next L/D
The required glide ratio to reach the next waypoint, given by the distance
to next waypoint divided by the height required to arrive at the safety arrival
altitude. Negative values indicate a climb is necessary to reach the waypoint.
If the height required is close to zero, the displayed value is ’–’.
L/D vario
Instantaneous glide ratio, given by the indicated airspeed divided by the total
energy vertical speed, when connected to an intelligent variometer. Negative
values indicate climbing cruise. If the total energy vario speed is close to zero,
the displayed value is ’–’.
10.4
Variometer
Thermal last 30 sec
A 30 second rolling average climb rate based on the reported GPS altitude, or
vario if available.
Last Thermal Average
Total altitude gain/loss in the last thermal divided by the time spent circling.
Last Thermal Gain
Total altitude gain/loss in the last thermal.
Last Thermal Time
Time spent circling in the last thermal.
Thermal Average
Altitude gained/lost in the current thermal, divided by time spent thermaling.
Thermal Gain
The altitude gained/lost in the current thermal.
XCSoar Manual (Altair version) • XCSoar-A-EN
86
10
INFOBOX REFERENCE
Vario
Instantaneous vertical speed, as reported by the GPS, or the intelligent vario
total energy vario value if connected to one.
Netto Vario
Instantaneous vertical speed of air-mass, equal to vario value less the glider’s
estimated sink rate. Best used if airspeed, accelerometers and vario are connected, otherwise calculations are based on GPS measurements and wind
estimates.
10.5
Atmosphere
Wind Speed
Wind speed estimated by XCSoar.
Wind Bearing
Wind bearing estimated by XCSoar. (Touchscreen/PC only) Manual adjustment is possible by pressing the up/down cursor keys to adjust bearing when
the InfoBox is active.
Outside Air Temperature
Outside air temperature measured by a probe if supported by a connected
intelligent variometer.
Relative Humidity
Relative humidity of the air in percent as measured by a probe if supported by
a connected intelligent variometer.
Forecast Temperature
Forecast temperature of the ground at the home airfield, used in estimating
convection height and cloud base in conjunction with outside air temperature
and relative humidity probe. (Touchscreen/PC only) Pressing the up/down
cursor keys adjusts this forecast temperature.
10.6
MacCready
MacCready Setting
The current MacCready setting. This InfoBox also shows whether MacCready
is manual or auto.
87
XCSoar Manual (Altair version) • XCSoar-A-EN
10
INFOBOX REFERENCE
Speed MacCready
The MacCready speed-to-fly for optimal flight to the next waypoint. In cruise
flight mode, this speed-to-fly is calculated for maintaining altitude. In final glide
mode, this speed-to-fly is calculated for descent.
Percentage climb
Percentage of time spent in climb mode. These statistics are reset upon starting the task.
Speed Dolphin
The instantaneous MacCready speed-to-fly, making use of Netto vario calculations to determine dolphin cruise speed in the glider’s current bearing. In
cruise flight mode, this speed-to-fly is calculated for maintaining altitude. In
final glide mode, this speed-to-fly is calculated for descent. In climb mode,
this switches to the speed for minimum sink at the current load factor (if an
accelerometer is connected). When Block mode speed to fly is selected, this
InfoBox displays the MacCready speed.
10.7
Navigation
Next Distance
The distance to the currently selected waypoint. For AAT tasks, this is the
distance to the target within the AAT sector.
Next Altitude Difference
Arrival altitude at the next waypoint relative to the safety arrival altitude.
Next Altitude Required
Altitude required to reach the next turn point.
Final Altitude Difference
Arrival altitude at the final task turn point relative to the safety arrival altitude.
Final Altitude Required
Altitude required to finish the task.
XCSoar Manual (Altair version) • XCSoar-A-EN
88
10
INFOBOX REFERENCE
Speed Task Average
Average cross country speed while on current task, compensated for altitude.
Speed Task Instantaneous
Instantaneous cross country speed while on current task, compensated for
altitude.
Speed Task Achieved
Achieved cross country speed while on current task, compensated for altitude.
Final Distance
Distance to finish around remaining turn points.
AA Time
Assigned Area Task time remaining.
AA Distance Max
Assigned Area Task maximum distance possible for remainder of task.
AA Distance Min
Assigned Area Task minimum distance possible for remainder of task.
AA Speed Max
Assigned Area Task average speed achievable if flying maximum possible distance remaining in minimum AAT time.
AA Speed Min
Assigned Area Task average speed achievable if flying minimum possible distance remaining in minimum AAT time.
89
XCSoar Manual (Altair version) • XCSoar-A-EN
10
INFOBOX REFERENCE
AA Distance Tgt
Assigned Area Task distance around target points for remainder of task.
AA Speed Tgt
Assigned Area Task average speed achievable around target points remaining
in minimum AAT time.
Distance Home
Distance to the home waypoint (if defined).
10.8
Waypoint
Next Waypoint
The name of the currently selected turn point. When this InfoBox is active,
using the up/down cursor keys selects the next/previous waypoint in the task.
(Touchscreen/PC only) Pressing the enter cursor key brings up the waypoint
details.
Time of flight
Time elapsed since takeoff was detected.
Time local
GPS time expressed in local time zone.
Time UTC
GPS time expressed in UTC.
Task Time To Go
Estimated time required to complete task, assuming performance of ideal
MacCready cruise/climb cycle.
XCSoar Manual (Altair version) • XCSoar-A-EN
90
10
INFOBOX REFERENCE
Next Time To Go
Estimated time required to reach next waypoint, assuming performance of
ideal MacCready cruise/climb cycle.
Task Arrival Time
Estimated arrival local time at task completion, assuming performance of ideal
MacCready cruise/climb cycle.
Next Arrival Time
Estimated arrival local time at next waypoint, assuming performance of ideal
MacCready cruise/climb cycle.
10.9
Team code
Own Team Code
The current Team code for this aircraft. Use this to report to other team members.
Team Bearing
The bearing to the team aircraft location at the last team code report.
Team Bearing Diff
The relative bearing to the team aircraft location at the last reported team
code.
Team range
The range to the team aircraft location at the last reported team code.
91
XCSoar Manual (Altair version) • XCSoar-A-EN
11
11
CONFIGURATION
Configuration
XCSoar is a highly configurable glide computer and can be customised to suit a wide variety of
preferences and user requirements. This section describes the configuration settings and options.
Scope of configuration
Several features of XCSoar can be customised:
• Modifying configuration settings. This is the sort of configuration most likely to be performed
by users; and this is given the greatest attention in this document.
• Changing the language, or even just to change the wording of text in the user interface.
• Changing the button assignments and button menus. This allows the content and structure
of the button menu to be changed.
• Changing or adding actions performed when glide computer events take place.
• Defining how long status messages appear and sounds to be played when those messages
occur.
Describing all of these is beyond the scope of this document.
Profiles and settings
There are a large set of configuration settings that may be customised from the Settings dialog
accessible from the menu under
CONF .
Setup system
You are strongly discouraged from changing these settings during flight. All changes
to the settings should be performed on the ground so that their desired effect on the
programs behaviour can be verified.
The settings dialog contains several pages. Once changes have been made, click the Close button
on the screen or PWR/ESC to close the dialog and return the program back to normal map mode.
Configuration settings are automatically saved to the profile xcsoar-registry.prf. To create a
new profile, copy this file and rename it. The new profile can be chosen at next system start.
It is recommended to create a new profile in order not to loose the configuration settings after
a system crash.
See 12 for a description of the data formats of files referred to in the settings. Where no file is to
be used, the field can be left blank. File name fields in forms show files that match a file extension
filter. This makes it much easier to find and select the correct file.
Safety lock
A safety feature is available to prevent settings being modified in flight. This optionally prevents
the configuration settings dialog from starting if the aircraft is in flight. This can be set on page
‘Interface’ in field ‘Safety lock’.
XCSoar Manual (Altair version) • XCSoar-A-EN
92
11
CONFIGURATION
Fail-safe
If the XCSoar software crashes due to an unrecoverable error while loading a file, the file will be
removed from the configuration settings in order to prevent the crash reoccuring. Therefore, if an
error was found in a file, the user must re-enter that file in the configuration settings after remedying
the situation.
93
XCSoar Manual (Altair version) • XCSoar-A-EN
11
11.1
CONFIGURATION
Site
The dialog specifies most of the important files that must be configured when flying at a new site.
• Map file The name of the map file (XCM) containing digital elevation terrain data, topology, waypoints etc.
• Waypoints 1 Primary waypoints file. If left blank, waypoints are loaded from the map file (if
available).
• Wpt1 outside terrain This option defines how waypoints outside the terrain range are handled:
the user can be asked when this occurs, or they can be always included or excluded.
• Waypoints 2 Secondary waypoints file. This may be used to add waypoints for a competition.
• Set Home
You can set your home airfield with this button. The current home is indicated on
the left side of the button.
• Airspace 1 File name of the primary airspace file in which special use airspaces are defined.
• Airspace 2 File name of the secondary airspace file. Intended especially for NOTAMs.
• Airfields file The airfields file may contain extracts from Enroute Supplements or other contributed information about individual airfields.
XCSoar Manual (Altair version) • XCSoar-A-EN
94
11
CONFIGURATION
11.2
Airspace
This page is used to determine how the airspace information is displayed and how warnings are
issued.
• Airspace display Controls how airspace display and warnings are filtered based on altitude. Filtering options for single airspaces or airspace classes are available in
(see 7.7 for more details).
Airspace Browser
• All off No airspaces are shown on the map.
• All on All the airspace information is displayed at the same time.
• Clip Only airspace below a user determined altitude is shown.
• Auto Only airspace at the current altitude plus or minus a user definable margin is shown.
• All Below Only airspace below the glider is shown.
• Clip altitude For clip mode, this is the altitude below which airspace is displayed.
• Margin For auto mode, this is the safety margin for warnings and display.
• Warnings Determines whether all warnings are enabled or disabled.
• Warning time This is the time before an incursion is estimated at which the system will warn the
pilot.
• Acknowledge time This is the time period in which an acknowledged airspace warning will not
be repeated.
• Use black outline Draws a black outline around each airspace.
95
XCSoar Manual (Altair version) • XCSoar-A-EN
11
CONFIGURATION
This page also has Colours which can be used to review or change the colours/patterns used
by each airspace class. When pressed, the following dialog is opened:
First select the airspace type you wish to change. Then press Enter and select the colour and
pattern you wish it to be drawn in.
XCSoar Manual (Altair version) • XCSoar-A-EN
96
11
CONFIGURATION
11.3
Map Display
This page has options relating to the map display.
• Labels This setting determines the label displayed with each waypoint. There are 6 options:
• Names The full name of each waypoint is displayed.
• Numbers The waypoint number of each waypoint is displayed.
• None No names are displayed with the waypoints.
• Names in task Names are only displayed for waypoints that are in the active task as well
as the home airfield.
• First Three The first 3 letters of the waypoint name are displayed.
• First Five The first 5 letters of the waypoint name are displayed.
• Trail length Determines whether and how long a trail is drawn behind the glider.
• Off No trail is drawn
• Long A long trail is drawn (approx 60 minutes)
• Short A short trail is drawn (approx 10 minutes)
• Full Displays the entire flight
• Orientation This determines how the screen is rotated with the glider.
• North up The moving map display will always be orientated north to south and the glider
icon will be rotated to show its course.
• Track up The moving map display will be rotated so the glider’s track is oriented up.
• North up when circling This is equivalent to track-up in cruise and north-up when circling.
97
XCSoar Manual (Altair version) • XCSoar-A-EN
11
CONFIGURATION
• Target up when circling This is equivalent to track-up in cruise and the bearing to next
waypoint up when circling.
• North/track North-up in cruise, glider track-track up in circling
• Auto zoom Determines whether auto-zoom is enabled. Auto-zoom changes the zoom level during flight so that the map zooms in as the active waypoint is approached. After passing a
waypoint, the map zooms out to the next waypoint.
• Circling zoom This determines whether separate zoom levels will be maintained for circling and
cruise modes. If unchecked, there is only one zoom. If enabled, then the map will zoom in
automatically when entering circling mode and zoom out automatically when leaving circling
mode.
• Trail drift Determines whether the trail is drifted with the wind when displayed in circling mode.
When OFF, the trail is uncompensated for wind draft.
• Trail width Sets the width of the trail display.
• Wind arrow Determines the way the wind arrow is drawn on the map.
• Arrow head Draws an arrow head only
• Full arrow Draws an arrow head with a dashed arrow line
XCSoar Manual (Altair version) • XCSoar-A-EN
98
11
CONFIGURATION
11.4
Terrain display
This page sets how terrain and topology is drawn on the map window.
• Terrain display Draws digital elevation terrain on the map
• Topology display Draws topological features (roads, rivers, lakes) on the map
• Terrain contrast Defines the amount of phong shading in the terrain rendering. Use large values
to emphasise terrain slope, smaller values if flying in steep mountains.
• Terrain brightness Defines the brightness (whiteness) of the terrain rendering. This controls
the average illumination of the terrain.
• Terrain colors Defines the color ramp used in terrain rendering. Various schemes are available,
which works best for you will depend on how mountainous your region is. The available
terrain color schemes are illustrated in the table below.
99
XCSoar Manual (Altair version) • XCSoar-A-EN
11
CONFIGURATION
Colour schemes
XCSoar Manual (Altair version) • XCSoar-A-EN
100
11
CONFIGURATION
11.5
Glide computer
This page allows glide computer algorithms to be configured.
• Glide terrain line This determines whether the glide terrain range is calculated and drawn as a
line on the map area.
• Auto wind This allows switching on or off the automatic wind algorithm. When the algorithm is
switched off, the pilot is responsible for setting the wind estimate. Circling mode requires
only a GPS source, ZigZag requires an intelligent vario with airspeed output.
• Auto Mc mode This option defines which auto MacCready algorithm is used.
Final glide Adjusts MC for fastest arrival.
Average Sets MC to the average climb rate across all climbs.
Both Both algorithms are used.
• Lift center Controls display of the thermal locator.
• OFF Lift center locator disabled.
• Circle at center A thermal marker is displayed at the center of lift.
• Pan to center A marker is displayed at the center of lift, and when circling, the display is
panned to this lift center.
• Block speed to fly If enabled, the command speed in cruise is set to the MacCready speed to
fly in no vertical air-mass movement. If disabled, the command speed in cruise is set to the
dolphin speed to fly, equivalent to the MacCready speed with vertical air-mass movement.
• Auto Force Final Glide This option enables automatic forcing of final glide mode if the aircraft
is above final glide prior to reaching the penultimate waypoint. Forcing final glide early can
also be performed manually from the task menu.
101
XCSoar Manual (Altair version) • XCSoar-A-EN
11
CONFIGURATION
• NAV by baro altitude When enabled and if connected to a barometric altimeter, barometric altitude is used for all navigation functions. Otherwise GPS altitude is used.
• Flap forces cruise When this option is enabled, causes the flap switches in Vega to force cruise
mode when the flap is not positive. This means that when departing a thermal, switching to
neutral or negative flap will immediately switch XCSoar’s mode to cruise mode.
Similarly, for Borgelt B50 systems, the speed command switch forces XCSoar’s climb or
cruise mode.
• STF risk factor The STF risk factor reduces the MacCready setting used to calculate speed to
fly as the glider gets low, in order to compensate for risk. Set to 0.0 for no compensation,
1.0 scales Mc linearly with height. See 5.5 for more details.
XCSoar Manual (Altair version) • XCSoar-A-EN
102
11
CONFIGURATION
11.6
Safety factors
This page allows the safety heights and behaviour in abort mode to be defined.
• Arrival height The height above terrain that the glider should arrive at for a safe landing.
• Breakoff height This is the height above terrain, below which the pilot should abort the task and
prepare for an outlanding.
• Terrain height The height above terrain that the glider must clear during final glide.
• Abort use current Mc When enabled, the current MacCready setting is used for determining
arrival altitude during task abort mode.
• Safety Mc The MacCready setting used in task abort mode and for determining arrival altitude
at airfields.
See 5.6 for more details on safety heights.
103
XCSoar Manual (Altair version) • XCSoar-A-EN
11
11.7
CONFIGURATION
Polar
This page allows the glide polar to be defined.
• Type This contains a selection of gliders of different performance classes, as well as a special
entry for ‘WinPilot File’.
• Polar file When ‘WinPilot File’ is the polar type, this is the name of the file containing the glide
polar data.
• V rough air The maximum manoeuvring speed can be entered on this page to prevent the glide
computer from commanding unrealistic cruise speeds.
• Handicap The handicap factor used for OnLine Contest scoring.
XCSoar Manual (Altair version) • XCSoar-A-EN
104
11
CONFIGURATION
11.8
Devices
The Devices page is used to specify the ports used to communicate with the GPS and other serial
devices. The default settings are COM1 and 4800 bits per second. When connected to the Vega
intelligent variometer, the settings should be COM1 and 38400.
Two COM devices are available (device A and device B), to allow, for example, one to be connected
to a GPS and another to be connected to a second device such as a variometer. If there is no
second device, set the device B port settings to the same as those of device A – this instructs the
program to ignore device B.
COM ports 0 to 10 may be used. Which COM port is appropriate for you depends on what make
of PDA you use, and the communications medium (serial cable, BlueTooth, virtual COM port, SD
card or CF based GPS, internal GPS). Detailing the various options for different devices is beyond
the scope of this document. If you have trouble identifying which COM port to set, please refer to
the XCSoar website and mailing lists.
The specific type of device can be selected from the list in order to enable support for devices with
proprietary protocols or special functions. If your device is not in the list, choose ‘Generic’.
This page also has a
intelligent variometer.
Setup ...
button to display a configuration dialog specific to the Vega
The ‘Use GPS time’ option, if enabled sets the clock of the computer to the GPS time once a fix is
set. This is only necessary if your computer does not have a real-time clock with battery backup or
your computer frequently runs out of battery power or otherwise loses time.
105
XCSoar Manual (Altair version) • XCSoar-A-EN
11
11.9
CONFIGURATION
Units
This page allows you to set the units preferences used in all displays, InfoBoxes, dialogs and input
fields. Separate selections are available for speed, distance, lift rate, altitude, task speed and
latitude/longitude.
The ‘UTC offset’ field allows the UTC local time offset to be specified. The local time is displayed
below in order to make it easier to verify the correct offset has been entered. Offsets to the half-hour
may be set.
XCSoar Manual (Altair version) • XCSoar-A-EN
106
11
CONFIGURATION
11.10
Interface
This page defines some general display features of XCSoar.
• Safety lock This determines whether the configuration settings dialog is accessible during flight.
• Msg window Defines the alignment of the status message box, either centered or in the top left
corner.
• Events The Input Events file defines the menu system and how XCSoar responds to button
presses and events from external devices.
• Language The language file defines translations for XCSoar text in English to other languages.
If this field is left blank, then XCSoar uses English.
• Status message The status message file can be used to define sounds to be played when
certain events occur, and how long various status messages will appear on screen.
• Menu timeout This determines how long menus will appear on screen if the user does not make
any button presses or interacts with the computer.
• Debounce time This is the minimum interval between the system recognising key presses. Set
this to a low value for a more responsive user interface; if it is too low, then accidental
multiple key presses can occur.
• Animation Determines whether to draw window animations when dialogs open and close.
107
XCSoar Manual (Altair version) • XCSoar-A-EN
11
11.11
CONFIGURATION
Appearance
This page defines various display styles used by symbols and InfoBoxes.
• Glider position Defines the location of the glider drawn on the screen in percent from the bottom.
• Final glide bar Two styles are available: Default and Alternate. The differences between these
styles is cosmetic. Alternate displays the height difference to the right of the final glide bar;
default displays the height difference above/below the final glide bar and inside a rounded
box.
• Landable fields Two styles are available: WinPilot style (green and purple circles) or a high
visibility style.
• Default map zoom
• North arrow Two styles are available. Normal, or with a white outline.
• Inverse InfoBoxes If true, the InfoBoxes are white on black, otherwise black on white.
• Colour InfoBoxes If true, certain InfoBoxes will have coloured text. For example, the active
waypoint InfoBox will be blue when the glider is above final glide.
• InfoBox border Two styles for InfoBox borders are available: ‘Box’ draws boxes around each
InfoBox. ‘Tab’ draws a tab at the top of the InfoBox across the title.
• FLARM display This enables the display of FLARM traffic on the map window as well as the
pop-up radar-like display.
• OFF FLARM radar and map display disabled
• ON/Fixed FLARM radar enabled, map display enabled with fixed scale.
XCSoar Manual (Altair version) • XCSoar-A-EN
108
11
CONFIGURATION
• ON/Scaled FLARM radar enabled, map display enabled and auto scaled.
When auto scaling is enabled, the FLARM targets on the map display are scaled so that
when the map is at large zoom levels, targets are still visible.
• FLARM symbols This controls the symbols used to display FLARM targets on the radar display.
• Relative altitude The relative altitude of the target is represented as a shape that becomes triangular for extreme above/below heights, square at the same altitude. An
arrow pointing up indicates the target is above the aircraft.
• Bearing The track bearing of the target relative to the track bearing of the aircraft is
displayed as an arrow head.
In all modes, the color of the target indicates the threat level.
109
XCSoar Manual (Altair version) • XCSoar-A-EN
11
11.12
CONFIGURATION
InfoBox
This page allows the configuration of InfoBoxes to be defined in each InfoBox display mode (circling,
cruise, final glide and auxiliary). See 2.2 for a description of the InfoBox types and their meanings.
Click on the InfoBox to set the different display modes.
Vario Gauge
By clicking on the Vario gauge, you can configure the following options:
• Speed arrows Whether to show speed command arrows on the Vario gauge. When shown,
in cruise mode, arrows point up to command slow down; arrows point down to command
speed up.
• Show average Whether to show the average climb rate. In cruise mode, this switches to showing
the average netto airmass rate.
• Show MacCready Whether to show the MacCready setting.
• Show bugs Whether to show the bugs percentage.
• Show ballast Whether to show the ballast percentage.
• Show gross Whether to show the gross vario value
• Averager needle If true, the vario gauge will display a hollow averager needle. During cruise,
this needle displays the average netto value. During circling, this needle displays the average gross value.
XCSoar Manual (Altair version) • XCSoar-A-EN
110
12
DATA FILES
12
Data Files
Data files used by XCSoar fall into two categories:
• Flight data files These files contain data relating to the aircraft type, airspace and maps, waypoints etc.
• Program data files These files contain data relating to the ‘look and feel’ of the program, including language translations, button assignments, input events, dialog layouts.
This section focuses on flight data files; see the XCSoar Advanced Configuration Guide for details
on program data files.
12.1
File management
File names must correspond to the name extensions specified below. It is good practice to make
sure that the file names are recognisable so that when making configuration changes there is less
risk of confusion between different files and different file types.
All data files should be copied into the directory:
My Documents/XCSoarData
12.2
Terrain
The terrain file (extension .dat) is a raster digital elevation model represented as an array of
elevations in meters on a latitude/longitude grid. The format used is unique to XCSoar as it contains
a header containing the grid geometry followed by the raster array.
Terrain files for various regions can be obtained from the XCSoar website. Additional terrain files
can be produced upon request.
12.3
Topology
The topology file (extension .tpl) is a text file containing a series of entries each of which define a layer of topology. Typical layers include roads, railway lines, large built-up areas (cities),
miscellaneous populated areas (towns and villages), lakes and rivers.
The topology file defines which features are to be displayed, their colour, maximum zoom visibility,
icons, and labelling. This file can be customised, for example to add or remove specific layers. The
topology data itself uses ESRI Shape files which are generated from the freely available VMAP0
database.
Topology files for various regions can be obtained from the XCSoar website. Additional topology
files can be produced upon request.
12.4
Waypoints
XCSoar uses waypoint files written in the format designed by Cambridge Aero Instruments for their
C302 instrument. The file extension should be .dat.
Files are available from the Soaring Turn-points section of the Soaring Server http://soaringweb.
org/TP.
111
XCSoar Manual (Altair version) • XCSoar-A-EN
12
DATA FILES
Several commercial and freely distributable programs exist for converting between different waypoint formats.
If the elevation of any waypoints is set to zero in the waypoint file, then XCSoar estimates the
waypoint elevation from the terrain database if available.
Furthermore, if the terrain database is available, then waypoints outside the terrain coverage area
cause a dialog to open asking the user if these waypoints are individually or all to be ignored
(excluded) or loaded (included). The configuration setting ‘Wpt outside terrain’ can be used to ask,
exclude or include all waypoints outside terrain on subsequent loads.
12.5
Airspace
XCSoar supports airspace files (extension .txt) using a subset of the widely distributed OpenAir
format. Files are available from the Special Use Airspace section of the Soaring Server at http:
//soaringweb.org/SUA.
The following are the list of supported airspace types: Class A, Class B, Class C, Class D, Class
E, Class F, Prohibited areas, Danger areas, Restricted Areas, CTR, No Gliders, Wave, Other. All
other airspace types will be drawn as type “Other”.
12.6
Map
The map file (extension .xcm) contains terrain, topology and optionally waypoints and airspace
information. The use of map files reduces the number of files the user needs to manage and to
specify in the configuration settings. For backward compatibility, though, the previous methods of
using individual terrain, topology, and waypoint files has been retained.
Map files can be generated from the online terrain/map file generator available from the xcsoar
website. This allows users to generate their own map files for their region, incorporating their own
waypoint files or by specifying the bounds of the region of interest.
Map files are superior to individual terrain/topology files because they incorporate compression of
the data, thereby allowing much larger areas and higher resolution terrain to be used.
12.7
Airfield details
The airfield details file (extension .txt) is a simple text format file containing entries for each airfield, marked in square brackets in uppercase, followed by the text to be displayed on the Waypoint
Details Dialog for that particular waypoint. The text should have a narrow margin because the
waypoint details dialog cannot currently handle word wrapping.
The names of airfields used in the file must correspond exactly to the names in the waypoints file,
with the exception of being converted to uppercase.
The XCSoar website provides airfield details files for several countries and includes tools to convert
from various Enroute Supplement sources to this file format.
Users are free to edit these files to add their own notes for airfields that may not otherwise be
included in the Enroute Supplement sources.
An example (extract from the Australian airfields file):
[BENALLA]
RUNWAYS:
XCSoar Manual (Altair version) • XCSoar-A-EN
112
12
DATA FILES
08 (RL1,7) 17 (RL53) 26
(R) 35 (R)
COMMUNICATIONS:
CTAF - 122.5 REMARKS: Nstd
10 NM rad to 5000’
REMARKS:
CAUTION - Animal haz. Rwy
08L-26R and 17L-35R for
glider ops and tailskidacft
only, SR-SS. TFC PAT - Rgt
circuits Rwy 08R-26L. NS
ABTMT - Rwy 17R-35L fly wide
ICAO: YBLA
[GROOTE EYLANDT]
...
12.8
Glide polar
The WinPilot format is used for glide polar files (extension .plr).
The WinPilot and XCSoar websites provide several glide polar files. Files for other gliders may be
created upon request to the XCSoar team.
The format of the file is simple. Lines beginning with * are ignored and so may be used to document
how the polar was calculated or if there are restrictions on its use. Other than comments, the file
must contain a single row of numbers separated with commas:
• Mass dry gross weight in kg: this is the weight of the glider plus a ’standard’ pilot without
ballast.
• Max water ballast in liters (kg)
• Speed in km/h for first measurement point, (usually minimum sink speed)
• Sink rate in m/s for first measurement point
• Speed in km/h for second measurement point, (usually best glide speed)
• Sink rate in m/s for second measurement point
• Speed in km/h for third measurement point, (usually max manoeuvring speed)
• Sink rate in m/s for third measurement point
An example, for the LS-3 glider, is given below:
113
XCSoar Manual (Altair version) • XCSoar-A-EN
12
DATA FILES
*LS-3 WinPilot POLAR file: MassDryGross[kg],
*MaxWaterBallast[liters], Speed1[km/h], Sink1[m/s],
*Speed2, Sink2, Speed3, Sink3
373,121,74.1,-0.65,102.0,-0.67,167.0,-1.85
Don’t be too optimistic when entering your polar data. It is all too easy to set your LD too high
and you will rapidly see yourself undershooting on final glide.
XCSoar Manual (Altair version) • XCSoar-A-EN
114
115
1-26E
1-34
1-35A
1-36 Sprite
604
ASH-25M 2
ASH-25M 1
ASH-25 (25m, PAS)
ASH-25 (25m, PIL)
ASH-26E
ASG29-18
AstirCS
ASW-12
ASW-15
ASW-17
ASW-19
ASW-20
ASW-24
ASW-27 Wnglts
ASW28-18
Std Cirrus
Cobra
DG-400 (15m)
DG-400 (17m)
DG-500M PAS
DG-500M PIL
DG-500 PAS
Name
Empty
mass
(kg)
315
354
381
322
570
750
660
693
602
435
355
330
948
349
522
363
377
350
357
345
337
350
440
444
750
659
660
Ballast
mass
(kg)
0
0
179
0
100
121
121
120
120
90
225
90
189
91
151
125
159
159
165
190
80
30
90
90
100
100
160
The polars built in to XCSoar are documented in the table below.
W1
(m/s)
-1.04
-0.8
-0.74
-0.68
0.72
-0.78
-0.73
-0.56
-0.52
-0.51
-0.47
-0.7
-0.57
-0.77
-0.7
-0.74
-0.77
-0.73
-0.64
-0.47
-0.74
-0.60
-0.76
-0.68
-0.75
-0.71
-0.72
V1
(kph)
82.3
89.82
98.68
75.98
112.97
130.01
121.3
105.67
98.5
90
85
75.0
95
97.56
114.5
97.47
116.2
108.82
108.8
65
93.23
70.8
115
118.28
121.6
115.4
115.5
(kph)
117.73
143.71
151.82
132.96
150.64
169.96
159.35
163.25
152.18
96
90
93.0
148
156.12
169.05
155.96
174.3
142.25
156.4
107
149.17
94.5
160.53
163.77
162.12
152.01
152.16
V2
(m/s)
-1.88
-2.1
-1.8
-2
-1.42
-1.4
-1.31
-1.34
-1.25
-0.53
-0.48
-0.74
-1.48
-1.9
-1.68
-1.64
-1.89
-1.21
-1.18
-0.67
-1.71
-0.69
-1.22
-1.15
-1.37
-1.28
-1.28
W2
(kph)
156.86
179.64
202.87
170.95
207.13
219.94
206.22
211.26
196.93
185
185
185.00
183.09
195.15
206.5
194.96
213.04
167.41
211.13
165
205.1
148.1
210.22
198.35
202.66
190.02
190.22
V3
(m/s)
-3.8
-3.8
-3.9
-4.1
-4.1
-2.6
-2.4
-2.5
-2.3
-2.0
-2.0
-3.1
-2.6
-3.4
-2.9
-3.1
-3.3
-1.8
-2.5
-2.0
-4.2
-1.83
-2.3
-1.8
-2.5
-2.3
-2.3
W3
12
DATA FILES
XCSoar Manual (Altair version) • XCSoar-A-EN
DG-500 PIL
DG-800 15m
DG-800 18m Wnglts
Discus A
Duo Discus (PAS)
Duo Discus (PIL)
Genesis II
Grob G-103 Twin II (PAS)
Grob G-103 Twin II (PIL)
H-201 Std Libelle
H-301 Libelle
IS-29D2 Lark
Jantar 2 (SZD-42A)
Janus B (18.2m PAS)
Janus B (18.2m PIL)
Ka-6CR
L-33 SOLO
LS-1C
LS-3
LS-4a
LS-6-18W
LS-8-15
LS-8-18
LS7wl
Nimbus 2 (20.3m)
Nimbus 3DM (24.6m PAS)
Nimbus 3D (24.6m PAS)
Nimbus 3D (24.6m PIL)
Nimbus 3 (24.6m)
Nimbus 3T
Nimbus 4DM (26m PAS)
570
468
472
350
628
537
374
580
494
304
300
360
482
603
508
310
330
350
383
361
330
325
325
350
493
820
712
621
527
577
820
160
120
120
182
201
201
151
0
0
50
50
0
191
170
170
0
0
91
121
121
140
185
185
150
159
168
168
168
159
310
168
107.5
133.9
106
103.77
106.5
94.06
94
99
90.75
97
94
100
109.5
115.5
105.7
87.35
87.2
115.87
115.03
114.87
90
70
80
103.77
119.83
114.97
93.64
87.47
116.18
141.7
100.01
-0.66
-0.88
-0.62
-0.72
-0.79
-0.72
-0.61
-0.8
-0.74
-0.79
-0.68
-0.82
-0.66
-0.76
-0.7
-0.81
-0.8
-1.02
-0.86
-0.8
-0.51
-0.51
-0.51
-0.73
-0.75
-0.57
-0.46
-0.43
-0.67
-0.99
-0.48
141.33
178.87
171.75
155.65
168.11
155.49
141.05
175.01
161.42
152.43
147.71
135.67
157.14
171.79
157.65
141.92
135.64
154.49
174.04
172.3
100
115
94
155.65
179.75
157.42
175.42
163.86
174.28
182.35
150.01
-1.19
-1.53
-1.47
-1.55
-1.54
-1.43
-1.18
-1.95
-1.8
-1.91
-2.03
-1.55
-1.47
-1.98
-1.82
-2.03
-1.73
-1.84
-1.76
-2.33
-0.57
-0.85
-0.56
-1.47
-2.14
-0.98
-1.48
-1.38
-1.81
-1.89
-0.87
176.66
223.59
214.83
190.24
201.31
188.21
172.4
225.02
207.54
190.54
184.64
184.12
196.42
209.96
192.68
174.68
174.4
193.12
212.72
210.59
183
173
173
180.00
219.69
222.24
218.69
204.27
232.37
243.13
190.76
-2.1
-2.5
-2.4
-3.1
-2.9
-2.7
-2.0
-3.8
-3.5
-3.3
-4.1
-3.3
-2.7
-4.0
-3.6
-3.5
-3.4
-3.3
-3.4
-4.5
-2.0
-2.0
-2.0
-2.66
-3.8
-2.3
-2.5
-2.3
-3.8
-4.0
-1.6
12
XCSoar Manual (Altair version) • XCSoar-A-EN
DATA FILES
116
Nimbus 4DM (26m PIL)
Nimbus 4D PAS
Nimbus 4D PIL
Nimbus 4 (26.4m)
PIK-20B
PIK-20D
PIK-20E
PIK-30M
PW-5 Smyk
Russia AC-4 (12.6m)
Speed Astir
Stemme S-10 PAS
Stemme S-10 PIL
SZD-55-1
Ventus A/B (16.6m)
Ventus B (15m)
Ventus 2C (18m)
Ventus 2Cx (18m)
Zuni II
729
743
652
597
354
348
437
460
300
250
351
850
759
336
358
341
385
385
358
168
303
303
303
144
144
80
0
0
0
90
0
0
201
151
151
180
215
182
94.31
107.5
99
85.1
102.5
100
109.61
123.6
99.5
99.3
90
133.47
125.8
98.3
100.17
97.69
80.0
80.0
110
-0.46
-0.5
-0.46
-0.41
-0.69
-0.69
-0.83
-0.78
-0.95
-0.92
-0.63
-0.83
-0.82
-0.67
-0.64
-0.68
-0.5
-0.5
-0.88
141.47
142.74
133.73
127.98
157.76
156.54
166.68
152.04
158.48
140.01
105
167.75
158.51
176.76
159.69
156.3
120.0
120.0
167
-0.82
-0.83
-0.78
-0.75
-1.59
-1.78
-2
-1.12
-2.85
-1.8
-0.72
-1.41
-1.33
-2.27
-1.47
-1.46
-0.73
-0.73
-2.21
179.9
181.51
170.07
162.74
216.91
215.24
241.15
200.22
198.1
170.01
157
205.03
193.74
216.04
239.54
234.45
180.0
180.0
203.72
-1.5
-1.6
-1.5
-1.4
-3.6
-4.2
-4.7
-2.2
-5.1
-2.9
-2.0
-2.3
-2.2
-4.3
-4.3
-3.9
-2.0
-2.0
-3.6
12
117
DATA FILES
XCSoar Manual (Altair version) • XCSoar-A-EN
12
12.9
DATA FILES
Profiles
Profile files (extension .prf) can be used to store configuration settings used by XCSoar. The
format is a simple text file containing <label>=<value> pairs. Certain values are text strings
delimited by double quotes, for example:
PilotName="Baron Richtoffen"
All other values are numeric, including ones that represent boolean values (true= 1, false= 0).
All values that have physical dimensions are expressed in SI units (meters, meters/second, seconds etc).
When a profile file is saved, it contains all configuration settings. Profile files may be edited with
a text editor to produce a smaller set of configuration settings that can be given to other pilots to
load.
When a profile file is loaded, only the settings present in that file overwrite the configuration settings
in XCSoar; all other settings are unaffected.
The default profile file is generated automatically when configuration settings are changed or when
the program exits; this has the file name xcsoar-registry.prf.
The easiest way to create a new profile is to copy a previous one, such as the default profile. Copy
the file, give it a logical name, and then when XCSoar starts next time the new profile can be
selected and customised through the configuration settings dialogs.
12.10
Checklist
The checklist file (xcsoar-checklist.txt) uses a similar format to the airfield details file. Each
page in the checklist is preceded by the name of the list in square brackets. Multiple pages can be
defined (up to 20).
An example (extract):
[Preflight]
Controls
Harness, secure objects
Airbrakes and flaps
Outside
Trim and ballast
Instruments
Canopy
[Derigging]
Remove tape from wings and tail
...
12.11
Tasks
Task files (extension .tsk) are currently in a special binary format and cannot be easily edited
other than in XCSoar or XCSoarPC. However they are transferable between devices.
Work is under way to produce a text format that will make it easier for users to edit the files or to
export/import them for use with other programs.
XCSoar Manual (Altair version) • XCSoar-A-EN
118
12
DATA FILES
12.12
Flight logs
The software flight logger generates IGC files (extension .igc) according to the long naming
convention described in the FAI document Technical Specification for IGC-Approved GNSS Flight
Recorders. These files can be imported into other programs for analysis after flight.
The flight logs replay facility allows the files to include embedded commands to control XCSoar as
if the user was interacting with the program. It does this by defining a special use for the generalpurpose ‘pilot event’ IGC sentence:
LPLT event=StatusMessage Hello everybody
This command will bring up a status message with the text “Hello everybody” when the line is
reached during replay.
The internal software logger has adjustable time steps, separate for cruise and circling modes, via
parameters in the configuration settings. Typically the circling time step is set to a smaller value
than cruise in order to give good quality flight logs for replay purposes.
12.13
Input events
The input event file (extension .xci) is a plain text file designed to control the input and events in
your glide computer.
You do not require access to the source code or understanding of programming to write your own
input event files but you do require some advanced understanding of XCSoar and of gliding.
Some reasons why you might like to use xci:
• Modify the layout of button labels
• Customise any button/key event
• Do multiple events from one key or glide computer triggered process
12.14
Language
The language file (extension .xcl) is a plain text file designed to provide translations between
English and other languages, for messages and text displayed by XCSoar.
The format is quite simple, it is a list of text lines that XCSoar uses, followed by an equals sign and
the translation, thus:
[English text]=[Translated text]
An example is provided below:
Hello=Hallo
Several language files are available from the XCSoar website.
Upon startup, if the language file “default.xcl” is present and no language file is specified in the
configuration settings, then this file will be loaded.
119
XCSoar Manual (Altair version) • XCSoar-A-EN
12
12.15
DATA FILES
Status
Status files are text of the form label=value, arranged in blocks of text where each block corresponds to an individual status message. These are delimited by double spaces. Each block can
contain the following fields:
• key This is the text of the status message.
• sound Location of a WAV audio file to play when the status message appears. This is optional.
• delay Duration in milliseconds the status message is to be displayed. This is optional.
• hide A boolean (yes/no) that dictates whether the message is to be hidden (that is, not displayed).
Example:
key=Simulation\r\nNothing is real!
sound=\My Documents\XCSoarData\Start_Real.wav
delay=1500
key=Task started
delay=1500
hide=yes
12.16
FLARM Identification file
The FLARM identification file xcsoar-flarm.txt defines a table of aircraft registrations or pilot
names against the ICAO IDs that are optionally broadcast by FLARM equipped aircraft. These
names are displayed on the map next to FLARM traffic symbols, for matching ICAO IDs.
The format of this file is a list of entries, one for each aircraft, of the form icao id=name, where icao
id is the six-digit hex value of the ICAO aircraft ID, and name is free text (limited to 20 characters),
describing the aircraft and/or pilot name. Short names are preferred in order to reduce clutter on
the map display.
Example:
DD8F12=WUS
DA8B06=Chuck Yeager
Currently this file is limited to a maximum of 200 entries.
12.17
Dialog files
These files describe the layout of dialogs, including font size, button size, and other aspects of the
layout of the widgets within the dialogs. The files are written in an XML data format.
Users may want to edit these files, or use replacements prepared by others, in order to change the
layout of dialogs to suit their preferences. In particular, it is possible to hide configuration settings
or other data fields that the user is not interested in.
XCSoar Manual (Altair version) • XCSoar-A-EN
120
13
ABOUT XCSOAR
13
13.1
About XCSoar
Product history
XCSoar started as a commercial product developed by Mike Roberts (UK), where it enjoyed a
successful share of the market for several years and going though several releases, the last being
Version 2. Personal reasons prevented him from being able to continue supporting the product
and so in late 2004 he announced the licensing of the source code to the GNU public license, as
XCSoar Version 3. A support website on Yahoo Groups was set up and the open source project
started to gain interest and input by developers.
In March 2005 the program was substantially enhanced and this resulted in Version 4.0 being
released. By this time, coordination of the various development efforts on the source code became
difficult and time-consuming, so it was decided to move the project to SourceForge, whereby all
the software work could be managed by a concurrent version management system.
In July 2005, Version 4.2 was released which addressed some compatibility issues that were
experienced with certain PDA and GPS hardware configurations.
In September 2005, Version 4.5 was released. This contained major enhancements to the user
interface including the introduction of the ‘input event’ system and language translation files.
In April 2006, Version 4.7 was released to Altair customers. This contained stability and performance enhancements as well as many bug fixes; and a new method for handling dialogs based on
XML files.
In September 2006, Version 5.0 was released on all platforms, Altair, PC, PDA. This version contains many improvements and new features and is based on extensive testing in flight and in simulation.
In September 2007, Version 5.1.2 was released on all platforms, Altair, PC, PDA. This version
contains many improvements and new features and is based on extensive testing in flight and
in simulation. Major improvements include a new map file format incorporating JPG2000 compression, online contest support, additional supported devices, FLARM radar screen, and overall
improved stability, reliability and accuracy of task calculations. Many feature requests from users
have been incorporated into this release.
In May 2008, Version 5.2 was released on Altair. This version contains many improvements and
has been completely reorganised to make the computer-pilot interaction easier.
13.2
Get involved
The success of the project is the result of many kinds of contributions. You do not have to be a
software developer to help; in general, there are perhaps five major ways of contributing, other than
working on the software itself:
• Give feedback Ideas, suggestions, bug reports, encouragement and constructive criticism are
all very welcome and helpful.
• Setup suggestions Because XCSoar is so configurable, we rely to some extent on users to
think about how they would like the program to be set up. Selection of InfoBox layouts,
button menus and button assignments require some design thought, and making these
available to the developers and other users will help us provide good default settings.
121
XCSoar Manual (Altair version) • XCSoar-A-EN
13
ABOUT XCSOAR
• Data integrity Airspace and waypoint files need to be kept up to date, and it often takes people
with local knowledge to do this.
• Promotion The more users the software has, the better the product will be. As more people use
the software and give feedback, bugs are found more easily and improvements can occur
at a greater pace. You can help here, for example, by showing the software to others and
by conducting demonstration and training sessions in your club.
• Documentation You are encouraged to add and edit text on the XCSoar homepage, which is
set up as a ‘Wiki’. All you need to do is to register for edit access.
13.3
Open source philosophy
There are several benefits to having software like XCSoar open source:
• Firstly, it is free so pilots can try out the software at no cost and decide if it is suitable for
their needs; and pilots are free to copy the program onto whatever Pocket PC device, PC or
EFIS they like without charge.
• You have access to the source code so you are free to change the software or use pieces
of it in new free programs.
• Having the source code available on the Internet means that it is subject to wide scrutiny
and therefore bugs are easily and quickly fixed.
• A large group of developers are available to help in troubleshooting and quickly implement
new features upon request.
• Open source software under the GNU public license cannot at a later date be made closedsource; so by using this software you will not be locked in to unspecified software costs in
the future.
The full terms of the licensing agreement for XCSoar is given in Appendix A.
The development of XCSoar since its open source release has been entirely a volunteer effort.
This does not preclude individual developers or organisations from offering commercial support
services. The spirit of the project however suggests that in such cases the commercial services
are encouraged to produce some flow-on benefit back to the wider community of users.
13.4
Development process
We try to incorporate new features as quickly as possible. This has to be balanced by the needs
to not change substantially the interface without appropriate warnings so users that upgrade do
not get a shock. This means that when we introduced the new button menu system in version 4.5,
it was necessary to also distribute a file that allowed users to have the buttons assigned to their
‘legacy’ function.
XCSoar, being used in flight, is a special kind of software because it can be regarded as ‘missioncritical’, and is a real-time system. This has placed a very high emphasis on developers to perform
a great deal of testing before releasing changes to the public.
The software developers all keep in contact with each other through the SourceForge developer’s
mailing list
XCSoar Manual (Altair version) • XCSoar-A-EN
122
13
ABOUT XCSOAR
[email protected]
We try to coordinate our activities to avoid conflict and duplicated effort, and to work together as a
team. If you would like to get involved in the software development, send the developers an email.
13.5
User base
Who is using XCSoar? Good question, and hard to answer. Since no-one pays for the product –
most people download the program anonymously – it is hard for anyone to keep track of how many
users are out there.
Statistics from the main website indicate there has been an average of approximately twenty downloads per day between June 2005 and June 2006, and eighty downloads per day between June
2006 and September 2007. Looking at how many people download the terrain and topology data
packs from the website indicates that it is used in many countries and in nearly every continent.
XCSoar is used by a wide cross section of pilots, including early post-solo through to experienced
competition pilots. There are many ‘armchair’ pilots who use XCSoar with gliding simulators, such
as Condor.
13.6
Credits
Software developers:
• Mike Roberts
• John Wharington [email protected]
• Samuel Gisiger [email protected]
• Scott Penrose [email protected]
• Jeff Goodenough [email protected]
• Robin Birch [email protected]
• Alastair Harrison [email protected]
Other code and algorithms contributions come from:
• Ephemeris Jarmo Lammi
• Shapelib Frank Warmerdam
• Least squares Curtis Olson http://www.flightgear.org/˜curt
• Aviation Formulary Ed Williams
• JasPer
• KFlog Volkslogger code by Heiner Lamprecht
• Volkslogger support Garrecht Ingenieurgesellschaft
123
XCSoar Manual (Altair version) • XCSoar-A-EN
13
XCSoar Manual (Altair version) • XCSoar-A-EN
ABOUT XCSOAR
124
A
GNU GENERAL PUBLIC LICENSE
A
GNU General Public License
GNU GENERAL PUBLIC LICENSE
Version 2, June 1991
Copyright (C) 1989, 1991 Free Software Foundation, Inc.
59 Temple Place, Suite 330, Boston, MA 02111-1307 USA
Everyone is permitted to copy and distribute verbatim copies of this license document, but changing
it is not allowed.
Preamble
The licenses for most software are designed to take away your freedom to share and change
it. By contrast, the GNU General Public License is intended to guarantee your freedom to share
and change free software–to make sure the software is free for all its users. This General Public
License applies to most of the Free Software Foundation’s software and to any other program
whose authors commit to using it. (Some other Free Software Foundation software is covered by
the GNU Library General Public License instead.) You can apply it to your programs, too.
When we speak of free software, we are referring to freedom, not price. Our General Public
Licenses are designed to make sure that you have the freedom to distribute copies of free software
(and charge for this service if you wish), that you receive source code or can get it if you want it,
that you can change the software or use pieces of it in new free programs; and that you know you
can do these things.
To protect your rights, we need to make restrictions that forbid anyone to deny you these rights or
to ask you to surrender the rights. These restrictions translate to certain responsibilities for you if
you distribute copies of the software, or if you modify it.
For example, if you distribute copies of such a program, whether gratis or for a fee, you must give
the recipients all the rights that you have. You must make sure that they, too, receive or can get the
source code. And you must show them these terms so they know their rights.
We protect your rights with two steps: (1) copyright the software, and (2) offer you this license
which gives you legal permission to copy, distribute and/or modify the software.
Also, for each author’s protection and ours, we want to make certain that everyone understands that
there is no warranty for this free software. If the software is modified by someone else and passed
on, we want its recipients to know that what they have is not the original, so that any problems
introduced by others will not reflect on the original authors’ reputations.
Finally, any free program is threatened constantly by software patents. We wish to avoid the danger
that redistributors of a free program will individually obtain patent licenses, in effect making the
program proprietary. To prevent this, we have made it clear that any patent must be licensed for
everyone’s free use or not licensed at all.
The precise terms and conditions for copying, distribution and modification follow.
125
XCSoar Manual (Altair version) • XCSoar-A-EN
A
GNU GENERAL PUBLIC LICENSE
GNU GENERAL PUBLIC LICENSE
TERMS AND CONDITIONS FOR COPYING, DISTRIBUTION AND MODIFICATION
1. This License applies to any program or other work which contains a notice placed by the
copyright holder saying it may be distributed under the terms of this General Public License.
The ”Program”, below, refers to any such program or work, and a ”work based on the Program” means either the Program or any derivative work under copyright law: that is to say,
a work containing the Program or a portion of it, either verbatim or with modifications and/or
translated into another language. (Hereinafter, translation is included without limitation in
the term ”modification”.) Each licensee is addressed as ”you”.
Activities other than copying, distribution and modification are not covered by this License;
they are outside its scope. The act of running the Program is not restricted, and the output
from the Program is covered only if its contents constitute a work based on the Program
(independent of having been made by running the Program). Whether that is true depends
on what the Program does.
2. You may copy and distribute verbatim copies of the Program’s source code as you receive
it, in any medium, provided that you conspicuously and appropriately publish on each copy
an appropriate copyright notice and disclaimer of warranty; keep intact all the notices that
refer to this License and to the absence of any warranty; and give any other recipients of
the Program a copy of this License along with the Program.
You may charge a fee for the physical act of transferring a copy, and you may at your option
offer warranty protection in exchange for a fee.
3. You may modify your copy or copies of the Program or any portion of it, thus forming a work
based on the Program, and copy and distribute such modifications or work under the terms
of Section 1 above, provided that you also meet all of these conditions:
(a) You must cause the modified files to carry prominent notices stating that you changed
the files and the date of any change.
(b) You must cause any work that you distribute or publish, that in whole or in part contains or is derived from the Program or any part thereof, to be licensed as a whole at
no charge to all third parties under the terms of this License.
(c) If the modified program normally reads commands interactively when run, you must
cause it, when started running for such interactive use in the most ordinary way, to
print or display an announcement including an appropriate copyright notice and a
notice that there is no warranty (or else, saying that you provide a warranty) and that
users may redistribute the program under these conditions, and telling the user how
to view a copy of this License. (Exception: if the Program itself is interactive but does
not normally print such an announcement, your work based on the Program is not
required to print an announcement.)
These requirements apply to the modified work as a whole. If identifiable sections of that
work are not derived from the Program, and can be reasonably considered independent
and separate works in themselves, then this License, and its terms, do not apply to those
sections when you distribute them as separate works. But when you distribute the same
sections as part of a whole which is a work based on the Program, the distribution of the
XCSoar Manual (Altair version) • XCSoar-A-EN
126
A
GNU GENERAL PUBLIC LICENSE
whole must be on the terms of this License, whose permissions for other licensees extend
to the entire whole, and thus to each and every part regardless of who wrote it.
Thus, it is not the intent of this section to claim rights or contest your rights to work written
entirely by you; rather, the intent is to exercise the right to control the distribution of derivative
or collective works based on the Program.
In addition, mere aggregation of another work not based on the Program with the Program
(or with a work based on the Program) on a volume of a storage or distribution medium does
not bring the other work under the scope of this License.
4. You may copy and distribute the Program (or a work based on it, under Section 2) in object
code or executable form under the terms of Sections 1 and 2 above provided that you also
do one of the following:
(a) Accompany it with the complete corresponding machine-readable source code, which
must be distributed under the terms of Sections 1 and 2 above on a medium customarily used for software interchange; or,
(b) Accompany it with a written offer, valid for at least three years, to give any third party,
for a charge no more than your cost of physically performing source distribution, a
complete machine-readable copy of the corresponding source code, to be distributed
under the terms of Sections 1 and 2 above on a medium customarily used for software
interchange; or,
(c) Accompany it with the information you received as to the offer to distribute corresponding source code. (This alternative is allowed only for noncommercial distribution and
only if you received the program in object code or executable form with such an offer,
in accord with Subsection b above.)
The source code for a work means the preferred form of the work for making modifications
to it. For an executable work, complete source code means all the source code for all
modules it contains, plus any associated interface definition files, plus the scripts used to
control compilation and installation of the executable. However, as a special exception,
the source code distributed need not include anything that is normally distributed (in either
source or binary form) with the major components (compiler, kernel, and so on) of the
operating system on which the executable runs, unless that component itself accompanies
the executable.
If distribution of executable or object code is made by offering access to copy from a designated place, then offering equivalent access to copy the source code from the same place
counts as distribution of the source code, even though third parties are not compelled to
copy the source along with the object code.
5. You may not copy, modify, sublicense, or distribute the Program except as expressly provided under this License. Any attempt otherwise to copy, modify, sublicense or distribute the
Program is void, and will automatically terminate your rights under this License. However,
parties who have received copies, or rights, from you under this License will not have their
licenses terminated so long as such parties remain in full compliance.
6. You are not required to accept this License, since you have not signed it. However, nothing
else grants you permission to modify or distribute the Program or its derivative works. These
actions are prohibited by law if you do not accept this License. Therefore, by modifying or
127
XCSoar Manual (Altair version) • XCSoar-A-EN
A
GNU GENERAL PUBLIC LICENSE
distributing the Program (or any work based on the Program), you indicate your acceptance
of this License to do so, and all its terms and conditions for copying, distributing or modifying
the Program or works based on it.
7. Each time you redistribute the Program (or any work based on the Program), the recipient
automatically receives a license from the original licensor to copy, distribute or modify the
Program subject to these terms and conditions. You may not impose any further restrictions
on the recipients’ exercise of the rights granted herein. You are not responsible for enforcing
compliance by third parties to this License.
8. If, as a consequence of a court judgment or allegation of patent infringement or for any
other reason (not limited to patent issues), conditions are imposed on you (whether by court
order, agreement or otherwise) that contradict the conditions of this License, they do not
excuse you from the conditions of this License. If you cannot distribute so as to satisfy
simultaneously your obligations under this License and any other pertinent obligations, then
as a consequence you may not distribute the Program at all. For example, if a patent license
would not permit royalty-free redistribution of the Program by all those who receive copies
directly or indirectly through you, then the only way you could satisfy both it and this License
would be to refrain entirely from distribution of the Program.
If any portion of this section is held invalid or unenforceable under any particular circumstance, the balance of the section is intended to apply and the section as a whole is intended
to apply in other circumstances.
It is not the purpose of this section to induce you to infringe any patents or other property
right claims or to contest validity of any such claims; this section has the sole purpose
of protecting the integrity of the free software distribution system, which is implemented
by public license practices. Many people have made generous contributions to the wide
range of software distributed through that system in reliance on consistent application of
that system; it is up to the author/donor to decide if he or she is willing to distribute software
through any other system and a licensee cannot impose that choice.
This section is intended to make thoroughly clear what is believed to be a consequence of
the rest of this License.
9. If the distribution and/or use of the Program is restricted in certain countries either by patents
or by copyrighted interfaces, the original copyright holder who places the Program under this
License may add an explicit geographical distribution limitation excluding those countries,
so that distribution is permitted only in or among countries not thus excluded. In such case,
this License incorporates the limitation as if written in the body of this License.
10. The Free Software Foundation may publish revised and/or new versions of the General
Public License from time to time. Such new versions will be similar in spirit to the present
version, but may differ in detail to address new problems or concerns.
Each version is given a distinguishing version number. If the Program specifies a version
number of this License which applies to it and ”any later version”, you have the option of
following the terms and conditions either of that version or of any later version published
by the Free Software Foundation. If the Program does not specify a version number of this
License, you may choose any version ever published by the Free Software Foundation.
11. If you wish to incorporate parts of the Program into other free programs whose distribution
conditions are different, write to the author to ask for permission. For software which is
XCSoar Manual (Altair version) • XCSoar-A-EN
128
A
GNU GENERAL PUBLIC LICENSE
copyrighted by the Free Software Foundation, write to the Free Software Foundation; we
sometimes make exceptions for this. Our decision will be guided by the two goals of preserving the free status of all derivatives of our free software and of promoting the sharing
and reuse of software generally.
No warranty
BECAUSE THE PROGRAM IS LICENSED FREE OF CHARGE, THERE IS NO WARRANTY FOR
THE PROGRAM, TO THE EXTENT PERMITTED BY APPLICABLE LAW. EXCEPT WHEN OTHERWISE STATED IN WRITING THE COPYRIGHT HOLDERS AND/OR OTHER PARTIES PROVIDE THE PROGRAM ”AS IS” WITHOUT WARRANTY OF ANY KIND, EITHER EXPRESSED OR
IMPLIED, INCLUDING, BUT NOT LIMITED TO, THE IMPLIED WARRANTIES OF MERCHANTABILITY AND FITNESS FOR A PARTICULAR PURPOSE. THE ENTIRE RISK AS TO THE QUALITY
AND PERFORMANCE OF THE PROGRAM IS WITH YOU. SHOULD THE PROGRAM PROVE
DEFECTIVE, YOU ASSUME THE COST OF ALL NECESSARY SERVICING, REPAIR OR CORRECTION.
IN NO EVENT UNLESS REQUIRED BY APPLICABLE LAW OR AGREED TO IN WRITING WILL
ANY COPYRIGHT HOLDER, OR ANY OTHER PARTY WHO MAY MODIFY AND/OR REDISTRIBUTE THE PROGRAM AS PERMITTED ABOVE, BE LIABLE TO YOU FOR DAMAGES, INCLUDING ANY GENERAL, SPECIAL, INCIDENTAL OR CONSEQUENTIAL DAMAGES ARISING
OUT OF THE USE OR INABILITY TO USE THE PROGRAM (INCLUDING BUT NOT LIMITED
TO LOSS OF DATA OR DATA BEING RENDERED INACCURATE OR LOSSES SUSTAINED BY
YOU OR THIRD PARTIES OR A FAILURE OF THE PROGRAM TO OPERATE WITH ANY OTHER
PROGRAMS), EVEN IF SUCH HOLDER OR OTHER PARTY HAS BEEN ADVISED OF THE POSSIBILITY OF SUCH DAMAGES.
129
XCSoar Manual (Altair version) • XCSoar-A-EN