1
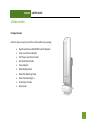
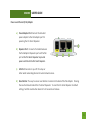
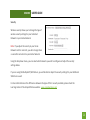
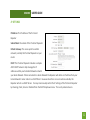
User’s Guide High Power Wireless-N 600mW Pro Smart Repeater SR600EX SR600EX USER’S GUIDE CONTENTS INTRODUCTION ..................................................................... 2 GETTING STARTED ................................................................. 3 Package Contents ...................................................................... 3 LED Indicators............................................................................ 3 Inside Panel ............................................................................... 5 Power over Ethernet (PoE) Adapter .......................................... 6 MOUNTING INSTRUCTIONS ................................................... 7 SETUP GUIDE ....................................................................... 10 Find a Setup Location/ Optimal Positioning ............................ 10 Connect your PC to the Pro Smart Repeater ........................... 12 Access Setup Wizard ............................................................... 13 Welcome to the Smart Setup Wizard ...................................... 14 Scan for a Wireless Network ................................................... 15 Connecting to a Secure Network ............................................. 16 Repeater Settings (SSID) .......................................................... 17 Repeater Settings (Security) .................................................... 18 Setup Summary ....................................................................... 19 WIRELESS SETTINGS............................................................. 21 Home Network Settings .......................................................... 21 Extended Network Settings ..................................................... 22 Wi-Fi Protected Setup (WPS) ................................................... 25 Antenna Settings ...................................................................... 26 Advanced Settings.................................................................... 27 SMART FEATURES ................................................................ 28 Access Schedule ....................................................................... 29 User Access Control ................................................................. 30 Wireless Coverage Controls ..................................................... 31 IP SETTINGS ......................................................................... 32 MANAGEMENT FEATURES ................................................... 34 Repeater Status ....................................................................... 35 Network Statistics .................................................................... 36 System Clock ............................................................................ 37 System Logs ............................................................................. 38 Upgrade Firmware ................................................................... 39 Save/Reload Settings ............................................................... 41 Password Settings .................................................................... 42 TECHNICAL SPECIFICATIONS ................................................. 43 DEFAULT SETTINGS .............................................................. 44 TROUBLESHOOTING AND SUPPORT ..................................... 45 WARRANTY & REGULATORY INFORMATION ........................ 54 1 SR600EX USER’S GUIDE INTRODUCTION Thank you for purchasing this Amped Wireless product. At Amped Wireless we strive to provide you with the highest quality products through innovation and advanced technology. We pride ourselves on delivering products that outperform the competition and go beyond your expectations. If you have any questions please feel free to contact us. We’d love to hear from you and thank you for your support! Email: [email protected] Call: 888-573-8830 Web: www.ampedwireless.com 2 SR600EX USER’S GUIDE GETTING STARTED Package Contents Check to make sure you have all the contents within your package: High Power Wireless-N 600mW Pro Smart Repeater Power over Ethernet Adapter 30 ft Power over Ethernet Cable Standard Ethernet Cable Power Adapter Metal Desktop Stand Metal Pole Mounting Clamp Plastic Pole Mounting Tie CD with User’s Guide Setup Guide 3 SR600EX USER’S GUIDE LED Indicators a) Power: When lit, the power is on. b) Wireless Activity: Blinks rapidly when wireless data traffic is passing through the Pro Smart Repeater. c) LAN: Shows the connection status and data activity of your local network (network devices connected to the Pro Access Point. d) POE: Shows the connection status of the LAN port on the POE Adapter 4 SR600EX USER’S GUIDE Inside Panel a) Optional External Antenna Port: RJ-SMA antenna connector. Compatible with all antennas with RP-SMA connectors. Upgradable to high gain antennas for more range. See the External Antenna configuration section for setup procedures. b) PoE Port: Power over Ethernet capable RJ-45 port used to connect the Pro Smart Repeater to the included PoE Adapter for power and data connectivity. c) LAN Port: RJ-45 port used to connect additional network devices to the Pro Smart Repeater. 5 SR600EX USER’S GUIDE Power over Ethernet (PoE) Adapter a) Power Adapter Port: Connect the included power adapter to the PoE adapter port for powering the Pro Smart Repeater. b) Repeater Port: Connect a PoE cable between the PoE Adapter’s Repeater port and the PoE port on the Pro Smart Repeater to provide power and data to the Pro Smart Repeater. c) LAN Port: Connects to your PC for setup or other wired networking devices for wired network access. d) Reset Button: The easy to access reset button is located on the back of the PoE Adapter. Pressing the reset button will reboot the Pro Smart Repeater. To reset the Pro Smart Repeater to default settings, hold the reset button down for 5-10 seconds and release. 6 SR600EX USER’S GUIDE MOUNTING INSTRUCTIONS Desktop Mounting a) b) Place the stand in an optimum location. Secure the SR600EX onto the desktop mount. 7 SR600EX USER’S GUIDE Wall Mounting a) b) c) Place the SR600EX against the wall, use a pencil and mark two locations through the mounting hole on the wall. Remove the SR600EX and securely drill two screws where you’ve marked on the wall. Now, mount the unit onto the secured screws. 8 SR600EX USER’S GUIDE Pole Mounting a) b) Place the SR600EX against the pole. Use the included hose clamp and secure it through the smaller hole located on the bottom of the mounting bracket. Use a screw driver to tighten the clamp until the adapter is securely mounted to the pole. 9 SR600EX USER’S GUIDE SETUP GUIDE Find a Setup Location The location of where you install the Pro Smart Repeater is very important to how it will function. The optimal setup location should be halfway between your wireless router and your wireless dead zone. 10 SR600EX USER’S GUIDE Find the Optimal Position for the Pro Smart Repeater Choose the option below that best fits your installation scenario. For best results, the signal strength between the Pro Smart Repeater and the Home Network / Hot Spot should be greater than 70%. 11 SR600EX USER’S GUIDE Connect your PC to the Pro Smart Repeater a) b) c) d) Open the lid of the Pro Smart Repeater and check that the PoE cable is securely fastened to the POE port Locate the PoE Adapter and connect the 30 ft PoE cable to the Repeater port on the PoE adapter Locate the power adapter and connect one end to a power outlet and the other end to the PWR port on the PoE adapter. Locate the shorter network cable and connect one end to the LAN port on the PoE adapter and the other to your PC’s network (LAN) port. Do NOT attempt to connect to the Pro Smart Repeater with a wireless connection at this time. 12 SR600EX USER’S GUIDE Accessing the Smart Setup Wizard a. b. c. d. Disconnect your computer from any wireless networks Open your web browser Type in: http://setup.ampedwireless.com into the web address bar If the web menu fails to open, then type in the following IP address into your web address bar: http://192.168.1.240 13 SR600EX USER’S GUIDE Welcome to the Smart Setup Wizard When the web menu appears, click Next to continue to the next page. The diagram on this page displays the terms used to describe: 1) The network you are trying to repeat (Home Network / Wireless Hot Spot) 2) The network that is rebroadcasted and extended (Extended Network) Study this diagram carefully as the terms used in the following instructions will refer to these names. 14 SR600EX USER’S GUIDE Scan for a Wireless Network Click SCAN to begin searching for available wireless networks to repeat. Highlight your network and click Next to continue. If you fail to find any wireless networks, the Pro Smart Repeater may be placed too far from the wireless network that you are trying to repeat. Move your Pro Smart Repeater closer to the wireless network that you are trying to repeat and click SCAN again. The Scan results page will display information regarding the name of the network (SSID), the wireless channel and the network details. AP stands for Access Point and is the standard type of wireless network. The results page will also display whether or not your network has security and what the signal strength is coming from each specific network detected. Ensure that the network you are repeating has a signal strength of at least 70%. If it does not, reorient the Pro Smart Repeater or your wireless router to achieve a signal strength of 70% or greater. 15 SR600EX USER’S GUIDE Connecting to a Secure Network If the wireless network you are trying to repeat has wireless security enabled, you will be prompted to enter a security key. If you did not select a secure network, continue to the next step. Enter the security key in the space provided. You do not need to select what type of security it is, just simply type in the key and click Next. The Smart Setup Wizard will automatically take care of the rest. If the key you entered is incorrect it will prompt you to enter the key again. If you do not know the key to the network you are trying to repeat, then click Back and select another network. 16 SR600EX USER’S GUIDE Repeater Settings (SSID) The default SSID of the Pro Smart Repeater is: Amped_Pro_SR This SSID for the Extended Network may be changed by adjusting the name in the field for the Extended Wireless Network ID. This ID will be used by wireless users connecting to the Pro Smart Repeater to identify the Pro Smart Repeater’s Extended Network. It is recommended to use the default settings. 17 SR600EX USER’S GUIDE Repeater Settings (Security) By default, the Extended Network has security enabled. The WPA security key is “wireless.” Users trying to connect to the Pro Smart Repeater wirelessly will be prompted to enter this key. It is recommended that you use the default settings for the wireless security key. To change the security key, simply retype your new key in the field and click Next. Write your security key down somewhere safe for future reference. No security key is necessary for computers connecting to the Pro Smart Repeater using a wired connection to the LAN ports. After clicking Next, the Pro Smart Repeater will reboot and apply your settings. Be patient and do not make any changes or adjustments to the Pro Smart Repeater at this time. 18 SR600EX USER’S GUIDE Setup Summary Once the Pro Smart Repeater has rebooted, it will load the Setup Summary page and provide you with the details of your setup. At this time, you may disconnect from the Pro Smart Repeater start a wireless connection. If you have any wired devices that you would like to attach to the Pro Smart Repeater you may do so now as well. Enjoy your Extended Network. 19 SR600EX USER’S GUIDE If the Home Network / Hot Spot connection fails, then try the following… a. b. c. d. e. f. g. Check that the signal strength between the Pro Smart Repeater and your Home Network/Wireless Hot Spot is above 70%. If it is not, you may need to reposition the Pro Smart Repeater. Check to see that your Home Network / Hot Spot security settings are correct. Check that your Home Network router’s DHCP server is enabled. Try changing the channel of the Home Network router to a higher channel number (5-11) and run the Setup Wizard again. If possible, check the Internet connection for your Home Network wireless router. Connect directly to your Home Network wireless router. If you are unable to access the internet through the Home Network wireless router you must first fix this problem. The Pro Smart Repeater will not be able to obtain internet access through a router that does not have internet access. Once Internet access is restored, connect to the Pro Smart Repeater again and retry the Smart Setup Wizard. Return to the Smart Setup Wizard and attempt to connect to another Home Network known to have Internet access. Try to reboot (unplug the power from the Pro Smart Repeater and plug it back in) the Pro Smart Repeater and check to see if the connection is established (some networks may be very slow and take longer than the allotted time for the Pro Smart Repeater to successfully connect). 20 SR600EX USER’S GUIDE WIRELESS SETTINGS Home Network Settings The Home Network Settings page allows you to adjust settings for your Home Network connection. These settings are for adjusting the Pro Smart Repeater after you have already gone through the Smart Setup Wizard and wish to adjust your current configurations. Home Network SSID: Manually enter the Identification name of the Home Network you wish to connect to. Channel Number: Enter the channel number of the Home Network. If the channel number does not match, a connection will not be established. Channel Width: Wi-Fi operates in two separate channel widths, 20Hz and 40Hz. 20Hz allows operation on channels 1-11, while 40Hz is 5-11. 40Hz allows for faster speeds. Select the channel width you wish to use for your network. This setting must match that of your Home Network for a successful connection. 21 SR600EX USER’S GUIDE Extended Network Settings The Extended Network Settings page allows you to adjust settings for your Extended Network. Band: Allows you to setup access under a specific combination of Wi-Fi speed standards. Broadcast SSID: Disabling the broadcasting of your SSID will make it so outside users cannot see your network when they scan for wireless networks. Users must manual enter the SSID to connect. SSID of Extended Network: This is the name of your Extended Network. 22 SR600EX USER’S GUIDE Multiple AP/SSID:: You may add an additional name (SSID) to you Extended Network with different characteristics. The additional AP or SSID can have its own security, band and data rate settings. You may restrict users for the specific SSID or provide access only to some users with lower bandwidth by changing the band. (i.e. only allow 802.11b access to specific users) Show Associated Clients: View all computers and network devices that are connected to your Extended Network wirelessly. 23 SR600EX USER’S GUIDE Security Wireless security allows you to change the type of wireless security settings for your Extended Network or your Home Network. Note: If you adjust the security in your Home Network and it is incorrect, you will no longer have a successful connection to your Home Network. Using the drop down menu, you can select which network you wish to configure and adjust the security settings below. If you are using the Multiple AP/SSID feature, you will be able to adjust the security settings for your additional SSIDs here as well. For more information on the differences between the types of Wi-Fi security available, please check the Learning Center of the Amped Wireless website: www.ampedwireless.com 24 SR600EX USER’S GUIDE Wi-Fi Protected Setup (WPS) WPS is a Wi-Fi feature created to make Wi-Fi setup simpler and easier. Some wireless routers and adapters support this feature with varying names (i.e. one touch setup or WPS). You may enable WPS setup here by selecting the type of WPS setup you wish to use. The Pro Smart Repeater supports all types of WPS setup: Push button: You may push the WPS button on the web menu. The Pro Smart Repeater does not have a physical WPS button. 25 SR600EX USER’S GUIDE Antenna Settings The Pro Smart Repeater includes an internal High Power Antenna, however, if you wish to use an external antenna instead of the internal antenna, you may activate the External Antenna port here. The External Antenna Port is a RJ-SMA port and accepts RP-SMA antenna connections. It is compatible with most high gain antennas. It is important that you attach the external antenna to the External Antenna Port BEFORE activating the External Antenna Port to avoid damage to the Pro Smart Repeater. After you have attached the external high gain antenna, select the External Antenna selection under Active Antenna and click Apply. After the Pro Smart Repeater reboots, your external antenna will be active and ready for use. 26 SR600EX USER’S GUIDE Advanced Settings It is recommended that only experts in Wi-Fi configuration adjust the advanced wireless settings for the Pro Smart Repeater. These settings allow you to control the details of your wireless network configuration. 27 SR600EX USER’S GUIDE SMART FEATURES The Pro Smart Repeater provides your Extended Network with Smart Features that help to provide convenience and protection for your Extended Network. The Smart Features allow you to control access to your Extended Network through on/off schedules, specific user authorizations as well as through the size of your wireless coverage for your Extended Network. Note: These settings are ONLY for your Extended Network and do not apply to your Home Network. 28 SR600EX USER’S GUIDE Access Schedule You can set a schedule for when your Wi-Fi is enabled or disabled (both Home Network and the Extended Network) through the Access Schedule feature. a. b. c. d. Enable Access Schedule Select which days you wish for your WiFi to be available Select the time frame during that day that you wish for Wi-Fi to be available Apply Changes Enabling Access Schedule will also disable Internet access for wired connections. Note: Make sure you have already configured your Time Zone Settings in order for your schedule to work correctly. Time Zone Settings can be adjusted from the web menu under Management > Time Zone Settings. 29 SR600EX USER’S GUIDE User Access Control User Access allows you to deny access or allow access to specific users connecting wirelessly to the Extended Network. Each networking device has a unique address called a MAC address (a 12 digit hex number). By inputting the MAC address into the field, you can define whether that device is allowed into your network or not allowed. 30 SR600EX USER’S GUIDE Wireless Coverage Controls Adjust the output power of the Pro Smart Repeater to control the coverage distance of your Extended Wireless Network. For a smaller coverage area you can select a lower output power. For the maximum wireless coverage select the 100% selection. Note that if you select a lower output power, your connection to your Home Network will also decrease in range. So be careful and test your signal strength after each adjustment. 31 SR600EX USER’S GUIDE IP SETTINGS IP Address: The IP address of the Pro Smart Repeater Subnet Mask: the subnet of the Pro Smart Repeater Default Gateway: The access point to another network, normally the Pro Smart Repeater or your router. DHCP: The Pro Smart Repeater includes a complex AUTO DHCP feature to help manage the IP addresses within your Extended Network and with your Home Network. When connected to a Home Network the Repeater will obtain an IP address from your Home Network’s router and act as a DHCP Client. However when there is no connection available, the Repeater will act as a DHCP Server. You may also manually control the IP settings of the Pro Smart Repeater by choosing, Client, Server or Disabled from the DHCP drop down menu. This is only advanced users. 32 SR600EX USER’S GUIDE DHCP Client Range: The range of IP addresses the Pro Smart Repeater’s DHCP server will assign to users and devices connecting to the Pro Smart Repeater. Static DHCP: You may set a static IP address within your DHCP network. The Pro Smart Repeater will track the device via its MAC address and assign it a pre-defined IP address each time the device logs into the network. Auto-Load Menu: The Pro Smart Repeater automatically loads the web based Smart Setup Wizard when it detects that there is a problem with your home network connection. To turn this feature off, disable the AutoLoad menu feature. Domain Name: The Domain Name allows you to change the URL which is used to access the Setup Menu for the Pro Smart Repeater. For example, entering http://setup.ampedwireless.com into your web browser while connected to the Pro Smart Repeater, will guide you to the Web menu for the Pro Smart Repeater. By changing the Domain Name, you will change the URL entered to access the Web menu. If you forget the Domain Name you entered and can no longer access the Web menu, then you will need to reset your Pro Smart Repeater to default settings by holding down the reset button on the back panel for 5-10 seconds. 33 SR600EX USER’S GUIDE MANAGEMENT FEATURES The Management features on the Pro Smart Repeater allow you to view the status of your Home Network and Extended Network. The Repeater Status page provides full information regarding each connection (Home and Extended), including the IP address, current connection SSID and current state. This page is often used to check the health of your Home or Extended Network connection. 34 SR600EX USER’S GUIDE Repeater Status The Pro Smart Repeater Status page provides detailed information regarding the system, wireless network and configurations as well as the current IP settings of the Pro Smart Repeater. This page is often used to check the health of your wireless network and the link to your home router/hot spot network. Home Network / Hot Spot Wireless Settings: This section displays the details of the connection between the Pro Smart Repeater and your Home Network / Hot Spot. The connection state will let you know whether or not a connection is established. Below that is the Signal Strength between the Pro Repeater and your home network. When adjusting the position or orientation of your Pro Smart Repeater, you may refresh this page to view the updated connection signal strength and continue adjusting until you have reached the best signal possible. 35 SR600EX USER’S GUIDE Network Statistics The Network Statistics page provides detailed traffic data for each connection type. 36 SR600EX USER’S GUIDE System Clock Maintain the internal clock for the Pro Smart Repeater by syncing with your computer’s time. Your system clock settings need to be accurate in order for logs and wireless access schedules to work correctly. 37 SR600EX USER’S GUIDE System Logs Maintain the internal clock for the Pro Smart Repeater by syncing with your computer’s time. Your system clock settings need to be accurate in order for logs and wireless access schedules to work correctly. 38 SR600EX USER’S GUIDE Upgrade Firmware The Pro Smart Repeater uses internet software (firmware) to operate. In the event that a new firmware file is available you may update it here. During the upgrade process DO NOT power off the device to avoid damage to the Pro Smart Repeater. To check for new firmware click the Check button. If a new firmware is available you will be given the option to install. 39 SR600EX USER’S GUIDE To manually upgrade your firmware: a. b. c. Download the file from the www.ampedwireless.com/support website and remember the location where you saved it. Firmware files may also be provided by Amped Wireless support representatives. Click Browse and locate the file Click Upload to begin upgrading. Note: Firmware files normally have a .bin file extension. 40 SR600EX USER’S GUIDE Save/Reload Settings Saving your current settings allows you to back-up your current settings which may be reloaded at a later time. This feature may be useful for testing new features and settings without having to worry about returning to a stable platform. To save current settings: a. b. Click Save Select a file name and location To load previously saved settings: a. b. c. Click Browse Locate the previously saved settings file Click Upload to restore the settings to the saved file. You may also reset the Pro Smart Repeater’s settings to factory settings by pressing Reset. By resetting the Pro Smart Repeater you will lose all previous configurations and will need to run the Smart Setup Wizard again to reconnect to a Home Network. 41 SR600EX USER’S GUIDE Password Settings By default, the Pro Smart Repeater does not require a password to login to the web menu. If you wish to enable a password to protect unauthorized access to the web menu and Smart Setup Wizard, you may enter one here. 42 SR600EX USER’S GUIDE TECHNICAL SPECIFICATIONS Wireless Standard: 802.11b/g/n Frequency Band: 2.4 – 2.48 GHz Wireless Security: WEP, WPA, WPA2 Wireless Sensitivity: -95 dBm (Max) Wireless Output Power: 29 dBm (Max) Amplifier: Low Noise Amplifier 600 mW Power Amplifier Wireless Access Control: MAC address filtering Wireless Access Scheduling: Specific day and time Wireless Coverage Control: 15% - 100% Output Power Antennas: 1 x High Gain Bi-Directional 9dBi Panel Antenna 1 x Reverse SMA Connector for optional external antennas Ports: Pro Smart Repeater: 2 x RJ45 PoE Adapter: 2 x RJ45 Mounting: Wall, Stand or Desktop Warranty: 1 Year Setup Requirements: 2.4GHz Wireless 802.11b/g/n Network Computer with wired (RJ-45) or wireless (802.11b/g/n) adapter 43 SR600EX USER’S GUIDE DEFAULT SETTINGS The default settings for your Pro Smart Repeater are listed here. If for some reason you need to return your Pro Smart Repeater back to default settings, hold down the Reset button on the back panel for 10 seconds. The Pro Smart Repeater will reset back to factory settings as listed below: IP Address: 192.168.1.240 DHCP: Auto Web Menu Access: http://setup.ampedwireless.com SSID: Amped_Pro_SR Security Key (WPA/AES): wireless 44 SR600EX USER’S GUIDE TROUBLESHOOTING & SUPPORT INFORMATION We are here to help. If you have any issues with your Pro Smart Repeater please contact us. To contact Amped Wireless’ Technical Support use one of the following methods: Phone: 888-573-8820 Email: [email protected] Web: www.ampedwireless.com/support 45 SR600EX USER’S GUIDE Troubleshooting The tips in this guide are listed in order of relevance. Try solution (a) before trying solution (b) etc… I entered setup.ampedwireless.com and it failed to open the Web Menu. a. b. c. d. e. f. Make sure your computer is connected to the Pro Smart Repeater/PoE Adapter using the included Ethernet cable. Make sure your computer is NOT connected to ANY wireless networks. Disconnect your computer from any wireless networks and try to access the web menu again. Close your current web browser and reopen it. Try the web address again. Try to use a different web browser. We recommend the Google Chrome web browser. Try to open your web browser to the default IP address by putting this number into your web browser instead: 192.168.1.240 Power off (unplug the power adapter) the Pro Smart Repeater and power it back on. Try again. Reset your Pro Smart Repeater to default settings by holding the Reset Button (located on the back of the PoE Adapter) for five to ten (5-10) seconds and try again 46 SR600EX USER’S GUIDE I cannot connect to my Home Network/Hot Spot. I received an Error when running the Smart Setup Wizard. a. b. c. Your Home Network may be secured. Double check that you have the correct security key to connect to the Home Network. Try adjusting the channel number of your Home Network’s router to channel 5 thru 11. Then attempt the Smart Setup Wizard again. Check to see that your Home Network router’s DHCP server is enabled. The Pro Smart Repeater needs to obtain an IP from your Home Network router. I cannot find my Home Network/Hot Spot when scanning for wireless networks in the Smart Setup Wizard a. b. c. d. The Pro Smart Repeater may be out of range. Move the Pro Smart Repeater closer towards the wireless router and try the Setup Wizard again from the Web Menu. The Home Network may be a dual band wireless router. The Pro Smart Repeater supports 802.11b/g/n 2.4GHz routers. If your Home Network uses a dual-band router, it will not work with the Pro Smart Repeater. Adjust the dual-band router’s configuration to disable the 5GHz band. Go to the Smart Features tab in the web menu and access the Wireless Coverage Controls. Make sure the setting is at 100% and try again. Make sure that your Home Network’s wireless SSID is broadcasting and not hidden. 47 SR600EX USER’S GUIDE My Pro Smart Repeater was working fine previously but now I can no longer access the Internet through the Pro Smart Repeater. a. b. c. d. e. The connection to your Home Network has been dropped. This can be caused by several events to your home wireless connection. When this occurs you may rescan for another network by accessing http://setup.ampedwireless.com to connect to and repeat or you may try to fix the issues with your Home Network/Hot Spot. The connection to the Home Network/Hot Spot may be unstable. Move the Pro Smart Repeater closer to the Home Network/Hot Spot and try to connect again. If you cannot access the setup menu, check to see that your Pro Smart Repeater is still on. Reboot the Pro Smart Repeater by unplugging the power adapter and plugging it back in. Check to see if your connection has been reestablished by viewing a website. If you do not have a connection, logon to http://setup.ampedwireless.com and configure a new Home Network connection. Check to see that your home wireless router is still on. If it has been turned off please turn it back on. The Pro Smart Repeater should automatically reconnect to your Home Network within 10 minutes. Check to see that your home wireless router settings have not changed. Any changes to the SSID, security, or channel number from the original settings will disconnect the Pro Smart Repeater’s connection to the home network. If you are not sure which settings have been changed, simply run the Smart Setup Wizard again from the web menu and reconfigure your Home Network connection. 48 SR600EX USER’S GUIDE I have a dual-band router and I cannot repeat it. a. Log into the Web Menu for your dual-band wireless router and adjust the wireless settings. Change the wireless band to 2.4GHz single band mode only. Disable the 5GHz wireless band. I cannot find any wireless networks (Home Networks/Hot Spots) to repeat. a. b. c. The Pro Smart Repeater may be out of range. Move the Pro Smart Repeater closer towards the wireless router and try the Setup Wizard again from the Web Menu. The antenna on your Pro Smart Repeater may be loose. Tighten the antenna connection and try again. The wireless Home Network/Hot Spot may not be a compatible wireless network (802.11b/g/n). I am connected to a Home Network/Hot Spot however I do not have Internet Access a. The Home Network/Hot Spot itself may not have Internet access. Check to see that you have internet access by connecting directly to the Home Network first. If you are able to go online then this is not a problem. If you cannot go online, then the Home Network’s Internet connection must first be resolved. 49 SR600EX b. c. USER’S GUIDE You may have a DNS issue and the Pro Smart Repeater is not obtaining the IP settings from your Home Network. Try to reboot the Pro Smart Repeater and then accessing a website. If that fails, then reboot the Home Router to see if that fixes it. There may be an IP conflict with your Home Network and your Extended Network. Try to adjust the IP Settings of your Extended Network using IP values that are different from your Home Network. I can no longer connect to the Pro Smart Repeater wirelessly. a. b. Power on and off the Pro Smart Repeater and try again. The connection to the Home Network may be down. Use an Ethernet cable and connect directly to the Pro Smart Repeater. Access http://setup.ampedwireless.com and run through the Smart Setup Wizard again. After you have successfully reset the Home Network connection, try connecting wirelessly again. I could NEVER log onto the Pro Smart Repeater wirelessly. a. Check that your wireless adapter supports WPA2 wireless security. If it does not then you will need to change the wireless security on the Pro Smart Repeater. Go to the Web Menu, select Wireless Settings and then Wireless Security. Select the Extended Network from the drop down menu and either disable security or downgrade the security to WEP. Try connecting again. 50 SR600EX b. USER’S GUIDE The connection to the Home Network may be down. Use an Ethernet cable and connect directly to the Pro Smart Repeater. Access http://setup.ampedwireless.com and run through the Smart Setup Wizard again. After you have successfully reset the Home Network/Hot Spot connection, try connecting wirelessly again. I can no longer access the Web Menu or the Pro Smart Repeater no longer responds. a. Connect to your Pro Smart Repeater and try to access http://setup.ampedwireless.com using your web browser. b. If you are advanced in networking troubleshooting, log onto your home router’s web interface. Look for the DHCP client list and try to find the IP address of your Pro Smart Repeater assigned by your home router. Once you have it, connect to the Pro Smart Repeater using an Ethernet cable. Open your web browser and enter the IP address into the address bar. c. Reset the Pro Smart Repeater back to default settings and try the Smart Setup Wizard again. To reset the Repeater back to default settings, push the Reset Button (on the back of the PoE Adapter) down for five to ten (5-10) seconds then let go. After the Pro Smart Repeater has fully reset, use an Ethernet cable and connect to the Pro Smart Repeater. Login to the Web Menu at http://setup.ampedwireless.com and run through the Wizard. 51 SR600EX USER’S GUIDE The connection to the Home Network/Hot Spot seems slow. File transfers take a long time to transfer. a. b. c. The Pro Smart Repeater may be too far away from your Home Network/Hot Spot. The closer the Pro Smart Repeater is to your Home Network/Hot Spot, the better its connection will be. The Pro Smart Repeater must have a strong signal (70% or greater) in order to repeat the signal with fast speeds and further range. Move the Pro Smart Repeater closer to your Home Network/Hot Spot and try again. You may also try turning the Pro Smart Repeater around so the back is facing the Hot Spot and try again. You may be downloading from the Internet and not within your Home Network or Extended Network. Files transferred through the Internet are limited by your ISP speed and the data download speeds from the website that you are downloading from. Your computer may be using an older Wi-Fi adapter with lower speed limits (802.11b/g) The range from the Pro Smart Repeater seems low a. b. Check to see that your wireless output settings are at 100%. Go to the Web Menu, Wireless Settings and check the Advanced Settings. Make sure the output power is at 100% Your Pro Smart Repeater may be installed in a poor location. Avoid setting up your Pro Smart Repeater in areas with high interference, such as, near fridges, microwaves, metallic objects and low surfaces. Install the Pro Smart Repeater in a higher location if possible. 52 SR600EX c. d. USER’S GUIDE Check the connections of the Antennas to the Pro Smart Repeater. Tighten them if necessary. Adjust the Antennas of the Pro Smart Repeater in different angles. My Wireless Access Schedule is being erratic and not working at the correct times. a. You need to adjust your Time Zone Settings from the Management Web Menu page. WiFi Protected Setup (WPS) is not working. There is no connection detected. a. The Pro Smart Repeater supports WPS connections (through the web menu only) however some companies may use proprietary code for their own push button configurations. Try connecting using the Windows wireless utility or Mac wireless utility instead. 53 SR600EX USER’S GUIDE WARRANTY & REGULATORY INFORMATION The Amped Wireless (A division of Newo Corporation, Inc.) Limited Warranty Warranty Period: The Amped Wireless Limited Warranty is for one (1) year from the date of purchase for new products. Refurbished products carry the Limited Warranty for thirty (30) days after the date of purchase. Guarantee: Amped Wireless warrants to the original purchaser that the hardware of this Amped Wireless product shall be free of defects in design, assembly, material, or workmanship. Conditions: The Amped Wireless Limited Warranty is for repair or replacement only at the sole discretion of Amped Wireless. Amped Wireless does not issue any refunds for purchased product. In the event that Amped Wireless is unable to repair or replace a product (i.e. discontinued product), Amped Wireless will offer a credit toward the purchase of a similar product of equal or lesser value direct from Amped Wireless. Any repaired or replacement products will be warranted for the remainder of the original Warranty Period or thirty (30) days, whichever is longer. Amped Wireless reserves the right to discontinue any of its products without notice, and disclaims any limited warranty to repair or replace any such discontinued product. Amped Wireless reserves the right to revise or make changes to this product, its documentation, packaging, specifications, hardware, and software without notice. If any portion of the Amped Wireless Limited Warranty is found to be 54 SR600EX USER’S GUIDE unenforceable, its remaining provisions shall remain in effect. All costs of shipping the product to Amped Wireless shall be borne solely by the purchaser. Limitations: IN NO EVENT SHALL AMPED WIRELESS’ (NEWO CORPORATION’S) LIABILITY EXCEED THE AMOUNT PAID BY YOU FOR THE PRODUCT FROM DIRECT, INDIRECT, SPECIAL, INCIDENTAL OR CONSEQUENTIAL DAMAGES RESULTING FROM THE USE OF THE PRODUCT, ITS ACCOMPANYING SOFTWARE, ACCESSORIES OR ITS DOCUMENTATION. The Amped Wireless Limited Warranty does not apply if: (a) the product assembly has been opened or damaged, (b) the product or its software or firmware has been altered or modified, (c) the product has not been used and installed in accordance to Amped Wireless’ instructions, (d) the product has been subjected to misuse, or negligence. Amped Wireless does not guarantee the continued availability of a third party’s service for which this product’s use or operation may require. The Amped Wireless Limited Warranty does not protect against acts of God, vandalism, theft, normal wear and tear, obsolescence and environmental damages such as, but not limited to, weather and electrical disturbances. The Amped Wireless Limited Warranty is the sole warranty for this product. There are no other warranties, expressed or, except required by law, implied, including the implied warranty or condition of quality, performance merchantability, or fitness for any particular purpose. 55 SR600EX USER’S GUIDE How to Claim Warranty: In the event that you have a problem with this product, please go to www.ampedwireless.com/support to find help on solving your problem. In the event that you cannot and need to file a warranty claim, please call Amped Wireless’ Customer Service or visit www.ampedwirleess.com/support to fill out a Return Authorization (RMA) form and obtain a Return Authorization (RMA) number. A dated proof of original purchase and the RMA number is required to process warranty claims. You are responsible for properly packaging and shipping the product at your cost and risk to Amped Wireless. The bearer of cost related to shipping repaired or replaced product back to the purchaser will be at the sole discretion of Amped Wireless and determined based on the details of each RMA case. Customers outside of the United States of America are responsible for all shipping and handling costs including custom duties, taxes and all other related charges. Technical Support: The Amped Wireless Limited Warranty is not related to the terms, conditions and policies of Amped Wireless’ Technical Support offerings. For questions regarding support, please contact [email protected]. 56 SR600EX USER’S GUIDE Regulatory Information FCC Statement and Declaration: Amped Wireless declares that this device complies with Part 15 of the FCC Rules and Regulations. Operation of this device is subject to the following two (2) conditions: (1) This device may not cause harmful interference (2) This device must accept any interference received, including interference that may cause undesired operation. FCC Notice: This equipment has been tested and found to comply with the limits for a Class B digital device, pursuant to Part 15 of the FCC Rules. These limits are designed to provide reasonable protection against harmful interference in a residential installation. This equipment generates, uses and can radiate radio frequency energy and, if not installed and used in accordance with the instructions, may cause harmful interference to radio communications. However, there is no guarantee that interference will not occur in a particular installation. If this equipment does cause harmful interference to radio or television reception, which can be determined by turning the equipment off and on, the user is encouraged to try and correct the interference by one or more of the following measures: - Reorient or relocate the receiving antenna. Increase the distance between the equipment and the receiver. 57 SR600EX - USER’S GUIDE Connect the equipment to an outlet on a circuit different from that to which the receiver is connected. Consult the dealer or an experienced radio/TV technician for help. FCC Caution and Safety Notices: Any changes or modifications (including the antennas) made to this device that are not expressly approved by the manufacturer may void the user’s authority to operate the equipment. This device and its antenna(s) must not be co-located or operating in conjunction with any other antenna or transmitter. Avoid use of this product near water or during an electrical storm as there may be a remote risk of electrical shock from lighting. This product may contain lead, known to the State of California to cause cancer, and birth defects or other reproductive harm. Wash hands after handling. This device must always be used with a Listed Computer or device. 58