1
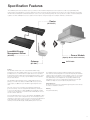
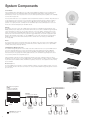
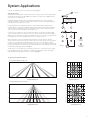
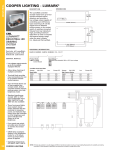
LumaWatt
Application Guide
LumaWatt
OUTDOOR WIRELESS CONTROL AND MONITORING SYSTEM
Table of Contents
Overview....................................................................... 1
Specification Features................................................... 2
System Components..................................................... 3
System Applications...................................................... 4
Parking Garage Applications.......................................... 5
Area and Site Applications............................................. 6
Three-Step System Setup (Quick-start Guide)............... 7
FAQs............................................................................. 8
Ordering Information.................................................... 10
Overview
Lighting management control can minimize peak energy costs and consumption by providing the right light levels at the right time. Typically 30%-50% savings in energy
consumption can be saved by a lighting management system that can employ aggressive control strategies.
Standards bodies are proposing tougher energy standards that are transitioning from voluntary to mandatory; for example; USGBC LEED (Leadership in Energy and
Environmental Design), the ICC (International Construction Code), Title 24 in California, and ASHRAE 2010. Taking advantage of these guidelines can be complicated and
require an automation control system to make implementation easy. Compliance to the standards may need to be verified by real time metering and monitoring of energy
performance to verify building code or standards compliance.
For existing facilities, retrofitting existing electrical systems with wired lighting control systems can be complex and expensive. The need to reduce material and labor upgrade
costs has put a focus on wireless lighting control technologies. Wireless solutions can provide an effective way of retrofitting lighting controls without the expense of modifying
existing wiring.
Wireless control can provide flexibility. Should the space usage change, lighting zones can be established regardless of existing circuiting. Controlled zones and system
behavior can be easily modified in software.
Wireless controls cost make sense as an value added cost to LED lighting technology. The rapid market acceptance of solid state lighting has driven down the cost of
dimming control. When coupled with the emergence of low cost radio frequency (RF) technology, wireless control system costs support 3-5 year pay backs.
Control Strategies
The LumaWatt System automates combinations of the four basic control strategies resulting in significant savings.
Scheduled ON/OFF
The basic automated event is a scheduled on or off by time of day. The LumaWatt System can use astronomical clock or photo sensing to create dusk-to-dawn,
dusk-to-curfew, e.g., business closing, or any time scheduled period of operation.
Scheduled Dimming
As an alternative to simple on or off, a dimmed lighting level may be scheduled for a period when security is required for periods of low usage, e.g., full brightness
from dusk-to-business closing then dim 50% to lower security level lighting until dawn.
Occupancy Detection
Energy is saved by reducing or extinguishing lighting when the site is no longer in use. Motion sensing can ensure that light is available when an area is occupied
then reduced upon vacancy. The LumaWatt System can time schedule periods where occupancy detection triggers an appropriate level of lighting. Use of daylight
harvesting.
Daylight Harvesting / Lumen Harvesting
Photo sensing can adjust or “hold off” luminaire light output and take advantage of “daylight harvesting” opportunities, e.g., parking garages with open sides.
During commissioning the lighting system can be calibrated to maintain target lighting levels, adjusting for luminaire lumen depreciation saving additional energy.
Key Features
The LumaWatt Outdoor Wireless Control System provides a flexible and reliable wireless solution that addresses the market needs.
• Factory installed luminaire sensor guarantees luminaire capatibility and performance.
• System operation is monitored and reported in real time for verification of occupancy, power, daylight harvesting and light level.
• Power monitoring is measured in real time to 2% accuracy.
• Failure detection and notification helps maintain quality of service.
• Device level self-diagnostics assists in network troubleshooting.
• Easy to use LumaWatt software creates and managing sensor profiles.
• Profiles can maintain up to nine events daily, managed by astronomical clock, photo sensing, or occupancy.
• The LumaWatt energy management server can address up to ten gateways each of which can address and additional 300 sensors up to a system capacity of 1,000
sensors. Multiple systems can be managed from any web browser capable device with sufficient screen size to view the user interface.
• Gateways communicate at a radio frequency of 2405-2480 MHz.
• 128-bit AES encryption for secure wireless communication.
• Sensors and gateways can communicate up to 300' line-of-site (LOS), without obstructions.
• LumaWatt can meet or exceed energy conservation codes:
- ASHRAE/IESNA 90.1
- California Energy Commission’s (CEC) Title 24
- USGBC LEED (Leadership in Energy and Environmental Design)
- International Energy Conservation Code (IECC)
1
Specification Features
The LumaWatt System is best described as a peer-to-peer wireless network of luminaire integrated sensors that operate in accordance to programmable profiles.
Profiles dictate how the individual sensor operates a luminaire as well as how to function among its network peers. The end user can create and manage sensor profiles
with browser-based management software and broadcast to sensors as necessary, via wireless gateways. The sensor operates in accordance to its latest loaded profile
regardless of network availability. Each sensor is capable of motion and photo sensing, metering power consumption and wireless communication.
.....
. . . . . . . . . . Router
.......
..........
(RF-ROUT1)
. . . . . . . . Sensor Module
(Specify Sensor with Luminaire)
.......
LumaWatt Energy
Management Server
(RF-EM1) . . . . . . . . . . . . .
Gateway
(RF-GW1) . . . . .
Features
The LumaWatt software resides on the locally installed LumaWatt energy
management server. The LumaWatt software can be accessed via a web portal by
providing remote access with web browser capable devices. Sensor operation is
monitored and reported, verifying and documenting luminaire performance. Power
is metered, in real-time, to 2% accuracy. System reliability is enhanced by failure
detection and notification.
The LumaWatt energy management server is scalable addressing up to ten
gateways, each of which can address an additional 300 sensors, up to a total
system capacity of 1,000 sensors per LumaWatt energy management server
server.
The router connects to the server and powers gateways through 48V PoE
(power-over-ethernet) connections using CAT5 cable. Gateways communicate
to sensors at a radio frequency of 2405-2480 MHz using 128-bit AES encryption
security. Sensors and gateways can communicate when within 300', line-of-site of
each other, without obstructions.
CAT5 Cable
The LumaWatt System is designed to minimize installation and commissioning
time. Luminaire commissioning data is discovered and analyzed by the LumaWatt
software to prepare for geographic location of luminaire control icons on site plans.
Verifying site plan icon locations is as easy as flashing light onto a specific sensor
in the field. Flashing a sensor highlights the corresponding LumaWatt energy
management server screen icon for drag-and-drop positioning on the site plan.
Hardware self-diagnostics assist in troubleshooting network issues.
Optional Enclosure
An optional enclosure houses the LumaWatt energy management server and up to
two routers for installation convenience.
Warranty
Five-year limited warranty.
Factory installed radio frequency sensors control luminaire output ON/OFF or dim in
5% increments. Sensors can be configured for up to nine events daily, based on a
combination of astronomical clock, photo sensing, or motion detection. Operational
modes define ramp-up times, length of operation on occupancy detection,
sensitivity to motion and ambient light, including dimming level for each event.
2
System Components
Sensor Module
Factory installated and locally intelligent sensors enable system reliability. Each luminaire sensor is installed and test
commissioned at the factory, saving field installation labor and minimizing startup failures. Luminaire behavior is
determined by how each sensor responds to its most recent software profile and operates regardless of the availability
of other network components.
A sensor profile is defined as a set of configuration values that determine the behavior of a luminaire. The profile is based
on rules used by the sensor in response to it's monitoring of operational and environmental conditions. Conditions
include ambient light, time of day, and occupancy detection. Operational modes define ramp up times, length of
operation on occupancy detection, sensitivity to motion and ambient light as well as dimming levels for each event.
Profiles are created and managed by the LumaWatt software.
Sensor Module
Gateway
The gateway connects the sensors via 2.4 GHz wireless technology to the LumaWatt energy management server.
Multiple gateways may be deployed to relay information between the sensors and the LumaWatt energy management
server. The gateway is for indoor use only. In order to wirelessly connect to the fixtures, a gateway is placed on the
interior of an exterior wall of the building within 150' of at least one of the luminaire array. It is desirable to locate the
gateway near an exterior window, as high as possible off the ground. Gateways connect with an appropriate length
Ethernet cable (maximum length 330') to one of the NETGEAR® ports this cable should then be routed through the
building as necessary to an exterior wall. Luminaires will then communicate to their nearest peer within 300' of
line-of-sight (LOS).
Router
The four port PoE (powered-over-ethernet) switch powers the gateways and connects them to the LumaWatt energy
management server. This device needs to be located with the server in a suitable electrical closet or optional ENCI
electrical cabinet and is powered by 120V only.
LumaWatt Energy Management Server
The LumaWatt energy management server should be located in a suitable electrical closet or optional ENCI electrical
enclosure powered by 120V only. It is a server class appliance that hosts the graphical user interface (GUI) that
discovers, commissions, and manages smart sensors. The LumaWatt software maintains a data base that logs,
monitors and reports energy usage. The intuitive graphical interface to the LumaWatt energy management server is
accessed via any web browser using HTTPS protocol.
Gateway
Router
Industry standard security with encryption safeguards the integrity of the system. A backup and restore feature is
provided to protect the server in case of its hardware failure or a software failure that corrupts or destroys configuration
or performance data. LumaWatt software and firmware for gateways and sensors can be updated over the air as they
become available.
Enclosure (Optional)
The optional ENCI enclosure provides a convenient installation solution in cases where suitable electrical or IT closets
are not available. The indoor rated enclosure includes one factory installed LumaWatt energy management server and
up to two routers.
LumaWatt Energy
Management Server
Enclosure
FIG. 1 System Configurations
RF-EM1
Connects up to10 RF-GW1
(1,000 Sensors Maximum)
RF-ROUT1
Connects up to four RF-GW1
Luminaire Sensor
Factory Installed
One per Luminaire
120V AC
RF-GW1
Connects up to
300 Sensors
CAT5 Cable (330' maximum)
Optional Components
3
System Applications
Laying out the LumaWatt system is easy following a few simple guidelines.
FIG. 2
Five Hops
Start with the Site Plan
Identify luminaire mounting heights to determine desired sensor lens types, narrow or wide. Specify luminaire
catalog numbers with the lens type suffix; DIMRF-LW for wide lenses used below 16' or DIMRF-LN narrow
lenses above 16' to a maximum of 35'.
Obstruction
Identify which luminaires are within 150' of the building as potential first points of contact for gateway
communication. Gateways need to be mounted on the interior side of an exterior wall, situated within 150'
of the luminaire chosen as a first point of contact.
Consider the luminaire layout and identify obstructions or spacing between luminaires approaching or
exceeding 300'. These may warrant an additional gateway nearby for reliable communication. The Ethernet
cable that connects the gateway back to the router is limited to a length of 330'. Locating the gateway as
close as possible to the router will minimize cable installation costs.
In general sensors communicate to any sensor within 250' - 300', line-of-sight, up to a maximum of 300
sensors. To extend the range of the system, any sensor can act as a “hopper” and repeat the signal 300' to
additional sensors. The Gateways are limited to a maximum of 15 “hops” so when laying out the gateways the
best design practice is to locate the gateway within 15 sensors of the farthest sensor.
When powering up the system the LumaWatt energy management server and software go through a
“discovery” process where all sensors start as a hopper. In discovery mode the system creates an optimized
pattern for sensor communication and determines which sensors are to be used as hoppers to extend
coverage or navigate around line-of-site issues. Typically if connection issues occur during commissioning, the
system has developed an incorrect hopper path to the problem fixture. This can be manually corrected using
the LumaWatt software during commissioning. FIG. 2
300'
Hopping
Luminaire
Non-Hopping
Luminaire
Gateway
The gateways are connected back to the router via Ethernet cable. Up to of four gateways can be installed
per router. Additional routers can be added up to a maximum of ten gateways per system, operated by a
single LumaWatt energy management server, not to exceed 1,000. FIG. 1
Occupancy Sensor Detection Patterns
For mounting heights from 8' up to 16'.
15
0
10
5
0
5
10
8
15
12
9
4
4
0
9
12
Coverage Top Area (Feet)
Coverage Side Area (Feet)
For mounting heights from 16' up to 40'.
0
40
30
20
10
20
0
30
20
10
30
40
40
40
30
20
10
0
10
Coverage Side Area (Feet)
20
30
40
Coverage Top Area (Feet)
4
Parking Garage Applications
Parking garage overall energy conservation and peak load reduction can be maximized by combining time scheduling, dimming on vacancy and daylight harvesting
strategies. Following the example below, an energy saving of 38% is possible in an enclosed parking garage. Perimeter luminaires may be grouped together and programmed
to dim, should natural lighting be available.
Sides of Drive Fixture Location
Fixture Spacing = 30' on center with 30' between fixtures above parking bays.
20 fixtures per 60' wide drive lane; 40 fixtures total for 300' x 120' parking deck.
IESNA Lighting Handbook 10th Edition
Illuminance Values for Parking Garage Applications
15'
Building
Electrical Closet
Minimum Horizontal
Footcandles (FC)
Illuminance
30'
LumaWatt sensor, one per fixture (Typical)
LumaWatt Energy
Management Server
Basic
1.0
Horizontal footcandle readings taken at floor level.
30'
Router
Horizontal
Average to minimum (A/M) footcandle levels not to exceed
ratio of 4:1.
CAT5 cable up to 330'
30'
15'
Gateway
30'
Maximum to minimum (M/M) footcandle levels not to exceed
ratio of 10:1.
Vertical
Minimum Horizontal
Footcandles (FC)
Illuminance
5' Above finished floor (AFF) at
lowest horizontal footcandle area.
Energy Savings Calculations
Configuration
Uniformity Requirements for Horizontal Reading
Daily Hours
of Operation
Control Event
Annual Load
(KWh)
0.5
Vertical footcandle readings taken at walls to the side of drive
lanes at 5' above finished floor (AFF).
40 Sensor Integrated Luminaires 8' Mounting Height (Enclosed Space)
Deck Ceiling
Bill-of-Material (BOM)
(1) RF-EM1, (1) RF-ROUT1, (1) RF-GW1
(40) VPL-B03-LED-E1-WQ-AP-TMB-DIMRF-LW (73W)
24
100% On
25,579
3
100% On
3,197
9:30am-4:00pm
6.5
50% On, On
Occupancy
100%
3,463
4:00pm-7:00pm
3
100% On
3,197
7:00pm-6:30am
11.5
50% On, On
Occupancy
100%
6,128
24
4 Events
15,987
Control Schedule
6:30am-9:30am
Total Controlled Load
Energy Saving
5
38%
Ceiling
Height
10'
Mounting Height/
Bottom of T-Joist
8'6"
Deck Floor
Area and Site Applications
For outdoor parking area applications, lighting should be dimmed or turned off within one hour of business closing. Scheduled dimming and occupancy detection can be
combined to reduce maximum lighting levels outside business hours yet ensuring egress and security lighting is available on occupancy detection.
Sides of Drive Fixture Location
Fixture Spacing = 160' x 120' on Center.
20 fixtures per 60' wide drive lane; 40 fixtures total for 420' x 120' parking deck.
IESNA IESNA Lighting Handbook 10th Edition
Illuminance Values for Area and Site Applications
Parking Lot Design Guide
Illuminance
Building
Electrical Closet
LumaWatt sensor, one per fixture (Typical)
Minimum
Vertical
Illuminance 2
lux/fc
2.0 / 0.2
20:1
1.0 / 0.1
LumaWatt Energy
Management Server
Basic
Enhanced
Security
5.0 / 0.5
15:1
2.5 / 0.25
CAT5 cable
up to 330'
Security
10.0 / 1.0
15:1
5.8-8.0 /
0.5-0.5
High
Security
30.0-60.0 /
3.0-6.0
4:1
12-60 /
1.2-6.0
Router
150' Gateway
NOTES: 1 Measured
on parking surface without
shadowing from any object. 2 For facial recognition measured
at 5' above the parking surface at the point of lowest
horizontal illuminance.
Max.
160'
Uniformity
Ratio
Max. / Min.
Basic
60'
60'
Minimum
Horizontal
Illuminance 1
160'
Energy Savings Calculations
Configuration
Daily Hours
of Operation
Control Event
Annual Load
(KWh)
100% On
28,948
14 Sensor Integrated Luminaires 35' Mounting Height, Centered 120' x 160'
Bill-of-Material (BOM)
(1) RF-EM1, (1) RF-ROUT1, (1) RF-GW1
(14) GLEON-AA10-LED-E1-T2-BZ-DIMRF-LN (515W)
11
40' Maximum
Mounting Height
Control Schedule
7:30pm-11:30pm
11:30pm-6:30am
Total Controlled Load
Energy Saving
4
100% On
10,526
7
40% On, On
Occupancy
70%
7,268
11
2 Events
17,895
Parking Surface
38%
6
Quick-start Guide (System Hardware)
STEP 1: Hardware setup of the LumaWatt energy management server, which includes:
Easy Interface
a. Attaching an Ethernet cable to the intranet port on the LumaWatt energy management
Easy, intuitive, menu driven, interface allows for placement of luminaire icons.
server from an Ethernet switch on organization’s intranet.
Changing luminaire icons indicated status.
b. Attaching an Ethernet cable to the building port on the LumaWatt energy management
server from router used to access gateways.
NOTE: Consult on-site network administrator before any installation or accessing local intranet.
STEP 2: Initial setup of the LumaWatt energy management server’s configuration, which
includes:
a. Powering on the LumaWatt energy management server.
b. Bringing up a browser window on another computer system to access the internal Web
server running in the LumaWatt energy management server, and logging into the web
server (See FIG. 1-6).
c. Describing the organization.
d. Creating a campus, building, and one or more floors in the building. Note, need floor
plan images for each of the floors.
e. Setting up, if needed, static IP address assignment.
f. Updating the time of use pricing table to match the rate schedule used by the utility
company for the organization.
g. Updating the demand response (DR) pricing table to match the utility rates.
h. Updating all of the profiles so that both the day types, and the start time for each
period of the day match what is used by the organization.
STEP 3: For each site plan area, doing the following:
a. Install the routers and connect to gateways. Power them on.
b. Install the fixtures and power them on. Discover, commission, and place the gateways in the LumaWatt energy management server web GUI. Troubleshooting the
system is easily done by observing sensor and gateway error codes. The error codes are communicated by observing blinking LEDs. Specific blink patterns are
referenced on a troubleshooting table for corrective action.
c. Discover, commission, and place the fixtures in the LumaWatt energy management server web GUI. Discovering the sensors then displays a screen icon on the
LumaWatt software ready for assigning a profile and locating on site plans. Verifying the location of site plan icon locations is as easy as flashing light onto a specific
luminaire sensor. The software will highlight the screen icon for that specific luminaire to drag-and-drop to the correct position on the site plan.
Hardware and Self-diagnostics
The error codes are communicated by observing blinking LEDs. Specific blink patterns are referred on a troubleshooting table for corrective action.
Red LED
Green LED
Sensor
Gateway
Off
Off
No Power
No Power
Off
On - Slow Blink
Normal (Auto Mode)
Normal
Off
On - Medium Blink
Manual Mode
Not Used
Off
On - Fast Blink
Not Used
Not Attached to LumaWatt
Energy Management Server
Off
On - Continuous
Not Used
Un-commissioned
On - Slow Blink
Off
CU Communication Failure
No IP Address
On - Slow Blink
On - Slow Blink
Not Used
Executing Firmware
On - Fast Blink
On - Fast Blink
Not Used
No MAC Address
On - Fast Blink
On - Continuous
Not Used
Radio Failure
On - Continuous
Off
Error
Error
Sensor Profile Sample Worksheet
In order to complete commissioning, the installer
creates profiles that define luminaire behavior.
A profile worksheet can organize the site requirements
as a worksheet to creating sensor profiles.
Profile Name: My Parking Lot
Start Times (Typical)
Morning (6:00am): 12am / Day (8:30am): 6:30am / Evening (5:30pm): 7:30pm / Night (8:30pm): 6:30pm
Days (Check all that apply): Sunday Monday Tuesday Wednesday Thursday Friday Saturday
Weekday Settings
Comments
Minimum Light Level When On (0-100%)
50%
Maximum Light Level When On (0-100%)
100%
Ramp-up Time (0-10 seconds)
Dimmed after midnight
3
Motion Control (Yes or No)
Yes
Use motion after midnight
Photocontrol (Yes or No)
Yes
Dusk-to-dawn
Minimum Light Level When On (0-100%)
50%
Dimmed after midnight
Maximum Light Level When On (0-100%)
100%
Weekday Settings
Ramp-up Time (0-10 seconds)
7
Comments
3
Motion Control (Yes or No)
Yes
Use motion after midnight
Photocontrol (Yes or No)
Yes
Dusk-to-dawn
Quick-start Guide (LumaWatt System Software)
Operational Setup
Look for any LED activity on the connector side of the
NETGEAR® switch to verify that power is on. Press
and release the momentary power button located on
the right side of the LumaWatt energy
management server to power it on. The power
button should illuminate with an LED if power is
turned on. Allow approximately four minutes for the
LumaWatt energy management server to complete
its power up tasks before continuing. Connect an
Ethernet cable from a free port (port 5 thru 8) on the
NETGEAR® switch to the Ethernet port on a laptop
or desktop PC. An internet browser must be installed
on this setup computer to communicate with the
LumaWatt energy management server. The user must
have administrator privileges on this computer. If this
computer has a wireless network adapter present it
must be disabled here before continuing.
STEP 1 (FIG. 1)
To configure the PC to connect to the LumaWatt
energy management server it is necessary to change
the PCs IP address as follows: Select Start – Control
Panel to open control panel as shown.
STEP 2 (FIG. 2)
Select Network and Sharing Center and then Local
Area Connection.
FIG. 1
FIG. 2
FIG. 3
FIG. 4
STEP 3 and 4 (FIG. 3 - 4)
Select Properties and then right click on Internet
Protocol Version 4 (TCP/IPv4) to highlight it.
STEP 5 (FIG. 5)
Click Properties and select Use the following IP
address. Fill in the IP addresses as shown below
and click OK. Click OK on the Local Area
Connection Properties and Close on Local Area
Connection Status. The PC is now configured to
connect to the LumaWatt energy management server.
STEP 6 (FIG. 6 - Launch Web Browser)
Type in the following address in the URL box and hit
enter: https://169.254.0.1/ems. You will be presented
with a warning stating that the site’s security certificate
is not trusted. Click Proceed Anyway to go to the
systems login page. If the login page displays asking
for the Username and Password you have
successfully installed the system. To continue system
setup and configuration please refer to the LumaWatt
Wireless Lighting Control User’s Manual.
FIG. 5
FIG. 6
8
FAQs
How do I order the system?
Using the application guidelines on page 4, determine the number of gateways, routers and LumaWatt energy management servers. If the network components cannot be
installed individually in a suitable location, specify the ENCI enclosure with factory installed router and LumaWatt energy management server. For compatible luminaires, add
the suffix DIMRF-LW (Wide sensor distribution) or DIMRF-LN (Narrow sensor distribution) to the end of the catalog number depending on the sensor lens distribution required.
Specify LN (narrow) for luminaire mounting heights above 40' or LW (wide) for heights below 16'.
Will controls extend standard delivery lead times?
No. Standard lead times will not change.
Who commissions the system?
Cooper Lighting will provide commissioning details at time of quotation.
Will Cooper Lighting be offering a commissioning certification program?
Yes. LumaWatt commissioning training will be offered in 2014.
What if I have more than four gateways?
Larger routers can be sourced for up to ten ports, or multiple routers may be used.
Does the LumaWatt energy management server have to be powered all of the time?
Yes. It will not log data, or meter power otherwise. The sensor clocks will occasionally require updating from the LumaWatt energy management server.
What If I do not have an IT closest or room to locate the LumaWatt energy management server and router?
You can order an ENCI enclosure with the LumaWatt energy management server, router and power supplies factory installed in an indoor enclosure rated enclosure.
Can you install a gateway outdoors?
No. This must be installed on the inside of an exterior wall.
What is the wireless standard?
Radio frequency 2405-2480 MHz (Channels 11-26) compliant with IEEE 802.15.4 wireless communication protocol including AES encryption to ensure secure links. What advantage does 2.4 GHz offer over 900 MHz?
The advantage of 2.4 GHz is higher speed and lower cost than 900 MHz. The much wider channels at 2.4 GHz allow a much higher data rate which cannot be matched by
the lower frequencies. The 2.4 GHz band is also used by common commercial wireless technologies such as Wifi, Bluetooth and Zigbee.
What are the standard sensor colors?
Sensors are available in bronze and off white. Bronze luminaires have bronze sensors, all other colors have an off white sensor installed.
Where are the setup and administration guides located?
The setup and administration guides (PDFs) are located on the Cooper Lighting web site at www.cooperlighting.com.
Will LumaWatt be sold to retrofit existing luminaires?
No. LumaWatt is only available factory installed in new luminaires. The product is not certified for field installation.
What other devices can be controlled by LumaWatt?
An outdoor rated, remote sensor enclosure will be soon be available. Consult factory for availability. The remote sensor will be suitable to provide ON/OFF functionality for
a 20a 120V circuit, or control a 0-10V circuit for up to ten drivers. This device will allow for integration of existing facade or landscape lighting, provided it is isolated on a
separate circuit.
Can I access the system with my smartphone?
The LumaWatt software is an Adobe Flash web application. Many smartphone browsers are not fully compatible with Adobe Flash. Adobe Flash is best run on a web capable
device with Windows Explorer or Google Chrome browsers. Many portable tablets running full versions are usually a better choice.
9
Ordering Information
System Ordering Information
Product Family
Components 1
Options
Accessories (Order Separately)
RF=LumaWatt Outdoor
Wireless System
EM1=LumaWatt Energy
Management Server 2, 3
GW1=Gateway 4, 5
ROUT1=Router 2, 6
ENCI=Indoor Rated Enclosure 1, 7
Luminaire Sensor (Add as Suffix)
DIMRF-LW=LumaWatt Wireless Sensor,
Wide Lens for 8'-16' Mounting
DIMRF-LN=LumaWatt Wireless Sensor,
Narrow Lens for 16'-40' Mounting
RFSEN1LWBZ=Wide Distribution Replacement Luminaire Sensor Finished in Bronze 8
RFSEN1LWWH=Wide Distribution Replacement Luminaire Sensor Finished in White 8
RFSEN1LNBZ=Narrow Distribution Replacement Luminaire Sensor Finished in Bronze 8
RFSEN1LNWH=Narrow Distribution Replacement Luminaire Sensor Finished in White 8
RFPP1=Replacement Fixture Power Pack
NOTES: 1 Minimum system requires RF-EM1, RF-GW1, and RF-ROUT1. 2 120 VAC, 50/60 Hz only. 3 Maximum of ten gateways per LumaWatt energy management server. System maximum of 1,000 sensors. 4 Sensors and gateways
communicate up to 300' LOS. Maximum 300 sensor per gateway. 5 Connect an appropriate length CAT5 Ethernet cable (maximum length 330') to the router PoE (power-over-ethernet) port (ports 1 thru 4). The gateway should be placed on
the interior of an exterior building wall, within 150' of one luminaire. 6 Maximum of four gateways per router. 7 ENCI enclosure consists of, factory installed: RF-EM1, RF-GW1, and RF-ROUT1. Indoor use only. For maximum 40°C ambient.
8 Factory installed replacement only. See luminaire specification sheet for more information.
Dimensions
LUMAWATT SERVER (RF-EM1)
ROUTER (RF-ROUT1)
GATEWAY (RF-GW1)
4"
[102mm]
5"
[127mm]
7"
[178mm]
1-1/4"
[32mm]
3"
[76mm]
1/2"
[13mm]
4" [102mm]
10" [254mm]
Optional Component
Sensor Option
ENCLOSURE (ENCI)
LUMINAIRE SENSOR
9-1/4" [235mm]
1-1/4"
[32mm]
20"
[508mm]
16"
[406mm]
Weight: 36 lbs. [16.32 kgs.]
6"
[152mm]
3-1/2" [89mm]
2-3/16"
3/4"
[19mm] [56mm]
Additional Information
Specification
Gateway Input Voltage PoE/48V
128-bit AES Encryption Gateway-to-Sensor
Controller Input Voltage 120/277 VAC, 50/60 Hz
Dimmer Control Output 0-10V DC
Certification FCC Part 15 Class A
RoHS
UL and cUL Listed
Shipping Data (Approximate Net Weight)
CE Certified
IEEE 802.15.4 Compliant
Radio Frequency 2405-2480 MHz (Channels 11-26)
Sensing Technology Dual-tech Passive IR/Photo
Standard Height Wide Lens 8'-16'
Standard Height Narrow Lens 16'-40'
LumaWatt Server (EM1) = 2.3 lbs. (1.04 kgs.)
Gateway (GW1) = 0.3 lbs. (0.13 kgs.)
Router (ROUT1) = 1
.7 lbs. (0.77 kgs.)
Enclosure (ENC1) = 38 lbs. (17.3 kgs.)
Luminaire Sensor = 0.2 lbs. (0.09 kgs.)
10
Cooper Lighting
Headquarters
1121 Highway 74 South
Peachtree City, GA 30269
P: 770-486-4800
www.cooperlighting.com
International Sales
Cooper Lighting
1121 Highway 74 South
Peachtree City, GA 30269
P: 770-486-4800
F: 770-486-4801
Canada Sales
Cooper Lighting
5925 McLaughlin Road
Mississauga, Ontario L5R 1B8
P: 905-501-3000
F: 905-501-3172
Domestic Distribution Facilities
Cranbury, New Jersey
Elk Grove Village, Illinois
Irving, Texas
Bloomington, California
Peachtree City, Georgia
Canadian Distribution Facilities
Calgary, Alberta T2E 7V9
Mississauga, Ontario L5R 1B8
The Cooper Lighting Family
Halo
Halo Commercial
Portfolio
IRiS
RSA
Metalux
Corelite
Neo-Ray
Fail-Safe
MWS
Ametrix
Shaper
io
Lumark
McGraw-Edison
Invue
Lumière
Streetworks
AtLite
Sure-Lites
The Cooper Controls Family
Greengate
iLumin
Zero 88
Fifth Light Technology
iLight (International Only)
25% PCRF
Cooper Lighting, Innovation you can rely on, and LumaWatt are valuable trademarks of Cooper Industries in the United States and other countries.
You are not permitted to use the Cooper Trademarks without the prior written consent of Cooper Industries.
Cooper US, Inc.
600 Travis, Ste. 5600
Houston, TX 77002-1001
P: 713-209-8400
www.cooperindustries.com
ADH131132
Printed in USA