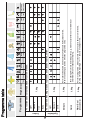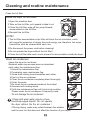
1
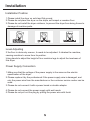
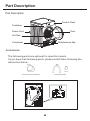
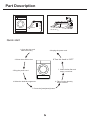
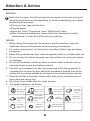
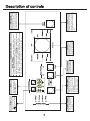
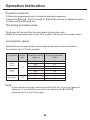
Before using your tumble dryer, please read this
manual carefully and keep it for future reference.
Tumble Dryer
OWNER’S MANUAL
BCD71
Read This Manual
Inside you will find many helpful hints on how to use
and maintain your tumble dryer properly. Just a little
preventative care on your part can save you a great
deal of time and money over the life of your tumble
dryer. You’ll find many answers to common problems
in the chart of troubleshooting tips. If you review the
chart of troubleshooting tips first, you may not need
to call for service.
Dear Customer,
Congratulations on purchasing your new product from Think Appliances.
To register your parts and labour warranty (some conditions apply please refer to your
warranty card for more details) please contact out Customer Care team on:
1800 444 357
Our Customer Care centre is there to ensure you get the most out of your appliance. For
example, should you want to learn more about recommended cooking temperatures, the
various cooking functions available, how to set and program your LED clock, and importantly
taking care of your appliance when cleaning, please call us because we are here to help you.
It is important that you read through the following use and care manual thoroughly to
familiarize yourself with the installation and operation requirements of your appliance to
ensure optimum performance.
We also carry a complete range of spare parts for all Think products. For all your spare parts
enquiries please contact our team at Pronto Parts on:
1300 306 973
Again, thank you for choosing an appliance brought to you by Think Appliances and we look
forward to being of service to you.
Kind regards
Management
Think Appliances
Contents
Safety information..............................................................................1
Installation......................................................................................... 3
Part description................................................................................. 4
Attention and advice..........................................................................6
Description of controls.......................................................................7
Operation instruction......................................................................... 8
Programme table...............................................................................9
Specialty drying function...................................................................10
Cleaning and routine maintenance.................................................. 12
Alarm function.................................................................................. 13
Precautions...................................................................................... 14
Technical specifications................................................................... 15
Safety information
Dry Care Symbols
Please pay attention to use the drying machine if the materials of your clothes can not be dried by it
or contain the symbols as follows:
Dry
Normal
Not tumble dry normal
Line dry / hang to dry
Drip dry
Dry flat
Dry clean
Do not dry clean
Do not dry
In the shade
A
F
Dry clean normal cycle
with any solvent
Dry clean normal cycle
petroleum solvent only
Safety notes
! To prevent any damages to your and others' life or property, you
have to follow the safety notes.
1.This product belongs to Category I electrical appliances, and only for drying
textiles which have been washed with water in the household. Please pay
attention to the safety of power use during the operation!
2.The power source with reliable earthing must be used. Its earth wire must be
buried under the ground and shall not be connected with the public utilities such
as city water pipe or gas pipe etc. The earth wire and null wire shall be
distinguished and shall not be connected together.
3.The power wire shall meet national standard and must be able to withstand
the current above 16A. To ensure your and your family's safety, please make
improvement immediately if any power use at your home does not comply with
the above-mentioned requirements.
Electric shock hazard
1.If the power cable is damaged, it must be replaced by the manufacturer, its
service agents or similarly qualified persons in order to avoid a hazard.
2.Do not draw the power cable forcefully to pull out the mains plug.
3.Please do not plug/draw the mains plug with wet hands.
4.Do not damage the power cord and the power plug.
5.To prevent any accidental electric shock, please make sure the mains plug of
the dryer is earthed. DO NOT USE AN EXTENSION CORD
1
Safety information
Injury danger
1.Please do not disassemble and install the dryer under no instruction or supervision.
2.Please do not stack this dryer on washing machine without stacking kits.
3.Please do not lean on the opened door of the dryer.
4.Please do not put any pyrotoxin on the dryer, such as the candle, electric cooker.
5.Children should be supervised to ensure that they do not play with the appliance.
6.This appliance is not intended for use by persons (including children) with reduced
physical, sensory or mental capabilities, or lack of experience and knowledge,
unless they have been given supervision or instruction concerning use of the
appliance by a person responsible for their safety.
7.The tumble dryer is not to be used if industrial chemicals have been used
for cleaning and lint must not to be allowed to accumulate around the
tumble dryer.
Damage danger
1.Please do not dry over the regulated capacity.
2.Please do not operate the dryer without the lint filter and air condenser.
3.Please do not dry clothes before they have been spun in a washing machine.
4.Please do not expose the dryer directly under the sun, and indoor use only.
5.Please do not install the dryer in the humid and drenching environment.
6.Please do not keep any object in the pockets of your laundry before drying process.
7.At the cleaning and maintenance, please do remember to pull out the power
plug and do not directly wash the dryer with water.
Explosion danger
Please do not dry the clothes with some flammable substances such as the coal oil,
alcohol or there will be the explosion.
Notes on disposal
When you want to dump the dryer because it is not operable or not worth of
repairing, please pull out the mains plug and cut the power cable. All the material
used for this machine is environmental-friendly and recyclable. Please help the
disposal of the material via environmental-friendly means.
Guidelines
Move cautiously. Do not grasp any salient parts of machine. The machine door
can not be used as the handle for delivery.
2
Installation
Installation Position
1.Please install the dryer on solid and flat ground.
2.Please do not place the dryer on the slope, soft carpet or wooden floor.
3.Please do not install the dryer outdoors, to prevent the dryer from being frozen to
damage of machine parts.
Level Adjusting
If the floor is obviously uneven, it needs to be adjusted. It vibrates the machine,
causing machine to move from its position.
Using hands to adjust the height of four machine legs to adjust the levelness of
this dryer.
Power Supply Connection
1.Make sure that the voltage of the power supply is the same as the electric
specification of the dryer.
2.Please replace it by the professional if the power supply wire is damaged, and
only the power wire from the manufacturer or the customer service center can be
used.
3.Please do not connect it with a power board or double adaptor
4.Please do not connect the power supply with wet hands.
5.Please do not pull out the plug by pulling the power wire with force
3
Part Description
Part Description
Control Panel
Container
Door
Power Cord
Lint filter
Maintenance flap
Condenser
Accessories
The following parts are optional for specific models.
If your dryer has following parts, please install them following the
instruction below .
Condensing drain hose(optional)
Hose holder(optional)
4
200cm
Min.80cm
Max.120cm
Part Description
Quick start
1. Open the door and
load the laundry
9.Unplug the power cord
8.Turn the knob to “OFF”
2 Close the machine door
7. Clean the lint filter and
empty container
3 Plug the power cord
6. Take out the laundry
when finished
4.Select the desired programme
5. Press the [start/pause] button
5
Attention & Advice
Attention
Before the first cycle, the dust and grease may remain in this dryer during the
period of manufacture and transportation, to avoid contaminating your clothes,
please follow these steps:
a)Put some clean rags into the drum.
b)Plug the power.
c)Select the “Quick” Programme, press “Start/Pause” button.
d)After finishing this programme, please follow the “cleaning and routine
maintenance” to clean the lint filter and air condenser.
Advice
1.Before drying, thoroughly spin the laundry in washing machine. High spin
speed can reduce the drying time and save energy consumption.
2.For uniform drying result, sort the laundry according to fabric type and drying
programme.
3.Before drying, please close zips, hooks and eyelets, button up, tie fabric belts, etc.
4.Do not over dry the clothes, because over dried clothes can easily get creases
or shrinkage.
5.Do not dry the articles containing rubber or similar elastic materials such as
raincoats,bicycle covers and feather products.
6.The door can be opened only after the programme of the drying machine is
completed.Do not open the door before the programme finished to avoid the
human skin from being scalded by hot steam or over heated drying machine.
7.Clean the lint filter and empty container after each use to avoid extension of
drying time and energy use.
8.Do not dry these clothes after dry-clean process.
9. The weight references as follows:
Blended Coats
(about 800g)
Jackets (about
800g in cotton)
Single Sheets
(about 600g in
cotton)
Work Clothes
(upper and lower)
(about 1120g in
cotton)
Undershirts
(about 180g in
cotton)
Jeans Trousers
(about 800g)
Towel Quilts
(about 900g
in cotton)
Pajamas
(about 200g)
Shirts (about
300g in cotton)
Socks (about 30g in
blended material)
Underpants
(about 70g in
cotton)
6
Fliter
7
Tank
Digital tube display
2
Anti-Crease
This function will give more
care to protect sensitive
textiles from being creased.
Delay/Light
This function is used to delay
drying process .You can get
1-24hour by pressing this key
continuously .
The drum light will activate when
you press the【Delay/Light】
during the drying procedure.
This function will give
less heat to protect sensitive
textiles from high temperature.
Gentle
Only light ( DELAY / REMAIN ) relevant to the phase that is currently
being carried out will remain display during the drying process.
When the drying procedure begins, REMAIN will display the remaining
time, that is, the drying procedure will finished in【x:xx】time.
The display “- - -”means programme in “hibernation” status, you can
press any buttons or open the door to awaken programme.
Status display
Please empty the container
when the“
” is flashing,
after the dryer stops.
The four LED lights indicate
the status of the drying
procedure.
Please clean the filter when
the“
” is flashing, after the
dryer stops.
Start/pause
Different Dryer cycle can be selected
according to the user's needs to make
the clothes have more effective drying
result.
Cycle
【Start/Pause】button,has the
start and pause function. When this
button is pressed, this machine is
switched between start and pause.
Description of controls
Operation Instruction
Programme selector
1.Rotate the programme knob to select the desired programme.
2.Select the【Delay】,【Anti-Crease】or【Gentle】functions for additional option.
3.Press the【Start/Pause】key.
The Drying procedure stops
The buzzer will prompt from the dryer when finishing the cycle.
Rotate the programme knob to the “OFF” position, and pull out the power cable.
Consumption values
Specifications are approximate values determined under normal conditions.
Fluctuations up to 10% are possible.
Programme
Weight
(kg)
Cotton
(standard)
7.0
Cotton
(iron)
Synthetics
3.5
Residual humidity
( approx.)
Energy consumption
( kWh)
50%
60%
70%
50%
60%
70%
40%
50%
3.7
4.3
5.0
3.6
3.8
4.2
1.2
1.6
Note:
Some jeans and large towels are difficult to dry ,due to its material
features, if you find them are still wet, please use【WARM】
programmme to dry them again.
8
Cotton
Synthetics
Weight(max)
Skirts/
Work
Towelling
T-Shirt Shirts Trousers dresses Sportswear clothes Anorak bathrobe Underwear Socks Bed linen
7.0kg
(30min/20min)
3.0kg
3.0kg
Quick
Warm/Cool
3.0kg
3.5kg
Delicate
Extra
Standard
Light
Table
linen
For timer programme , delicate textiles made of acrylic fibres or small items.
Using 【Time Adjusting】“+” “-” function to adjust time.
For washing which is to be dried quickly, e.g. made of acrylic fibres or for individual
small items. Also for subsequent drying.
For machine-washable woollen textiles.Textiles are fluffer,but not dried.
Remove and hang up textiles when the programme ends.
For non-iron washing made of synthetic and blended fabrics,cotton.
Extra
Iron
Standard
Light
For cottons and coloureds made of cotton or linen.
Programme
Programme table
9
Terry Tea towels/
towels hand towels
Specialty drying function
Specialty drying function
1. Instruction of the moisture sensor
This function can automatically sense the moisture of clothes, and will
automatically adjust the time of drying procedure according to how much clothes
you put into the dryer.
This function will automatically activate during the drying procedure except the
“Warm” and “Cool” programme.
2. Additional time adjusting function
This function can set the time of drying procedure by your self; the time can be
adjusted from 20 to 40 minutes by press“+” or “-” buttons. This function is
designed for a small
ORad, for example, one facecloth or two pairs
of socks. It's like using timer
to control drying process, but only for “Warm” and
“Cool” programme.
3. Instruction to the delay drying procedure
This function is used to delay clothes drying within 24 hours. You can press this
key continuously; it can be selected within 1-24 hours. The delay time means
drying procedure will start in x:xx hours.
When the delay procedure starts, the display will only show the delay start time
and light DELAY icon.
Steps in details
(1).Load your laundry and make sure the machine door is closed.
(2).To turn the programme selector knob and select a desired programme
(3).You can select the 【Anti-Crease】 or 【Gentle】functions according to your
need;
(4).To press the 【Delay/Light】 key;
(5).Continue to press the 【Delay/Light】to select the delay time;
(6).After the 【Start/Pause】 key is pushed, the Dryer is at the run condition.
The drying procedure will be automatically performed when the delay time is over.
(7).If you push the【Start/Pause】button again, the delay function will be paused.
(8).If you want to cancel the “Delay” function, please turn the programme
selector knob to “OFF”and reselect the programme .
4. Instruction of the child safety feature
(1).This machine incorporates a special child safety lock, which can prevent
children from carelessly pressing keys or making the faulty operation.
(2).When the dryer is at the operation state, press the【Delay/Light】and
【Anti-Crease】buttons at the same time for over 3 seconds to start child lock
function. When child lock function is set, the display will light “Child Lock”
10
Special drying function
icon and no key can effect to the dryer.
Under the start state of the child lock button, the【Delay/Light】and
【Anti-Crease】buttons shall be pressed at the same time for over 3 seconds to
release the child lock function.
5. Instruction of the【Anti-Crease】function
When the anti-crease function is selected, the LED of anti-crease shall illuminate,
and the drum will intermittent rotate during the drying programme , in older to
give more care to ensure the sensitive textiles can not get crease.
6. Instruction of the【Gentle】function
When the Gentle function is selected, the LED of Gentle shall illuminate, and the
programme will give less heat to protect sensitive textiles from high temperature
which may harm to these textiles, such as acetate, elastane and etc.
7. Instruction of the drum light
For your convenience, this function can help you to see clearly when you open the
machine door, and the drum light will also activate when you press the
【Delay/Light】during the drying procedure.
8.Instruction of the Auto Anti-crease function
To avoid the clothes creasing after the programme finished, the dryer will
automatically intermittent rotate about 2 hours.
11
Cleaning and routine maintenance
Clean the lint filter
Leave the dryer to cool down.
1.Open the machine door.
2.Take out the lint filter, pull upward to take it out.
3.Clean the lint filter; wipe off the scrap threads
accumulated on the lint filter.
4.Reinstall the lint filter.
NOTE!
1.The lint filter accumulated on the filter will block the air circulation, which
will cause the extension of drying time and energy use; therefore, the scrap
thread filter shall be cleaned after each use.
2.Do disconnect the power cord before cleaning!
3.Do not operate the dryer without the lint filter !
4.Clean the lint filter after each use to prevent lint accumulation inside the dryer.
Wash air condenser
-Leave the dryer to cool down.
-Residual water may escape,place an absorbent
cloth under the maintenance flap.
1.Unlock the maintenance flap.
2.Completely open maintenace flap.
3.Screw both locking levers towardas each other.
4.Pool out the air conderser.
5.Clean the air conderser completely,drain thoroughly.
6.Clean the seals.
7.Re-insert the air conderser,handle at the button!
8.Unscrew both locking levers.
9.Cloth the maintenance flap until it locks into position.
Please clean the air condenser if frequently used.
Do not damage the air conderser!
1.Clean with warm water only;do not use
hard/sharp-edged objects! Do not operate
the dryer without the the air condenser !
2.During drying, water may collect between the window
and the seal, but this does not affect the function of your dryer!
12
Alarm function
Alarm function
Alarm Problem
Alarm Reason
Buzzer Alarm
Release
“
”Is flashing
Water tank full or pump
error
Check the water tank and pump.
“
”Is flashing
Air flow block
Check the filter and the air folw
“ E30 ”
Heater problem
“ E34 ”
Check the heater and the thermostat
The Error Code is
Check the Humidity sensor and PCB
Humidity sensor error flashing on X:XX
at Flash Rate 1 .
Meanwhile the
Check the front temprature sensor
Temprature sensor error beep is sounded
every 1 5 minutes. Check the rear temprature sensor
“ E60 ”
Motor error
“ E32 ”
“ E33 ”
Check the motor and the PCB
13
Precautions
Precautions
Repairs may be carried out by customer service of authorised
technicians only!
Before you call customer service, please check whether you can correct the
fault yourself.
A technician will charge you for advice, even during the warranty period.
Problem
Solution
Display does not
come on
The mains plug is inserted.
Check the programme selected.
Check fuse in the house.
“
”Is flashing
Empty condensation container.
If failure, check hose for condensation outlet.
“
”Is flashing
Clean air cooler.
Clear lint filter.
Dryer does not start
Check the start button has selected .
Check the the door has closed.
Check the programme has set.
Water is running out
Align dryer horizontally.
Clear air condenser and door seals.
Door is open by itself
Humidity in the room is
increase significantly
Degree of dryness was
not reached or drying
time too long
Press door until it “clicks”into position.
Check the clothes is over load .
Ventilate room adequately.
Clean the cool grille.
Ensure that the air condenser has been inserted.
Clean lint filter and wash condenser.
Empty container.
Check water outlet.
Dryer installation too restricted.
Clean the moisture sensors.
Use next higher drying programme or using
Timer programme.
If you cannot correct a fault yourself or if a repair is required:
1.Set programme knob to OFF.
2.Pull out the mains plug and call the service.
14
Technical Specification
Specification
Power supply voltage
220-240V~
Rated input Power
Rated Frenquency
Overall Size
2000W
50Hz
595×565×845(mm)
Rated DryingCapacity
Net Weight
7.0kg (Dry Clothes)
43kg
15
(AUS)
Think Appliances Pty Ltd.
416-424 Barry Rd
Coolaroo VIC 3048
Sales Telephone
1300 132 824
Service Telephone
1800 444 357
Website
www.thinkappliances.com
(NZ)
Applico Ltd.
Private Bag 92900
Onehunga, Auckland,
New Zealand 1061
Website
www.baumatic.co.nz
(UK)
United Kingdom
Baumatic Ltd.,
Baumatic Buildings,
6 Bennet Road,
Reading, Berkshire
RG2 0QX
United Kingdom
Sales Telephone
(0118) 933 6900
Website:
www.baumatic.co.uk