1
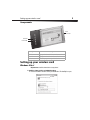
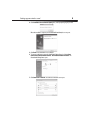
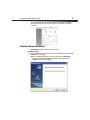
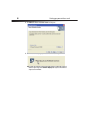
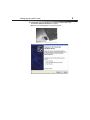
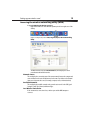
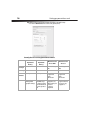
Wireless N Notebook Card
DX-NNBC
USE R GUI DE
2
Contents
Dynex DX-NNBC
Wireless N Notebook Card
Contents
Wireless card features........................................................................2
Setting up your wireless card ............................................................3
Setting up your wireless card ............................................................3
Troubleshooting ..............................................................................23
Specifications ..................................................................................28
Legal notices ...................................................................................28
One-Year Limited Warranty .............................................................31
Wireless card features
The card complies with the IEEE draft-802.11n specifications to communicate with other
draft-802.11n-compliant wireless devices at 270 Mbps. The card is compatible with 802.11g
devices at 54 Mbps, as well as other 802.11b products at 11 Mbps. Your wireless card
operates on the same 2.4 GHz frequency band as 802.11b/g Wi-Fi® products.
• 2.4 GHz ISM (Industrial, Science, and Medical) band operation
• Integrated easy-to-use Wireless Networking Utility
• CardBus interface, for operation in virtually any notebook computer
• WPA, WPA2, Wi-Fi Protected Setup (WPS), 64-bit WEP (Wired Equivalent Privacy), or
128-bit encryption
• Wireless access to networked resources
• Support for both Infrastructure and Ad-Hoc (peer-to-peer) networking modes
• Data rate of up to 270 Mbps (draft 802.11n), 54 Mbps (802.11g), or 11 Mbps (802.11b)
• Easy installation and use
• LED power and network link indicators
Note: The standard transmission rate of 270 Mbps is the physical data rate. Actual data
throughput will be lower. Wireless performance may vary depending on the networking
environment.
Package contents
•
•
•
•
Wireless N notebook card
Quick Installation Guide
Installation software CD
This User Guide
System requirements
• PC-compatible notebook computer with one available CardBus slot and CD/DVD drive
• Windows® 2000, Windows XP, or Windows Vista®
3
Setting up your wireless card
Components
Card
connector
Link LED
Power LED
Component
Description
Link LED
Lights up when the card links to a wireless network
Power LED
Lights up when the card is turned on.
Card connector
Fits securely into your computer’s CardBus slot
Setting up your wireless card
Windows Vista®
Important note: Install the software before inserting the card.
To install the software and the card with Windows Vista:
1 Insert the Installation Software CD into your CD/DVD drive. The AutoPlay box opens.
DX-NNBC
4
Setting up your wireless card
2 Double-click Run Installer.exe. If you see a window titled, “An unidentified program
wants access to your computer,” click Allow. The InstallShield Wizard screen opens.
3 Click Next to begin the installation process.
You may see a window titled, “Windows can't verify the publisher of this driver
software.” This is normal and does not indicate a problem. Our software has been fully
tested and is compatible with this operating system.
Setting up your wireless card
5
4 Click Install this driver software anyway, then, when prompted, plug in your card.
When the installation completes, the InstallShield Wizard Complete screen opens.
5 Click Finish. Your installation is now complete.
6 To connect to the Internet, open the Network and Sharing Center by clicking Start,
Control Panel, Network and Internet - View network status and tasks. The
Network and Sharing Center opens.
7 Click Connect to a network. The Connect to a network screen opens.
6
Setting up your wireless card
8 Select an available wireless network, then click Connect. Your card attempts to
connect to the selected network.
Depending on the security settings of your wireless network, you may be prompted to
enter in a network security key or a passphrase.
9 Enter the network security key or passphrase, then click Connect. The successful
connection screen opens.
After connecting to the network, you can choose to save this network and connect
automatically when your card is in range.
Setting up your wireless card
7
The Network and Sharing Center should now show the network connection that you
have just made. The links on the left of the window let you configure your network
connections.
All other Windows versions
Important note: Install the software before inserting the card.
To install the software:
1 Insert the Installation Software CD into your notebook’s CD/DVD drive. The InstallShield
Wizard Welcome screen opens.
Note: If the InstallShield Wizard Welcome screen does not open, double-click My Computer,
then double-click the CD/DVD drive where the installation CD was placed. Double-click
the Files folder, then double-click setup.exe.
8
Setting up your wireless card
2 Click Next. The Choose Destination Location screen opens.
3 Click Next. The Please plug in your Notebook Card now screen opens.
Note: If at any time during the install a warning appears that the software has not passed
Windows® logo testing, click the Continue Anyway button to proceed. This software is
designed to run on Windows.
Setting up your wireless card
4 Firmly insert the card, label side UP, into your computer's CardBus slot until it stops.
The Found New Hardware Wizard Welcome screen opens.
Note: If your system did not prompt you to insert your Card, do so now.
9
10
Setting up your wireless card
5 Click No, not this time, then click Next. The Welcome to the Found New Hardware
Wizard Install screen opens.
6 Click Install the software automatically (Recommended), then click Next. The
Completing the Found New Hardware Wizard opens.
Setting up your wireless card
11
7 Click Finish. The Setup has finished installing screen opens.
8 Click Yes, I want to restart my computer now, then click Finish. Your computer
will restart and the Dynex Wireless Networking Utility opens.
Note: In order to see your available networks, you must be near a working wireless router.
12
Setting up your wireless card
9 Select a network to connect to from the Available Networks list, then click Connect.
Note: If the Dynex Wireless Networking Utility did not open automatically, double-click the
Wireless Utility icon in the system tray near the clock.
Connecting to your network
To use the wireless networking utility:
1 After restarting your computer, double-click the Wireless Networking Utility (WNU)
icon located on the screen. The WNU screen opens.
2 Select a network to connect to from the Available Networks list, then click Connect.
Note: In order to see your available networks, you must be near a working wireless router.
3 The WNU icon can also be found on the system tray.
Note: Double-clicking on the WNU icon on the system tray will bring up the Utility screen.
Setting up your wireless card
13
Accessing the wireless networking utility (WNU)
To access the WNU from the Windows system tray:
• Right-click the WNU icon on the Windows system tray in the lower right corner of the
desktop.
If the icon is not present, click on Start, Programs, Dynex, Wireless Networking
Utility.
The WNU’s default screen is the Current Status tab, which displays the current
network status and available networks.
Network Status
This area displays the connectivity status of the current network, between the computer and
router and between the router and the Internet. In the event of a problem, use the Network
Status area to determine the source (for example, computer, router, or Internet/modem).
Available Networks
This area displays the available networks at the current location as well as the SSID, Signal
Strength, Security Type, Channel, and Network Type.
Lost Wireless Connection
If the current wireless connection is lost, a window opens and the WNU attempts to
reconnect.
14
Setting up your wireless card
Connection Failure
Other options will appear during attempts to reconnect. To stop trying to connect, click Stop.
To re-try connecting, click Retry.
Network Status and Solution Tips
To further understand the current network status, click Open Wireless Utility. The default
screen is the Current Status tab and the Network Status section determines which
connections are good or faulty.
Setting up your wireless card
15
Setting Wireless Network Profiles
The My Connections tab on the WNU lets you add, edit, and delete connection profiles. It
also displays signal strength, security, and network type.
Securing your Wi-Fi® Network
If your router has security (WEP or WPA) set, you will see this box when you try to connect.
When this box opens, type the encryption key you set on your router, then click Connect.
The next few pages are advanced options of setting the security through the card instead of
the router.
16
Setting up your wireless card
Note: When you select a network using encryption, you will first see the simple security
screen. Click the Advanced button to see other security options (below).
Currently, there are four encryption methods available:
64-Bit Wired
Equivalent
Privacy
Acronym
Security
128-Bit Wired
Equivalent
Privacy
Wi-Fi Protected
Access-TKIP
Wi-Fi Protected
Access 2
64-bit WEP
128-bit WEP
WPA-TKIP/AES (or just WPA2-AES (or just
WPA)
WPA2)
Good
Better
Best
Best
Static keys
Static keys
Dynamic key
encryption and
mutual
authentication
Dynamic key
encryption and
mutual
authentication
TKIP (Temporal Key
Integrity Protocol)
added so that keys are
rotated and
encryption is
strengthened
AES (Advanced
Encryption Standard)
does not cause any
throughput loss
Features
Encryption keys based More secure than
64-bit WEP using a
on RC4 algorithm
(typically 40-bit keys) key length of 104 bits
plus 24 additional bits
of system generated
data
Setting up your wireless card
17
WEP
WEP is a common protocol that adds security to all Wi-Fi-compliant wireless products. WEP
gives wireless networks the equivalent level of privacy protection as a comparable wired
network.
WEP Encryption Keys—After selecting either the 64-bit or 128-bit WEP encryption mode,
it is critical that you generate an encryption key. If the encryption key is not consistent
throughout the entire wireless network, your wireless networking devices will be unable to
communicate with one another. You can enter your key by typing in the hex key manually, or
you can type a passphrase into the “Passphrase” field and click “Generate” to create a key. A
hex (hexadecimal) key is a combination of numbers and letters from A–F and 0–9. For 64-bit
WEP, you need to enter 10 hex characters. For 128-bit WEP, you need to enter 26 hex
characters.
For instance:
AF 0F 4B C3 D4 = 64-bit WEP key
C3 03 0F AF 0F 4B B2 C3 D4 4B C3 D4 E7 = 128-bit WEP key
The WEP passphrase is NOT the same as a WEP key. Your card uses this passphrase to
generate your WEP keys, but different hardware manufacturers might have different
methods on generating the keys. If you have multiple vendors’ equipment in your network,
the easiest thing to do is to use the hex WEP key from your wireless router and enter it
manually into the hex WEP key table in your card’s configuration screen.
WPA
WPA is a new Wi-Fi standard that improves upon the security features of WEP. To use WPA
security, the drivers and software of your wireless equipment must be upgraded to support
it. These updates will be found on your wireless vendor’s Website. There are three types of
WPA security: WPA-PSK (no server), WPA (with radius server), and WPA2.
WPA-PSK (no server) uses what is known as a pre-shared key as the network key. A network
key is a password that is between eight and 63 characters long. It can be a combination of
letters, numbers, or characters. Each client uses the same network key to access the network.
Typically, this is the mode that will be used in a home environment.
WPA (with radius server) is a system where a radius server distributes the network key to the
clients automatically. This is typically found in a business environment.
WPA2 requires Advanced Encryption Standard (AES) for encryption of data, which offers
much greater security than WPA. WPA uses both Temporal Key Integrity Protocol (TKIP) and
AES for encryption.
Most Wi-Fi products ship with security turned off. So once you have your network working,
you need to activate WEP or WPA and make sure all your wireless devices are sharing the
same network key.
IMPORTANT: You must now set all wireless network cards/adapters to match these settings.
18
Setting up your wireless card
Configuring your wireless N notebook card to use security
You should already have your wireless router set to use WPA or WEP. You will need to set your
Wireless N Notebook card to use the same security settings.
Changing the Wireless Security Settings
The Wireless N Cardbus network adapter supports the latest WPA security feature as well as
the legacy WEP security standard. By default, wireless security is disabled.
Your Dynex wireless card is equipped with the latest security standard called Wi-Fi Protected
Access 2 (WPA2™) and the legacy security standard called Wired Equivalent Privacy (WEP). It
also supports the Wi-Fi Protected Setup (WPS) specification, which simplifies the setup of a
wireless network. WPS uses familiar methodologies, such as typing in a Personal
Identification Number (PIN) or pushing a button, to enable you to automatically configure
network names and strong WPA/WPA2 data encryption and authentication.
Using Wi-Fi protected setup:
• Encryption key if not using WPS
• Personal Identification Number (PIN) method: Your wireless adapter generates a PIN
to be entered into your router.
• Push Button Configuration (PBC) method: Your wireless adapter can also connect by
using the software pushbutton.
• Manual configuration method: This section lists the default security settings to be set
if you are not using WPS.
WPS uses WPA2 for encryption. It does not provide additional security, but standardized the
method for securing your wireless network. On your client utility, WPS-enabled networks are
indicated by a key icon. You can use either the PBC method or the PIN method to let a device
access your wireless network.
To use the PBC method:
1 Push and hold the WPS button (located on the back of your router) for three seconds.
Initiate the WPS procedure on the client utility within two minutes.
2 Open the WNU and select the network name, then click Connect. Your client
automatically exchanges security information and is added to your wireless network.
You can also initiate the PBS method from the client side.
To use the PIN method:
1 Open the WNU and select the WPS-enabled network, then click Connect.
2 Choose the PIN method option, then complete the WPS procedure on your router. Your
client is automatically enrolled in your wireless network within two minutes.
To enable security, you will first need to determine which standard is used by the router. (See
your wireless router’s guide for directions on how to access the security settings.)
Setting up your wireless card
19
To access the security settings on your card:
1 Open the WNU.
2 Click the My Connections tab, then click the connection you want to change.
3 Click Edit, then click Advanced to change settings.
Setting up WEP
To set up 64-Bit WEP encryption:
1 Select OPEN from the Network Authentication menu on the Wireless Network
Properties tab on the Edit information for a network page.
2 Select WEP from the Data Encryption menu.
3 After selecting your WEP encryption mode, you can enter your key by typing in the hex
key manually, or you can type in a passphrase in the Passphrase field, then click
Generate to create a key.
A hex (hexadecimal) key is a combination of numbers and letters from A–F and 0–9.
For 64-bit WEP, you need to enter 10 hex characters.
20
Setting up your wireless card
For instance:
AF 0F 4B C3 D4 = 64-bit WEP key
4 Click Save to finish. Encryption in the wireless router is now set. Each of your
computers on your wireless network will now need to be configured with the same
security settings.
Caution: If you are using a wireless client (such as your notebook equipped with a wireless
notebook card) to turn on the security settings in your wireless router, you will temporarily
lose your wireless connection until you activate security on your wireless client. Record the
key prior to applying changes in the wireless router. If you don’t remember the hex key,
your client will be locked out of the wireless router.
Setting up 128-bit WEP encryption:
1 Select OPEN from the Network Authentication menu on the Wireless Network
Properties tab on the Edit information for a network page.
2 Select WEP from the Data Encryption menu.
3 After selecting your WEP encryption mode, you can enter your key by typing in the hex
key manually, or you can type in a passphrase in the Passphrase field, then click
Generate to create a key.
A hex (hexadecimal) key is a combination of numbers and letters from A–F and 0–9.
For 128-bit WEP, you need to enter 26 hex characters.
Setting up your wireless card
21
For instance:
C3 03 0F AF 0F 4B B2 C3 D4 4B C3 D4 E7 = 128-bit WEP key
4 Click Save to finish. Encryption in the wireless router is now set. Each of your
computers on your wireless network will now need to be configured with the same
security settings.
Caution: If you are using a wireless client (such as your notebook equipped with a wireless
notebook card) to turn on the security settings in your wireless router, you will temporarily
lose your wireless connection until you activate security on your wireless client. Record the
key prior to applying changes in the wireless router. If you don’t remember the hex key,
your client will be locked out of the wireless router.
To set up WPA2-PSK (no server):
Note: Choose this setting if your network does not use a radius server. WPA2-PSK (no server)
is typically used in home and small office networking.
1 Select WPA-PSK or WPA2-PSK (no server) from the Network Authentication menu
on the Wireless Network Properties tab on the Edit information for a network page.
2 Select TKIP or AES from the list.
22
Setting up your wireless card
3 Enter your network key. This can be from eight to 63 characters and can be letters,
numbers, or symbols. This same key must be used on all of the clients (network cards)
that you want to include in your network.
4 Click Save to finish. You must now set all clients (network cards) to match these
settings.
Wireless networking utility options
The Options tab on the Wireless Networking Utility (WNU) lets you customize WNU settings.
Troubleshooting
23
WNU Help
The WNU Help tab lets you access to online and telephone support, as well as advanced
diagnostic tools.
Advanced diagnostic tools
The Advanced Diagnostic Tools section is the central control panel for all the settings of
the hardware and software components of the wireless network. It provides an array of tests
and connectivity services to ensure optimal network performance.
Troubleshooting
Placement of your wireless networking hardware for
optimal performance
Your wireless connection will be stronger the closer your computer is to your wireless router.
Typical indoor operating range for your wireless devices is between 100 and 200 feet. In the
same way, your wireless connection and performance will degrade somewhat as the
distance between your wireless router and connected devices increases. This may or may not
be noticeable to you. As you move farther from your wireless router, connection speed may
decrease.
Factors that can weaken signals simply by getting in the way of your network’s radio waves
are metal appliances, obstructions, and walls.
24
Troubleshooting
If you have concerns about your network’s performance that might be related to range or
obstruction factors, try moving the computer to a position between five and 10 feet from the
wireless router in order to see if distance is the problem. If difficulties persist refer to the user
guide that accompanied your wireless router.
Note: While some of the items listed below can affect network performance, they will not
prohibit your wireless network from functioning. If you are concerned that your network
is not operating at its maximum effectiveness, this checklist may help.
You cannot connect to the Internet wirelessly
If you are unable to connect to the Internet from a wireless computer, check the following
items:
• Look at the lights on your wireless router. If you’re using a Dynex Wireless Router, the
lights should be as follows:
• The Power light should be on.
• The Connected light should be on, and not blinking.
• The WAN light should be either on or blinking.
If you are not using a Dynex Wireless Router, consult that router manufacturer’s user
guide.
• Open your Wireless Networking Utility (WNU) software by clicking on the icon in the
system tray at the bottom right corner of the screen. The tray icon should look like this
(the icon may be red or green):
• The window that opens should have a list of Available Networks. Available networks
are wireless networks to which you can connect.
If you are using a Dynex 802.11g (54g) router, Dynex54g is the default name. If you
are using a Dynex 802.11n router, Dynex is the default name.
If you are NOT using a Dynex router, consult your router manufacturer’s user guide for
the default name.
The name of your wireless network appears in the Available Networks list.
If the correct network name is listed in the Available Networks list, follow these steps to
connect wirelessly:
1 Click on the correct network name in the Available Networks list.
2 If the network has security (encryption) enabled, you need to enter the network key.
For more information regarding security, see “Securing your Wi-Fi® Network” on
page 15.
3 Within a few seconds, the tray icon in the lower right corner of your screen should turn
green, indicating a successful connection to the network.
Troubleshooting
25
The name of your wireless network DOES NOT appear in the list of
Available Networks.
If the correct network name is not listed under “Available Networks” in the WNU, try the
following troubleshooting steps:
1 Temporarily move the computer, if possible, to 5 to 10 feet away from the wireless
router. Close the WNU and reopen it. If the correct network name now appears under
Available Networks, you may have a range or interference problem. See the
suggestions listed in “Placement of your wireless networking hardware for optimal
performance” on page 23.
2 Using a computer that is connected to the wireless router through a network cable (as
opposed to wirelessly), make sure that Broadcast SSID is enabled. This setting is
found on the router’s wireless Channel and SSID configuration page. For detailed
instructions on accessing this page and changing settings, see your wireless router’s
User Manual.
The installation CD does not start WNU
If the installation CD does not start the WNU automatically, it could be that the computer is
running other applications that are interfering with the CD drive.
To start the installation manually:
1 If the WNU screen does not appear within 15-20 seconds, open up your CD drive by
double-clicking on the My Computer icon.
2 Double-click on the CD drive that the installation CD has been placed in to start the
installation.
3 Double-click the Files folder, then double-click the Setup.exe icon.
The Power LED does not come on. The card is not working
If the LED indicators are not ON, the problem may be that the card is not connected or is not
installed correctly.
Make sure that the card is plugged firmly into the PCI slot of your computer. Check to see that
the drivers for the card have been installed. Right-click on the My Computer icon on your
notebook. Choose Properties and navigate to the Device Manager and see if your card is
listed without any errors.
26
Troubleshooting
The Link LED is blinking slowly and you cannot connect to
a wireless network or the Internet
If your card appears to be functioning correctly, but you cannot connect to a network or you
have a red wireless icon at the bottom of your screen, the problem may be that there is a
mismatch between the network name (SSID) settings in your wireless network properties.
Check the SSID settings to see if they match. The SSID is case-sensitive and the spelling on
each computer must be exactly the same in order for the card to connect to the wireless
router.
Note: To check the SSID settings or look for an available network, double-click the Signal
Indicator icon to bring up the Wireless Networks screen. Click Add if you do not see the
network you are trying to connect to and type in the SSID.
For more information about setting up an SSID, refer to your router manufacturer’s user
guide.
The Link LED is solid, but you cannot connect to the
Internet
If you have a signal but cannot get online or obtain an IP address, the problem may be that
there is a mismatch between the encryption key settings in your computer and wireless
router.
Check the WEP key settings to see if they match. The key is case-sensitive and the spelling on
each computer and wireless router must be exactly the same in order for the card to connect
to the router. For more information about encryption, see “Securing your Wi-Fi® Network” on
page 15.
The data transfer is sometimes slow or signal strength is
poor
Wireless technology is radio-based, which means connectivity and the throughput
performance between devices decreases when the distance between devices increases.
Other factors that cause signal degradation are obstructions such as walls and metal
appliances. As a result, the typical indoor range of your wireless devices will be between 100
to 200 feet. Note also that connection speed may decrease as you move farther from the
wireless router.
In order to determine if wireless issues are related to range, we suggest temporarily moving
the computer, if possible, to five to 10 feet away from the wireless router. See “Placement of
your wireless networking hardware for optimal performance” on page 23.
Changing the wireless channel - Depending on local wireless traffic and interference,
switching the wireless channel of your network can improve performance and reliability. The
default channel the router is shipped with is channel 11. You may choose from several other
channels depending on your region; see your router's (or access point's) user manual for
instructions on how to choose other channels.
Troubleshooting
27
Limiting the wireless transmit rate - Limiting the wireless transmit rate can help
improve the maximum wireless range, and connection stability. Most wireless cards have the
ability to limit the transmission rate. To change this property, click Start, Control Panel,
Network Connections, then double-click your card's connection. In the Properties dialog,
select the Configure button on the General tab (Windows 98 users will have to select the
Wireless Card in the list box and then click Properties), then choose the Advanced tab and
select the rate property. Wireless client cards are usually set to automatically adjust the
wireless transmit rate for you, but doing so can cause periodic disconnects when the wireless
signal is too weak; as a rule, slower transmission rates are more stable. Experiment with
different connection rates until you find the best one for your environment; note that all
available transmission rates should be acceptable for browsing the Internet. For more
assistance, see your wireless card's literature.
Why are there two wireless utilities in your system tray?
Which one should you use?
There are several features and advantages to using the WNU over the Windows XP Wireless
Zero Configuration utility. We offer a site survey, detailed link information, and adapter
diagnosis.
It’s essential to know which utility is managing your adapter. We recommend using the WNU.
To use the WNU:
1 Right-click on the network status icon in the system tray and select View Available
Wireless Networks.
2 Click the Advanced button in the lower left-hand corner of the Available Wireless
Networks window.
3 From the Advanced tab, uncheck Use Windows to configure my wireless
network. After the box is unchecked, click OK to close the window.
You are now using the WNU to configure the card.
The card does not work or the connection is unstable
when the computer has a second built-in wireless network
card (such as a mini PCI or Intel® Centrino™)
This condition occurs if your computer has a built-in wireless card while your Wireless Card is
also active. This happens because Windows must now handle two active wireless
connections.
You need to disable the built-in wireless card from your computer under Network Adapters
in the Device Manager.
28
Specifications
Card does not work or the connection is slow when
computer has a built-in wired Ethernet card
This condition occurs if your computer has an active Ethernet card while your wireless card is
also active. This happens because Windows must now handle two active network
connections. You need to disable the Ethernet card from your computer under Network
Adapters in the Device Manager.
Specifications
Host Interface
32-bit CardBus
Power Consumption
Tx/Rx peak 450/260 mA @ 3.3 VDC (max.)
Operating Temperature
32 to 185 degrees F (0 to 85 degrees C)
Storage Temperature
-4 to 194 degrees F (-20 to 90 degrees C)
Humidity
Max. 95% (non-condensing)
Typical Operating Range
Up to 1000 ft. (231 m) (wireless performance may
vary, depending on the networking environment)
Legal notices
FCC Statement
Declaration of Conformity with FCC Rules for Electromagnetic
Compatibility
We, the Dynex Corporation, of 7601 Penn Ave. South, Richfield, MN 55423 U.S.A., declare
under our sole responsibility that the product, DX-NNBC, to which this declaration relates,
complies with Part 15 of the FCC Rules. Operation is subject to the following two conditions:
(1) this device may not cause harmful interference, and (2) this device must accept any
interference received, including interference that may cause undesired operation.
Caution: Exposure to Radio Frequency Radiation.
The radiated output power of this device is far below the FCC radio frequency exposure limits.
Nevertheless, the device shall be used in such a manner that the potential for human contact
during normal operation is minimized. When connecting an external antenna to the device,
the antenna shall be placed in such a manner to minimize the potential for human contact
during normal operation. In order to avoid the possibility of exceeding the FCC radio
frequency exposure limits, human proximity to the antenna shall not be less than 20cm (8
inches) during normal operation.
FCC warning
Changes or modifications not expressly approved by the party responsible for compliance
with the FCC Rules could void the user’s authority to operate this equipment.
Legal notices
29
DHHS and FDA safety certification
This product is made and tested to meet safety standards of the FCC, requirements and
compliance with safety performance of the U.S. Department of Health and Human Services,
and also with FDA Radiation Performance Standards 21 CFR Subchapter J.
Canada ICES-003 statement
This Class B digital apparatus complies with Canadian ICES-003.
FCC Part 15
This device complies with Part 15 of the FCC Rules. Operation of this product is subject to the
following two conditions: (1) this device may not cause harmful interference, and (2) this
device must accept any interference received, including interference that may cause
undesired operation.
This equipment has been tested and found to comply within the limits for a class B digital
device, pursuant to Part 15 of the FCC Rules. These limits are designed to provide reasonable
protection against harmful interference in a residential installation. This equipment
generates, uses, and can radiate radio frequency energy and, if not installed and used in
accordance with the instructions, may cause harmful interference to radio communications.
However, there is no guarantee that interference will not occur in a particular installation. If
this equipment does cause harmful interference to radio or television reception, which can
be determined by turning the equipment off and on, the user is encouraged to try to correct
the interference by one or more of the following measures:
• Reorient or relocate the receiving antenna.
• Increase the separation between the equipment and receiver.
• Connect the equipment into an outlet on a circuit different from that to which the
receiver is connected.
• Consult the dealer or an experienced technician for help.
RSS 210 statement
To reduce potential radio interference to other users, the antenna type and its gain should be
so chosen that the equivalent isotropically radiated power (e.i.r.p.) is not more than that
permitted for successful communication.
30
Legal notices
Legal notices
31
One-Year Limited Warranty
Dynex Products (“Dynex”) warrants to you, the original purchaser of this new DX-NNBC (“Product”), that the
Product shall be free of defects in the original manufacture of the material or workmanship for a period of one (1)
year from the date of your purchase of the Product (“Warranty Period”). This Product must be purchased from an
authorized dealer of Dynex brand Products and packaged with this warranty statement. This warranty does not
cover refurbished product. If you notify Dynex during the Warranty Period of a defect covered by this warranty
that requires service, terms of this warranty apply.
How long does the coverage last?
The Warranty Period lasts for one year (365 days) from the date you purchased the Product. The purchase date is
printed on the receipt you received with the Product.
What does this warranty cover?
During the Warranty Period, if the original manufacture of the material or workmanship of the Product is
determined to be defective by an authorized Dynex repair center or store personnel, Dynex will (at its sole option):
(1) repair the Product with new or rebuilt parts; or (2) replace the Product at no charge with new or rebuilt
comparable products or parts. Products and parts replaced under this warranty become the property of Dynex
and are not returned to you. If service of products and parts are required after the Warranty Period expires, you
must pay all labor and parts charges. This warranty lasts as long as you own your Dynex Product during the
Warranty Period. Warranty coverage terminates if you sell or otherwise transfer the Product.
How to obtain warranty service?
If you purchased the Product at a retail store location, take your original receipt and the Product to the store you
purchased it from. Make sure that you place the Product in its original packaging or packaging that provides the
same amount of protection as the original packaging. If you purchased the Product from an online web site, mail
your original receipt and the Product to the address listed on the web site. Make sure that you put the Product in
its original packaging or packaging that provides the same amount of protection as the original packaging.
To obtain in-home warranty service for a television with a screen 25 inches or larger, call 1-888-BESTBUY. Call
agents will diagnose and correct the issue over the phone or will have an Dynex-approved repair person
dispatched to your home.
Where is the warranty valid?
This warranty is valid only to the original purchaser of the Product in the United States, Canada, and Mexico.
What does the warranty not cover?
This warranty does not cover:
• Customer instruction
• Installation
• Set up adjustments
• Cosmetic damage
• Damage due to acts of God, such as lightning strikes
• Accident
• Misuse
• Abuse
• Negligence
• Commercial use
• Modification of any part of the Product
• Plasma display panel damaged by static (non-moving) images applied for lengthy periods (burn-in).
32
Legal notices
This warranty also does not cover:
• Damage due to incorrect operation or maintenance
• Connection to an incorrect voltage supply
• Attempted repair by anyone other than a facility authorized by Dynex to service the Product
• Products sold as is or with all faults
• Consumables, such as fuses or batteries
• Products where the factory applied serial number has been altered or removed
REPAIR REPLACEMENT AS PROVIDED UNDER THIS WARRANTY IS YOUR EXCLUSIVE REMEDY. DYNEX SHALL NOT BE
LIABLE FOR ANY INCIDENTAL OR CONSEQUENTIAL DAMAGES FOR THE BREACH OF ANY EXPRESS OR IMPLIED
WARRANTY ON THIS PRODUCT, INCLUDING, BUT NOT LIMITED TO, LOST DATA, LOSS OF USE OF YOUR PRODUCT, LOST
BUSINESS OR LOST PROFITS. DYNEX PRODUCTS MAKES NO OTHER EXPRESS WARRANTIES WITH RESPECT TO THE
PRODUCT, ALL EXPRESS AND IMPLIED WARRANTIES FOR THE PRODUCT, INCLUDING, BUT NOT LIMITED TO, ANY
IMPLIED WARRANTIES OF AND CONDITIONS OF MERCHANTABILITY AND FITNESS FOR A PARTICULAR PURPOSE, ARE
LIMITED IN DURATION TO THE WARRANTY PERIOD SET FORTH ABOVE AND NO WARRANTIES, WHETHER EXPRESS OR
IMPLIED, WILL APPLY AFTER THE WARRANTY PERIOD. SOME STATES, PROVINCES AND JURISDICTIONS DO NOT
ALLOW LIMITATIONS ON HOW LONG AN IMPLIED WARRANTY LASTS, SO THE ABOVE LIMITATION MAY NOT APPLY TO
YOU. THIS WARRANTY GIVES YOU SPECIFIC LEGAL RIGHTS, AND YOU MAY ALSO HAVE OTHER RIGHTS, WHICH VARY
FROM STATE TO STATE OR PROVINCE TO PROVINCE.
Contact Dynex:
For customer service please call 1-800-305-2204
www.dynexproducts.com
Distributed by Best Buy Purchasing, LLC
7601 Penn Avenue South, Richfield, Minnesota, U.S.A. 55423-3645
© 2008 Best Buy Enterprise Services, Inc.
All rights reserved. DYNEX is a trademark of Best Buy Enterprise Services, Inc. Registered in some countries. All
other products and brand names are trademarks of their respective owners.
ENGLISH
08-1499
PM01448
www.dynexproducts.com (800) 305-2204
© 2008 Best Buy Enterprise Services, Inc. All rights reserved.
DYNEX is a trademark of Best Buy Enterprise Services, Inc. Registered in some countries. All other
products and brand names are trademarks of their respective owners.
Distributed by Best Buy Purchasing, LLC
7601 Penn Ave. South, Richfield, MN 55423 U.S.A.