1
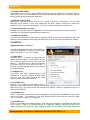
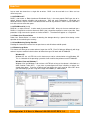
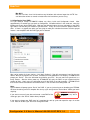
Version 3.0
User Manual
Revised July 23, 2010
Thank you for purchasing a WiebeTech™ product. Configurator 3.0 is a software application that comes
free with your WiebeTech product and is compatible with Microsoft Windows XP, Vista, Windows 7 and
Mac OS X. Configurator 3.0 gives you the ability to adjust various firmware settings of your product and
set up a RAID on RTX™400-QR. If you need help using or configuring your product, WiebeTech offers
free phone support for 90 days after purchase (1-866-744-8722), or email support anytime at
[email protected].
Table of Contents
1. Requirements
2. Installing Configurator 3.0
2
2
2.1 Windows Installation
2
2.2 Mac Installation
2
3. Using Configurator 3.0
3
3.1 Details Tab
3
3.2 Options Tab
3
3.3 RAID Tab
4
3.4 RTX220-QR Tab
7
4. Frequently Asked Questions (FAQ)
5. License Agreement
8
9
C o n f i g u r a t o r 3 . 0 U s e r M a n u a l A9 - 0 0 0 - 0 0 2 7 R E V 1 . 0
-1-
WiebeTech
1. Requirements
Operating System: Windows XP/32, Vista/32 and Vista/64, Windows 7/32 and Windows 7/64, or Intel
Macs running OS X 10.5 or 10.6
Connections: FireWire 400 (1394a), FireWire 800 (1394b), or USB only
Products: RTX400-QR, RTX220-QR and other WiebeTech products that use an Oxford 93x chipset
2. Installing Configurator 3.0
Configurator 3.0 can be found on our webpage (http://www.wiebetech.com/software/configurator.php) or
on the WiebeTech Product CD in the WiebeTech Extras folder.
• To install from the web go to the webpage and select the download that’s compatible with your
operating system.
• To install from the Product CD open the folder called WiebeTech Extras, then open the folder called
Configurator. Both Mac and Windows versions will be in this folder, so simply select the appropriate
file and follow the installation instructions.
2.1 Windows Installation
If you’ve chosen the Windows version of Configurator 3.0 a Setup Wizard will appear on your screen.
Click “Next”. After you click “Next” it will take you to a licensed agreement for installing this software.
Read over the agreement and select “I accept the agreement”, then click “Next”. The Setup Wizard will
automatically create folders for Configurator. If you would like to install it in a different folder on your
system that’s acceptable, just click “Browse” and select a new location. Once you’ve decided on where to
store the software click “Next”. Shortcuts will automatically be installed in the Start Menu under a
subfolder called WiebeTech. Again, if you’d like to install this in a different area select “Browse” and
choose a different location. After you’ve decided on where to store the program’s shortcuts click “Next”.
Then you can opt to have a desktop icon installed. Make your selection and click “Next”. After that the
wizard will prompt you to install the software and will give a brief recap of the different selections you
made. Click “Install” and let the wizard complete your installation. Finally, you can choose to launch
Configurator now. Click “Finish” and open up Configurator 3.0.
2.2 Mac Installation
If you’ve chosen the version of Configurator 3.0 a License Agreement will appear on your screen. You
can select “Agree” and run Configurator straight from the source, or you can select “Save” and save the
software to your Mac. WiebeTech recommends saving it to your Mac as well as placing an icon on your
desktop for future use.
3. Using Configurator 3.0
Open Configurator 3.0. A reminder will appear telling you to disconnect all other FireWire and USB
devices. Be sure to do that and then select “Continue”. If configuring a RAID on RTX220-QR you can
have your drives loaded inside of the unit, otherwise, disconnect any hard drives that are attached to your
product. When Configurator 3.0 appears you can power on your unit.
Configurator 3.0 User’s Manual A9-000-0027 REV 1.0
-2-
WiebeTech
3.1 Details Tab
Supported products: WiebeTech products that have an Oxford 93x chipset, including ToughTech Q,
RTX220 (all models), and RTX400-QR.
3.1.1 Product ID
Displays the name of your product. It cannot be
changed.
3.1.2 Firmware Time/Date/Version
Shows the time, date, and version number of the
currently installed firmware. This application cannot
be used to change the firmware version.
3.1.3 Chip ID
This 6-digit number indicates the FireWire chip ID
reported to the computer. Each FireWire device
connected to a computer should have a unique ID
number to avoid conflicts. If multiple connected
devices are using the same ID number, only one can
be recognized by the computer at a time. You may
change this number to correct such conflicts.
3.1.4 Device Type
Selecting “Unknown” allows compatibility with a wider
range of devices, because this allows the device type
to be automatically detected. However, specifying the
device type may lead to faster performance or better
compatibility with a specific device. Note: Forensic
devices should always be set to “Hard Disk Drive”.
3.1 Options Tab
Supported products: WiebeTech products that have
an Oxford 93x chipset, including ToughTech Q,
RTX220 (all models), and RTX400-QR.
In general, checking the boxes for the following
settings will increase compatibility at the cost of slightly
slower performance.
NOTE: Not all options are
available for every product.
3.2.1 Detect drives with non-std signature
Some devices that do not follow ATA specifications
are not detected by the firmware. Enabling this option
increases compatibility with such devices.
3.2.2 Wait 6s before polling drive
Some hard drives take longer to become operational
after power up or reset. This can cause the FireWire
device to not detect the drive properly. Enabling this
feature increases the time that the device waits to
detect the drive, thus improving compatibility.
Configurator 3.0 User’s Manual A9-000-0027 REV 1.0
-3-
WiebeTech
3.2.3 Enable ATAPI UDMA
Older ATAPI Devices may not support UDMA while newer ones do. Enabling this setting will allow an
ATAPI device (such as a CD-ROM drive) to use UDMA data transfer mode. This may improve the data
transfer speeds of devices other than hard drives.
3.2.4 Disable cache flushing
When data is read from or written to the drive, it is stored in the drive’s cache memory. Since reading
data from cache memory is faster than reading from the drive’s platters, enabling this setting may
sometimes result in faster data read speeds. This cache is normally flushed on a regular basis.
3.2.5 Use extended drive test time
Enabling this setting will cause the FireWire device to wait longer for the drive to respond to any given
command. This may improve compatibility with some drives.
3.2.7 Enable Large Disks
This feature will allow you to create volumes larger than 2.2TB. Each OS behaves differently with large
volumes so please read the below sections to find out how your OS works with your WiebeTech product.
3.3 RAID Tab
Supported Product: RTX400-QR
This feature of Configurator 3.0 is where RAIDs are
set up for RTX400-QR. The RAID sets up instantly
whether a RAID 0, 1, 3, 5 or 10 is selected.
3.3.1 Span Disks
Spanning disks is a method of storing data on
multiple disks that appears as one volume on your
OS. However, spanned volumes have zero fault
tolerance. That means that if a disk should happen
to fail most likely all of the data will be lost. It
provides the largest possible volume, but at the cost
of no data protection.
3.3.2 RAID Levels
Each RAID level offers different features and
performance. If you are uncertain of which RAID
level best suits your needs read over the below
sections to help you make your decision.
3.3.2.1 RAID Level 0
RAID 0 is also known as disk striping. Data is
distributed across multiple drives in the array. As with spanning, there is no data protection. However, the
data transfer rate is very high and you lose very little disk capacity. RAID 0 is capable of using 2 or 4
disks with RTX400-QR.
3.3.2.2 RAID Level 1
RAID 1 is also known as mirroring. All data is replicated on separated disks. RTX400-QR can only utilize
2 disks in a RAID 1. This solution has a very high reliability but the transfer rates are similar to a single
disk. The volume will appear as a single disk.
3.3.2.3 RAID Level 3
RAID 3 is also known as bit-interleaved parity. Data and parity information is subdivided and distributed
across all disks. RAID 3 can withstand the loss of a single disk, however it generally cannot service
multiple requests at the same time. Data reliability is slightly less than RAID 1 and transfer speeds are
Configurator 3.0 User’s Manual A9-000-0027 REV 1.0
-4-
WiebeTech
fast on reads but slower than a single disk on writes. RAID 3 can be used with 3 or 4 disks and can
utilize hot spares.
3.3.2.4 RAID Level 5
RAID 5, also known as Block-Interleaved Distributed Parity, is the most popular RAID type due to its
optimal balance between reliability and performance. Data and parity information is subdivided and
distributed across all disks. RAID 5 can withstand the failure of any one drive. RAID 5 can be used with 3
or 4 disks and can utilize hot spares.
3.3.2.5 RAID Level 10 (1 + 0)
RAID 10 is a stripe of mirrors. In other words, there are two RAID 1 drive pairs that are combined into a
RAID 0. A single disk can be lost from each RAID 1 but it should be replaced as soon as possible. Data
protection is high, but transfer speeds are similar to RAID 1. The volume will appear as a single disk.
3.3.3 Power Loss Reconciliation
Power Loss Reconciliation is a means of detecting the damage done by a power failure during a write
operation and accelerating the recovery.
3.3.4 Load Balancing During Rebuilds
Enabling this feature will increase host responsiveness and will reduce rebuild speeds.
3.3.5 Enable Large Disks
This feature will allow you to create volumes larger than 2.2TB. Each OS behaves differently with large
volumes so please read the below sections to find out how your OS works with RTX400-QR.
Windows XP
Windows XP has a 2.2TB limit so this feature must not be selected when using Windows XP.
This is a limitation of the operating system but it will not affect the performance of RTX400-QR.
Windows Vista and Windows 7
Windows Vista and Windows 7 do not have a 2.2TB limit so long as the volume is initialized as a
GUID Partition Table (GPT). If you have a preconfigured unit then initializing a volume has
already been done. If you are installing your own drives then you’ll need to select GPT when
you’re formatting if you are using drives larger than 500GB (as shown below).
Configurator 3.0 User’s Manual A9-000-0027 REV 1.0
-5-
WiebeTech
Mac OS X
Mac OS X versions since 10.4 do not have any limitations with volumes larger than 2.2TB. You
can format the volume as normal no matter what size hard drives you are using.
3.3.6 Configuring Your RAID
First you need to startup RTX400-QR without any drives inside and Configurator closed. After
approximately 15 seconds you can open up Configurator. Still without drives in the enclosure, select the
bubble next to your desired RAID type. Look over the different features that are selectable in your RAID
type and be sure that they are checked if you want them. Finally, be sure to select the proper number of
disks. If there is a grayed area when you are trying to make your selection that means that the grayed
feature is not compatible with the RAID type you’ve selected.
After you’ve made all of your choices, click “Apply Settings”. You will see progress bars like the one
above. Wait for all progress bars to close, and then turn to RTX400-QR’s LCD display. RTX400-QR will
prompt you “Re-init”. Press the left button to reinitialize your RTX. You can now insert your drives in a
timely manner. After the drives power up, RTX400-QR will verify the RAID set you selected and the
number of disks. Again, press the left button to verify the RAID set and disk number. RTX400-QR will
then reset the drives and advance to the Active Menu. You can now close Configurator 3.0.
Note:
Future reboots will prompt you to “Re-init” the RAID. If you are just turning on or rebooting your RTX400QR then do nothing and let it complete the start up cycle and go to the “Active Menu” before you touch
anything.
If you want to erase all your data and create a new RAID of the
same type, press the “Re-init” button when prompted.
WARNING: Reinitializing a
RAID will erase any data on
the drives.
If you want to change your RAID type, let it complete the start up cycle and repeat the steps in section
3.3.6. Data will be lost if you “Re-init” or change the RAID.
Configurator 3.0 User’s Manual A9-000-0027 REV 1.0
-6-
WiebeTech
3.4 RTX220-QRTab
Supported Product: RTX220-QR
3.4.1 Configuration PIN
This feature allows you to set a PIN to prevent
unauthorized configuration. The default PIN is 0000.
RTX220-QR only requires you to enter a PIN if a
different value has been set.
3.4.2 Buzzers
Place a check in the boxes to indicate which
warning/alarm buzzers you want to be activated.
3.4.2.1 System Warning Buzzer
This buzzer will sound when a drive reaches a default
temperature, or a temperature that you set (see
section 3.4.3). As a visual alert, the “system” LED will
glow amber when the temperature is reached.
3.4.2.2 System Alarm Buzzer
This buzzer will sound on 3 occasions:
• When a drive reaches a default temperature or
the temperature that you set (see section 3.4.3).
• When the enclosure reaches a default temperature or the temperature that you set (see section
3.4.3).
• When the fan fails
As a visual alert, the “system” LED will glow red when any of these three situations occur.
3.4.2.3 RAID Warning Buzzer
This buzzer will sound when RTX220-QR is in degraded RAID mode (a drive has failed and is in need of
rebuild or the RAID is rebuilding). The “RAID” LED will glow amber if this occurs.
3.4.2.4 RAID Alarm Buzzer
This buzzer will sound when the RAID has failed or is
invalid. The “RAID” LED will glow red if this occurs.
3.4.3 Temperature Sliders
When your RTX220-QR reaches a certain temperature,
buzzers sound and the fan kicks on. You may want to
change these default temperatures according to your
environment. With these “sliders,” you can change the
default temperatures of the:
•
•
•
•
Enclosure fan kick-on
Enclosure Temp Alarm
Drive Temp Warning
Drive Temp Alarm
Click “Apply Settings” to save your changes.
Configurator 3.0 User’s Manual A9-000-0027 REV 1.0
-7-
WiebeTech
4. Frequently Asked Questions (FAQ)
Q: What should I do on a reboot when RTX400-QR prompts me to “Re-init” the RAID?
A: Short answer: Do not do anything unless you wish to erase all data and re-initialize the RAID. After a
few seconds, the message will disappear and the RTX400-QR will finish booting up.
Longer answer:
If you bought RTX400-QR without drives and you want to create a RAID 5 with 4 disks (default RAID
type) then simply insert your drives, turn on RTX400-QR, and select the “Re-init” (left) button on the front
display when prompted. RTX400-QR will verify the RAID 5 with 4 disks and you can select the “-Init” (left)
button on the front display to set up that RAID.
If you desire a different RAID type or disk number refer to section 3.3 (“RAID Tab”) in this user’s manual
for further instructions.
If you are simply rebooting the unit and want to return to the “Active Menu” then let RTX400-QR complete
the start up cycle and it will arrive at the “Active Menu” momentarily. Do not press any buttons on the
front display.
Q: I changed the fan kick-on temperature to a higher value, but the fan comes on at a lower temperature
than I set. Why?
A: If any temperature threshold is reached, and the amber or red LEDs come on, the fan will kick on to
cool the unit down. This is to help protect your hard drives and data from damage due to overheating.
Configurator 3.0 User’s Manual A9-000-0027 REV 1.0
-8-
WiebeTech
5. License Agreement
This License Agreement (the “License”) is a binding agreement between you (either an individual or an
entity) and CRU Acquisitions Group, LLC (“CRU”) that specifies approved usage of this software product
(the “Software”). By clicking “Accept” below, you indicate your full agreement with the following provisions.
1.
This computer Software product may only be used in conjunction with registered WiebeTech brand hardware
products. You may use this Software only on a temporary 7-day “trial” basis with WiebeTech hardware
products that are not yet registered.
Registration can be completed at the WiebeTech website
(www.wiebetech.com/registration.php). Usage of this Software with non-WiebeTech branded products is
expressly forbidden.
2.
This computer Software product and all accompanying materials are COPYRIGHT © 2008, 2010 CRU
Acquisitions Group, LLC. Unauthorized duplication or alteration is prohibited. You may not decompile,
disassemble, or reverse engineer the Software. CRU retains all rights to ownership of this Software including
all applicable rights in patents, copyrights and trade secrets contained therein.
3.
Unless specifically approved in writing by an authorized CRU representative, you may not distribute or make
available this software to any third party. Any unauthorized copying, alteration, or distribution of the Software,
written materials, or other materials accompanying the Software may be criminal and/or civil offenses for which
you may be liable for fines, damages, and legal fees.
4.
You retain full control over the use of the Software and you assume all risks and liability for results obtained by
the use of the Software. CRU SHALL HAVE NO LIABILITY OR RESPONSIBILITY TO YOU OR ANY OTHER
PERSON OR ENTITY WITH RESPECT TO ANY LIABILITY, LOSS OR DAMAGE CAUSED DIRECTLY OR
INDIRECTLY BY USE OR PERFORMANCE OF THE SOFTWARE PRODUCT OR ARISING OUT OF ANY
BREACH OF THIS LICENSE, INCLUDING, BUT NOT LIMITED TO, ANY DAMAGES RESULTING FROM
LOST OR CORRUPTED DATA, INCONVENIENCE, LOSS OF TIME, PROPERTY, REVENUE, OR PROFIT
OR ANY INDIRECT, SPECIAL, INCIDENTAL, OR CONSEQUENTIAL DAMAGES, EVEN IF CRU HAS BEEN
ADVISED OF THE POSSIBILITY OF SUCH DAMAGES.
5.
Your right to use this product may not be transferred. You shall not assign or sublicense your rights or
obligations under this License.
6.
The term of this license agreement extends from the moment of your acceptance until you such time as you
uninstall the Software product. However, failure to comply with the conditions of this License may result in
termination of the License by CRU at any time. In such an event, you shall immediately uninstall the Software.
The provisions of this License that protect the proprietary rights of CRU shall continue in force after termination
of the License.
7.
LIMITED WARRANTY: CRU warrants that the Software will perform substantially in accordance with the
accompanying written materials for a period of thirty (30) days from the date of distribution by CRU. Since
some states and countries do not allow limitations on duration of an implied warranty, the above limitation may
not apply to you. No other warranties, either express or implied, including those of merchantability and fitness
for a particular purpose, apply to this Software product or accompanying materials.
8.
If the software fails to perform in accordance with the accompanying written materials within the limited
warranty period, CRU will, at CRU’s option, either (a) replace the Software, which must be returned to CRU, or
(b) return any money paid to CRU by you in the purchase of the product. CRU may, at its discretion, require
you to furnish proof of purchase for the Software product before providing the remedies listed above.
9.
This License constitutes the entire agreement between CRU and you relative to this License. Any change
hereto shall be effective only if in writing and signed by both you and a duly authorized agent of CRU.
10. If any portions of this License are held to be invalid, void, or unenforceable, the remaining provisions of this
License shall remain in full force and effect and shall in no way be affected, impaired, or invalidated.
11. This License agreement is governed by the laws of the state of Washington.
Configurator, RTX, and ToughTech are trademarks of CRU-DataPort. Other marks are the property of their
respective owners.
© 2008, 2010 CRU-DataPort. All rights reserved.
Configurator 3.0 User’s Manual A9-000-0027 REV 1.0
-9-


![議事録[PDF:299KB]](http://vs1.manualzilla.com/store/data/006615021_2-ca7646eafef05d2c88ccbd96aa1a3bbf-150x150.png)