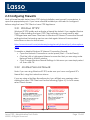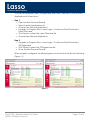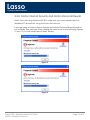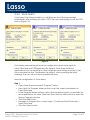
1
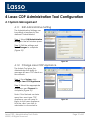
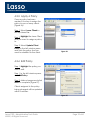
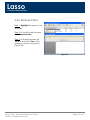
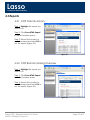
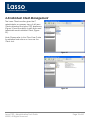
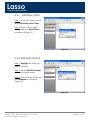
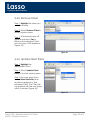
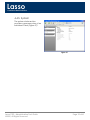
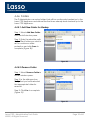
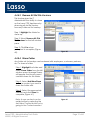
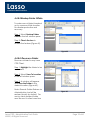
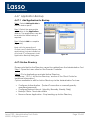
Lasso
Continuous Data Protection
Lasso CDP
Administration Tool Guide
August 2005, Version 1.6.1
Lasso CDP – Administration Tool Guide
@2005, All Rights Reserved.
Page 1 of 41
Lasso
Continuous Data Protection
Copyright
Copyright ©2005 Lasso Logic, LLC. All Rights Reserved.
No part of this publication may be reproduced, stored or transmitted in any form or by any
means, electronic, mechanical, photocopying, recording or otherwise, without the prior
written consent of Lasso Logic, LLC. Contact information is available on the Lasso Logic
website www.lassologic.com.
Windows 2000 and Windows XP are trademarks of Microsoft Corporation.
The material in this publication is for information only and is subject to change without notice.
While reasonable efforts have been made in the preparation of this document to assure its
accuracy, Lasso Logic, LLC assumes no liability resulting from errors or omissions in this
document, or from the use of the information contained herein.
Lasso reserves the right to make changes in the product design without reservation and
without notification to its users.
Lasso CDP – Administration Tool Guide
@2005, All Rights Reserved.
Page 2 of 41
Lasso
Continuous Data Protection
Table of Contents
1
INTRODUCTION TO LASSO CDP ......................................................................................................................................5
2
GETTING STARTED ............................................................................................................................................................8
2.1
INSTALLING THE LASSO CDP CLIENT SOFTWARE ..............................................................................................................8
2.1.1
Custom Installation ...................................................................................................................................................10
2.2
REGISTERING THE LASSO CDP APPLIANCE ......................................................................................................................11
2.3
CONFIGURING FIREWALLS ..............................................................................................................................................12
2.3.1
Windows XP SP2.......................................................................................................................................................12
2.3.2
McAfee Personal Firewall .........................................................................................................................................12
2.3.3
Norton Internet Security and Norton Personal Firewall .............................................................................................14
2.3.4
Zone Alarm ...............................................................................................................................................................16
3
LASSO CDP ADMIN TOOL FEATURES ..........................................................................................................................18
3.1
3.2
3.3
4
SYSTEM MANAGEMENT ..................................................................................................................................................18
POLICY MANAGEMENT ...................................................................................................................................................19
REPORTING ....................................................................................................................................................................20
LASSO CDP ADMINISTRATION TOOL CONFIGURATION ........................................................................................21
4.1
4.1.1
4.1.2
4.2
4.2.1
4.2.2
4.2.3
4.2.4
4.2.5
4.3
4.3.1
4.3.2
4.4
4.4.1
4.4.2
4.4.3
4.4.4
4.4.5
4.4.6
SYSTEM MANAGEMENT ..................................................................................................................................................21
Edit Administrative Setting ........................................................................................................................................21
Change Lasso CDP Appliance...................................................................................................................................21
POLICY MANAGEMENT ...................................................................................................................................................22
Add New policy .........................................................................................................................................................22
Edit Default Policy....................................................................................................................................................22
Apply a Policy...........................................................................................................................................................23
Edit Policy ................................................................................................................................................................23
Remove Policy...........................................................................................................................................................24
REPORTS ........................................................................................................................................................................25
CDP Client Summary ................................................................................................................................................25
CDP Remote Sharing Overview.................................................................................................................................25
INDIVIDUAL CLIENT MANAGEMENT ................................................................................................................................26
Add New Client .........................................................................................................................................................27
Edit Client Name.......................................................................................................................................................27
Remove Client ...........................................................................................................................................................28
Update Client Policy .................................................................................................................................................28
System.......................................................................................................................................................................29
Folders .....................................................................................................................................................................30
4.4.6.1
4.4.6.2
4.4.6.3
4.4.6.4
4.4.6.5
4.4.6.6
4.4.7
Application Backup ...................................................................................................................................................33
4.4.7.1
4.4.7.2
4.4.7.3
4.4.7.4
4.4.7.5
4.4.8
Add New Folder for Backup...............................................................................................................................................30
Remove Folder ..................................................................................................................................................................30
Remove All Old File Versions............................................................................................................................................31
Share Folder ......................................................................................................................................................................31
Backup Folder Offsite ........................................................................................................................................................32
Recover a Folder................................................................................................................................................................32
Add Application for Backup...............................................................................................................................................33
Active Directory ................................................................................................................................................................33
Microsoft Exchange ...........................................................................................................................................................34
Restore Application ...........................................................................................................................................................35
Remove Application ..........................................................................................................................................................35
Manage Offsite Data .................................................................................................................................................36
4.4.8.1
4.4.8.2
Add Folder for Offsite Backup ...........................................................................................................................................36
Add Application for Offsite Backup ...................................................................................................................................36
Lasso CDP – Administration Tool Guide
@2005, All Rights Reserved.
Page 3 of 41
Lasso
Continuous Data Protection
4.4.9
Contacts....................................................................................................................................................................37
4.4.9.1
4.4.9.2
4.4.9.3
4.4.9.4
4.4.9.5
4.4.10
4.4.10.1
4.4.10.2
5
Share for Client ....................................................................................................................................................39
Save to Location ................................................................................................................................................................39
Manage Shares...................................................................................................................................................................40
DISASTER RECOVERY .....................................................................................................................................................41
5.1
6
Add Contact ......................................................................................................................................................................37
Add Folder Share...............................................................................................................................................................37
Remove Folder Share.........................................................................................................................................................38
Edit Contact.......................................................................................................................................................................38
Delete Contact ...................................................................................................................................................................39
CLIENT ..........................................................................................................................................................................41
SUPPORT .............................................................................................................................................................................41
6.1
6.2
ON LINE SUPPORT ..........................................................................................................................................................41
TELEPHONE SUPPORT .....................................................................................................................................................41
Lasso CDP – Administration Tool Guide
@2005, All Rights Reserved.
Page 4 of 41
Lasso
Continuous Data Protection
1 Introduction to Lasso CDP
Product Benefits
•
Zero touch continuous data
protection (CDP)
•
Eliminates need for notoriously
unreliable tape systems
•
Reduces downtime after
failure from days or hours to
minutes
•
Provides hands free, hassle
free local and offsite backup
•
One-click instant recovery
•
Plug-in-play installation
•
Simple to use
•
No maintenance / No manual
intervention
•
Anywhere, anytime access for
increased productivity
•
HIPAA Compliant
What would happen if a business lost all its data?
Downtime after data loss costs the average business over $8,000 per
day. Unfortunately, most businesses and remote offices with less than
100 employees backup with antiquated tape systems that are
subject to human error, cumbersome, and notoriously unreliable. The
facts tell more:
•
•
•
Over 30% of IT costs are associated with backup;
On average 20% of nightly tape-based backup jobs fail1;
and
40% of dedicated, full-time IT Managers can’t recover data
from their tape backups2
As the value, complexity, and volume of business data increases,
traditional fixed-schedule backup to tape or disk no longer provides
adequate data protection. In addition to these challenges,
traditional backup methods can not accommodate laptop and
other mobile data that moves between home, business trips,
partners, and clients.
Businesses and remote offices deserve the same robust backup,
recovery, and data availability solutions as large enterprises.
Eliminate the Threats of Data Loss
Specifically developed for the business and remote office network,
Lasso CDP provides real-time continuous data protection for servers,
laptops, and PCs - both locally and offsite.
Lasso CDP is a zero-touch, hassle-free data protection solution that
backs up data as changes occur and replicates them first locally
and then to a secure offsite location. This real-time data protection
guarantees the most current file and system backup possible. By
combining the advantages of local disk-based backup (fast
recovery) with offsite backup (insurance against local disasters),
Lasso CDP is the first solution to eliminate (not just mitigate) exposure
to threats of data loss.
As importantly, Lasso CDP is available to remote employees,
partners, and clients by policies the IT administrator establishes using
the same security technology implemented by major financial and
government institutions.
1
2
Yankee Group, 2004
InfoStor, 2004
Lasso CDP – Administration Tool Guide
@2005, All Rights Reserved.
Page 5 of 41
Lasso
Continuous Data Protection
Product Features
Continuous Data Protection: Lasso CDP replicates data in real-time, capturing all new, changed and deleted
information at any point in time. There are no backup windows to that leave data exposed to data loss – a
serious risk that exists with most other backup solutions. Lasso CDP’s continuous data protection works even
when users are on their laptops working remotely.
Offsite Backup: Offsite backup protects businesses against power
surges, theft, server crashes, viruses and other disasters. Unlike
cumbersome tape or CD processes, Lasso CDP provides handsfree offsite backup to a secure data center, to a business’ remote
office or other third-party site. Lasso CDP’s intelligent and
proprietary Adaptive Backup Engine (ABE) monitors and
recognizes a business’ Internet usage patterns so that it may
complete offsite backups only when network usage is at its lowest.
Instant Recovery and Unlimited File Versions: Lasso CDP saves every version of every file, not just the latest
version. Therefore, any user on the network can instantly retrieve previous versions of a document, even after
they have saved over it. Users can go back to any point in time – minutes, hours, days or more!
Security: Data is secured by the same 128-bit secure socket layer (SSL) encryption technologies implemented
by major financial institutions and government agencies. Lasso CDP also utilizes public-key encryption and
digital certificates as an additional layer of protection. Finally, every Lasso CDP customer has secure email
address & password authentication.
Remote Access: Remote access is included for travelers, telecommuters and anyone who works while they’re
away from the office. Lasso CDP enables users to have instant and secure access to their data. Using any
Internet-enabled device, users can login at www.lassologic.com and gain access to their local data.
File Sharing: Share folders and files with an unlimited number of partners, clients, employees and peers. Network
administrators are able to name specific areas of the Lasso CDP that each user has access to when they login
using individualized IDs and passwords.
Intelligent Applications: Lasso CDP integrates a collection of intelligent software applications on top of its ABE.
One such application is a backup reporting tool, which provides constant visual data backup verification. The
tool places a highlighted Lasso stamp on each protected file so the user knows that the backup system is
working. Plans include another intelligent application – remote administration – as a simple-to-operate webbased management interface that enables Lasso CDP to be configured and managed remotely.
Application Support: Lasso CDP supports most business applications including Microsoft Exchange, SQL Server
ACT!, Goldmine, QuickBooks, Peachtree, Outlook, and Outlook Express, as well as most industry specific
applications. It also supports open files, Microsoft Small Business Server, and other database packages including
Microsoft Access, DBASE, and MYSQL.
HIPAA Compliant: By combining the advantages of real-time local disk-based backup (fast recovery) with
offsite backup (insurance against local disasters), Lasso CDP is the first solution to eliminate (not just mitigate)
exposure to HIPAA infringement. HIPAA requires that healthcare records be maintained for six (6) years.
Unfortunately, tapes degrade more than 40% during the first five years.
Lasso CDP – Administration Tool Guide
@2005, All Rights Reserved.
Page 6 of 41
Lasso
Continuous Data Protection
Simple to Install, Simple to Administer
Lasso CDP has three components: Lasso CDP
Appliance, a client application, and a client
agent
•
Lasso CDP Appliance
Lasso CDP is the dedicated backup
appliance will enabling all the features and
functions included with the product
•
Client Application
If the administrator wants to provide backup
capability to a user on the network, the client
application is installed on the users PC. Lasso
CDP can be centrally administered or
configured from each workstation. Installation
of this application is optional on each client
•
Client Agent
The client agent is a system service searching
for file and database changes on the client (a
server, PC, or laptop). The agent takes less
than 2 MM of memory and has no impact on
the client or network
Lasso CDP’s admin panel provides the administrator capability to
central manage backups, and allows individual users capability to
simply recover their own files.
Lasso CDP Technical Specifications
Minimum Client Requirements
Pentium III Processor
450 MHZ with at least 256 MB of RAM
40 MB of free disk space
Minimum Server Requirements
Intel Celeron 2.0GHZ Process
256 MB DDR
Windows XP Home
Network Requirements
DHCP enabled network
High speed Internet connection (DSL, Cable, T1, etc.)
Router or hub with wired Ethernet port
Network Protocols
TCP/IP
UDP/IP
Http Tunneling
Operating Systems
Windows XP (Home and Professional)
Windows Server 2003
Windows 2000 (Pro and Server)
Lasso CDP – Administration Tool Guide
@2005, All Rights Reserved.
Page 7 of 41
Lasso
Continuous Data Protection
2 Getting Started
2.1 Installing the Lasso CDP Client Software
Warning: Before installing the Lasso CDP Client Software, please save document changes and
close all open applications.
Lasso CDP Client software must be installed on each Server, PC, and Laptop in the network
that will be backed up to the Lasso CDP Appliance.
Note: You must have Administrator privileges on the computer to install the Lasso CDP Client
software. However, Administrator privileges are not required to run the Lasso CDP Client
application.
1. Insert the Lasso CDP Client Software
Installation CD in the computer's CDROM drive. The InstallShield Wizard
Welcome screen opens. Click Next and
the Lasso CDP License Agreement will
open (Figures 1).
If you have downloaded the software,
select Setup.exe to begin the
installation process.
Figure 1
2. If you agree, select I accept the terms
of the license agreement and click Next
(Figure 2).
Note: The Lasso CDP client requires the
Microsoft™ .NET Framework 1.1 software
and installs it automatically if it is not
already present on your computer.
Although the Lasso CDP client software
requires only about 6 MB of disk space,
the .NET software can require as much
as 23 MB or more.
Lasso CDP – Administration Tool Guide
@2005, All Rights Reserved.
Figure 2
Page 8 of 41
Lasso
Continuous Data Protection
3. Select Complete and Click Next to start
the installation process (Figure 3).
Note: For Custom Installation, refer to
Section 2.1.1.
Figure 3
4. The Setup Status screen will show the
progress of the installation (Figure 4). This
may take a few minutes depending on
the speed of the PC or if the .NET
service is installed.
Figure 4
5. Once the software installation is
complete, a Lasso CDP Client icon
automatically appears on the Desktop
and in the Start Menu (Figure 5).
Figure 5
Lasso CDP – Administration Tool Guide
@2005, All Rights Reserved.
Page 9 of 41
Lasso
Continuous Data Protection
2.1.1 Custom Installation
Lasso CDP can be configured to install only the needed software modules
(Figures 6 and 7).
•
Lasso CDP Agent – Required
installation. The agent takes
less than 2 MB of memory
and has no impact on the
client or network.
•
Lasso CDP Client – Needed
for end-user recovery of files
backed up on the Lasso CDP
Appliance and for backup
configuration if enabled by
the IT Administrator.
•
Lasso CDP Administration
Tool – Required for central
management of the Lasso
CDP Appliance and all
connected Clients. Optional
install on the individual
Clients.
Figure 6
Figure 7
Lasso CDP – Administration Tool Guide
@2005, All Rights Reserved.
Page 10 of 41
Lasso
Continuous Data Protection
2.2 Registering the Lasso CDP Appliance
The Lasso CDP Appliance must be registered using the software license key before backing
up data from the Lasso Clients.
Note: The Administration Tool only has to be installed on the computer that will be used for
central administration. Refer to Custom Installation, Section 2.1.
1. Launch the Administration Tool from
Start>All Programs>Lasso Logic>Lasso
CDP Administration.
2. Enter all the required information for the
Lasso CDP Appliance. The license key
was sent via email from Lasso Logic
(Figure 8).
Figure 8
3. Once the registration is complete, a
confirmation window will be displayed
(Figure 9).
4. The Lasso CDP Appliance is now ready
for use.
Figure 9
Lasso CDP – Administration Tool Guide
@2005, All Rights Reserved.
Page 11 of 41
Lasso
Continuous Data Protection
2.3 Configuring Firewalls
Most software firewalls detect Lasso CDP during installation and prompt for permission to
open the appropriate ports. If you have a firewall installed you will need to configure it
before using the Lasso CDP Client or Lasso CDP Appliance.
2.3.1 Windows XP SP2
Windows XP SP2 installs and activates a firewall by default. If you applied Service
Pack 2 after installing the Lasso CDP Client software, you may need to add
CDPAgent.exe and Lasso.Client.exe to Windows XP Internet Connection Firewall
settings before the backup service can start again. Microsoft has excellent
instructions on how to do this here:
http://www.microsoft.com/windowsxp/using/security/internet/sp2_wfexceptions.
mspx
To enable or disable Windows XP Internet Connection Firewall:
• Open the Network Connections control panel (Start > Control Panel).
• Click the LAN or high-speed Internet connection that you are using under
Network Tasks in the left window
• Click Change Windows Firewall Settings. In this menu you can simply select
off, then click OK.
2.3.2 McAfee Personal Firewall
Note: If you are using Windows XP SP2, make sure you have configured XP's
firewall first, using the instructions above.
If you are using a McAfee firewall product you will likely see warnings when
starting the Lasso CDP Client such as the following (Figure 10). In both cases,
select Grant Access.
Figure 10
Lasso CDP – Administration Tool Guide
@2005, All Rights Reserved.
Page 12 of 41
Lasso
Continuous Data Protection
You can also manually add CDPAgent.exe and Lasso.Client.exe to the Allowed
Applications list. Here's how:
•
Step 1:
• Open McAfee Personal Firewall
• Select Internet Applications List
• Choose New Allowed Application
• Navigate to Program Files > Lasso Logic > Continuous Data Protection>
Lasso.Client.exe
• Click Open to select the Lasso.Client.exe file.
• Choose New Allowed Application.
Step 2:
• Navigate to Program Files > Lasso Logic > Continuous Data Protection>
CDPAgent.exe
• Click Open to select the CDPAgent.exe file.
• Close McAfee Personal Firewall
When properly configured, McAfee program control should look like the following
(Figure 11).
Figure 11
Lasso CDP – Administration Tool Guide
@2005, All Rights Reserved.
Page 13 of 41
Lasso
Continuous Data Protection
2.3.3 Norton Internet Security and Norton Personal Firewall
Note: If you are using Windows XP SP2, make sure you have opened ports or
disabled XP's firewall first, using the instructions above.
If you are using a Norton Internet Security and Norton Personal Firewall product
you will likely see warnings when starting the client such as the following (Figures
12 and 13), In both cases select Permit Always.
Figure 12
Figure 13
Lasso CDP – Administration Tool Guide
@2005, All Rights Reserved.
Page 14 of 41
Lasso
Continuous Data Protection
To manually configure Norton Internet Security and Norton Personal Firewall:
•
•
Step 1:
• Open Norton Internet Security
(a new window will appear)
• Double-click Personal Firewall,
or click once to select
Personal Firewall, then click
the configure button to the
right (Figure 14)
• Click the Program Control tab
• Click the Add button
• Navigate to Program Files >
Lasso Logic > Continuous Data
Protection > Lasso.Client.exe
• Click the Open button
• The window should now
display "Internet Access Permit
All" next to Lasso.Client.exe
Figure 14
Step 2:
• Click the Program Control tab
again
• Click the Add button
• Navigate to Program Files >
Lasso Logic > Continuous Data
Protection > CDPAgent.exe
• Click the Open button
• The window should now
display "Internet Access Permit
All" next to CDPAgent.exe.
(Figure 15)
• Click the OK button
Figure 15
This adds Lasso.Client.exe and CDPAgent.exe, which should enable you to
backup your files. You may need to restart your computer for these changes to
take effect.
For online support using Norton Internet Security or Norton Personal Firewall, visit
the Symantec Web site: http://www.symantec.com/techsupp/.
Lasso CDP – Administration Tool Guide
@2005, All Rights Reserved.
Page 15 of 41
Lasso
Continuous Data Protection
2.3.4 Zone Alarm
If you have Zone Alarm installed you will likely see the following warnings
immediately after installing the Lasso CDP Client and attempting to use the CDP
service (Figure 16):
Figure 16
Zone Alarm personal firewall must be configured to grant server rights to
Lasso.Client.exe and CDPAgent.exe. By default, Zone Alarm will block
applications from connecting to other computers and acting as servers. If you
have checked the box “Remember this setting” when receiving the initial
warnings, then you will not receive additional ones.
Manual configuration of Zone Alarm:
Step 1:
• Open Zone Alarm and select Program Control
• Next, click the Program Wizard button to set the correct permissions for
Lasso.Client.exe
• In the Program Wizard window, select the Advanced option to manually set
server permissions for Lasso.Client.exe then click the Next button to open the
Secure Programs window
• Click the Add button
• Navigate to Program Files > Lasso Logic > Continuous Data Protection >
Lasso.Client.exe
• Click the Open button
Lasso CDP – Administration Tool Guide
@2005, All Rights Reserved.
Page 16 of 41
Lasso
Continuous Data Protection
•
In the Secure Programs window, set Lasso.Client.exe with both access and
server rights, then click the Finish button
Step 2:
• Select Program Control again
• Next, click the Program Wizard button to set the correct permissions for
CDPAgent.exe
• In the Program Wizard window, select the Advanced option to manually set
server permissions for CDPAgent.exe then click the Next button to open the
Secure Programs window
• Click the Add button
• Navigate to Program Files > Lasso Logic > Continuous Data Protection >
CDPAgent.exe
• Click the Open button
• In the Secure Programs window, set CDPAgent.exe with both access and
server rights, then click the Finish button
When properly configured, McAfee program control should look like the following
(Figure 17).
Figure 17
This adds Lasso.Client.exe and CDPAgent.exe, which enable you to backup your
files. For online support using Zone Alarm, visit the Zone Labs Web site:
http://www.zonelabs.com/support/.
Lasso CDP – Administration Tool Guide
@2005, All Rights Reserved.
Page 17 of 41
Lasso
Continuous Data Protection
3 Lasso CDP Admin Tool Features
3.1 System Management
The system profile screen gives the IT administrator a summary view of the Lasso CDP
Appliance’s disk usage, settings, quota, etc (Figure 18).
•
Administrative Settings - The
Administrative Settings identifies the
person that has administrative
privileges for Lasso CDP Appliance.
These settings were established during
the Admin Tool installation process.
•
Default Policy - Lasso CDP has a
default policy that initiates at the time
of installation. This policy is used by
any Clients that haven’t been
assigned a custom policy. To
administer policies, please refer to
Section 3.2 – Policy Management.
Lasso CDP – Administration Tool Guide
@2005, All Rights Reserved.
Figure 18
Page 18 of 41
Lasso
Continuous Data Protection
3.2 Policy Management
The IT Administrator can establish common back up policies that propagate across all clients
connected to Lasso CDP Appliance or individual client PCs/Laptops (Figure 19).
•
•
•
General Settings - Set backup limits and
restrict client functionality.
o Policy Name - Gives the ability to
identify a policy easily
o Local Quota - Establishes how much
data a client is allowed to backup
locally to Lasso CDP
o Offsite Quota - Establishes how much
data a client is allowed to backup to
the secure offsite location
o Enable Local Management - Gives the
client the ability to select folders and
applications for backup
o Enable Remote Access for this Policy Allows the client to retrieve backed up
files from a remote location
o Enable Remote File Sharing - Allows
the client to share backed up folders
with customers, partners, employees,
or anyone else
o Enable Offsite Backup for this Policy Makes sure that all folders selected for
local backup will also be backed up
Figure 19
at the secure offsite location
o Revision Limit - Limits the number of file
versions that in stored locally on Lasso
CDP
Folder Settings - Setup predefined folders for backups and filter unwanted files for backups
o Filters - When set, Lasso CDP will not backup designated file types
o Manager Common Folders - Easy way to select folders that are common on all clients,
like My Documents
o Manage Predefined Folders - Manually enter root folders for backup
Application Settings - Setup predefined applications for backup. Once an application is
selected, Lasso CDP identifies the appropriate directories to properly backup the
application.
o Manage Predefined Applications – Easy way to select applications that are
common on all clients, like MS Outlook.
Lasso CDP – Administration Tool Guide
@2005, All Rights Reserved.
Page 19 of 41
Lasso
Continuous Data Protection
3.3 Reporting
Provides key overview reports for the IT Administrator to help manage the Lasso CDP
Appliance.
•
CDP Client Summary – Shows summary
stats for Lasso Clients which include file
count, storage space used, and
assigned policy (Figure 20).
Figure 20
•
CDP Remote Sharing Overview Shows all contacts that have access
to company data and which Lasso
client shared to the contact (Figure
21).
Figure 21
Lasso CDP – Administration Tool Guide
@2005, All Rights Reserved.
Page 20 of 41
Lasso
Continuous Data Protection
4 Lasso CDP Administration Tool Configuration
4.1 System Management
4.1.1 Edit Administrative Setting
The Administrative Settings can
be edited at anytime by the
defined IT Administrator.
Step 1: Select Edit Administrative
Settings in the left window pane.
Step 2: Edit the settings and
Save Changes to complete
(Figure 22).
Figure 22
4.1.2 Change Lasso CDP Appliance
The Admin Tool gives the
Administrator the ability to
manage all Lasso CDP clients on
the network.
Step 1: From System, click
Change Lasso CDP Appliance.
Step 2: Select the appropriate
Appliance and Connect to
complete (Figure 23).
Note: If the Network contains
more than one Lasso CDP
Appliance you will need to
logon to the Lasso Appliance
that the client you wish to
administer is connected to.
Lasso CDP – Administration Tool Guide
@2005, All Rights Reserved.
Figure 23
Page 21 of 41
Lasso
Continuous Data Protection
4.2 Policy Management
The IT Administrator can establish common back up policies that propagate across all clients
connected to Lasso CDP Appliance or individual client PCs/Laptops.
Note: Lasso CDP has a default policy that initiates at installation. This policy has a filter set for
.tmp files. Please refer to Section 4.2.2 – Edit Default Policy to change the setting.
4.2.1 Add New policy
Step 1: In the left window pane,
click Add New Policy.
Step 2: Select the appropriate
settings for the policy and click
Save to complete (Figure 24).
Note: Refer to Section 3.2 –
Policy Management for a
description of all the features.
Figure 24
4.2.2 Edit Default Policy
Step 1: Select Edit Default Policy
in the left window pane.
Step 2: Select the appropriate
settings for the default policy
and click Save to complete
(Figure 25).
Note: Refer to Section 3.2 –
Policy Management for a
description of all the features.
Figure 25
Lasso CDP – Administration Tool Guide
@2005, All Rights Reserved.
Page 22 of 41
Lasso
Continuous Data Protection
4.2.3 Apply a Policy
Once a policy has been
created, it is easy to assign the
policy to one or many clients
(Figure 26).
Step 1: Select Lasso Clients in
the top Menu Bar.
Step 2: Highlight the Lasso Client
that you want to assign a policy
to.
Step 3: Select Update Client
Policy in the left window pane
and click the policy that you
want to establish for the client.
Figure 26
4.2.4 Edit Policy
Step 1: Highlight the policy you
wish to edit.
Step 1: In the left window pane,
click Edit Policy.
Step 2: Make changes and click
Save to complete (Figure 27).
Clients assigned to the policy
being changed will be updated
within 2 minutes.
Figure 27
Lasso CDP – Administration Tool Guide
@2005, All Rights Reserved.
Page 23 of 41
Lasso
Continuous Data Protection
4.2.5 Remove Policy
Step 1: Highlight the policy to be
removed.
Step 2: In the left window pane,
click Remove Policy.
Step 3: A Warning Screen will
appear and select Yes at the
warning to remove the policy
(Figure 28).
Figure 28
Lasso CDP – Administration Tool Guide
@2005, All Rights Reserved.
Page 24 of 41
Lasso
Continuous Data Protection
4.3 Reports
4.3.1 CDP Client Summary
Step 1: Highlight the report you
wish to run.
Step 2: Click Save HTML Report
in the left window pane.
Step 3: Select the location to
save the report and click OK to
run the report (Figure 29).
Figure 29
4.3.2 CDP Remote Sharing Overview
Step 1: Highlight the report you
wish to run.
Step 2: Click Save HTML Report
in the left window pane.
Step 3: Select the location to
save the report and click OK to
run the report (Figure 30).
Figure 30
Lasso CDP – Administration Tool Guide
@2005, All Rights Reserved.
Page 25 of 41
Lasso
Continuous Data Protection
4.4 Individual Client Management
The Lasso Clients section gives the IT
administrator a summary view of all Lasso
Clients attached the Lasso CDP Appliance
(Figure 31)and the ability to drill down and
administer each individual Client (Figure
32).
Note: Please refer to the Client User Guide
for detailed instructions on how use the
Client tool.
Figure 31
Figure 32
Lasso CDP – Administration Tool Guide
@2005, All Rights Reserved.
Page 26 of 41
Lasso
Continuous Data Protection
4.4.1 Add New Client
Step 1: In the left window pane,
select Add New Lasso Client.
Step 2: Enter a Lasso Client
Name, and click Add Client to
complete (Figure 33).
Figure 33
4.4.2 Edit Client Name
Step 1: Highlight the client you
wish to rename.
Step 2: Select Edit Client Name
in the left window pane.
Step 3: Enter the new name and
click Rename to complete
(Figure 34).
Figure 34
Lasso CDP – Administration Tool Guide
@2005, All Rights Reserved.
Page 27 of 41
Lasso
Continuous Data Protection
4.4.3 Remove Client
Step 1: Highlight the client you
want to remove.
Step 2: Select Remove Client in
the left window pane.
Step 3: A Warning Screen will
appear and select Yes to
Remove the individual Client
from the Lasso CDP Appliance
(Figure 35).
Figure 35
4.4.4 Update Client Policy
Step 1: Highlight the
appropriate Client
Step 2: Select Update Client
Policy in the left window pane.
Step 3: From the drop down
menu, Select the Policy that
should be assigned to that
individual Client. The Client will
be updated with the new policy
within 2 minutes (Figure 36).
Figure 36
Lasso CDP – Administration Tool Guide
@2005, All Rights Reserved.
Page 28 of 41
Lasso
Continuous Data Protection
4.4.5 System
The system status section
provides a summary view of an
individual Client (Figure 37).
Figure 37
Lasso CDP – Administration Tool Guide
@2005, All Rights Reserved.
Page 29 of 41
Lasso
Continuous Data Protection
4.4.6 Folders
The IT Administrator can setup folders that will be continuously backed up to the
Lasso CDP Appliance and restore files that have already been backed up to the
Lasso CDP Appliance.
4.4.6.1 Add New Folder for Backup
Step 1: Select Add New Folder
from the left window pane.
Step 2: Enter the absolute path
of the Client folder you want to
set for continuous data
protection and click Save to
complete (Figure 38).
Figure 38
4.4.6.2 Remove Folder
Step 1: Select Remove Folder in
the left window pane.
Step 2: In the dialogue box,
Verify that you have selected
the appropriate folder for
removal
Step 3: Click Yes to complete
(Figure 39).
Figure 39
Lasso CDP – Administration Tool Guide
@2005, All Rights Reserved.
Page 30 of 41
Lasso
Continuous Data Protection
4.4.6.3 Remove All Old File Versions
This feature gives the IT
Administrator the ability to clean
up the Lasso CDP Appliance by
removing all old file versions
from any folder set for backup.
Step 1: Highlight the folder for
clean up.
Step 2: Select Remove All Old
File Versions for the left window
pane.
Step 3: Click Yes when
prompted to complete (Figure
40).
Figure 40
4.4.6.4 Share Folder
Any folder set for backup can be shared with employees, customers, partners,
etc. To share a folder:
Step 1: Highlight the folder and
select Share Folder from the left
window pane. Manage Shares
will appear that shows current
contacts share for this folder.
Step 2: Select Add New Share
to find a contact you want to
share the folder with.
Step 3: Select the appropriate
contact and click Share to
complete (Figure 41).
Note: A new contact can be
added either by selecting the
Add New Contact button or by
going to the Contacts section.
Lasso CDP – Administration Tool Guide
@2005, All Rights Reserved.
Figure 41
Page 31 of 41
Lasso
Continuous Data Protection
4.4.6.5 Backup Folder Offsite
To make sure a folder is backed
up to a secure offsite location
for disaster protection and
recovery:
Step 1: Select Backup Folder
Offsite in the left window pane.
Step 2: Check the box to
enable the feature (Figure 42).
Figure 42
4.4.6.6 Recover a Folder
Recover a folder for any Lasso
CDP Client.
Step 1: Highlight the folder to be
recovered.
Step 2: Select Save To Location
in the left window pane.
Step 3: A window will appear
and Save the Folder in the
desired location (Figure 43).
Note: Remote Folder Restore via
Administration tool will be
restored locally by default. For
use by client restored folder
must be sent to client machine.
Lasso CDP – Administration Tool Guide
@2005, All Rights Reserved.
Figure 43
Page 32 of 41
Lasso
Continuous Data Protection
4.4.7 Application Backup
4.4.7.1 Add Application for Backup
Step 1: Select Add Application in
the left window pane.
Step 2: Select the appropriate
application in the Applications
window. The applications can also
be added for offsite backup if
required.
Step 3: Select Add to complete
(Figure 44).
Note: with the exception of
Outlook and Outlook Express, only
applications that are installed on
your local PC will appear in Add
Application Backup dialog box.
Figure 44
4.4.7.2 Active Directory
Please note that Active Directory cannot be added from the Administration Tool.
Step 1: Open the Lasso client on the Domain Controller
Step 2: Go to Applications and add Active Directory.
(Please see ‘1.3.5. 4 - MS Active Directory’ section of the Client Guide for
additional information.)
Options available to edit for Active Directory via the Administration Tool are:
•
•
•
•
Configure Authentication - (Trusted Connection or manually specify
username/password)
Configure Backup Interval - (Monthly, Biweekly, Weekly, Daily)
Backup Offsite - Send data offsite
Remove Server Application - Stop backing up Active Directory
Lasso CDP – Administration Tool Guide
@2005, All Rights Reserved.
Page 33 of 41
Lasso
Continuous Data Protection
4.4.7.3 Microsoft Exchange
Please note that Exchange cannot be added from the Administration Tool.
Step 1: Open the Lasso client on the Exchange server
Step 2: Go to Applications and add Microsoft Exchange.
(Please see ‘1.3.5.2 - Microsoft Exchange’ section of the Client Guide for
additional information.)
Options available to edit for Exchange via the Administration Tool are:
•
•
Backup Offsite - Send data offsite
Remove Server Application - Stop backing up Exchange
If for any reason you are unable to use the Lasso agents or you would prefer the
manual backup of SQL and Exchange Microsoft has excellent instructions on
how to do this.
http://msdn.microsoft.com/library/default.asp?url=/library/en-us/adminsql/ad_bkprst_9zcj.asp
http://www.microsoft.com/technet/prodtechnol/exchange/2000/library/reskit/resguide/c28back.mspx
http://support.microsoft.com/?scid=kb;en-us;296788&spid=1773&sid=78
Lasso CDP – Administration Tool Guide
@2005, All Rights Reserved.
Page 34 of 41
Lasso
Continuous Data Protection
4.4.7.4 Restore Application
Step 1: Select the application
that you want to restore.
Step 2: In the left window pane,
select Restore a File Version.
Step 3: Select the file version for
restore and then the directory
that you want to restore to and
click Save to Location (Figure
45).
Note: Remote Folder Restore via
Administration tool will be
restored locally by default. For
use by client restored folder
must be sent to client machine.
Make sure the file is saved in the
appropriate root folder on the
Client.
Figure 45
4.4.7.5 Remove Application
Step 1: Highlight the application
you wish to remove.
Step 3: Select Remove
Application from the left
window pane.
Step 3: Click Yes at the warning
screen to complete (Figure 46).
Figure 46
Lasso CDP – Administration Tool Guide
@2005, All Rights Reserved.
Page 35 of 41
Lasso
Continuous Data Protection
4.4.8 Manage Offsite Data
4.4.8.1 Add Folder for Offsite Backup
In the Lasso Client Offsite Data
section:
Step 1: Highlight Offsite Folders
and select Add Offsite Folder
from the left window pane.
Step 2: Highlight the folder you
want to set for offsite backup.
Step 3: Click Add to complete
(Figure 47).
Figure 47
4.4.8.2 Add Application for Offsite Backup
In the Lasso Client Offsite Data
section:
Step 1: Highlight Offsite
Applications and select Add
Offsite Application for the left
window pane.
Step 2: Highlight the application
you want to set for offsite
backup.
Step 3: Click Add to complete
(Figure 48).
Figure 48
Lasso CDP – Administration Tool Guide
@2005, All Rights Reserved.
Page 36 of 41
Lasso
Continuous Data Protection
4.4.9 Contacts
Manage contacts for remote access and file sharing.
4.4.9.1 Add Contact
In the Lasso Client Contacts
section:
Step 1: Select Add Contact from
the left window pane.
Step 2: Enter Contact Name and
Email into the window
Step 3: Click Save to complete
(Figure 49).
Figure 49
4.4.9.2 Add Folder Share
In the Lasso Client Contacts
section:
Step 1: Highlight the contact you
want to share a folder with.
Step 2: Select Add Folder Share
in the left window pane. In the
Folder window pane, select the
folder to share.
Step 3: Click Add to complete
(Figure 50).
Figure 50
Lasso CDP – Administration Tool Guide
@2005, All Rights Reserved.
Page 37 of 41
Lasso
Continuous Data Protection
4.4.9.3 Remove Folder Share
In the Lasso Client Contacts
section:
Step 1: Double click on the
contact you want to remove a
folder share from.
Step 2: Highlight the
appropriate folder and select
Remove Folder Share in the left
window pane.
Step 3: Select Yes to complete
(Figure 51).
Figure 51
4.4.9.4 Edit Contact
In the Lasso Client Contacts
section:
Step 1: Highlight the contact you
want to edit.
Step 2: Select Edit Contact in the
left window pane.
Step 3: Enter the new Contact
Name and click Save (Figure
52).
Figure 52
Lasso CDP – Administration Tool Guide
@2005, All Rights Reserved.
Page 38 of 41
Lasso
Continuous Data Protection
4.4.9.5 Delete Contact
In the Lasso Client Contacts
section:
Step 1: Highlight the contact you
want to delete.
Step 2: Select Delete Contact in
the left window pane.
This process will remove the
Contact and all associated
shares (Figure 53).
Figure 53
4.4.10 Share for Client
View all shared data from and accessible to an individual Client.
4.4.10.1
Save to Location
In the Lasso Client Contacts
section:
Step 1: Highlight the folder.
Step 2: Select Save To Location
in the left window pane.
Step 3: A window will appear
and Save the Folder in the
desired location (Figure 54).
Figure 54
Lasso CDP – Administration Tool Guide
@2005, All Rights Reserved.
Page 39 of 41
Lasso
Continuous Data Protection
4.4.10.2
Manage Shares
Any folder set for backup can be shared with employees, customers, partners,
etc.
To share a folder: (Figure 55)
Step 1: Highlight the folder and
select Manage Shares from the
left window pane.
Manage Shares shows current
shares for this folder.
Step 2: Select Add New Share to
find an existing contact or a
local Lasso Client you want to
share the folder with.
Step 3: Select the contact or
client and click Share to
complete the process.
Figure 55
Note: A new contact must be
added in the Contacts section.
To delete a folder share: (Figure
56)
Step 1: Highlight the folder
Step 2: Select Manage Shares
from the left window pane.
A window labeled Manage
Shares will appear that shows
current contacts share for this
folder.
Figure 56
Lasso CDP – Administration Tool Guide
@2005, All Rights Reserved.
Page 40 of 41
Lasso
Continuous Data Protection
5 Disaster Recovery
5.1 Client
If a PC/Laptop should experience an event that results in data loss, you will still be able to
recover any data that you had defined for backup.
Step 1: If your PC should become inoperable, please follow the prescribed restore
procedures of the system which may include the re installation of the
operating system, applications, or even a new PC.
Step 2: Once the system(s) is operable again, reinstall the Lasso CDP client software
on each affected computer using the software provided by Lasso Logic. Enter
the same user name and email address that you entered during your initial
installation for the reinstall.
Note: If you are using a new PC, it must have the same Computer Name as
the previous machine in order to re-synch the data from the Lasso CDP
Appliance.
Step 3: Connect the Client to the Lasso CDP Appliance and click Folders. Previously
backed up folders and applications will be displayed and will be ready for
downloading to the restored workstation. Simply select the directory that you
want to restore and click Save To Location. Select a restore destination and
click OK.
6 Support
6.1 On Line Support
Please be sure to read our Frequently Asked Questions and On-line Help at
http://www.lassologic.com/support.htm.
6.2 Telephone Support
Telephone support is available free of charge for the initial setup of your newly purchased
Lasso CDP products. Call 415-357-9688 between 9:00 a.m. and 7:00 p.m. PST. When
contacting Technical Support, be sure to have your Lasso Logic License Key available.
Lasso CDP – Administration Tool Guide
@2005, All Rights Reserved.
Page 41 of 41