1
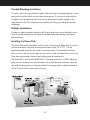
LM Series
Professional Installation Manual
Owner’s Manual
& Warranty Information
SAFETY INSTRUCTIONS
Congratulations on your purchase of a Clearwater Chlorinator. You have made a wise decision and will
benefit from your Clearwater for many years to come. Please take a moment to read through the entire
manual before installing your new unit. Your chlorinator must be installed and operated as specified.
IMPORTANT SAFETY INSTRUCTIONS.
READ AND FOLLOW ALL INSTRUCTIONS.
SAVE ALL INSTRUCTIONS.
!
WARNING
Failure to heed the following warnings can result in
permanent injury, electrocution or drowning.
ELECTRICAL HAZARD
• To reduce risk of electrical shock
- Make sure all power to pool equipment area is off prior to any installation or removal of Clearwater
components.
- Replace damaged power pack cord immediately.
- Do not bury cord. Locate cord to minimize abuse from lawn mowers, hedge trimmers and other
equipment.
• Severe shock or injury will likely occur as a result of a drill or drill cord coming in contact with water.
Never allow electric drill or cord to come in contact with water. Only plug drill into a Class A (5
Milliampere Trip) protected Ground Fault Circuit Interrupter (GFCI) in accordance with the National
Electrical Code Section 680 (USA only). Please see your drill owner’s manual for further safety
precautions.
• Install the power pack at least 10 feet from the inside walls of a pool to prevent any possibility of the
unit coming in contact with water.
• Your Clearwater Chlorinator has been designed with an electronic flow switch. This device automatically
switches the chlorinator ‘OFF’ when the water through the cell stops.To prevent cell damage and
personal injury, do not in any way interfere with this system which has been designed for your
protection.
CHEMICAL USE HAZARD
• To avoid personal injury when working with pool chemicals, always wear rubber gloves and eye
protection and work in a well-ventilated area. Use caution when choosing a location to open and use
chemicals as they may damage any surface in which they come in contact.
• The addition of certain chemicals can reduce the effectiveness of chlorine. Always make sure that proper
residual chlorine levels are maintained to avoid personal injury.
• This product manufactures chlorine. Individuals with any type of chlorine sensitivity should take the
appropriate precautions to avoid injury or illness.
2
SAFETY INSTRUCTIONS
EQUIPMENT WATER PRESSURE HAZARD
• Always turn pump off prior to installing or removing any Clearwater cell. Your pump/filter system is
operated under pressure and the pressure must be released before you begin work. Please see your
pump/filter owner’s manual for further instructions.
• To avoid cell damage, water pressure in the cell must not exceed 29 psi (200kPa)
PREVENT CHILD INJURY AND DROWNING
• To reduce the risk of injury, do not permit children to operate this product.
• Do not let anyone, especially small children, sit, step, lean, or climb on any equipment installed as part of
your pool’s operational system. Unless otherwise stated, ALL components of your pool's operational
system should be located at least 3 feet from the pool so children cannot use the equipment to gain
access and be injured or drown.
!
CAUTION
Failure to heed the following warnings could cause
damage to pool equipment or personal injury.
• Chlorinator must be installed and operated as specified.
• Scratching or bending plates in cell housing can reduce cell life.
• Power to the LM2 should be turned off before unplugging the cell connectors to prevent cell damage and
low voltage sparks.
• Keep the cell terminals protected with a light coating of silicone grease to allow for a positive electric
connection. Use of any other type of grease may damage the terminal seals and ‘o’ rings. Do not
immerse these terminals in acid wash solution, and avoid accidental contact with salt water.
• Water above the temperature of 104 degrees F (40 degrees C) flowing through the cell can cause plastic
cell to discolor.
• Power pack must not be installed directly above any other heat source such as filter, pump or heater. It
must be at least 1 Ft. (300 mm) from the ground to allow free circulation of air around it. It must not
be installed in a closed box. If the power pack is to be installed on a post, then it must be centrally
positioned on a flat panel of suitable waterproof material at least 10 inches (240mm) wide and 18 inches
(440mm) high.
• Check the cell frequently to prevent the accumulation of pool debris that for any reason may have bypassed the pool filter.
3
NOTES
4
INDEX
Page No.
Safety Instructions
2
Clearwater LM Series Product Specifications
6
Clearwater LM Installation (by qualified personnel only)
7
How Your Clearwater Chlorinator Works
10
Clearwater Model LM2 Operation
11
Control Panel Functions
12
Indicator Lights: What They Mean
14
Operating Tips
15
Salt: When And How To Add It
17
Salt Chart
18
Stabilizer Chart
19
Some Tips On Water Chemistry
20
Troubleshooting
22
Chlorinator Maintenance
27
Clearwater LM Series Limited Warranty
29
Clearwater LM Series Warranty Registration
31
5
CLEARWATER LM SERIES PRODUCT SPECIFICATIONS
Salt Level:
Maximum chlorine output/hour
(gas chlorine equivalent)
LM2-24:
LM2-40:
DuoClear:
Minimum Flow rate:
Plumbing:
4000 ppm
24 grams/hour
40 grams/hour
15 grams/hour
12 gallons/minute
1 1/2" or 2" Schedule 40 PVC
Maximum water temperature
through the cell:
104 F
Maximum operating pressure:
29 psi
Maximum salt level:
13,000 ppm
Power requirements:
220 volt
2 amp draw
Dimensions
Cell:
Power pack:
Limited warranty
Cell:
Power pack:
8 1/4" x 3" x 3 1/4"
7 5/8" x 14 3/4" x 4 7/8"
3 years
3 years
Clearwater LM Series chlorinators should be
installed on residential pools only.
Salt level in your Clearwater pool should never exceed 13,000 ppm
6
CLEARWATER LM INSTALLATION
Clearwater LM Installation
Clearwater saltwater chlorinators must be installed by a qualified swimming pool
professional or certified electrician. If you need assistance in finding a qualified installer
please contact our technical service department at 1-888-537-6657.
Installing the cell
The Clearwater cell MUST be installed horizontally, with the ports down, as the
last piece of pool equipment in line. (The design of the cell forms a natural gas trap. Even
though the LM unit has an internal flow sensor, this installation provides a secondary safety
feature to prevent gas build-up within the system.) There are no height restrictions or
requirements. The cell should be installed within 6’ of the power pack. Unions and adaptors
are provided. Water can flow in either direction without affecting performance. 11/2" or 2"
sch 40 rigid PVC is required. Any standard PVC cement may be used. Allow adequate drying
time before turning on the chlorinator.
7
Flooded Plumbing Installation
This occurs when the water level of the pool is above the height of the pool equipment. Some
pool systems may have valves that will isolate the equipment. If not, one ball valve should be
installed on the inlet side of the cell and a one-way check valve should be installed on the
outlet side of the cell.This will eliminate the possibility of having a gas build-up and possible
cell damage.
Multiple Installations
If conditions require multiple installations the LM series chlorinator may be plumbed in either
series or parallel providing that the header or manifold is balanced, providing equal flow to
each chlorinator.
Installing the Power Pack
The Power Pack can be mounted on a wall or a post. If mounting the Power Pack on a post, it
must be centered on a flat panel of waterproof material at least 9.5" x 17.5". Use the
template provided to position the anchors & mounting screws. Do not enclose the Power
Pack in any box. Do not install it above any heat source. Install the Power Pack a minimum of
3 feet from the pool edge. See your local building codes for requirements.
The Power Pack is hard-wired to 220V ONLY. It should be wired to the "LOAD" side of the
pump timer or the pump circuit of a controller, so that the Clearwater chlorinator comes on
only when the pump comes on. Connect the black & red output cables to either electrode on
the cell. Connect the blue sensor clip to the post.
8
Salt
Always test the salt level before adding salt. Refer to page 18 & 19 for instructions on
adding salt.
Safety Test
After installing the Clearwater chlorinator the following safety test MUST be performed.
Turn on the pool pump and the chlorinator. Adjust the chlorine output to maximum.
Disconnect the blue sensor clip from the terminal pin at the end of the cell. The RED "no
flow" light should be illuminated and the output lights should drop to the minimum, showing a
yellow light only. If this happens, the flow sensor is operating properly. Reconnect the blue
flow sensor clip to resume normal operation. Do not operate the unit if it fails this test.
Contact Zodiac at 1-888-537-6657 for instructions.
9
HOW YOUR CLEARWATER CHLORINATOR WORKS
How your Clearwater
Chlorinator Works
Common salt (sodium chloride) is made up of two elements, sodium and chloride.When your
Clearwater LM2 is installed, a measured quantity of salt is dissolved in the pool water to make
it slightly salty.As part of the daily filtration cycle, the pool water is passed through the
Clearwater electrolysis cell to produce chlorine which is dissolved instantly into the water.
Your Clearwater LM2 also produces ozone in the cell as a by-product.
In simple, non-technical terms, the chlorine instantly starts to destroy bacteria, viruses and
algae, and in doing this reverts to dissolved salt.This cycle continues with more new chlorine
being produced from the salt water in the electrolysis cell, sanitizing the pool, and changing
once more back to dissolved salt.
Everyday, when the Clearwater unit and the filtration system are switched on, dust and
debris are trapped by the filter and the Clearwater sanitizes the water to make if safe
and sparkling clean.
Important.
To ensure your LM2 works at maximum efficiency, regularly check and maintain the chemistry
of your pool.
Preferred Water Chemistry Readings
Salt concentration
4,000 ppm
pH
7.2 to 7.6
Chlorine stabilizer (Cyanuric acid)
40 to 100 ppm
depending on regional climate
Total alkalinity
80 to 120 ppm
Total hardness
200 to 400 ppm
Free chlorine
1 to 3 ppm
10
CLEARWATER MODEL LM2 OPERATION
Clearwater Model LM2
Operation
The chlorine production of the Clearwater LM2 is controlled by the number of hours the LM2
and filtration system is ON, as well as the setting of the output control. Power to this unit must
be controlled by the pump timer.The chlorinator functions may only be set when the filtration
system is running.
The Clearwater LM2 includes a Super Chlorinate feature which automatically super chlorinates
the pool for an approximated 24 hour period of pool pump operation.
The Clearwater LM2 is also fitted with 3 indicator lights that monitor the operation of the
chlorinator, the concentration of salt in the pool, and the water flow.
The LM2 is designed to require minimum operator maintenance using reverse polarity
technology to minimize the scaling of the cell.
11
CONTROL PANEL FUNCTIONS
Control Panel Functions
On / Off Button.
This button switches the LM2 ON and OFF. A yellow light appears in the chlorine output
indicator window when the unit is ON.
Output Button.
The output button is used to set the chlorine output of the LM2.
Chlorine output is selected by repeatedly pushing this button until maximum is reached on the
chlorine output indicator. An extra push of this button will reset the output to minimum.
Super Chlorinate Button.
The Super Chlorinate function is used to rapidly add chlorine to the pool.
This feature automatically super chlorinates your pool for approximately 24 hours of pool
pump run time.
Backup Battery.
The LM2 is fitted with a rechargeable battery. If the power is removed, the LM2 will retain the
output power settings and Super Chlorinate settings.
12
CONTROL PANEL FUNCTIONS
LM2 Display Panel
13
INDICATOR LIGHTS – WHAT THEY MEAN
Indicator lights:
What they mean
Chlorine Output.
A series of six lights indicate the chlorine output setting of the power pack. More lights equals
greater chlorine production. Note: This setting does not show the actual chlorine reading in
the pool. Use of a test kit is required to confirm the Salt Level or Free Chlorine reading of the
pool water.
Chlorine Output - Yellow Light Flashing.
The yellow (low output) light flashes for a few minutes during cell reversal (cell self clean)
indicating no output during this time.
Super Chlorinate - Light ON.
This light indicates that the Super Chlorinate feature has been selected, it will turn OFF when
the Super Chlorinate period has ended.
Super Chlorinate - Light OFF.
Function not selected.
Add Salt - Light ON.
The Add Salt light will come on at any salt level between 3000ppm and 4000ppm depending on
mains voltage and water temperature (below 65˚).This is not a fault but a precaution to ensure
the salt level is never too low. (See ‘Salt:When And How To Add It’). Note: Operating the LM-2
at reduced salt levels may shorten the life of the cell.
Add Salt - Light OFF.
Indicates that the salt level in the pool is correct.
No Flow - Light ON.
This indicates insufficient water flow in cell, usually caused by the pump not running. The
chlorine output will also turn off at this time.
All Lights OFF.
All lights OFF indicates the LM2 is turned off.Turn unit ON. If lights are still OFF, check the
resettable fuse and circuit breaker.
14
OPERATING TIPS
Operating Tips
A. Filtration and chlorination system operating periods.
Run your filtration and chlorination system for at least 6 to 8 hours per day.
During very hot weather it might be necessary to run the system for additional hours, but in
winter where pools remain open, it is only necessary to run the filtration system for around 4
hours per day. Shorter periods will help to lengthen the life of the cell electrodes.
B. Chlorine output settings.
Start operation of the Clearwater LM2 at maximum output. Add salt to the pool if the ‘Add
Salt’ light is showing. For a home pool of about 13,200 gallons, the addition of one (1) 50 lb.
bag of salt will increase the salt concentration by 500 ppm. Refer to ‘Salt:When And How To
Add It’ and the ‘Adding Salt Chart’ on pages 17-18.
C. Free (residual) chlorine reading.
The free chlorine residual in the pool should be between 1 - 3 ppm. Increasing the daily
operating period of the system increases the free chlorine reading, and a shorter operating
period reduces the chlorine reading. Likewise, operating the chlorinator at maximum output
will produce a higher chlorine reading than operating the chlorinator at a lower setting.
D. Chlorine stabilizer (Cyanuric acid) level.
The Chlorine stabilizer (cyanuric acid) reading should be between 40-100 ppm. This will vary
depending on your regional climate. Chlorine stabilizer helps to keep a satisfactory free
chlorine reading in hot sunny climates. Extremely hot and sunny climates will require readings
at the higher end of the given range. Refer to ‘Stabilizer Chart’ on page 19.
E. pH readings.
It is ABSOLUTELY ESSENTIAL that the pH of the pool be maintained in the range of 7.2 - 7.6.
The effectiveness of chlorine as a sanitizer is significantly reduced as the pH rises. At a pH of
8.0, nearly all of the chlorine being added to the pool is wasted, and it will be almost
impossible to maintain a satisfactory free chlorine reading.
15
OPERATING TIPS
F. Regular maintenance checks.
Weekly:
•
•
•
•
•
Visually check the cell electrodes. Only if necessary, remove the cell and flush with a garden
hose to remove any debris that may have passed through the filter and lodged in the cell
housing.Avoid inserting objects into the cell which can scratch or bend the cell plates.
Check the free chlorine.
Check the total alkalinity.Adjust if necessary.
Check the pH of the water.Adjust if necessary.
Check the pressure gauge on the filter to see if backwashing is necessary.
Monthly:
•
•
Check the salt concentration of the pool (see ‘Salt:When And How To Add It).
Check the chlorine stabilizer reading.Adjust if necessary.
16
SALT:WHEN & HOW TO ADD IT
Salt: When And How To Add It
When to add salt.
Add salt when indicated on the control panel.The light marked ‘Add Salt’ functions
automatically when extra salt is needed. Note that the ‘Add Salt’ light may switch on at any salt
level between 3000 and 4000ppm, depending upon the water temperature and mains voltage
(see note).This is not a fault but a precaution to ensure that the salt level is never too low.
The salt concentration should normally be around 4000 ppm, but should never be allowed to
fall below 3000 ppm, as this can reduce the life of the cell electrodes.
Salt is not lost through evaporation. Salt is lost with the water splashed out of the pool or
during backwash. Adding fresh water or rainfall to the pool dilutes the salt concentration.
Adding salt may be needed from time to time to maintain an optimum salt level.
NOTE: Even if the salt concentration is around 4000 ppm, the ‘Add Salt’ light may switch ON
if the water temperature drops below 65˚ or mains supply voltage is too low. In this situation,
it may not be possible to set the Chlorine Output to maximum. Addition of more salt to the
pool will allow the Chlorine Output to reach maximum settings.
How much to add.
Use a salt test strip to determine salt level in pool water prior to adding any salt. Capture
water from elbows depth in a container, then use a test strip in this water sample. Previous
regular usage of sodium hypochlorite (liquid chlorine) creates residual salt within the pool and
may bring your salt level close to the required 4000 ppm concentration. Only 99.5% pure
refined salt (sodium chloride) should be used with the Clearwater chlorinator. Add enough
salt to obtain a 4000 ppm concentration.
- In a pool of approximately 13,200 gallons, one (1) 50 lb. bag of salt will increase the salt
concentration by 500 ppm.
- In a NEW pool (where there is no salt residual) of approximately 13,200 gallons, eight
(8) 50 lb bags of salt are required to reach a 4000 ppm concentration.
- Refer to ‘Salt Chart’ on page 18.
IMPORTANT:To avoid damage to your Clearwater chlorinator, never allow
salt level to exceed 13,000 ppm
How to add salt.
Evenly disperse the proper amount of salt around the perimeter of the pool. Run filter for 4-6
hours. Allow 24 hours for salt to fully dissolve. If the ADD SALT light is on after 24 hours, test salt
level and add necessary salt to obtain a 4000 ppm concentration. Even if the salt level is maintained
a 4000 ppm, but water temperature drops below 65˚, the ADD SALT may come on.This is not
cause for concern. For further assistance, consult your pool professional or call 1-888-537-6657.
Note: Do not add salt to the skimmer box.
17
SALT CHART
Adding Salt to Your Pool
Pounds and (KG) of salt needed to raise level to 4000 PPM
Current
Gallons and (Liters) of Pool/Spa Water
Salt
Level
12,000 14,000 16,000 18,000 20,000 22,000 24,000 26,000 28,000 30,000
ppm
(45425) (52996) (60567) (68137) (75708) (83279) (90850) (98421) (105992) (113562)
0
401
(182)
467
(212)
534
(242)
601
(273)
668
(303)
734
(333)
801
(363)
868
(394)
935
(424)
1001
(454)
250
376
(170)
438
(199)
501
(227)
563
(256)
626
(284)
688
(312)
75
(341)
814
(369)
876
(397)
939
(426)
500
351
(159)
409
(185)
467
(212)
526
(238)
584
(265)
643
(291)
70
(318)
759
(344)
818
(371)
876
(397)
750
325
(148)
380
(172)
434
(197)
488
(221)
542
(246)
597
(271)
651
(295)
705
(320)
759
(344)
814
(369)
1000
300
(136)
351
(159)
401
(182)
451
(204)
501
(227)
551
(250)
601
(273)
651
(295)
701
(318)
751
(341)
1250
275
(125)
321
(146)
367
(167)
413
(187)
459
(208)
505
(229)
551
(250)
597
(271)
643
(291)
688
(312)
1500
250
(114)
292
(132)
334
(151)
376
(170)
417
(189)
459
(208)
501
(227)
542
(246)
584
(265)
626
(284)
1750
225
(102)
263
(119)
300
(136)
338
(153)
376
(170)
413
(187)
451
(204)
488
(221)
526
(238)
563
(256)
2000
200
(91)
234
(106)
267
(121)
300
(136)
334
(151)
367
(167)
401
(182)
434
(197)
467
(212)
501
(227)
2250
175
(79)
204
(93)
234
(106)
263
(119)
292
(132)
321
(146)
351
(159)
380
(172)
409
(185)
438
(199)
2500
150
(68)
175
(79)
200
(91)
225
(102)
250
(114)
275
(125)
300
(136)
325
(148)
351
(159)
376
(170)
2750
125
(57)
146
(66)
167
(76)
188
(85)
209
(95)
229
(104)
250
(114)
271
(123)
292
(132)
313
(142)
3000
100
(45)
117
(53)
134
(61)
150
(68)
167
(76)
184
(83)
200
(91)
217
(98)
234
(106)
250
(114)
3250
75
(34)
88
(40)
100
(45)
113
(51)
125
(57)
138
(62)
150
(68)
163
(74)
175
(79)
188
(85)
3500
50
(23)
58
(26)
67
(30)
75
(34)
83
(38)
92
(42)
100
(45)
108
(49)
117
(53)
125
(57)
3750
25
(11)
29
(13)
33
(15)
38
(17)
42
(19)
46
(21)
50
(23)
54
(25)
58
(26)
63
(28)
4000
Optimum Optimum Optimum Optimum Optimum Optimum Optimum Optimum Optimum Optimum
18
STABILIZER CHART
Adding Stabilizer to Your Pool
Pounds and (KG) of stabilizer (Cyanuric Acid)
needed to raise level to 80 PPM
Current
Gallons and (Liters) of Pool/Spa Water
Chlorine
Stabilizer
Level
12,000 14,000 16,000 18,000 20,000 22,000 24,000 26,000 28,000 30,000
ppm
(45425) (52996) (60567) (68137) (75708) (83279) (90850) (98421) (105992) (113562)
0
8.0
(3.6)
9.3
(4.2)
10.7
(4.8)
12.0
(5.5)
13.4
(6.1)
14.7
(6.7)
16.0
(7.3)
17.4
(7.9)
18.7
(8.5)
20.0
(9.1)
10
7.0
(3.2)
8.2
(3.7)
9.3
(4.2)
10.5
(4.8)
11.7
(5.3)
12.9
(5.8)
14.0
(6.4)
15.2
(6.9)
16.4
(7.4)
17.5
(7.9)
20
6.0
(2.7)
7.0
(3.2)
8.0
(3.6)
9.0
(4.1)
10.0
(4.5)
11.0
(5.0)
12.0
(5.5)
13.0
(5.9)
14.0
(6.4)
15.0
(6.8)
30
5.0
(2.3)
5.8
(2.6)
6.7
(3.0)
7.5
(3.4)
8.3
(3.8)
9.2
(4.2)
10.0
(4.5)
10.8
(4.9)
11.7
(5.3)
12.5
(5.7)
40
4.0
(1.8)
4.7
(2.1)
5.3
(2.4)
6.0
(2.7)
6.7
(3.0)
7.3
(3.3)
8.0
(3.6)
8.7
(3.9)
9.3
(4.2)
10.0
(4.5)
50
3.0
(1.4)
3.5
(1.6 )
4.0
(1.8)
4.5
(2.0)
5.0
(2.3)
5.5
(2.5)
6.0
(2.7)
6.5
(3.0)
7.0
(3.2)
7.5
(3.4)
60
2.0
(0.91)
2.3
(1.1)
2.7
(1.2)
3.0
(1.4)
3.3
(1.5)
3.7
(1.7)
4.0
(1.8)
4.3
(2.0)
4.7
(2.1)
5.0
(2.3)
70
1.0
(0.45)
1.2
(0.53)
1.3
(0.61)
1.5
(0.68)
1.7
(0.76)
1.8
(0.83)
2.0
(0.91)
2.2
(1.0)
2.3
(1.1)
2.5
(1.1)
80
Optimum Optimum Optimum Optimum Optimum Optimum Optimum Optimum Optimum Optimum
The above chart is for general reference only.The recommended stabilizer reading is
between 40-100 ppm and will vary dependent on geographic climate.Warm, sunny
climates will require a stabilizer reading at the higher end of the given range. Consult
your local pool professional for your optimum level. Always add stabilizer according to
manufacturer’s instructions.
19
SOME TIPS ON WATER CHEMISTRY
Some Tips On
Water Chemistry
How to adjust pH.
A pH range of 7.2 - 7.6 is ideal for maximum comfort and minimum chlorine demand. Always
adjust total alkalinity before adjusting pH.
Low pH (acidic water) leads to stinging eyes and corrosion of open metal fittings. Raise the pH
by adding sodium bicarbonate or soda ash. Consult your pool professional regarding which
chemical is best for your situation and the proper amount to use. Check the pH after 4 hours
of circulation, adjusting as necessary to achieve the proper range.
High pH (alkaline water) leads to clouding of the water and reduces the amount of active
chlorine.This means algae and germs can grow. Lower the pH by adding muriatic acid to the pool
water.The acid demand indicated by your 4-in-1 test kit will show the amount of acid to use.
If your pH remains inconsistent, check your total alkalinity.
Total alkalinity affects pH.
Total alkalinity is a measure of the alkaline chemicals in your pool water (eg. Bicarbonates,
carbonates, and hydroxides). It can be thought of as the buffering system necessary to control
pH. Low alkalinity can be compared to weak shock absorbers on a car, allowing pH to
fluctuate.The pH will be difficult to maintain and staining of pool surfaces may occur when
total alkalinity is too low.
Total alkalinity should be in the range of 80 - 120 ppm.Total alkalinity is often confused with
pH, which it affects.
To raise total alkalinity, add pH buffer (sodium bicarbonate) at the rate shown in the
manufacturers instructions to achieve a reading in the 80 - 120ppm range. 1.5 lbs. of sodium
bicarbonate raises 10,000 gallons of pool water by 10 ppm.
To lower the total alkalinity, use muriatic acid.The acid demand chart in your 4-in-1 test kit will
indicate the necessary amount to add.Adjust as needed until the reading (taken at least 24
hours later) is in the 80-120 ppm range.When total alkalinity is correct, you may need to
adjust pH.
20
SOME TIPS ON WATER CHEMISTRY
Use of algaecides and phosphate removers
Although not normally needed, algaecides and phosphate removers may be used in conjunction
with a Clearwater chlorinator. Consult your pool professional regarding the presence of
phosphates in your local area and always follow manufacturers instructions for treatment.
The chlorine residual level automatically maintained by a Clearwater chlorinator is the best
defense against algae and is usually all that is necessary. If algae is observed however, brush spot
thoroughly, adjust pH, super-chlorinate with your Clearwater chlorinator or manually shock pool
water with either liquid or granular chlorine. A chlorine residual should be measurable within 24
hours. If not, repeat shock treatment (see pages 22-23 for additional water balance instructions).
After shocking, check to ensure that the Clearwater chlorinator is maintaining a residual chlorine
level to prevent future algae growth.With extreme algae conditions, manually shocking the pool is
the best option.
Note: Overuse of algaecides can lead to a reduction in chlorine residual because algaecides
can negatively react with the chlorine produced by the Clearwater chlorinator.When using
algaecides, always follow manufacturer's instructions and adjust the output of the Clearwater
chlorinator to maintain a residual chlorine level.
The addition of certain chemicals can reduce the effectiveness of chlorine. Always
make sure that proper residual chlorine levels are maintained to avoid illness.
Use of sequestoring agents
In some areas the total hardness of your source water may be unusually high. High total
hardness contributes to scale formation in the pool. Sequestoring agents will help keep minerals
in solution, preventing this from happening. Consult your pool professional about the use of a
sequestoring agent.
21
TROUBLESHOOTING
Troubleshooting
NOTE: If the chlorinator and pump are running it is normal for a cloud of small bubbles to
be produced in the cell, indicating chlorine is also being produced.
Problem A
Water looks clean but no chlorine residual reading.
To test for chlorine residual, switch on the filtration system and adjust the Clearwater to
maximum output.After a few hours take a water sample from the pool.Test this water with
your test kit. Chlorine residual should measure between 1 and 3 ppm.
REMEDY:
•
•
•
•
•
•
•
Adjust total alkalinity to 80 - 120 ppm.
Adjust the pH within the range 7.2 - 7.6.
Make sure your cell is clean.
Check cyanuric acid levels.
Increase the setting of the output control.
Increase the running time of the filter and chlorinator. Make sure that the filter is clean and
functioning properly.
Add salt if indicated by ‘Add Salt’ light.
Use chlorine stabilizer (cyanuric acid) to protect chlorine residual.
This chemical acts as a sun-screen for chlorine and prevents chlorine from being too quickly
destroyed by the sun. Chlorine stabilizer is essential to prolong the life of chlorine in the pool
water. It should be added following the manufacturer’s instructions to achieve a level of 40 100 ppm. depending on geographical climate. Refer to stabilizer chart on page 19.
Use of algaecides.
Although not normally needed with a Clearwater chlorinator, algaecides may be used. Always
follow manufacturer's instructions for treatment. Overdosing the pool with any type of
algaecide may reduce residual chlorine measurements/reading. If this occurs, you must
manually shock pool water with granular or liquid chlorine until a measurable free chlorine
residual reading is obtained.
22
TROUBLESHOOTING
Problem B
Pool green and no chlorine reading.
Chlorine is still considered the most effective way of destroying algae and bacteria in your pool
water. A chlorine residual of 1 to 3 ppm is considered desirable.
REMEDY:
Superchlorinate or manually shock the pool. This will raise the chlorine residual to a very high
level for a short period of time, and reduce chlorine demand.
1.
Superchlorinate with a Clearwater chlorinator:
i)
Backwash the filter.
ii)
Adjust the pH to within the range 7.2 - 7.6. See ‘Tips on Water Chemistry’ on pages 20-21.
iii) Press the button marked ‘Super Chlorinate’. The Clearwater automatically increases its
output and runs for approx. 24 hours of pool pump time.
iv) After 24 hours, backwash the filter.
v)
Re-adjust the pH to 7.2 - 7.6.
vi) Check the chlorine reading.
vii) If the chlorine reading is too low, repeat steps (iii) to (vi) until the chlorine reading
is satisfactory.
2.
Manually shock with chlorine or oxidizing agents:
i)
Backwash the filter.
ii)
Adjust the pH to within the range 7.2 - 7.6 (See ‘Tips on Water Chemistry’ pages 20-21).
iii) Add 1 lb. granular chlorine or 1 gallon liquid chlorine or 1 lb. non-chlorine oxidizer per
10,000 gallons of water.
iv) After shock dosing, re-adjust the pH to within the range of 7.2 - 7.6 and check the
chlorine level before using the pool.The chlorine residual should be 1-3ppm..
23
TROUBLESHOOTING
Problem C
Chlorine odor.
CAUSE:
Not enough free chlorine.
Surprisingly, the problem here is not too much chlorine as many imagine. Chloramines form by
the bonding of chlorine with amines from sweat and other sources.These chloramines can
create a chlorine odor and can also cause eye and skin irritation. Free chlorine does not smell
(up to 10 ppm concentration).
REMEDY:
Same as problem B.
Problem D
Slimy walls of pool or spa.
CAUSE:
Combined algae and bacteria growth.
REMEDY:
Brush down the affected walls and follow remedy for Problem B, manually shocking pool.
Problem E
Eye and/or skin irritation.
CAUSE:
Incorrect pH.
REMEDY:
Adjust the pH to within the range 7.2 - 7.6 (See ‘Tips on Water Chemistry’ pages 20-21).
Problem F
Scale formation on pool equipment.
To clean the deposit (scale) from the cell, see Chlorinator Maintenance section.
CAUSE 1: Incorrect pH and hard water.
REMEDY:
Adjust the pH to within the range 7.2 - 7.6 (See ‘Tips on Water Chemistry’ pages 20-21).
CAUSE 2: High total hardness.
REMEDY:
Dilute pool with fresh water. Consult your pool professional regarding use of a sequestering
agent.
24
TROUBLESHOOTING
Problem G
Chlorine Output will not reach maximum - Add Salt light may also be on.
CAUSE 1: Low incoming voltage.
REMEDY:
Confirm Clearwater is wired to 220V. If wired to 220V but incoming voltage is less due to
location (rural areas for example), raising the salt level will compensate.
CAUSE 2: Salt level below 4000ppm or water temperature is below 65˚.
REMEDY:
Add salt. (See Salt:When and How to Add it)
CAUSE 3: Cell reversing (self clean).
REMEDY:
If the cell is reversing the yellow light on the Chlorine Output indicator will flash.Wait
approximately three minutes and the output should return to normal.
CAUSE 4: Cell electrodes may be damaged.
REMEDY:
Replace cell.The cell must be replaced with the same model or the chlorinator will not
function correctly, call the Clearwater USA office for further instructions (See page 30).
Problem H
No Flow light on.
CAUSE 1: Insufficient water flow through the cell.
REMEDY:
Ensure sufficient water flow through chlorinator cell. Verify that the filter pump is on. Flow may
be restricted if the filter needs backwashing. A pocket of air trapped in the top of the cell
confirms low water flow through the cell.
CAUSE 2: Sensor disconnected.
REMEDY:
Make sure that the sensor lead from the power pack to the cell is attached at the cell
(small clip lead).
25
TROUBLESHOOTING
Problem I
Chlorinator stops working, all lights OFF.
CAUSE 1: Unit turned off.
REMEDY:
Push ON/OFF button. A yellow light in the Chlorine Output indicator window is present
when the unit is “ON”.
CAUSE 2: Mains power removed or blown fuse.
REMEDY:
Check mains power source and fuse.
Resetting the Fuse.
Turn off all power to the Clearwater powerpack.The resettable fuse is located above the
powercord on the bottom rear of the LM2 unit. If the fuse is blown (popped with white area
exposed), push to reset. Restore power to unit.
Mains power supply.
Your Clearwater chlorinator must be connected to a properly grounded electrical power
socket, or power source.
Problem J
Chlorine level is too high.
CAUSE 1: Chlorinator is manufacturing too much chlorine.
REMEDY 1:
Use the output button to reduce setting. Retest chlorine daily until proper level is attained.
REMEDY 2:
Manually turn chlorinator off. The LM Series uses a smart switch that turns the chlorinator on
automatically with each pump cycle. If longer periods of zero (0) chlorine output are required,
disconnect the blue sensor clip on cell. (Red NO FLOW light will illuminate once chlorine
production has stopped.) Sensor clip must be reconnected for chlorine production to begin.
Any type of electrical troubleshooting should be handled by a
qualified pool professional or certified electrician.
26
CHLORINATOR MAINTENANCE
Chlorinator Maintenance
How to clean your cell.
In unusual situations, the self cleaning electrodes may benefit from occasional manual cleaning
to remove scale build-up as the result of having very “hard” water or continuous high pH
conditions, which can occur with new plaster finishes.
1. Switch off the filter pump and chlorinator, close necessary valves.
Note:Always turn pump off prior to installing or removing any Clearwater Cell.
Your pump/filter system is operated under pressure and pressure must be released
before you begin. Open the air relief valve on your pool filter to release the
pressure in the system.
2. Unplug the leads from the cell terminals.
3. Undo the two barrel unions joining the cell housing to the pool filtration system and
carefully remove the cell housing. Lay the housing upside down on a flat surface with the
inlet ports on top.
Chlorinator Maintenance
(Continued on next page)
27
CHLORINATOR MAINTENANCE
4. Mix cleaning solution in a suitable plastic vessel by adding one (1) part of Hydrochloric
(muriatic) acid to ten (10) parts water. Note:To avoid splash, always ADD MURIATIC
ACID TO WATER rather than water to muriatic acid. Solutions stronger than
1:10 will damage cell and void warranty. Pour the cleaning mixture into the upturned
cell housing until the electrodes are completely covered. Allow the cleaning solution to dissolve
the calcium deposits for approximately 5 minutes.When the electrodes are clean, pour the
cleaning solution and the calcium residue out of the cell housing into a bucket of water. This
can now be disposed of down a drain. Note: Never mix chemicals together.Always
rinse bucket and drain area after cleaning cell.
To avoid personal injury when working with pool chemicals, always wear rubber
gloves and eye protection and work in a well ventilated area. Use caution when
choosing a location to open and use chemicals as they may damage any surface in
which they come in contact.
5. Repeat the procedure if necessary.Take care to avoid splashing the cell terminals and other
equipment with the acidic cleaning solution.Wash down any spills with plenty of fresh water.
6. Rinse the electrodes in clean water and refit the cell and housing to the filtration system.
Tighten the barrel union connections to prevent leaks.
7. Replace the electrical connectors after drying and smearing lightly with silicone grease.
8. Reset valves and switches.Turn pump and chlorinator on.
9. Confirm chlorine output and settings on the powerpack.Timer settings are
automatically retained.
Your Clearwater Chlorinator has been designed with an electronic flow switch.This
device automatically switches the chlorinator “OFF” when water through the cell
stops.To prevent cell damage and personal injury, do not in any way interfere with
this system that has been designed for your protection.
Damage caused by insects.
The case of the Clearwater power pack has small vents to allow internal components to
remain cool in hot weather. Sometimes small insects may enter the case of the power pack,
and this can cause damage to the internal electrical components.To avoid this, spray some
insect repellent on surfaces around the powerpack.
28
CLEARWATER LM SERIES LIMITED WARRANTY
The limited warranties contained within this document are the only warranties given with your Clearwater
LM Series Chlorinator and supersede any prior warranties. All other warranties, expressed or implied,
including the implied warranty of merchantability or the implied warranty of fitness for a particular purpose
are hereby disclaimed. Our sole obligation under this warranty, and the purchaser’s sole remedy, is limited
to the repair or replacement of the Clearwater Chlorinator, or one of its parts. This Clearwater Limited
Warranty applies to the original owner only.
CHLORINATOR AND CELL ELECTRODE WARRANTY
• The manufacturer warrants this Clearwater Chlorinator to be free of defects in materials and
workmanship for a period of one (1) year from the date of purchase*.
• In addition to the one (1) year warranty, the manufacturer further warrants the power pack for an
additional two (2) year period (parts only) **.
• In addition to the one (1) year warranty, the manufacturer further warrants on a pro-rated basis the cell
electrode (parts only)**. (In the second year the cell electrode will be replaced for a payment of 33% of
current list price; in the third year the cell electrode will be replaced for a payment of 66% of the current
list price).
* If no proof of purchase date is supplied, the warranty period begins on the date of manufacturer as
encoded on the product.
** The cost of field service calls and/or freight cost to return goods for repair are not covered by this
warranty after the one (1) year unconditional period has expired.
EXCLUSIONS FROM WARRANTY
The Clearwater Chlorinator is designed for residential use only and any commercial application voids all warranty.
If the unit is used in any application other than as a chlorinator in a swimming pool, the purchaser and/or enduser releases the manufacturer from any and all claims related to the use of the Clearwater Chlorinator and
agrees to indemnify the manufacturer from any claims related to improper or non-authorized use.
This warranty does not cover problems arising from whole or in part from purchaser’s or user’s negligence,
misuse or abuse, improper maintenance or installation, accident, improper application, failure to follow all
safety instructions or precautions, Acts of God, abnormal weather conditions, damage from plants or
animals, and improper use of chemicals.
This warranty specifically excludes all incidental or consequential damages, except where state law requires
them to be paid. This warranty gives you specific rights. You may have other rights that vary from state to state.
TO SUBMIT A CLAIM
Report claims to Zodiac Pool Care, Inc. by calling 1-888-537-6657. Only the original purchaser may submit
a claim under this limited warranty. All claims must be accompanied by an original purchase receipt.
For more information consult your pool care professional or call 1-888-537-6657.
Due to constant developments and improvements, specifications may change without notice.
29
CLEARWATER USA
ZODIAC POOL CARE, INC.
2028 NW 25th Avenue
Pompano Beach, Florida 33069
1-800-YES-PURE
1-877-550-5262
1-480-545-5262 (Phoenix, AZ)
30
RECORD YOUR CLEARWATER CHLORINATOR PURCHASE DETAILS HERE:
Model No.:
❑ LM2-24
❑ LM2-40
❑ DuoClear
Serial # (located on the Warranty Registration Card) W ________________________________
Date of Purchase:__________________________________________________________________
Purchased From: __________________________________________________________________
City: ______________________________
State ______________
Zip ______________
Keep this part with your manual for your records
IMPORTANT - MAIL THE WARRANTY REGISTRATION TODAY
Clearwater Warranty Registration Card
Serial No. W
Please check the Clearwater Chlorinator you have just purchased: ❑ LM2-24 ❑ LM2-40 ❑ DuoClear
Consumer Name: ____________________________________________________________________________
First
Middle
Last
Mailing Address: ______________________________________________________________________________
City:____________________________________________ State: __________________ Zip: ______________
Tel: (______) ____________________ Purchase Date:_____/_____/_____ Installation Date _____/_____/_____
E-mail: ______________________________________________________________________________________
Purchased From:______________________________________________________________________________
Store or Builder Name
Type of Installation ____ New
Type of Pool: ____ Vinyl
____ Retrofit
____ Fiberglass
City/State/Zip
____ Renovation
____ Plaster
____ Painted
____ Other
Do you have an automatic pool cleaner? ❑ No ❑ Yes Brand/Model __________________________________
Do you have a Nature2 Natural Mineral Purifier for your pool? ❑ No ❑ Yes Model ____________________
YOUR WARRANTY CERTIFICATE FOR YOUR
LM Series
BUSINESS REPLY MAIL
FIRST CLASS MAIL PERMIT NO. 293 FT. LAUDERDALE, FL
POSTAGE WILL BE PAID BY ADDRESSEE
W170801
CLEARWATER WARRANTY
ZODIAC POOL CARE INC
2028 NW 25TH AVE
POMPANO BEACH FL 33069-9906