1
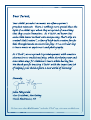
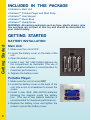
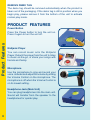
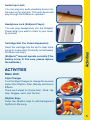
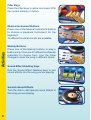
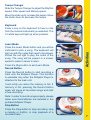
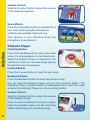
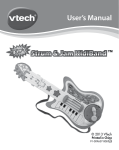
TM
User’s
Manual
To learn more about KidiCreative™ and other VTech® toys, visit www.vtechkids.com
INTRODUCTION
Thank you for purchasing the VTech® KidiJamzTM!
KidiJamzTM is a unique creative music studio designed especially for
younger children. With KidiJamzTM, kids can rock to their own beat!
KidiJamzTM is an interactive music station that lets kids record their own
songs and music and play it back on a detachable music player. Music
mixing is a snap with 20 kid-friendly tunes. To find their own beat, kids
can choose from 10 different instrumental sounds, five musical stylings,
and three rhythm buttons. Adding to the fun, kids can sing to their hearts’
content with the included microphone and digital voice effects. A musical
scratching disc and light-up keyboard round out the fun.
11
12
13 14
15
1
16
2
10
1
2
3
4
5
6
7
8
9
MICROPHONE
SFX RUBBING KEYS
VOICE EFFECT BUTTONS
SCRATCH SOUND EFFECT
LEARN MODE
VOLUME CONTROL
14 FLASHING KEYS
20 MELODIES
3
7
8
9
10
11
12
13
14
15
16
Introduction
17
4
6
5
10 MUSICAL INSTRUMENTS
POWER BUTTON
STYLE CHANGER
SPEAKER
TEMPO CHANGER
FILLER KEYS
RHYTHM KEYS
KIDIJAMZ PLAYER
HEADPHONES
1
INCLUDED IN THIS PACKAGE
• KidiJamzTM Main Unit
• KidiJamzTM Portable Player and Wrist Strap
• KidiJamzTM User Manual
• KidiJamzTM Music Book
• KidiJamzTM Headphones
WARNING: All packing materials such as tape, plastic sheets, wire
ties and tags are not part of this toy and should be discarded for
your child’s safety.
GETTING STARTED
Getting Started
BATTERY INSTALLATION
Main Unit:
1.Make sure the unit is OFF.
2.Locate the battery cover on the back of the
unit.
3.Open the battery cover.
4.Install 4 new “AA” (AM-3/LR6) batteries into
the compartment as illustrated. (The use of
new, alkaline batteries is recommended for
maximum performance.)
5. Replace the battery cover.
Portable Player:
1.Make sure the unit is turned OFF.
2.Locate the battery cover on the back of the
unit. Use a coin or screwdriver to loosen the
screw.
3.Install 3 new ‘AAA’ (AM-4/LR03) batteries
following the diagram inside the battery
box. (The use of new alkaline batteries is
recommended for maximum performance.)
4.Replace the battery cover and tighten the
screw to secure the battery cover.
2
• Install batteries correctly observing the polarity (+, -) signs to avoid
leakage.
• Do not mix old and new batteries.
• Do not mix batteries of different types: alkaline, standard (carbon-zinc)
or rechargeable (nickel-cadmium).
• Remove the batteries from the equipment when the unit will not be
used for an extended period of time.
• Always remove exhausted batteries from the equipment.
• Do not dispose of batteries in fire.
• Do not attempt to recharge ordinary batteries.
• The supply terminals are not to be short-circuited.
• Only batteries of the same and equivalent type as recommended are
to be used.
WE DO NOT RECOMMEND THE USE OF RECHARGEABLE
BATTERIES.
AC ADAPTOR
• Use a VTech® 9V 300mA AC/DC adaptor or a standard AC/DC
adaptor with equivalent specification.
• Make sure the unit is turned OFF.
• Plug the power jack into the 9V DC socket at the back of the unit.
• Plug the AC adaptor into a wall socket.
NOTE: The use of an adaptor will override the batteries. When the toy
is not going to be in use for an extended period of time, unplug the
adaptor.
Getting Started
BATTERY NOTICE
Standard Guidelines for Adaptor Toys
• The toy is not intended for use by children under 3 years old.
• Only use the recommended adaptor with the toy.
• The transformer is not a toy.
• Never clean a plugged-in toy with liquid.
• Never use more than one adaptor.
• Do not leave the toy plugged-in for extended periods of time.
3
REMOVE DEMO TAG
The demo tag should be removed automatically when the product is
taken out of the packaging. If the demo tag is still in position when you
begin play, please remove it from the bottom of the unit to activate
normal play mode.
Product Features
Product Features
Power Button
Press the Power button to turn the unit on.
Press it again to turn the unit off.
Kidijamz Player
You can record music onto the Kidijamz
Player. Detach the player from the unit to listen
to music on-the-go, or share your songs with
friends and family.
Microphone
Use the microphone to sing and record your
voice. Activate and adjust the volume by sliding
the Volume Control on the microphone. The
microphone is off when the Volume Control is
on its lowest setting.
Headphone Jack (Main Unit)
You can plug headphones into the main unit.
Sound will transfer from the speaker to the
headphones for quieter play.
4
Audio Input Jack
You can plug any audio playback device into
the main unit’s input jack. The audio device will
play through the KidiJamzTM speaker!
Cartridge Slot (For Future Expansion)
Insert the cartridge into the slot to hear more
songs in a new style! (Currently not activated;
for future use only.)
(KidijamzTM may not operate correctly if the
battery is low. In this case, please replace
the batteries.)
Activities
Activities
Headphone Jack (Kidijamz Player)
You can plug headphones into the Kidijamz
Player when you want to listen to your music
by yourself.
Main Unit:
Style Changer
Turn the Style Changer to change the musical
style of the Rhythm, Filler, Melody and Sound
Effects.
There are 5 styles to choose from: Rock, Hip
Hop, Reggae, Jazz, and Techno.
Rhythm Keys
Press the Rhythm keys to add background
rhythms to the song.
5
Filler Keys
Press the Filler keys to add a cool music riff to
the current melody or rhythm.
Musical Instrument Buttons
Press one of the Musical Instrument buttons
to choose a playback instrument for the
keyboard.
Activities
10 different musical sounds are available.
Melody Buttons
Press one of the Melody buttons to play a
built-in song. There are 20 different kid-friendly
melodies to choose from. Use the Style
Changer to hear the song in different styles!
Sound Effect Rubbing Keys
Rub the Sound Effect Rubbing keys to jam
sound effects into the song you are playing.
Scratch Sound Effects
Turn the disk to add special sound effects to
the song you are playing.
6
Tempo Changer
Slide the Tempo Changer to adjust the Rhythm
speed, Filler speed and Melody speed.
Move the slider up to increase the tempo. Move
the slider down to decrease the tempo.
Learn Mode
Press the Learn Mode button and you will be
instructed to pick a song. The keyboard will
light up with the notes that need to be played.
Follow the red light to play the notes of the
song. The song will be played in a slower
speed to make it easier to learn.
Press the Stop button to exit Learn Mode.
Record Button
Press the Record button to start recording a
track onto the Kidijamz Player. This function
is available only when the Kidijamz Player is
attached to the main unit.
Activities
Keyboard
Press a key on the keyboard to hear a note
from the musical instrument you selected. The
14 white keys will light up when pressed.
It will notify you when the memory is full. If
memory is full, pressing the Record button
again will erase all recorded songs and start
a new recording.
Note: In order to record songs properly, please
make sure that batteries are installed in the
portable Kidijamz Player.
Stop Button
Press the Stop button to stop recording, stop
a melody or rhythm, or stop playback of a
recorded track.
7
Volume Control
Slide the Volume Control to adjust the volume
of the keyboard speaker.
Voice Effects
Press the Voice Effect buttons to add effects to
your voice when using the microphone.
2 effects are available: High and Low
This feature is only effective when the
microphone is switched on.
Activities
Kidijamz Player:
Play/Stop Button
Press the Play/Stop button to play a recorded
song or to stop playback of a recorded song.
When the Kidijamz Player is attached to the
switched-on main unit, recorded songs will play
through the main unit speaker.
Forward Button
Press the Forward button to hear the next song.
Backward Button
Press the Backward button to hear the previous song.
You can take the KidiJamz Player out from the recording station. The
Play/Stop button, Forward button and Backward button work the same
as when the KidiJamz Player is in the recording station.
Volume Control
Slide the Volume Control to adjust the volume
of the Kidijamz Player.
Note: You are not advised to remove or place
back the portable player into the recording
station while playing or recording songs.
8
1.Keep the unit clean by wiping it with a slightly damp cloth.
2.Keep the unit out of direct sunlight and away from any direct heat
source.
3.Remove the batteries when the unit is not in use for an extended period
of time.
4.Do not drop the unit on hard surfaces and do not expose the unit to
moisture or water.
TROUBLESHOOTING
If for some reason the program/activity stops working or malfunctions,
please follow these steps:
1.Please turn the unit OFF.
2.Interrupt the power supply by removing the batteries.
3.Let the unit stand for a few minutes, then replace the batteries.
4.Turn the unit ON. The unit should now be ready to play again.
5.If the product still does not work, replace with a new set of batteries.
If the problem persists, please call our Consumer Services Department at
1-800-521-2010 in the U.S. or 1-877-352-8697 in Canada, and a service
representative will be happy to help you.
IMPORTANT NOTE:
Creating and developing KidiCreativeTM products is accompanied by
a responsibility that we at VTech® take very seriously. We make every
effort to ensure the accuracy of the information which forms the value
of our products. However, errors sometimes can occur. It is important
for you to know that we stand behind our products and encourage
you to call our Consumer Services Department at 1-800-521-2010
in the U.S. or 1-877-352-8697 in Canada, with any problems and/or
suggestions that you might have. A service representative will be
happy to help you.
Care & Maintenance / Troubleshooting
CARE & MAINTENANCE
9
Note:
This equipment has been tested and found to comply with the limits for
a Class B digital device, pursuant to Part 15 of the FCC Rules. These
limits are designed to provide reasonable protection against harmful
interference in a residential installation. This equipment generates, uses
and can radiate radio frequency energy and, if not installed and used in
accordance with the instructions, may cause harmful interference to radio
communications. However, there is no guarantee that interference will
not occur in a particular installation. If this equipment does cause harmful
interference to radio or television reception, which can be determined by
turning the equipment off and on, the user is encouraged to try to correct
the interference by one or more of the following measures:
Caution: Changes or modifications not expressly approved by the party
responsible for compliance could void the user’s authority to operate the
equipment.
© 2008 VTECH
Printed in China
91-002322-000
Note
• Reorient or relocate the receiving antenna
• Increase the separation between the equipment and receiver
• Connect the equipment into an outlet on a circuit different from that to
which the receiver is connected
• Consult the dealer or an experienced radio/TV technician for help
10