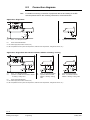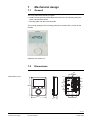
1
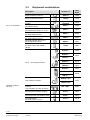
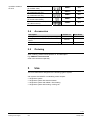
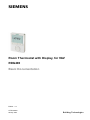
s
Room Thermostat with Display, for VAV
RDG400
Basic Documentation
Edition: 1.0
CE1P3182en
28 May 2009
Building Technologies
Table of contents
1
About this document ......................................................................................... 3
1.1
Revision history.................................................................................................... 3
1.2
Reference documents .......................................................................................... 3
1.3
1.3.1
1.3.2
1.3.3
Before you start.................................................................................................... 3
Copyright.............................................................................................................. 3
Quality assurance ................................................................................................ 3
Document use / request to the reader .................................................................. 4
2
Summary............................................................................................................. 5
2.1
Brief description ................................................................................................... 5
2.2
Types and features............................................................................................... 5
2.3
Equipment combinations ...................................................................................... 6
2.4
Accessories.......................................................................................................... 7
2.5
Ordering ............................................................................................................... 7
3
Use ...................................................................................................................... 7
4
Functions ............................................................................................................ 8
4.1
Temperature control ............................................................................................. 8
4.2
Operating modes.................................................................................................. 9
4.3
Setpoints ............................................................................................................ 10
4.4
Setpoints and sequence......................................................................................11
4.5
Applications overview......................................................................................... 13
4.6
Additional features ............................................................................................. 14
4.7
4.7.1
4.7.2
4.7.3
4.7.4
4.7.5
4.7.6
4.7.7
Control sequences ............................................................................................. 17
Applications and sequences............................................................................... 17
Sequences overview (setting via parameter P01) .............................................. 17
Control outputs overview (setting via DIP 4 / 5 and parameters P46 / P47) ..... 18
Single duct ......................................................................................................... 19
Single duct with electrical heater........................................................................ 20
Single duct with radiator or floor heating ............................................................ 21
Single duct with heating / cooling coil................................................................. 22
4.8
4.8.1
4.8.2
Control outputs................................................................................................... 23
Control output for air flow ................................................................................... 23
Control output for electrical heater, radiator and heating / cooling coil ............... 24
4.9
Multifunctional input, Digital input ....................................................................... 26
4.10
Handling of faults ............................................................................................... 27
4.11
DIP switches ...................................................................................................... 27
4.12
4.12.1
4.12.2
Control parameters............................................................................................. 28
Parameters Service level ................................................................................... 29
Parameters Expert level, diagnostics & test ....................................................... 30
5
Handling............................................................................................................ 32
5.1
Mounting and installation.................................................................................... 32
5.2
Operation ........................................................................................................... 33
5.3
Disposal ............................................................................................................. 34
6
Engineering ...................................................................................................... 35
6.1
Connection terminals ......................................................................................... 35
6.2
Connection diagrams ......................................................................................... 36
7
Mechanical design ........................................................................................... 37
7.1
General .............................................................................................................. 37
7.2
Dimensions ........................................................................................................ 37
8
Technical data................................................................................................... 38
Index
........................................................................................................................... 40
2 / 42
Siemens
Building Technologies
RDG100, RDG100T, RDG110, RDG140, RDG160 Basic Documentation
Table of contents
CE1P3182en
28 May 2009
1
About this document
1.1
Revision history
Edition
Date
Changes
1.0
May 2009
First edition
1.2
Section
Pages
Reference documents
Ref.
Document title
Type of document
Document No.
[1]
[2]
Wall-mounted room thermostat with LCD
RDG400
Data sheet
Operating Instructions
CE1N3182en
CE1B3182en
[3]
RDG400
Mounting Instructions
CE1M3182en
1.3
Before you start
1.3.1
Copyright
This document may be duplicated and distributed only with the express permission
of Siemens, and may be passed only to authorized persons or companies with the
required technical knowledge.
1.3.2
Quality assurance
These documents were prepared with great care.
• The contents of all documents are checked at regular intervals.
• Any corrections necessary are included in subsequent versions.
• Documents are automatically amended as a consequence of modifications and
corrections to the products described.
Please make sure that you are aware of the latest document revision date.
If you find lack of clarity while using this document, or if you have any criticisms or
suggestions, please contact the product manager in your nearest branch office.
The addresses of the Siemens regional companies are available at
www.buildingtechnologies.siemens.com.
3 / 42
Siemens
Building Technologies
RDG100, RDG100T, RDG110, RDG140, RDG160 Basic Documentation
About this document
CE1P3182en
28 May 2009
1.3.3
Document use / request to the reader
Before using our products, it is important that you read the documents supplied
with or ordered at the same time as the products (equipment, applications, tools
etc.) carefully and in full.
We assume that persons using our products and documents are authorized and
trained appropriately and have the technical knowledge required to use our
products as intended.
More information on the products and applications is available:
• On the intranet (Siemens employees only) at
https://workspace.sbt.siemens.com/content/00001123/default.aspx
• From the Siemens branch office near you
www.buildingtechnologies.siemens.com or from your system supplier
• From the support team at headquarters [email protected] if
there is no local point of contact
Siemens assumes no liability to the extent allowed under the law for any losses
resulting from a failure to comply with the aforementioned points or for the improper
compliance of the same.
4 / 42
Siemens
Building Technologies
RDG100…/RDG110…/RDG140.../RDG160… Basic Documentation
About this document
CE1P3182en
28 May 2009
2
Summary
2.1
Brief description
Applications
•
•
•
•
Features
• Two multifunctional inputs and one digital input for keycard contact, external
sensor, etc.
• Operating modes: Comfort, Energy Saving and Protection
• Automatic or manual heating/cooling changeover
• Adjustable commissioning and control parameters
• Minimum and maximum setpoint limitation
• Backlit LCD
•
•
•
•
•
•
Single-duct system
Single-duct system with electrical heater
Single-duct system and radiator / floor heating
Single-duct system with heating / cooling coil
AC 24 V operating voltage
Modulating PI / P control
Output DC 0 … 10 V
Output signal inversion as an option
Output on/off, PWM or 3-position control
Adjustable minimum and maximum limitation of air flow output signal
• Maintain room temperature via built-in temperature sensor or external room
temperature / return air temperature sensor
• Automatic or manual changeover between heating and cooling mode
• Select applications via DIP switches
• Select operating mode via the operating mode button on the thermostat
• Display current room temperature or setpoint in °C and/or °F
• Minimum and maximum setpoint limitation
• Button lock (automatic and manual)
• One digital input, freely selectable for:
– Operating mode switchover contact (key card)
– Automatic heating/cooling changeover contact
– Electrical heater enable
– Fault input
• Two multifunctional inputs, freely selectable for:
– Operating mode switchover contact (key card)
– Automatic heating/cooling changeover sensor
– External room temperature or return air temperature
– Dewpoint sensor
– Electrical heater enable
– Fault input
• Floor heating temperature limit
• Reload factory settings for commissioning and control parameters
2.2
Types and features
Product no.
Operating voltage
Number of control outputs
ON/OFF
RDG400
AC 24 V
1
1)
PWM
1
1)
3-pos
1
LCD backlight
DC 0 … 10 V
1)
1
1) Either ON/OFF, 3-position or PWM (triac outputs)
5 / 42
Siemens
Building Technologies
RDG100, RDG100T, RDG110, RDG140, RDG160 Basic Documentation
Summary
CE1P3182en
28 May 2009
2.3
Equipment combinations
Product no.
Data
Sheet
Cable temperature sensor
QAH11.1
1840
Room temperature sensor
QAA32
1747
QXA2000 /
AQX2000
1542
SSA61...
4893
SSC61…
4895
SSP61…
4864
SSB61...
4891
SSD61...
4861
STS61
4880
GQD161…
4605
Description
DC 0..10 V actuator
Condensation detector / extension
module
Electrical actuator, DC 0..10 V
(for radiator valve)
Electrical actuator, DC 0..10 V
(for 2 and 3 port valves / V…P45)
Electrical actuator, DC 0..10 V
(for small valve 2,5 mm)
Electrical actuator, DC 0..10 V
(for small valves 5.5 mm)
Electrical actuator, DC 0..10 V
(for Combi-valve VPI45)
Thermal actuator, DC 0..10 V
(for small valves and radiator
valves)
GDB161…
4634
GLB161…
DC 0…10 V damper actuator
GMA161…
4614
GEB161…
4621
GCA161…
4613
GBB161…
4626
GIB161…
GDB181.1E/3
3544
VAV compact controller
GLB181.1E/3
ON/OFF actuators
AC 24 V
Electromotoric ON/OFF valve and
actuator
MVI…/MXI…
4867
Electromotoric ON/OFF actuator
SFA71...
4863
Thermal actuator (for radiator valve)
STA71...
4877
Thermal actuator
(for small valves 2.5 mm)
STP71...
4878
(only available in AP, UAE, SA and IN)
6 / 42
Siemens
Building Technologies
RDG100…/RDG110…/RDG140.../RDG160… Basic Documentation
Summary
CE1P3182en
28 May 2009
3-position actuators
AC 24 V
Electrical actuator, 3-position
(for radiator valve)
Electrical actuator, 3-position
(for small valve 2,5 mm)
Electrical actuator, 3-position
(for small valve 5,5 mm)
Electrical actuator, 3-position
(for Combi-valve VPI45)
Electromotoric actuator, 3-position
(for valves 5.5 mm)
2.4
4893
SSP81…
4864
SSB81...
4891
SSD81...
4861
SQS85…
4573
Accessories
Description
Changeover mounting kit (50 pcs / package)
Adapter plate 120 x 120 mm for 4“ x 4“ conduit
boxes
Adapter plate 112 x 130 mm for surface wiring
2.5
SSA81...
Product no.
ARG86.3
Data Sheet
1840
ARG70
ARG70.2
Ordering
When ordering, please indicate product no. and description:
E.g. RDG400 room thermostat
Order valve actuators separately.
3
Use
The room thermostat is designed for the following types of system:
VAV systems via ON/OFF or modulating control outputs:
•
•
•
•
Single-duct system
Single-duct system with electrical heater
Single-duct system and radiator / floor heating
Single-duct system with heating / cooling coil
7 / 42
Siemens
Building Technologies
RDG100, RDG100T, RDG110, RDG140, RDG160 Basic Documentation
Use
CE1P3182en
28 May 2009
General note
4
Functions
4.1
Temperature control
Setting of the control parameters (P01 etc., mentioned throughout the document) is
described in section 4.12.
The thermostat acquires the room temperature via built-in sensor, external room
temperature sensor (QAA32), or external return air temperature sensor (QAH11.1),
and maintains the setpoint by issuing actuator control commands to heating and/or
cooling equipment. The following control outputs are available:
•
•
•
•
Modulating PI / P control with DC 0 … 10 V control output
Modulating PI / P control with 3-position control output
Modulating PI / P control with PWM output
On/off control (2-position)
The switching differential or proportional band is 2 K for heating and 1 K for cooling
(adjustable via parameters P30 and P31).
The integral action time for continuous PI control is 5 minutes (adjustable via
parameter P35).
Display
/
Concurrent display of
°C and °F
The display shows the acquired room temperature or the Comfort setpoint, selectable via parameter P06. The factory setting displays the current room temperature.
Use parameter P04 to display the room temperature or setpoint in °F rather than
°C as needed.
If the thermostat is used in a system with manual heating/cooling changeover
(P01=2), the heating and cooling
symbols on the display show the terminal
unit status. Thus, the symbols are displayed even when the thermostat operates in
symbols are
the neutral zone. For all other cases, the heating and cooling
displayed when the heating or cooling output is energized.
Concurrent display of the current temperature or setpoint in °C and in °F
(parameter P07) is possible.
8 / 42
Siemens
Building Technologies
RDG100…/RDG110…/RDG140.../RDG160… Basic Documentation
Functions
CE1P3182en
28 May 2009
4.2
Operating modes
Select the thermostat's operating mode via operating mode button on the
thermostat or operating mode input (e.g. keycard occupancy sensor, when X1, X2,
or D1 set to 3 (P38, P40, P42). A corresponding setpoint is used to maintain the
room temperature at the desired level depending on the active operating mode.
The following operating modes are available:
Comfort mode
In Comfort mode, the thermostat maintains the setpoint which can be adjusted via
the rotary knob. The fan can be set to automatic or manual fan speed: Low,
medium or high.
Energy Saving
Energy Saving mode helps save energy. Select it by pressing the operating mode
button if parameter P02 is set accordingly, or if the external operating mode
switchover contact is active (e.g. window contact).
Note
If the external operating mode switchover contact is active, user operations are
ineffective and “OFF” is displayed. Control will then be according to Energy Saving
setpoints (P11 and P12).
Protection mode
In Protection mode, the system is
– protected against frost (factory setting 8°C, can be disabled or changed via P65)
– protected against overheating (factory setting OFF, can be enabled or changed
via P66)
Operating mode button
The behavior of the operating mode button can be selected via parameter P02:
#
1
2
Sequence
Remark
Factory setting
9 / 42
Siemens
Building Technologies
RDG100, RDG100T, RDG110, RDG140, RDG160 Basic Documentation
Functions
CE1P3182en
28 May 2009
4.3
Setpoints
Comfort mode
The setpoint in Comfort mode can be adjusted via the rotary knob.
Setpoint limitation
For Energy Saving purposes, the setpoint adjusting range can be limited to
minimum (P09) and maximum (P10).
P09 < P10
• If the minimum limit P09 is set lower than the maximum limit P10, both heating
and cooling are adjustable between these two limits.
P09 ≥ P10
• For heating or cooling applications (e.g. single duct; single duct & H/C coil)
– The setting range in cooling mode is from P09…40° instead of 5…40°
– The setting range in heating mode is from 5…P10° instead of 5…40°
• For cooling and heating with electrical heater or radiator applications
– P09 is the setpoint for cooling and P10 the setpoint for heating;
– the setpoint can no longer be adjusted via rotary knob
Examples
Single duct heating or cooling
Single duct cooling
with el. heater / radiator
P09 < P10
5°C
18°C
P09
25°C
P10
40°C
Cooling setpoint adjustable 18…25°C
Heating setpoint adjustable 18…25°C
P09 ≥ P10
5°C
21°C
P10
25°C
P09
40°C
5°C
18°C
P09
25°C
P10
40°C
Cooling setpoint adjustable 18…25°C
Heating setpoint adjustable 18…25°C
Cooling fixed = 25°C (P09)
Heating fixed = 21°C (P10)
Cooling setpoint adjustable 25…40°C
Heating setpoint adjustable 5…21°C
Temporary setpoint
If the “Temporary setpoint function” is enabled via parameter P69, the setpoint
adjusted via rotary knob is set back to the Comfort basic setpoint when the
operating mode changes.
The factory setting for the Comfort basic setpoint is 21 °C and can be changed via
parameter P08.
Energy Saving mode
Use control parameters P11 and P12 to adjust the Energy Saving mode setpoints.
The heating setpoint is factory-set to 15 °C and to 30 °C for cooling.
Protection mode
Use control parameters P65 and P66 to adjust the Protection mode setpoints.
The heating setpoint is factory-set to 8 °C (frost protection) and to OFF for cooling.
Caution
If a setpoint is set to OFF (P65, P66), the thermostat does not maintain the setpoint
in the corresponding mode (heating or cooling).
This means no protective heating or cooling function and thus risk of frost in the
heating mode or risk of overheat in cooling mode!
10 / 42
Siemens
Building Technologies
RDG100…/RDG110…/RDG140.../RDG160… Basic Documentation
Functions
CE1P3182en
28 May 2009
4.4
Setpoints and sequence
In single-duct changeover applications the Comfort setpoints for heating and
cooling sequence are the same (w).
In applications with electrical heater, radiator or heating / cooling coil the Comfort
setpoint is at the heating sequence.
The start of the cooling sequence is linked to “Dead-zone” above the Comfort
setpoint. The dead zone can be set via parameter P33.
The setpoints for Energy Saving and Protection mode are below the Comfort
setpoints (heating) and above the Comfort setpoints (cooling).
They can be set via parameters P11, P12 (Energy Saving) and P65, P66
(Protection).
The control signal for air flow can be limited via parameters P63 and P64.
See section 4.8.1.
To simplify the diagram below, only minimum limitation is shown.
w
wHeatEco
T[°C]
wCoolProt
3181D127
wHeatProt
wCoolEco
Comfort mode
Heating mode
Application
Energy Saving / Protection mode
Cooling mode
Y
Heating mode
Y
Y
Cooling mode
Y
Single duct
W
Single duct
with min/max
limitation
W
T
Y
Y
W
Y
W
T
Comfort mode
WHeatProt WHeatEco T
T
Energy Saving
Y
WHeatProt WHeatEco T
T
WCoolEco WCoolProt T
WCoolEco
WCoolProt T
Protection mode
Application
Single duct
with
electrical
heater
Single duct
with radiator
Y
YE
Y
W
Y
Y
W
T
Y
WHeatEco WCoolEco T
T
YR
YE
YR
WHeatEco WCoolEco T
YE
WHeatProt
Y
WCoolProtT
YR
WHeatProt
WCoolProtT
11 / 42
Siemens
Building Technologies
RDG100, RDG100T, RDG110, RDG140, RDG160 Basic Documentation
Functions
CE1P3182en
28 May 2009
Comfort mode
Heating mode
Application
Single duct
with heating /
cooling coil
Y
Cooling mode
YHC
W
Energy Saving mode
YHC
Y
T
Heating mode
W
Y
YHC
Cooling mode
WHeatEco WCoolEco T
T
YHC
Y
WHeatEco WCoolEco T
Protection mode
Heating mode
Y
YHC
WHeatProt WCoolProt T
Cooling mode
Y
YHC
WHeatProt WCoolProt T
W=Setpoint in Comfort mode
WHeatEco/Prot = Setpoint heating in Energy Saving or Protection mode
WCoolEco/Prot = Setpoint cooling in Energy Saving or Protection mode
YR = Radiator sequence
YE = El. heater sequence
YHC = Heat/cool coil sequence
12 / 42
Siemens
Building Technologies
RDG100…/RDG110…/RDG140.../RDG160… Basic Documentation
Functions
CE1P3182en
28 May 2009
4.5
Applications overview
The thermostat supports the following applications, which can be configured via
DIP switches at the rear of the unit. The control output for the damper actuator is
either DC 0…10 V (factory setting) or 3-position (see parameter P47), and for the
heating / cooling output ON/OFF, PWM, 3-position or DC 0…10 V.
Application
DIP switch
Control output
Single-duct
• DC 0…10 V damper actuator
• 3-position damper actuator
DC 0…10 V
M
V
ON
YV
OFF
1
2
3
4
5
3-position
T
B1
Single-duct with electrical heater
• DC 0…10 V damper actuator and
ON/OFF, PWM or 3-position electrical
heater
• 3-position damper actuator and
DC 0…10 V electrical heater
DC 0…10 V
YE
M
V
ON
YV
OFF
1
2
3
4
5
ON/OFF, PWM or
3-position
T
B1
Single-duct and radiator / floor
heating
• DC 0…10 V damper actuator and
ON/OFF, PWM or 3-position radiator
• 3-position damper actuator and
DC 0…10 V radiator
DC 0…10 V
ON
YV
OFF
YR
1
2
3
4
5
ON/OFF, PWM or
3-position
T
B1
Single-duct heating / cooling coil
DC 0…10 V
V
M
YV
T
• DC 0…10 V damper actuator and
ON/OFF, PWM or 3-position heating /
cooling
• 3-position damper actuator and
DC 0…10 V heating /cooling
B2
ON
OFF
Y1
1
2
3
4
5
ON/OFF, PWM or
3-position
T
B1
Key
Y1
Heating or heating/cooling valve actuator
YV damper actuator
YE Electrical heater
B1 Return air temperature sensor or external
room temperature sensor (optional)
B2 Changeover sensor (optional)
13 / 42
Siemens
Building Technologies
RDG100, RDG100T, RDG110, RDG140, RDG160 Basic Documentation
Functions
CE1P3182en
28 May 2009
4.6
Output signal inversion
Min / Max air flow
Additional features
The output signals DC 0…10V can be inverted by means of DIP switch 4
(see section 4.7.3).
To ensure a minimum or maximum supply air volume, the output signal for the air
flow (DC 0...10V or 3-position) can be limited to a minimum value via parameter
P63 and to a maximum value via parameter P64.
Both values can be set between 0% and 100%.
Changeover
Y10
XpH
H
100%
XpC
C
max
Vmax
min
Vmin
T
Y10
w
XpH
XpC
Vmin
Vmax
Room temperature
Control output
Room temperature setpoint
Proportional band Heating
Proportional band Cooling
Minimum limitation air flow
Maximum limitation air flow
0%
W
TR [°C]
If Vmin is not set >0, then a minimum air flow of Vmin is assured in Comfort and
Energy Saving modes. In Protected mode, Vmin is 0.
Comfort or Energy Saving mode with Vmin
Protection mode (Vmin = 0)
Y
max
Vmax
C
H
Vmax
YV
min
Vmin
0%
SpH Comf/Eco
Automatic H/C
changeover
100%
max
C
YV
Vmin
min
100%
Y
H
0%
SpC Comf/Eco TR [°C]
SpH Prot
SpC Prot TR [°C]
The water temperature acquired by the changeover sensor (QAH11.1 + ARG86.3)
is used to change over from heating to cooling mode and vice-versa. When the
water temperature is above 28 °C (parameter P37), the thermostat changes over to
heating mode, and to cooling mode when below 16 °C (parameter P36).
If the water temperature is between the 2 changeover points immediately after
power-up, the thermostat starts in heating mode.
The water temperature is acquired at 30-second intervals and the operating state is
updated accordingly.
M
16
M
28
Operating mode
Tw Water temperature
Remote heating/
cooling changeover
Tw[°C]
Cooling mode
Heating mode
The QAH11.1 cable temperature sensor for automatic heating/cooling changeover
can be replaced by an external switch for manual, remote changeover:
14 / 42
Siemens
Building Technologies
RDG100…/RDG110…/RDG140.../RDG160… Basic Documentation
Functions
CE1P3182en
28 May 2009
X2
M
T
QAH11.1
X2
M
3076Z03
Contact open
heating mode
Contact closed
cooling mode
T °C
The sensor or switch can be connected to the input terminal X2 (factory setting) or
X1 or D1 (switch only), depending on the commissioning of the inputs (P38, P40,
P42).
See also section 4.9 “Multifunctional input”.
External / return air
temperature sensor
The thermostat acquires the room temperature via built-in sensor, external room
temperature sensor (QAA32), or external return air temperature sensor (QAH11.1)
connected to multifunctional input X1 or X2.
Inputs X1 or X2 need to be commissioned accordingly. See section 4.9 “Multifunctional input”.
Floor heating
Application "Single duct and radiator" can also be used for floor heating.
Floor heating
limitation function
The temperature should be limited for two reasons: comfort and protection of the
floor. It is only available with application "Single duct and radiator".
The floor temperature sensor, connected to multifunctional input X1 or X2,
measures the floor temperature. If the temperature exceeds the parameterized limit
(parameter P51), the heating valve is fully closed until the floor temperature drops
to 2K below the parameterized limit.
This function is factory-set to OFF (disabled).
Input X1 or X2 must be commissioned accordingly (P38 or P40 = 1).
See section 4.9 “Multifunctional input”.
Recommended values
for P51:
Living rooms:
up to 26 °C for long term presence, up to 28 °C for short time presence
Bath rooms:
up to 28 °C for long term presence, up to 30 °C for short time presence
The table below shows the relation between parameter, temperature source and
temperature display:
Parameter P51
External temp.
sensor available
Source for display of room
temperature
Output control according
to
Floor temp. limit
function
OFF
No
Built-in sensor
Built-in sensor
Not active
OFF
Yes
External temp. sensor
External temp. sensor
Not active
10...50˚C
No
Built-in sensor
Built-in sensor
Not active
10…50˚C
Yes
Built-in sensor
Built-in sensor + limit by
external sensor
Active
Dewpoint monitoring
Dewpoint monitoring is essential to prevent condensation on the cooling coil.
It helps avoid associated damage to the building.
A dewpoint sensor with a potential-free contact is connected to multifunctional input
X1, X2 or D1. If there is condensation, the cooling valve is fully closed until no
more condensation is detected, and the cooling output is disabled temporarily.
The condensation symbol is displayed during temporary override.
The input must be commissioned accordingly (P38, P40, P42).
See section 4.9 “Multifunctional input”.
15 / 42
Siemens
Building Technologies
RDG100, RDG100T, RDG110, RDG140, RDG160 Basic Documentation
Functions
CE1P3182en
28 May 2009
Button lock
If the button lock function is enabled by parameter P14, then the buttons will be
locked or unlocked by pressing the right button for 3 sec.
If “Auto lock” is configured, then the thermostat will automatically lock the buttons
10 sec after the last adjustment.
Operating mode
switchover contact
(Window contact)
The thermostat can be forced into Energy Saving mode, e.g. when a window is
opened. The window contact can be connected to digital input D1 (or
multifunctional input X1, X2). Set parameter P42 (P38, P40) to 3.
Extended Comfort
mode (operating mode
switchover contact
closed)
The left button switches the operating mode from Energy Saving to Comfort for the
period preset in P68, if the following conditions are fulfilled:
• The operating mode switchover contact is closed (connected to input X1, X2,
D1, parameter P38, P40, P42 set to 3)
• Parameter P68 (extend Comfort period) is greater than 0
During the temporary Comfort mode extension, timer symbol
appears.
If parameter P68 (extend Comfort period) = 0, extended Comfort cannot be
activated; pressing the left button will show “OFF” (blinking 3 times)
Temporary timer for
extension of presence /
absence
The current operating mode can be forced temporarily into Comfort or Energy
Saving / Protection mode. The time period is adjusted via the rotary knob:
• Extend presence: Set the device to Comfort mode for the selected time period
• Extend absence: Set the device to Energy Saving / Protection mode for the
selected time period
To activate the function, keep the left button pressed and, within 3 seconds, turn
the rotary knob
• clockwise for extended presence
• counterclockwise for extended absence
The rotary knob adjusts the time period:
• Extend presence: 0.00…+9:30 in steps of 30 minutes; symbol
appears
• Extend absence: 0.00…–9:30 in steps of 30 minutes; symbol or
appears
During the extended presence / absence period, timer symbol
appears.
Function
User operating mode
selection
Operating
mode when
activating
function
Comf
Comf
Prot
Comf
Comf
Eco
Eco
Prot
Function
Operating mode
during function
Operating mode at
the end of function
Extension
Absence
Not available
Extension
Absence
Extension
Absence
Not available
Comf
Prot
Comf
Eco
Comf
Eco
-
Prot
Comf
Eco
Comf
Eco
Comf
-
16 / 42
Siemens
Building Technologies
RDG100…/RDG110…/RDG140.../RDG160… Basic Documentation
Functions
CE1P3182en
28 May 2009
4.7
Control sequences
4.7.1
Applications and sequences
Application VAV
Single duct
Single duct & electrical heater
Single duct & radiator
Single duct with heat/cool coil
4.7.2
Sequences
h ( \ ), c ( / )
el.h + c ( \ / )
rad + c ( r\ / ),
h+c( \ / )
Sequences overview (setting via parameter P01)
The sequence can be set via parameter P01, if available.
The thermostats can be used in systems featuring:
•
•
•
•
•
Heating only mode (P01=0)
Cooling only mode (P01=1)
Manual heating/cooling changeover (P01=2)
Automatic heating/cooling changeover (P01=3)
Heating and cooling mode (e.g. 4-pipe system) (P01=4)
The available modes depend on the application
(selected via DIP switch, see section 4.5).
Parameter
P01 = 0
P01 = 1
P01 = 2
P01 = 3
T
Sequence
T °C
T °C
Heating mode
Mode
Cooling mode
T °C
Manually select
heating or
cooling mode
Available for:
1)
Single duct
Single duct &
electrical heater
Single duct &
radiator
Single duct with
heat/cool coil
Notes
T °C
Automatic
heating/cooling
changeover via
external water
temperature
sensor or
remote switch
1)
3)
3)
3)
3)
3)
3)
3)
3)
2)
2)
1) Changeover air
2) Changeover water; heat/cool coil
3) The controller operates in heating AND cooling mode. P01 is not available
17 / 42
Siemens
Building Technologies
RDG100, RDG100T, RDG110, RDG140, RDG160 Basic Documentation
Functions
CE1P3182en
28 May 2009
Application
Modulating
3-position
ON/OFF
(2-position)
Control outputs
Modulating
DC 0 … 10 V
Control outputs overview
(setting via DIP 4 / 5 and parameters P46 / P47)
Modulating
PWM
(2-position)
4.7.3
Single duct
Single duct and electrical heater
Single duct and radiator / floor heating
Single-duct heating / cooling coil
The function of the control outputs is set via DIP switches 4 and 5:
ON
OFF
OFF
1
2
DIP 4:
Y10 =
DIP 5: Y1 / Y2 =
Note
ON
3
4
5
0 … 10 V
2-position
ON
OFF
1
2
3
4
5
0 … 10 V
3-position
3181D101
ON
OFF
1
2
3
4
5
1
2
3
4
5
10 … 0 V inverted 10 … 0 V inv
2-position
3-position
Y1, Y2:
If 2-position is selected, the factory setting is on/off.
If you want PWM (pulse width modulation), set parameter P46 to 2 = PWM.
P47:
• 0 = VAV box DC 0 … 10 V control signal
• 1 = VAV box : 3-position control signal
For details concerning connection of peripheral devices and setting of the DIP
switches please refer to the mounting instructions, M3182 [3]:
18 / 42
Siemens
Building Technologies
RDG100…/RDG110…/RDG140.../RDG160… Basic Documentation
Functions
CE1P3182en
28 May 2009
4.7.4
Single duct
In single duct applications, the controller controls an actuator (valve, damper, VAV
system, etc)
Single duct,
heating or cooling
– in heating/cooling mode with changeover (automatic or manual),
– heating only mode,
– or cooling only mode.
Cooling only is factory set (P01=1).
The output signal for the air flow can be limited to a minimum and maximum value
if required (see section 4.6 "additional features").
Modulating control 3-position, PWM or DC 0 … 10 V
The diagram below shows the control sequence for continuous PI control.
Heating only (P01 = 0)
100%
Y10
XpH
XpC
C
100%
max
Vmax
Vmin
min
Vmin
Vmax
max
H
0%
min
Y10
Cooling only (P01 = 1)
0%
W
W
TR [°C]
TR [°C]
Changeover (P01 = 2, 3)
Changeover
Y10
100%
H
XpH
XpC
C
max
Vmax
min
Vmin
0%
W
T[°C]
w
Y10
Note
Room temperature
Room temperature setpoint
Control command “Valve”
TR [°C]
XpH
XpC
Vmin
Vmax
Proportional band “Heating”
Proportional band “Cooling”
Min. limitation for output
Max. limitation for output
The diagrams show the PI controller’s proportional part only.
Setting the sequence and the control outputs
Refer to sections 4.5 (applications), 4.7.1 (sequences) and 4.7.3 (outputs).
19 / 42
Siemens
Building Technologies
RDG100, RDG100T, RDG110, RDG140, RDG160 Basic Documentation
Functions
CE1P3182en
28 May 2009
4.7.5
Single duct with electrical
heater
Single duct with electrical heater
In single duct applications with electrical heater, the thermostat controls a valve
plus an auxiliary electrical heater. Parameter P01 is not available.
The output signal for the air flow can be limited to a minimum and maximum value
if required (see section 4.6 "additional features").
Electrical heating,
active in cooling mode
The air flow starts to rise when the acquired room temperature is above "setpoint"
+ "dead zone".
The electrical heater receives an ON command when the acquired room
temperature drops below “setpoint” – “dead zone” (= “setpoint for electrical
heater”).
Digital input “Enable
electrical heater”
Remote enabling/disabling of the electrical heater is possible via input X1, X2, or
D1 for overheat protection, tariff regulations, energy saving etc.
Input X1, X2, or D1 must be commissioned accordingly (parameter P38, P40, P42).
See section 4.9 “Multifunctional input”.
ON/OFF electrical heater
Modulating electrical heater
Y
Y
XpC
C
100%
max
Vmax
YV
min
Vmin
0%
XpC
Vmax
YV
Vmin
0%
TR [°C]
TR [°C]
Y
Y
XpH
SDH
ON
100%
YE
OFF
Y
TR
W
H
C
YV
YE
C
100%
max
Sequences
In case of insufficient air flow, the thermostat cannot protect the electrical heater
against overtemperature. That is why the electrical heater must feature a separate
safety device (thermal cutout).
min
Caution
YE
W
dz
Output signal
Room temperature
Effective setpoint Comfort
Heating sequence
Cooling sequence
Volume flow rate
Electrical heater
W
0%
dz
TR [°C]
XpH
XpC
Vmin
Vmax
TR [°C]
Proportional band heating
Proportional band cooling
Minimum volume output
Maximum volume output
Note: The diagrams show the PI controller's proportional part only.
Setting the sequence and the control outputs
Refer to sections 4.5 (applications), 4.7.1 (sequences) and 4.7.3 (outputs).
20 / 42
Siemens
Building Technologies
RDG100…/RDG110…/RDG140.../RDG160… Basic Documentation
Functions
CE1P3182en
28 May 2009
4.7.6
Single duct with radiator or floor heating
In single duct applications with radiator or floor heating, the thermostat controls a
valve plus an auxiliary electrical heater. Parameter P01 is not available.
The output signal for the air flow can be limited to a minimum and maximum value
if required (see section 4.6 "additional features").
The air flow starts to rise when the acquired room temperature is above "setpoint"
+ "dead zone".
The radiator receives an ON command when the acquired room temperature drops
below “setpoint” – “dead zone” (= “setpoint for radiator”).
Note: “Setpoint for radiator” is limited by parameter “Maximum heating setpoint”
(P10).
Floor heating
The radiator sequence can also be used for floor heating.
The "Floor heating limitation function" is described on page 15.
Sequences
ON/OFF radiator / floor heating
Modulating radiator / floor heating
Y
Y
max
Vmax
YV
min
Vmin
0%
XpC
Vmax
YV
Vmin
0%
TR [°C]
TR [°C]
Y
Y
XpH
SDH
ON
100%
YR
OFF
Y
TR
W
H
C
YV
YR
C
100%
max
C
100%
min
XpC
YR
W
dz
Output signal
Room temperature
Effective setpoint Comfort
Heating sequence
Cooling sequence
Volume flow rate
Radiator / floor heating
W
0%
dz
TR [°C]
XpH
XpC
Vmin
Vmax
TR [°C]
Proportional band heating
Proportional band cooling
Minimum volume output
Maximum volume output
Note: The diagrams show the PI controller's proportional part only.
Setting the sequence and the control outputs
Refer to sections 4.5 (applications), 4.7.1 (sequences) and 4.7.3 (outputs).
21 / 42
Siemens
Building Technologies
RDG100, RDG100T, RDG110, RDG140, RDG160 Basic Documentation
Functions
CE1P3182en
28 May 2009
4.7.7
Single duct with heating / cooling coil
In single duct applications with heating / cooling coil, the controller controls an
actuator (damper, VAV system, etc.) plus a reheating / cooling water coil.
The output signal for the air flow can be limited to a minimum and maximum value
if required (see section 4.6 "additional features").
The thermostat controls the reheating / cooling water valve either in heating / cooling mode with changeover (automatic or manual), heating only, or cooling only.
Cooling only is factory set (P01=01).
Water coil valve in
cooling mode
If the room temperature is above the setpoint for cooling, the valve will receive an
OPEN command and the air flow signal starts to rise in order to maintain the room
temperature.
Water coil valve in
heating mode
If the room temperature drops below the setpoint for heating, then the valve will
receive an OPEN command.
Control sequence
The diagram below shows the control sequence for continuous PI control in
Comfort mode.
Modulating heating / cooling coil
On/off heating / cooling coil
Y
Y
100%
max
Vmax
YV
YV
Vmin
0%
0%
TR [°C]
TR [°C]
Changeover water
Changeover water
Y
Y
H
SDC
SDH
YHC
Y
TR
W
H
C
YV
C
H
100%
YHC
ON
OFF
C
Vmax
min
Vmin
XpC
100%
max
C
min
XpC
Output signal
Room temperature
Comfort setpoint
Heating sequence
Cooling sequence
Volume flow rate
W
0%
dz
TR [°C]
XpH
XpC
Vmin
Vmax
C
YHC
YHC
W
dz
XpC
XpH
TR [°C]
Proportional band heating
Proportional band cooling
Minimum volume output
Maximum volume output
Note: The diagrams show the PI controller's proportional part only.
Setting the sequence and the control outputs
Refer to sections 4.5 (applications), 4.7.1 (sequences) and 4.7.3 (outputs).
22 / 42
Siemens
Building Technologies
RDG100…/RDG110…/RDG140.../RDG160… Basic Documentation
Functions
CE1P3182en
28 May 2009
4.8
Overview of control
outputs
Control outputs
Different control output signals are available depending on the configuration of
thermostat via DIP switches 4 & 5, and parameters P46 & P47.
Control output
Product No.
RDG400
4.8.1
DC 0..10 V
control signal
3-posotion
control signal
Synchronization
Modulating
DC 0 … 10 V
2-position
on/off
2-position
PWM
Modulating
3-position
Y10
Y1
Y1
Y1/Y2
(1 x /
)
Control output for air flow
The demand calculated by the PI control from the current room temperature and
setpoint is provided to the valve actuator as a continuous DC 0...10 V signal via
output Y10.
A 3-position control output for a damper has 2 control signals, one for the “opening”
command and one for the “closing” command. The thermostat has an internal
stroke model to calculate the position of the actuator. Therefore the running time
from the fully closed to the fully open position has to be adjusted via parameter P44
(from 20…300sec; factory setting is 150 seconds).
In single-duct applications, a closing synchronization is done to readjust the
internal stroke model to the real position of the actuator.
1.
2.
3.
When the controller starts up, a closing signal (actuator running time + 150%
= 2.5 x running time) is delivered to ensure the actuator will be fully closed
and synchronized with the control algorithm.
Each time the controller calculates the position fully closed, the actuator’s
running time is extended + 150% to ensure the right position of the actuator.
When the actuator has reached the position calculated by the controller, a
waiting time of 30 seconds is observed in order to stabilize the outputs.
Note: opening synchronization is available for valve outputs only.
23 / 42
Siemens
Building Technologies
RDG100, RDG100T, RDG110, RDG140, RDG160 Basic Documentation
Functions
CE1P3182en
28 May 2009
4.8.2
ON/OFF control signal
(2-position)
Control output for electrical heater, radiator and heating /
cooling coil
The valve receives an OPEN/ON command via control output Y1
1. When the acquired room temperature is below “setpoint” (heating mode) or
above the setpoint (cooling mode)
2. When the control outputs have been inactive for more than the “Minimum output
off-time” (factory setting 1 minute, adjustable via parameter P48).
OFF command for valve output:
1. When the acquired room temperature is above the setpoint (heating mode) or
below the setpoint (cooling mode).
2. When the valve has been active for more than the “Minimum output on-time”
(factory setting 1 minute, adjustable via parameter P49).
Electrical heater
control signal
(2-position)
The electrical heater receives an ON command via the auxiliary heating control
output (Y1):
1. When the acquired room temperature is below “setpoint for electric heater”.
2. When the electrical heater has been switched off for at least 1 minute.
The OFF command for the electrical heater is output:
1. When the acquired room temperature is above the setpoint (electric heater).
2. When the electrical heater has been switched on for at least 1 minute.
DC 0 ... 10 V
for el. heaters
A safety thermostat (to prevent overheating) must be provided externally.
• The demand calculated by PI control from the current room temperature and
setpoint is provided via Y10 as a continuous DC 0 ... 10 V signal.
• The signal converter (SEM61.4) converts the DC 0 ... 10 V signal to AC 24 V
PDM pulses for the current valve
• The current valve (SEA45.1) supplies the el. heater with AC 50 … 660 V pulsed
current.
L
G
FF
G
Y
N1
Y
E
PWM
AC 24 V
G0 Y1 G
3181D21
Caution
F...
U1
DC 0 ... 10 V
Y1 G
L
Q
G0
Y1
K...
5.7 kW
max.
N
N1
U1
Y1
K…
FF
F…
RDG400
Signal converter SEM61.4
(see data sheet N5102)
Current valve SEA45.1
(see data sheet N4937)
Safety "chain", e.g. safety thermostat and high-temperature cut-out
Very fast-acting fuse
Overcurrent trip
24 / 42
Siemens
Building Technologies
RDG100…/RDG110…/RDG140.../RDG160… Basic Documentation
Functions
CE1P3182en
28 May 2009
3-position control
signal
Output Y1 provides the OPEN command, and Y2 the CLOSE command to the 3position actuator.
The factory setting for the actuator runtime is 150 seconds. It can be adjusted via
parameter P44 (Y1 and Y2).
The parameter is only visible if 3-point is selected via DIP switch 5.
Synchronization
1. When the thermostat gets powered up, a closing command for the actuator
runtime + 150 % is provided to ensure that the actuator fully closes and
synchronizes to the control algorithm.
2. When the thermostat calculates the positions "fully close" or "fully open", the
actuator runtime is extended + 150 % to ensure the right actuator position
synchronized to the control algorithm.
3. After the actuator reaches the position calculated by the thermostat, a waiting
time of 30 seconds is applied to stabilize the outputs.
The demand calculated by PI control from the current room temperature and setpoint is provided via Y1 to the valve actuator as a PWM signal (Pulse width
modulation) for thermic actuators. The output is switched on for a period proportional to the heat/cool demand and then switched off for the rest of the PWM interval.
PWM control
The interval is 150 sec (factory setting). It can be adjusted via parameters P44
(Y1). The parameters are only visible if 2-point is selected via DIP switch 5.
For thermic valve actuators, set the running time to 240 sec.
PWM for thermic
valve actuators
Note!
PWM for el. heaters
• Never apply PWM to a motoric actuator.
• It is not possible to ensure exact parallel running of more than one thermic valve
actuator. If several fan coils are driven by the same thermostat, preference
should be given to motoric actuators.
For electric heaters, set the running time to 90 sec.
In order to avoid burn-off of mechanical contacts by frequent switching, use a
current valve instead of a relay or contactor.
25 / 42
Siemens
Building Technologies
RDG100, RDG100T, RDG110, RDG140, RDG160 Basic Documentation
Functions
CE1P3182en
28 May 2009
4.9
Multifunctional input, Digital input
The thermostat offers two multifunctional inputs X1 and X2 and a digital input D1.
A sensor of type NTC like QAH11.1 (AI, analog input) or a switch (DI, digital input)
can be connected to the input terminals. The functionality of the inputs can be
configured via parameters P38 for X1, P40 for X2, and P42 for D1.
#
Function of input
Description
0
1
Not used
External/Return
air temp.
2
Heat/cool
changeover
3
Operating mode
switchover
4
Dewpoint monitor
5
Enable electrical
heater
Fault
No function.
Sensor input for external room temperature sensor or
return air temperature sensor to measure the current
room temperature, or floor heating temperature
sensor to limit the heating output.
Note: The room temperature is measured by the builtin sensor if the floor heating limitation function is
enabled via parameter P51.
Sensor input for automatic heating / cooling
changeover function.
A switch can also be connected rather than a sensor
(switch closed = cooling, see section 4.6).
Digital input to switch over the operating mode to
Energy Saving.
If the operating mode switchover contact is active,
user operations are ineffective and “OFF” is displayed.
Digital input for a dewpoint sensor to detect
condensation. Cooling is stopped if condensation
occurs.
Digital input to enable/disable the electrical heater via
remote control.
Digital input to signal a fault.
If the input is active, “ALx” is displayed
(Alarm x, with x = 1 for X1, x = 2 for X2, x = 3 for D1).
Note: Fault displays do not influence the thermostat's
operation. They merely represent a visual signal.
Example: dirty air filter
6
Type
X1/X2
-AI
Type
DI
--
AI/(DI)
DI
DI
DI
DI
DI
DI
DI
DI
DI
Operational action can be changed between normally open (N.O.) and normally
closed (N.C.) via parameter P39, P41 (or P43 if it is a digital input).
Each input X1, X2 or D1 must be configured with a different function (1 … 5).
Exception: one or two or three inputs may be configured as alarm inputs (6)
X1 is factory-set to “External sensor” (1), X2 to “Heating/Cooling changeover” (2),
and D1 to Operating mode changeover (3).
For more information see section 4.5 “Applications”.
26 / 42
Siemens
Building Technologies
RDG100…/RDG110…/RDG140.../RDG160… Basic Documentation
Functions
CE1P3182en
28 May 2009
4.10
Handling of faults
When the room temperature is outside the measuring range, i.e. above 49 °C or
below 0 °C, the limiting temperatures flash, e.g. “0 °C” or “49 °C”.
The heating output is energized if the current setpoint is not set to “OFF”, the
thermostat is in heating mode and the temperature is below 0 °C.
For all other cases, no output is energized.
The thermostat resumes Comfort mode after the temperature returns to within the
measuring range.
Temperature out of
range
4.11
DIP switches
Use the DIP switches on the rear side of the thermostat to commission the
thermostat's basic application prior to snapping it to the base.
ON
OFF
1
2
3
4
5
– The application is set via DIP switches 1 … 3.
– The function of the control outputs (2-position or 3-position, DC 0 … 10 V) is set
via DIP switches 4 and 5.
For details concerning connection of peripheral devices and setting of the DIP
switches please refer to the mounting instructions, document M3182 [3].
Note
During startup, the thermostat reloads the control parameter factory settings after
each change of DIP switch setting.
27 / 42
Siemens
Building Technologies
RDG100, RDG100T, RDG110, RDG140, RDG160 Basic Documentation
Functions
CE1P3182en
28 May 2009
4.12
Control parameters
A number of control parameters can be readjusted to optimize control performance.
These parameters can also be set during operation without opening the unit. In the
event of a power failure, all control parameter settings are retained.
The control parameters are divided in two levels:
• “Service” level, and
• “Expert” level and "Diagnostics & test"
The “Service” level contains a small set of parameters to set up the thermostat for
the HVAC system and to adjust the user interface. These parameters can usually
be adjusted any time.
Change parameters in the “Expert” level only carefully, as they impact control
performance and functionality of the thermostat.
Parameter setting
Change the parameters as follows:
Enter only “Service”
level
1.
Press left + right button simultaneously >3sec, release,
then press right button >3sec
The display shows “P01” (or P02 when P01 is not available).
Continue with Step 2.
Enter “Expert” level
and
"Diagnostics & test"
1.
Press left button + right button simultaneously >3sec, release,
press left button >3sec,
then rotate rotary knob anti-clockwise min ½ rotation
The display shows “Pxx”.
Continue with Step 2.
Adjust parameters
2.
3.
Select the required parameter by turning the rotary knob.
Press
(OK); the current value of the selected parameter starts to flash and
can be changed by turning the rotary knob.
(OK) to confirm the adjusted value or (Esc) to cancel the change.
Press
If you wish to adjust additional parameters, repeat steps 2 through 4
Press (Esc) to leave the parameter mode.
4.
5.
6.
Reset parameters
The factory setting for the control parameters can be reloaded via parameter P71,
by changing the value to “ON”, and confirming by pressing the right button.
The display shows “8888” during reload.
28 / 42
Siemens
Building Technologies
RDG100…/RDG110…/RDG140.../RDG160… Basic Documentation
Functions
CE1P3182en
28 May 2009
Parameters Service level
Name
Factory setting
Range
RDG400
Parameter
4.12.1
Service level
P01
Control sequence
When 2-pipe /
2-stage:
1 = Cooling only
When 4-pipe:
4 = H and C
0 = Heating only
1 = Cooling only
2 = H/C changeover manual
3 = H/C changeover auto
4 = Heating and Cooling
P02
User operating mode profile (mode button)
1
P04
Selection of °C or °F
0 (°C)
P05
Sensor calibration (intern, extern)
0K
1 = (Auto) - Comfort - Protection
2 = (Auto) - Comfort - E Saving - Prot
0 = Degrees Celsius (°C)
1 = Degrees Fahrenheit (°F)
– 3 ... 3 K
P06
Standard temperature display
0
P07
0
P08
Display info line
(2nd line of LCD)
Comfort setpoint
21 °C
0 = Room Temperature
1 = Setpoint
0 = --- (No display)
1 = °C and °F
5 ... 40 °C
P09
Minimum setpoint in Comfort mode
5 °C
5 ... 40 °C
P10
Maximum setpoint in Comfort mode
35 °C
5 ... 40 °C
P11
Energy Saving heating setpoint
15 °C
P12
Energy Saving cooling setpoint
30 °C
P14
Button lock function
0
OFF, 5 ... WcoolE-saving;
(WcoolE-saving = 40 °C max)
OFF, WHeatE-saving ... 40 °C;
(WHeatE-saving = 5 °C min)
0 = Unlocked
1 = Auto locked
2 = Manual locked
Note
0..1
Parameter display depends on selected application and function
29 / 42
Siemens
Building Technologies
RDG100, RDG100T, RDG110, RDG140, RDG160 Basic Documentation
Functions
CE1P3182en
28 May 2009
Parameters Expert level, diagnostics & test
Name
Factory setting
Range
RDG400
Parameter
4.12.2
Expert level
P30
P-band / Switching differential in heating mode
2K
0.5 … 6 K
P31
P-band / Switching differential in cooling mode
1K
0.5 … 6 K
P32
P-band / Switching differential for radiator
2K
0.5 … 6 K
P33
Dead zone in Comfort mode
2K
0.5 … 5 K
P34
Setpoint differential (wD)
2K
0.5 … 5 K
P35
Integral time
5 min
0…10 min
P36
Heating / cooling changeover switching point
cooling (X1/X2)
Heating / cooling changeover switching point
heating (X1/X2)
Functionality of X1
16 °C
10…25 °C
28 °C
27…40 °C
1: = Ext. sensor
0 = --- (no function)
1 = Room temp ext / Return temp (AI)
2 = H/C changeover (AI/DI)
3 = Operating mode contact [DI)
4 = Dew point sen. (DI)
5 = Enable electric heater (DI)
6 = Fault input (DI)
P37
P38
P39
Operating action of X1 if digital input
P40
Functionality of X2
0 = Normally open
/ Open
1 = Normally closed / Closed
2 = H/C changeover 0 = --- (no function)
1 = Room temp ext / Return temp (AI)
2 = H/C changeover (AI/DI)
3 = Operating mode contact [DI)
4 = Dew point sen. (DI)
5 = Enable electric heater (DI)
6 = Fault input (DI)
0 (N.O.)
P41
Operating action of X2 if digital input
0 (N.O.)
P42
Functionality of D1
3 = Op. mode
changeover
0 = Normally open
/ Open
1 = Normally closed / Closed
0 = --- (no function)
2 = H/C changeover (DI)
3 = Operating mode contact [DI)
4 = Dew point sen. (DI)
5 = Enable electric heater (DI)
6 = Fault input (DI)
P43
Operating action of D1 if digital input
0 (N.O.)
P44
150 s
P46
Running time of Y1/Y2 output
(only when modulating PI control)
Output Y1/Y2 (if not parameterized as 3-pos.)
P51
Floor heating limit temperature
OFF
1 = 2-position
2 = PWM
OFF, 10..50 °C
P63
Minimum output limitation air flow signal
0%
0…P64 (%)
P64
Maximum output limitation air flow signal
100%
P63…100 (%)
P65
Protection heating setpoint
8 °C
P66
Protection cooling setpoint
OFF
P68
Prolong Comfort period
OFF
OFF, 5 … W Cool Prot;
(W Cool Prot = 40 °C max)
OFF, W Heat Prot … 40;
(W Heat Prot = 5 °C min.)
OFF; 15 ... 360 min
P69
Temporary setpoint Comfort
(see also Comfort setpoint P08)
Reload factory settings
OFF
P71
Note
0..6
ON/OFF (1)
OFF
0..6
0..6
0 = Normally open / Open
1 = Normally closed / Closed
20…300 sec
OFF = Disabled
ON = Enable
OFF = Disabled
ON = Reload start
P46: Setting to 2-position or 3-position is done with DIP 4
30 / 42
Siemens
Building Technologies
RDG100…/RDG110…/RDG140.../RDG160… Basic Documentation
Functions
CE1P3182en
28 May 2009
Factory setting
Range
RDG400
Parameter
Name
Diagnostics & test
d01
Application type
Diagnostics
0:= --- (No application)
1:= Single-duct
2:= Single-duct with el. heater
3:= Single-duct with radiator
4:= Single-duct with h/c coil
d02
X1 status
Diagnostics
0 = Not activated (for DI)
1 = activated (DI)
0…49 °C = cur. temp. value (for AI)
00
= HC input short
100 = HC input open
d03
X2 status
Diagnostics
0 = Not activated (for DI)
1 = activated (DI)
0…49 °C = cur. temp. value (for AI)
00
= HC input short
100 = HC input open
d04
D1 status
Diagnostics
0 = Not activated (for DI)
1 = activated (DI)
00
= HC input short
100
= HC input open
d05
Test mode for checking the Y1/Y2
actuator direction
(press left button to escape)
---
“---“ = no signal on outputs Y1 and Y2
OPE = output Y1 forced open
CLO = output Y2 forced closing
31 / 42
Siemens
Building Technologies
RDG100, RDG100T, RDG110, RDG140, RDG160 Basic Documentation
Functions
CE1P3182en
28 May 2009
5
Handling
5.1
Mounting and installation
Do not mount on a wall in niches or bookshelves, behind curtains, above or near
heat sources, or exposed to direct solar radiation. Mount about 1.5 m above the
floor.
Mounting
• The room thermostat must be mounted in a clean, dry indoor place and must not be
exposed to drip or splash water
Wiring
See Mounting Instructions (M3182) enclosed with the thermostat.
• Comply with local regulations to wire, fuse and earth the thermostat
• The power supply line must have an external fuse or circuit breaker with a
rated current of no more than 10 A
• Inputs X1-M, X2-M or D1-GND of different units (e.g. summer / winter
switch) may be connected in parallel with an external switch. Consider
overall maximum contact sensing current for switch rating
• Disconnect power supply before removing the thermostat from the mounting
plate!
Commissioning
Select the application and type of control output via the DIP switches before fitting
the thermostat to the mounting plate.
After power is applied, the thermostat carries out a reset during which all LCD
segments flash, indicating that the reset was correct. After the reset, which takes
about 3 seconds, the thermostat is ready for commissioning by qualified HVAC
staff. The control parameters of the thermostat can be set to ensure optimum
performance of the entire system (see Basic Documentation P3182).
Control sequence
• The control sequence may need to be set via parameter P01 depending on the
application. The factory setting for the single-duct application is “Cooling only”
Calibrate sensor
• Recalibrate the temperature sensor if the room temperature displayed on the
thermostat does not match the room temperature measured. To do this, change
parameter P05
Setpoint and setpoint
range limitation
• We recommend to review the setpoints and setpoint ranges (parameters
P08…P12) and change them as needed to achieve maximum comfort and save
energy
32 / 42
Siemens
Building Technologies
RDG100…/RDG110…/RDG140.../RDG160… Basic Documentation
Handling
CE1P3182en
28 May 2009
5.2
Operation
See also the operating instructions B3181 enclosed with the thermostat.
Layout
2
1
3
1 Operating mode button / Esc
2 Protection mode and OK
3 Rotary knob for setpoint and parameter adjustment
Button operation
• When the thermostat is in normal operation, the actual operating mode and
status is indicated by symbols.
• When a button is pressed, the RDG goes into the Mode selection
The LCD backlight will turn on, all possible mode selection options (symbols) will
turn on, indicator element (arrow) will appear on the current mode/status.
• When the button is pressed again, the indicator element will toggle to the next
mode symbol and so on.
• After the last press and a timeout of 3 sec, the new selected mode is confirmed,
the other elements disappear.
• After a timeout of 20 sec the LCD backlight will turn off
User action
Press left button
Press left button >3 sec
Remain on left button and
turn rotary knob clockwise
Remain on left button and
turn rotary knob anti-clockwise
Press left button while "Operating mode
switch-over" is activated
Press right button >3 sec
Press right button
Rotate rotary knob
Press left + right button >3sec, release,
then press right button >3sec
Press left button + right button 3sec,
release, press left button 3sec,
then rotate rotary knob counter-clockwise
min ½ rotation
Effect, description
Go into Operating mode selection
Set thermostat to Protection mode
Activate temporary timer "Extend presence"
and set the time (details see page 16)
Activate temporary timer " Extend absence"
and set the time (details see page 16)
Activate " Extend Comfort mode"
(details see page 16)
Activate/deactivate button lock
Change to protection mode and back
Adjust the room temperature setpoint
Go into parameter mode Service level
Go into parameter mode Expert level,
diagnostics & test
33 / 42
Siemens
Building Technologies
RDG100, RDG100T, RDG110, RDG140, RDG160 Basic Documentation
Handling
CE1P3182en
28 May 2009
17 16 15
LCD display
14 13 12
11
1
2
3
4
5
6
6
7
#
Symbol
8
9 10
Description
# Symbol Description
1
Heating mode
10
Confirmation of parameters
2
Electrical heater active
11
Degrees Celsius
Degrees Fahrenheit
3
Cooling mode
12
Digits for room temperature and setpoint
4
Comfort mode
13
Button lock active
5
Energy Saving mode
14
Condensation in room (dewpoint sensor active)
6
Protection
15
Fault
7
Escape
16
Temporary timer function (visible when
operating mode is temporarily extended
presence or absence)
8
Digits for room temperature, setpoint,
etc.
17
Indicates that room temperature is displayed
5.3
Disposal
The device is classified as waste electronic equipment in terms of the European
Directive 2002/96/EC (WEEE) and should not be disposed of as unsorted municipal waste.
The relevant national legal rules are to be adhered to.
Regarding disposal, use the systems setup for collecting electronic waste.
Observe all local and applicable laws.
34 / 42
Siemens
Building Technologies
RDG100…/RDG110…/RDG140.../RDG160… Basic Documentation
Handling
CE1P3182en
28 May 2009
G
X1
M
X2
G0
D1
6
Engineering
6.1
Connection terminals
GND
SELV
G, G0
Operating voltage AC 24 V
Y10/G0
Control output for DC 0…10 V actuator
Y1/G, Y2/G Control output for 2-position, PWM or 3-position actuators
X1, X2
Multifunctional input for temperature sensor (e.g. QAH11.1)
or potential-free switch
Factory setting:
- X1 = external room temperature sensor
- X2 = sensor or switch for automatic heating / cooling
changeover
M
D1, GND
Measuring neutral for sensor and switch
Multifunctional input for potential-free switch.
Factory setting: Operating mode switchover contact
35 / 42
Siemens
Building Technologies
RDG100, RDG100T, RDG110, RDG140, RDG160 Basic Documentation
Engineering
CE1P3182en
28 May 2009
6.2
Connection diagrams
For details concerning connection of peripheral devices and setting of the DIP
switches please refer to the mounting instructions, document M3182.
Note
Application: Single-duct
S3
V1
V1
V1
DC 0…10 V damper actuator
V1
3-position damper actuator
N1
Room thermostat RDG400
S1..S3 Switch (keycard, window contact, etc.)
B1, B2 Temperature sensor (return air temperature, external room temperature, changeover sensor, etc.)
Application: Single-duct with electrical heater, radiator or heating / cooling
S3
V1
V1
V2
V2
DC 0…10 V damper actuator
2-position or PWM electrical heater, radiator
or heating / cooling valve
V1
V1
V2
V2
DC 0…10 V damper actuator
3-position electrical heater,
radiator or heating / cooling
valve
V2
V1
V2
V1
3-position damper actuator
DC 0…10 V electrical heater,
radiator or heating / cooling valve
N1
Room thermostat RDG400
S1..S3 Switch (keycard, window contact, etc.)
B1, B2 Temperature sensor (return air temperature, external room temperature, changeover sensor, etc.)
36 / 42
Siemens
Building Technologies
RDG100…/RDG110…/RDG140.../RDG160… Basic Documentation
Engineering
CE1P3182en
28 May 2009
7
Mechanical design
7.1
General
The room thermostat consists of 2 parts:
• Plastic housing which accommodates the electronics, the operating elements
and the temperature sensor
• Mounting plate with the screw terminals
The housing engages in the mounting plate and is secured with 2 screws on the
left side.
Operation see section 5.2.
7.2
Dimensions
4.0
28.3
Dimensions in mm
28.3
9.0
4.0
128.0
28.3
28.3
28.3
27.7
16.0
93.0
28.5
30.8
28.2 27.8
37 / 42
Siemens
Building Technologies
RDG100, RDG100T, RDG110, RDG140, RDG160 Basic Documentation
Mechanical design
CE1P3182en
28 May 2009
8
Power supply
Outputs
Inputs
Technical data
SELV AC 24 V ± 20%
50/60 Hz
Max. 2 VA
DC 0…10 V
39 mV
Max. ± 1 mA
AC 24 V
Max. 1 A
Operating voltage
Frequency
Power consumption
Control output Y10-G0
Resolution
Current
Control output Y1, Y2-G
Rating
Multifunctional inputs
X1-M / X2-M
Temperature sensor input
Type
Digital input
Operating action
Contact sensing
D1-GND
Operating action
Contact sensing
QAH11.1 (NTC)
Selectable (NO/NC)
DC 0…5 V, max. 5 mA
Selectable (NO/NC)
SELV DC 6…15 V, 3…6 mA
Function input
External temperature sensor, changeover
sensor, operating mode switchover contact,
dewpoint monitor contact, enable electrical
heater contact, fault contact
Operational data
Switching differential, adjustable
Heating mode
Cooling mode
Setpoint setting and range
Comfort mode
Energy Saving mode
Protection
Multifunctional inputs X1 / X2 / D1
Input X1
Input X2
Input D1
Built-in room temperature sensor
Measuring range
Accuracy at 25 °C
Temperature calibration range
Settings and display resolution
Setpoints
Current temperature value displayed
(P30)
(P31)
(P08)
(P11-P12)
(P65-P66)
Selectable
2 K (0.5...6 K)
1 K (0.5...6 K)
21 °C
(5...40 °C)
15 °C/30 °C (OFF, 5...40
°C)
8 °C/OFF (OFF, 5...40 °C)
Selectable
Ext. temperature sensor
(P38=1)
Changeover sensor
(P40=2)
Operating mode switchover
(P42=3)
0…49 °C
< ± 0.5 K
± 3.0 K
0.5 °C
0.5 °C
38 / 42
Siemens
Building Technologies
RDG100…/RDG110…/RDG140.../RDG160… Basic Documentation
Technical data
CE1P3182en
28 May 2009
Environmental
conditions
Standards
Operation
Climatic conditions
Temperature
Humidity
Transport
Climatic conditions
Temperature
Humidity
Mechanical conditions
Storage
Climatic conditions
Temperature
Humidity
conformity
EMC directive
As per IEC 721-3-3
Class 3K5
0 ...50 °C
< 95% r.h.
As per IEC 721-3-2
Class 2K3
− 25... 60 °C
< 95% r.h.
Class 2M2
As per IEC 721-3-1
Class 1K3
− 25... 60 °C
< 95% r.h.
2004/108/EC
N474
C-tick conformity to
EMC emission standard
Reduction of hazardous substances
Product standards
Automatic electrical controls for household and
similar use
Special requirements for temperature-dependent
controls
Electronic control type
General
Electromagnetic compatibility
Emissions
Immunity
Safety class
Pollution class
Degree of protection of housing
Connection terminals
Housing front color
Weight
AS/NSZ 4251.1:1999
2002/95/EC
As per EN 60730–1
As per EN 60730–2-9
2.B (micro-disconnection on
operation)
As per IEC/EN 61000-6-3
As per IEC/EN 61000-6-2
III as per EN 60730
Normal
IP30 as per EN 60529
Solid wires or prepared
stranded wires
1 x 0.4…2.5 mm2
or 2 x 0.4…1.5 mm2
RAL 9003 white
0.350 kg
39 / 42
Siemens
Building Technologies
RDG100, RDG100T, RDG110, RDG140, RDG160 Basic Documentation
Technical data
CE1P3182en
28 May 2009
Index
3
3-position control signal......................................... 23
3-position for air flow ............................................. 23
A
Absence................................................................. 16
Air flow min / max .................................................. 14
Applications ........................................................... 13
Automatic heating/cooling changeover ........... 14, 17
B
Backlit LCD .............................................................. 5
Button lock ............................................................. 16
C
Comfort mode .......................................................... 9
Control outputs ........................................................ 5
Control outputs (overview)..................................... 18
Control parameters ................................................ 28
Control sequences................................................. 17
Cooling mode......................................................... 17
D
DC 0 … 10 V control signal ................................... 23
DC 0 … 10 V for air flow........................................ 23
DC 0 … 10 V for el. heaters .................................. 24
Dewpoint monitor................................................... 26
Dewpoint monitoring.............................................. 15
Diagnostics & test .................................................. 28
Digital input ............................................................ 26
DIP switches .......................................................... 27
Disposal ................................................................. 34
E
Electrical heater ..................................................... 20
Enable/disable electrical heater....................... 20, 26
Energy Saving ......................................................... 9
Expert level parameters......................................... 28
Extend Comfort mode............................................ 16
Extension of presence / absence .......................... 16
External/Return air temp........................................ 26
External/return air temperature sensor.................. 15
F
Fault....................................................................... 26
Fault, handling ....................................................... 27
Floor heating.......................................................... 15
Floor heating limitation function............................. 15
H
Heat/cool changeover............................................ 26
Heating mode ........................................................ 17
I
Integral action time .................................................. 8
L
LCD display ........................................................... 34
LCD, backlit ............................................................. 5
M
Manually select heating or cooling mode .............. 17
Min / max air flow .................................................. 14
Mounting and installation....................................... 32
Multifunctional inputs............................................. 26
O
On/off control signal .............................................. 23
Operating mode button............................................ 9
Operating mode input.............................................. 9
Operating mode switchover................................... 26
Operating voltage .................................................... 5
Output signal inversion.......................................... 14
P
Parameter setting .................................................. 28
Presence ............................................................... 16
Proportional band .................................................... 8
Protection mode / Standby ...................................... 9
PWM...................................................................... 23
PWM for el. heater ................................................ 25
R
Radiator ................................................................. 21
Remote heating/ cooling changeover.................... 14
Reset parameters.................................................. 28
S
Sensor input .......................................................... 26
Sequences ............................................................ 17
Service level parameters....................................... 28
Setpoint Comfort ....................................................11
Setpoint Energy Saving..........................................11
Setpoint limitation .................................................. 10
Setpoint Protection .................................................11
Setpointts and sequences ......................................11
Standby / Protection mode ...................................... 9
Switching differential ............................................... 8
Synchronization............................................... 23, 25
T
Temperature out of range ...................................... 27
Temporary setpoint................................................ 10
W
Window contact ..................................................... 16
40 / 42
Siemens
Building Technologies
RDG100…/RDG110…/RDG140.../RDG160… Basic Documentation
Index
CE1P3182en
28 May 2009
41 / 42
Siemens
Building Technologies
RDG100, RDG100T, RDG110, RDG140, RDG160 Basic Documentation
CE1P3182en
28 May 2009
Siemens Switzerland Ltd
Building Technologies Division
International Headquarters
Gubelstrasse 22
CH-6301 Zug
Tel. +41 41-724 24 24
Fax +41 41-724 35 22
www.buildingtechnologies.siemens.com
© 2009 Siemens Switzerland Ltd
Subject to change
42 / 42
Siemens
Building Technologies
RDG100…/RDG110…/RDG140.../RDG160… Basic Documentation
CE1P3182en
28 May 2009