1
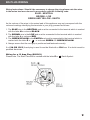
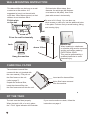
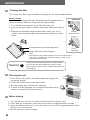
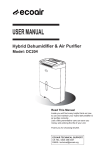
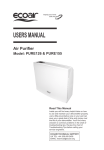
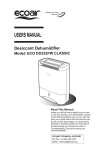
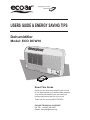
keeping your home
safe and clean
USERS GUIDE & ENERGY SAVING TIPS
Dehumidifier
Model: ECO DCW10
Read This Guide
Inside you will find many helpful hints on how
to use and maintain your dehumidifier properly.
Just a little preventative care can save you
money and prolong the life of your unit.
Thank you for choosing ECO DCW10.
ECOAIR
ECOAIRTECHNICAL
TECHNICALSUPPORT
SUPPORT
UK
UKTEL:
TEL:+44
+44845
208388
4590005
2458
EMAIL:
EMAIL:[email protected]
[email protected]
YOUR DEHUMIDIFIER
Read and follow all the instructions even if you feel you are familiar with the product , and find a place
to keep it handy for future reference.
For your convenience record the model number (located on the product identification plate ) and the
date you received the product, together with your purchase receipt and attach to the Service and
Warranty information included in this manual.
NOTE: The rating of this product ( as marked on the product identification plate ) is based on specific
loading tests. Normal use may draw significantly less power.
IMPORTANT INSTRUCTIONS
Do not install and use your dehumidifier before completely reading these instructions.
.
This will help you optimize the operation of your dehumidifier.
The following advice and instructions should be followed closely:
1. Your unit must always be used in an upright position
because it contains a compressor.
2. After unpacking your unit, place the unit upright to
allow the cooling agent to stabilize, and wait 2 hours
before use.
Failure to comply with these
instructions may damage the unit and
will invalidate the warranty.
3. This product must not be disposed with domestic waste.
This product has to be disposed of at an authorized place
for recycling of electrical and electronic appliances.
4 The appliance can be installed in the bathroom but requires specialist installation with regard to
power supply. Use a qualified electrician at all times.
5. The appliance should be installed in accordance with national wiring regulations and must
positioned so that the plug is accessible.
6. If the supply cord is damaged, it must be replaced by the manufacturer or its servce agent or a
similarly qualified person in order to avoid a hazard.
WEE/EC2601UR
1
BS PLUG WIRING
Wiring Instructions: Should it be necessary to change the plug please note the wires
in the mains lead are coloured in accordance with the following code:
BLUE - NEUTRAL
BROWN - LIVE
GREEN AND YELLOW - EARTH
As the colours of the wires in the mains lead of this appliance may not correspond with the
coloured markings identifying the terminals in your plug, proceed as follows:
1. The BLUE wire is the NEUTRAL and must be connected to the terminal which is marked
with the letter N or coloured BLACK.
2. The BROWN wire is the LIVE and must be connected to the terminal which is marked
with the letter L or coloured RED.
3. The GREEN/YELLOW is the EARTH and must be connected to the terminal which is
marked with the letter E or
or coloured GREEN OR GREEN/YELLOW.
4. Always ensure that the cord grip is positioned and fastened correctly.
If a 13A (BS 1363) fused plug is used it must be fitted with a 13A fuse. If in doubt consult a
qualified electrician.
Wiring for a 13 Amp Plug (BS1363)
Please note. The Earth Terminal is marked with the letter E or
Earth Symbol.
23 2
IMPORTANT SAFETY INSTRUCTIONS
PLEASE READ ALL INSTRUCTIONS CAREFULLY BEFORE OPERATING.
WARNING - This appliance is intended for use in a domestic environment and light office
use only. Any other use is not recommended by the manufacturer and may cause fire,
electrical shocks or other injury to person or property.
When using electrical appliances, basic safety precautions should always be followed:
1. Do not operate the unit with a damaged cord or plug, after it malfunctions or has been
dropped or damaged in any way. Return to an authorized service facility for examination
and repair.
2. This unit should always be kept in an upright position to avoid any damage. The appliance
must be placed on a level flat surface or mounted upright during operation.
3. When wall-mounted be sure the mounting plate is fixed firmly and horizontally. The wall
must be rigid and strong enough to support the mounting plate and the unit.
4. Check the household voltage to ensure it matches the units rated specification before
operating.
5. Operate this unit in an ambient temperature between 5°C and 35°C.
6. Ensure that the air inlets and outlets are not blocked or covered.
7. Do not place the unit too close to curtains or other objects - min 40cm.
8. Never place anything on top of the unit and do not cover with any kind of material while
in use.
9. This product is intended for domestic and light office use ONLY and not for commercial,
industrial or outdoor use.
10. To protect against electrical shocks, do not immerse unit, plug or cord in water, or spray
11. Always unplug the unit when not in use or moving location. To disconnect from the
power supply, grip the plug and pull from the power socket. Never pull by the cord.
12. Always empty the water tank before storing the unit away.
13. Close supervision is necessary when any appliance is used by or near children and pets.
Do not let children play with the drain hose or the water tank.
14. Do not run the power cord under carpeting, or cover with rugs or runners. Arrange the
cord away from areas where it may be tripped over.
15. Never operate or store the unit in direct sunlight.
16. To repair the unit, take it to a qualified service engineer. Repairs carried out by
unqualified people may cause damage to the unit or injury to persons or property and
void the warranty.
17. Where possible, avoid the use of an extension cable as they may overheat and cause
a risk of fire. Only use an extension cord after ensuring it is in perfect condition.
18. Do not use the unit without the air filter.
This appliance is not intended for use by persons (including children) with reduced physical,
sensory or mental capabilities, or lack of experience and knowledge, unless they have been given
supervision or instruction concerning use of the appliance by a person responsible for their safety.
Children should be supervised to ensure that they do not play with the appliance.
SAVE AND READ THESE IMPORTANT SAFETY INSTRUCTIONS
3
HOW TO USE YOUR DEHUMIDIFIER
ECO DCW10
On / Off
Press to run or stop the machine.
Timer
Press to set the time when the machine is intended to stop. Choose from 2, 4 and 8 hours.
Hold Timer down if requried to run continuously.
Indicators
" FULL" indicator: it lights up when the tank is full of water for disposal.
Please pour out water and restore the tank.
"DEHUMIDIFY" indicator: it lights up to indicate the unit running dehumidification.
"DEFROST" indicator: blinks when defrosting. It will automatically return to
dehumidification.
Installing remote control battery
First installation or replacing battery:
1) Remove the 2 screws to release the battery cover from
back of the remote.
2) Insert the new battery with (+) pole up.
3) Fasten the cover.
Battery + pole must
face outwards
One CR2032 battery is required.
Signal will fail when the battery needs replacing. Battery life is approximately six months but cannot be
guaranteed (due to the length of the the product could have been held in stock).
Incorrect handling of battery may cause electric shock, fire, fluid leakage, heat or explosion.
Do not short-circuit, disassemble, heat it or burn it. Remove when not in use for long periods.
4
WALL-MOUNTING INSTRUCTION
Drill two holes 20mm deep, 6mm
diameter for wall plugs (the distance
must same as the plate), then fit the
plate with screws in horizontally.
This dehumidifier can be hung on a wall
or stand on a flat surface. It is
suggested to hang it on the wall with
more than 150cm above ground, so that
children do not interfere with it.
Fit this plate
on the wall
Be sure to fix it firmly. You can also use
other screws or nails to fix into the additional holes
in the plate. Fix them firmly to avoid loosing, falling
and causing injury.
wall
plug x2
screw x2
wall
Fit on the wall horizontally
back
above 150cm
Hang the machine
IMPORTANT
When installing in a bathroom
or toilet the plug must be removed
and the connection made by
ELECTRICAL SPUR.
This must be performed by a
qualified electrician to avoid
personal injury.
CHARCOAL FILTER
The activated charcoal filter
comes with the unit (packed with
the user manual). First pull out
the filter frame on the unit
(refer to page 7).
Unpack the charcoal filter,
insert the charcoal filter into
the filter frame and refit into the unit.
Insert and fix charcoal filter
Nylon filter frame removed
from the machine
FIT THE TANK
The tank must be fitted properly.
If you need a continuous drain, follow the
When the tank is full or is not in place,
instructions on page 6.
the " FULL" lights indicator will illuminate.
5
TO EMPTY THE TANK
When the tank is full, the " FULL " indicator
lights will illuminate and the unit will stop.
Don't remove the tank immediately
if the machine is still running or just
stopping. This may cause some water
to drip.
To pull out
To remove the tank, hold the tank grip
then pull it out and hold it with
two hands carefully.
After pouring out the water, clean the
tank and restore in place.
To hold with
two hands
To restore after
pouring
TO DRAIN WATER (Continuous Drainage)
Back
Water can be bypassed the tank by using the hose
provided.
Use a screwdriver to remove the knock-out
at the back. Attach the hose to the
connector through the hole. The hose
should lead to the drain with no sharp bends
and in a downward slope.
Knockout
hose
TO START
Don't cover the air
vents.
Do not insert small objects into the
vents to avoid damage
Place the unit on a stable, horizontal
surface, or fit on a level wall,
otherwise water may leak.
TO MOVE
Unplug the cord and empty the water tank before moving the unit.
Remove and reinstall the bracket for hanging the unit to your new location.
Before operating the unit, make sure the unit is settled horizontally and the tank
is secure in the unit.
6
MAINTENANCE
Cleaning the filter
Tip: Clean your filter every 2 weeks to prolong the life of your dehumidifier.
How to Clean
If the filter is covered with dust, the airflow and the performance
of the unit will be affected. Check the filter periodically.
1. Turn off the unit and remove the filter from the unit.
2. Vacuum the nylon filter or wash it with clean water and drip dry
it.
3. Replace the activated charcoal filter after using it for 3 or 6
months when the fibre side has changed from white to a dark
colour.
Charcoal filter should be replaced.
Nylon filter should be cleaned
Move the
tank out first
Pull out
the filter
Note:
Don't leave a dirty charcoal filter in the unit or malfunction
may occur. Contact your dealer should you want a new
activated charcoal filter.
Caution !
Always ensure that fine particles or small objects
do not enter the dehumidifier through the vents.
Dust build-up in the unit can cause malfunction and
overheating.
Cleaning the unit
1. Turn off the unit, wait for the fan to stop and unplug from
the power socket.
2. Clean the surface with a soft damp cloth.
3. Dry thoroughly with a towel after cleaning.
4. In order to avoid damage, do not wash the machine with
water, or let water drip into the vents.
Before storing
1. Turn off the unit, wait for it to stop and disconnect the power cord.
2. Clean and dry the bucket. Leave the unit to drain for approximately one day.
3. Clean the filter and the unit. Cover the unit to prevent it from gathering dust. Store
upright in a cool dry place.
4. Do not expose to direct sunlight.
7
SPECIFICATIONS
Model: ECO DCW10
Operating Temperature Range: 5ºC - 35ºC
Dehumidification: 10 litres / day (30ºC / 80%RH)
Water tank capacity: 2 Litres
Power Consumption: 200W
Voltage: 220-240V ~ 50Hz
N.W: 10.5 Kg
G.W: 12.5 Kg
Product size: 32.3H x 53W x 17.5D cm
Water Resistance class: IPX2
Remote Control
Model: DCW10-REMOTE
Voltage: 3V (DC), CR2032 battery cell
Dimensions: 8.7H x5.4W x1.15D cm
Net weight: 40g (with battery)
Water Resistance class: IPX5
What’s in the box
1 x DCW10
1 x Charcoal Filter
1 x Remote Control
1 x 2 meters Hose
4 x Wall Plug
4 x Screw
1 x Wall Bracket
1 x DCW10 User Guides & Energy Saving Tips
8
SERVICE AND WARRANTY
TWO (2) YEAR LIMITED WARRANTY
Save This Warranty Information
Eco Air guarantees this product free from defects in materials and workmanship for a period
of Two (2) years from the date of purchase. Coverage is valid only with proof of purchase.
This unit must be operated in the conditions recommended and at the voltage indicated .
Misuse or use in a dusty environment, along with attempts to service or alter the unit, will
render this WARRANTY VOID. The actual product may differ slightly from illustration.
This warranty is in addition to, and does not affect your statutory rights.
For further information, please contact +44 845 388 0007.
This product has been manufactured to comply with the EC Directives 2006/95/EC and
2004/108/EC.
ments
keeping your home
safe and clean
WEE/EC2601UR
Copyright Reserved
C135