1
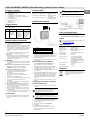
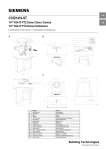
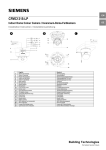
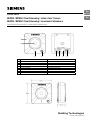
EN
CCIC1410
DE
MJPEG / MPEG4 / Dual-Streaming / Indoor Color Camera
MJPEG / MPEG4 / Dual-Streaming / Innenraum-Farbkamera
Installation Instruction / Installationsanleitung
1
2
3
5
4
6
7
8
English
Deutsch
1
Built-in microphone (only CCIC1410-LA, -LAW)
Eingebautes Mikrofon (nur CCIC1410-LA, -LAW)
2
Lens
Objektiv
3
Status LED
Status-LED
4
Privacy button (only CCIC1410-LA, -LAW)
Privacy-Taste (nur CCIC1410-LA, -LAW)
5
Indented reset button
Eingelassene Reset-Taste
6
Power supply socket
Spannungsversorgungsanschluss
7
Ethernet 10/100 RJ socket
Ethernet 10/100 RJ-Buchse
8
I/O terminal block (only CCIC1410-LA, -LAW)
I/O-Anschlussleiste (nur CCIC1410-LA, -LAW)
Building Technologies
Fire Safety & Security Products
CCIC1410 MJPEG / MPEG4 / Dual-Streaming / Indoor Colour Camera
Package contents
Ordering data
•
•
•
•
•
•
•
•
•
•
Type
CCIC1410-L
Item Number
S54561-C90-A1
CCIC1410-LA
S54561-C90-A2
1 x SIEMENS CCIC1410 IP Camera
1 x Documentation CD
1 x Utilities CD
1 x Installation instruction (English, German)
1 x Installation instruction (French, Spanish, Italian)
1 x Power adapter
1 x Wall/Ceiling bracket
1 x Ethernet cable (1:1, 2 m)
2 x Wall plugs
2 x Mounting screw
Target readers
Description
1/4" VGA IP-Camera
Colour
1/4" VGA IP-Camera
Colour Audio
1/4" VGA IP-Camera
Colour Audio WLAN
CCIC1410-LAW S54561-C90-A3
Note
If the Ethernet cable is not connected, the camera
will switch to WLAN when it is restarted.
8. Replug the power cable to the camera.
Î The Network Camera now operates in wireless mode.
Installing the camera
Step 1: Network deployment
1 2 3
4
The instructions in this document are designed only for the
following target readers:
Target Qualification
readers
Installer Technical
training for
electrical
installations.
For further set up, please refer to the Configuration Manual
on the supplied CD.
Activity
Condition of the
product
Installs the
Components of
product,
the product are
individual
not yet installed
components of or need to be
the product or replaced or
replacement
modified.
parts.
Care and maintenance
The camera is maintenance-free. Small amounts of dirt or
dust can be cleaned from the camera using a clean soft cloth.
•
Do not touch the lens area. Use a soft cloth moistened to
clean the surface if it is touched accidentally
Update
General safety precautions
For the latest camera firmware update, please refer to
the following download link:
http://www.siemens.com/cctv
•
Read the general safety precautions before installing,
configuring and operating the device.
• Keep this document for reference.
• Always pass this document on together with the product.
• Please also take into account any additional countryspecific, local safety standards or regulations concerning
project planning, operation and disposal of the product.
• Follow all warnings and instructions marked on the
device.
• Do not attempt to service or modify this device yourself.
Refer this work to qualified service personnel.
Liability claim
• Do not make any changes or modifications to the device
unless they have been approved by the manufacturer.
• Use only spare parts and accessories that have been
approved by the manufacturer.
Installation
•
It is recommended that all preparatory work (e.g. fitting of
accessories) be carried out in a workshop prior to final
installation.
Radio interference with other devices in the environment
• When handling modules that are susceptible to
electrostatic discharge, please observe the ESD
guidelines.
Damage due to unsuitable mounting location
• The environmental conditions recommended by the
manufacturer must be observed. See section
Specifications.
• Do not operate the device in dusty places.
• Do not expose the device to mechanical vibrations or
shocks.
• Protect the device against moisture.
• Place the unit on a stable surface that will hold its weight.
• The mounting surface must be solid and noncombustible.
• Do not operate the device close to sources of powerful
electromagnetic radiation.
Danger of electrical shock due to incorrect connection
• Connect the device only to power sources with the
specified voltage. Voltage supply requirements can be
found on the mains adapter.
• Make sure the device is permanently connected to the
electricity supply; a readily accessible disconnect device
must be provided.
• This device is designed to work with 5 V DC-systems. Do
not connect the device to any other power systems
Specifications
Power
2
Digital Output
3
Digital Input
4
1.
2.
3.
Ground
If you have external devices such as sensors and alarms,
make connection from general I/O terminal block.
Connect the camera to a switch/hub via Ethernet cable.
Use Category 5 Cross Cable when Network Camera is
directly connected to PC.
Connect the supplied power adapter from the camera to
a power outlet.
Step 2: Assigning an IP address
1.
Install the CCIC1410 Installation Wizard under the
Software Utility directory from the supplied CD.
2.
The program will conduct analyses on your network
environment. After your network is analyzed, please click
on the Next button to continue the program.
The program will search the SIEMENS Network Devices
in the same LAN.
3.
4.
After searching the SIEMENS Network Devices, the main
installer window will pop up. Click on the MAC address
that matches the one labeled on the rear of your device
to connect the web browser (ex. Microsoft® Internet
Explorer, Mozilla Firefox or Netscape) to the Network
Camera.
5.
Retrieve live videos through web browsers or recording
software.
Image sensor
Effective pixels
Image compression
method
Image frame rate
Min. Illumination
Synchronisation
Network connection
Internet protocol
Power requirement
Camera weight
Operating temperature
1/4" CMOS sensor
640 (H) x 480 (V)
MJPEG / MPEG4 simultaneous
dual-streaming
VGA (640 x 480) at max. 30 ips
0.4 lux (F2.0)
Internal
1 x 10/100 base-T Ethernet
connection for LAN / WAN
IPv4, TCP/IP, HTTP, UPnP,
RTSP/RTP/RTCP, IGMP, SMTP,
FTP, TelNet, DHCP, NTP, DNS,
DDNS, PPPoE
5 V DC (plug-type power supply
included)
0.128 kg
0 – 40 ºC
Disposal
Electrical and electronic products should be
disposed of separately from the municipal
waste stream via designated collection facilities
appointed by the government or the local
authorities.
Configuring the wireless connection
(CCIC1410-LAW only)
1.
Check the SSID currently set on your wireless access
point (AP).
Note
SSID, abbreviated from Service Set Identifier, is the
name assigned to the wireless network. The
CCAC1410-LAW factory SSID setting is set to
"default".
Transportation
•
•
1
Note
Select "Ad-Hoc" wireless mode if you want the
CCIC1410-LAW to communicate without using an AP
or wireless router.
Keep the packaging material for future transportation.
Do not expose the device to mechanical vibrations or
shocks.
2.
3.
Go to CCAC1410-LAW Configuration > Wireless LAN.
Type in the SSID consistent with the setting on your
access point (AP).
4. Select the Wireless mode as Infrastructure.
5. Click Save.
Î The Network Camera starts to reboot.
6.
7.
Wait for the live image is reloaded to your browser.
Unplug the power cable and Ethernet cable from the
Network Camera.
2
Siemens Building Technologies
Fire Safety & Security Products
04.2009
EN
CCIC1410 MJPEG / MPEG4 / Dual-Streaming / Innenraum-Farbkamera
Lieferumfang
Transport
•
•
•
•
•
•
•
•
•
•
•
1 x SIEMENS CCIC1410 IP-Kamera
1 x Dokumentations-CD
1 x Dienstprogramme-CD
1 x Installationsanleitung (Englisch, Deutsch)
1 x Installationsanleitung (Französisch, Spanisch,
Italienisch)
1 x Netzadapter
1 x Wand-/Deckenhalterung
1 x Ethernet-Kabel (1:1, 2 m)
2 x Dübel
2 x Befestigungsschraube
•
Die Anweisungen in diesem Dokument gelten nur für
folgende Personen:
Typ
CCIC1410-L
Art. Nr.
S54561-C90-A1
CCIC1410-LA
S54561-C90-A2
1.
Tätigkeit
1: Netzwerkanschluss
1 2 3
4
HINWEIS
Wählen Sie den Wireless Mode "Ad-Hoc", wenn die
Kommunikation mit der CCIC1410-LAW ohne APoder Wireless-Router erfolgen soll.
2.
3.
7.
•
Wir empfehlen Ihnen, alle vorbereitenden Arbeiten (wie z.
B. Installation von Zubehörteilen) an einem dafür
vorgesehenen Ort (z. B. in einer Werkstatt) vor der
endgültigen Installation des Produkts auszuführen.
Funkstörungen im Umfeld anderer Geräte
• Beachten Sie beim Berühren von elektrostatisch
gefährdeten Baugruppen und Bauteilen die
Handhabungsvorschriften (EGB-Richtlinie).
Schäden aufgrund eines ungeeigneten Montageortes
• Beachten Sie die vom Hersteller empfohlenen
Umgebungsbedingungen. Siehe Abschnitt Technische
Daten.
• Betreiben Sie das Gerät nicht an staubigen Orten.
• Setzen Sie das Gerät keinen mechanischen
Erschütterungen oder Stößen aus.
• Schützen Sie das Gerät vor Feuchtigkeit und Nässe.
• Achten Sie bei der Aufstellung des Gerätes auf stabilen
Untergrund und sicheren Stand.
• Montieren Sie das Gerät nur auf festen und nicht
brennbaren Oberflächen.
• Betreiben Sie das Gerät nicht in der Nähe starker
elektromagnetischer Strahlung.
Stromschlaggefahr durch falschen Anschluss an die
Spannungsversorgung
• Schließen Sie das Gerät nur an Stromquellen mit der
vorgeschriebenen Spannung an. Angaben zur
Versorgungsspannung finden Sie auf dem Netzteil.
• Betreiben Sie das Gerät nur mit Festanschluss und gut
zugänglicher Trennvorrichtung am Versorgungskreis.
• Dieses Gerät ist ausgelegt für den Betrieb mit 5 V DCSystemen. Schließen Sie das Gerät nicht an andere
Stromversorgungsnetze an.
Issued by
Siemens Building Technologies
Fire & Security Products GmbH & Co. oHG
D-76181 Karlsruhe
www.buildingtechnologies.siemens.com
Document no.
A6V10248478
Edition
21.04.2009
Ziehen Sie das Netzkabel und das Ethernet-Kabel von
der Netzwerkkamera ab.
HINWEIS
Wenn das Ethernet-Kabel nicht angeschlossen ist,
schaltet die Kamera nach dem Neustart auf WLAN
um.
•
Montage
Gehen Sie zu CCAC1410-LAW Configuration >
Wireless LAN.
Geben Sie den SSID ein, der der Einstellung an Ihrem
Access Point (AP) entspricht.
4. Wählen Sie den Wireless Mode als Infrastruktur.
5. Klicken Sie auf Save.
Î Die Netzwerkkamera startet neu.
6. Warten Sie, bis das Live-Bild auf Ihren Browser geladen
ist.
Allgemeine
Sicherheitshinweise
Lesen Sie die allgemeinen Sicherheitshinweise, bevor
Sie das Gerät installieren, konfigurieren und in Betrieb
nehmen.
• Bewahren Sie dieses Dokument zum Nachschlagen auf.
• Geben Sie dieses Dokument bei der Weitergabe des
Produktes mit.
• Beachten Sie bitte alle zusätzlichen länderspezifischen,
lokalen Sicherheitsnormen oder -vorschriften hinsichtlich
Projektplanung, Betrieb und Entsorgung des Produkts.
• Befolgen Sie alle auf dem Gerät angebrachten
Warnungen und Anweisungen.
• Lassen Sie Wartungsarbeiten und Änderungen an
diesem Gerät nur von Fachpersonal durchführen.
Haftungsanspruch
• Nehmen Sie nur Veränderungen am Gerät vor, die vom
Hersteller genehmigt sind.
• Verwenden Sie ausschließlich vom Hersteller
genehmigte Ersatz- und Zubehörteile.
Prüfen Sie die aktuelle Einstellung des SSID auf Ihrem
Wireless Access Point (AP).
HINWEIS
SSID, Abkürzung für Service Set Identifier, ist der
Name für das drahtlose Netzwerk. Die
Werkseinstellung des CCAC1410-LAW SSID ist
"Default".
Beschreibung
1/4" VGA IP-Kamera
Farbe
1/4" VGA IP-Kamera
Farbe Audio
1/4" VGA IP-Kamera
Farbe Audio WLAN
Kamerainstallation
Zustand des
Schritt
Produkts
Besitzt FachInstalliert
Einzelkomponenten
kenntnisse im das Prodes Produkts sind noch
Bereich
dukt,
nicht installiert oder
Elektroinstalla- Einzelkom- müssen ersetzt oder
tionen.
ponenten
umgebaut werden.
oder Ersatzteile
des Produkts.
Zielgruppe Qualifikation
Konfiguration des WirelessAnschlusses (nur CCIC1410-LAW)
Bestelldaten
CCIC1410-LAW S54561-C90-A3
Zielgruppe
Installer
Bewahren Sie das Verpackungsmaterial für einen
zukünftigen Transport auf.
Setzen Sie das Gerät keinen mechanischen
Erschütterungen oder Stößen aus.
8. Schließen Sie das Netzkabel wieder an die Kamera an.
Î Die Netzwerkkamera arbeitet jetzt im Wireless Mode.
1
Spannungsversorgung
2
Digitaler Ausgang
3
Digitaler Eingang
4
1.
Masse
Wenn Sie externe Geräte wie z.B. Sensoren und
Alarmgeber anschließen wollen, nehmen Sie den
Anschluss über die allgemeine I/O-Anschlussleiste vor.
2.
Schließen Sie die Kamera über Ethernet-Kabel an einen
Switch / Hub an. Verwenden Sie ein gekreuztes Kabel
der Kategorie 5, wenn die Netzwerkkamera direkt an
einen PC angeschossen wird.
3.
Schließen Sie den mitgelieferten Netzadapter an eine
Steckdose an.
Weitere Konfigurationsmöglichkeiten finden Sie im
Konfigurationshandbuch auf der mitgelieferten CD.
Service und Wartung
Die Kamera ist wartungsfrei. Entfernen Sie leichte
Verschmutzungen oder Staub auf dem Kamera mit einem
sauberen weichen Tuch.
•
Berühren Sie nicht den Objektivbereich. Sollte er
versehentlich berührt worden sein, reinigen Sie die
Oberfläche mit einem weichen, leicht mit Alkohol
getränkten Tuch.
Update
Die neueste Version der Kamera-Firmware können
Sie unter folgendem Link herunterladen:
http://www.siemens.com/cctv
Schritt 2: IP-Adresse zuweisen
1.
2.
3.
4.
5.
Installieren Sie den CCIC1410 Installation Wizard im
Software-Diensteverzeichnis auf der mitgelieferten CD.
Das Programm nimmt eine Analyse Ihrer
Netzwerkumgebung vor. Wenn die Analyse Ihres
Netzwerks abgeschlossen ist, klicken Sie auf die
Schaltfläche Next, um mit dem Programm fortzufahren.
Das Programm sucht nach SIEMENS-Netzwerkgeräten
im gleichen LAN.
Nachdem die Suche nach SIEMENS-Netzwerkgeräten
abgeschlossen ist, öffnet sich das Hauptinstallationsfenster. Klicken Sie auf die MAC-Adresse, die den
Angaben an der Rückseite Ihres Gerätes entspricht, um
den Web Browser (Bsp. Microsoft® Internet Explorer,
Mozilla Firefox oder Netscape) mit der Netzwerkkamera
zu verbinden.
Rufen Sie Livevideos über Web Browser oder
Aufzeichnungssoftware ab.
Technische Daten
Bildsensor
Effektive Bildpunkte
Bildkompressionsverfahren
Bildrate
Mindestbeleuchtungsstärke
Synchronisation
Netzwerkanschluss
Internetprotokoll
Leistungsaufnahme
Gewicht der Kamera
Betriebstemperatur
1/4" CMOS-Sensor
640 (H) x 480 (V)
Gleichzeitiges DualStreaming MJPEG / MPEG4
VGA (640 x 480) bei max.
30 ips
0,4 lux (F2.0)
Intern
1 x 10/100 base-T EthernetAnschluss für LAN / WAN
IPv4, TCP/IP, HTTP, UPnP,
RTSP/RTP/RTCP, IGMP,
SMTP, FTP, TelNet, DHCP,
NTP, DNS, DDNS, PPPoE
5 V DC (Steckernetzgerät im
Lieferumfang enthalten)
0,128 kg
0 – 40 ºC
Entsorgung
Alle Elektro- und Elektronikgeräte sind getrennt
vom allgemeinen Hausmüll über dafür staatlich
vorgesehene Stellen zu entsorgen.
© 2009 Copyright by
Siemens Building Technologies
Data and design subject to change without notice.
Supply subject to availability.
DE